Package Included:
1 x Mouse
1 x USB Charging Cable
Specification:
Size:110mm*60mm*25mm/4.3inx2.4inx1in
Color: Black/Gold/White/Silvery
Charging Cable Length: Approx. 30cm
Connectivity: 2.4GHz wireless connection
Range: about 10 meters effective wireless connection distanceAdjustable DPI: 1000-1200-1600
Interface: USB
System requirements: suitable for all systems
Features:
–Ergonomic design & comfortable shape
–Wireless Ultra Slim Optical Mouse
–Surface Matt (Partial metallic paint)
–With a discreet color-changeable lighting (switchable)
–Three-level on-off switch (with light, without light, off)
–Built-in rechargeable battery (Long Stamina)
–Charging possible during use
–Silent keys
–Driverless installation
–Intelligent sleep mode
–Full plug and play support
–Double bridge type UPE on the lower side
Note:
–Please allow minor deviation due to manual measurement.
–Due to the difference between different monitors in each computer, the picture may not reflect the actual color of the item.


Пользуюсь подобными мышами постоянно, так как они достаточно удобные в использовании, но не будем вдаваться в подробности удобства. В статье я подробно расскажу про то, как подключить мышку к компьютеру. Также рассмотрим некоторые проблемы, с которыми может столкнуться каждый из пользователей.
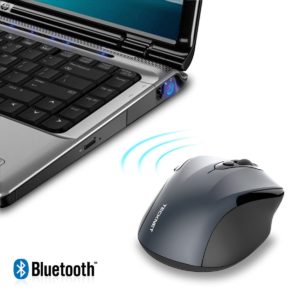
Сначала давайте рассмотрим типы подключения. Самый популярный – это коннект при помощи специального внешнего адаптера. Он работает с помощью радиоволн на частоте 2.4 ГГц. Второй тип обычно использует Bluetooth передачу и дополнительного модуля у него нет. Благо у ноутбуков почти у всех есть «Голубой зуб». Ну и третий тип – это совмещение двух этих подключений.
Посмотреть ТОП-12 лучших беспроводных мышей, вы можете в этой статье!
В статье я рассмотрю оба варианта: при подключении с помощью адаптера и при помощи Bluetooth. Если у вас будут какие-то вопросы, то пишите в комментариях.
ПРИМЕЧАНИЕ! Инструкции подходят для всех моделей: SD Connexion, A4Tech, Abkoncore, ASUS, Aceline, Acer, Apple, Canyon, CoolerMaster, Corsair, Cougar, DEXP, Dark Project, Defender, Fellowes, GAMDIAS, GIGABYTE, Gembird, Genesis, Genius, Glorious, HP, Harper, Huawei, HyperX, Jet.A, Kensington, Lenovo, Logitech, MSI, Mad Catz, Marvo, Microsoft, Oklick, Petriot Memory, QUMO, Qcyber, RITMIX, Razer, Redragon, SPEED-LINK, SVEN, Satechi, Sharkoon, Smartbuy, SteelSeries, ThunderX3, Trust, Tt eSPORTS, Xiaomi, ZET, Zowie.
С адаптером
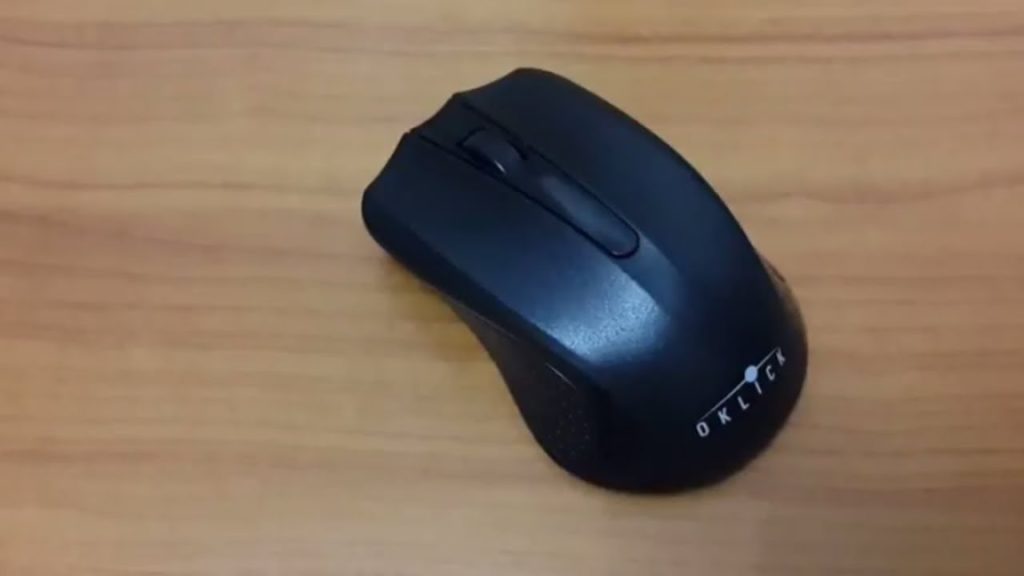
Данный тип мышей – самый популярный, поэтому скорее всего у вас именно такая мышь. Подключается она также достаточно просто, как к ноутбуку, так и к обычному стационарному компьютеру без Bluetooth. И подключение беспроводной мыши к ноутбуку происходит в один этап.

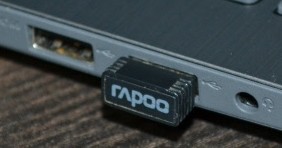
Найдите под корпусом беспроводной модуль и подключите его к одному из USB разъёмов на ноуте или компе. ПК должен при этом быть включен.
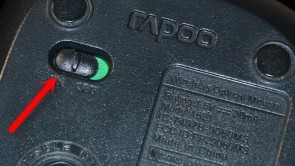
На дне мышки найдите переключатель и передвинет его в состояние «ON». Для выключения, наверное, вы уже поняли, нужно передвинуть в состояние «OFF». Но обычно мышь автоматически выключается и делать это постоянно не нужно.
Драйвера должны установиться автоматически, а в правом нижнем углу экрана в трее вы увидите соответствующее уведомление о подключении. Если курсор после этого не двигается, то делаем следующее:
- Можно вытащить и вставить батарейку, которая питает мышку. Возможно, она отошла. Также их можно поменять – возможно, она просто села.
- Перезапустите ПК.
- Переподключите адаптер – просто вытащите и вставьте его обратно. Если ничего не происходит, то просто вставьте его в соседний USB порт – возможно, этот вход не работает.
Также можно зайти в «Диспетчер устройств»:
- Нажмите на клавиатуре клавиши «Win» и «R».
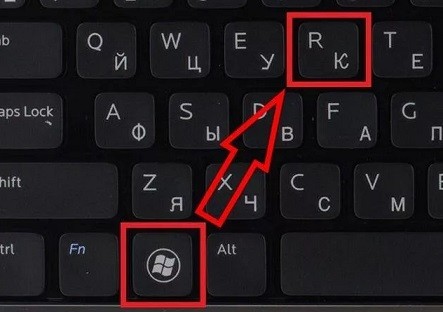
- Прописываем команду: «devmgmt.msc».

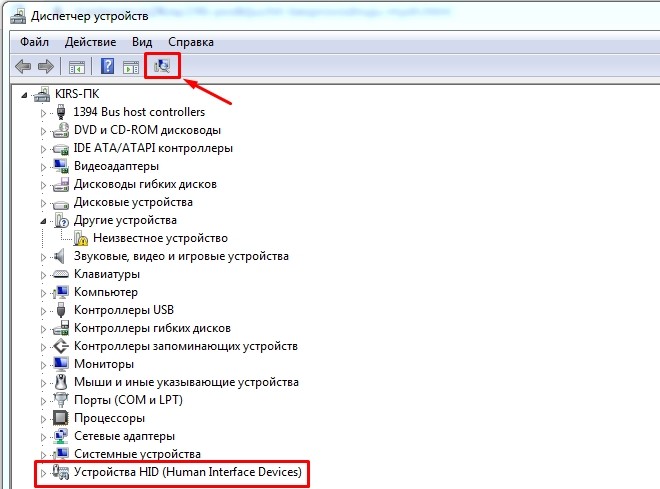
- Возможно, у вас отключена функция автоматического поиска драйверов. Нажимаем на значок «Компьютера с лупой» в самом верху. Если это не поможет, то найдите вашу мышку в разделе «Устройства HID (Human Interface Devices)». Устройство должно называться абсолютно также. Нажмите правой кнопкой и далее выберите «Обновить драйверы». Желательно при этом быть подключенным к интернету.
Обычно проблем с подключением не происходит, и драйвера автоматом находятся на всех версиях Windows: 7, 8, 8.1 и 10. Если у вас возникли какие-то трудности, то попробуйте подключить её к другому компьютеру или ноутбуку. В другом случае нужно нести её обратно в магазин.
Подключение по Bluetooth (мышь без адаптера)
Чтобы подключить оптическую Блютуз мышь к ноутбуку – в первую очередь убедитесь, что ваша мышь поддерживает данное подключение. Обычно на дне или сбоку должен быть логотип «Голубого зуба». Также данная информация есть на коробке от мышки.
ВНИМАНИЕ! Если вы собираетесь подключать данную мышку к компьютеру, то убедитесь, что на материнской плате есть поддержка Bluetooth. В другом случае вам нужно будет прикупить дополнительный адаптер
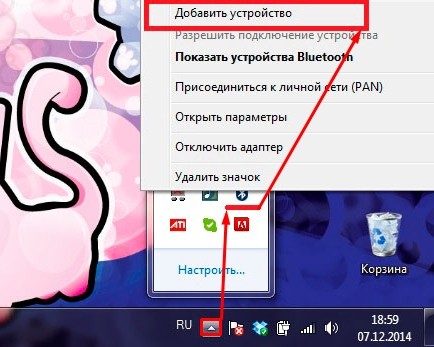
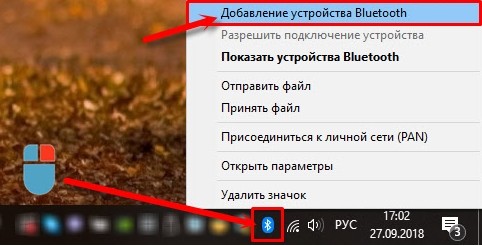
В трее найдите значок «Bluetooth» и нажмите на него правой кнопкой. Далее выбираем кнопку для добавления устройства.
ПРИМЕЧАНИЕ! Если вы не видите данный значок у себя, то нажмите на стрелочку, которая указывает вверх – возможно, он просто скрыт. Если его все равно нет, то проверьте его наличие в диспетчере устройств. Если он отсутствует – то значит скорее всего у вас он не включен и на него не установлены драйвера – по установке Bluetooth есть отдельная подробная статья от моего коллеги тут.
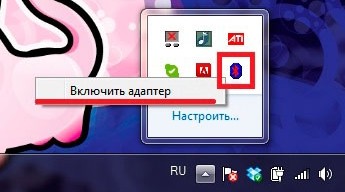
Windows 7
Найдите «Блутус» в трее и включите его, если он ещё не активен – нажимаем правой кнопкой и выбираем «Включить адаптер».
Опять нажимаем правой кнопкой и выбираем «Добавить устройство».
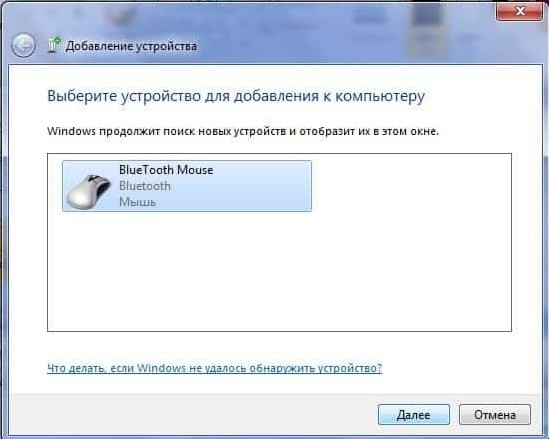
Выбираем вашу мышь из списка. Если вы её не видите, то ещё раз проделайте действия, о которых я написал чуть выше – возможно вы её не включили, или не активировали режим соединения.
Так как мы используем именно мышь, то выбираем «Связывание без кода».
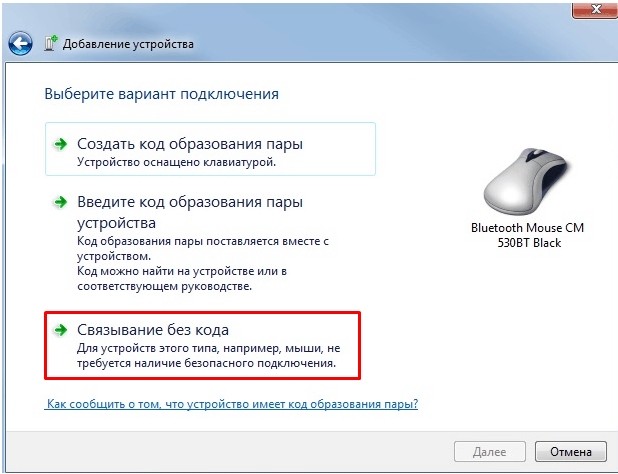
После этого подключение должно быть установлено.
Windows 10
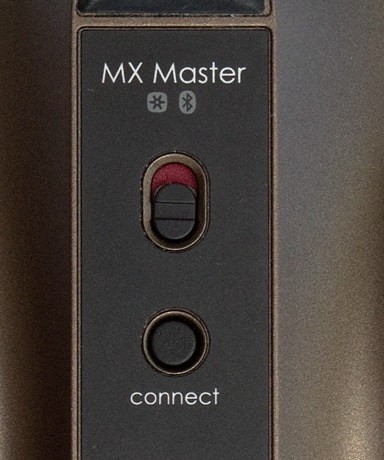
На мышке на дне должна быть кнопка, которая включает «Bluetooth» – вы должны её заметить по соответствующему значку. После включения данной кнопки мышка начнет искать к кому бы подключиться. Чтобы активировать сопряжение, нужно нажать ещё на одну кнопку – чаще всего она называет как «Connect». Понажимайте на неё несколько раз.
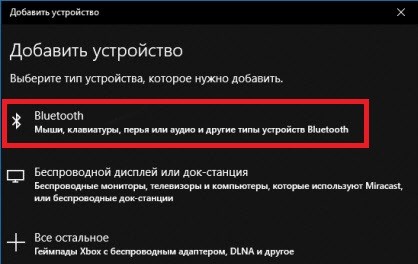
Соединение должно уже быть установлено, теперь его надо настроить на ПК. Выбираем пункт «Добавление Bluetooth или другого устройства». Далее выбираем именно подключение по «Блютус».
Теперь среди всех предложенных устройств, вы должны увидеть именно свою мышь – нажмите на неё.

После этого ноутбук и мышь должны приконектиться друг к другу, и вы увидите сообщение об успехе. Попробуйте пошевелить мышкой.

Также я советую дополнительно установить программное обеспечение специально для вашей мыши. Особенно это актуально для крутых игровых устройств, на которых можно настроить более детально чувствительность или запрограммировать некоторые клавиши. Скачать данное ПО можно с официального сайта производителя. Вы можете или зайти на оф. сайт и поискать там вашу мышь, или просто вбить в поисковик полное наименование модели. Точное название модели можно посмотреть на коробке, в инструкции или под корпусом.
Как отключить тачпад (touchpad) на ноутбуке?
Тачпад при работе доставляет много хлопот, так как при печати текста, ты ненароком постоянно соприкасаешься с ним. Но его можно отключить, если у вас на ноутбуке установлена официальная утилита от производителя.
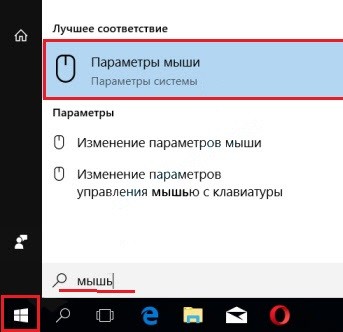
Нажмите на меню «Пуск» и в поиске введите «Мышь» – далее нужно нажать на «Параметры мыши».
В разделе устройства нажимаем на «Дополнительные параметры…».
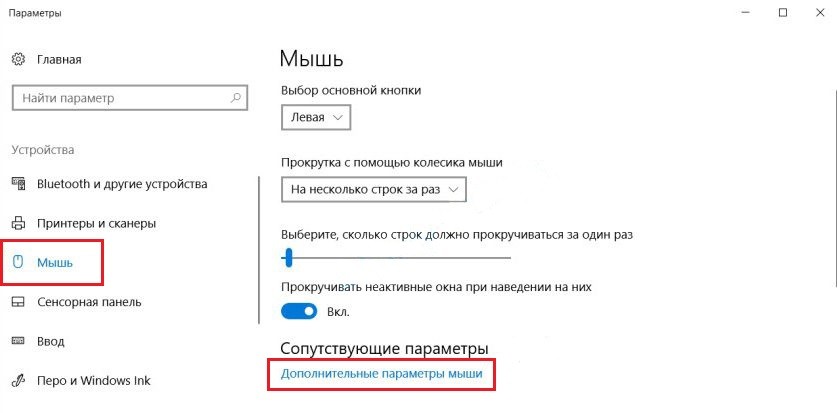
На одной из вкладок должна быть галочка, которая будет отключать тачпад при подключении подобного устройства. При этом не важно какой аппарат – проводное или беспроводное. В самом конце нажимаем «Применить». Я показал вам на примере бука «Леново», но данная функция есть на всех ноутбуках.

Материалы взяты из следующего источника:
https://wifigid.ru/raznye-sovety-dlya-windows/kak-podklyuchit-besprovodnuyu-myshku-k-noutbuku
Иллюстрация:
https://wifigid.ru/raznye-sovety-dlya-windows/kak-podklyuchit-besprovodnuyu-myshku-k-noutbuku
 logitech Mouse User Guide
 DETAILED SETUP
 DETAILED SETUP
- Make sure the mouse is turned on.
The On/Off switch is located on the bottom of the mouse.

The number 1 LED on the bottom of the mouse should be blinking fast.
NOTE: If the LED is not blinking fast, do a long press of three seconds on the Easy- Switch button on the mouse bottom.
- There are two ways you can connect your mouse:
- Use the wireless USB receiver
Plug the receiver into a USB port on your computer. - Connect directly via Bluetooth
Open the Bluetooth settings on your computer to complete the pairing.
Search for new devices and click on MX Anywhere 3 to connect.
Click here for more details on how to do this on your computer.
If you experience issues with Bluetooth, click here for Bluetooth troubleshooting.
- Use the wireless USB receiver
- Install Logitech Options Software.
Download Logitech Options to customize your mouse and benefit from advanced
shortcuts and all the possibilities this mouse has to offer. To download and learn more
about the full range of features, go to logitech.com/options
Product Overview

- Mag Speed scroll wheel
- Mode shift button for the scroll wheel — shift between line-by-line scrolling and free spinning
- Battery status LED
- Silicone side grips
- USB-C charging port
- On/Off button
- Darkfield 4000DPI sensor
- Easy-Switch and connect button
- Back/Forward buttons
YOU CAN PAIR TO A SECOND COMPUTER WITH EASY-SWITCH
Your mouse can be paired with up to three different computers using the Easy-Switch button to change the channel.

- A short press on the Easy-Switch button will let you switch channels (from one computer to another). Select the channel you want and go to the next step.
- Press and hold the Easy-Switch button for three seconds. This will put the mouse in discoverable mode so that it can be seen by your computer. The LED will start blinking fast.
- Choose how you want to connect your mouse to your computer, Bluetooth, or USB:
o Bluetooth: Open the Bluetooth settings on your computer to complete the pairing. More details here.
o USB receiver: Plug the receiver into a USB port, open Logitech Options, and select: Add devices > Setup Unifying device, then follow the instructions.
MagSpeed adaptive scroll-wheel with SmartShift 

The speed-adaptive scroll wheel shifts between two scrolling modes automatically. As you scroll faster, it will automatically shift from line-by-line scrolling to free-spinning.
- Line-by-line (ratchet) mode — ideal for precise navigation of items and lists.
- Hyper-fast (free-spin) mode — near-frictionless spinning, letting you fly through long documents and web pages.


Switch modes manually
You can also manually switch between modes by pressing the mode shift button.
By default, mode shift is assigned to the button on top of the mouse.
In Logitech Options software, you can decide to disable SmartShift if you prefer to stay in one scrolling mode and always shift manually. You can also adjust the SmartShift sensitivity, which will change the speed required to automatically shift into free spinning.

Horizontal Scroll

You can scroll horizontally with your MX Anywhere 3!
This is done with a two-button combination: Press and hold one of the side buttons and scroll with the wheel simultaneously.
NOTE: The horizontal scroll is ON by default in your Logitech Options software. You can customize this feature in the Point & Scroll tab in Logitech Options.
For more detailed information on Horizontal scroll, click here.
Back/Forward buttons
The back and forward buttons enhance navigation and simplify tasks.
To move back and forward:
- Press the back or forward button to navigate web or document pages, depending on the location of the mouse pointer.
NOTE: On a Mac, enabling the back/forward buttons requires installation of Logitech Options software.
In addition to enabling the buttons for use with Macs, Logitech Options software lets you assign other useful functions to the buttons, including undo/redo, OS navigation, volume up/down, and more.
App-Specific Settings
Your mouse buttons can be assigned to perform different functions for different applications. For instance, you can assign the side buttons to control volume in Spotify, copy/paste in Microsoft Excel, or undo/redo in Adobe Photoshop.
When you install Logitech options, you can install predefined app-specific settings that will adapt the mouse button behavior to the selected applications.
Here are the app-specific settings we have created for you:

With these settings, the wheel mode-shift button retains the same functionality across all applications.
Each of these settings can be customized manually, for any application.

Adjust the feel of the scroll wheel
When you scroll in Ratchet mode, you can adjust the feel of your scroll wheel on the “Point & Scroll” tab in Logitech Options.
- A lower force will make the ratchet very subtle and smooth.
- A higher force will make every ratchet very firm and precise.

Assign gestures to the top button
If you want more advanced functionality, you can assign the top button of the mouse to be the “Gesture Button”. This will transform your top button into a powerful multi-function button allowing you to use gestures for desktop navigation, app management, pan, zoom, and more.
On the Mouse tab, select the top button below the wheel and click on Gesture Button.

By default, the gesture buttons will allow you to navigate between windows and desktops.

In order to perform the gestures, you will need to hold the button while you move the mouse.
Flow between two computers
You can work on multiple computers with a single MX Anywhere 3.
With Logitech Flow, you can use the mouse cursor to move from one computer to the next. You can even copy and paste between computers, and if you have a compatible Logitech keyboard, such as MX Keys, the keyboard will follow the mouse and switch computers at the same time.

You will need to install Logitech Options software on both computers and follow these instructions.
Charging MX Anywhere 3

- Connect one end of the provided charging cable to the USB-C port on the mouse and the other end to a USB power source.
A minimum of a three-minute charge gives you enough power for a full day of use. Depending on how you use the mouse, a full charge can last up to 70 days*.
* Battery life may vary depending on user and operating conditions.
Check Battery Status
The LED on the top of the mouse indicates battery status.
You can install Logitech Options software to receive battery status notifications, including low-charge warnings.
LED Color Indications
Green From 100% to 10% charge
Red 10% charge or below
Pulsing green While charging
FAQS
What is the Darkfield 4000DPI sensor?
Darkfield technology allows the sensor to track on almost any surface, including glass and transparent surfaces, such as a monitor or laptop.
What is the Mode shift button for the scroll wheel?
The Mode shift button allows you to shift between line-by-line scrolling and free spinning of the scroll wheel.
What is the Easy-Switch and connect button?
The Easy-Switch button allows you to switch between devices with a single click. The connect button allows you to pair your mouse with a second computer.
How do I pair my mouse with a second computer?
To pair your mouse with a second computer, hold down the Easy-Switch button for three seconds until the number 1 LED blinks twice. Then, on the second computer, open Bluetooth settings and search for new devices. Once found, click on MX Anywhere 3 to connect.
Is this available as a left-hand version?
Studies have shown that even though 10% of people are left-handed, only 1% of people actually use a mouse left-handed. The companies that have done high-end left-handed versions have said that it doesn’t make them any money.
Any scrolling issues/bugs with mx master 3 mouse?
No… In fact, scrolling is VERY satisfiying
What’s the difference between logitech mx master 3 vs logitech mx master 3 business edition? apart from price (higher for business edition) and color
Suggest googling that one. Higher price could mean the thumb rest pad pushable extra button may have additional features to the normal Mx master 3 where it’s best suited for business I.e the thumb rest pad button could open other software functions that is also programmable for business function. Or it could be a colour difference. Not sure
Is it responsive scrolling downwards but stutters when scrolling upwards? or is mine defective? (have tried different setting and disabling smartshift
No, it does both, there is a button near the wheel that switches off the incremental action (stutter), but if you scroll fast by spinning the wheel fast it will scroll (responsive) without the incrementalal judder and when it slows down locks back up the incremental element. It is almost like a clutch which can be switched on and off. This is by far the best nice I’ve used in 30 years. Great for large spreadsheets or long web pages. I don’t think you’ll be disappointed.
When is the white master 3 gonna come back?
It ain’t
Can you use ordinary batteries in this and if so what is battery life?
No, you cannot use ordinary batteries in it – the battery is inbuilt and needs to be charged on its special base.
Battery life depends on usage but I get about a week before recharging.
Its a great mouse.
Logitech option software does not work on macos 12. any solution?
Well my mac mini is running Monterey which is 12.0.1 and the Logi Options AP seems to be working just tried reassigning Hoz Scroll to Zoom and it worked. Apple softwear sometimes grabs control of peripherals in System Preferences it all depends how you set things up.
Does this still come with Adobe? Date has expired
No, it doesn’t – but it is a great mouse.
Is the usb receiver for the logitech mx master 3 usb-c?
No the receiver is not usb-c it is a standard usb connection
Does this mouse work with wireless charging?
No
Is the mouse click silent?
Pretty much. You can hear a quiet click but it’s certainly not annoying or intrusive. Great mouse all round. Expensive but never regretted buying it.
Will this mx3 be able to work with a logi k480 keyboard (which is connected via USB)
This mouse uses the unifying reciever which a small usb stick. If your keyboard doesn’t use one then no it won’t work. It will work with unifying software on it’s own and it does come with the dongle but that would then take up a usb slot plus the keyboard.
is there a battery life indicator?
The battery level can be checked via the companion app (that also manages the settings) or via Windows/settings/devices.
The led indicators on the left side are on only when the mouse is charging and are not really accurate.
How can you justify charging £117 for this mouse when the RRP is £99?
Great that you have a choice where to shop!
VIDEO
Documents / Resources
References
Еще несколько лет назад трудно было представить, что два устройства могут взаимодействовать друг с другом без каких-либо проводов. В современном мире все большую популярность приобретают беспроводные устройства, и одно из них – компьютерная мышь. Она соединяется с компьютером с помощью радиоволн. Такой способ подключения значительно упрощает работу пользователя за счет отсутствия проводов, которые очень часто путаются и мешаются на рабочем столе.
Содержание статьи
- Правила подключения беспроводной мыши
- Трудности и их решения
- Пошаговая инструкция подключения беспроводной Bluetooth мыши
- Пошаговое подключение радиочастотной мышки
Правила подключения беспроводной мыши
Именно от типа мыши будет зависеть способ подключения. Существует 2 вида сопряжения: USB и Bluetooth для соединения манипулятора и компьютера. Для всех мышей необходимо питание, так как провод отсутствует, и компьютер не может обеспечивать устройство питанием. Снизу мышки имеется отсек, куда вставляется батарейка.

Bluetooth мыши подключаются к ПК с помощью Bluetooth связи. Поэтому компьютер должен поддерживать такой вид соединения. Проверить это можно так:
- На ярлыке «Мой компьютер» кликнуть правой кнопкой мыши и выбрать «Управление».
- Справа перейти во вкладку «Диспетчер устройств».
- При наличии интегрированного адаптера «Bluetooth» в списке устройств должно быть значение «Bluetooth». Если его нет, значит компьютер не поддерживает такое соединение без дополнительного оборудования.
Некоторые модели компьютер может сразу не распознать, и тогда мышь не будет работать. Для этого в комплект с манипулятором входит и диск, с помощью которого можно установить драйвер на компьютер. Утилита позволит синхронизировать ноутбук или ПК с мышью.
Трудности и их решения
В процессе эксплуатации пользователь может столкнуться с несколькими проблемами. Одна из них – потеря адаптера от USB мышки.
В случае утраты или потери адаптера, который прилагается в комплект с мышью, можно попробовать несколько способов исправления ситуации:
- В магазине цифровой техники можно поинтересоваться о наличии адаптеров для той или иной модели мыши. Многие производители учитывают то, что потребитель может потерять эту деталь, и выпускают в продажу адаптеры отдельно.
- Можно приобрести такую же модель мыши с рук вместе с адаптером. Нужно поменять «начинку» своей мыши на внутренние детали купленной, чтобы адаптер смог принимать сигналы именно от этого манипулятора. Конечно же, следует покупать использованную мышь по низкой цене, чтобы затраты были оправданными.
Если же описанные способы оказались бесполезными, то лучше всего купить новую мышь.
Вторая трудность заключается в том, что компьютер не имеет встроенного Bluetooth адаптера. Казалось бы, подключение мыши с помощью такой связи невозможно, однако есть решение. Следует приобрести внешний адаптер, который внедрит эту функцию на компьютер. Приобретение такого аксессуара Bluetooth позволит пользоваться функциями соединения, причем отличий между интегрированной версией и внешней совсем нет.
Внимание! Если есть старая проводная мышка, то не стоит сразу выбрасывать ее при приобретении беспроводного варианта. Первая может послужить отличной заменой, когда, например, сели батарейки у беспроводного манипулятора или устройство пришло в негодность, а пользование компьютером неотложно.
Пошаговая инструкция подключения беспроводной Bluetooth мыши
Для подключения таких разновидностей мыши придется выполнить несколько дополнительных действий для синхронизации:
- Вставить батарейку в манипулятор, чтобы обеспечить его энергией для работы. Затем включить мышь.
- На ноутбуке или ПК включить функцию Bluetooth, зайти в ее раздел и нажать кнопку «Добавить устройство».
- Если мышь включена, то в настройках Bluetooth появится марка этого самого манипулятора, на которую нужно нажать и подключить. После проведенных действий можно пользоваться мышью. Однако стоит учесть то, что Bluetooth должен постоянно быть включен, чтобы поддерживать связь с манипулятором.
Настроить компьютерную мышку можно под себя. Для этого необходимо зайти в панель управления и найти пункт «Мышь». В этом разделе будут отображаться все свойства и настройки, которые, при желании, можно изменить (скорость нажатия, функция залипания, настройка под левшу или правшу).
Пошаговое подключение радиочастотной мышки
- В комплекте с такого вида мышью идет адаптер, который следует подключить к компьютеру через USB порт. Адаптер принимает сигналы мыши и передает их на ПК.
- Вставить в манипулятор батарейку и сдвинуть переключатель в положение «ON» или «ВКЛ».
- Проверить работоспособность мыши на экране.

Таким образом, за счет того, что существует два вида подключения беспроводной мыши, можно выбрать под себя именно ту разновидность, которая будет удобна. Проблемы, возникающие при использовании оборудования пользователем, имеют ясное решение, поэтому достоинством беспроводных мышей является еще и простота использования.
hp-support-head-portlet
![]()
Actions
- ${title}
Loading…
hp-contact-secondary-navigation-portlet
![]()
Actions
- ${title}
Loading…
HP Customer Support
Search
hp-hero-support-search
![]()
Actions
- ${title}
Loading…
Search all support
- All Support
- Software, Drivers and Updates
- Troubleshooting
- How to
- Product Information
- User Guides
Cancel
Examples: «LaserJet Pro P1102 paper jam», «EliteBook 840 G3 bios update»
hp-share-print-widget-portlet
![]()
Actions
- ${title}
Loading…
-
Information
Need Windows 11 help?
Check the information on compatibility, upgrade, and available fixes from HP and Microsoft. Windows 11 Support Center
-
Feedback
hp-detect-load-my-device-portlet
![]()
Actions
- ${title}
Loading…
hp-product-information-portlet
![]()
Actions
- ${title}
Loading…
Already have an HP account? Select from the products you own.
Sign in
/
Register
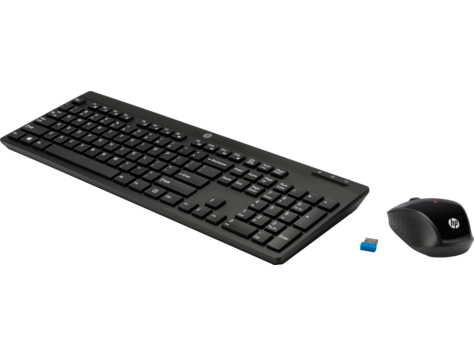
HP Wireless Keyboard and Mouse 200
Choose a different product
![]()
Add this product to My Dashboard


This product has been added to your dashboard
hp-product-builder-portlet
![]()
Actions
- ${title}
Loading…
hp-pdp-secondary-navigation-portlet
![]()
Actions
- ${title}
Loading…
hp-promotion-tiles-portlet
![]()
Actions
- ${title}
Loading…
hp-country-locator-portlet
![]()
Actions
- ${title}
Loading…
Country/Region:

United States
hp-product-warranty-check
![]()
Actions
- ${title}
Loading…