Каталоги и руководства
Каталоги велосипедов CUBE и аксесcуаров, руководства по оборудованию и запасным частям. И еще много всякой полезной информации о велосипедах CUBE и всем, что с ними связано.
Каталоги
Руководство пользователя
Руководства по задним амортизаторам
Руководства по вилкам
Руководства по компонентам
Руководства по велокомпьютерам
Корзина
Мы свяжемся с Вами в ближайшее время.
Наша цель — помочь вам с выбором вашего CUBE.
Мы экономим ваше время на поиск велосипеда, у нас вы можете узнать наличие интересующей модели у авторизованных дилеров CUBE.
А также сориентируем вас по будущим поставкам в случае отсутствия интересующей модели.
Получить консультацию и оставить заявку можно по телефону 8 800 707-97-17 или +7 (495) 070-72-27
Montage Computerhalterung /
Installation of computer bracket
Bedienungsanleitung
Instruction manual
Die Bedienungsanleitung ist Bestandteil dieses Produkts. Sie enthält wichtige
Hinweise zur Sicherheit, Montage und Entsorgung. Machen Sie sich vor der
Benutzung des Produkts mit allen Bedien- und Sicherheitshinweisen vertraut.
Benutzen Sie das Produkt nur wie beschrieben und für die angegebenen
Einsatzbereiche. Händigen Sie alle Unterlagen bei Weitergabe des Produkts
an Dritte mit aus.
The instruction manual is part of this product. It contains important
information on safety, assembly, and disposal. Before using this product, it is
Vorbau / Stem
important that you familiarise yourself with all operating and safety
instructions. Use the product only as described in the manual and only for the
indicated application areas. If you pass on the product to third parties, provide
it with all the documentation.
Display
Icone
Signalempfang
/
Zeigt gewählte Geschwindigkeitseinheit
/
Zeigt gewähltes Rad 1 oder Rad 2
Aktuelle Geschwindigkeit
Hintergrundbeleuchtung aktiv
Ausgewählte Funktion
Batteriewarnung
Wert der ausgewählten
Dauerschleifen-Modus aktiv
Funktion
Vergleich der aktuellen Geschwindigkeit mit der
Durchschnittsgeschwindigkeit
Computer einstellen
-Taste für 3 Sekunden gedrückt halten um in das Einstell-Menü zu
gelangen bzw. es zu verlassen.
Mit der
-Taste blättert man von Einstellung zu Einstellung.
Um in die ausgewählte Einstellung zu gelangen die
-Taste kurz
drücken.
Mit der
-Taste die gewünschte Einstellung auswählen und mit der
-Taste bestätigen.
Ist die Einstellung vorgenommen worden erscheint «Set OK» im Display.
Ohne Reaktion schließt sich das Menü nach einer Minute automatisch.
Display
Icons
Signal reception
/
Shows selected speed unit
/
Shows selected bike 1 or bike 2
Current speed
Backlight enabled
Selected function
Battery alert
Value of the selected
Infinite loop mode enabled
function
Comparison of the current speed with the average
speed
Set computer
Press
key for 3 seconds to access or to exit the settings menu.
Use the
key to browse from one setting to the other.
To access the selected setting, briefly press the
key.
Select the desired setting with the
key and confirm with the
key.
When the setting has been made, the display shows «Set OK».
If there is no reaction, the menu closes automatically after one minute.
Écran
Icônes
Réception du signal
/
Affiche l’unité de vitesse sélectionnée
/
Affiche le vélo 1 ou le vélo 2 sélectionnée
Vitesse actuelle
Rétroéclairage activé
Fonction sélectionnée
Avertissement de la batterie
Valeur de la fonction
Mode boucle continue activé
sélectionnée
Comparaison de la vitesse actuelle avec la vitesse
moyenne
Configuration de l’ordinateur
Appuyez sur la touche
pendant 3 secondes pour ouvrir ou fermer le
menu de configuration.
La touche
vous permet de passer d’un paramètre à l’autre.
Pour ouvrir le paramètre sélectionné, appuyez brièvement sur la
touche
.
Appuyez sur
pour sélectionner la configuration souhaitée et
confirmez votre choix avec la touche
.
Si le réglage a été effectué, « Set OK » apparaît sur l’affichage.
Si vous ne faites rien, le menu se ferme automatiquement après une
minute.
Montage Computer /
Mounting computer
Lock
Unlock
Montage Speichenmagnet /
Installation of spoke magnet
Lenker / Handlebar
Lock
Tasten
-Taste:
nächste Funktion
-Taste:
vorherige Funktion
Sprache
Uhrzeit
Datum
S
um Einstellung zu öffnen
S
um Einstellung zu öffnen
S
um Einstellung zu öffnen
S
um Sprache auszuwählen
S
um 12/24h Anzeige
S
um Datum einzustellen
S
zum Bestätigen
S
auszuwählen
S
zum Bestätigen
S
zum Bestätigen
S
um Uhrzeit einzustellen
S
zum Bestätigen
Keys
-Key:
Next function
-Key:
Previous function
Language
Clock
Date
S
open settings
S
open settings
S
open settings
S
select language
S
select 12/24h
S
set date
S
confirm
S
confirm
S
confirm
S
set clock
S
confirm
Touches
Touche-
:
fonction suivante
Touche-
:
fonction précédente
Langue
Heure
Date
S
pour ouvrir le menu des
S
S
pour ouvrir le menu des
S
S
pour ouvrir le menu des
S
S
paramètres
S
paramètres
S
paramètres
S
pour sélectionner la
S S
S
pour choisir le mode
S S
S
pour configurer la date
S
langue
S
d’affichage 12 ou 24h
S
pour confirmer
S
pour confirmer votre
S S
S
pour confirmer votre
S S
S
choix
S
choix
S
pour configurer l’heure
S
pour confirmer
Montage Sensor + Magnet / Mounting sensor + magnet
Option A
Type A
max. 5 mm
Die Sensorkontrollleuchte signalisiert den korrekten Abstand zum Magneten.
Achtung: Montieren Sie den Sensor auf der Vorderseite der Gabel.
The sensor indicator light signals the correct distance to the magnet.
Attention: Mount the sensor on the front side of the fork.
Funktionen
Durchschnitts-
Maximal-
Uhrzeit
Dauerschleife
geschwindigkeit
geschwindigkeit
Gesamtfahrzeit
Gesamtstrecke
Rad1/2
Rad1/2
Temperatur
Einheiten
Radgröße
Gesamtwerte
S
um Einstellung zu öffnen
S
um Einstellung zu öffnen
Hier können die Gesamtwerte
S
um Einheit auszuwählen
S
um Rad 1 oder Rad 2
betrachtet und auch
S
zum Bestätigen
S
auszuwählen
eingestellt werden.
S
zum Bestätigen
S
um Reifenliste oder
S
um Einstellung zu öffnen
S
Manuelle Einstellung
S
um zum nächsten Wert zu
S
auszuwählen
S
gelangen
S
zum Bestätigen
S
um den Wert anzuwählen
S
um Reifen zu wählen oder
S
um den Wert einzustellen
S
den Radumfang manuell
S
zum Bestätigen
S
einzugeben
S
zum Bestätigen
Functions
Clock
Loop mode
Average speed
Maximum speed
Total time
Total distance
bike1/2
bike1/2
Temperature
Units
Wheelsize
Totals
Here, the total values can be
S
open settings
S
open settings
shown and set.
S
select unit
S
select bike 1 or 2
S
confirm
S
confirm
S
open settings
S
select tire list or manual
S
go to the next value
S
setting
S
select value
S
confirm
S
set value
S
select tire or insert wheel
S
confirm
S
circumference manually
S
confirm
Fonctions
Boucle
Vitesse
Vitesse
Heure
continue
moyenne
maximum
Temps total
Distance totale
du vélo 1/2
du vélo 1/2
Température
Circonférence
Unités
de la roue
Valeurs totales
S
pour ouvrir le menu des
S
S
pour ouvrir le menu des
S
Ici, vous pouvez consulter et
S
paramètres
S
paramètres
configurer les valeurs totales.
S
pour sélectionner l’unité
S
pour sélectionner le vélo 1
S
pour confirmer votre
S S
S
ou le vélo 2
S
pour ouvrir le menu des
S
S
choix
S
pour confirmer
S
paramètres
S
pour sélectionner la liste
S
pour aller à la valeur
S S
S
de pneus (Tipo Neum) ou
S
suivante
S
l’ajustement manuel
S
pour sélectionner la
S S
S
pour confirmer
S
valeur
S
pour sélectionner les
S
S
pour configurer la valeur
S
pneus ou saisir
S S S
S
pour confirmer
S
manuellement la
S S S
S
circonférence de la roue
S
pour confirmer
Option B
max. 70 cm
Type B
max. 5 mm
Hintergrundbeleuchtung
S
und
gleichzeitig drücken um die Hintergrundbeleuchtung an-
Strecke
bzw. auszuschalten. Die Beleuchtung ist ca. 6 Sekunden aktiv nachdem
eine beliebige Taste gedrückt wurde.
Rad wechseln
S
und
gleichzeitig für 3 Sekunden gedrückt halten. Der
Computer wechselt auf die Einstellungen des gewählten Rads.
Dauerschleife
Fahrzeit
S
Im Dauerschleifen-Modus werden während der Fahrt die wichtigsten
Funktionen automatisch alle 4 Sekunden weitergeschaltet. Durch
drücken einer beliebigen Taste wird der Dauerschleifen-Modus
beendet.
Ruhe-/ Schlafmodus
Werksreset
Der Computer verfügt über einen
Vibrationssensor. Ohne Erschütte-
rung und Signal schaltet der
Computer nach 6 Minuten in den
Hier kann der Computer auf
Ruhemodus und zeigt die Uhrzeit
die Werkseinstellung
an. Durch erneute Erschütterung
zurückgesetzt werden. Dabei
kehrt der Computer in den
werden alle Daten vom
Betriebsmodus zurück.
Computer gelöscht.
Fällt der Computer in den
S
um Einstellung zu öffnen
S
um Nein oder Ja
S S S
Schlafmodus (Sleep), erwacht
S
auszuwählen
dieser erst wieder durch das
S
zum Bestätigen
Drücken einer beliebiegen Taste.
Backlight
S
Press
and
simultaneously to switch the backlight on or off.
Trip distance
After pressing any key, the lights are on for approx. 6 seconds.
Change bike
S
Press
and
simultaneously for 3 seconds. The computer
changes to the selected bike settings.
Loop mode
S
With the infinite loop mode enabled, the most important functions are
Trip time
automatically forwarded every 4 seconds during the ride. The infinite
loop mode is disabled by pressing any key.
Rest / Sleep mode
Total reset
The computer is equipped with a
vibration sensor. If no vibrations or
signals are registered, the
computer switches to rest mode
Here, the computer can be
after 6 minutes and displays the
reset to factory settings. In
time. As soon as it picks up
this process all data is
vibrations, the computer switches
deleted.
back to operating mode.
S
open settings
S
select Yes or No
If the computer is in sleep mode, it
S
confirm
wakes up when any key is pressed.
Rétroéclairage
S
Appuyez simultanément sur
et
pour activer ou désactiver le
Distance
rétroéclairage.
L’éclairage reste actif environ 6 secondes après la dernière utilisation
d’une touche.
Changer de vélo
S
Maintenez simultanément les touches
et
pendant 3 secondes.
L’ordinateur bascule vers les paramètres de la vélo sélectionnée.
Temps
Boucle continue
S
Dans le mode boucle continue, les fonctions principales sont
automatiquement réutilisées toutes les 4 secondes pendant que vous
roulez. Appuyez sur une touche pour quitter le mode boucle continue.
Réinitialisation des
Mode veille / repos
paramètres d’usine
L’ordinateur dispose d’un capteur
de vibrations. En l’absence de
signal ou de vibration, il passe en
mode veille au bout de 6 minutes
Ici, vous pouvez réinitialiser
et affiche l’heure. En cas de
l’ordinateur avec les
paramètres d’usine. Toutes
vibration, l’ordinateur sort du
les données sont alors
mode veille et redevient
supprimées de l’ordinateur.
opérationnel.
S
pour ouvrir le menu des
S
Si l’ordinateur passe en mode
S
paramètres
repos (Sleep), il est nécessaire
S
pour sélectionner Oui ou
S
Non
d’appuyer sur une touche pour le
S
pour confirmer votre
S S
rallumer.
S
choix
Batteriewechsel / Change battery
Achtung:
Beim Batteriewechsel gehen
KEINE gespeicherten Daten
Open
Close
verloren.
Verwenden Sie ausschließlich
CR2032 3V Batterien.
Stellen Sie sichter, dass der
Dichtungsring korrekt
platziert ist.
Attention:
When battery is replaced NO
saved data gets lost.
Use only CR2032 3V batteries.
Make sure that the sealing
ring is placed correctly.
Open
Close
Tourdaten zurücksetzten
-Taste für 3 Sekunden
gedrückt halten um die
Tourdaten zurückzusetzten.
Einstellungen werden dabei
nicht beeinflusst.
Batteriewarnung
Ist die Batterie des Computers
schwach, blinkt das Batteriesymbol
auf.
Ist die Batterie des Sensors
schwach, blinkt die Sensorkontroll-
leuchte nach dem Aufwachen rot
auf. Im Display erscheint „Sensor
Batt.».
Ersetzen Sie möglichst bald die
schwache Batterie.
Reset tour data
Press
key for 3 seconds to
reset tour data.
Settings are not modified.
Battery alert
If the computer battery power is
low, the battery symbol flashes.
If the sensor battery power is low,
the sensor control light starts
flashing red after waking up. The
display shows «Sensor Batt.».
Replace the weak battery as soon
as possible.
Réinitialisation des données du parcours
Maintenez la touche
pen-
dant 3 secondes pour
réinitialiser les données du
parcours.
Cela n’affecte pas les
paramètres.
Avertissement de la batterie
Lorsque la batterie de l’ordinateur
est presque vide, l’icône de la
batterie clignote.
Si la batterie du capteur est
presque vide, le témoin du capteur
s’allume rouge lorsque l’ordina-
teur sort du mode veille. L’écran
affiche « Capteur Pile » .
Remplacez la batterie faible dès
que possible.
-Taste:
nächste Funktion
-Taste:
vorherige Funktion
Sprache
S um Einstellung zu öffnen
S um Sprache auszuwählen
S zum Bestätigen
Uhrzeit
S um Einstellung zu öffnen
S um 12/24h Anzeige
S auszuwählen
S zum Bestätigen
S um Uhrzeit einzustellen
S zum Bestätigen
Datum
S um Einstellung zu öffnen
S um Datum einzustellen
S zum Bestätigen
Einheiten
S um Einstellung zu öffnen
S um Einheit auszuwählen
S zum Bestätigen
Radgröße
S um Einstellung zu öffnen
S um Rad 1 oder Rad 2
S auszuwählen
S zum Bestätigen
S um Reifenliste oder
S Manuelle Einstellung
S auszuwählen
S zum Bestätigen
S um Reifen zu wählen oder
S den Radumfang manuell
S einzugeben
S zum Bestätigen
Gesamtwerte
Hier können die Gesamtwerte
betrachtet und auch
eingestellt werden.
S um Einstellung zu öffnen
S um zum nächsten Wert zu
S gelangen
S um den Wert anzuwählen
S um den Wert einzustellen
S zum Bestätigen
Werksreset
Hier kann der Computer auf
die Werkseinstellung
zurückgesetzt werden. Dabei
werden alle Daten vom
Computer gelöscht.
S um Einstellung zu öffnen
S um Nein oder Ja S S S
S auszuwählen
S zum Bestätigen
Der Computer verfügt über einen
Vibrationssensor. Ohne Erschütte-
rung und Signal schaltet der
Computer nach 6 Minuten in den
Ruhemodus und zeigt die Uhrzeit
an. Durch erneute Erschütterung
kehrt der Computer in den
Betriebsmodus zurück.
Fällt der Computer in den
Schlafmodus (Sleep), erwacht
dieser erst wieder durch das
Drücken einer beliebiegen Taste.
Ist die Batterie des Computers
schwach, blinkt das Batteriesymbol
auf.
Ist die Batterie des Sensors
schwach, blinkt die Sensorkontroll-
leuchte nach dem Aufwachen rot
auf. Im Display erscheint „Sensor
Batt.“.
Ersetzen Sie möglichst bald die
schwache Batterie.
Signalempfang
/ Zeigt gewählte Geschwindigkeitseinheit
/ Zeigt gewähltes Rad 1 oder Rad 2
Hintergrundbeleuchtung aktiv
Batteriewarnung
Dauerschleifen-Modus aktiv
Vergleich der aktuellen Geschwindigkeit mit der
Durchschnittsgeschwindigkeit
Hintergrundbeleuchtung
S
und gleichzeitig drücken um die Hintergrundbeleuchtung an-
bzw. auszuschalten. Die Beleuchtung ist ca. 6 Sekunden aktiv nachdem
eine beliebige Taste gedrückt wurde.
Rad wechseln
S
und gleichzeitig für 3 Sekunden gedrückt halten. Der
Computer wechselt auf die Einstellungen des gewählten Rads.
Dauerschleife
S
Im Dauerschleifen-Modus werden während der Fahrt die wichtigsten
Funktionen automatisch alle 4 Sekunden weitergeschaltet. Durch
drücken einer beliebigen Taste wird der Dauerschleifen-Modus
beendet.
-Taste für 3 Sekunden
gedrückt halten um die
Tourdaten zurückzusetzten.
Einstellungen werden dabei
nicht beeinflusst.
-Taste für 3 Sekunden gedrückt halten um in das Einstell-Menü zu
gelangen bzw. es zu verlassen.
Mit der -Taste blättert man von Einstellung zu Einstellung.
Um in die ausgewählte Einstellung zu gelangen die -Taste kurz
drücken.
Mit der -Taste die gewünschte Einstellung auswählen und mit der
-Taste bestätigen.
Ist die Einstellung vorgenommen worden erscheint “Set OK“ im Display.
Ohne Reaktion schließt sich das Menü nach einer Minute automatisch.
DEUTSCHENGLISHFRANÇAIS
MONTAGEANLEITUNG / INSTALLATION INSTRUCTIONS
Die Sensorkontrollleuchte signalisiert den korrekten Abstand zum Magneten.
The sensor indicator light signals the correct distance to the magnet.
Achtung: Montieren Sie den Sensor auf der Vorderseite der Gabel.
Attention: Mount the sensor on the front side of the fork.
Achtung:
Beim Batteriewechsel gehen
KEINE gespeicherten Daten
verloren.
Verwenden Sie ausschließlich
CR2032 3V Batterien.
Stellen Sie sichter, dass der
Dichtungsring korrekt
platziert ist.
Attention:
When battery is replaced NO
saved data gets lost.
Use only CR2032 3V batteries.
Make sure that the sealing
ring is placed correctly.
Option A Option B
Display
Bedienungsanleitung
Instruction manual
Montage Sensor + Magnet / Mounting sensor + magnet Batteriewechsel / Change batteryMontage Computerhalterung /
Installation of computer bracket
Montage Computer /
Mounting computer
Montage Speichenmagnet /
Installation of spoke magnet
Computer einstellen
Icone Tasten Funktionen Tourdaten zurücksetzten
Ruhe-/ Schlafmodus Batteriewarnung
Ausgewählte Funktion
Aktuelle Geschwindigkeit
Die Bedienungsanleitung ist Bestandteil dieses Produkts. Sie enthält wichtige
Hinweise zur Sicherheit, Montage und Entsorgung. Machen Sie sich vor der
Benutzung des Produkts mit allen Bedien- und Sicherheitshinweisen vertraut.
Benutzen Sie das Produkt nur wie beschrieben und für die angegebenen
Einsatzbereiche. Händigen Sie alle Unterlagen bei Weitergabe des Produkts
an Dritte mit aus.
The instruction manual is part of this product. It contains important
information on safety, assembly, and disposal. Before using this product, it is
important that you familiarise yourself with all operating and safety
instructions. Use the product only as described in the manual and only for the
indicated application areas. If you pass on the product to third parties, provide
it with all the documentation.
Lenker / Handlebar
Vorbau / Stem
Wert der ausgewählten
Funktion
Uhrzeit Dauerschleife
Durchschnitts-
geschwindigkeit
Maximal-
geschwindigkeit Strecke
FahrzeitTemperatur
Gesamtstrecke
Rad1/2
Gesamtfahrzeit
Rad1/2
Type A Type B
max. 5 mm max. 5 mm
Lock
Lock
Unlock
Open Close
Open Close
max. 70 cm
-Key:
Next function
-Key:
Previous function
Language
S open settings
S select language
S confirm
Clock
S open settings
S select 12/24h
S confirm
S set clock
S confirm
Date
S open settings
S set date
S confirm
Units
S open settings
S select unit
S confirm
Wheelsize
S open settings
S select bike 1 or 2
S confirm
S select tire list or manual
S setting
S confirm
S select tire or insert wheel
S circumference manually
S confirm
Totals
Here, the total values can be
shown and set.
S open settings
S go to the next value
S select value
S set value
S confirm
Total reset
Here, the computer can be
reset to factory settings. In
this process all data is
deleted.
S open settings
S select Yes or No
S confirm
The computer is equipped with a
vibration sensor. If no vibrations or
signals are registered, the
computer switches to rest mode
after 6 minutes and displays the
time. As soon as it picks up
vibrations, the computer switches
back to operating mode.
If the computer is in sleep mode, it
wakes up when any key is pressed.
If the computer battery power is
low, the battery symbol flashes.
If the sensor battery power is low,
the sensor control light starts
flashing red after waking up. The
display shows «Sensor Batt.».
Replace the weak battery as soon
as possible.
Signal reception
/ Shows selected speed unit
/ Shows selected bike 1 or bike 2
Backlight enabled
Battery alert
Infinite loop mode enabled
Comparison of the current speed with the average
speed
Backlight
S
Press and simultaneously to switch the backlight on or off.
After pressing any key, the lights are on for approx. 6 seconds.
Change bike
S
Press and simultaneously for 3 seconds. The computer
changes to the selected bike settings.
Loop mode
S
With the infinite loop mode enabled, the most important functions are
automatically forwarded every 4 seconds during the ride. The infinite
loop mode is disabled by pressing any key.
Press key for 3 seconds to
reset tour data.
Settings are not modified.
Press key for 3 seconds to access or to exit the settings menu.
Use the key to browse from one setting to the other.
To access the selected setting, briefly press the key.
Select the desired setting with the key and confirm with the key.
When the setting has been made, the display shows «Set OK».
If there is no reaction, the menu closes automatically after one minute.
Display
Set computer
Icons Keys Functions Reset tour data
Rest / Sleep mode Battery alert
Selected function
Current speed
Value of the selected
function
Clock Loop mode Average speed Maximum speed Trip distance
Trip timeTemperature
Total distance
bike1/2
Total time
bike1/2
Touche- :
fonction suivante
Touche- :
fonction précédente
Langue
S pour ouvrir le menu des S
S paramètres
S pour sélectionner la S S
S langue
S pour confirmer votre S S
S choix
Heure
S pour ouvrir le menu des S
S paramètres
S pour choisir le mode S S
S d’affichage 12 ou 24h
S pour confirmer votre S S
S choix
S pour configurer l’heure
S pour confirmer
Date
S pour ouvrir le menu des S
S paramètres
S pour configurer la date
S pour confirmer
Unités
S pour ouvrir le menu des S
S paramètres
S pour sélectionner l’unité
S pour confirmer votre S S
S choix
Circonférence
de la roue
S pour ouvrir le menu des S
S paramètres
S pour sélectionner le vélo1
S ou le vélo2
S pour confirmer
S pour sélectionner la liste
S de pneus (Tipo Neum) ou
S l‘ajustement manuel
S pour confirmer
S pour sélectionner les S
S pneus ou saisir S S S
S manuellement la S S S
S circonférence de la roue
S pour confirmer
Valeurs totales
Ici, vous pouvez consulter et
configurer les valeurs totales.
S pour ouvrir le menu des S
S paramètres
S pour aller à la valeur S S
S suivante
S pour sélectionner la S S
S valeur
S pour configurer la valeur
S pour confirmer
Réinitialisation des
paramètres d’usine
Ici, vous pouvez réinitialiser
l’ordinateur avec les
paramètres d’usine. Toutes
les données sont alors
supprimées de l’ordinateur.
S pour ouvrir le menu des S
S paramètres
S pour sélectionner Oui ou
S Non
S pour confirmer votre S S
S choix
L’ordinateur dispose d’un capteur
de vibrations. En l’absence de
signal ou de vibration, il passe en
mode veille au bout de 6minutes
et affiche l’heure. En cas de
vibration, l’ordinateur sort du
mode veille et redevient
opérationnel.
Si l’ordinateur passe en mode
repos (Sleep), il est nécessaire
d’appuyer sur une touche pour le
rallumer.
Lorsque la batterie de l’ordinateur
est presque vide, l’icône de la
batterie clignote.
Si la batterie du capteur est
presque vide, le témoin du capteur
s’allume rouge lorsque l’ordina-
teur sort du mode veille. L’écran
affiche «Capteur Pile» .
Remplacez la batterie faible dès
que possible.
Réception du signal
/ Affiche l’unité de vitesse sélectionnée
/ Affiche le vélo1 ou le vélo2 sélectionnée
Rétroéclairage activé
Avertissement de la batterie
Mode boucle continue activé
Comparaison de la vitesse actuelle avec la vitesse
moyenne
Rétroéclairage
S
Appuyez simultanément sur et pour activer ou désactiver le
rétroéclairage.
L’éclairage reste actif environ 6secondes après la dernière utilisation
d’une touche.
Changer de vélo
S
Maintenez simultanément les touches et pendant 3secondes.
L’ordinateur bascule vers les paramètres de la vélo sélectionnée.
Boucle continue
S
Dans le mode boucle continue, les fonctions principales sont
automatiquement réutilisées toutes les 4secondes pendant que vous
roulez. Appuyez sur une touche pour quitter le mode boucle continue.
Maintenez la touche pen-
dant 3secondes pour
réinitialiser les données du
parcours.
Cela n’affecte pas les
paramètres.
Appuyez sur la touche pendant 3secondes pour ouvrir ou fermer le
menu de configuration.
La touche vous permet de passer d’un paramètre à l’autre.
Pour ouvrir le paramètre sélectionné, appuyez brièvement sur la
touche .
Appuyez sur pour sélectionner la configuration souhaitée et
confirmez votre choix avec la touche .
Si le réglage a été effectué, «Set OK» apparaît sur l’affichage.
Si vous ne faites rien, le menu se ferme automatiquement après une
minute.
Écran
Configuration de l’ordinateur
Icônes Touches Fonctions Réinitialisation des données du parcours
Mode veille / repos Avertissement de la batterie
Fonction sélectionnée
Vitesse actuelle
Valeur de la fonction
sélectionnée
Heure
Boucle
continue
Vitesse
moyenne
Vitesse
maximum Distance
TempsTempérature
Distance totale
du vélo 1/2
Temps total
du vélo 1/2
В настоящее время вы находитесь на странице с руководствами . Выберите один из продуктов, чтобы сразу перейти к руководству по этому продукту. Не можете найти ? Тогда попробуйте вбить в поле поиска и модель, чтобы найти нужное руководство . На ManualsPDF.ru в настоящее время имеется 10 руководств . Самые популярные :
- Cube Stereo Super HPC
- Cube Reaction GTC
- Cube EPO Pedelec
Последнее добавленное руководство было добавлено 2018-10-05, и это Cube EPO Pedelec.

- Форум
- Техника
- Мои два колеса
- Cube
- нормальный мануал на cube.

-
06.06.2012, 15:59
#1
Без 5-ти минут веломаньяк!
нормальный мануал на cube.
поделитесь пожалуйста ссылкой, по которой можно скачать полноценный мануал про конкретную модель Cube (reaction race 2012) в PDF
-
06.06.2012, 18:10
#2
Сообщение от ae485
полноценный мануал про конкретную модель Cube
Позвольте полюбопытствовать, что вы там хотите найти?
)
-
07.06.2012, 08:07
#3
Без 5-ти минут веломаньяк!
Сообщение от c_h_e_f
Позвольте полюбопытствовать, что вы там хотите найти?
)хотел бы ознакомиться как правильно эксплуатировать. при покупке дали книжку, даже на русском. но полезность ее стремится к нулю (видно что сами переводили, и не очень старались при этом).
сгодится и мануал от других производителей.
-
07.06.2012, 13:34
#4
Веломаньяк
ae485, как правило все мануалы бестолковы. Форум тебе в помощь тут и как смазывать цепь тема на 1500+ постов, и про переклюки , и про втулки да про все можно найти.
Либо в сервис, как написано в любом мануале.ИМХО проверить масло в штанах вилки надо и катать ,катать , катать….
+79267255274(вопросы можно задать в Telegram, его смотрит админ и все механики ) Веломастерская Xlab
-
07.06.2012, 16:22
#5
Увлекающаяся
Сообщение от ae485
поделитесь пожалуйста ссылкой, по которой можно скачать полноценный мануал про конкретную модель Cube (reaction race 2012) в PDF
У Куба нет «конкретных» мануалов по моделям. Есть только по типу велосипедов. Смотри здесь
-
07.06.2012, 18:22
#6
Сообщение от ae485
как правильно эксплуатировать
Эксплуатация Cube Reaction Race 2012 ничем не отличается от эксплуатации скажем Cube Reaction Pro 2011, ну вы поняли
А что касается эксплуатации и обслуживания конкретных компонентов велосипеда, например вилки, ищите их на официальных сайтах соответствующих производителей. Про базовое же обслуживание, как правильно было замечено выше, в сети куча всяких различных мануалов и статей по этому поводу, поиск вам в помощь.


") )
)
")
Информация о теме
Пользователи, просматривающие эту тему
Эту тему просматривают: 1 (пользователей: 0 , гостей: 1)
Похожие темы
-
Ответов: 48
Последнее сообщение: 04.03.2013, 13:43
-
Ответов: 98
Последнее сообщение: 31.03.2009, 22:04
-
Ответов: 25
Последнее сообщение: 20.06.2007, 18:48
-
Ответов: 6
Последнее сообщение: 11.05.2007, 08:41
-
Ответов: 9
Последнее сообщение: 22.04.2005, 12:02
- Manuals
- Brands
- Cube Manuals
- 3D Printers
- 3d printer
- User manual
-
Contents
-
Table of Contents
-
Bookmarks
Quick Links
Summary of Contents for Cube 3d printer
-
Page 1
3D Printer User Guide… -
Page 2: Table Of Contents
INTRODUCTION …………………………..4 COPYRIGHT …………………………..5 IMPORTANT SAFETY INFORMATION ……………………6 Safety Guidelines …………………………6 CUBE 3D PRINTER FEATURES AND BENEFITS …………………7 Cube 3D Printer Features ……………………….7 Cube 3D Printer Properties ………………………. 7 AT A GLANCE …………………………..8 REQUIREMENTS FOR YOUR CUBE ……………………. 9 Wireless Options …………………………9…
-
Page 3
FINISHING YOUR CREATION ……………………40-41 Removing your Creation From the Print Pad ………………..40 Removing Raft …………………………41 Removing Supports ……………………….42 MAINTAINING YOUR CUBE ………………………42-43 Cleaning the Exterior ……………………….42 Cleaning the Print Pad ………………………..42 Cleaning the Print Tip ……………………….42 Cleaning the Touchscreen ……………………..43 8 Amp Fuse Replacement ……………………..43… -
Page 4: Introduction
INTRODUCTION Thank you for purchasing “The Cube®.” It’s portable, plug and print design, enables everybody in the family to express their cre- ativity like never before.With ten different material colors to choose from, enjoy the freedom to print in your true colors or to mix it up.Cube 3D Printers ready-to-print technology provides a new dimension to your imagination and helps you share your creations…
-
Page 5: Copyright
Cube 3D Printer. The warranty period for the Cube 3D Printer is ninety (90) days and shall start on the earlier of the date your Cube 3D printer is activated or the thirtieth day after your purchase of the Cube 3D printer.
-
Page 6: Important Safety Information
Cube’s appropriate use. Ensure small 3D prints are not accessible to young children. These 3D prints are potential choking hazards for young children. When the Cube is operating, the print tip on the printjet and the print pad become hot; avoid touching these areas until they have cooled down.
-
Page 7: Cube 3D Printer Features And Benefits
CUBE 3D PRINTER FEATURES AND BENEFITS pad. After each layer is produced, the print pad lowers so that a new layer can be drawn on top of the last. This is the process continues until the last layer on the top of the creation is jetted.
-
Page 8: At A Glance
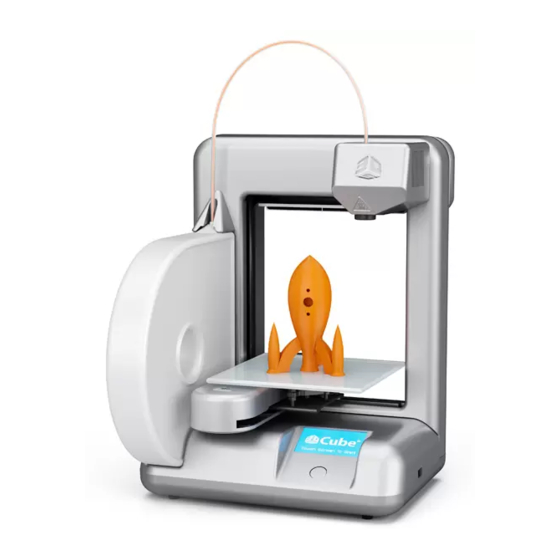
AT A GLANCE Cube Tube Print Jet Print Tip Print Pad Material Cartridge USB Connection- For Print Files Only Power Cord (Right side of printer) Connection Operator’s Touch ON/OFF Push-Button Screen Power Switch & ware updates only Menu Function Button…
-
Page 9: Requirements For Your Cube
Electrical Requirements Wireless Options: 802.11b/g with: WPS Infrastructure or Ad hoc Mode Outlet requirements: 100-240 Volts, at 50/60 Hz. Cube electrical rating: 24VDC, 6.25 amp. Wired Option: Material Storage All polymers degrade with time. The following condi- tions ensure the material remains high quality: Software: Do not unpack until material is needed.
-
Page 10: Unpacking And Setting Up The Cube
Note: Retain packaging and Cube carton for future transporting. Remove white plastic inserts from each side of box. Pinch and bend insert out. Next, pull insert out of box to remove. Lift top of carton up and remove.
-
Page 11
Remove foam above and below plate by gently pulling out from the back of the Cube; remove blue shipping tape from Cube. Remove Blue Shipping Tape Remove Foam Remove print pad from foam under Cube and set aside. Lift foam that Cube was sitting on to access power supply and other accessories. -
Page 12: Activate Your Cube In Cubify.com
If you have not created an account in Cubify.com, please do so now to receive your one time activation code. Once your se- rial number is entered in “Activate my Cube,” your activation code will be sent to your e-mail account. If your e-mail was not start creating.
-
Page 13
Click on “Activate my Cube” from “My Cubify “ drop down menu. Click Here On the Cube Activation Form, enter your Cube 12 digit/letter serial number (located on the back of Cube) in the activation screen and click on “Activate.”… -
Page 14: Unlock Your Cube
UNLOCK YOUR CUBE Once you have successfully activated your Cube account, next step is to unlock your Cube to begin your creations. Your unique activation code appears in the ”Congratulations” screen after you activated your Cube account; your code was also sent to your e-mail account.
-
Page 15: Download And Install Cubify Client Software
Tap in your activation code and then tap on the check box to unlock your Cube. If an error is made while entering now start your creation. You are now at the main menu. Main Menu Tap Here DOWNLOAD AND INSTALL CUBIFY CLIENT SOFTWARE your own prints.
-
Page 16
Click Here and then Here The Cubify Setup Wizard will guide you through the steps to install the software on your computer. Select Next to start the Setup Wizard. Click Next… -
Page 17: Download Your Free Creations
DOWNLOAD YOUR FREE CREATIONS Download your free 25 Free creations by following these simple steps. 1. Click on “Download free creation;” your download will start immediately. Click Here Click Here…
-
Page 18: Cubify Client Software Overview
The Cubify Client Software allows you manipulate your design before sending it to the Cube for printing. It simulates the Cube’s print pad so you can orient, scale, re-size and rotate the 3D print to get the best result when printing.
-
Page 19
Click on “Print” to transfer your creation to the Cube. The two methods of sending your creation to print are: Set up Ad hoc or WPS WI-FI modes USB stick connected to your computer for downloading your creation for print. -
Page 20
These icons permit you to view your creation in various view points. After selecting a particular view, place your cursor on the part and hold the mouse button down; rotate the print pad to view different angles of the part. Back Side Top Side Bottom Side… -
Page 21
Select “Yes” to delete the 3D print or “No” if you would like to continue. Allows connection between your computer and the Cube your Cube. Click on the Help button to access the Cube 3-D Printer User Guide and Material Safety Data Sheet (MSDS). -
Page 22: Wi-Fi Set-Up
NOTE: Ad hoc will not connect to operating systems running Windows XP. An ad hoc network is a temporary connection to your Cube Printer through your computer or your wireless smart phone. Ad hoc networks can only be wireless, so you must have a wireless network adapter installed in your computer to setup or join an ad hoc network.
-
Page 23: Set Up A Computer (Wps) Network
WPS (WI-FI Protected Setup) allow easy establishment of a secure wireless network. All new wireless-routers are set up for WPS. To be sure, look for the WPS logo on your wireless-router box. WPS connection will allow you to connect to your Cube Printer through the Cubify Client Software.
-
Page 24
Tap on “WPS” in the menu screen. The next screen will show your printer connecting to your computer and then if WPS connection was successful. If connection was not successful, unplug the power to your Cube and then plug your Cube in;… -
Page 25: Wired Computer Set Up (Without Wi-Fi Options)
Tap Here One Time If your USB drive is connected to the Cube, please remove the USB drive please remove the USB drive, (the screen will display the directions to do this). Tap the “NEXT” arrow on the display; locate the USB cable and connect the cable to the Cube USB port located on the back of the Cube (again, these instructions will be displayed on the screen).
-
Page 26
“Firmware Updated Successfully”, click OK. Disconnect the USB cable from your Cube and computer; unplug the Cube power cord. Plug power cord back in and press the Cube power button; a message will display on the touchscreen “Setting restored,” click on the check mark to… -
Page 27: Print Pad Installation
SETTING PRINT JET GAP properly. When the Cube is operating, the print tip on the print jet and the print pad become hot; avoid touching these areas until they have cooled down. Finger tap “Set Up” on the touchscreen and press “Next” until “Set Gap” appears.
-
Page 28
Finger tap “Set Gap;” The print jet and print pad will move into position to set the gap. Next, fold a sheet of standard paper in half and place it between the print tip and the print pad. If the paper can not slide between the print tip and print pad, tap the “down”… -
Page 29: Material Cartridge Preparation
1. Remove material cartridge from packaing; using scissors cut top portion of bag and remove the cartridge. Tap “Setup” on Cube touch screen then select “Load Cartridge,” press Next. 3. Remove thumbscrew on the side of the material cartridge. Remove the blue tape from material. Retain screw to re-install in cartridge when you need to store cartridge again.
-
Page 30: Material Cartridge Installation
MATERIAL CARTRIDGE INSTALLATION Remove material cartridge from packaging; using scissors cut top portion of bag and remove the cartridge. Tap “Setup” on Cube touch screen then select “load cartridge,” press Next. Tap Here Tap Here Remove thumbscrew on the side of the material cartridge. Remove the blue tape from material. Retain screw to re- install in cartridge when you need to store cartridge again.
-
Page 31
Locate the clear tube (Cube tube) in packaging and thread the material through the Cube tube until it comes out of the other end of tube. Cube Tube Insert material coming from tube into print jet; continue to hold material and press Next on the touchscreen. Continue… -
Page 32
PRINT TIP BECOMES EXTREMELY HOT DURING SET-UP AND OPERATION. DO NOT TOUCH NOZZLE. Remove the jetted material loading the cartridge is not successful because the material did not jet from the print tip, remove the material from the print jet. Repeat the Material Cartridge Installation. Insert Cube tube into print jet. -
Page 33: Printing Preparation
Remove glue from the foam and remove cap. Remove print pad from the Cube; paint a thin coat of glue on the entire print pad until the glue is evenly distributed (do not over apply). Replace glue cap after use.
-
Page 34: Printing Your First Creation
Do not change color of material or cartridge during printing; doing so may damage the Cube. NOTE: Your Cube will have printed test creations before leaving the factory. These test creations may have been printed in a different material color than you are using. Therefore, a small amount material color until it transitions over to your material color.
-
Page 35
The software’s print pad is a simulation of your Cube print pad. Click here In the client software you can orient, scale, and manipulate your creation to ensure that you obtain the optimum printing results. -
Page 36
Click here Printing with WI-FI Connection… -
Page 37: Printing From The Usb Drive
X box to cancel. The Cube will begin a ten minute heating process. During the heating process, the print tip and the print pad will reach the temperatures that have been preset by the manufacturer. Once these temperatures are reached, your creation will begin to print.
-
Page 38: Aborting Your Print
Here The Cube will begin a ten minute heating process. During the heating process, the print tip and the print pad will reach the temperatures that have been preset by the manufacturer. Once these temperatures are reached, your creation will WARNING –…
-
Page 39: Replacing Material Cartridge During Printing
Do not change to a different color of mate- rial; doing so can cause damage to your Cube. Please follow these steps to replace the cartridge.
-
Page 40: Finishing Your Creation
FINISHING YOUR CREATION Removing your Creation From the Print Pad Refer to the Cube User Guide for instructions for “Cleaning Print Pad” in Maintaining your Cube, to remove the glue from the print pad.
-
Page 41: Removing Raft
Removing Raft (If Required) your creation. In places where the supports are inside your creation and are hard to get to, use little wire snips or needle nose pliers to remove the supports. Removing Supports (If Required) Carefully break the supports away from your creation. In places where the supports are inside your creation and are hard to get to, use small needle nose pliers (not supplied) to remove the supports.
-
Page 42: Maintaining Your Cube
MAINTAINING YOUR CUBE Cleaning the Exterior Clean the Cube’s exterior with a lint free cloth and water. Dampen the cloth with water and wipe the outer surfaces of any debris that is visible. Cleaning the Print Pad Rinse pad under tap water and dry using a lint free wipe.
-
Page 43: Cleaning The Touchscreen
8 Amp Fuse Replacement Caution: Before replacing the fuse, switch Cube’s power off and unplug power cord. 8 Amp, 250V fast blow fuse is located on the back left side of your Cube. installed, plug power cord into outlet and switch power on.
-
Page 44: Print Pad Plate Leveling Instructions
PRINT PAD PLATE LEVELING INSTRUCTIONS Your print pad plate may become un-leveled when transporting your Cube, If this occurs, please follow these instructions to level your print pad plate for optimum creation experience. Tools Required: 7-mm Open-end Wrench- Supplied in Cube packaging The print pad plate is mounted on three bolts;…
-
Page 45
Touch the “clockwise” and “counter-clockwise” buttons to automatically move the print jet around the four corners of the print pad. During each movement along the sides of the print pad, observe any gaps between the pad and the print jet. If there are gaps on one side of print pad and the print jet tip is barely touching the print pad on the other side, the print pad plate is not level. -
Page 46
SIDE TO SIDE If the gap between the print pad and print jet tip is at the right or left side, adjust the plate using the side adjusting screw. EXAMPLE: If the gap appears on the side of print pad, the plate is too low and will need to be moved up. -
Page 47
FRONT TO BACK If the gap between the print pad and print jet tip is at the front or back of plate, adjust the plate using the front adjusting screw. EXAMPLE: If the gap between the print jet tip and the print pad is too low, the plate is too low and will need to be moved up. -
Page 48
RE-SET PRINT JET GAP printed layer sticks properly. When the Cube is operating, the print tip on the print jet and the print pad become hot; avoid touching these areas until they have cooled down. Finger tap “Set Up” on the touchscreen and press “Next” until “Set Gap” appears. -
Page 49
Press the “Z” up key to move the print pad upward to the print tip until the paper is tight between the print pad and the print tip. Finger tap the down key until the paper slides back and forth with no resistance. Press the check mark to save setting to printer’s memory. -
Page 50
pn 350341-00, Rev. C…