
2nd Edition (2014)
Download Ebook


The entire Pro Git book, written by Scott Chacon and Ben Straub and published by Apress, is available here. All content is licensed under the Creative Commons Attribution Non Commercial Share Alike 3.0 license. Print versions of the book are available on Amazon.com.
The version found here has been updated with corrections and additions from hundreds of contributors. If you see an error or have a suggestion, patches and issues are welcome in its GitHub repository.
-
1. Введение
-
1.1
О системе контроля версий -
1.2
Краткая история Git -
1.3
Что такое Git? -
1.4
Командная строка -
1.5
Установка Git -
1.6
Первоначальная настройка Git -
1.7
Как получить помощь? -
1.8
Заключение
-
1.1
-
2. Основы Git
-
2.1
Создание Git-репозитория -
2.2
Запись изменений в репозиторий -
2.3
Просмотр истории коммитов -
2.4
Операции отмены -
2.5
Работа с удалёнными репозиториями -
2.6
Работа с тегами -
2.7
Псевдонимы в Git -
2.8
Заключение
-
2.1
-
3. Ветвление в Git
-
3.1
О ветвлении в двух словах -
3.2
Основы ветвления и слияния -
3.3
Управление ветками -
3.4
Работа с ветками -
3.5
Удалённые ветки -
3.6
Перебазирование -
3.7
Заключение
-
3.1
-
4. Git на сервере
-
4.1
Протоколы -
4.2
Установка Git на сервер -
4.3
Генерация открытого SSH ключа -
4.4
Настраиваем сервер -
4.5
Git-демон -
4.6
Умный HTTP -
4.7
GitWeb -
4.8
GitLab -
4.9
Git-хостинг -
4.10
Заключение
-
4.1
-
5. Распределённый Git
-
5.1
Распределённый рабочий процесс -
5.2
Участие в проекте -
5.3
Сопровождение проекта -
5.4
Заключение
-
5.1
-
6. GitHub
-
6.1
Настройка и конфигурация учетной записи -
6.2
Внесение собственного вклада в проекты -
6.3
Сопровождение проекта -
6.4
Управление организацией -
6.5
Создание сценариев GitHub -
6.6
Заключение
-
6.1
-
7. Инструменты Git
-
7.1
Выбор ревизии -
7.2
Интерактивное индексирование -
7.3
Припрятывание и очистка -
7.4
Подпись -
7.5
Поиск -
7.6
Перезапись истории -
7.7
Раскрытие тайн reset -
7.8
Продвинутое слияние -
7.9
Rerere -
7.10
Обнаружение ошибок с помощью Git -
7.11
Подмодули -
7.12
Создание пакетов -
7.13
Замена -
7.14
Хранилище учётных данных -
7.15
Заключение
-
7.1
-
8. Настройка Git
-
8.1
Конфигурация Git -
8.2
Атрибуты Git -
8.3
Хуки в Git -
8.4
Пример принудительной политики Git -
8.5
Заключение
-
8.1
-
9. Git и другие системы контроля версий
-
9.1
Git как клиент -
9.2
Переход на Git -
9.3
Заключение
-
9.1
-
10. Git изнутри
-
10.1
Сантехника и Фарфор -
10.2
Объекты Git -
10.3
Ссылки в Git -
10.4
Pack-файлы -
10.5
Спецификации ссылок -
10.6
Протоколы передачи данных -
10.7
Обслуживание репозитория и восстановление данных -
10.8
Переменные окружения -
10.9
Заключение
-
10.1
-
A1. Приложение A: Git в других окружениях
-
A1.1
Графические интерфейсы -
A1.2
Git в Visual Studio -
A1.3
Git в Visual Studio Code -
A1.4
Git в Eclipse -
A1.5
Git в IntelliJ / PyCharm / WebStorm / PhpStorm / RubyMine -
A1.6
Git в Sublime Text -
A1.7
Git в Bash -
A1.8
Git в Zsh -
A1.9
Git в PowerShell -
A1.10
Заключение
-
A1.1
-
A2. Приложение B: Встраивание Git в ваши приложения
-
A2.1
Git из командной строки -
A2.2
Libgit2 -
A2.3
JGit -
A2.4
go-git -
A2.5
Dulwich
-
A2.1
-
A3. Приложение C: Команды Git
-
A3.1
Настройка и конфигурация -
A3.2
Клонирование и создание репозиториев -
A3.3
Основные команды -
A3.4
Ветвление и слияния -
A3.5
Совместная работа и обновление проектов -
A3.6
Осмотр и сравнение -
A3.7
Отладка -
A3.8
Внесение исправлений -
A3.9
Работа с помощью электронной почты -
A3.10
Внешние системы -
A3.11
Администрирование -
A3.12
Низкоуровневые команды
-
A3.1
![]()
В этой статье помимо архитектуры Git будут рассмотрены принципы работы таких команд, как add, checkout, reset, commit, merge, rebase, cherry-pick, pull, push и tag.
💡 Обо всем по порядку
Вы должны практиковаться параллельно с чтением поста.
Давайте сначала создадим новый проект с именем git-101, а затем инициализируем репозиторий git с помощью команды git init:
        $ mkdir git-101
$ cd git-101
Git CLI предоставляет два типа команд:
- Plumbing – состоит из низкоуровневых команд, используемых Git за кулисами, когда пользователи вводят высокоуровневые команды.
- Porcelain – которые являются высокоуровневыми командами, обычно используемыми пользователями Git.
В этом руководстве мы увидим, как команды plumbing связаны с командами porcelain, которые мы используем изо дня в день.
Внутри проекта, содержащего репозиторий Git, ознакомимся с компонентами Git:
        $ ls -F1 .git/

HEAD
config
description
hooks/
info/
objects/
refs/
Мы остановимся на основных:
- .git/objects/
- .git/refs
- HEAD
Разберем подробно каждый компонент.
💾 База данных объектов
Используя find, инструмент UNIX, мы можем ознакомиться со структурой папки .git/objects:
        $ find .git/objects

.git/objects
.git/objects/pack
.git/objects/info
В Git все хранится в структуре .git/objects, которая представляет собой Git Object Database.
Что мы можем сохранить в Git? Все.
🤔 Подождите!
Как это возможно?
С помощью хэш-функций.
🔵 Спасаемся хэшированием
Хэш-функция преобразует данные произвольного динамического размера в значения фиксированного размера. Делая это, мы можем хранить/сохранять что угодно, потому что конечное значение всегда будет иметь один и тот же размер.
Плохая реализация хэш-функций может легко привести к коллизиям, когда два разных данных динамического размера могут отображаться в один и тот же окончательный хэш фиксированного размера.
SHA-1 – известная реализация хэш-функции, которая в целом безопасна и почти не имеет коллизий.
Возьмем, к примеру, хэширование строки my precious:
        $ echo -e "my precious" | openssl sha1
fa628c8eeaa9527cfb5ac39f43c3760fe4bf8bed
Примечание. Если вы работаете в Linux, вы можете использовать команду sha1sum вместо OpenSSL.
🔵 Сравнение различий в содержании
Хорошее хэширование – это безопасная практика, когда мы не можем знать необработанное значение, т. е. реверс-инжиниринг.
В случае если мы хотим знать, изменилось ли значение, мы просто помещаем значение в хэш-функцию и вуаля – мы можем сравнить разницу:
        $ echo -e "my precious" | openssl sha1
fa628c8eeaa9527cfb5ac39f43c3760fe4bf8bed

$ echo -e "no longer my precious" | openssl sha1
2e71c9ae2ef57194955feeaa99f8543ea4cd9f9f
Если хэши разные, то можно считать, что значение изменилось.
Можете ли вы найти здесь возможность? Как насчет использования SHA-1 для хранения данных и просто отслеживания всего путем сравнения хэшей? Это именно то, что Git делает внутри 🤯.
🔵 Git и SHA-1
Git использует SHA-1 для генерации хэширования всего и сохраняет его в .git/objectsпапке. Просто так!
hash-object, команда plumbing:
        $ echo "my precious" | git hash-object --stdin
8b73d29acc6ae79354c2b87ab791aecccf51701f
Сравним с OpenSSL версией:
        $ echo -e "my precious" | openssl sha1
fa628c8eeaa9527cfb5ac39f43c3760fe4bf8bed
Упс … это совсем другое. Это потому, что Git добавляет определенное слово, за которым следует размер содержимого и разделитель . Это слово Git называет типом объекта.
Да, у объектов Git есть типы. Первый объект, который мы рассмотрим, – это объект blob.
🔵 blob-объект
Когда мы отправляем, например, строку my precious в команду hash-object, Git добавляет паттерн {object_type} {content_size} к функции SHA-1, так что:
blob 12myprecious
Затем:
        $ echo -e "blob 12my precious" | openssl sha1
8b73d29acc6ae79354c2b87ab791aecccf51701f

$ echo "my precious" | git hash-object --stdin
8b73d29acc6ae79354c2b87ab791aecccf51701f
Ура! 🎉
🔵 Хранение blob в базе данных
Но сама команда hash-object не сохраняется в папке .git/objects. Мы должны добавить -w и объект будет сохранен:
        $ echo "my precious" | git hash-object --stdin -w
8b73d29acc6ae79354c2b87ab791aecccf51701f

$ find .git/objects
...
.git/objects/8b
.git/objects/8b/73d29acc6ae79354c2b87ab791aecccf51701f

### Or, simply
$ find .git/objects -type f
.git/objects/8b/73d29acc6ae79354c2b87ab791aecccf51701f

Данное изображение и все последующие взяты отсюда.
🔵 Чтение необработанного содержимого блоба
Мы уже знаем, что по криптографическим соображениям невозможно прочитать необработанное содержимое из его хэшированной версии.
🤔 Хорошо, но подождите.
Как Git узнает исходное значение?
Он использует хэш в качестве ключа, указывающего на значение, которое является оригинальным содержимым, используя алгоритм сжатия под названием Zlib, который сжимает содержимое и сохраняет его в базе данных объектов, тем самым экономя место для хранения.
cat-file, команда plumbing, при наличии ключа распаковывает сжатые данные, таким образом, получая исходное содержимое:
        $ git cat-file -p 8b73d29acc6ae79354c2b87ab791aecccf51701f
my precious
Таким образом, Git – это база данных с ключом и значением!

🔵 Как поделиться blob
Используя Git, мы хотим работать над содержимым и делиться им с другими людьми
Как правило, после работы над различными файлами/блобами мы готовы поделиться ими и подписать свои имена.
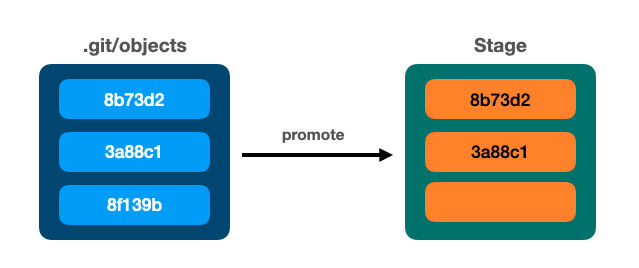
Другими словами, нам нужно сгруппировать, продвигать и добавлять метаданные в наши блобы. Этот процесс работает следующим образом:
- Добавьте большой двоичный объект в промежуточную область
- Сгруппируйте все blob-объекты в рабочей области в древовидную структуру
- Добавьте метаданные в древовидную структуру (имя автора, дата, смысловое сообщение)
Давайте рассмотрим описанные выше шаги подробнее.
🔵 Stage area и index
update-index, команда plumbing, позволяет добавить blob в stage area и дать ему имя:
        $ git update-index
    --add
    --cacheinfo 100644
    8b73d29acc6ae79354c2b87ab791aecccf51701f
    index.txt
--add: добавляет blob в stage, также называемый индексом.--cacheinfo: используется для регистрации файла, которого еще нет в рабочем каталоге- хэш blob
index.txt: имя большого двоичного объекта в индексе.
Где Git хранит индекс?
        $ cat .git/index

DIRCsҚjT¸zQp    index.txtÆ
                          7CJVVÙ
Недоступен для чтения человеком и сжат с использованием Zlib.
Мы можем добавить в индекс столько больших двоичных объектов, сколько захотим, например:
        $ git update-index {sha-1} f1.txt
$ git update-index {sha-1} f2.txt
После добавления blob-объектов в индекс мы можем сгруппировать их в древовидную структуру, чтобы мы могли поделиться ими.
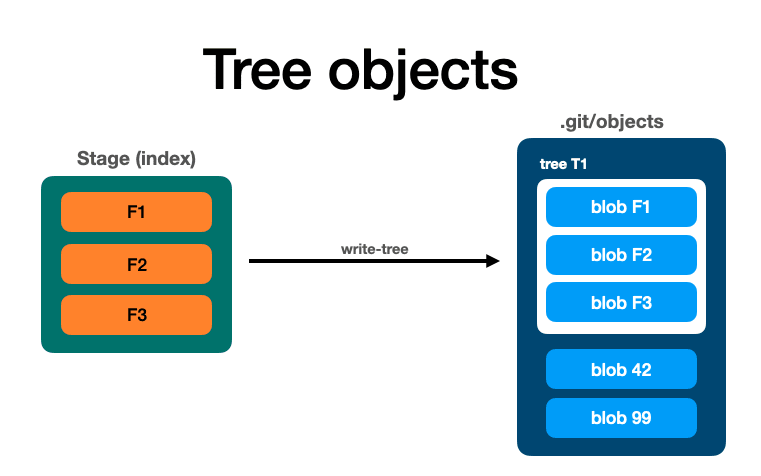
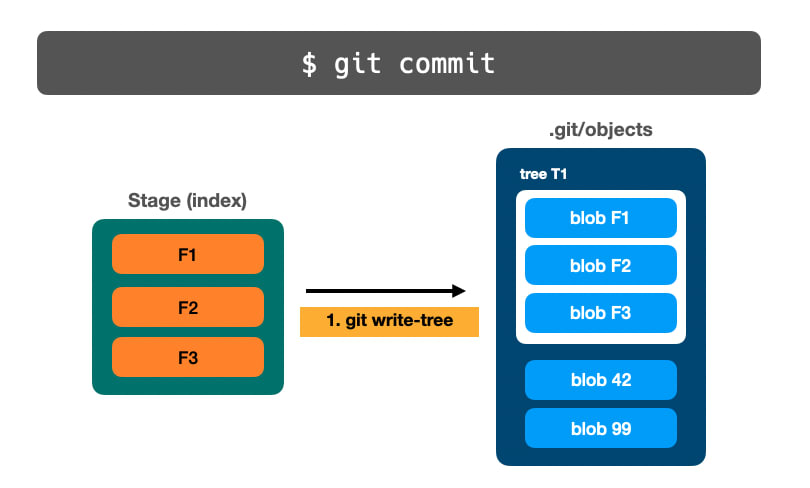
🔵 Объект дерева
Команда write-tree (plumbing) позволяет Git группировать все blob, которые были добавлены в индекс, и создает в папке еще один объект: .git/objects
        $ git write-tree
3725c9e313e5ae764b2451a8f3b1415bf67cf471
Проверяя папку .git/objects, обратите внимание, что был создан новый объект:
        $ find .git/objects

### The new object
.git/objects/37
.git/objects/37/25c9e313e5ae764b2451a8f3b1415bf67cf471

### The blob previously created
.git/objects/8b
.git/objects/8b/73d29acc6ae79354c2b87ab791aecccf51701f
Давайте извлечем исходное значение с помощью cat-file для лучшего понимания:
        ### Using the option -t, we get the object type
$ git cat-file -t 3725c9e313e5ae764b2451a8f3b1415bf67cf471
tree

$ git cat-file -p 3725c9e313e5ae764b2451a8f3b1415bf67cf471
100644 blob 8b73d29acc6ae79354c2b87ab791aecccf51701f index.txt
Это интересный вывод, он сильно отличается от BLOB-объекта, который вернул исходное содержимое.
В дереве объектов Git возвращает все объекты, которые были добавлены в индекс.
100644 blob 8b73d29acc6ae79354c2b87ab791aecccf51701f index.txt
100644: кэш-информацияblob: тип объекта- хэш blob
- имя blob
После завершения работы добавим некоторые метаданные в дерево, чтобы мы могли присвоить имя автора, дату и так далее.
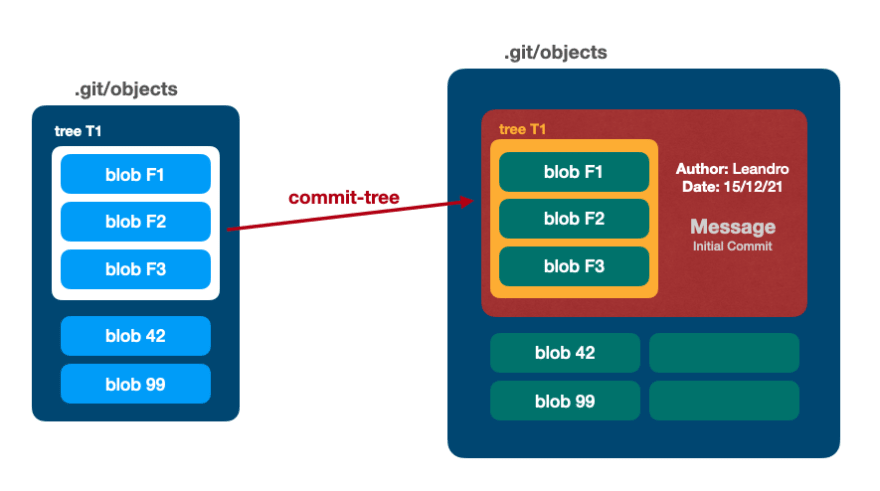
🔵 Объект коммита
commit-tree, команда plumbing, получает дерево, сообщение коммита и создает еще один объект в папке .git/objects:
        $ git commit-tree 3725c -m 'my precious commit'
505555f4f07d90ae14a0f2e67cba7f7b9af539ee
Что это за объект?
        $ find .git/objects
...
.git/objects/50
.git/objects/50/5555f4f07d90ae14a0f2e67cba7f7b9af539ee

### cat-file
$ git cat-file -t 505555f4f07d90ae14a0f2e67cba7f7b9af539ee
commit
А как насчет его стоимости?
        $ git cat-file -p 505555f4f07d90ae14a0f2e67cba7f7b9af539ee

tree 3725c9e313e5ae764b2451a8f3b1415bf67cf471
author leandronsp <leandronsp@example.com> 1678768514 -0300
committer leandronsp <leandronsp@example.com> 1678768514 -0300

my precious commit
- tree
3725c: объект дерева ссылок - автор/коммиттер
- сообщение коммита my precious commit
🤯 ОМГ! Я вижу здесь закономерность?
Кроме того, коммиты могут ссылаться на другие коммиты:
        $ git commit-tree 3725c -p 50555 -m 'second commit'
5ea578a41333bae71527db537072534a199a0b67
-p позволяет ссылаться на родительский коммит:
        $ git cat-file -p 5ea578a41333bae71527db537072534a199a0b67

tree 3725c9e313e5ae764b2451a8f3b1415bf67cf471
parent 505555f4f07d90ae14a0f2e67cba7f7b9af539ee
author leandronsp <leandronsp@gmail.com> 1678768968 -0300
committer leandronsp <leandronsp@gmail.com> 1678768968 -0300

second commit
Мы видим, что, благодаря коммиту с родителем, мы можем рекурсивно пройти все коммиты по всем их деревьям, пока не доберемся до финальных blob-объектов .
Возможное решение:
        $ git cat-file -p <first-commit-sha1>
$ git cat-file -p <first-commit-tree-sha1>
$ git cat-file -p <first-commit-parent-sha1>
$ git cat-file -p <parent-commit-sha1>
...
И так далее. Ну вы попали в точку.
🔵 Логирование для восстановления
git log, команда porcelain, решает эту проблему, просматривая все коммиты, их родителей и деревья, давая нам представление о временной хронологии нашей работы.
        $ git log 5ea57

commit 5ea578a41333bae71527db537072534a199a0b67
Author: leandronsp <leandronsp@gmail.com>
Date:   Mon Mar 13 22:42:48 2023 -0300

    second commit

commit 505555f4f07d90ae14a0f2e67cba7f7b9af539ee
Author: leandronsp <leandronsp@gmail.com>
Date:   Mon Mar 13 22:35:14 2023 -0300

    my precious commit
🤯 ОМГ!
Git – это гигантская, но легкая база данных графа ключ-значение!
🔵 Граф Git
В Git мы можем манипулировать указателями на граф.
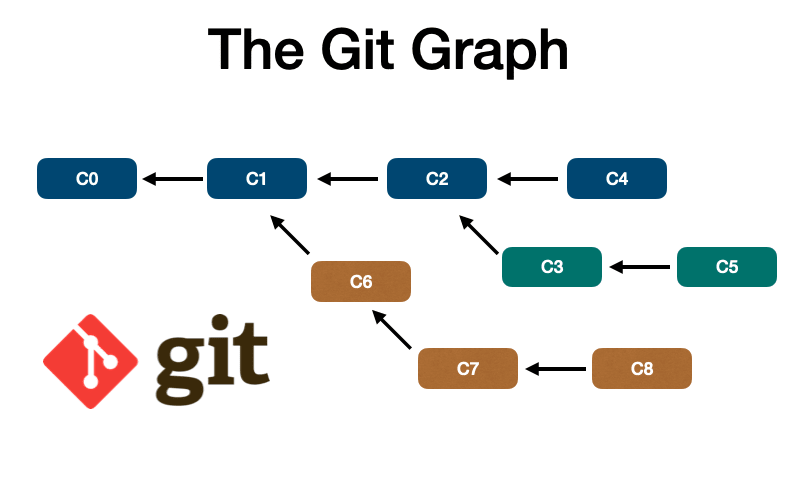
- Blob – это моментальные снимки данных/файлов.
- Деревья представляют собой набор блобов или другое дерево.
- Коммиты ссылаются на деревья и/или другие коммиты, добавляя метаданные
Это очень мило и все такое, но использование sha1 в команде git log может быть громоздким.
Как насчет присвоения имен хэшам? Используйте ссылки.
Ссылки на Git
Ссылки находятся в папке .git/refs:
        $ find .git/refs

.git/refs/
.git/refs/heads
.git/refs/tags
🔵 Дадим имена коммитам
Мы можем связать любой хэш коммита с произвольным именем, расположенным в .git/refs/heads, например:
echo 5ea578a41333bae71527db537072534a199a0b67 > .git/refs/heads/test
Теперь давайте выполним git log, используя новую ссылку:
        $ git log test

commit 5ea578a41333bae71527db537072534a199a0b67
Author: leandronsp <leandronsp@gmail.com>
Date:   Mon Mar 13 22:42:48 2023 -0300

    second commit

commit 505555f4f07d90ae14a0f2e67cba7f7b9af539ee
Author: leandronsp <leandronsp@gmail.com>
Date:   Mon Mar 13 22:35:14 2023 -0300

    my precious commit
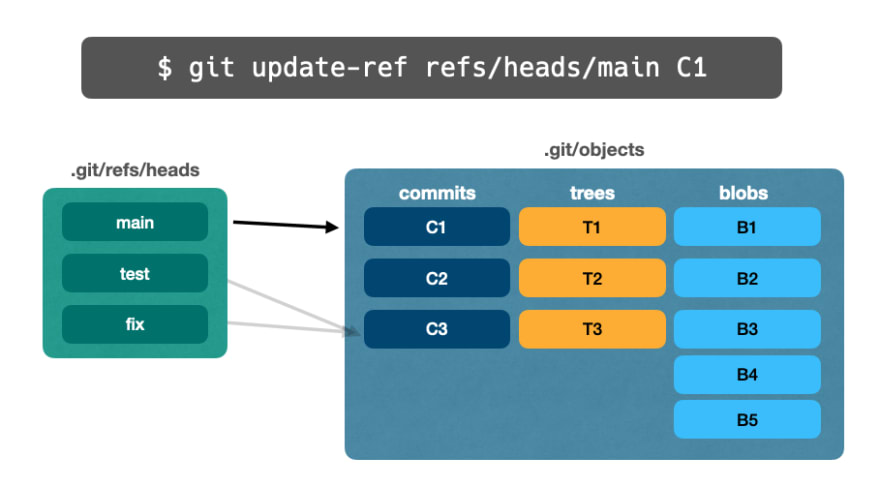
Что еще лучше, Git предоставляет update-ref, команду plumbing, и мы можем использовать ее для обновления связи коммита со ссылкой:
$ git update-ref refs/heads/test 5ea578a41333bae71527db537072534a199a0b67
Звучит знакомо, да? Да, речь идет о ветках.
🔵 Ветки
Ветки – это ссылки, указывающие на конкретный коммит.
Поскольку ветки представляют команду update-ref, хэш коммита может измениться в любое время, то есть ссылка на ветку является изменяемой.
На мгновение давайте подумаем о том, как git log работает без аргументов:
        $ git log

fatal: your current branch 'main' does not have any commits yet
🤔 Хм…
Как Git узнает, что моя текущая ветка является «основной»?
🔵 HEAD
Ссылка на HEAD находится в .git/HEAD. Это один файл, который указывает на главную ссылку (ветвь):
        $ cat .git/HEAD

ref: refs/heads/main
Точно так же, используя команду porcelain:
        $ git branch
* main
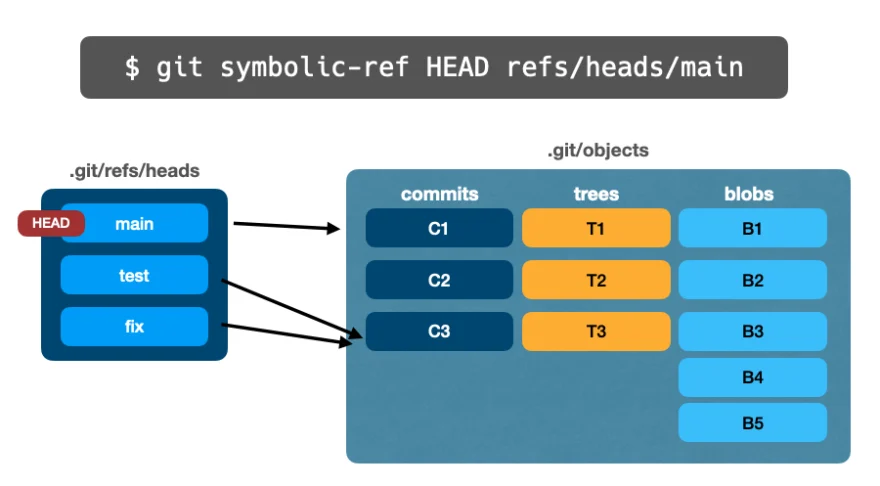
Используя symbolic-ref, команду plumbing, мы можем управлять тем, на какую ветку указывает HEAD:
        $ git symbolic-ref HEAD refs/heads/test

### Check the current branch
$ git branch
* test
Как и update-ref в ветках, мы можем обновить HEAD, используя symbolic-ref в любое время.
На картинке ниже мы изменим HEAD с ветки main на ветку fix:
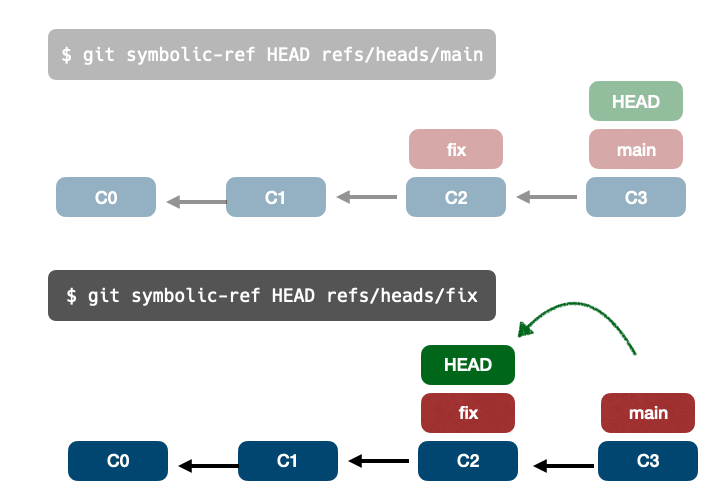
Без аргументов команда git log обходит корневой коммит, на который ссылается текущая ветвь (HEAD):
        $ git log

commit 5ea578a41333bae71527db537072534a199a0b67 (HEAD -> test)
Author: leandronsp <leandronsp@gmail.com>
Date:   Tue Mar 14 01:42:48 2023 -0300

    second commit

commit 505555f4f07d90ae14a0f2e67cba7f7b9af539ee
Author: leandronsp <leandronsp@gmail.com>
Date:   Tue Mar 14 01:35:14 2023 -0300

    my precious commit
До сих пор мы изучали архитектуру и основные компоненты в Git, а также вспомогательные команды, которые являются более низкоуровневыми командами.
Пришло время связать все эти знания с porcelain командами, которые мы используем ежедневно.
🍽️ Porcelain команды
Git предоставляет большое количество команд высокого уровня, которые мы можем использовать без необходимости напрямую манипулировать объектами и ссылками.
Эти команды называются porcelain командами.
🔵 git add
Команда git add принимает файлы в рабочем каталоге в качестве аргументов, сохраняет их как blob-объекты в базе данных и добавляет их в индекс.
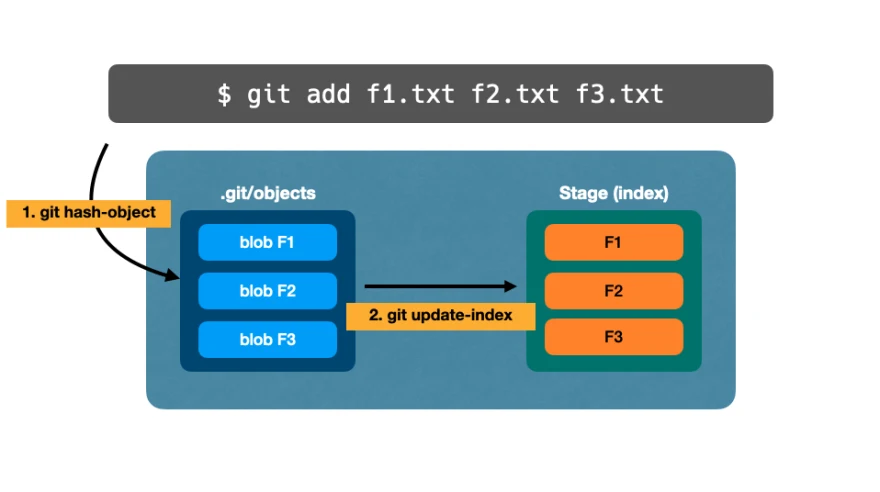
Короче говоря, git add:
- запускает
hash-objectдля каждого аргумента файла - запускает
update-indexдля каждого аргумента файла
🔵 git commit
git commit принимает в качестве аргумента сообщение, группирует все ранее добавленные в индекс файлы и создает объект коммита.
Сначала выполняется write-tree:
Затем выполняется commit-tree:

        $ git commit -m 'another commit'

[test b77b454] another commit
 1 file changed, 1 deletion(-)
 delete mode 100644 index.txt
🕸️ Управление указателями в Git
Широко используются следующие команды porcelain, которые манипулируют ссылками Git под капотом.
Предполагая, что мы только что клонировали проект, в котором HEAD указывает на main ветку, которая указывает на коммит C1:
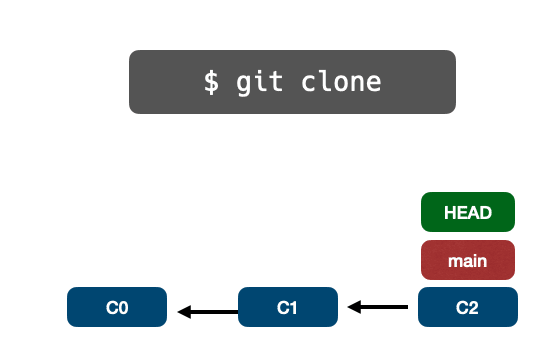
Как мы можем создать еще одну новую ветку из текущей HEAD и переместить HEAD в эту новую ветку?
🔵 git checkout
Используя git checkout с параметром -b, Git создаст новую ветку из текущей (HEAD) и переместит HEAD в эту новую ветку.
        ### HEAD
$ git branch
* main

### Creates a new branch "fix" using the same reference SHA-1
#### of the current HEAD
$ git checkout -b fix
Switched to a new branch 'fix'

### HEAD
$ git branch
* fix
main
Какая plumbing-команда отвечает за перемещение HEAD? Точно, symbolic-ref.

После этого мы делаем новую работу в ветке fix, а затем выполняем git commit, который добавит новый коммит под названием C3:
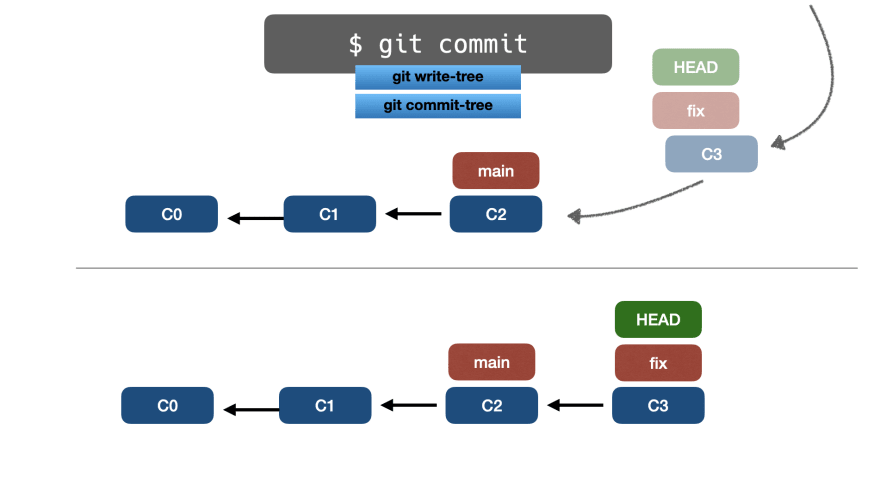
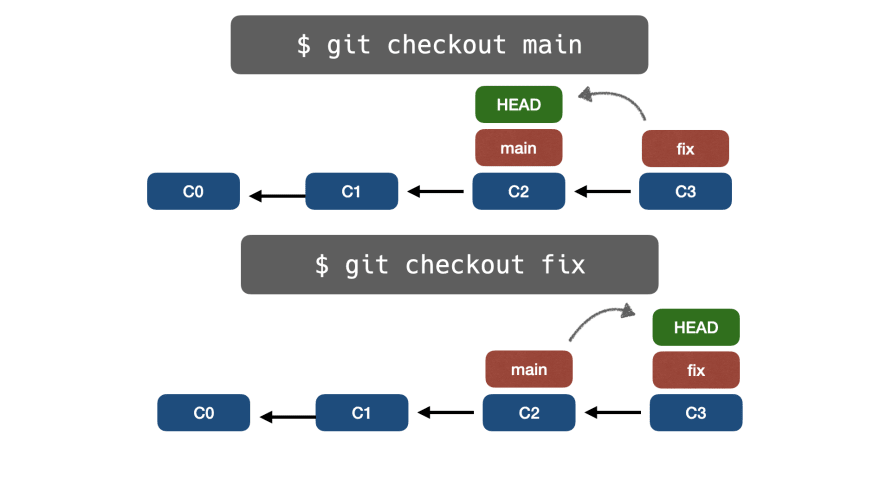
Запустив git checkout, мы можем продолжать переключать HEAD между разными ветвями:
Иногда нам может понадобиться переместить коммит, на который указывает ветка.
Мы уже знаем, что это делает команда plumbing update-ref:
$ git update-ref refs/heads/fix 356c2
🔵 git reset
Команда git reset (porcelain) запускает update-ref внутри, поэтому нам просто нужно выполнить:
$ git reset 356c2
Но как Git узнает, какую ветку нужно переместить? Что ж, git reset перемещает ветку, на которую указывает HEAD.
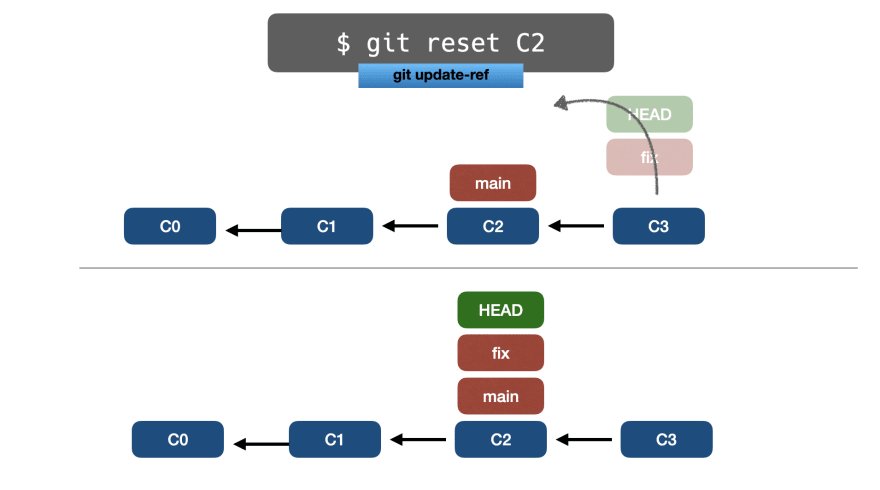
Что делать, если есть различия между ревизиями? Используя reset, Git перемещает указатель, но оставляет все различия в рабочей области (индексе).
$ git reset b77b
Проверка с помощью git status:
        $ git status

On branch fix
Untracked files:
  (use "git add <file>..." to include in what will be committed)
        another.html
        bye.html
        hello.html

nothing added to commit but untracked files present (use "git add" to track)
Коммит ревизии был изменен в ветке fix и все отличия перенесены в index .
Тем не менее, что нам делать, если мы хотим сбросить и отбросить все различия? Просто использовать параметр --hard:
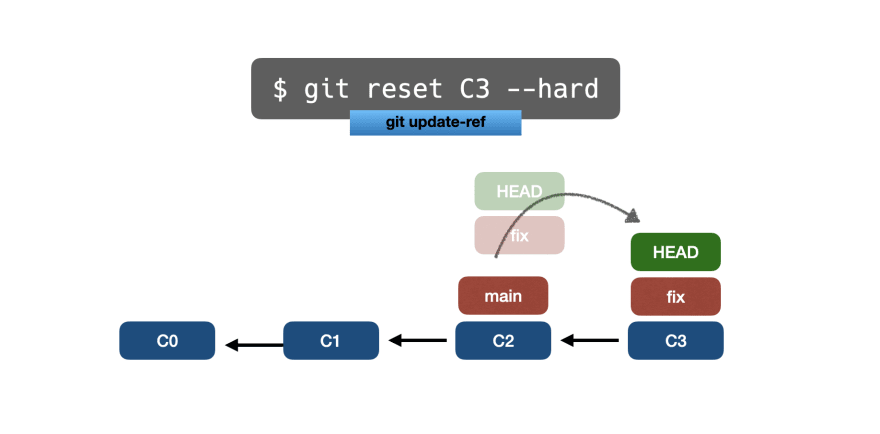
При использовании git reset --hard любые различия между ревизиями будут отброшены, и они не будут отображаться в индексе .
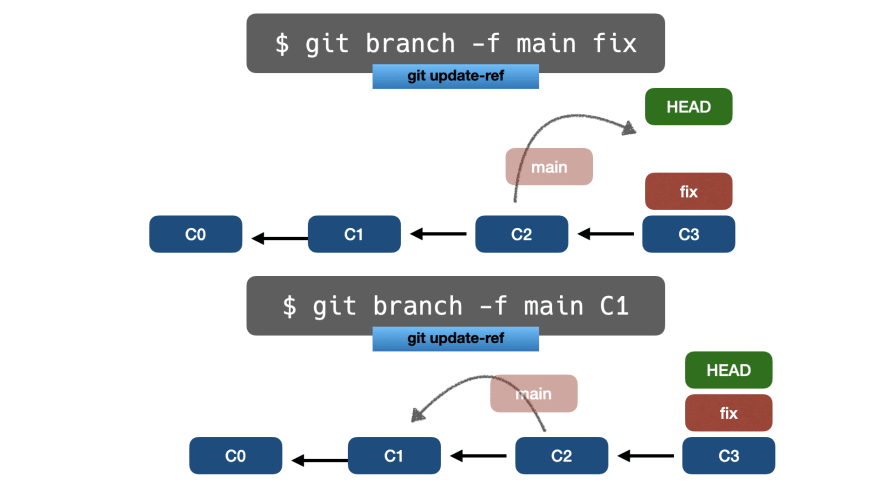
💡 Золотой совет о перемещении ветки
Если мы хотим выполнить подключение update-ref к другой ветке, нет необходимости проверять ветку, как это необходимо в git reset.
Вместо этого мы можем выполнить porcelain-команду git branch -f source target:
$ git branch -f main b77b
Под капотом он выполняет git reset --hard в исходной ветке. Давайте проверим, на какой коммит указывает основная ветка:
        $ git log main --pretty=oneline -n1
b77b454a9a507f839880879a895ac4f241177a28 (main) another commit
Также мы подтверждаем, что ветка fix по-прежнему указывает на коммит 369cd:
        $ git log fix --pretty=oneline -n1
369cd96b1f1ef6fa7de1ff2ed12e15be979dcffa (HEAD -> fix, test) add files
Мы сделали git reset без перемещения HEAD!
Нередко вместо перемещения указателя ветки мы хотим применить конкретный коммит к текущей ветке.
🔵 git cherry-pick
С помощью porcelain-команды git cherry-pick мы можем применить произвольную фиксацию к текущей ветке.
Возьмем следующий сценарий:
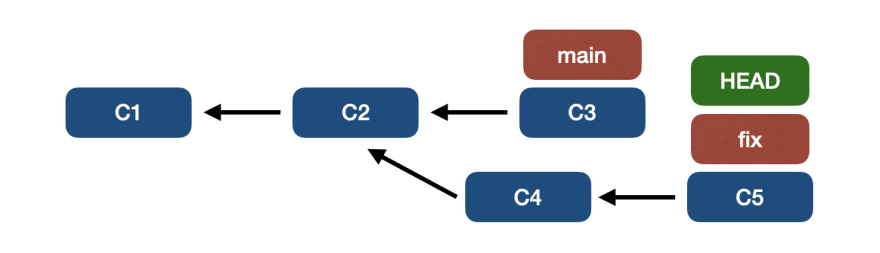
- main-пункты к C3 – C2 – C1
- fix для точек на C5 – C4 – C2 – C1
- HEAD указывает на fix
В ветке исправления отсутствует фиксация C3, на которую ссылается основная ветка.
Для этого запустим git cherry-pick C3:
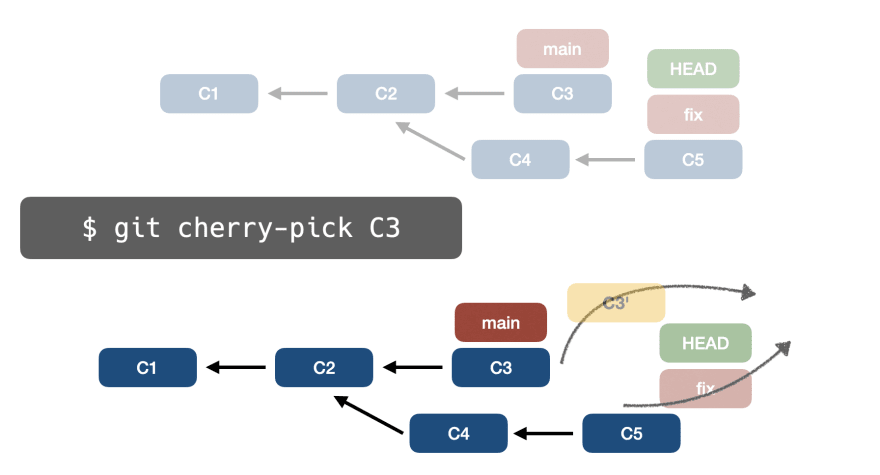
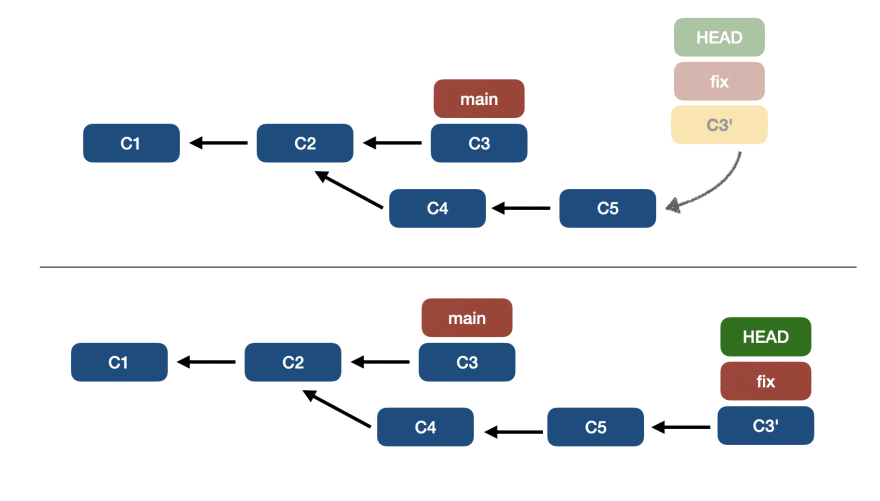
Обратите внимание, что:
- коммит
C3будет клонирован в новый коммит с именемC3 - этот новый коммит будет ссылаться на коммит
C5 - fix переместит указатель на C3′
HEADпродолжает указывать на исправление
После применения изменений график будет представлен следующим образом:
Однако есть еще один способ переместить указатель ветки. Он заключается в использовании произвольного коммита другой ветки, и при необходимости выполняется слияние различий.
Вы не ошиблись, здесь мы говорим о git merge.
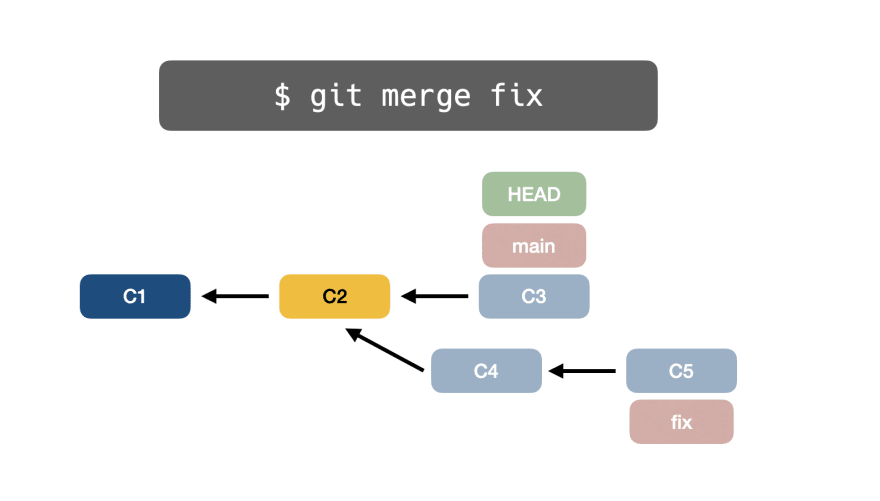
🔵 git merge
Опишем следующий сценарий:
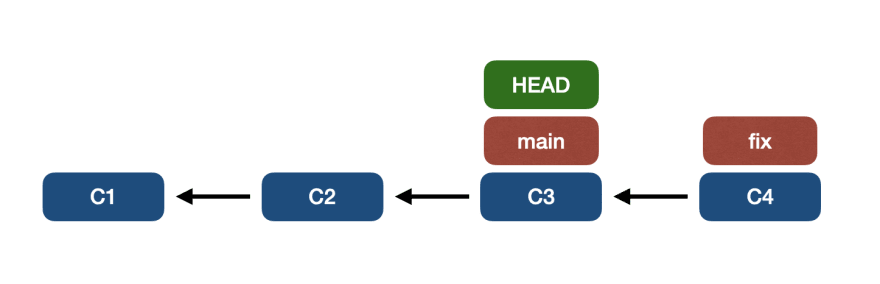
- Main-пункты к C3 – C2 – C1
- Fix точек на C4 – C3 – C2 – C1
HEADуказывает наmain
Мы хотим применить исправленную ветку к текущей (основной) ветке, т. е. выполнить git merge fix.
Обратите внимание, что ветка fix содержит все коммиты, принадлежащие основной ветке (C3 – C2 – C1), имея только один коммит перед основным (C4).
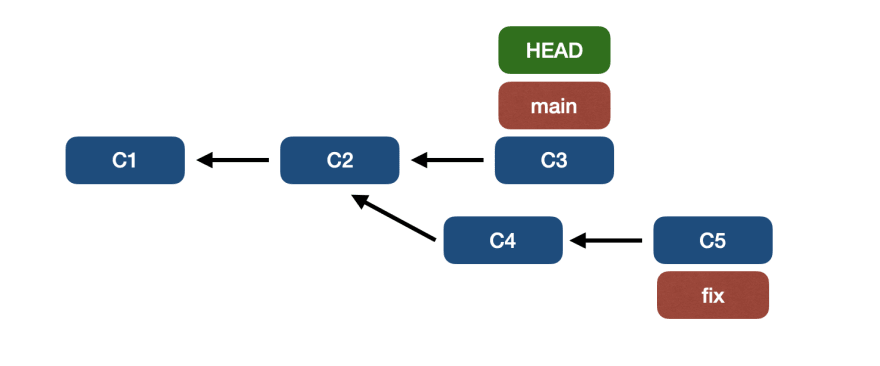
В этом случае основная ветвь будет «переадресована», указывая на тот же коммит, что и ветка исправления.
Такое слияние называется fast-forward, как показано на изображении ниже:

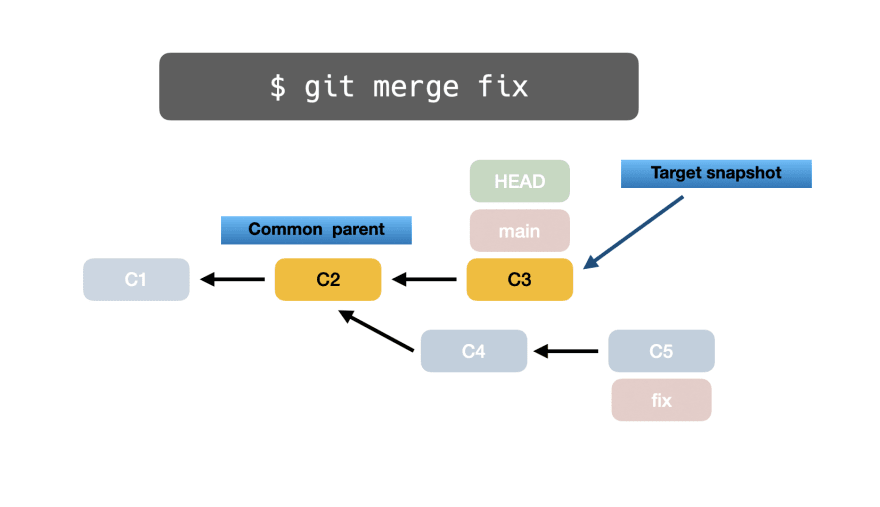
Когда fast-forward невозможен
Иногда текущее состояние нашей древовидной структуры не позволяет выполнять ускоренную перемотку вперед. Рассмотрим сценарий ниже:
Когда в ветке слияния – ветке исправления в приведенном выше примере – отсутствует одна или несколько коммитов из текущей ветки (основной): коммит C3.
Таким образом, fast-forward невозможен.
Однако, чтобы слияние прошло успешно, Git выполняет технику, называемую Snapshotting, состоящую из следующих шагов.
Во-первых, Git ищет следующего общего родителя двух ветвей, в этом примере коммит C2.
Во-вторых, Git делает снимок целевой ветки фиксации C3:
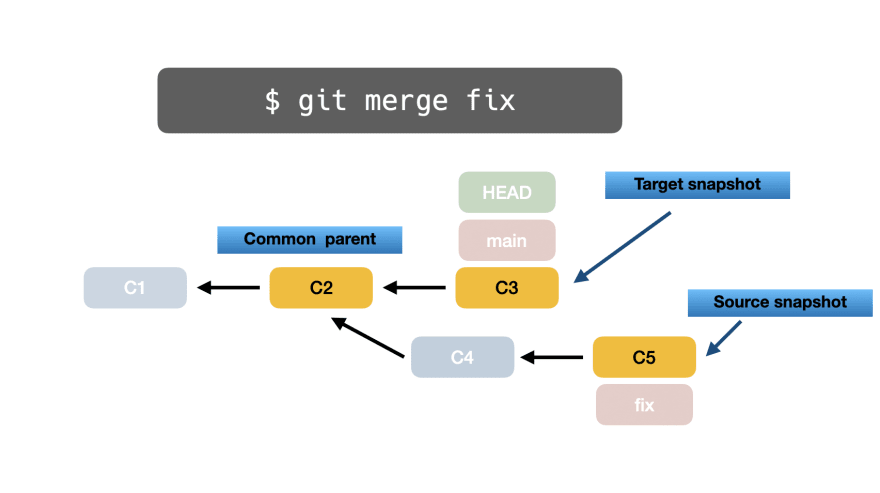
В-третьих, Git делает снимок исходной ветки фиксации C5:
Наконец, Git автоматически создает слияние фиксации (C6) и указывает на двух родителей соответственно: C3 (цель) и C5 (источник):
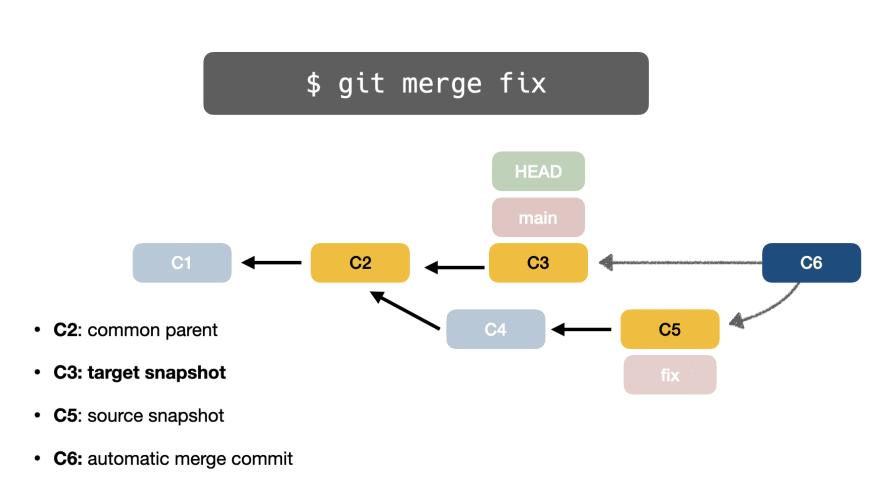
Вы когда-нибудь задумывались, почему в дереве Git отображаются некоторые коммиты, созданные автоматически?
Не заблуждайтесь, этот процесс слияния называется трехсторонним слиянием!

Далее давайте изучим другой метод слияния, при котором fast-forward невозможен, но вместо моментального снимка и автоматического слияния коммита Git применяет различия поверх исходной ветки.
Да, это git rebase.
🔵 git rebase
Рассмотрим следующее изображение:
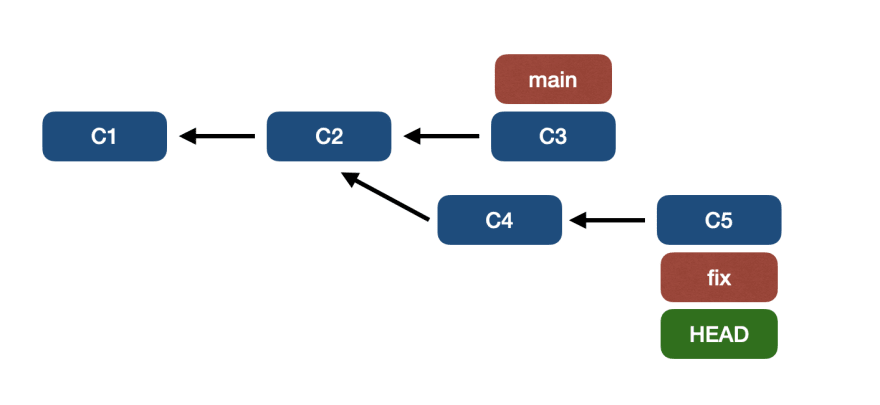
- Main-пункты к
C3 – C2 – C1 - fix точек на
C5 – C4 – C2 – C1 HEADуказывает наfix
Мы хотим перебазировать основную ветку в ветку исправления, посредством git rebase main. Но как работает git rebase?
👉git reset
Сначала Git выполняет git reset main, при этом ветка fix будет указывать на тот же указатель основной ветки: C3 – C2 – C1.
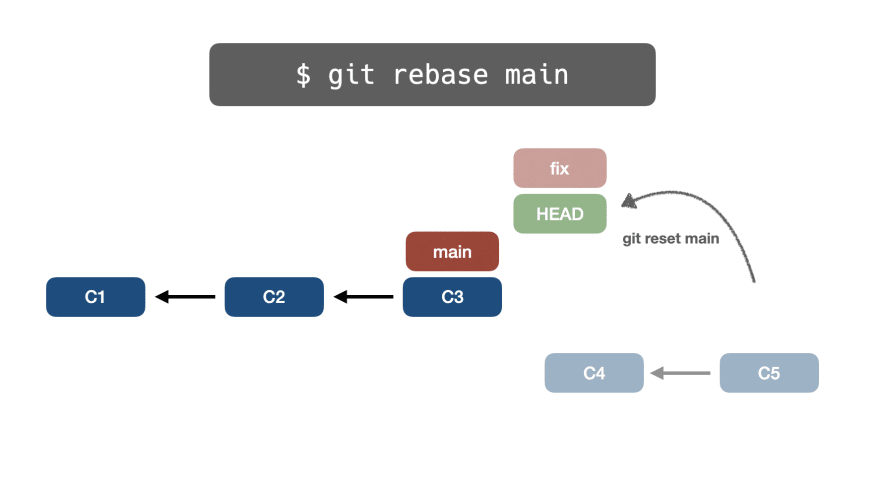
На данный момент у коммитов C5-C4 нет ссылок.
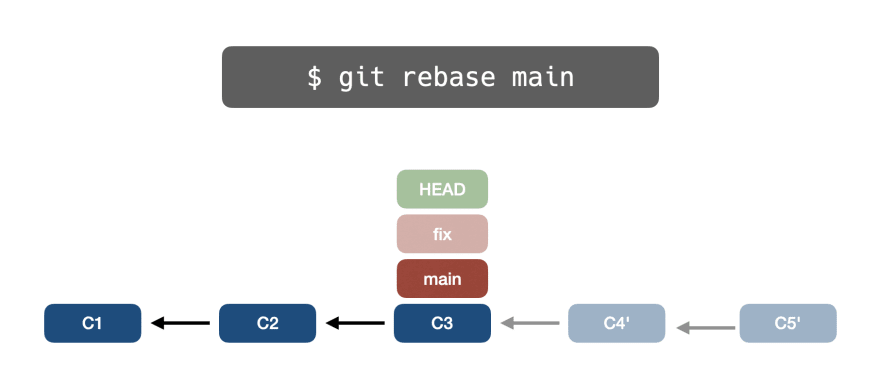
👉git cherry-pick
Во-вторых, Git выполняет git cherry-pick C5 в текущую ветку:

Обратите внимание, что выбранные коммиты клонируются, поэтому окончательный хэш изменится: C5 – C4 станет C5′ – C4′.
После у нас может быть следующий сценарий:
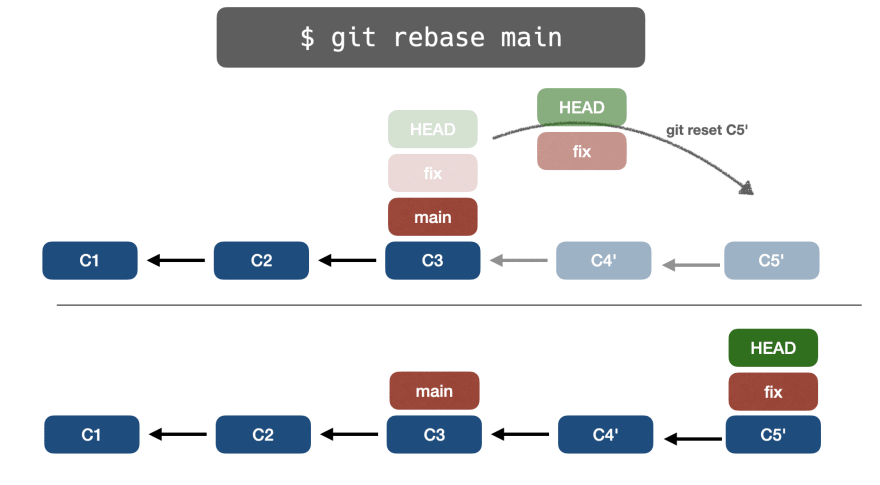
👉git reset еще раз
Наконец, Git выполнит git reset C5', поэтому указатель ветки fix переместится с C3 на C5'.
Процесс rebase завершен.
До сих пор мы работали с локальными ветками, т.е. хранящимися на нашем устройстве. Пришло время научиться работать с удаленными ветками, которые синхронизированы с удаленными репозиториями в интернете.
🌐 Удаленные ветки
Чтобы работать с удаленными ветками, нам нужно добавить удаленную ветку в наш локальный репозиторий с помощью команды porcelain – git remote.
$ git remote add origin git@github.com/myaccount/myrepo.git
Удаленные репозитории находятся в папке .git/refs/remotes:
        $ find .git/refs
...
.git/refs/remotes/origin
.git/refs/remotes/origin/main
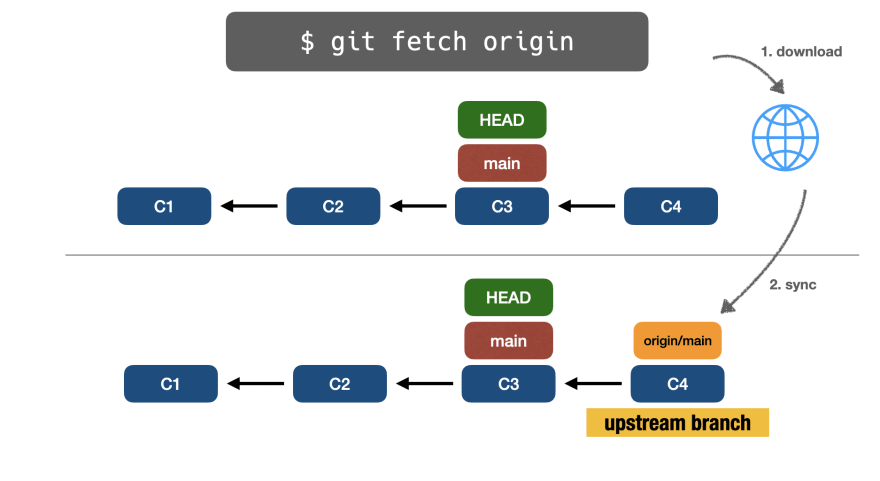
🔵 Скачать с удаленного репозитория
Как нам синхронизировать удаленную ветку с нашей локальной веткой?
Git предлагает два шага:
👉git fetch
С помощью git fetch origin main Git загрузит удаленную ветку и синхронизирует ее с новой локальной веткой с именем origin/main, также известной как upstream branch (восходящая ветка).
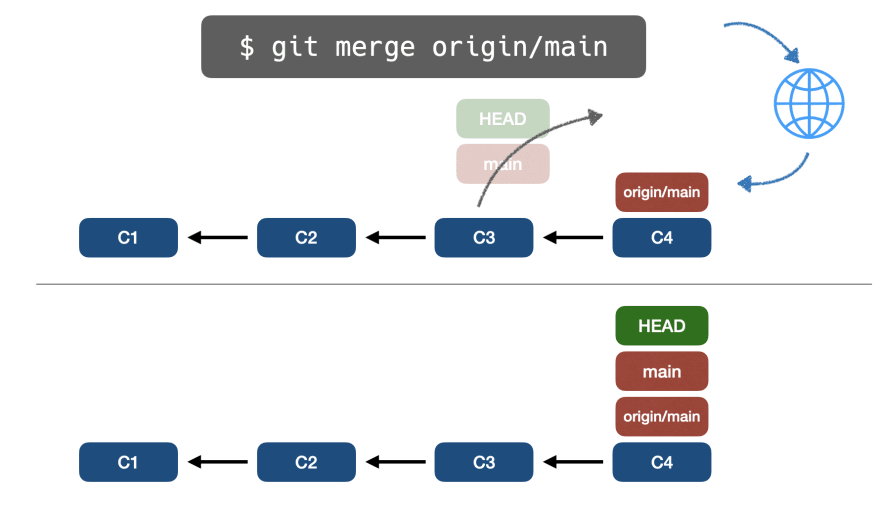
👉git merge
После извлечения и синхронизации вышестоящей ветки мы можем выполнить git merge origin/main и, поскольку восходящая ветка опережает нашу локальную ветку, Git безопасно применит ускоренное слияние.
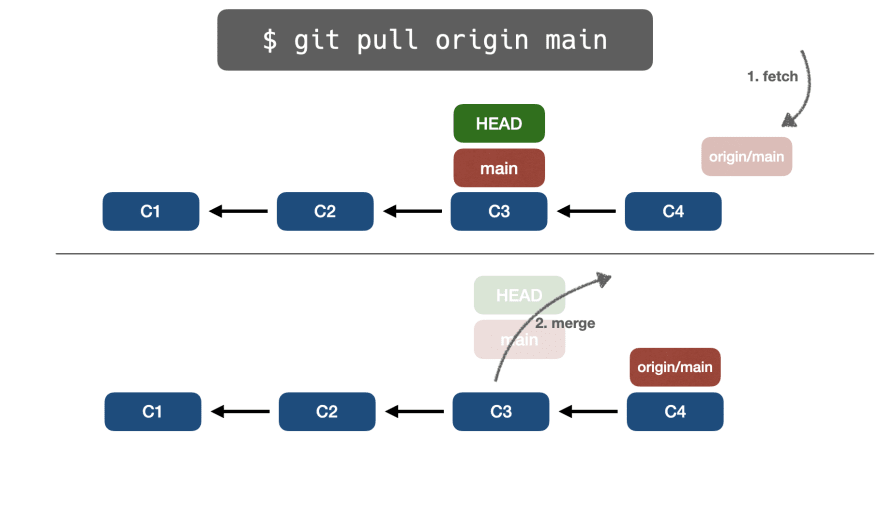
Однако комбинация fetch + merge может повториться, так как мы будем синхронизировать локальные/удаленные ветки несколько раз в день.
Но сегодня наш счастливый день, и Git предоставляет команду git pullchina, которая выполняет fetch + merge от нашего имени.
👉git pull
git pull выполнит выборку (синхронизирует удаленную ветвь с вышестоящей ветвью), а затем объединит восходящую ветвь с локальной ветвью.
Итак, мы увидели, как получать/загружать изменения с репозитория. С другой стороны, как насчет отправки локальных изменений на удаленные?
🔵 Загрузить на удаленный репозиторий
Git предоставляет porcelain команду под названием git push:
👉git push
Выполнение git push origin main приведет к загрузке изменения на удаленный репозиторий:
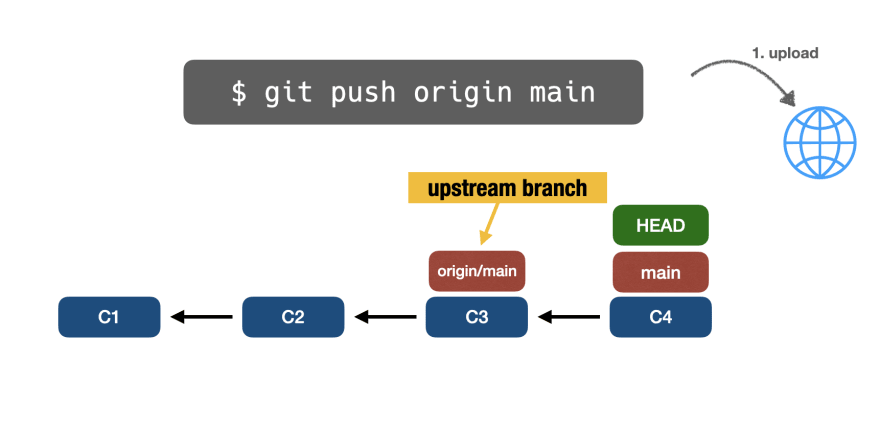
Затем Git объединит восходящую ветвь origin/main с локальной main-веткой:
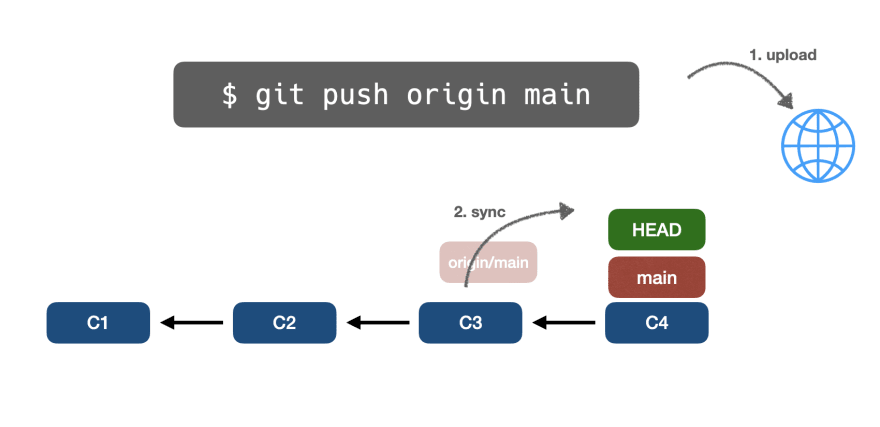
В конце мы получим следующее изображение:
Где:
- Удаленный репозиторий обновлен (локальные изменения отправлены)
- main к C4
- origin/main к C4
- HEAD указывает на main
🔵 Предоставление неизменяемых имен коммитам
Мы знаем, что ветки – это просто изменяемые ссылки на коммиты, поэтому мы можем переместить указатель ветки.
Однако Git также предлагает способ предоставления неизменяемых ссылок, указатели которых не могут быть изменены (если только вы не удалите их и не создадите снова).
Неизменяемые ссылки полезны, например, когда мы хотим пометить/отметить коммиты, которые готовы для какого-то производственного выпуска.
Да, мы говорим о тегах.
👉git tag
Используя команду (porcelain) git tag, мы можем давать имена коммитам, но мы не можем выполнить сброс или любую другую команду, которая изменила бы указатель.
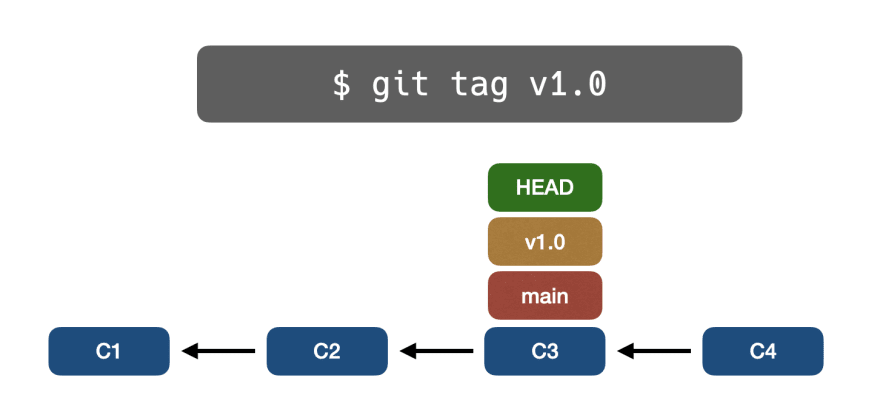
Это очень полезно для управления версиями. Теги находятся в папке .git/refs/tags:
        $ find .git/refs

...
.git/refs/tags
.git/refs/tags/v1.0
Если мы хотим изменить указатель тега, мы должны удалить его и создать еще один с тем же именем.
💡 Git reflog
И последнее, но не менее важное – вызываемая команда git reflog, которая сохраняет все изменения, которые мы сделали, в нашем локальном репозитории.
        $ git reflog

369cd96 (HEAD -> fix, test) HEAD@{0}: reset: moving to main
b77b454 (main) HEAD@{1}: reset: moving to b77b
369cd96 (HEAD -> fix, test) HEAD@{2}: checkout: moving from main to fix
369cd96 (HEAD -> fix, test) HEAD@{3}: checkout: moving from fix to main
369cd96 (HEAD -> fix, test) HEAD@{4}: checkout: moving from main to fix
369cd96 (HEAD -> fix, test) HEAD@{5}: checkout: moving from fix to main
369cd96 (HEAD -> fix, test) HEAD@{6}: checkout: moving from main to fix
369cd96 (HEAD -> fix, test) HEAD@{7}: checkout: moving from test to main
369cd96 (HEAD -> fix, test) HEAD@{8}: checkout: moving from main to test
369cd96 (HEAD -> fix, test) HEAD@{9}: checkout: moving from test to main
369cd96 (HEAD -> fix, test) HEAD@{10}: commit: add files
b77b454 (main) HEAD@{11}: commit: another commit
5ea578a HEAD@{12}:
Это очень полезно, если мы хотим перемещаться вперед и назад по временной шкале Git. Наряду с reset, cherry-pick и подобными, это мощный инструмент, если мы хотим освоить Git.
Подведение итогов
Какое долгое путешествие!
Эта статья была слишком длинной, но я смог изложить основные темы, которые, по моему мнению, важны для понимания Git.
Я надеюсь, что после прочтения этой статьи вы будете более уверенно использовать Git, разрешая ежедневные конфликты и сложные случаи во время процесса слияния/перебазирования.
***
Материалы по теме
- Git за полчаса: руководство для начинающих
- 📁 Настраиваем Git для правильной работы с опенсорс-проектами
- Основы Git: контроль версий для самых маленьких
- 💽 Git для Data Science: контроль версий моделей и датасетов с помощью DVC
- 👍 Как правильно писать сообщения коммитов в GIT, чтобы всем было хорошо
Highlights of the article:
- Introduction to Git
- Git Repository Structure
- Github
- Accessing Github central repository via HTTPS or ssh
- Working with git – Important Git commands
Introduction to Git
For installation purposes on ubuntu, you can refer to this article: How to Install, Configure and Use GIT on Ubuntu?
Git is a distributed version control system. So, What is a Version Control System?
A version Control system is a system that maintains different versions of your project when we work in a team or as an individual. (system managing changes to files) As the project progresses, new features get added to it. So, a version control system maintains all the different versions of your project for you and you can roll back to any version you want without causing any trouble to you for maintaining different versions by giving names to it like MyProject, MyProjectWithFeature1, etc.
Distributed Version control system means every collaborator(any developer working on a team project)has a local repository of the project in his/her local machine unlike central where team members should have an internet connection to every time update their work to the main central repository.
So, by distributed we mean: the project is distributed. A repository is an area that keeps all your project files, images, etc. In terms of Github: different versions of projects correspond to commits.
For more details on introduction to Github, you can refer: Introduction to Github
Git Repository Structure
It consists of 4 parts:
- Working directory: This is your local directory where you make the project (write code) and make changes to it.
- Staging Area (or index): this is an area where you first need to put your project before committing. This is used for code review by other team members.
- Local Repository: this is your local repository where you commit changes to the project before pushing them to the central repository on Github. This is what is provided by the distributed version control system. This corresponds to the .git folder in our directory.
- Central Repository: This is the main project on the central server, a copy of which is with every team member as a local repository.
All the repository structure is internal to Git and is transparent to the developer.
Some commands which relate to repository structure:
// transfers your project from working directory
// to staging area.
git add .

// transfers your project from staging area to
// Local Repository.
git commit -m "your message here"


// transfers project from local to central repository.
// (requires internet)
git push
Github
Github basically is a for-profit company owned by Microsoft, which hosts Git repositories online. It helps users share their git repository online, with other users, or access it remotely. You can also host a public repository for free on Github.
User share their repository online for various reasons including but not limited to project deployment, project sharing, open source contribution, helping out the community and many such.
Accessing Github central repository via HTTPS or SSH
Here, transfer project means transfer changes as git is very lightweight and works on changes in a project. It internally does the transfer by using Lossless Compression Techniques and transferring compressed files. Https is the default way to access Github central repository.
- By git remote add origin http_url: remote means the remote central repository. Origin corresponds to your central repository which you need to define (hereby giving HTTPS URL) in order to push changes to Github.
- Via SSH: connect to Linux or other servers remotely.
If you access Github by ssh you don’t need to type your username and password every time you push changes to GitHub.
Terminal commands:
ssh-keygen -t rsa -b 4096 -C "your_email@example.com"
This does the ssh key generation using RSA cryptographic algorithm.

eval "$(ssh-agent -s)" -> enable information about local login session.

ssh-add ~/.ssh/id_rsa -> add to ssh key.
cat ~/.ssh/id_rsa (use .pub file if not able to connect)
add this ssh key to github.


Now, go to github settings -> new ssh key -> create key

ssh -T git@github.com -> activate ssh key (test connection)

Refresh your github Page.
Working with git – Important Git commands
Git user configuration (First Step)
git --version (to check git version)
git config --global user.name "your name here"
git config --global user.email "your email here"
These are the information attached to commits.
Initialize directory
git init
initializes your directory to work with git and makes a local repository. .git folder is made (OR)
git clone http_url
This is done if we have an existing git repository and we want to copy its content to a new place.
Connecting to the remote repository
git remote add origin http_url/ssh_url
connect to the central repo to push/pull. pull means adopting the changes on the remote repository to your local repository. push merges the changes from your local repository to the remote repository.
git pull origin master
One should always first pull contents from the central repo before pushing so that you are updated with other team members’ work. It helps prevent merge conflicts. Here, master means the master branch (in Git).
Stash Area in git
git stash
Whichever files are present in the staging area, it will move that files to stash before committing it.
git stash pop
Whenever we want files for commit from stash we should use this command.
git stash clear
By doing this, all files from stash area is been deleted.
Steps to add a file to a remote Repository:
First, your file is in your working directory, Move it to the staging area by typing:
git add -A (for all files and folders)
#To add all files only in the current directory
git add .
git status: here, untracked files mean files that you haven’t added to the staging area. Changes are not staged for commit means you have staged the file earlier than you have made changes in that files in your working directory and the changes need to be staged once more. Changes ready to be committed: these are files that have been committed and are ready to be pushed to the central repository.
git status
git commit -a -m "message for commit"
-a: commit all files and for files that have been
     staged earlier need not to be git add once more
-a option does that automatically.
git push origin master -> pushes your files to
                         github master branch
git push origin anyOtherBranch -> pushes any
                      other branch to github.
git log ; to see all your commits
git checkout commitObject(first 8 bits) file.txt->
revert back to this previous commit for file file.txt
Previous commits might be seen through the git log command.
HEAD -> pointer to our latest commit.
Ignoring files while committing
In many cases, the project creates a lot of logs and other irrelevant files which are to be ignored. So to ignore those files, we have to put their names in“.gitignore” file.
touch .gitignore
echo "filename.ext" >>.gitignore
#to ignore all files with .log extension
echo "*.log" > .gitignore
Now the filenames written in the .gitignore file would be ignored while pushing a new commit. To get the changes between commits, commit, and working tree.
git diff
The ‘git diff’ command compares the staging area with the working directory and tells us the changes made. It compares the earlier information as well as the current modified information.
Branching in Git
create branch ->
git branch myBranch
or
git checkout -b myBranch -> make and switch to the
                                  branch myBranch
Do the work in your branch. Then,
git checkout master ; to switch back to master branch
Now, merge contents with your myBranch By:
git merge myBranch (writing in master branch)
This merger makes a new commit.
Another way
git rebase myBranch
This merges the branch with the master in a serial fashion. Now,
git push origin master
To remove or delete a file
To remove. a file from the Git repository we use
git rm “file name”
To remove only from the staging area
git rm –cached “ file name”
Undoing change
To change all the files to as same as the previous commit then use
git checkout -f
Contributing to Open Source
Open Source might be considered as a way where user across the globe may share their opinions, customizations or work together to solve an issue or to complete the desired project together. Many companies host there repositories online on Github to allow access to developers to make changes to their product. Some companies(not necessarily all) rewards their contributors in different ways.
You can contribute to any open source project on Github by forking it, making desired changes to the forked repository, and then opening a pull request. The project owner will review your project and will ask to improve it or will merge it.
Время на прочтение
17 мин
Количество просмотров 125K
Оглавление
Предисловие
1. Настройка git
….1.1 Конфигурационные файлы
….1.2 Настройки по умолчанию
….1.3 Псевдонимы (aliases)
2. Основы git
….2.1 Создание репозитория
….2.2 Состояние файлов
….2.3 Работа с индексом
….2.4 Работа с коммитами
….2.5 Просмотр истории
….2.6 Работа с удалённым репозиторием
3. Ветвление в git
….3.1 Базовые операций
….3.2 Слияние веток
….3.3 Rerere
4. Указатели в git
….4.1 Перемещение указателей
5. Рекомендуемая литература
Предисловие
Git — самая популярная распределённая система контроля версиями.[1][2]
Основное предназначение Git – это сохранение снимков последовательно улучшающихся состояний вашего проекта (Pro git, 2019).
Эта статья для тех, кто имеет по крайней мере базовые знания и навык работы с git и желает расширить свои знания.
Здесь рассматриваются только технические аспекты git’а, для более подробного погружения в философию git’а и его внутреннюю реализацию, советую прочитать несколько полезных книг (см. Рекомендуемая литература).
1. Настройка git
Прежде чем начинать работу с git необходимо его настроить под себя!
1.1 Конфигурационные файлы
- /etc/gitconfig — Общие настройки для всех пользователей и репозиториев
- ~/.gitconfig или ~/.config/git/config — Настройки конкретного пользователя
- .git/config — Настройки для конкретного репозитория
Есть специальная команда
git config [<опции>]которая позволит вам изменить стандартное поведение git, если это необходимо, но вы можете редактировать конфигурационные файлы в ручную (я считаю так быстрее).
В зависимости какой параметр вы передадите команде git config (—system, —global, —local), настройки будут записываются в один из этих файлов. Каждый из этих “уровней” (системный, глобальный, локальный) переопределяет значения предыдущего уровня!
Что бы посмотреть в каком файле, какие настройки установлены используйте git config —list —show-origin.
Игнорирование файлов
В git вы сами решаете какие файлы и в какой коммит попадут, но возможно вы бы хотели, что бы определённые файлы никогда не попали в индекс и в коммит, да и вообще не отображались в списке не отлеживаемых. Для этого вы можете создать специальный файл (.gitignore) в вашем репозитории и записать туда шаблон игнорируемых файлов. Если вы не хотите создавать такой файл в каждом репозитории вы можете определить его глобально с помощью core.excludesfile (см. Полезные настройки). Вы также можете скачать готовый .gitignore file для языка программирования на котором вы работаете.
Для настройки .gitignore используйте регулярные выражения bash.
1.2 Настройки по умолчанию
Есть куча настроек git’а как для сервера так и для клиента, здесь будут рассмотрены только основные настройки клиента.
Используйте
git config name value
где name это название параметра, а value его значение, для того что бы задать настройки.
Пример:
git config --global core.editor nanoустановит редактор по умолчанию nano.
Вы можете посмотреть значение существующего параметра с помощью git config —get [name] где name это параметр, значение которого вы хотите получить.
Полезные настройки:
- user.name — Имя, которое будет использоваться при создании коммита
- user.email — Email, который будет использоваться при создании коммита
- core.excludesfile — Файл, шаблон которого будет использоваться для игнорирования определённых файлов глобально
- core.editor — Редактор по умолчанию
- commit.template — Файл, содержимое которого будет использоваться для сообщения коммита по умолчанию (См. Работа с коммитами).
- help.autocorrect — При установке значения 1, git будет выполнять неправильно написанные команды.
- credential.helper [mode] — Устанавливает режим хранения учётных данных. [cache] — учётные данные сохраняются на определённый период, пароли не сохраняются (—timeout [seconds] количество секунд после которого данные удаляются, по умолчанию 15 мин). [store] — учётные данные сохраняются на неограниченное время в открытом виде (—file [file] указывает путь для хранения данных, по умолчанию ~/.git-credentials).
1.3 Псевдонимы (aliases)
Если вы не хотите печатать каждую команду для Git целиком, вы легко можете настроить псевдонимы. Для создания псевдонима используйте:
git config alias.SHORT_NAME COMMANDгде SHORT_NAME это имя для сокращения, а COMMAND команда(ы) которую нужно сократить. Пример:
git config --global alias.last 'log -1 HEAD'после выполнения этой команды вы можете просматривать информацию о последнем коммите на текущей ветке выполнив git last.
Я советую вам использовать следующие сокращения (вы также можете определить любые свои):
- st = status
- ch = checkout
- br = branch
- mg = merge
- cm = commit
- reb = rebase
- lg = «git log —pretty=format:’%h — %ar: %s’»
Для просмотра настроек конфигурации используйте: git config —list.
2. Основы git
Здесь перечислены только обязательные и полезные (на мой взгляд) параметры, ибо перечисление всех неуместно. Для этого используйте git command -help или —help, где command — название команды справку о который вы хотите получить.
2.1 Создание репозитория
- git init [<опции>] — Создаёт git репозитории и директорию .git в текущей директории (или в директории указанной после —separate-git-dir <каталог-git>, в этом случае директория .git будет находится в другом месте);
- git clone [<опции>] [—] <репозиторий> [<каталог>] [-o, —origin <имя>] [-b, —branch <ветка>] [—single-branch] [—no-tags] [—separate-git-dir <каталог-git>] [-c, —config <ключ=значение>] — Клонирует репозитории с названием origin (или с тем которое вы укажите -o <имя>), находясь на той ветке, на которую указывает HEAD (или на той которую вы укажите -b <ветка>). Также вы можете клонировать только необходимую ветку HEAD (или ту которую укажите в -b <ветка>) указав —single-branch. По умолчанию клонируются все метки, но указав —no-tags вы можете не клонировать их. После выполнения команды создаётся директория .git в текущей директории (или в директории указанной после —separate-git-dir <каталог-git>, в этом случае директория .git будет находится в другом месте);
2.2 Состояние файлов
Для просмотра состояния файлов в вашем репозитории используйте:
git status [<опции>]Эта команда может показать вам: на какой ветке вы сейчас находитесь и состояние всех файлов. Обязательных опций нет, из полезных можно выделить разве что -s которая покажет краткое представление о состояний файлов.
Жизненный цикл файлов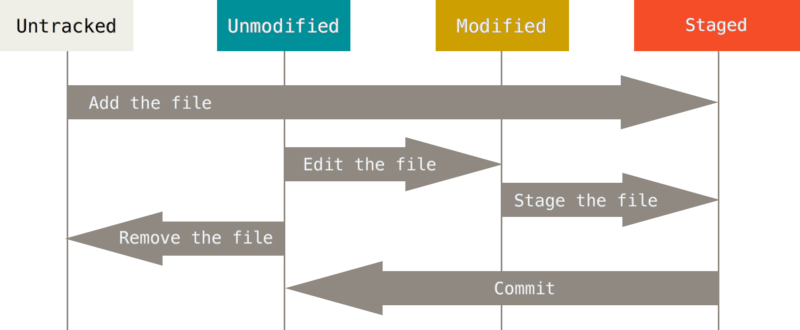
Как видно на картинке файлы могут быть не отслеживаемые (Untracked) и отслеживаемые. Отслеживаемые файлы могут находится в 3 состояниях: Не изменено (Unmodified), изменено (Modified), подготовленное (Staged).
Если вы добавляете (с помощью git add) «Не отслеживаемый» файл, то он переходит в состояние «Подготовлено».
Если вы изменяете файл в состояния «Не изменено», то он переходит в состояние «Изменено». Если вы сохраняете изменённый файл (то есть находящийся в состоянии «Изменено») он переходит в состояние «Подготовлено». Если вы делаете коммит файла (то есть находящийся в состоянии «Подготовлено») он переходит в состояние «Не изменено».
Если версии файла в HEAD и рабочей директории отличаются, то файл будет находится в состояний «Изменено», иначе (если версия в HEAD и в рабочем каталоге одинакова») файл будет находится в состояний «Не изменено».
Если версия файла в HEAD отличается от рабочего каталога, но не отличается от версии в индексе, то файл будет в состоянии «Подготовлено».
Этот цикл можно представить следующим образом:
Unmodified -> Modified -> Staged -> Unmodified
То есть вы изменяете файл сохраняете его в индексе и делаете коммит и потом все сначала.
2.3 Работа с индексом
Надеюсь вы поняли, как выглядит жизненный цикл git репозитория. Теперь разберём как вы можете управлять индексом и файлами в вашем git репозитории.
Индекс — промежуточное место между вашим прошлым коммитом и следующим. Вы можете добавлять или удалять файлы из индекса. Когда вы делаете коммит в него попадают данные из индекса, а не из рабочей области.
Что бы просмотреть индекс, используйте git status.
Что бы добавить файлы в индекс используйте
git add [<опции>]Полезные параметры команды git add:
- -f, —force — добавить также игнорируемые файлы
- -u, —update — обновить отслеживаемые файлы
Что бы удалить файлы из индекса вы можете использовать 2 команды git reset и git restore.
git-restore — восстановит файлы рабочего дерева.
git-reset — сбрасывает текущий HEAD до указанного состояния.
По сути вы можете добиться одного и того же с помощью обеих команд.
Что бы удалить из индекса некоторые файлы используйте:
git restore --staged <file>таким образом вы восстановите ваш индекс (или точнее удалите конкретные файлы из индекса), будто бы git add после последнего коммита не выполнялся для них. С помощью этой команды вы можете восстановить и рабочую директорию, что бы она выглядела так, будто бы после коммита не выполнялось никаких изменений. Вот только эта команда имеет немного странное поведение — если вы добавили в индекс новую версию вашего файла вы не можете изменить вашу рабочую директорию, пока индекс отличается от HEAD. Поэтому вам сначала нужно восстановить ваш индекс и только потом рабочую директорию. К сожалению сделать это одной командой не возможно так как при передаче обеих аргументов (git restore -SW) не происходит ничего. И точно также при передаче -W тоже ничего не произойдет если файл в индексе и HEAD разный. Наверное, это сделали для защиты что бы вы случайно не изменили вашу рабочую директорию. Но в таком случае почему аргумент -W передаётся по умолчанию? В общем мне не понятно зачем было так сделано и для чего вообще была добавлена эта команда. По мне так reset справляется с этой задачей намного лучше, да и еще и имеет более богатый функционал так как может перемещать индекс и рабочую директорию не только на последний коммит но и на любой другой.
Но собственно разработчики рекомендуют для сброса индекса использовать именно git restore -S . Вместо git reset HEAD .
С помощью git status вы можете посмотреть какие файлы изменились но если вы также хотите узнать что именно изменилось в файлах то воспользуйтесь командой:
git diff [<options>]таким образом выполнив команду без аргументов вы можете сравнить ваш индекс с рабочей директорией. Если вы уже добавил в индекс файлы, то используйте git diff —cached что бы посмотреть различия между последним коммитом (или тем который вы укажите) и рабочей директории. Вы также можете посмотреть различия между двумя коммитами или ветками передав их как аргумент. Пример: git diff 00656c 3d5119 покажет различия между коммитом 00656c и 3d5119.
2.4 Работа с коммитами
Теперь, когда ваш индекс находится в нужном состояний, пора сделать коммит ваших изменений. Запомните, что все файлы для которых вы не выполнили git add после момента редактирования — не войдут в этот коммит. На деле файлы в нём будут, но только их старая версия (если таковая имеется).
Для того что бы сделать коммит ваших изменений используйте:
git commit [<опции>]Полезные опции команды git commit:
- -F, —file [file] — Записать сообщение коммита из указанного файла
- —author [author] — Подменить автора коммита
- —date [date] — Подменить дату коммита
- -m, —mesage [message] — Сообщение коммита
- -a, —all — Закоммитеть все изменения в файлах
- -i, —include [files…] — Добавить в индекс указанные файлы для следующего коммита
- -o, —only [files…] — Закоммитеть только указанные файлы
- —amend — Перезаписать предыдущий коммит
Вы можете определить сообщение для коммита по умолчанию с помощью commit.template. Эта директива в конфигурационном файле отвечает за файл содержимое которого будет использоваться для коммита по умолчанию. Пример: git config —global commit.template ~/.gitmessage.txt.
Вы также можете изменить, удалить, объединить любой коммит.
Как вы уже могли заметить вы можете быстро перезаписать последний коммит с помощью git commit —amend.
Для изменения коммитом в вашей истории используйте
git rebase -i <commit>где commit это верхний коммит в вашей цепочке с которого вы бы хотели что либо изменить.
После выполнения git rebase -i в интерактивном меню выберите что вы хотите сделать.
- pick <коммит> = использовать коммит
- reword <коммит> = использовать коммит, но изменить сообщение коммита
- edit <коммит> = использовать коммит, но остановиться для исправления
- squash <коммит> = использовать коммит, но объединить с предыдущим коммитом
- fixup <коммит> = как «squash», но пропустить сообщение коммита
- exec <команда> = выполнить команду (остаток строки) с помощью командной оболочки
- break = остановиться здесь (продолжить с помощью «git rebase —continue»)
- drop <коммит> = удалить коммит
- label <метка> = дать имя текущему HEAD
- reset <метка> = сбросить HEAD к указанной метке
Для изменения сообщения определённого коммита.
Необходимо изменить pick на edit над коммитом который вы хотите изменить.
Пример: вы хотите изменить сообщение коммита 750f5ae.
pick 2748cb4 first commit
edit 750f5ae second commit
pick 716eb99 third commit
После сохранения скрипта вы вернётесь в командную строку и git скажет что необходимо делать дальше:
Остановлено на 750f5ae … second commit
You can amend the commit now, with
git commit —amend
Once you are satisfied with your changes, run
git rebase —continue
Как указанно выше необходимо выполнить git commit —amend для того что бы изменить сообщение коммита. После чего выполнить git rebase —continue. Если вы выбрали несколько коммитов для изменения названия то данные операций необходимо будет проделать над каждым коммитом.
Для удаления коммита
Необходимо удалить строку с коммитом.
Пример: вы хотите удалить коммит 750f5ae
Нужно изменить скрипт с такого:
pick 2748cb4 third commit
pick 750f5ae second commit
pick 716eb99 first commit
на такой:
pick 2748cb4 first commit
pick 716eb99 third commit
Для объединения коммитов
Необходимо изменить pick на squash над коммитами которые вы хотите объединить.
Пример: вы хотите объединить коммиты 750f5ae и 716eb99.
Необходимо изменить скрипт с такого:
pick 2748cb4 third commit
pick 750f5ae second commit
pick 716eb99 first commit
На такой
pick 2748cb4 third commit
squash 750f5ae second commit
squash 716eb99 first commit
Заметьте что в интерактивном скрипте коммиты изображены в обратном порядке нежели в git log. С помощью squash вы объедините коммит 750f5ae с 716eb99, а 750f5ae с 2748cb4. В итоге получая один коммит содержащий изменения всех трёх.
2.5 Просмотр истории
С помощью команды
git log [<опции>] [<диапазон-редакций>]вы можете просматривать историю коммитов вашего репозитория. Есть также куча параметров для сортировки и поиска определённого коммита.
Полезные параметры команды git log:
- -p — Показывает разницу для каждого коммита.
- —stat — Показывает статистику измененных файлов для каждого коммита.
- —graph — Отображает ASCII граф с ветвлениями и историей слияний.
Тагже можно отсортировать коммиты по времени, количеству и тд.
- -(n) Показывает только последние n коммитов.
- —since, —after — Показывает коммиты, сделанные после указанной даты.
- —until, —before — Показывает коммиты, сделанные до указанной даты.
- —author — Показывает только те коммиты, в которых запись author совпадает с указанной строкой.
- —committer — Показывает только те коммиты, в которых запись committer совпадает с указанной строкой.
- —grep — Показывает только коммиты, сообщение которых содержит указанную строку.
- -S — Показывает только коммиты, в которых изменение в коде повлекло за собой добавление или удаление указанной строки.
Вот несколько примеров:
git log —since=3.weeks — Покажет коммиты за последние 2 недели
git log —since=«2019-01-14» — Покажет коммиты сделанные 2019-01-14
git log —since=«2 years 1 day ago» — Покажет коммиты сделанные 2 года и один день назад.
Также вы можете настроить свои формат вывода коммитов с помощью
git log --format:["format"]Варианты форматирования для git log —format.
- %H — Хеш коммита
- %h — Сокращенный хеш коммита
- %T — Хеш дерева
- %t — Сокращенный хеш дерева
- %P — Хеш родителей
- %p — Сокращенный хеш родителей
- %an — Имя автора — %ae — Электронная почта автора
- %ad — Дата автора (формат даты можно задать опцией —date=option)
- %ar — Относительная дата автора
- %cn — Имя коммитера
- %ce — Электронная почта коммитера
- %cd — Дата коммитера
- %cr — Относительная дата коммитера
- %s — Содержание
Пример:
git log --pretty=format:"%h - %ar : %s"покажет список коммитов состоящий из хэша времени и сообщения коммита.
2.6 Работа с удалённым репозиторием
Так как git это распределённая СКВ вы можете работать не только с локальными но и с внешними репозиториеми.
Удалённые репозитории представляют собой версии вашего проекта, сохранённые на внешнем сервере.
Для работы с внешними репозиториями используйте:
git remote [<options>]Если вы с клонировали репозитории через http URL то у вас уже имеется ссылка на внешний. В другом случае вы можете добавить её с помощью
git remote add [<options>] <name> <adres>Вы можете тут же извлечь внешние ветки с помощью -f, —fetch (вы получите имена и состояние веток внешнего репозитория). Вы можете настроить репозитории только на отправку или получение данных с помощью —mirror[=(push|fetch)]. Для получения меток укажите —tags.
Для просмотра подключённых внешних репозиториев используйте git remote без аргументов или git remote -v для просмотра адресов на отправку и получение данных от репозитория.
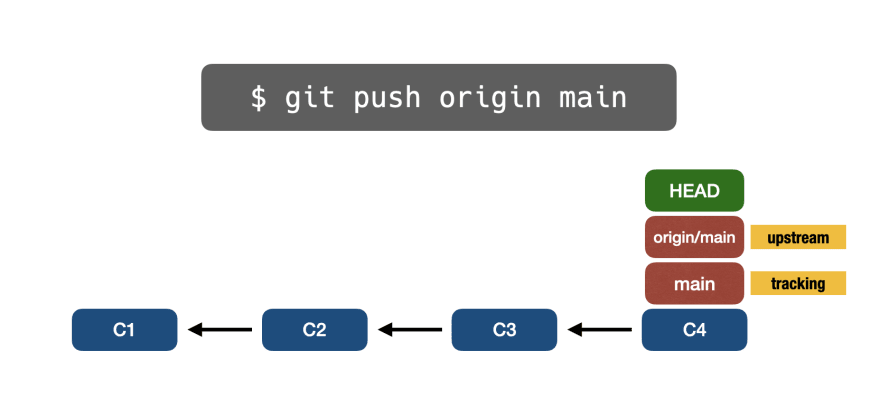
Для отслеживания веток используйте git branch -u <rep/br> где rep это название репозитория, br название внешней ветки, а branch название локальной ветки. Либо git branch —set-upstream local_br origin/br для того что бы указать какая именно локальная ветка будет отслеживать внешнюю ветку.
Когда ваша ветка отслеживает внешнюю вы можете узнать какая ветка (локальная или внешняя) отстаёт или опережает и на сколько коммитов. К примеру если после коммита вы не выполняли git push то ваша ветка будет опережать внешнюю на 1 коммит. Вы можете узнать об этом выполнив git branch -vv, но прежде выполните git fetch [remote-name] (—all для получения обновления со всех репозиториев) что бы получить актуальные данные из внешнего репозитория. Для отмены отслеживания ветки используйте git branch —unset-upstream [<local_branch>].
Для загрузки данных с внешнего репозитория используйте git pull [rep] [branch]. Если ваши ветки отслеживают внешние, то можете не указывать их при выполнение git pull. По умолчанию вы получите данные со всех отслеживаемых веток.
Для загрузки веток на новую ветку используйте git checkout -b <new_branch_name> <rep/branch>.
Для отправки данных на сервер используйте
git push [<rep>] [<br>]где rep это название внешнего репозитория, а br локальная ветка которую вы хотите отправить. Также вы можете использовать такую запись git push origin master:dev. Таким образом вы выгрузите вашу локальную ветку master на origin (но там она будет называется dev). Вы не сможете отправить данные во внешний репозитории если у вас нет на это прав. Также вы не сможете отправить данные на внешнюю ветку если она опережает вашу (в общем то отправить вы можете используя -f, —forse в этом случае вы перепишите историю на внешнем репозитории). Вы можете не указывать название ветки если ваша ветка отслеживает внешнюю.
Для удаления внешних веток используйте
git push origin --delete branch_nameДля получения подробной информации о внешнем репозитории (адреса для отправки и получения, на что указывает HEAD, внешние ветки, локальные ветки настроенные для git pull и локальные ссылки настроенные для git push)
git remote show <remote_name>Для переименования названия внешнего репозитория используйте
git remote rename <last_name> <new_name>Для удаления ссылки на внешний репозитории используйте
git remote rm <name>3. Ветвление в git
Ветвление это мощные инструмент и одна из главных фич git’а поскольку позволяет вам быстро создавать и переключатся между различным ветками вашего репозитория. Главная концепция ветвления состоит в том что вы можете откланяться от основной линии разработки и продолжать работу независимо от нее, не вмешиваясь в основную линию. Ветка всегда указывает на последний коммит в ней, а HEAD указывает на текущую ветку (см. Указатели в git).
3.1 Базовые операций
Для создания ветки используйте
git branch <branch_name> [<start_commit>]Здесь branch_name это название для новой ветки, а start_commit это коммит на который будет указывать ветка (то есть последний коммит в ней). По умолчанию ветка будет находится на последнем коммите родительской ветки.
Опции git branch:
- -r | -a [—merged | —no-merged] — Список отслеживаемых внешних веток -r. Список и отслеживаемых и локальных веток -a. Список слитых веток —merged. Список не слитых веток —no-merged.
- -l, -f <имя-ветки> [<точка-начала>] — Список имён веток -l. Принудительное создание, перемещение или удаление ветки -f. Создание новой ветки <имя ветки>.
- -r (-d | -D) — Выполнить действие на отслеживаемой внешней ветке -r. Удалить слитую ветку -d. Принудительное удаление (даже не слитой ветки) -D.
- -m | -M [<Старая ветка>] <Новая ветка> — Переместить/переименовать ветки и ее журнал ссылок (-m). Переместить/переименовать ветку, даже если целевое имя уже существует -M.
- (-с | -С) [<старая-ветка>] <новая-ветка> — Скопировать ветку и её журнал ссылок -c. Скопировать ветку, даже если целевое имя уже существует -C.
- -v, -vv — Список веток с последним коммитом на ветке -v. Список и состояние отслеживаемых веток с последним коммитом на них.
Больше информации смотрите в git branch -h | —help.
Для переключения на ветку используйте git checkout . Также вы можете создать ветку выполнив git checkout -b <ветка>.
3.2 Слияние веток
Для слияния 2 веток git репозитория используйте git merge .
Полезные параметры для git merge:
- —squash — Создать один коммит вместо выполнения слияния. Если у вас есть конфликт на ветках, то после его устранения у вас на ветке прибавится 2 коммита (коммит с сливаемой ветки + коммит слияния), но указав этот аргумент у вас прибавится только один коммит (коммит слияния).
- —ff-only — Не выполнять слияние если имеется конфликт. Пусть кто ни будь другой разрешает конфликты

- -X [strategy] — Использовать выбранную стратегию слияния.
- —abort — Отменить выполнение слияния.

Процесс слияния.
Если вы не выполняли на родительской ветке новых коммитов то слияние сводится к быстрой перемотке «fast-forward», будто бы вы не создавали новую ветку, а все изменения происходили прям тут (на родительской ветке).
Если вы выполняли коммиты на обеих ветках, но при этом не создали конфликт, то слияния пройдёт в «recursive strategy», то есть вам просто нужно будет создать коммит слияния что бы применить изменения (используйте опцию —squash что бы не создавать лишний коммит).
Если вы выполняли коммиты на обоих ветках, которые внесли разные изменения в одну и ту же часть одного и того же файла, то вам придётся устранить конфликт и зафиксировать слияние коммитом.
При разрешении конфликта вам необходимо выбрать какую часть изменений из двух веток вы хотите оставить. При открытии конфликтующего файла, в нём будет содержатся следующее:
<<<<<<< HEAD
Тут будет версия изменения последнего коммита текущей ветки
======
Тут будет версия изменений последнего коммита сливаемой ветки
>>>>>>> Тут название ветки с которой сливаем
Разрешив конфликт вы должны завершить слияния выполнив коммит.
Во время конфликта вы можете посмотреть какие различия в каких файлах имеются.
git diff —ours — Разница до слияния и после
git diff —theirs — Разница сливаемой ветки до слияния и после
git diff —base — Разница с обеими ветками до слияния и после
Если вы не хотите разрешать слияние то используйте различные стратегии слияния, выбрав либо «нашу» версию (то есть ту которая находится на текущей ветке) либо выбрать «их» версию находящуюся на сливаемой ветке при этом не исправляя конфликт. Выполните git merge —Xours или git merge —Xtheirs соответственно.
3.3 Rerere
Rerere — «reuse recorded resolution” — “повторное использование сохраненных разрешений конфликтов». Механизм rerere способен запомнить каким образом вы разрешали некую часть конфликта в прошлом и провести автоматическое исправление конфликта при возникновении его в следующий раз.
Что бы включить rerere выполните
git config --global rerere.enabled trueТаrже вы можите включить rerere создав каталог .git/rr-cache в нужном репозитории.
Используйте git rerere status для того что бы посмотреть для каких файлов rerere сохранил снимки состояния до начала слияния.
Используйте git rerere diff для просмотра текущего состояния конфликта.
Если во время слияния написано: Resolved ‘nameFile’ using previous resolution. Значит rerere уже устранил конфликт используя кэш.
Для отмены автоматического устранения конфликта используйте git checkout —conflict=merge таким образом вы отмените авто устранение конфликта и вернёте файл(ы) в состояние конфликта для ручного устранения.
4. Указатели в git
в git есть такие указатели как HEAD branch. По сути всё очень просто HEAD указывает на текущую ветку, а ветка указывает на последний коммит в ней. Но для понимания лучше представлять что HEAD указывает на последний коммит.
4.1 Перемещение указателей
В книге Pro git приводится очень хороший пример того как вы можете управлять вашим репозиторием поэтому я тоже буду придерживается его. Представите что Git управляет содержимым трех различных деревьев. Здесь под “деревом” понимается “набор файлов”.
В своих обычных операциях Git управляет тремя деревьями:
- HEAD — Снимок последнего коммита, родитель следующего
- Индекс — Снимок следующего намеченного коммита
- Рабочий Каталог — Песочница
Собственно git предоставляет инструменты для манипулировании всеми тремя деревьями. Далее будет рассмотрена команда git reset, позволяющая работать с тремя деревьями вашего репозитория.
Используя различные опций этой команды вы можете:
- —soft — Cбросить только HEAD
- —mixed — Cбросить HEAD и индекс
- —hard — Cбросить HEAD, индекс и рабочий каталог
Под сбросить понимается переместить на указанный коммит. По умолчанию выполняется —mixed.
Примеру 1. Вы сделали 3 лишних коммита каждый из которых приносит маленькие изменения и вы хотите сделать из них один, таким образом вы можете с помощью git reset —soft переместить указатель HEAD при этом оставив индекс и рабочий каталог нетронутым и сделать коммит. В итоге в вашей истории будет выглядеть так, что все изменения произошли в одном коммите.
Пример 2. Вы добавили в индекс лишние файлы и хотите их от туда убрать. Для этого вы можете использовать git reset HEAD <files…>. Или вы хотите что бы в коммите файлы выглядели как пару коммитов назад. Как я уже говорил ранее вы можете сбросить индекс на любой коммит в отличий от git restore который сбрасывает только до последнего коммита. Только с опцией mixed вы можете применить действие к указанному файлу!
Пример 3. Вы начали работать над новой фичей на вашем проекте, но вдруг работодатель говорит что она более не нужна и вы в порыве злости выполняете git reset —hard возвращая ваш индекс, файлы и HEAD к тому моменту когда вы ещё не начали работать над фичей. А на следующей день вам говорят, что фичу всё таки стоит запилить. Но что же делать? Как же переместится вперёд ведь вы откатили все 3 дерева и теперь в истории с помощью git log их не найти. А выход есть — это журнал ссылок git reflog. С помощью этой команды вы можете посмотреть куда указывал HEAD и переместится не только вниз по истории коммитов но и вверх. Этот журнал является локальным для каждого пользователя.
В общем думаю вы сможете придумать намного больше примеров чем я. В заключение скажу, что с помощью git reset можно творить магию…
5. Рекомендуемая литература
- Pro git — Scott Chacon
- Git для профессионального программиста — С. Чакон, Б, Штрауб
- Git Essentials — F. Santacroce
- Git: Version Control for Everyone (2013) — R. Somasundaram
- Version Control with Git: Powerful tools and techniques for collaborative software development (2009) — J. Loeliger, M. McCullough
- Practical Git and GitHub (2016) — D. Cruz
- Git in Practice (2016) — M. McQuaid
- Git Best Practices Guide (2014) — E. Pidoux
- Learn Enough Git to Be Dangerous (2016) — M. Hartl
- Learn Version Control with Git: A step-by-step course for the complete beginner (2014) — T. Günther
- Git: Learn Version Control with Git: A step-by-step Ultimate beginners Guide (2017) — D. Hutten
- Pragmatic Guide to Git (2010) — S. Travis
- Волшебство Git (2016) — Б. Лин
- A Hacker’s Guide to Git (2014) — J. Wynn
- Practical Git and GitHub (2016) — D. Cruz
- Deploying to OpenShift(2018) — G. Dumpleton
- Git for Teams (2015) — Emma Jane Hogbin Westby

Git Guide
Everything you need to know about Git, from getting started to advanced commands and workflows.
What is Git?
Git is distributed version control software. Version control is a way to save changes over time without overwriting previous versions. Being distributed means that every developer working with a Git repository has a copy of that entire repository — every commit, every branch, every file. If you’re used to working with centralized version control systems, this is a big difference!
Whether or not you’ve worked with version control before, there are a few things you should know before getting started with Git:
- Branches are lightweight and cheap, so it’s OK to have many of them
- Git stores changes in SHA hashes, which work by compressing text files. That makes Git a very good version control system (VCS) for software programming, but not so good for binary files like images or videos.
- Git repositories can be connected, so you can work on one locally on your own machine, and connect it to a shared repository. This way, you can push and pull changes to a repository and easily collaborate with others.
Why Use Git?
Version control is very important — without it, you risk losing your work. With Git, you can make a «commit», or a save point, as often as you’d like. You can also go back to previous commits. This takes the pressure off of you while you’re working. Commit often and commit early, and you’ll never have that gut sinking feeling of overwriting or losing changes.
There are many version control systems out there — but Git has some major advantages.
Speed
Like we mentioned above, Git uses SHA compression, which makes it very fast.
Merge conflicts
Git can handle merge conflicts, which mean that it’s OK for multiple people to work on the same file at the same time. This opens up the world of development in a way that isn’t possible with centralized version control. You have access to the entire project, and if you’re working on a branch, you can do whatever you need to and know that your changes are safe.
Cheap branches
Speaking of branches, Git offers a lot of flexibility and opportunity for collaboration with branches. By using branches, developers can make changes in a safe sandbox.
Instead of only committing code that is 100% sure to succeed, developers can commit code that might still need help. Then, they can push that code to the remote and get fast feedback from integrated tests or peer review.
Without sharing the code through branches, this would never be possible.
Ease of roll back
If you make a mistake, it’s OK! Commits are immutable, meaning they can’t be changed. (Note: You can change history, but it will create new replacement commits instead of editing the existing commits. More on that later!) This means that if you do make a mistake, even on an important branch like main, it’s OK. You can easily revert that change, or roll back the branch pointer to the commit where everything was fine.
The benefits of this can’t be overstated. Not only does it create a safer environment for the project and code, but it fosters a development environment where developers can be braver, trusting that Git has their back.
Getting Started With Git
Depending on your operating system, you may already have Git installed. But, getting started means more than having the software! To get started, it’s important to know the basics of how Git works. You may choose to do the actual work within a terminal, an app like GitHub Desktop, or through GitHub.com. (Note: while you can interact with Git through GitHub.com, your experience may be limited. Many local tools can give you access to the most widely used Git functionalities, though only the terminal will give you access to them all.)
There are many ways to use Git, which doesn’t necessarily make it easier! But, the fundamental Git workflow has a few main steps. You can practice all of these in the Introduction to GitHub course.
Create a branch
The main branch is usually called main. We want to work on another branch, so we can make a pull request and make changes safely. To get started, create a branch off of main. Name it however you’d like — but we recommend naming branches based on the function or feature that will be the focus of this branch. One person may have several branches, and one branch may have several people collaborate on it — branches are for a purpose, not a person. Wherever you currently «are» (wherever HEAD is pointing, or whatever branch you’re currently «checked out» to) will be the parent of the branch you create. That means you can create branches from other branches, tags, or any commit! But, the most typical workflow is to create a branch from main — which represents the most current production code.
Make change (and make a commit)
Once you’ve created a branch, and moved the HEAD pointer to it by «checking out» to that branch, you’re ready to get to work. Make the changes in your repository using your favorite text editor or IDE.
Next, save your changes. You’re ready to start the commit!
To start your commit, you need to let Git know what changes you’d like to include with git add [file].
Once you’ve saved and staged the changes, you’re ready to make the commit with git commit -m "descriptive commit message".
Push your changes to the remote
So far, if you’ve made a commit locally, you’re the only one that can see it. To let others see your work and begin collaboration, you should «push» your changes using git push. If you’re pushing from a branch for the first time that you’ve created locally, you may need to give Git some more information. git push -u origin [branch-name] tells Git to push the current branch, and create a branch on the remote that matches it with the same name — and also, create a relationship with that branch, so that git push will be enough information in the future.
By default, git push only pushes the branch that you’re currently checked out to.
Sometimes, if there has been a new commit on the branch on the remote, you may be blocked from pushing. Don’t worry! Start with a simple git pull to incorporate the changes on the remote into your own local branch, resolve any conflicts or finish the merge from the remote into the local branch, and then try the push again.
Open a pull request
Pushing a branch, or new commits, to a remote repository is enough if a pull request already exists, but if it’s the first time you’re pushing that branch, you should open a new pull request. A pull request is a comparison of two branches — typically main, or the branch that the feature branch was created from, and the feature branch. This way, like branches, pull requests are scoped around a specific function or addition of work, rather than the person making the changes or amount of time the changes will take.
Pull requests are the powerhouse of GitHub. Integrated tests can automatically run on pull requests, giving you immediate feedback on your code. Peers can give detailed code reviews, letting you know if there are changes to make, or if it’s ready to go.
Make sure you start your pull requests off with the right information. Put yourself in the shoes of your teammates, or even of your future self. Include information about what this change relates to, what prompted it, what is already done, what is left to do, and any specific asks for help or reviews. Include links to relevant work or conversations. Pull request templates can help make this process easy by automating the starting content of the body of pull requests.
Collaborate (get feedback from tests or peers, make more commits locally and then push them up and get more feedback)
Once the pull request is open, then the real fun starts. It’s important to recognize that pull requests aren’t meant to be open when work is finished. Pull requests should be open when work is beginning! The earlier you open a pull request, the more visibility the entire team has to the work that you’re doing. When you’re ready for feedback, you can get it by integrating tests or requesting reviews from teammates.
It’s very likely that you will want to make more changes to your work. That’s great! To do that, make more commits on the same branch. Once the new commits are present on the remote, the pull request will update and show the most recent version of your work.
Merge into main
Once you and your team decide that the pull request looks good, you can merge it. By merging, you integrate the feature branch into the other branch (most typically the main branch). Then, main will be updated with your changes, and your pull request will be closed. Don’t forget to delete your branch! You won’t need it anymore. Remember, branches are lightweight and cheap, and you should create a new one when you need it based on the most recent commit on the main branch.
If you choose not to merge the pull request, you can also close pull requests with unmerged changes.
How to Use Git
Learning & Mastering Git Commands
If you’re getting started with Git, a great place to start is the Git Cheat sheet. It’s translated into many languages, open source as a part of the github/training-kit repository, and a great starting place for the fundamentals on the command line.
Some of the most important and most used commands that you’ll find there are:
git clone [url]: Clone (download) a repository that already exists on GitHub, including all of the files, branches, and commits.git status: Always a good idea, this command shows you what branch you’re on, what files are in the working or staging directory, and any other important information.git branch: This shows the existing branches in your local repository. You can also usegit branch [banch-name]to create a branch from your current location, orgit branch --allto see all branches, both the local ones on your machine, and the remote tracking branches stored from the lastgit pullorgit fetchfrom the remote.git checkout [branch-name]: Switches to the specified branch and updates the working directory.git add [file]: Snapshots the file in preparation for versioning, adding it to the staging area.git commit -m "descriptive message": Records file snapshots permanently in version history.git pull: Updates your current local working branch with all new commits from the corresponding remote branch on GitHub.git pullis a combination ofgit fetchandgit merge.git push: Uploads all local branch commits to the remote.git log: Browse and inspect the evolution of project files.git remote -v: Show the associated remote repositories and their stored name, likeorigin.
Getting Started With GitHub
If you’re wondering where Git ends and GitHub begins, you’re not alone. They are tied closely together to make working with them both a seamless experience. While Git takes care of the underlying version control, GitHub is the collaboration platform built on top of it. GitHub is the place for pull requests, comments, reviews, integrated tests, and so much more. Most developers work locally to develop, and use GitHub for collaboration. That ranges from using GitHub to host the shared remote repository, to working with colleagues and capitalizing on features like protected branches, code review, GitHub Actions, and more.
The best place to practice using Git and GitHub is the Introduction to GitHub course.
If you already know Git and need to sign up for a GitHub account, head over to github.com.
Contribute to this article on GitHub.
Get started with git and GitHub
Review code, manage projects, and build software alongside 40 million developers.
Sign up for GitHub
Sign in
Введение в Git — это почти всегда пошаговая инструкция, но не всегда достаточно понятная. Именно поэтому мы дополнили гайд схемами, которые сделают информацию максимально доступной.
Примечание Вы читаете улучшенную версию некогда выпущенной нами статьи.
- Основы Git
- Коммиты
- Файловая система
- Просмотр изменений
- Удалённые репозитории
- Работа с ветками
- Продвинутое использование
Git — это система контроля версий (VCS), которая позволяет отслеживать и фиксировать изменения в коде: вы можете восстановить код в случае сбоя или откатить до более ранних версий. А ещё это must-have инструмент для взаимодействия нескольких разработчиков на одном проекте. Подробнее об этом в руководстве по командной разработке с Git.
С Git работают через командную строку или инструменты вроде GitHub Desktop. Команды Git принимают вид git <команда> <аргументы>, где аргументом может быть путь к файлу. В команды также включаются опции, которые обозначаются как --<опция>. Забыли, как использовать команду? Откройте руководство с git help <команда>.
Установка Git
Введение в Git всегда начинается с установки: скачайте Git для Windows, macOS или Linux и проверьте версию с помощью git --version.
Настройка конфигурационного файла
Первое, что нужно сделать, — настроить имя пользователя и email для идентификации. Эти настройки хранятся в конфигурационном файле.
Вы можете напрямую отредактировать файл .gitconfig в текстовом редакторе или сделать это командой git config --global --edit. Для отдельных полей это git config --global <поле> <значение> — поля user.name и user.email.
Также можно настроить текстовый редактор для написания сообщений коммитов, используя поле core.editor. А вот поле commit.template позволяет указать шаблон, который будет использоваться при каждом коммите. Ещё одно полезное поле — alias, которое привязывает команду к псевдониму. Например, git config --global alias.st "status -s" позволяет использовать git st вместо git status -s
Команда git config --list выведет все поля и их значения из конфигурационного файла.
Создаём Git-репозиторий
Для инициализации нового репозитория .git подойдёт git init или, если хотите скопировать существующий, git clone <адрес репозитория>.
Коммиты
Основы работы с Git предполагают понимание коммитов. Команда git commit откроет текстовый редактор для ввода сообщения коммита. Также эта команда принимает несколько аргументов:
-mпозволяет написать сообщение вместе с командой, не открывая редактор. Напримерgit commit -m "Пофиксил баг";-aпереносит все отслеживаемые файлы в область подготовленных файлов и включает их в коммит (позволяет пропуститьgit addперед коммитом);--amendзаменяет последний коммит новым изменённым коммитом, что бывает полезно, если вы неправильно набрали сообщение последнего коммита или забыли включить в него какие-то файлы.
Советы для эффективного введения в Git:
- Коммитьте как можно чаще.
- Одно изменение — один коммит: не помещайте все не связанные между собой изменения в один коммит, разделите их, чтобы было проще откатиться.
- Формат сообщений: заголовок должен быть в повелительном наклонении, меньше 50 символов в длину и должен логически дополнять фразу
this commit will ___(this commit will fix bugs — этот коммит исправит баги). Сообщение должно пояснять, почему был сделан коммит, а сам коммит показывает, что изменилось. - Если у вас много незначительных изменений, хорошим тоном считается делать небольшие коммиты при разработке, а при добавлении в большой репозиторий объединять их в один коммит.
История коммитов в Git
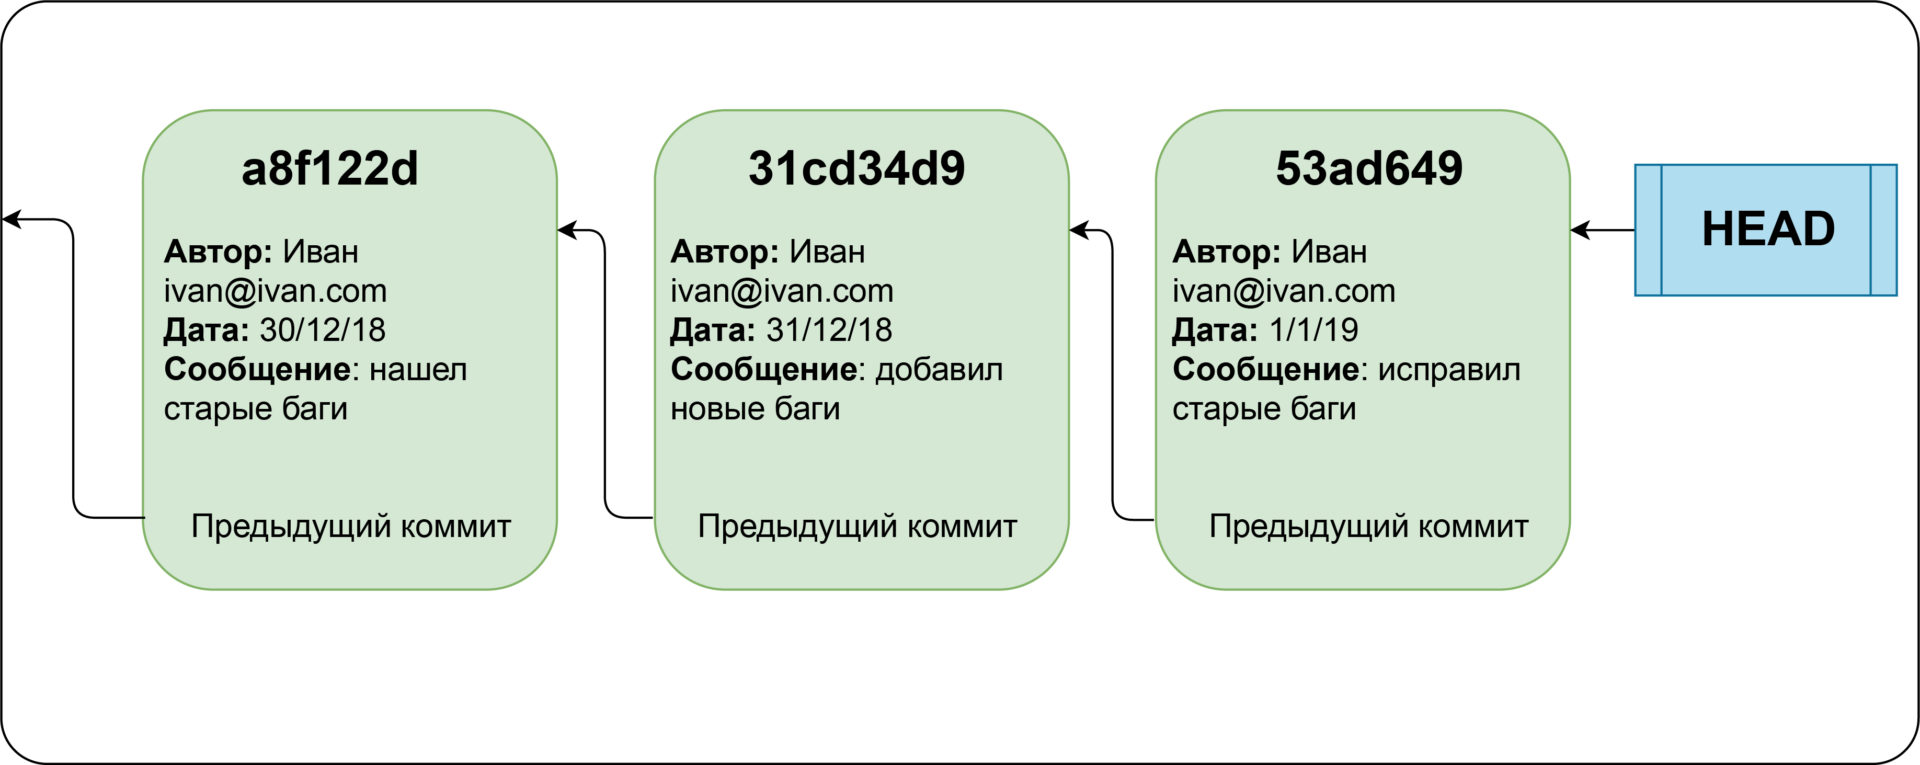
Коммиты хранят состояние файловой системы в определённый момент времени и указатели на предыдущие коммиты. Каждый коммит содержит уникальную контрольную сумму — идентификатор, который Git использует, чтобы ссылаться на коммит. Чтобы отслеживать историю, Git хранит указатель HEAD, который указывает на первый коммит (мы следуем по цепочке коммитов в обратном порядке, чтобы попасть к предыдущим коммитам).
Мы можем ссылаться на коммит либо через его контрольную сумму, либо через его позицию относительно HEAD, например HEAD~4 ссылается на коммит, который находится 4 коммитами ранее HEAD.
Файловая система Git

Git отслеживает файлы в трёх основных разделах:
- рабочая директория (файловая система вашего компьютера);
- область подготовленных файлов (staging area, хранит содержание следующего коммита);
- HEAD (последний коммит в репозитории).
Все основные команды по работе с файлами сводятся к пониманию того, как Git управляет этими тремя разделами. Существует распространённое заблуждение, что область подготовленных файлов только хранит изменения. Лучше думать об этих трёх разделах как об отдельных файловых системах, каждая из которых содержит свои копии файлов.
Просмотр изменений в файловых системах
Команда git status отображает все файлы, которые различаются между тремя разделами. У файлов есть 4 состояния:
- Неотслеживаемый (untracked) — находится в рабочей директории, но нет ни одной версии в HEAD или в области подготовленных файлов (Git не знает о файле).
- Изменён (modified) — в рабочей директории есть более новая версия по сравнению с хранящейся в HEAD или в области подготовленных файлов (изменения не находятся в следующем коммите).
- Подготовлен (staged) — в рабочей директории и области подготовленных файлов есть более новая версия по сравнению с хранящейся в HEAD (готов к коммиту).
- Без изменений — одна версия файла во всех разделах, т. е. в последнем коммите содержится актуальная версия.
Примечание Файл может быть одновременно в состоянии «изменён» и «подготовлен», если версия в рабочей директории новее, чем в области подготовленных файлов, которая в свою очередь новее версии в HEAD.
Мы можем использовать опцию -s для команды git status, чтобы получить более компактный вывод (по строке на файл). Если файл не отслеживается, то будет выведено ??; если он был изменён, то его имя будет красным, а если подготовлен — зелёным.
Чтобы посмотреть сами изменения, а не изменённые файлы, можно использовать следующие команды:
git diff— сравнение рабочей директории с областью подготовленных файлов;git diff --staged— сравнение области подготовленных файлов с HEAD.
Если использовать аргумент <файл/папка>, то diff покажет изменения только для указанных файлов/папок, например git diff src/.
Обновление файловых систем
Команда git add <файл/папка> обновляет область подготовленных файлов версиями файлов/папок из рабочей директории.
Команда git commit обновляет HEAD новым коммитом, который делает снимки файлов в области подготовленных файлов.
Действие команды git reset <коммит> состоит из трёх потенциальных шагов:
- Переместить указатель HEAD на <коммит> (например, при откате коммита в рабочей директории и области подготовленных файлов будут более новые версии файлов, чем в HEAD). Также указатель HEAD ветки будет перемещён на этот коммит.
- Обновить область подготовленных файлов содержимым коммита. В таком случае только в рабочей директории будут новейшие версии файлов.
- Обновить рабочую директорию содержимым области подготовленных файлов. С этим нужно быть осторожнее, поскольку в итоге будут уничтожены изменения файлов.
По умолчанию команда git reset выполняет только шаги 1 и 2, однако её поведение можно изменить с помощью опций --soft (только 1 шаг) и --hard (все шаги).
Если передать путь к файлу/папке, то команда будет выполнена только для них, например git reset --soft HEAD~1 src/.
Команда git checkout HEAD <файл> приводит к тому же результату, что и git reset --hard HEAD <файл> — перезаписывает версию файла в области подготовленных файлов и в рабочей директорией версией из HEAD, то есть отменяет изменения после последнего коммита.
С другой стороны, git checkout <файл> (уже без HEAD) перезаписывает версию файла в рабочей директории версией в области подготовленных файлов, то есть отменяет изменения с момента последней подготовленной версии.
Наконец, git rm <файл> отменяет отслеживание файла и удаляет его из рабочей директории, опция --cached позволит сохранить файл.
Игнорирование файлов
Зачастую нам не нужно, чтобы Git отслеживал все файлы в репозитории, потому что в их число могут входить:
- файлы с чувствительной информацией вроде паролей;
- большие бинарные файлы;
- файлы сборок, которые генерируются после каждой компиляции;
- файлы, специфичные для ОС/IDE, например, .DS_Store для macOS или .iml для IntelliJ IDEA — нам нужно, чтобы репозиторий как можно меньше зависел от системы.
Для игнорирования используется файл .gitignore. Чтобы отметить файлы, которые мы хотим игнорировать, можно использовать шаблоны поиска (считайте их упрощёнными регулярными выражениями):
/___— позволяет избежать рекурсивности — соответствует файлам только в текущей директории;__/— соответствует всем файлам в указанной директории;*___— соответствует всем файлам с указанным окончанием;!— игнорирование файлов, попадающих под указанный шаблон;[__]— соответствует любому символу из указанных в квадратных скобках;?— соответствует любому символу;/**/— соответствует вложенным директориям, напримерa/**/dсоответствуетa/d,a/b/d,a/b/c/dи т. д.
Мы даже можем использовать шаблоны поиска при указании файла/папки в других командах. Например, git add src/*.css добавит все файлы .css в папке src.
Просмотр изменений
Для просмотра истории предыдущих коммитов в обратном хронологическом порядке можно использовать команду git log. Ей можно передать разные опции:
-pпоказывает изменения в каждом коммите;--statпоказывает сокращённую статистику для коммитов, например изменённые файлы и количество добавленных/удалённых строк в каждом их них;-nпоказывает n последних коммитов;--since=___и--until=___позволяет отфильтровать коммиты по промежутку времени, например--since="2019-01-01"покажет коммиты с 1 января 2019 года;--prettyпозволяет указать формат логов (например,--pretty=oneline), также можно использовать--pretty=formatдля большей кастомизации, например--pretty=format:"%h %s";--grepи-Sфильтруют коммиты с сообщениями/изменениями кода, которые содержат указанную строку, например,git log -S имя_функциипозволяет посмотреть добавление/удаление функции;--no-mergesпропускает коммиты со слиянием веток;ветка1..ветка2позволяет посмотреть, какие коммиты из ветки 2 не находятся в ветке 1 (полезно при слиянии веток). Например,git log master..testпокажет, каких коммитов из ветки test нет в master (о ветках поговорим чуть позже).--left-right ветка1...ветка2показывает коммиты, которые есть либо в ветке 1, либо в ветке 2, но не в обеих; знак<обозначает коммиты изветка1, а>— изветка2. Обратите внимание: используется три точки, а не две;-Lпринимает аргументначало,конец:файлили:функция:файли показывает историю изменений переданного набора строк или функции в файле.
Другой полезной командой является git blame <файл>, которая для каждой строки файла показывает автора и контрольную сумму последнего коммита, который изменил эту строку. -L <начало>, <конец> позволяет ограничить эту команду заданными строками. Это можно использовать, например, для выяснения того, какой коммит привёл к определённому багу (чтобы можно было его откатить).
Наконец, есть команда git grep, которая ищет по всем файлам в истории коммитов (а не только в рабочей директории, как grep) по заданному регулярному выражению. Опция -n отображает соответствующий номер строки в файле для каждого совпадения, а --count показывает количество совпадений для каждого файла.
Примечание Не путайте git grep с git log --grep! Первый ищет по файлам среди коммитов, а последний смотрит на сообщения логов.
Удалённые репозитории
Пока что мы обсуждали использование Git только на локальной машине. Однако мы можем хранить историю коммитов удалённых репозиториев, которую можно отслеживать и обновлять. git remote -v выводит список удалённых репозиториев, которые мы отслеживаем, и имена, которые мы им присвоили.
При использовании команды git clone <url репозитория> мы не только загружаем себе копию репозитория, но и неявно отслеживаем удалённый сервер, который находится по указанному адресу и которому присваивается имя origin.
Наиболее употребляемые команды:
git remote add <имя> <url>— добавляет удалённый репозиторий с заданным именем;git remote remove <имя>— удаляет удалённый репозиторий с заданным именем;git remote rename <старое имя> <новое имя>— переименовывает удалённый репозиторий;git remote set-url <имя> <url>— присваивает репозиторию с именем новый адрес;git remote show <имя>— показывает информацию о репозитории.
Следующие команды работают с удалёнными ветками:
git fetch <имя> <ветка>— получает данные из ветки заданного репозитория, но не сливает изменения;git pull <имя> <ветка>— сливает данные из ветки заданного репозитория;git push <имя> <ветка>— отправляет изменения в ветку заданного репозитория. Если локальная ветка уже отслеживает удалённую, то можно использовать простоgit pushилиgit pull.
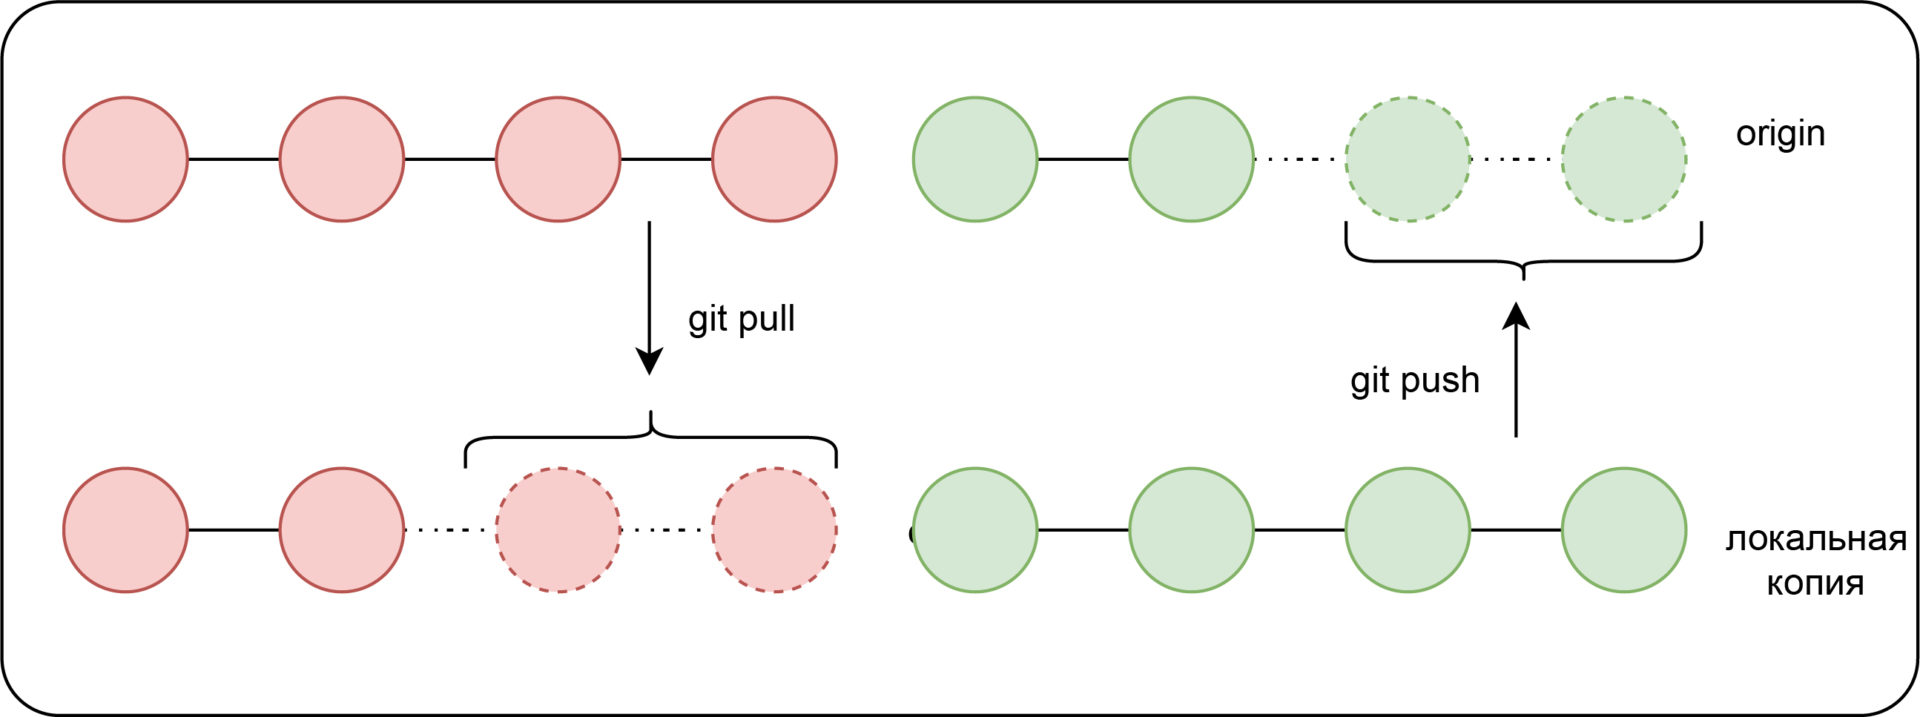
Таким образом несколько людей могут запрашивать изменения с сервера, делать изменения в локальных копиях и затем отправлять их на удалённый сервер, что позволяет взаимодействовать друг с другом в пределах одного репозитория.
GitHub
GitHub — это платформа, которая хранит Git-репозитории на своих серверах, и основы распределенной системы управления версиями Git подразумевает умение с ней работать. Вы можете хранить свои удалённые репозитории или участвовать в Open Source проектах на GitHub.
Да, есть и другие платформы, но GitHub идеален для введения в Git и дополняет VCS новыми возможностями.
Например, вы можете сделать форк удалённого репозитория, то есть создать свою копию репозитория на севере GitHub. Это полезно в тех случаях, когда у вас нет прав на создание ветки в оригинальном репозитории. Когда вы воспользуетесь командой git clone, ваш локальный репозиторий будет отслеживать удалённый форк как origin, а оригинальный репозиторий как upstream.
После этого вам может понадобиться слить тематическую ветку вашего удалённого репозитория в основную ветку оригинального. Для этого вы можете создать новый Pull Request — запрос на внесение изменений, где GitHub проверяет наличие конфликтов прежде чем повзолить вам провести слияние. Зачастую существуют и другие проверки перед слиянием, например просмотр и одобрение кода или даже запуск тестов. В запросе можно обсудить код, а все коммиты, которые вы отправляете в удалённую тематическую ветку, будут автоматически добавлены в запрос, даже если он был создан до этих коммитов.
Работа с ветками
Ветвление — это возможность работать над разными версиями проекта: вместо одного списка с упорядоченными коммитами история будет расходиться в определённых точках. Каждая ветвь содержит легковесный указатель HEAD на последний коммит, что позволяет без лишних затрат создать много веток. Ветка по умолчанию называется master, но лучше назвать её в соответствии с разрабатываемой в ней функциональностью.
Итак, есть общий указатель HEAD и HEAD для каждой ветки. Переключение между ветками предполагает только перемещение HEAD в HEAD соответствующей ветки.
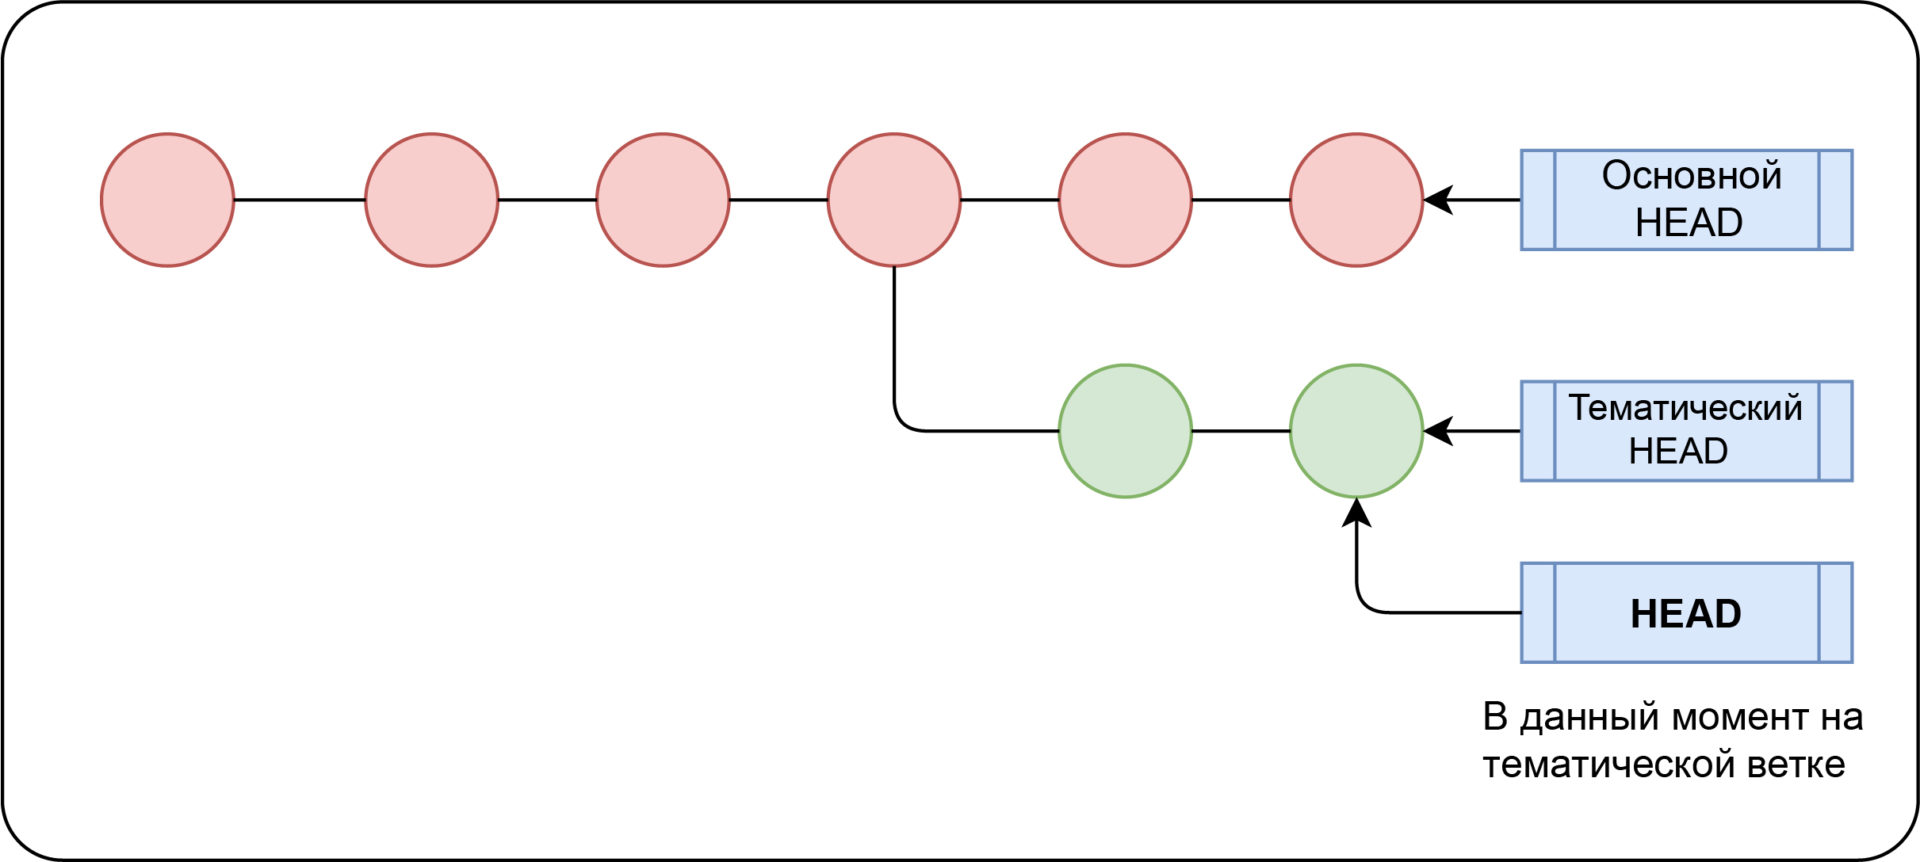
Команды:
git branch <имя ветки>— создаёт новую ветку с HEAD, указывающим на HEAD. Если не передать аргумент<имя ветки>, то команда выведет список всех локальных веток;git checkout <имя ветки>— переключается на эту ветку. Можно передать опцию-b, чтобы создать новую ветку перед переключением;git branch -d <имя ветки>— удаляет ветку.
Локальный и удалённый репозитории могут иметь немало ветвей, поэтому когда вы отслеживаете удалённый репозиторий — отслеживается удалённая ветка (git clone привязывает вашу ветку master к ветке origin/master удалённого репозитория).
Привязка к удалённой ветке:
git branch -u <имя удалённого репозитория>/<удалённая ветка>— привязывает текущую ветку к указанной удалённой ветке;git checkout --track <имя удалённого репозитория>/<удалённая ветка>— аналог предыдущей команды;git checkout -b <ветка> <имя удалённого репозитория>/<удалённая ветка>— создаёт новую локальную ветку и начинает отслеживать удалённую;git branch --vv— показывает локальные и отслеживаемые удалённые ветки;git checkout <удалённая ветка>— создаёт локальную ветку с таким же именем, как у удалённой, и начинает её отслеживать.
В общем, git checkout связан с изменением места, на которое указывает HEAD ветки, что похоже на то, как git reset перемещает общий HEAD.
Прятки и чистка
Есть одна тонкость — при переключении веток Git требует, чтобы рабочее состояние было чистым, то есть все изменения в отслеживаемых файлах должны быть зафиксированы.
Прим. перев. Это не совсем так. При некоторых обстоятельствах Git может автоматически перенести незафиксированное изменение в другую ветку.
Однако порой у вас есть незавершённые изменения, которые нельзя фиксировать. В такой ситуации их можно сохранить и «спрятать» с помощью команды git stash. Чтобы вернуть изменения, используйте git stash apply.
Возможно, вместо этого вы захотите стереть все внесённые изменения. В таком случае используйте команду git clean. Опция -d также удалит неотслеживаемые файлы. Совет: добавьте опцию -n, чтобы увидеть, что произойдёт при запуске git clean без непосредственного использования.
Слияние
Ветку, в которую мы хотим слить изменения, будем называть основной, а ветку, из которой мы будем их сливать, — тематической.
Слиние включает в себя создание нового коммита, который основан на общем коммите-предке двух ветвей и указывает на оба HEAD в качестве предыдущих коммитов. Для слияния мы переходим на основную ветку и используем команду git merge <тематическая ветка>.
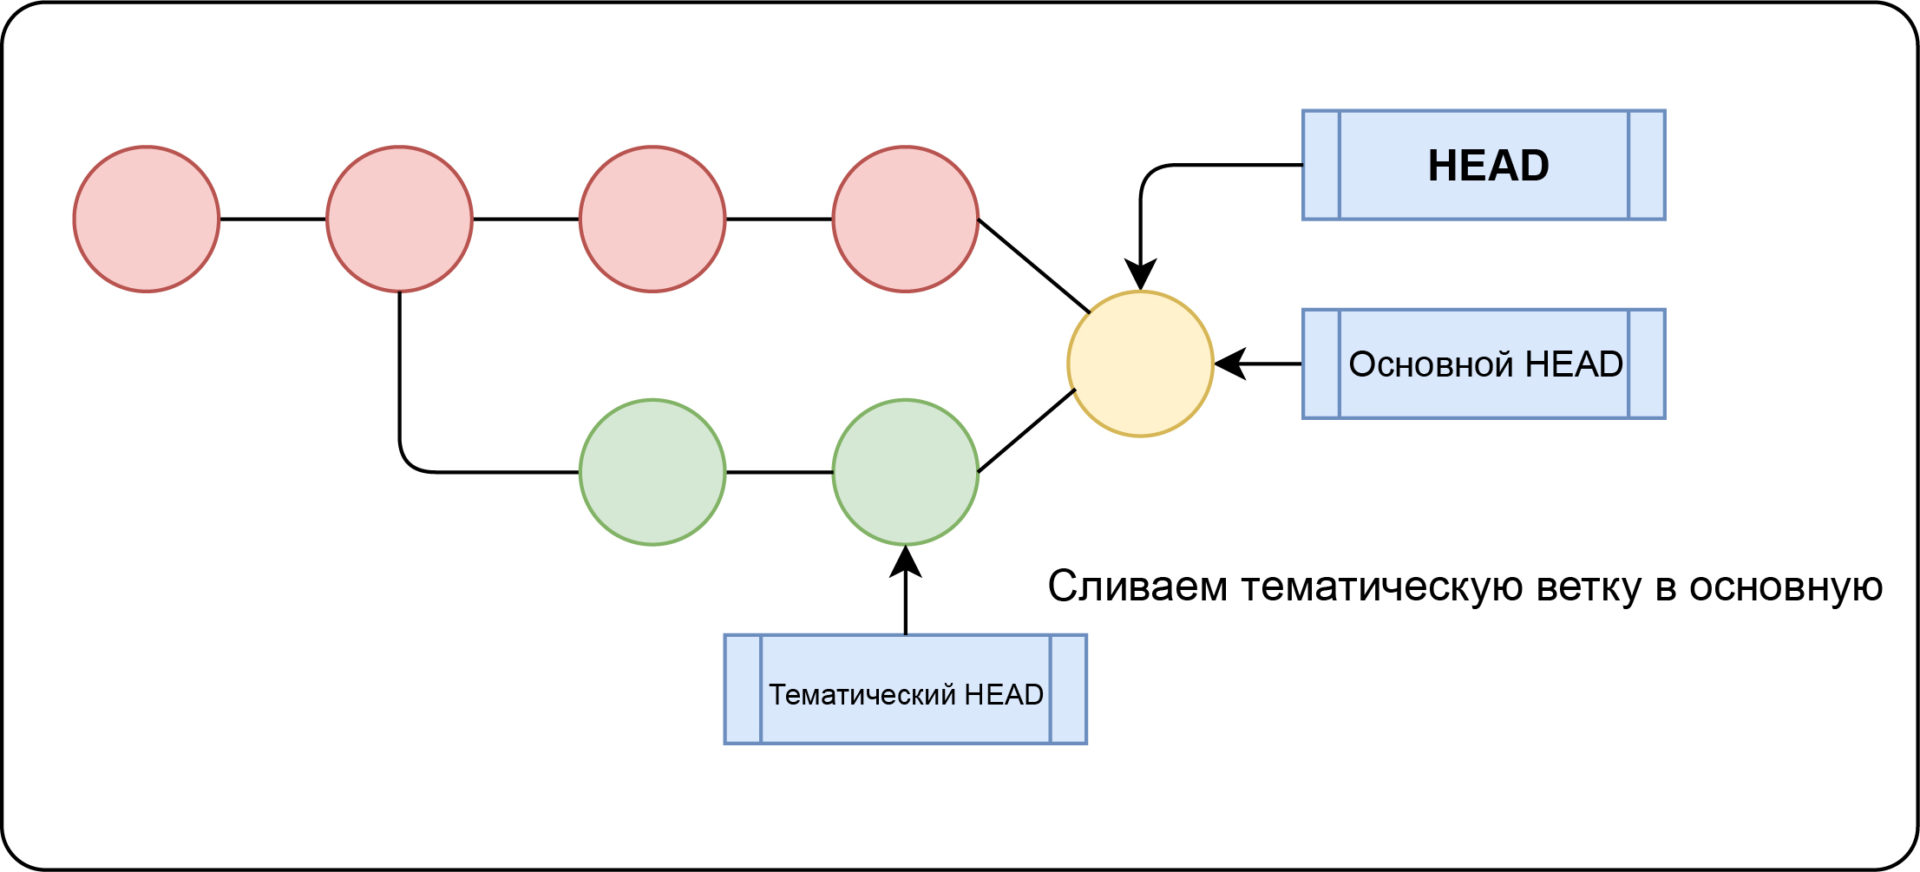
Если обе ветви меняют одну и ту же часть файла, то возникает конфликт слияния — ситуация, в которой Git не знает, какую версию файла сохранить, поэтому разрешать конфликт нужно собственноручно. Чтобы увидеть конфликтующие файлы, используйте git status.
После открытия таких файлов вы увидите похожие маркеры разрешения конфликта:
 <<<<<<< HEAD:index.html
 Everything above the ==== is the version in master.
 =======
 Everything below the ==== is the version in the test branch.
 >>>>>>> test:index.html
Замените в этом блоке всё на версию, которую вы хотите оставить, и подготовьте файл. После разрешения всех конфликтов можно использовать git commit для завершения слияния.
Перемещение
Вместо совмещения двух ветвей коммитом слияния, перемещение заново воспроизводит коммиты тематической ветки в виде набора новых коммитов базовой ветки, что выливается в более чистую историю коммитов.
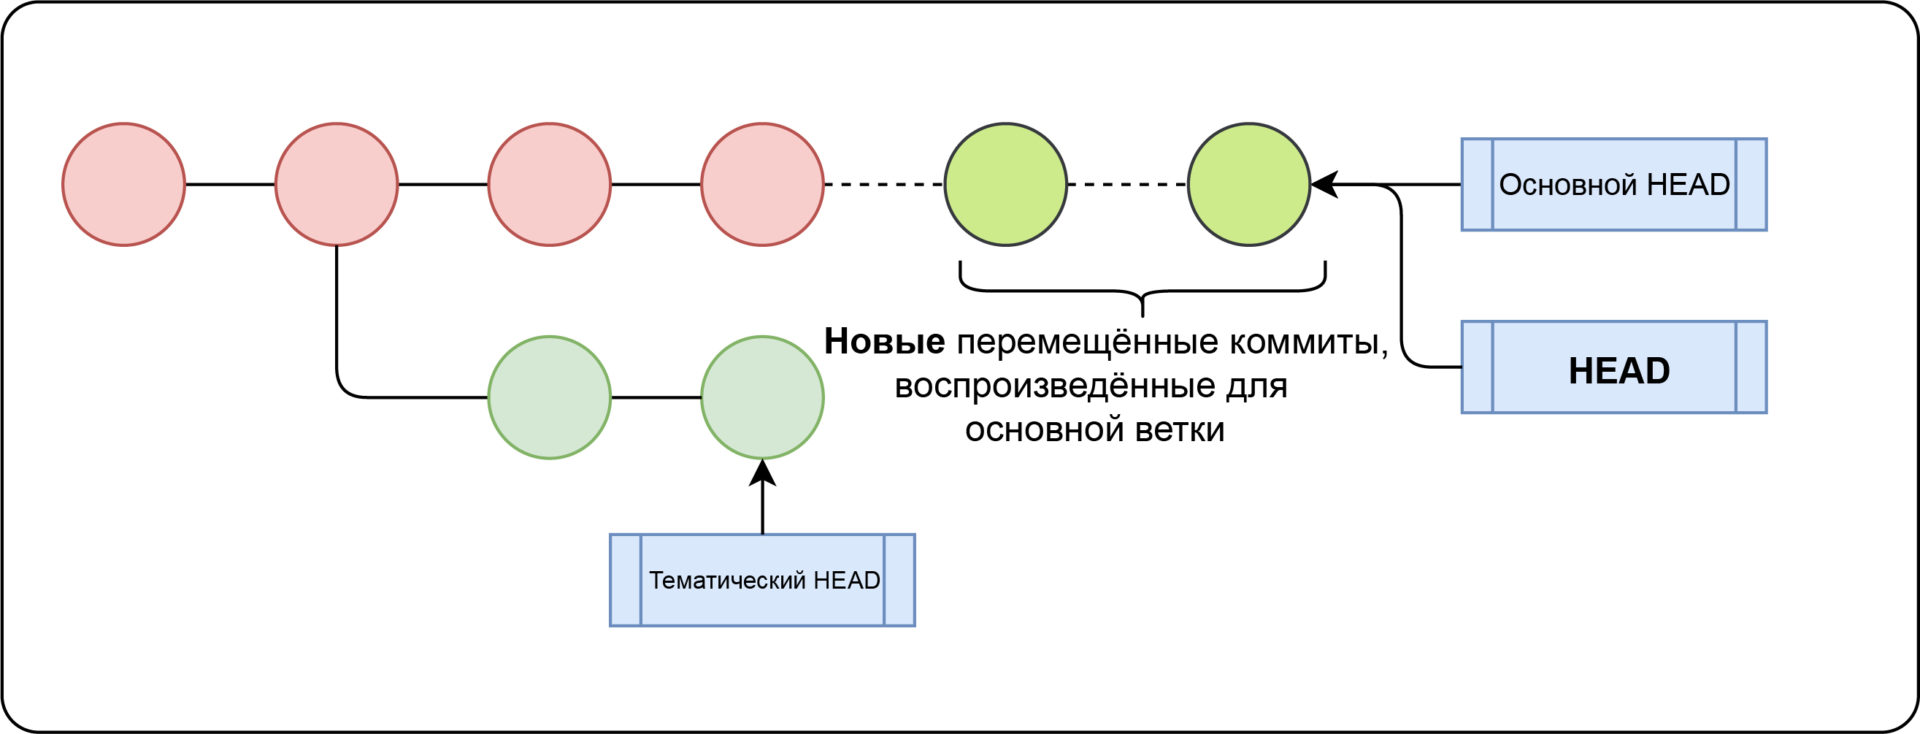
Для перемещения используется команда git rebase <основная ветка> <тематическая ветка>, которая воспроизводит изменения тематической ветки на основной; HEAD тематической ветки указывает на последний воспроизведённый коммит.
Перемещение vs. слияние
После слияния лог с историей может выглядеть довольно беспорядочно. С другой стороны, перемещение позволяет переписать историю в нормальной, последовательной форме. Но перемещение — не панацея от запутанных логов: перемещённые коммиты отличаются от оригинальных, хотя и имеют одного и того же автора, сообщение и изменения.
Сценарий:
- В своей ветке вы создаёте несколько коммитов и сливаете их в мастер-ветку.
- Кто-то ещё решает поработать на основе ваших коммитов.
- Вы решаете переместить ваши коммиты и отправить их на сервер.
- Когда кто-то попытается слить свою работу на основе ваших изначальных коммитов, в итоге мы получим две параллельные ветки с одним автором, сообщениями и изменениями, но разными коммитами.
Перемещайте изменения только на вашей приватной локальной ветке — не перемещайте коммиты, от которых зависит ещё кто-то.
Откат коммитов — revert и reset
Похожие дебаты по поводу того, что лучше использовать, возникают, когда вы хотите откатить коммит. Команда git revert <коммит> создаёт новый коммит, отменяющий изменения, но сохраняющий историю, в то время как git reset <коммит> перемещает указатель HEAD, предоставляя более чистую историю (словно бы этого коммита никогда и не было). Важно отметить, что это также означает, что вы больше не сможете вернуться обратно к этим изменениям, например, если вы всё-таки решите, что отмена коммита была лишней. Чище — не значит лучше!
Продвинутое использование
На этом основное введение в Git заканчивается, и начинается более глубокое изучение.
Интерактивная подготовка
Вы можете с удобством управлять областью подготовленных файлов (например при фиксации нескольких небольших коммитов вместо одного большого) с помощью интерактивной консоли, которую можно запустить с git add -i. В ней есть 8 команд:
status— показывает для каждого файла краткое описание того, что (не)подготовлено;update— подготавливает отслеживаемые файлы;revert— убрать один или несколько файлов из подготовленной области;add untracked— подготавливает неотслеживаемый файл;patch— подготавливает только часть файла (полезно, когда вы, например, изменили несколько функций, но хотите разбить изменения на несколько коммитов). После выбора файла вам будут показаны его фрагменты и представлены возможные команды:Stage this hunk [y,n,q,a,d,j,J,g,/,e,?]?. Можно ввести?, чтобы узнать, что делает каждая команда;diff— показывает список подготовленных файлов и позволяет посмотреть изменения для каждого из них;quit— выходит из интерактивной консоли;help— показывает краткое описание каждой команды.
Символ * рядом с файлом означает, что команда изменит его статус (подготовлен/неподготовлен в зависимости от того, происходит ли обновление или откат). Если нажать Enter, не введя ничего ни в одном из под-меню команды, то все файлы перейдут в (не)подготовленное состояние. Создание патчей доступно в интерактивной консоли и через команду git add -p.
Правка истории
Для большего контроля над историей коммитов локальной ветки можно использовать команду git rebase -i HEAD~n, которая откроет интерактивную консоль для перемещения набора последних n коммитов, перечисленных в порядке от старых к новым (то есть в том порядке, в котором они будут перемещены). Таким образом вы можете «редактировать историю», однако помните, что оригинальные коммиты нельзя изменить, только переместить.
Вы можете поменять порядок коммитов, изменив порядок, в котором они перечислены.
Изменение сообщения/разбивка коммитов
Для указания коммита, который вы хотите изменить, используется команда edit. Затем, когда Git будет проводить перемещение, он остановится на этом коммите. После этого вы можете использовать git commit --amend, чтобы изменить сообщение или подготовить забытые файлы. Если вы хотите разделить коммит, после остановки введите git reset HEAD^ (в результате HEAD будет перемещён на один коммит назад и все изменённые в этом коммите файлы перейдут в статус неподготовленных). Затем вы сможете зафиксировать файлы в отдельных коммитах обычным образом.
После завершения редактирования введите git rebase --continue.
Перезапись нескольких коммитов
Иногда вам может потребоваться перезаписать несколько коммитов — в таких случаях можно использовать git filter-branch. Например, чтобы удалить случайно зафиксированный файл, можно ввести git filter-branch --tree-filter 'git rm -f <имя файла>' HEAD. Однако учтите, что при этом вся история перемещается.
Объединение нескольких коммитов

Если коммиты незначительные и небольшие, это может засорить историю проекта. В связи с этим можно объединить несколько коммитов в один большой. Используйте команду pick для выбора первого коммита и squash для последующих.
Перенос отдельного коммита
Кроме слияния/перемещения всех коммитов в тематической ветке, вас может интересовать только определённый коммит. Допустим, у вас есть локальная ветка drafts, где вы работаете над несколькими потенциальными статьями, но хотите опубликовать только одну из них. Для этого можно использовать команду git cherry-pick. Чтобы получить определённые коммиты, из которых мы хотим выбирать, можно использовать git log <основная ветка>..<тематическая>.
Обратите внимание, что таким образом создаётся новый коммит, который только повторяет diff выбранного коммита (то есть разницу между этим коммитом и предыдущим), но не его состояние.
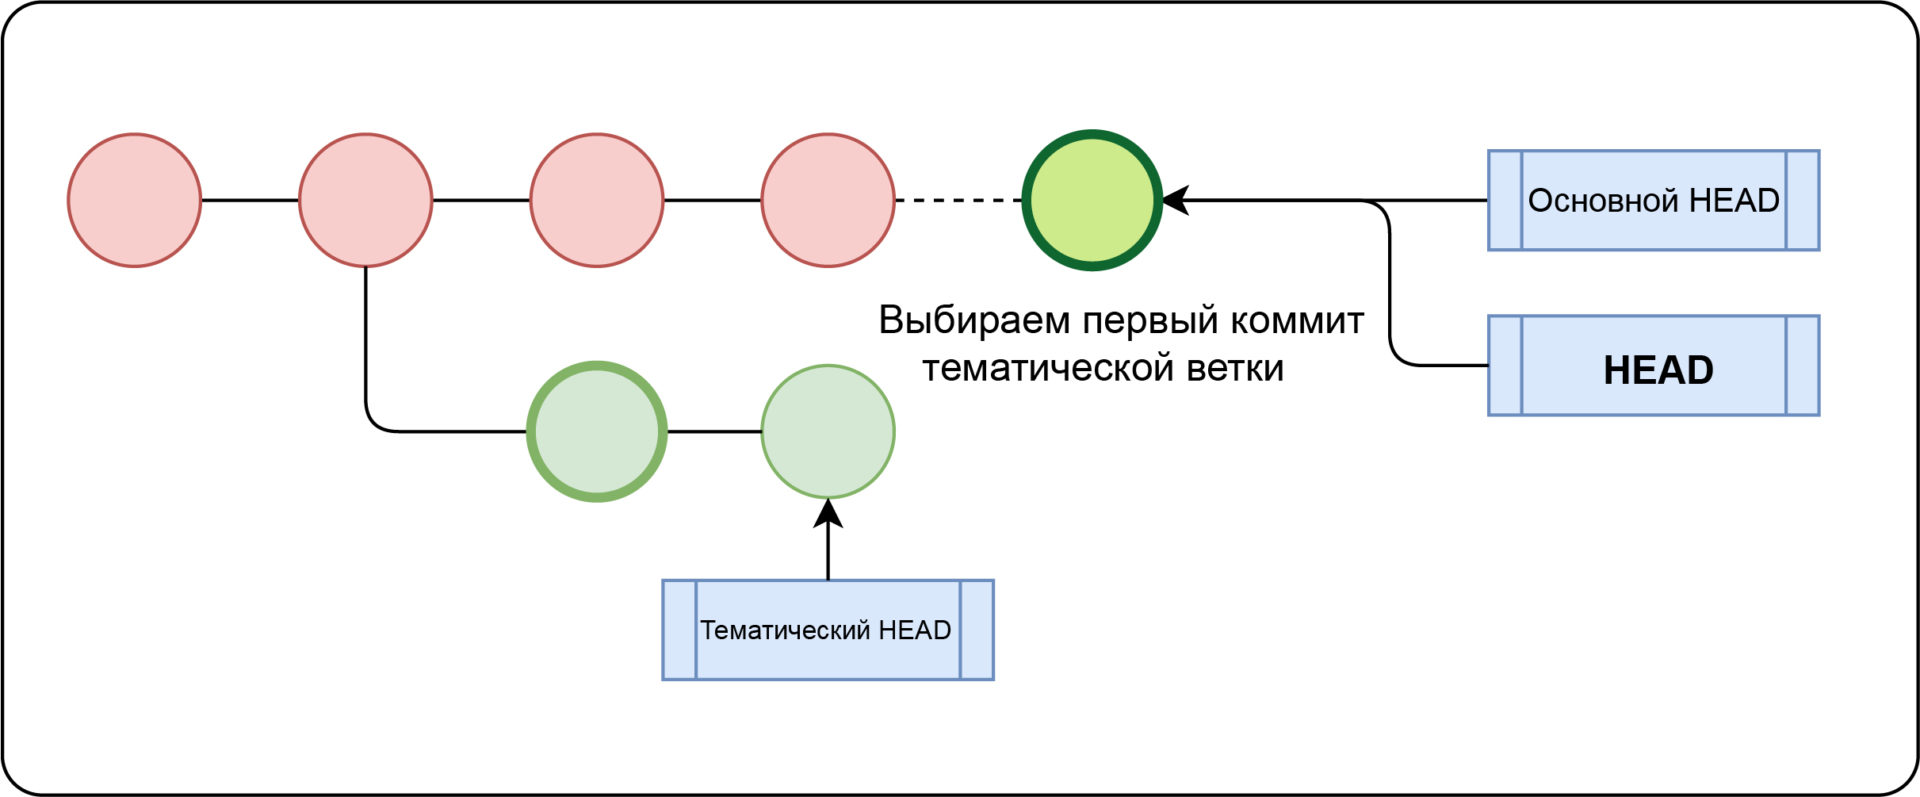
Закрепите введение в Git информацией о типичных ошибках в данной VCS и способах их решения.
Перевод статьи «The Ultimate Beginner Git Cheatsheet»
Introduction
Git is a fast distributed revision control system.
This manual is designed to be readable by someone with basic UNIX
command-line skills, but no previous knowledge of Git.
Chapter 1, Repositories and Branches and Chapter 2, Exploring Git history explain how
to fetch and study a project using git—read these chapters to learn how
to build and test a particular version of a software project, search for
regressions, and so on.
People needing to do actual development will also want to read
Chapter 3, Developing with Git and Chapter 4, Sharing development with others.
Further chapters cover more specialized topics.
Comprehensive reference documentation is available through the man
pages, or git-help(1) command. For example, for the command
git clone <repo>, you can either use:
$ man git-clone
or:
$ git help clone
With the latter, you can use the manual viewer of your choice; see
git-help(1) for more information.
See also Appendix A, Git Quick Reference for a brief overview of Git commands,
without any explanation.
Finally, see Appendix B, Notes and todo list for this manual for ways that you can help make this manual more
complete.
Chapter 1. Repositories and Branches
How to get a Git repository
It will be useful to have a Git repository to experiment with as you
read this manual.
The best way to get one is by using the git-clone(1) command to
download a copy of an existing repository. If you don’t already have a
project in mind, here are some interesting examples:
        # Git itself (approx. 40MB download):
$ git clone git://git.kernel.org/pub/scm/git/git.git
        # the Linux kernel (approx. 640MB download):
$ git clone git://git.kernel.org/pub/scm/linux/kernel/git/torvalds/linux.git
The initial clone may be time-consuming for a large project, but you
will only need to clone once.
The clone command creates a new directory named after the project
(git or linux in the examples above). After you cd into this
directory, you will see that it contains a copy of the project files,
called the working tree, together with a special
top-level directory named .git, which contains all the information
about the history of the project.
How to check out a different version of a project
Git is best thought of as a tool for storing the history of a collection
of files. It stores the history as a compressed collection of
interrelated snapshots of the project’s contents. In Git each such
version is called a commit.
Those snapshots aren’t necessarily all arranged in a single line from
oldest to newest; instead, work may simultaneously proceed along
parallel lines of development, called branches, which may
merge and diverge.
A single Git repository can track development on multiple branches. It
does this by keeping a list of heads which reference the
latest commit on each branch; the git-branch(1) command shows
you the list of branch heads:
$ git branch
* master
A freshly cloned repository contains a single branch head, by default
named «master», with the working directory initialized to the state of
the project referred to by that branch head.
Most projects also use tags. Tags, like heads, are
references into the project’s history, and can be listed using the
git-tag(1) command:
$ git tag -l
v2.6.11
v2.6.11-tree
v2.6.12
v2.6.12-rc2
v2.6.12-rc3
v2.6.12-rc4
v2.6.12-rc5
v2.6.12-rc6
v2.6.13
...
Tags are expected to always point at the same version of a project,
while heads are expected to advance as development progresses.
Create a new branch head pointing to one of these versions and check it
out using git-switch(1):
$ git switch -c new v2.6.13
The working directory then reflects the contents that the project had
when it was tagged v2.6.13, and git-branch(1) shows two
branches, with an asterisk marking the currently checked-out branch:
$ git branch
  master
* new
If you decide that you’d rather see version 2.6.17, you can modify
the current branch to point at v2.6.17 instead, with
$ git reset --hard v2.6.17
Note that if the current branch head was your only reference to a
particular point in history, then resetting that branch may leave you
with no way to find the history it used to point to; so use this command
carefully.
Understanding History: Commits
Every change in the history of a project is represented by a commit.
The git-show(1) command shows the most recent commit on the
current branch:
$ git show
commit 17cf781661e6d38f737f15f53ab552f1e95960d7
Author: Linus Torvalds <torvalds@ppc970.osdl.org.(none)>
Date:   Tue Apr 19 14:11:06 2005 -0700

    Remove duplicate getenv(DB_ENVIRONMENT) call

    Noted by Tony Luck.

diff --git a/init-db.c b/init-db.c
index 65898fa..b002dc6 100644
--- a/init-db.c
+++ b/init-db.c
@@ -7,7 +7,7 @@

 int main(int argc, char **argv)
 {
-       char *sha1_dir = getenv(DB_ENVIRONMENT), *path;
+       char *sha1_dir, *path;
        int len, i;

        if (mkdir(".git", 0755) < 0) {
As you can see, a commit shows who made the latest change, what they
did, and why.
Every commit has a 40-hexdigit id, sometimes called the «object name» or the
«SHA-1 id», shown on the first line of the git show output. You can usually
refer to a commit by a shorter name, such as a tag or a branch name, but this
longer name can also be useful. Most importantly, it is a globally unique
name for this commit: so if you tell somebody else the object name (for
example in email), then you are guaranteed that name will refer to the same
commit in their repository that it does in yours (assuming their repository
has that commit at all). Since the object name is computed as a hash over the
contents of the commit, you are guaranteed that the commit can never change
without its name also changing.
In fact, in Chapter 7, Git concepts we shall see that everything stored in Git
history, including file data and directory contents, is stored in an object
with a name that is a hash of its contents.
Understanding history: commits, parents, and reachability
Every commit (except the very first commit in a project) also has a
parent commit which shows what happened before this commit.
Following the chain of parents will eventually take you back to the
beginning of the project.
However, the commits do not form a simple list; Git allows lines of
development to diverge and then reconverge, and the point where two
lines of development reconverge is called a «merge». The commit
representing a merge can therefore have more than one parent, with
each parent representing the most recent commit on one of the lines
of development leading to that point.
The best way to see how this works is using the gitk(1)
command; running gitk now on a Git repository and looking for merge
commits will help understand how Git organizes history.
In the following, we say that commit X is «reachable» from commit Y
if commit X is an ancestor of commit Y. Equivalently, you could say
that Y is a descendant of X, or that there is a chain of parents
leading from commit Y to commit X.
Understanding history: History diagrams
We will sometimes represent Git history using diagrams like the one
below. Commits are shown as «o», and the links between them with
lines drawn with — / and . Time goes left to right:
         o--o--o <-- Branch A
        /
 o--o--o <-- master

         o--o--o <-- Branch B
If we need to talk about a particular commit, the character «o» may
be replaced with another letter or number.
Understanding history: What is a branch?
When we need to be precise, we will use the word «branch» to mean a line
of development, and «branch head» (or just «head») to mean a reference
to the most recent commit on a branch. In the example above, the branch
head named «A» is a pointer to one particular commit, but we refer to
the line of three commits leading up to that point as all being part of
«branch A».
However, when no confusion will result, we often just use the term
«branch» both for branches and for branch heads.
Manipulating branches
Creating, deleting, and modifying branches is quick and easy; here’s
a summary of the commands:
git branch
- list all branches.
git branch <branch>
-
create a new branch named
<branch>, referencing the same
point in history as the current branch.
git branch <branch> <start-point>
-
create a new branch named
<branch>, referencing
<start-point>, which may be specified any way you like,
including using a branch name or a tag name.
git branch -d <branch>
-
delete the branch
<branch>; if the branch is not fully
merged in its upstream branch or contained in the current branch,
this command will fail with a warning.
git branch -D <branch>
-
delete the branch
<branch>irrespective of its merged status.
git switch <branch>
-
make the current branch
<branch>, updating the working
directory to reflect the version referenced by<branch>.
git switch -c <new> <start-point>
-
create a new branch
<new>referencing<start-point>, and
check it out.
The special symbol «HEAD» can always be used to refer to the current
branch. In fact, Git uses a file named HEAD in the .git directory
to remember which branch is current:
$ cat .git/HEAD
ref: refs/heads/master
Examining an old version without creating a new branch
The git switch command normally expects a branch head, but will also
accept an arbitrary commit when invoked with —detach; for example,
you can check out the commit referenced by a tag:
$ git switch --detach v2.6.17
Note: checking out 'v2.6.17'.

You are in 'detached HEAD' state. You can look around, make experimental
changes and commit them, and you can discard any commits you make in this
state without impacting any branches by performing another switch.

If you want to create a new branch to retain commits you create, you may
do so (now or later) by using -c with the switch command again. Example:

  git switch -c new_branch_name

HEAD is now at 427abfa Linux v2.6.17
The HEAD then refers to the SHA-1 of the commit instead of to a branch,
and git branch shows that you are no longer on a branch:
$ cat .git/HEAD
427abfa28afedffadfca9dd8b067eb6d36bac53f
$ git branch
* (detached from v2.6.17)
  master
In this case we say that the HEAD is «detached».
This is an easy way to check out a particular version without having to
make up a name for the new branch. You can still create a new branch
(or tag) for this version later if you decide to.
Examining branches from a remote repository
The «master» branch that was created at the time you cloned is a copy
of the HEAD in the repository that you cloned from. That repository
may also have had other branches, though, and your local repository
keeps branches which track each of those remote branches, called
remote-tracking branches, which you
can view using the -r option to git-branch(1):
$ git branch -r
  origin/HEAD
  origin/html
  origin/maint
  origin/man
  origin/master
  origin/next
  origin/seen
  origin/todo
In this example, «origin» is called a remote repository, or «remote»
for short. The branches of this repository are called «remote
branches» from our point of view. The remote-tracking branches listed
above were created based on the remote branches at clone time and will
be updated by git fetch (hence git pull) and git push. See
the section called “Updating a repository with git fetch” for details.
You might want to build on one of these remote-tracking branches
on a branch of your own, just as you would for a tag:
$ git switch -c my-todo-copy origin/todo
You can also check out origin/todo directly to examine it or
write a one-off patch. See detached head.
Note that the name «origin» is just the name that Git uses by default
to refer to the repository that you cloned from.
Naming branches, tags, and other references
Branches, remote-tracking branches, and tags are all references to
commits. All references are named with a slash-separated path name
starting with refs; the names we’ve been using so far are actually
shorthand:
-
The branch
testis short forrefs/heads/test. -
The tag
v2.6.18is short forrefs/tags/v2.6.18. -
origin/masteris short forrefs/remotes/origin/master.
The full name is occasionally useful if, for example, there ever
exists a tag and a branch with the same name.
(Newly created refs are actually stored in the .git/refs directory,
under the path given by their name. However, for efficiency reasons
they may also be packed together in a single file; see
git-pack-refs(1)).
As another useful shortcut, the «HEAD» of a repository can be referred
to just using the name of that repository. So, for example, «origin»
is usually a shortcut for the HEAD branch in the repository «origin».
For the complete list of paths which Git checks for references, and
the order it uses to decide which to choose when there are multiple
references with the same shorthand name, see the «SPECIFYING
REVISIONS» section of gitrevisions(7).
Updating a repository with git fetch
After you clone a repository and commit a few changes of your own, you
may wish to check the original repository for updates.
The git-fetch command, with no arguments, will update all of the
remote-tracking branches to the latest version found in the original
repository. It will not touch any of your own branches—not even the
«master» branch that was created for you on clone.
Fetching branches from other repositories
You can also track branches from repositories other than the one you
cloned from, using git-remote(1):
$ git remote add staging git://git.kernel.org/.../gregkh/staging.git
$ git fetch staging
...
From git://git.kernel.org/pub/scm/linux/kernel/git/gregkh/staging
 * [new branch]      master     -> staging/master
 * [new branch]      staging-linus -> staging/staging-linus
 * [new branch]      staging-next -> staging/staging-next
New remote-tracking branches will be stored under the shorthand name
that you gave git remote add, in this case staging:
$ git branch -r
  origin/HEAD -> origin/master
  origin/master
  staging/master
  staging/staging-linus
  staging/staging-next
If you run git fetch <remote> later, the remote-tracking branches
for the named <remote> will be updated.
If you examine the file .git/config, you will see that Git has added
a new stanza:
$ cat .git/config
...
[remote "staging"]
        url = git://git.kernel.org/pub/scm/linux/kernel/git/gregkh/staging.git
        fetch = +refs/heads/*:refs/remotes/staging/*
...
This is what causes Git to track the remote’s branches; you may modify
or delete these configuration options by editing .git/config with a
text editor. (See the «CONFIGURATION FILE» section of
git-config(1) for details.)
Chapter 2. Exploring Git history
Git is best thought of as a tool for storing the history of a
collection of files. It does this by storing compressed snapshots of
the contents of a file hierarchy, together with «commits» which show
the relationships between these snapshots.
Git provides extremely flexible and fast tools for exploring the
history of a project.
We start with one specialized tool that is useful for finding the
commit that introduced a bug into a project.
How to use bisect to find a regression
Suppose version 2.6.18 of your project worked, but the version at
«master» crashes. Sometimes the best way to find the cause of such a
regression is to perform a brute-force search through the project’s
history to find the particular commit that caused the problem. The
git-bisect(1) command can help you do this:
$ git bisect start
$ git bisect good v2.6.18
$ git bisect bad master
Bisecting: 3537 revisions left to test after this
[65934a9a028b88e83e2b0f8b36618fe503349f8e] BLOCK: Make USB storage depend on SCSI rather than selecting it [try #6]
If you run git branch at this point, you’ll see that Git has
temporarily moved you in «(no branch)». HEAD is now detached from any
branch and points directly to a commit (with commit id 65934) that
is reachable from «master» but not from v2.6.18. Compile and test it,
and see whether it crashes. Assume it does crash. Then:
$ git bisect bad
Bisecting: 1769 revisions left to test after this
[7eff82c8b1511017ae605f0c99ac275a7e21b867] i2c-core: Drop useless bitmaskings
checks out an older version. Continue like this, telling Git at each
stage whether the version it gives you is good or bad, and notice
that the number of revisions left to test is cut approximately in
half each time.
After about 13 tests (in this case), it will output the commit id of
the guilty commit. You can then examine the commit with
git-show(1), find out who wrote it, and mail them your bug
report with the commit id. Finally, run
$ git bisect reset
to return you to the branch you were on before.
Note that the version which git bisect checks out for you at each
point is just a suggestion, and you’re free to try a different
version if you think it would be a good idea. For example,
occasionally you may land on a commit that broke something unrelated;
run
$ git bisect visualize
which will run gitk and label the commit it chose with a marker that
says «bisect». Choose a safe-looking commit nearby, note its commit
id, and check it out with:
$ git reset --hard fb47ddb2db
then test, run bisect good or bisect bad as appropriate, and
continue.
Instead of git bisect visualize and then git reset --hard, you might just want to tell Git that you want to skip
fb47ddb2db
the current commit:
$ git bisect skip
In this case, though, Git may not eventually be able to tell the first
bad one between some first skipped commits and a later bad commit.
There are also ways to automate the bisecting process if you have a
test script that can tell a good from a bad commit. See
git-bisect(1) for more information about this and other git features.
bisect
Naming commits
We have seen several ways of naming commits already:
- 40-hexdigit object name
-
branch name: refers to the commit at the head of the given
branch -
tag name: refers to the commit pointed to by the given tag
(we’ve seen branches and tags are special cases of
references). - HEAD: refers to the head of the current branch
There are many more; see the «SPECIFYING REVISIONS» section of the
gitrevisions(7) man page for the complete list of ways to
name revisions. Some examples:
$ git show fb47ddb2 # the first few characters of the object name
                    # are usually enough to specify it uniquely
$ git show HEAD^    # the parent of the HEAD commit
$ git show HEAD^^   # the grandparent
$ git show HEAD~4   # the great-great-grandparent
Recall that merge commits may have more than one parent; by default,
^ and ~ follow the first parent listed in the commit, but you can
also choose:
$ git show HEAD^1   # show the first parent of HEAD
$ git show HEAD^2   # show the second parent of HEAD
In addition to HEAD, there are several other special names for
commits:
Merges (to be discussed later), as well as operations such as
git reset, which change the currently checked-out commit, generally
set ORIG_HEAD to the value HEAD had before the current operation.
The git fetch operation always stores the head of the last fetched
branch in FETCH_HEAD. For example, if you run git fetch without
specifying a local branch as the target of the operation
$ git fetch git://example.com/proj.git theirbranch
the fetched commits will still be available from FETCH_HEAD.
When we discuss merges we’ll also see the special name MERGE_HEAD,
which refers to the other branch that we’re merging in to the current
branch.
The git-rev-parse(1) command is a low-level command that is
occasionally useful for translating some name for a commit to the object
name for that commit:
$ git rev-parse origin
e05db0fd4f31dde7005f075a84f96b360d05984b
Creating tags
We can also create a tag to refer to a particular commit; after
running
$ git tag stable-1 1b2e1d63ff
You can use stable-1 to refer to the commit 1b2e1d63ff.
This creates a «lightweight» tag. If you would also like to include a
comment with the tag, and possibly sign it cryptographically, then you
should create a tag object instead; see the git-tag(1) man page
for details.
Browsing revisions
The git-log(1) command can show lists of commits. On its
own, it shows all commits reachable from the parent commit; but you
can also make more specific requests:
$ git log v2.5..        # commits since (not reachable from) v2.5
$ git log test..master  # commits reachable from master but not test
$ git log master..test  # ...reachable from test but not master
$ git log master...test # ...reachable from either test or master,
                        #    but not both
$ git log --since="2 weeks ago" # commits from the last 2 weeks
$ git log Makefile      # commits which modify Makefile
$ git log fs/           # ... which modify any file under fs/
$ git log -S'foo()'     # commits which add or remove any file data
                        # matching the string 'foo()'
And of course you can combine all of these; the following finds
commits since v2.5 which touch the Makefile or any file under fs:
$ git log v2.5.. Makefile fs/
You can also ask git log to show patches:
$ git log -p
See the --pretty option in the git-log(1) man page for more
display options.
Note that git log starts with the most recent commit and works
backwards through the parents; however, since Git history can contain
multiple independent lines of development, the particular order that
commits are listed in may be somewhat arbitrary.
Generating diffs
You can generate diffs between any two versions using
git-diff(1):
$ git diff master..test
That will produce the diff between the tips of the two branches. If
you’d prefer to find the diff from their common ancestor to test, you
can use three dots instead of two:
$ git diff master...test
Sometimes what you want instead is a set of patches; for this you can
use git-format-patch(1):
$ git format-patch master..test
will generate a file with a patch for each commit reachable from test
but not from master.
Viewing old file versions
You can always view an old version of a file by just checking out the
correct revision first. But sometimes it is more convenient to be
able to view an old version of a single file without checking
anything out; this command does that:
$ git show v2.5:fs/locks.c
Before the colon may be anything that names a commit, and after it
may be any path to a file tracked by Git.
Examples
Counting the number of commits on a branch
Suppose you want to know how many commits you’ve made on mybranch
since it diverged from origin:
$ git log --pretty=oneline origin..mybranch | wc -l
Alternatively, you may often see this sort of thing done with the
lower-level command git-rev-list(1), which just lists the SHA-1’s
of all the given commits:
$ git rev-list origin..mybranch | wc -l
Check whether two branches point at the same history
Suppose you want to check whether two branches point at the same point
in history.
$ git diff origin..master
will tell you whether the contents of the project are the same at the
two branches; in theory, however, it’s possible that the same project
contents could have been arrived at by two different historical
routes. You could compare the object names:
$ git rev-list origin
e05db0fd4f31dde7005f075a84f96b360d05984b
$ git rev-list master
e05db0fd4f31dde7005f075a84f96b360d05984b
Or you could recall that the ... operator selects all commits
reachable from either one reference or the other but not
both; so
$ git log origin...master
will return no commits when the two branches are equal.
Find first tagged version including a given fix
Suppose you know that the commit e05db0fd fixed a certain problem.
You’d like to find the earliest tagged release that contains that
fix.
Of course, there may be more than one answer—if the history branched
after commit e05db0fd, then there could be multiple «earliest» tagged
releases.
You could just visually inspect the commits since e05db0fd:
$ gitk e05db0fd..
or you can use git-name-rev(1), which will give the commit a
name based on any tag it finds pointing to one of the commit’s
descendants:
$ git name-rev --tags e05db0fd
e05db0fd tags/v1.5.0-rc1^0~23
The git-describe(1) command does the opposite, naming the
revision using a tag on which the given commit is based:
$ git describe e05db0fd
v1.5.0-rc0-260-ge05db0f
but that may sometimes help you guess which tags might come after the
given commit.
If you just want to verify whether a given tagged version contains a
given commit, you could use git-merge-base(1):
$ git merge-base e05db0fd v1.5.0-rc1
e05db0fd4f31dde7005f075a84f96b360d05984b
The merge-base command finds a common ancestor of the given commits,
and always returns one or the other in the case where one is a
descendant of the other; so the above output shows that e05db0fd
actually is an ancestor of v1.5.0-rc1.
Alternatively, note that
$ git log v1.5.0-rc1..e05db0fd
will produce empty output if and only if v1.5.0-rc1 includes e05db0fd,
because it outputs only commits that are not reachable from v1.5.0-rc1.
As yet another alternative, the git-show-branch(1) command lists
the commits reachable from its arguments with a display on the left-hand
side that indicates which arguments that commit is reachable from.
So, if you run something like
$ git show-branch e05db0fd v1.5.0-rc0 v1.5.0-rc1 v1.5.0-rc2
! [e05db0fd] Fix warnings in sha1_file.c - use C99 printf format if
available
 ! [v1.5.0-rc0] GIT v1.5.0 preview
  ! [v1.5.0-rc1] GIT v1.5.0-rc1
   ! [v1.5.0-rc2] GIT v1.5.0-rc2
...
then a line like
+ ++ [e05db0fd] Fix warnings in sha1_file.c - use C99 printf format if
available
shows that e05db0fd is reachable from itself, from v1.5.0-rc1,
and from v1.5.0-rc2, and not from v1.5.0-rc0.
Showing commits unique to a given branch
Suppose you would like to see all the commits reachable from the branch
head named master but not from any other head in your repository.
We can list all the heads in this repository with
git-show-ref(1):
$ git show-ref --heads
bf62196b5e363d73353a9dcf094c59595f3153b7 refs/heads/core-tutorial
db768d5504c1bb46f63ee9d6e1772bd047e05bf9 refs/heads/maint
a07157ac624b2524a059a3414e99f6f44bebc1e7 refs/heads/master
24dbc180ea14dc1aebe09f14c8ecf32010690627 refs/heads/tutorial-2
1e87486ae06626c2f31eaa63d26fc0fd646c8af2 refs/heads/tutorial-fixes
We can get just the branch-head names, and remove master, with
the help of the standard utilities cut and grep:
$ git show-ref --heads | cut -d' ' -f2 | grep -v '^refs/heads/master'
refs/heads/core-tutorial
refs/heads/maint
refs/heads/tutorial-2
refs/heads/tutorial-fixes
And then we can ask to see all the commits reachable from master
but not from these other heads:
$ gitk master --not $( git show-ref --heads | cut -d' ' -f2 |
                                grep -v '^refs/heads/master' )
Obviously, endless variations are possible; for example, to see all
commits reachable from some head but not from any tag in the repository:
$ gitk $( git show-ref --heads ) --not $( git show-ref --tags )
(See gitrevisions(7) for explanations of commit-selecting
syntax such as --not.)
Creating a changelog and tarball for a software release
The git-archive(1) command can create a tar or zip archive from
any version of a project; for example:
$ git archive -o latest.tar.gz --prefix=project/ HEAD
will use HEAD to produce a gzipped tar archive in which each filename
is preceded by project/. The output file format is inferred from
the output file extension if possible, see git-archive(1) for
details.
Versions of Git older than 1.7.7 don’t know about the tar.gz format,
you’ll need to use gzip explicitly:
$ git archive --format=tar --prefix=project/ HEAD | gzip >latest.tar.gz
If you’re releasing a new version of a software project, you may want
to simultaneously make a changelog to include in the release
announcement.
Linus Torvalds, for example, makes new kernel releases by tagging them,
then running:
$ release-script 2.6.12 2.6.13-rc6 2.6.13-rc7
where release-script is a shell script that looks like:
#!/bin/sh
stable="$1"
last="$2"
new="$3"
echo "# git tag v$new"
echo "git archive --prefix=linux-$new/ v$new | gzip -9 > ../linux-$new.tar.gz"
echo "git diff v$stable v$new | gzip -9 > ../patch-$new.gz"
echo "git log --no-merges v$new ^v$last > ../ChangeLog-$new"
echo "git shortlog --no-merges v$new ^v$last > ../ShortLog"
echo "git diff --stat --summary -M v$last v$new > ../diffstat-$new"
and then he just cut-and-pastes the output commands after verifying that
they look OK.
Finding commits referencing a file with given content
Somebody hands you a copy of a file, and asks which commits modified a
file such that it contained the given content either before or after the
commit. You can find out with this:
$  git log --raw --abbrev=40 --pretty=oneline |
        grep -B 1 `git hash-object filename`
Figuring out why this works is left as an exercise to the (advanced)
student. The git-log(1), git-diff-tree(1), and
git-hash-object(1) man pages may prove helpful.
Chapter 3. Developing with Git
Telling Git your name
Before creating any commits, you should introduce yourself to Git.
The easiest way to do so is to use git-config(1):
$ git config --global user.name 'Your Name Comes Here'
$ git config --global user.email 'you@yourdomain.example.com'
Which will add the following to a file named .gitconfig in your
home directory:
[user]
        name = Your Name Comes Here
        email = you@yourdomain.example.com
See the «CONFIGURATION FILE» section of git-config(1) for
details on the configuration file. The file is plain text, so you can
also edit it with your favorite editor.
Creating a new repository
Creating a new repository from scratch is very easy:
$ mkdir project
$ cd project
$ git init
If you have some initial content (say, a tarball):
$ tar xzvf project.tar.gz
$ cd project
$ git init
$ git add . # include everything below ./ in the first commit:
$ git commit
How to make a commit
Creating a new commit takes three steps:
-
Making some changes to the working directory using your
favorite editor. - Telling Git about your changes.
-
Creating the commit using the content you told Git about
in step 2.
In practice, you can interleave and repeat steps 1 and 2 as many
times as you want: in order to keep track of what you want committed
at step 3, Git maintains a snapshot of the tree’s contents in a
special staging area called «the index.»
At the beginning, the content of the index will be identical to
that of the HEAD. The command git diff --cached, which shows
the difference between the HEAD and the index, should therefore
produce no output at that point.
Modifying the index is easy:
To update the index with the contents of a new or modified file, use
$ git add path/to/file
To remove a file from the index and from the working tree, use
$ git rm path/to/file
After each step you can verify that
$ git diff --cached
always shows the difference between the HEAD and the index file—this
is what you’d commit if you created the commit now—and that
$ git diff
shows the difference between the working tree and the index file.
Note that git add always adds just the current contents of a file
to the index; further changes to the same file will be ignored unless
you run git add on the file again.
When you’re ready, just run
$ git commit
and Git will prompt you for a commit message and then create the new
commit. Check to make sure it looks like what you expected with
$ git show
As a special shortcut,
$ git commit -a
will update the index with any files that you’ve modified or removed
and create a commit, all in one step.
A number of commands are useful for keeping track of what you’re
about to commit:
$ git diff --cached # difference between HEAD and the index; what
                    # would be committed if you ran "commit" now.
$ git diff          # difference between the index file and your
                    # working directory; changes that would not
                    # be included if you ran "commit" now.
$ git diff HEAD     # difference between HEAD and working tree; what
                    # would be committed if you ran "commit -a" now.
$ git status        # a brief per-file summary of the above.
You can also use git-gui(1) to create commits, view changes in
the index and the working tree files, and individually select diff hunks
for inclusion in the index (by right-clicking on the diff hunk and
choosing «Stage Hunk For Commit»).
Creating good commit messages
Though not required, it’s a good idea to begin the commit message
with a single short (less than 50 character) line summarizing the
change, followed by a blank line and then a more thorough
description. The text up to the first blank line in a commit
message is treated as the commit title, and that title is used
throughout Git. For example, git-format-patch(1) turns a
commit into email, and it uses the title on the Subject line and the
rest of the commit in the body.
Ignoring files
A project will often generate files that you do not want to track with Git.
This typically includes files generated by a build process or temporary
backup files made by your editor. Of course, not tracking files with Git
is just a matter of not calling git add on them. But it quickly becomes
annoying to have these untracked files lying around; e.g. they make
git add . practically useless, and they keep showing up in the output of
git status.
You can tell Git to ignore certain files by creating a file called
.gitignore in the top level of your working directory, with contents
such as:
# Lines starting with '#' are considered comments.
# Ignore any file named foo.txt.
foo.txt
# Ignore (generated) html files,
*.html
# except foo.html which is maintained by hand.
!foo.html
# Ignore objects and archives.
*.[oa]
See gitignore(5) for a detailed explanation of the syntax. You can
also place .gitignore files in other directories in your working tree, and they
will apply to those directories and their subdirectories. The .gitignore
files can be added to your repository like any other files (just run git add and
.gitignoregit commit, as usual), which is convenient when the exclude
patterns (such as patterns matching build output files) would also make sense
for other users who clone your repository.
If you wish the exclude patterns to affect only certain repositories
(instead of every repository for a given project), you may instead put
them in a file in your repository named .git/info/exclude, or in any
file specified by the core.excludesFile configuration variable.
Some Git commands can also take exclude patterns directly on the
command line. See gitignore(5) for the details.
How to merge
You can rejoin two diverging branches of development using
git-merge(1):
$ git merge branchname
merges the development in the branch branchname into the current
branch.
A merge is made by combining the changes made in branchname and the
changes made up to the latest commit in your current branch since
their histories forked. The work tree is overwritten by the result of
the merge when this combining is done cleanly, or overwritten by a
half-merged results when this combining results in conflicts.
Therefore, if you have uncommitted changes touching the same files as
the ones impacted by the merge, Git will refuse to proceed. Most of
the time, you will want to commit your changes before you can merge,
and if you don’t, then git-stash(1) can take these changes
away while you’re doing the merge, and reapply them afterwards.
If the changes are independent enough, Git will automatically complete
the merge and commit the result (or reuse an existing commit in case
of fast-forward, see below). On the other hand,
if there are conflicts—for example, if the same file is
modified in two different ways in the remote branch and the local
branch—then you are warned; the output may look something like this:
$ git merge next
 100% (4/4) done
Auto-merged file.txt
CONFLICT (content): Merge conflict in file.txt
Automatic merge failed; fix conflicts and then commit the result.
Conflict markers are left in the problematic files, and after
you resolve the conflicts manually, you can update the index
with the contents and run Git commit, as you normally would when
creating a new file.
If you examine the resulting commit using gitk, you will see that it
has two parents, one pointing to the top of the current branch, and
one to the top of the other branch.
Resolving a merge
When a merge isn’t resolved automatically, Git leaves the index and
the working tree in a special state that gives you all the
information you need to help resolve the merge.
Files with conflicts are marked specially in the index, so until you
resolve the problem and update the index, git-commit(1) will
fail:
$ git commit
file.txt: needs merge
Also, git-status(1) will list those files as «unmerged», and the
files with conflicts will have conflict markers added, like this:
<<<<<<< HEAD:file.txt
Hello world
=======
Goodbye
>>>>>>> 77976da35a11db4580b80ae27e8d65caf5208086:file.txt
All you need to do is edit the files to resolve the conflicts, and then
$ git add file.txt
$ git commit
Note that the commit message will already be filled in for you with
some information about the merge. Normally you can just use this
default message unchanged, but you may add additional commentary of
your own if desired.
The above is all you need to know to resolve a simple merge. But Git
also provides more information to help resolve conflicts:
Getting conflict-resolution help during a merge
All of the changes that Git was able to merge automatically are
already added to the index file, so git-diff(1) shows only
the conflicts. It uses an unusual syntax:
$ git diff
diff --cc file.txt
index 802992c,2b60207..0000000
--- a/file.txt
+++ b/file.txt
@@@ -1,1 -1,1 +1,5 @@@
++<<<<<<< HEAD:file.txt
 +Hello world
++=======
+ Goodbye
++>>>>>>> 77976da35a11db4580b80ae27e8d65caf5208086:file.txt
Recall that the commit which will be committed after we resolve this
conflict will have two parents instead of the usual one: one parent
will be HEAD, the tip of the current branch; the other will be the
tip of the other branch, which is stored temporarily in MERGE_HEAD.
During the merge, the index holds three versions of each file. Each of
these three «file stages» represents a different version of the file:
$ git show :1:file.txt  # the file in a common ancestor of both branches
$ git show :2:file.txt  # the version from HEAD.
$ git show :3:file.txt  # the version from MERGE_HEAD.
When you ask git-diff(1) to show the conflicts, it runs a
three-way diff between the conflicted merge results in the work tree with
stages 2 and 3 to show only hunks whose contents come from both sides,
mixed (in other words, when a hunk’s merge results come only from stage 2,
that part is not conflicting and is not shown. Same for stage 3).
The diff above shows the differences between the working-tree version of
file.txt and the stage 2 and stage 3 versions. So instead of preceding
each line by a single + or -, it now uses two columns: the first
column is used for differences between the first parent and the working
directory copy, and the second for differences between the second parent
and the working directory copy. (See the «COMBINED DIFF FORMAT» section
of git-diff-files(1) for a details of the format.)
After resolving the conflict in the obvious way (but before updating the
index), the diff will look like:
$ git diff
diff --cc file.txt
index 802992c,2b60207..0000000
--- a/file.txt
+++ b/file.txt
@@@ -1,1 -1,1 +1,1 @@@
- Hello world
 -Goodbye
++Goodbye world
This shows that our resolved version deleted «Hello world» from the
first parent, deleted «Goodbye» from the second parent, and added
«Goodbye world», which was previously absent from both.
Some special diff options allow diffing the working directory against
any of these stages:
$ git diff -1 file.txt          # diff against stage 1
$ git diff --base file.txt      # same as the above
$ git diff -2 file.txt          # diff against stage 2
$ git diff --ours file.txt      # same as the above
$ git diff -3 file.txt          # diff against stage 3
$ git diff --theirs file.txt    # same as the above.
The git-log(1) and gitk(1) commands also provide special help
for merges:
$ git log --merge
$ gitk --merge
These will display all commits which exist only on HEAD or on
MERGE_HEAD, and which touch an unmerged file.
You may also use git-mergetool(1), which lets you merge the
unmerged files using external tools such as Emacs or kdiff3.
Each time you resolve the conflicts in a file and update the index:
$ git add file.txt
the different stages of that file will be «collapsed», after which
git diff will (by default) no longer show diffs for that file.
Undoing a merge
If you get stuck and decide to just give up and throw the whole mess
away, you can always return to the pre-merge state with
$ git merge --abort
Or, if you’ve already committed the merge that you want to throw away,
$ git reset --hard ORIG_HEAD
However, this last command can be dangerous in some cases—never
throw away a commit you have already committed if that commit may
itself have been merged into another branch, as doing so may confuse
further merges.
Fast-forward merges
There is one special case not mentioned above, which is treated
differently. Normally, a merge results in a merge commit, with two
parents, one pointing at each of the two lines of development that
were merged.
However, if the current branch is an ancestor of the other—so every commit
present in the current branch is already contained in the other branch—then Git
just performs a «fast-forward»; the head of the current branch is moved forward
to point at the head of the merged-in branch, without any new commits being
created.
Fixing mistakes
If you’ve messed up the working tree, but haven’t yet committed your
mistake, you can return the entire working tree to the last committed
state with
$ git restore --staged --worktree :/
If you make a commit that you later wish you hadn’t, there are two
fundamentally different ways to fix the problem:
-
You can create a new commit that undoes whatever was done
by the old commit. This is the correct thing if your
mistake has already been made public. -
You can go back and modify the old commit. You should
never do this if you have already made the history public;
Git does not normally expect the «history» of a project to
change, and cannot correctly perform repeated merges from
a branch that has had its history changed.
Fixing a mistake with a new commit
Creating a new commit that reverts an earlier change is very easy;
just pass the git-revert(1) command a reference to the bad
commit; for example, to revert the most recent commit:
$ git revert HEAD
This will create a new commit which undoes the change in HEAD. You
will be given a chance to edit the commit message for the new commit.
You can also revert an earlier change, for example, the next-to-last:
$ git revert HEAD^
In this case Git will attempt to undo the old change while leaving
intact any changes made since then. If more recent changes overlap
with the changes to be reverted, then you will be asked to fix
conflicts manually, just as in the case of resolving a merge.
Fixing a mistake by rewriting history
If the problematic commit is the most recent commit, and you have not
yet made that commit public, then you may just
destroy it using git reset.
Alternatively, you
can edit the working directory and update the index to fix your
mistake, just as if you were going to create a new commit, then run
$ git commit --amend
which will replace the old commit by a new commit incorporating your
changes, giving you a chance to edit the old commit message first.
Again, you should never do this to a commit that may already have
been merged into another branch; use git-revert(1) instead in
that case.
It is also possible to replace commits further back in the history, but
this is an advanced topic to be left for
another chapter.
Checking out an old version of a file
In the process of undoing a previous bad change, you may find it
useful to check out an older version of a particular file using
git-restore(1). The command
$ git restore --source=HEAD^ path/to/file
replaces path/to/file by the contents it had in the commit HEAD^, and
also updates the index to match. It does not change branches.
If you just want to look at an old version of the file, without
modifying the working directory, you can do that with
git-show(1):
$ git show HEAD^:path/to/file
which will display the given version of the file.
Temporarily setting aside work in progress
While you are in the middle of working on something complicated, you
find an unrelated but obvious and trivial bug. You would like to fix it
before continuing. You can use git-stash(1) to save the current
state of your work, and after fixing the bug (or, optionally after doing
so on a different branch and then coming back), unstash the
work-in-progress changes.
$ git stash push -m "work in progress for foo feature"
This command will save your changes away to the stash, and
reset your working tree and the index to match the tip of your
current branch. Then you can make your fix as usual.
... edit and test ...
$ git commit -a -m "blorpl: typofix"
After that, you can go back to what you were working on with
git stash pop:
$ git stash pop
Ensuring good performance
On large repositories, Git depends on compression to keep the history
information from taking up too much space on disk or in memory. Some
Git commands may automatically run git-gc(1), so you don’t
have to worry about running it manually. However, compressing a large
repository may take a while, so you may want to call gc explicitly
to avoid automatic compression kicking in when it is not convenient.
Ensuring reliability
Checking the repository for corruption
The git-fsck(1) command runs a number of self-consistency checks
on the repository, and reports on any problems. This may take some
time.
$ git fsck
dangling commit 7281251ddd2a61e38657c827739c57015671a6b3
dangling commit 2706a059f258c6b245f298dc4ff2ccd30ec21a63
dangling commit 13472b7c4b80851a1bc551779171dcb03655e9b5
dangling blob 218761f9d90712d37a9c5e36f406f92202db07eb
dangling commit bf093535a34a4d35731aa2bd90fe6b176302f14f
dangling commit 8e4bec7f2ddaa268bef999853c25755452100f8e
dangling tree d50bb86186bf27b681d25af89d3b5b68382e4085
dangling tree b24c2473f1fd3d91352a624795be026d64c8841f
...
You will see informational messages on dangling objects. They are objects
that still exist in the repository but are no longer referenced by any of
your branches, and can (and will) be removed after a while with gc.
You can run git fsck --no-dangling to suppress these messages, and still
view real errors.
Recovering lost changes
Reflogs
Say you modify a branch with git reset --hard,
and then realize that the branch was the only reference you had to
that point in history.
Fortunately, Git also keeps a log, called a «reflog», of all the
previous values of each branch. So in this case you can still find the
old history using, for example,
$ git log master@{1}
This lists the commits reachable from the previous version of the
master branch head. This syntax can be used with any Git command
that accepts a commit, not just with git log. Some other examples:
$ git show master@{2}           # See where the branch pointed 2,
$ git show master@{3}           # 3, ... changes ago.
$ gitk master@{yesterday}       # See where it pointed yesterday,
$ gitk master@{"1 week ago"}    # ... or last week
$ git log --walk-reflogs master # show reflog entries for master
A separate reflog is kept for the HEAD, so
$ git show HEAD@{"1 week ago"}
will show what HEAD pointed to one week ago, not what the current branch
pointed to one week ago. This allows you to see the history of what
you’ve checked out.
The reflogs are kept by default for 30 days, after which they may be
pruned. See git-reflog(1) and git-gc(1) to learn
how to control this pruning, and see the «SPECIFYING REVISIONS»
section of gitrevisions(7) for details.
Note that the reflog history is very different from normal Git history.
While normal history is shared by every repository that works on the
same project, the reflog history is not shared: it tells you only about
how the branches in your local repository have changed over time.
Examining dangling objects
In some situations the reflog may not be able to save you. For example,
suppose you delete a branch, then realize you need the history it
contained. The reflog is also deleted; however, if you have not yet
pruned the repository, then you may still be able to find the lost
commits in the dangling objects that git fsck reports. See
the section called “Dangling objects” for the details.
$ git fsck
dangling commit 7281251ddd2a61e38657c827739c57015671a6b3
dangling commit 2706a059f258c6b245f298dc4ff2ccd30ec21a63
dangling commit 13472b7c4b80851a1bc551779171dcb03655e9b5
...
You can examine
one of those dangling commits with, for example,
$ gitk 7281251ddd --not --all
which does what it sounds like: it says that you want to see the commit
history that is described by the dangling commit(s), but not the
history that is described by all your existing branches and tags. Thus
you get exactly the history reachable from that commit that is lost.
(And notice that it might not be just one commit: we only report the
«tip of the line» as being dangling, but there might be a whole deep
and complex commit history that was dropped.)
If you decide you want the history back, you can always create a new
reference pointing to it, for example, a new branch:
$ git branch recovered-branch 7281251ddd
Other types of dangling objects (blobs and trees) are also possible, and
dangling objects can arise in other situations.
Chapter 4. Sharing development with others
Getting updates with git pull
After you clone a repository and commit a few changes of your own, you
may wish to check the original repository for updates and merge them
into your own work.
We have already seen how to keep remote-tracking branches up to date with git-fetch(1),
and how to merge two branches. So you can merge in changes from the
original repository’s master branch with:
$ git fetch
$ git merge origin/master
However, the git-pull(1) command provides a way to do this in
one step:
$ git pull origin master
In fact, if you have master checked out, then this branch has been
configured by git clone to get changes from the HEAD branch of the
origin repository. So often you can
accomplish the above with just a simple
$ git pull
This command will fetch changes from the remote branches to your
remote-tracking branches origin/*, and merge the default branch into
the current branch.
More generally, a branch that is created from a remote-tracking branch
will pull
by default from that branch. See the descriptions of the
branch.<name>.remote and branch.<name>.merge options in
git-config(1), and the discussion of the --track option in
git-checkout(1), to learn how to control these defaults.
In addition to saving you keystrokes, git pull also helps you by
producing a default commit message documenting the branch and
repository that you pulled from.
(But note that no such commit will be created in the case of a
fast-forward; instead, your branch will just be
updated to point to the latest commit from the upstream branch.)
The git pull command can also be given . as the «remote» repository,
in which case it just merges in a branch from the current repository; so
the commands
$ git pull . branch
$ git merge branch
are roughly equivalent.
Submitting patches to a project
If you just have a few changes, the simplest way to submit them may
just be to send them as patches in email:
First, use git-format-patch(1); for example:
$ git format-patch origin
will produce a numbered series of files in the current directory, one
for each patch in the current branch but not in origin/HEAD.
git format-patch can include an initial «cover letter». You can insert
commentary on individual patches after the three dash line which
format-patch places after the commit message but before the patch
itself. If you use git notes to track your cover letter material,
git format-patch --notes will include the commit’s notes in a similar
manner.
You can then import these into your mail client and send them by
hand. However, if you have a lot to send at once, you may prefer to
use the git-send-email(1) script to automate the process.
Consult the mailing list for your project first to determine
their requirements for submitting patches.
Importing patches to a project
Git also provides a tool called git-am(1) (am stands for
«apply mailbox»), for importing such an emailed series of patches.
Just save all of the patch-containing messages, in order, into a
single mailbox file, say patches.mbox, then run
$ git am -3 patches.mbox
Git will apply each patch in order; if any conflicts are found, it
will stop, and you can fix the conflicts as described in
«Resolving a merge». (The -3 option tells
Git to perform a merge; if you would prefer it just to abort and
leave your tree and index untouched, you may omit that option.)
Once the index is updated with the results of the conflict
resolution, instead of creating a new commit, just run
$ git am --continue
and Git will create the commit for you and continue applying the
remaining patches from the mailbox.
The final result will be a series of commits, one for each patch in
the original mailbox, with authorship and commit log message each
taken from the message containing each patch.
Public Git repositories
Another way to submit changes to a project is to tell the maintainer
of that project to pull the changes from your repository using
git-pull(1). In the section «Getting updates with git pull» we described this as a way to get
updates from the «main» repository, but it works just as well in the
other direction.
If you and the maintainer both have accounts on the same machine, then
you can just pull changes from each other’s repositories directly;
commands that accept repository URLs as arguments will also accept a
local directory name:
$ git clone /path/to/repository
$ git pull /path/to/other/repository
or an ssh URL:
$ git clone ssh://yourhost/~you/repository
For projects with few developers, or for synchronizing a few private
repositories, this may be all you need.
However, the more common way to do this is to maintain a separate public
repository (usually on a different host) for others to pull changes
from. This is usually more convenient, and allows you to cleanly
separate private work in progress from publicly visible work.
You will continue to do your day-to-day work in your personal
repository, but periodically «push» changes from your personal
repository into your public repository, allowing other developers to
pull from that repository. So the flow of changes, in a situation
where there is one other developer with a public repository, looks
like this:
                      you push
your personal repo ------------------> your public repo
      ^                                     |
      |                                     |
      | you pull                            | they pull
      |                                     |
      |                                     |
      |               they push             V
their public repo <------------------- their repo
We explain how to do this in the following sections.
Setting up a public repository
Assume your personal repository is in the directory ~/proj. We
first create a new clone of the repository and tell git daemon that it
is meant to be public:
$ git clone --bare ~/proj proj.git
$ touch proj.git/git-daemon-export-ok
The resulting directory proj.git contains a «bare» git repository—it is
just the contents of the .git directory, without any files checked out
around it.
Next, copy proj.git to the server where you plan to host the
public repository. You can use scp, rsync, or whatever is most
convenient.
Exporting a Git repository via the Git protocol
This is the preferred method.
If someone else administers the server, they should tell you what
directory to put the repository in, and what git:// URL it will
appear at. You can then skip to the section
«Pushing changes to a public repository», below.
Otherwise, all you need to do is start git-daemon(1); it will
listen on port 9418. By default, it will allow access to any directory
that looks like a Git directory and contains the magic file
git-daemon-export-ok. Passing some directory paths as git daemon
arguments will further restrict the exports to those paths.
You can also run git daemon as an inetd service; see the
git-daemon(1) man page for details. (See especially the
examples section.)
Exporting a git repository via HTTP
The Git protocol gives better performance and reliability, but on a
host with a web server set up, HTTP exports may be simpler to set up.
All you need to do is place the newly created bare Git repository in
a directory that is exported by the web server, and make some
adjustments to give web clients some extra information they need:
$ mv proj.git /home/you/public_html/proj.git
$ cd proj.git
$ git --bare update-server-info
$ mv hooks/post-update.sample hooks/post-update
(For an explanation of the last two lines, see
git-update-server-info(1) and githooks(5).)
Advertise the URL of proj.git. Anybody else should then be able to
clone or pull from that URL, for example with a command line like:
$ git clone http://yourserver.com/~you/proj.git
(See also
setup-git-server-over-http
for a slightly more sophisticated setup using WebDAV which also
allows pushing over HTTP.)
Pushing changes to a public repository
Note that the two techniques outlined above (exporting via
http or git) allow other
maintainers to fetch your latest changes, but they do not allow write
access, which you will need to update the public repository with the
latest changes created in your private repository.
The simplest way to do this is using git-push(1) and ssh; to
update the remote branch named master with the latest state of your
branch named master, run
$ git push ssh://yourserver.com/~you/proj.git master:master
or just
$ git push ssh://yourserver.com/~you/proj.git master
As with git fetch, git push will complain if this does not result in a
fast-forward; see the following section for details on
handling this case.
Note that the target of a push is normally a
bare repository. You can also push to a
repository that has a checked-out working tree, but a push to update the
currently checked-out branch is denied by default to prevent confusion.
See the description of the receive.denyCurrentBranch option
in git-config(1) for details.
As with git fetch, you may also set up configuration options to
save typing; so, for example:
$ git remote add public-repo ssh://yourserver.com/~you/proj.git
adds the following to .git/config:
[remote "public-repo"]
        url = yourserver.com:proj.git
        fetch = +refs/heads/*:refs/remotes/example/*
which lets you do the same push with just
$ git push public-repo master
See the explanations of the remote.<name>.url,
branch.<name>.remote, and remote.<name>.push options in
git-config(1) for details.
What to do when a push fails
If a push would not result in a fast-forward of the
remote branch, then it will fail with an error like:
 ! [rejected]        master -> master (non-fast-forward)
error: failed to push some refs to '...'
hint: Updates were rejected because the tip of your current branch is behind
hint: its remote counterpart. Integrate the remote changes (e.g.
hint: 'git pull ...') before pushing again.
hint: See the 'Note about fast-forwards' in 'git push --help' for details.
This can happen, for example, if you:
-
use
git reset --hardto remove already-published commits, or -
use
git commit --amendto replace already-published commits
(as in the section called “Fixing a mistake by rewriting history”), or -
use
git rebaseto rebase any already-published commits (as
in the section called “Keeping a patch series up to date using git rebase”).
You may force git push to perform the update anyway by preceding the
branch name with a plus sign:
$ git push ssh://yourserver.com/~you/proj.git +master
Note the addition of the + sign. Alternatively, you can use the
-f flag to force the remote update, as in:
$ git push -f ssh://yourserver.com/~you/proj.git master
Normally whenever a branch head in a public repository is modified, it
is modified to point to a descendant of the commit that it pointed to
before. By forcing a push in this situation, you break that convention.
(See the section called “Problems with rewriting history”.)
Nevertheless, this is a common practice for people that need a simple
way to publish a work-in-progress patch series, and it is an acceptable
compromise as long as you warn other developers that this is how you
intend to manage the branch.
It’s also possible for a push to fail in this way when other people have
the right to push to the same repository. In that case, the correct
solution is to retry the push after first updating your work: either by a
pull, or by a fetch followed by a rebase; see the
next section and
gitcvs-migration(7) for more.
Setting up a shared repository
Another way to collaborate is by using a model similar to that
commonly used in CVS, where several developers with special rights
all push to and pull from a single shared repository. See
gitcvs-migration(7) for instructions on how to
set this up.
However, while there is nothing wrong with Git’s support for shared
repositories, this mode of operation is not generally recommended,
simply because the mode of collaboration that Git supports—by
exchanging patches and pulling from public repositories—has so many
advantages over the central shared repository:
-
Git’s ability to quickly import and merge patches allows a
single maintainer to process incoming changes even at very
high rates. And when that becomes too much,git pullprovides
an easy way for that maintainer to delegate this job to other
maintainers while still allowing optional review of incoming
changes. -
Since every developer’s repository has the same complete copy
of the project history, no repository is special, and it is
trivial for another developer to take over maintenance of a
project, either by mutual agreement, or because a maintainer
becomes unresponsive or difficult to work with. -
The lack of a central group of «committers» means there is
less need for formal decisions about who is «in» and who is
«out».
Allowing web browsing of a repository
The gitweb cgi script provides users an easy way to browse your
project’s revisions, file contents and logs without having to install
Git. Features like RSS/Atom feeds and blame/annotation details may
optionally be enabled.
The git-instaweb(1) command provides a simple way to start
browsing the repository using gitweb. The default server when using
instaweb is lighttpd.
See the file gitweb/INSTALL in the Git source tree and
gitweb(1) for instructions on details setting up a permanent
installation with a CGI or Perl capable server.
How to get a Git repository with minimal history
A shallow clone, with its truncated
history, is useful when one is interested only in recent history
of a project and getting full history from the upstream is
expensive.
A shallow clone is created by specifying
the git-clone(1) --depth switch. The depth can later be
changed with the git-fetch(1) --depth switch, or full
history restored with --unshallow.
Merging inside a shallow clone will work as long
as a merge base is in the recent history.
Otherwise, it will be like merging unrelated histories and may
have to result in huge conflicts. This limitation may make such
a repository unsuitable to be used in merge based workflows.
Examples
Maintaining topic branches for a Linux subsystem maintainer
This describes how Tony Luck uses Git in his role as maintainer of the
IA64 architecture for the Linux kernel.
He uses two public branches:
-
A «test» tree into which patches are initially placed so that they
can get some exposure when integrated with other ongoing development.
This tree is available to Andrew for pulling into -mm whenever he
wants. -
A «release» tree into which tested patches are moved for final sanity
checking, and as a vehicle to send them upstream to Linus (by sending
him a «please pull» request.)
He also uses a set of temporary branches («topic branches»), each
containing a logical grouping of patches.
To set this up, first create your work tree by cloning Linus’s public
tree:
$ git clone git://git.kernel.org/pub/scm/linux/kernel/git/torvalds/linux.git work
$ cd work
Linus’s tree will be stored in the remote-tracking branch named origin/master,
and can be updated using git-fetch(1); you can track other
public trees using git-remote(1) to set up a «remote» and
git-fetch(1) to keep them up to date; see
Chapter 1, Repositories and Branches.
Now create the branches in which you are going to work; these start out
at the current tip of origin/master branch, and should be set up (using
the --track option to git-branch(1)) to merge changes in from
Linus by default.
$ git branch --track test origin/master
$ git branch --track release origin/master
These can be easily kept up to date using git-pull(1).
$ git switch test && git pull
$ git switch release && git pull
Important note! If you have any local changes in these branches, then
this merge will create a commit object in the history (with no local
changes Git will simply do a «fast-forward» merge). Many people dislike
the «noise» that this creates in the Linux history, so you should avoid
doing this capriciously in the release branch, as these noisy commits
will become part of the permanent history when you ask Linus to pull
from the release branch.
A few configuration variables (see git-config(1)) can
make it easy to push both branches to your public tree. (See
the section called “Setting up a public repository”.)
$ cat >> .git/config <<EOF
[remote "mytree"]
        url =  master.kernel.org:/pub/scm/linux/kernel/git/aegl/linux.git
        push = release
        push = test
EOF
Then you can push both the test and release trees using
git-push(1):
$ git push mytree
or push just one of the test and release branches using:
$ git push mytree test
or
$ git push mytree release
Now to apply some patches from the community. Think of a short
snappy name for a branch to hold this patch (or related group of
patches), and create a new branch from a recent stable tag of
Linus’s branch. Picking a stable base for your branch will:
1) help you: by avoiding inclusion of unrelated and perhaps lightly
tested changes
2) help future bug hunters that use git bisect to find problems
$ git switch -c speed-up-spinlocks v2.6.35
Now you apply the patch(es), run some tests, and commit the change(s). If
the patch is a multi-part series, then you should apply each as a separate
commit to this branch.
$ ... patch ... test ... commit [ ... patch ... test ... commit ]*
When you are happy with the state of this change, you can merge it into the
«test» branch in preparation to make it public:
$ git switch test && git merge speed-up-spinlocks
It is unlikely that you would have any conflicts here … but you might if you
spent a while on this step and had also pulled new versions from upstream.
Sometime later when enough time has passed and testing done, you can pull the
same branch into the release tree ready to go upstream. This is where you
see the value of keeping each patch (or patch series) in its own branch. It
means that the patches can be moved into the release tree in any order.
$ git switch release && git merge speed-up-spinlocks
After a while, you will have a number of branches, and despite the
well chosen names you picked for each of them, you may forget what
they are for, or what status they are in. To get a reminder of what
changes are in a specific branch, use:
$ git log linux..branchname | git shortlog
To see whether it has already been merged into the test or release branches,
use:
$ git log test..branchname
or
$ git log release..branchname
(If this branch has not yet been merged, you will see some log entries.
If it has been merged, then there will be no output.)
Once a patch completes the great cycle (moving from test to release,
then pulled by Linus, and finally coming back into your local
origin/master branch), the branch for this change is no longer needed.
You detect this when the output from:
$ git log origin..branchname
is empty. At this point the branch can be deleted:
$ git branch -d branchname
Some changes are so trivial that it is not necessary to create a separate
branch and then merge into each of the test and release branches. For
these changes, just apply directly to the release branch, and then
merge that into the test branch.
After pushing your work to mytree, you can use
git-request-pull(1) to prepare a «please pull» request message
to send to Linus:
$ git push mytree
$ git request-pull origin mytree release
Here are some of the scripts that simplify all this even further.
==== update script ====
# Update a branch in my Git tree.  If the branch to be updated
# is origin, then pull from kernel.org.  Otherwise merge
# origin/master branch into test|release branch

case "$1" in
test|release)
        git checkout $1 && git pull . origin
        ;;
origin)
        before=$(git rev-parse refs/remotes/origin/master)
        git fetch origin
        after=$(git rev-parse refs/remotes/origin/master)
        if [ $before != $after ]
        then
                git log $before..$after | git shortlog
        fi
        ;;
*)
        echo "usage: $0 origin|test|release" 1>&2
        exit 1
        ;;
esac
==== merge script ====
# Merge a branch into either the test or release branch

pname=$0

usage()
{
        echo "usage: $pname branch test|release" 1>&2
        exit 1
}

git show-ref -q --verify -- refs/heads/"$1" || {
        echo "Can't see branch <$1>" 1>&2
        usage
}

case "$2" in
test|release)
        if [ $(git log $2..$1 | wc -c) -eq 0 ]
        then
                echo $1 already merged into $2 1>&2
                exit 1
        fi
        git checkout $2 && git pull . $1
        ;;
*)
        usage
        ;;
esac
==== status script ====
# report on status of my ia64 Git tree

gb=$(tput setab 2)
rb=$(tput setab 1)
restore=$(tput setab 9)

if [ `git rev-list test..release | wc -c` -gt 0 ]
then
        echo $rb Warning: commits in release that are not in test $restore
        git log test..release
fi

for branch in `git show-ref --heads | sed 's|^.*/||'`
do
        if [ $branch = test -o $branch = release ]
        then
                continue
        fi

        echo -n $gb ======= $branch ====== $restore " "
        status=
        for ref in test release origin/master
        do
                if [ `git rev-list $ref..$branch | wc -c` -gt 0 ]
                then
                        status=$status${ref:0:1}
                fi
        done
        case $status in
        trl)
                echo $rb Need to pull into test $restore
                ;;
        rl)
                echo "In test"
                ;;
        l)
                echo "Waiting for linus"
                ;;
        "")
                echo $rb All done $restore
                ;;
        *)
                echo $rb "<$status>" $restore
                ;;
        esac
        git log origin/master..$branch | git shortlog
done
Chapter 5. Rewriting history and maintaining patch series
Normally commits are only added to a project, never taken away or
replaced. Git is designed with this assumption, and violating it will
cause Git’s merge machinery (for example) to do the wrong thing.
However, there is a situation in which it can be useful to violate this
assumption.
Creating the perfect patch series
Suppose you are a contributor to a large project, and you want to add a
complicated feature, and to present it to the other developers in a way
that makes it easy for them to read your changes, verify that they are
correct, and understand why you made each change.
If you present all of your changes as a single patch (or commit), they
may find that it is too much to digest all at once.
If you present them with the entire history of your work, complete with
mistakes, corrections, and dead ends, they may be overwhelmed.
So the ideal is usually to produce a series of patches such that:
- Each patch can be applied in order.
-
Each patch includes a single logical change, together with a
message explaining the change. -
No patch introduces a regression: after applying any initial
part of the series, the resulting project still compiles and
works, and has no bugs that it didn’t have before. -
The complete series produces the same end result as your own
(probably much messier!) development process did.
We will introduce some tools that can help you do this, explain how to
use them, and then explain some of the problems that can arise because
you are rewriting history.
Keeping a patch series up to date using git rebase
Suppose that you create a branch mywork on a remote-tracking branch
origin, and create some commits on top of it:
$ git switch -c mywork origin
$ vi file.txt
$ git commit
$ vi otherfile.txt
$ git commit
...
You have performed no merges into mywork, so it is just a simple linear
sequence of patches on top of origin:
 o--o--O <-- origin

         a--b--c <-- mywork
Some more interesting work has been done in the upstream project, and
origin has advanced:
 o--o--O--o--o--o <-- origin

         a--b--c <-- mywork
At this point, you could use pull to merge your changes back in;
the result would create a new merge commit, like this:
 o--o--O--o--o--o <-- origin

         a--b--c--m <-- mywork
However, if you prefer to keep the history in mywork a simple series of
commits without any merges, you may instead choose to use
git-rebase(1):
$ git switch mywork
$ git rebase origin
This will remove each of your commits from mywork, temporarily saving
them as patches (in a directory named .git/rebase-apply), update mywork to
point at the latest version of origin, then apply each of the saved
patches to the new mywork. The result will look like:
 o--o--O--o--o--o <-- origin

                  a'--b'--c' <-- mywork
In the process, it may discover conflicts. In that case it will stop
and allow you to fix the conflicts; after fixing conflicts, use git add
to update the index with those contents, and then, instead of
running git commit, just run
$ git rebase --continue
and Git will continue applying the rest of the patches.
At any point you may use the --abort option to abort this process and
return mywork to the state it had before you started the rebase:
$ git rebase --abort
If you need to reorder or edit a number of commits in a branch, it may
be easier to use git rebase -i, which allows you to reorder and
squash commits, as well as marking them for individual editing during
the rebase. See the section called “Using interactive rebases” for details, and
the section called “Reordering or selecting from a patch series” for alternatives.
Rewriting a single commit
We saw in the section called “Fixing a mistake by rewriting history” that you can replace the
most recent commit using
$ git commit --amend
which will replace the old commit by a new commit incorporating your
changes, giving you a chance to edit the old commit message first.
This is useful for fixing typos in your last commit, or for adjusting
the patch contents of a poorly staged commit.
If you need to amend commits from deeper in your history, you can
use interactive rebase’s edit instruction.
Reordering or selecting from a patch series
Sometimes you want to edit a commit deeper in your history. One
approach is to use git format-patch to create a series of patches
and then reset the state to before the patches:
$ git format-patch origin
$ git reset --hard origin
Then modify, reorder, or eliminate patches as needed before applying
them again with git-am(1):
$ git am *.patch
Using interactive rebases
You can also edit a patch series with an interactive rebase. This is
the same as reordering a patch series using format-patch, so use whichever interface you like best.
Rebase your current HEAD on the last commit you want to retain as-is.
For example, if you want to reorder the last 5 commits, use:
$ git rebase -i HEAD~5
This will open your editor with a list of steps to be taken to perform
your rebase.
pick deadbee The oneline of this commit
pick fa1afe1 The oneline of the next commit
...

# Rebase c0ffeee..deadbee onto c0ffeee
#
# Commands:
#  p, pick = use commit
#  r, reword = use commit, but edit the commit message
#  e, edit = use commit, but stop for amending
#  s, squash = use commit, but meld into previous commit
#  f, fixup = like "squash", but discard this commit's log message
#  x, exec = run command (the rest of the line) using shell
#
# These lines can be re-ordered; they are executed from top to bottom.
#
# If you remove a line here THAT COMMIT WILL BE LOST.
#
# However, if you remove everything, the rebase will be aborted.
#
# Note that empty commits are commented out
As explained in the comments, you can reorder commits, squash them
together, edit commit messages, etc. by editing the list. Once you
are satisfied, save the list and close your editor, and the rebase
will begin.
The rebase will stop where pick has been replaced with edit or
when a step in the list fails to mechanically resolve conflicts and
needs your help. When you are done editing and/or resolving conflicts
you can continue with git rebase --continue. If you decide that
things are getting too hairy, you can always bail out with git rebase. Even after the rebase is complete, you can still recover
--abort
the original branch by using the reflog.
For a more detailed discussion of the procedure and additional tips,
see the «INTERACTIVE MODE» section of git-rebase(1).
Other tools
There are numerous other tools, such as StGit, which exist for the
purpose of maintaining a patch series. These are outside of the scope of
this manual.
Problems with rewriting history
The primary problem with rewriting the history of a branch has to do
with merging. Suppose somebody fetches your branch and merges it into
their branch, with a result something like this:
 o--o--O--o--o--o <-- origin

         t--t--t--m <-- their branch:
Then suppose you modify the last three commits:
         o--o--o <-- new head of origin
        /
 o--o--O--o--o--o <-- old head of origin
If we examined all this history together in one repository, it will
look like:
         o--o--o <-- new head of origin
        /
 o--o--O--o--o--o <-- old head of origin

         t--t--t--m <-- their branch:
Git has no way of knowing that the new head is an updated version of
the old head; it treats this situation exactly the same as it would if
two developers had independently done the work on the old and new heads
in parallel. At this point, if someone attempts to merge the new head
in to their branch, Git will attempt to merge together the two (old and
new) lines of development, instead of trying to replace the old by the
new. The results are likely to be unexpected.
You may still choose to publish branches whose history is rewritten,
and it may be useful for others to be able to fetch those branches in
order to examine or test them, but they should not attempt to pull such
branches into their own work.
For true distributed development that supports proper merging,
published branches should never be rewritten.
Why bisecting merge commits can be harder than bisecting linear history
The git-bisect(1) command correctly handles history that
includes merge commits. However, when the commit that it finds is a
merge commit, the user may need to work harder than usual to figure out
why that commit introduced a problem.
Imagine this history:
      ---Z---o---X---...---o---A---C---D
                                 /
           o---o---Y---...---o---B
Suppose that on the upper line of development, the meaning of one
of the functions that exists at Z is changed at commit X. The
commits from Z leading to A change both the function’s
implementation and all calling sites that exist at Z, as well
as new calling sites they add, to be consistent. There is no
bug at A.
Suppose that in the meantime on the lower line of development somebody
adds a new calling site for that function at commit Y. The
commits from Z leading to B all assume the old semantics of that
function and the callers and the callee are consistent with each
other. There is no bug at B, either.
Suppose further that the two development lines merge cleanly at C,
so no conflict resolution is required.
Nevertheless, the code at C is broken, because the callers added
on the lower line of development have not been converted to the new
semantics introduced on the upper line of development. So if all
you know is that D is bad, that Z is good, and that
git-bisect(1) identifies C as the culprit, how will you
figure out that the problem is due to this change in semantics?
When the result of a git bisect is a non-merge commit, you should
normally be able to discover the problem by examining just that commit.
Developers can make this easy by breaking their changes into small
self-contained commits. That won’t help in the case above, however,
because the problem isn’t obvious from examination of any single
commit; instead, a global view of the development is required. To
make matters worse, the change in semantics in the problematic
function may be just one small part of the changes in the upper
line of development.
On the other hand, if instead of merging at C you had rebased the
history between Z to B on top of A, you would have gotten this
linear history:
---Z---o---X--...---o---A---o---o---Y*--...---o---B*--D*
Bisecting between Z and D* would hit a single culprit commit Y*,
and understanding why Y* was broken would probably be easier.
Partly for this reason, many experienced Git users, even when
working on an otherwise merge-heavy project, keep the history
linear by rebasing against the latest upstream version before
publishing.
Chapter 6. Advanced branch management
Fetching individual branches
Instead of using git-remote(1), you can also choose just
to update one branch at a time, and to store it locally under an
arbitrary name:
$ git fetch origin todo:my-todo-work
The first argument, origin, just tells Git to fetch from the
repository you originally cloned from. The second argument tells Git
to fetch the branch named todo from the remote repository, and to
store it locally under the name refs/heads/my-todo-work.
You can also fetch branches from other repositories; so
$ git fetch git://example.com/proj.git master:example-master
will create a new branch named example-master and store in it the
branch named master from the repository at the given URL. If you
already have a branch named example-master, it will attempt to
fast-forward to the commit given by example.com’s
master branch. In more detail:
git fetch and fast-forwards
In the previous example, when updating an existing branch, git fetch
checks to make sure that the most recent commit on the remote
branch is a descendant of the most recent commit on your copy of the
branch before updating your copy of the branch to point at the new
commit. Git calls this process a fast-forward.
A fast-forward looks something like this:
 o--o--o--o <-- old head of the branch

            o--o--o <-- new head of the branch
In some cases it is possible that the new head will not actually be
a descendant of the old head. For example, the developer may have
realized a serious mistake was made and decided to backtrack,
resulting in a situation like:
 o--o--o--o--a--b <-- old head of the branch

            o--o--o <-- new head of the branch
In this case, git fetch will fail, and print out a warning.
In that case, you can still force Git to update to the new head, as
described in the following section. However, note that in the
situation above this may mean losing the commits labeled a and b,
unless you’ve already created a reference of your own pointing to
them.
Forcing git fetch to do non-fast-forward updates
If git fetch fails because the new head of a branch is not a
descendant of the old head, you may force the update with:
$ git fetch git://example.com/proj.git +master:refs/remotes/example/master
Note the addition of the + sign. Alternatively, you can use the -f
flag to force updates of all the fetched branches, as in:
$ git fetch -f origin
Be aware that commits that the old version of example/master pointed at
may be lost, as we saw in the previous section.
Configuring remote-tracking branches
We saw above that origin is just a shortcut to refer to the
repository that you originally cloned from. This information is
stored in Git configuration variables, which you can see using
git-config(1):
$ git config -l
core.repositoryformatversion=0
core.filemode=true
core.logallrefupdates=true
remote.origin.url=git://git.kernel.org/pub/scm/git/git.git
remote.origin.fetch=+refs/heads/*:refs/remotes/origin/*
branch.master.remote=origin
branch.master.merge=refs/heads/master
If there are other repositories that you also use frequently, you can
create similar configuration options to save typing; for example,
$ git remote add example git://example.com/proj.git
adds the following to .git/config:
[remote "example"]
        url = git://example.com/proj.git
        fetch = +refs/heads/*:refs/remotes/example/*
Also note that the above configuration can be performed by directly
editing the file .git/config instead of using git-remote(1).
After configuring the remote, the following three commands will do the
same thing:
$ git fetch git://example.com/proj.git +refs/heads/*:refs/remotes/example/*
$ git fetch example +refs/heads/*:refs/remotes/example/*
$ git fetch example
See git-config(1) for more details on the configuration
options mentioned above and git-fetch(1) for more details on
the refspec syntax.
Chapter 7. Git concepts
Git is built on a small number of simple but powerful ideas. While it
is possible to get things done without understanding them, you will find
Git much more intuitive if you do.
We start with the most important, the object database and the index.
The Object Database
We already saw in the section called “Understanding History: Commits” that all commits are stored
under a 40-digit «object name». In fact, all the information needed to
represent the history of a project is stored in objects with such names.
In each case the name is calculated by taking the SHA-1 hash of the
contents of the object. The SHA-1 hash is a cryptographic hash function.
What that means to us is that it is impossible to find two different
objects with the same name. This has a number of advantages; among
others:
-
Git can quickly determine whether two objects are identical or not,
just by comparing names. -
Since object names are computed the same way in every repository, the
same content stored in two repositories will always be stored under
the same name. -
Git can detect errors when it reads an object, by checking that the
object’s name is still the SHA-1 hash of its contents.
(See the section called “Object storage format” for the details of the object formatting and
SHA-1 calculation.)
There are four different types of objects: «blob», «tree», «commit», and
«tag».
- A «blob» object is used to store file data.
-
A «tree» object ties one or more
«blob» objects into a directory structure. In addition, a tree object
can refer to other tree objects, thus creating a directory hierarchy. -
A «commit» object ties such directory hierarchies
together into a directed acyclic graph of revisions—each
commit contains the object name of exactly one tree designating the
directory hierarchy at the time of the commit. In addition, a commit
refers to «parent» commit objects that describe the history of how we
arrived at that directory hierarchy. -
A «tag» object symbolically identifies and can be
used to sign other objects. It contains the object name and type of
another object, a symbolic name (of course!) and, optionally, a
signature.
The object types in some more detail:
Commit Object
The «commit» object links a physical state of a tree with a description
of how we got there and why. Use the --pretty=raw option to
git-show(1) or git-log(1) to examine your favorite
commit:
$ git show -s --pretty=raw 2be7fcb476
commit 2be7fcb4764f2dbcee52635b91fedb1b3dcf7ab4
tree fb3a8bdd0ceddd019615af4d57a53f43d8cee2bf
parent 257a84d9d02e90447b149af58b271c19405edb6a
author Dave Watson <dwatson@mimvista.com> 1187576872 -0400
committer Junio C Hamano <gitster@pobox.com> 1187591163 -0700

    Fix misspelling of 'suppress' in docs

    Signed-off-by: Junio C Hamano <gitster@pobox.com>
As you can see, a commit is defined by:
-
a tree: The SHA-1 name of a tree object (as defined below), representing
the contents of a directory at a certain point in time. -
parent(s): The SHA-1 name(s) of some number of commits which represent the
immediately previous step(s) in the history of the project. The
example above has one parent; merge commits may have more than
one. A commit with no parents is called a «root» commit, and
represents the initial revision of a project. Each project must have
at least one root. A project can also have multiple roots, though
that isn’t common (or necessarily a good idea). -
an author: The name of the person responsible for this change, together
with its date. -
a committer: The name of the person who actually created the commit,
with the date it was done. This may be different from the author, for
example, if the author was someone who wrote a patch and emailed it
to the person who used it to create the commit. - a comment describing this commit.
Note that a commit does not itself contain any information about what
actually changed; all changes are calculated by comparing the contents
of the tree referred to by this commit with the trees associated with
its parents. In particular, Git does not attempt to record file renames
explicitly, though it can identify cases where the existence of the same
file data at changing paths suggests a rename. (See, for example, the
-M option to git-diff(1)).
A commit is usually created by git-commit(1), which creates a
commit whose parent is normally the current HEAD, and whose tree is
taken from the content currently stored in the index.
Tree Object
The ever-versatile git-show(1) command can also be used to
examine tree objects, but git-ls-tree(1) will give you more
details:
$ git ls-tree fb3a8bdd0ce
100644 blob 63c918c667fa005ff12ad89437f2fdc80926e21c    .gitignore
100644 blob 5529b198e8d14decbe4ad99db3f7fb632de0439d    .mailmap
100644 blob 6ff87c4664981e4397625791c8ea3bbb5f2279a3    COPYING
040000 tree 2fb783e477100ce076f6bf57e4a6f026013dc745    Documentation
100755 blob 3c0032cec592a765692234f1cba47dfdcc3a9200    GIT-VERSION-GEN
100644 blob 289b046a443c0647624607d471289b2c7dcd470b    INSTALL
100644 blob 4eb463797adc693dc168b926b6932ff53f17d0b1    Makefile
100644 blob 548142c327a6790ff8821d67c2ee1eff7a656b52    README
...
As you can see, a tree object contains a list of entries, each with a
mode, object type, SHA-1 name, and name, sorted by name. It represents
the contents of a single directory tree.
The object type may be a blob, representing the contents of a file, or
another tree, representing the contents of a subdirectory. Since trees
and blobs, like all other objects, are named by the SHA-1 hash of their
contents, two trees have the same SHA-1 name if and only if their
contents (including, recursively, the contents of all subdirectories)
are identical. This allows Git to quickly determine the differences
between two related tree objects, since it can ignore any entries with
identical object names.
(Note: in the presence of submodules, trees may also have commits as
entries. See Chapter 8, Submodules for documentation.)
Note that the files all have mode 644 or 755: Git actually only pays
attention to the executable bit.
Blob Object
You can use git-show(1) to examine the contents of a blob; take,
for example, the blob in the entry for COPYING from the tree above:
$ git show 6ff87c4664

 Note that the only valid version of the GPL as far as this project
 is concerned is _this_ particular version of the license (ie v2, not
 v2.2 or v3.x or whatever), unless explicitly otherwise stated.
...
A «blob» object is nothing but a binary blob of data. It doesn’t refer
to anything else or have attributes of any kind.
Since the blob is entirely defined by its data, if two files in a
directory tree (or in multiple different versions of the repository)
have the same contents, they will share the same blob object. The object
is totally independent of its location in the directory tree, and
renaming a file does not change the object that file is associated with.
Note that any tree or blob object can be examined using
git-show(1) with the <revision>:<path> syntax. This can
sometimes be useful for browsing the contents of a tree that is not
currently checked out.
Trust
If you receive the SHA-1 name of a blob from one source, and its contents
from another (possibly untrusted) source, you can still trust that those
contents are correct as long as the SHA-1 name agrees. This is because
the SHA-1 is designed so that it is infeasible to find different contents
that produce the same hash.
Similarly, you need only trust the SHA-1 name of a top-level tree object
to trust the contents of the entire directory that it refers to, and if
you receive the SHA-1 name of a commit from a trusted source, then you
can easily verify the entire history of commits reachable through
parents of that commit, and all of those contents of the trees referred
to by those commits.
So to introduce some real trust in the system, the only thing you need
to do is to digitally sign just one special note, which includes the
name of a top-level commit. Your digital signature shows others
that you trust that commit, and the immutability of the history of
commits tells others that they can trust the whole history.
In other words, you can easily validate a whole archive by just
sending out a single email that tells the people the name (SHA-1 hash)
of the top commit, and digitally sign that email using something
like GPG/PGP.
To assist in this, Git also provides the tag object…
Tag Object
A tag object contains an object, object type, tag name, the name of the
person («tagger») who created the tag, and a message, which may contain
a signature, as can be seen using git-cat-file(1):
$ git cat-file tag v1.5.0
object 437b1b20df4b356c9342dac8d38849f24ef44f27
type commit
tag v1.5.0
tagger Junio C Hamano <junkio@cox.net> 1171411200 +0000

GIT 1.5.0
-----BEGIN PGP SIGNATURE-----
Version: GnuPG v1.4.6 (GNU/Linux)

iD8DBQBF0lGqwMbZpPMRm5oRAuRiAJ9ohBLd7s2kqjkKlq1qqC57SbnmzQCdG4ui
nLE/L9aUXdWeTFPron96DLA=
=2E+0
-----END PGP SIGNATURE-----
See the git-tag(1) command to learn how to create and verify tag
objects. (Note that git-tag(1) can also be used to create
«lightweight tags», which are not tag objects at all, but just simple
references whose names begin with refs/tags/).
How Git stores objects efficiently: pack files
Newly created objects are initially created in a file named after the
object’s SHA-1 hash (stored in .git/objects).
Unfortunately this system becomes inefficient once a project has a
lot of objects. Try this on an old project:
$ git count-objects
6930 objects, 47620 kilobytes
The first number is the number of objects which are kept in
individual files. The second is the amount of space taken up by
those «loose» objects.
You can save space and make Git faster by moving these loose objects in
to a «pack file», which stores a group of objects in an efficient
compressed format; the details of how pack files are formatted can be
found in gitformat-pack(5).
To put the loose objects into a pack, just run git repack:
$ git repack
Counting objects: 6020, done.
Delta compression using up to 4 threads.
Compressing objects: 100% (6020/6020), done.
Writing objects: 100% (6020/6020), done.
Total 6020 (delta 4070), reused 0 (delta 0)
This creates a single «pack file» in .git/objects/pack/
containing all currently unpacked objects. You can then run
$ git prune
to remove any of the «loose» objects that are now contained in the
pack. This will also remove any unreferenced objects (which may be
created when, for example, you use git reset to remove a commit).
You can verify that the loose objects are gone by looking at the
.git/objects directory or by running
$ git count-objects
0 objects, 0 kilobytes
Although the object files are gone, any commands that refer to those
objects will work exactly as they did before.
The git-gc(1) command performs packing, pruning, and more for
you, so is normally the only high-level command you need.
Dangling objects
The git-fsck(1) command will sometimes complain about dangling
objects. They are not a problem.
The most common cause of dangling objects is that you’ve rebased a
branch, or you have pulled from somebody else who rebased a branch—see
Chapter 5, Rewriting history and maintaining patch series. In that case, the old head of the original
branch still exists, as does everything it pointed to. The branch
pointer itself just doesn’t, since you replaced it with another one.
There are also other situations that cause dangling objects. For
example, a «dangling blob» may arise because you did a git add of a
file, but then, before you actually committed it and made it part of the
bigger picture, you changed something else in that file and committed
that updated thing—the old state that you added originally ends up
not being pointed to by any commit or tree, so it’s now a dangling blob
object.
Similarly, when the «ort» merge strategy runs, and finds that
there are criss-cross merges and thus more than one merge base (which is
fairly unusual, but it does happen), it will generate one temporary
midway tree (or possibly even more, if you had lots of criss-crossing
merges and more than two merge bases) as a temporary internal merge
base, and again, those are real objects, but the end result will not end
up pointing to them, so they end up «dangling» in your repository.
Generally, dangling objects aren’t anything to worry about. They can
even be very useful: if you screw something up, the dangling objects can
be how you recover your old tree (say, you did a rebase, and realized
that you really didn’t want to—you can look at what dangling objects
you have, and decide to reset your head to some old dangling state).
For commits, you can just use:
$ gitk <dangling-commit-sha-goes-here> --not --all
This asks for all the history reachable from the given commit but not
from any branch, tag, or other reference. If you decide it’s something
you want, you can always create a new reference to it, e.g.,
$ git branch recovered-branch <dangling-commit-sha-goes-here>
For blobs and trees, you can’t do the same, but you can still examine
them. You can just do
$ git show <dangling-blob/tree-sha-goes-here>
to show what the contents of the blob were (or, for a tree, basically
what the ls for that directory was), and that may give you some idea
of what the operation was that left that dangling object.
Usually, dangling blobs and trees aren’t very interesting. They’re
almost always the result of either being a half-way mergebase (the blob
will often even have the conflict markers from a merge in it, if you
have had conflicting merges that you fixed up by hand), or simply
because you interrupted a git fetch with ^C or something like that,
leaving some of the new objects in the object database, but just
dangling and useless.
Anyway, once you are sure that you’re not interested in any dangling
state, you can just prune all unreachable objects:
$ git prune
and they’ll be gone. (You should only run git prune on a quiescent
repository—it’s kind of like doing a filesystem fsck recovery: you
don’t want to do that while the filesystem is mounted.
git prune is designed not to cause any harm in such cases of concurrent
accesses to a repository but you might receive confusing or scary messages.)
Recovering from repository corruption
By design, Git treats data trusted to it with caution. However, even in
the absence of bugs in Git itself, it is still possible that hardware or
operating system errors could corrupt data.
The first defense against such problems is backups. You can back up a
Git directory using clone, or just using cp, tar, or any other backup
mechanism.
As a last resort, you can search for the corrupted objects and attempt
to replace them by hand. Back up your repository before attempting this
in case you corrupt things even more in the process.
We’ll assume that the problem is a single missing or corrupted blob,
which is sometimes a solvable problem. (Recovering missing trees and
especially commits is much harder).
Before starting, verify that there is corruption, and figure out where
it is with git-fsck(1); this may be time-consuming.
Assume the output looks like this:
$ git fsck --full --no-dangling
broken link from    tree 2d9263c6d23595e7cb2a21e5ebbb53655278dff8
              to    blob 4b9458b3786228369c63936db65827de3cc06200
missing blob 4b9458b3786228369c63936db65827de3cc06200
Now you know that blob 4b9458b3 is missing, and that the tree 2d9263c6
points to it. If you could find just one copy of that missing blob
object, possibly in some other repository, you could move it into
.git/objects/4b/9458b3... and be done. Suppose you can’t. You can
still examine the tree that pointed to it with git-ls-tree(1),
which might output something like:
$ git ls-tree 2d9263c6d23595e7cb2a21e5ebbb53655278dff8
100644 blob 8d14531846b95bfa3564b58ccfb7913a034323b8    .gitignore
100644 blob ebf9bf84da0aab5ed944264a5db2a65fe3a3e883    .mailmap
100644 blob ca442d313d86dc67e0a2e5d584b465bd382cbf5c    COPYING
...
100644 blob 4b9458b3786228369c63936db65827de3cc06200    myfile
...
So now you know that the missing blob was the data for a file named
myfile. And chances are you can also identify the directory—let’s
say it’s in somedirectory. If you’re lucky the missing copy might be
the same as the copy you have checked out in your working tree at
somedirectory/myfile; you can test whether that’s right with
git-hash-object(1):
$ git hash-object -w somedirectory/myfile
which will create and store a blob object with the contents of
somedirectory/myfile, and output the SHA-1 of that object. if you’re
extremely lucky it might be 4b9458b3786228369c63936db65827de3cc06200, in
which case you’ve guessed right, and the corruption is fixed!
Otherwise, you need more information. How do you tell which version of
the file has been lost?
The easiest way to do this is with:
$ git log --raw --all --full-history -- somedirectory/myfile
Because you’re asking for raw output, you’ll now get something like
commit abc
Author:
Date:
...
:100644 100644 4b9458b newsha M somedirectory/myfile


commit xyz
Author:
Date:

...
:100644 100644 oldsha 4b9458b M somedirectory/myfile
This tells you that the immediately following version of the file was
«newsha», and that the immediately preceding version was «oldsha».
You also know the commit messages that went with the change from oldsha
to 4b9458b and with the change from 4b9458b to newsha.
If you’ve been committing small enough changes, you may now have a good
shot at reconstructing the contents of the in-between state 4b9458b.
If you can do that, you can now recreate the missing object with
$ git hash-object -w <recreated-file>
and your repository is good again!
(Btw, you could have ignored the fsck, and started with doing a
$ git log --raw --all
and just looked for the sha of the missing object (4b9458b) in that
whole thing. It’s up to you—Git does have a lot of information, it is
just missing one particular blob version.
The index
The index is a binary file (generally kept in .git/index) containing a
sorted list of path names, each with permissions and the SHA-1 of a blob
object; git-ls-files(1) can show you the contents of the index:
$ git ls-files --stage
100644 63c918c667fa005ff12ad89437f2fdc80926e21c 0       .gitignore
100644 5529b198e8d14decbe4ad99db3f7fb632de0439d 0       .mailmap
100644 6ff87c4664981e4397625791c8ea3bbb5f2279a3 0       COPYING
100644 a37b2152bd26be2c2289e1f57a292534a51a93c7 0       Documentation/.gitignore
100644 fbefe9a45b00a54b58d94d06eca48b03d40a50e0 0       Documentation/Makefile
...
100644 2511aef8d89ab52be5ec6a5e46236b4b6bcd07ea 0       xdiff/xtypes.h
100644 2ade97b2574a9f77e7ae4002a4e07a6a38e46d07 0       xdiff/xutils.c
100644 d5de8292e05e7c36c4b68857c1cf9855e3d2f70a 0       xdiff/xutils.h
Note that in older documentation you may see the index called the
«current directory cache» or just the «cache». It has three important
properties:
-
The index contains all the information necessary to generate a single
(uniquely determined) tree object.For example, running git-commit(1) generates this tree object
from the index, stores it in the object database, and uses it as the
tree object associated with the new commit. -
The index enables fast comparisons between the tree object it defines
and the working tree.It does this by storing some additional data for each entry (such as
the last modified time). This data is not displayed above, and is not
stored in the created tree object, but it can be used to determine
quickly which files in the working directory differ from what was
stored in the index, and thus save Git from having to read all of the
data from such files to look for changes. -
It can efficiently represent information about merge conflicts
between different tree objects, allowing each pathname to be
associated with sufficient information about the trees involved that
you can create a three-way merge between them.We saw in the section called “Getting conflict-resolution help during a merge” that during a merge the index can
store multiple versions of a single file (called «stages»). The third
column in the git-ls-files(1) output above is the stage
number, and will take on values other than 0 for files with merge
conflicts.
The index is thus a sort of temporary staging area, which is filled with
a tree which you are in the process of working on.
If you blow the index away entirely, you generally haven’t lost any
information as long as you have the name of the tree that it described.
Chapter 8. Submodules
Table of Contents
- Pitfalls with submodules
Large projects are often composed of smaller, self-contained modules. For
example, an embedded Linux distribution’s source tree would include every
piece of software in the distribution with some local modifications; a movie
player might need to build against a specific, known-working version of a
decompression library; several independent programs might all share the same
build scripts.
With centralized revision control systems this is often accomplished by
including every module in one single repository. Developers can check out
all modules or only the modules they need to work with. They can even modify
files across several modules in a single commit while moving things around
or updating APIs and translations.
Git does not allow partial checkouts, so duplicating this approach in Git
would force developers to keep a local copy of modules they are not
interested in touching. Commits in an enormous checkout would be slower
than you’d expect as Git would have to scan every directory for changes.
If modules have a lot of local history, clones would take forever.
On the plus side, distributed revision control systems can much better
integrate with external sources. In a centralized model, a single arbitrary
snapshot of the external project is exported from its own revision control
and then imported into the local revision control on a vendor branch. All
the history is hidden. With distributed revision control you can clone the
entire external history and much more easily follow development and re-merge
local changes.
Git’s submodule support allows a repository to contain, as a subdirectory, a
checkout of an external project. Submodules maintain their own identity;
the submodule support just stores the submodule repository location and
commit ID, so other developers who clone the containing project
(«superproject») can easily clone all the submodules at the same revision.
Partial checkouts of the superproject are possible: you can tell Git to
clone none, some or all of the submodules.
The git-submodule(1) command is available since Git 1.5.3. Users
with Git 1.5.2 can look up the submodule commits in the repository and
manually check them out; earlier versions won’t recognize the submodules at
all.
To see how submodule support works, create four example
repositories that can be used later as a submodule:
$ mkdir ~/git
$ cd ~/git
$ for i in a b c d
do
        mkdir $i
        cd $i
        git init
        echo "module $i" > $i.txt
        git add $i.txt
        git commit -m "Initial commit, submodule $i"
        cd ..
done
Now create the superproject and add all the submodules:
$ mkdir super
$ cd super
$ git init
$ for i in a b c d
do
        git submodule add ~/git/$i $i
done
Note
Do not use local URLs here if you plan to publish your superproject!
See what files git submodule created:
$ ls -a
.  ..  .git  .gitmodules  a  b  c  d
The git submodule add <repo> <path> command does a couple of things:
-
It clones the submodule from
<repo>to the given<path>under the
current directory and by default checks out the master branch. -
It adds the submodule’s clone path to the gitmodules(5) file and
adds this file to the index, ready to be committed. -
It adds the submodule’s current commit ID to the index, ready to be
committed.
Commit the superproject:
$ git commit -m "Add submodules a, b, c and d."
Now clone the superproject:
$ cd ..
$ git clone super cloned
$ cd cloned
The submodule directories are there, but they’re empty:
$ ls -a a
.  ..
$ git submodule status
-d266b9873ad50488163457f025db7cdd9683d88b a
-e81d457da15309b4fef4249aba9b50187999670d b
-c1536a972b9affea0f16e0680ba87332dc059146 c
-d96249ff5d57de5de093e6baff9e0aafa5276a74 d
Note
The commit object names shown above would be different for you, but they
should match the HEAD commit object names of your repositories. You can check
it by running git ls-remote ../a.
Pulling down the submodules is a two-step process. First run git submodule to add the submodule repository URLs to
init.git/config:
$ git submodule init
Now use git submodule update to clone the repositories and check out the
commits specified in the superproject:
$ git submodule update
$ cd a
$ ls -a
.  ..  .git  a.txt
One major difference between git submodule update and git submodule add is
that git submodule update checks out a specific commit, rather than the tip
of a branch. It’s like checking out a tag: the head is detached, so you’re not
working on a branch.
$ git branch
* (detached from d266b98)
  master
If you want to make a change within a submodule and you have a detached head,
then you should create or checkout a branch, make your changes, publish the
change within the submodule, and then update the superproject to reference the
new commit:
$ git switch master
or
$ git switch -c fix-up
then
$ echo "adding a line again" >> a.txt
$ git commit -a -m "Updated the submodule from within the superproject."
$ git push
$ cd ..
$ git diff
diff --git a/a b/a
index d266b98..261dfac 160000
--- a/a
+++ b/a
@@ -1 +1 @@
-Subproject commit d266b9873ad50488163457f025db7cdd9683d88b
+Subproject commit 261dfac35cb99d380eb966e102c1197139f7fa24
$ git add a
$ git commit -m "Updated submodule a."
$ git push
You have to run git submodule update after git pull if you want to update
submodules, too.
Pitfalls with submodules
Always publish the submodule change before publishing the change to the
superproject that references it. If you forget to publish the submodule change,
others won’t be able to clone the repository:
$ cd ~/git/super/a
$ echo i added another line to this file >> a.txt
$ git commit -a -m "doing it wrong this time"
$ cd ..
$ git add a
$ git commit -m "Updated submodule a again."
$ git push
$ cd ~/git/cloned
$ git pull
$ git submodule update
error: pathspec '261dfac35cb99d380eb966e102c1197139f7fa24' did not match any file(s) known to git.
Did you forget to 'git add'?
Unable to checkout '261dfac35cb99d380eb966e102c1197139f7fa24' in submodule path 'a'
In older Git versions it could be easily forgotten to commit new or modified
files in a submodule, which silently leads to similar problems as not pushing
the submodule changes. Starting with Git 1.7.0 both git status and git diff
in the superproject show submodules as modified when they contain new or
modified files to protect against accidentally committing such a state. git will also add a
diff-dirty to the work tree side when generating patch
output or used with the --submodule option:
$ git diff diff --git a/sub b/sub --- a/sub +++ b/sub @@ -1 +1 @@ -Subproject commit 3f356705649b5d566d97ff843cf193359229a453 +Subproject commit 3f356705649b5d566d97ff843cf193359229a453-dirty $ git diff --submodule Submodule sub 3f35670..3f35670-dirty:
You also should not rewind branches in a submodule beyond commits that were
ever recorded in any superproject.
It’s not safe to run git submodule update if you’ve made and committed
changes within a submodule without checking out a branch first. They will be
silently overwritten:
$ cat a.txt module a $ echo line added from private2 >> a.txt $ git commit -a -m "line added inside private2" $ cd .. $ git submodule update Submodule path 'a': checked out 'd266b9873ad50488163457f025db7cdd9683d88b' $ cd a $ cat a.txt module a
Note
The changes are still visible in the submodule’s reflog.
If you have uncommitted changes in your submodule working tree, git will not overwrite them. Instead, you get the usual
submodule update
warning about not being able switch from a dirty branch.
Chapter 9. Low-level Git operations
Many of the higher-level commands were originally implemented as shell
scripts using a smaller core of low-level Git commands. These can still
be useful when doing unusual things with Git, or just as a way to
understand its inner workings.
The Workflow
High-level operations such as git-commit(1) and
git-restore(1) work by moving data
between the working tree, the index, and the object database. Git
provides low-level operations which perform each of these steps
individually.
Generally, all Git operations work on the index file. Some operations
work purely on the index file (showing the current state of the
index), but most operations move data between the index file and either
the database or the working directory. Thus there are four main
combinations:
working directory → index
The git-update-index(1) command updates the index with
information from the working directory. You generally update the
index information by just specifying the filename you want to update,
like so:
$ git update-index filename
but to avoid common mistakes with filename globbing etc., the command
will not normally add totally new entries or remove old entries,
i.e. it will normally just update existing cache entries.
To tell Git that yes, you really do realize that certain files no
longer exist, or that new files should be added, you
should use the --remove and --add flags respectively.
NOTE! A --remove flag does not mean that subsequent filenames will
necessarily be removed: if the files still exist in your directory
structure, the index will be updated with their new status, not
removed. The only thing --remove means is that update-index will be
considering a removed file to be a valid thing, and if the file really
does not exist any more, it will update the index accordingly.
As a special case, you can also do git update-index --refresh, which
will refresh the «stat» information of each index to match the current
stat information. It will not update the object status itself, and
it will only update the fields that are used to quickly test whether
an object still matches its old backing store object.
The previously introduced git-add(1) is just a wrapper for
git-update-index(1).
index → object database
You write your current index file to a «tree» object with the program
$ git write-tree
that doesn’t come with any options—it will just write out the
current index into the set of tree objects that describe that state,
and it will return the name of the resulting top-level tree. You can
use that tree to re-generate the index at any time by going in the
other direction:
object database → index
You read a «tree» file from the object database, and use that to
populate (and overwrite—don’t do this if your index contains any
unsaved state that you might want to restore later!) your current
index. Normal operation is just
$ git read-tree <SHA-1 of tree>
and your index file will now be equivalent to the tree that you saved
earlier. However, that is only your index file: your working
directory contents have not been modified.
index → working directory
You update your working directory from the index by «checking out»
files. This is not a very common operation, since normally you’d just
keep your files updated, and rather than write to your working
directory, you’d tell the index files about the changes in your
working directory (i.e. git update-index).
However, if you decide to jump to a new version, or check out somebody
else’s version, or just restore a previous tree, you’d populate your
index file with read-tree, and then you need to check out the result
with
$ git checkout-index filename
or, if you want to check out all of the index, use -a.
NOTE! git checkout-index normally refuses to overwrite old files, so
if you have an old version of the tree already checked out, you will
need to use the -f flag (before the -a flag or the filename) to
force the checkout.
Finally, there are a few odds and ends which are not purely moving
from one representation to the other:
Tying it all together
To commit a tree you have instantiated with git write-tree, you’d
create a «commit» object that refers to that tree and the history
behind it—most notably the «parent» commits that preceded it in
history.
Normally a «commit» has one parent: the previous state of the tree
before a certain change was made. However, sometimes it can have two
or more parent commits, in which case we call it a «merge», due to the
fact that such a commit brings together («merges») two or more
previous states represented by other commits.
In other words, while a «tree» represents a particular directory state
of a working directory, a «commit» represents that state in time,
and explains how we got there.
You create a commit object by giving it the tree that describes the
state at the time of the commit, and a list of parents:
$ git commit-tree <tree> -p <parent> [(-p <parent2>)...]
and then giving the reason for the commit on stdin (either through
redirection from a pipe or file, or by just typing it at the tty).
git commit-tree will return the name of the object that represents
that commit, and you should save it away for later use. Normally,
you’d commit a new HEAD state, and while Git doesn’t care where you
save the note about that state, in practice we tend to just write the
result to the file pointed at by .git/HEAD, so that we can always see
what the last committed state was.
Here is a picture that illustrates how various pieces fit together:
commit-tree
commit obj
+----+
| |
| |
V V
+-----------+
| Object DB |
| Backing |
| Store |
+-----------+
^
write-tree | |
tree obj | |
| | read-tree
| | tree obj
V
+-----------+
| Index |
| "cache" |
+-----------+
update-index ^
blob obj | |
| |
checkout-index -u | | checkout-index
stat | | blob obj
V
+-----------+
| Working |
| Directory |
+-----------+
Examining the data
You can examine the data represented in the object database and the
index with various helper tools. For every object, you can use
git-cat-file(1) to examine details about the
object:
$ git cat-file -t <objectname>
shows the type of the object, and once you have the type (which is
usually implicit in where you find the object), you can use
$ git cat-file blob|tree|commit|tag <objectname>
to show its contents. NOTE! Trees have binary content, and as a result
there is a special helper for showing that content, called
git ls-tree, which turns the binary content into a more easily
readable form.
It’s especially instructive to look at «commit» objects, since those
tend to be small and fairly self-explanatory. In particular, if you
follow the convention of having the top commit name in .git/HEAD,
you can do
$ git cat-file commit HEAD
to see what the top commit was.
Merging multiple trees
Git can help you perform a three-way merge, which can in turn be
used for a many-way merge by repeating the merge procedure several
times. The usual situation is that you only do one three-way merge
(reconciling two lines of history) and commit the result, but if
you like to, you can merge several branches in one go.
To perform a three-way merge, you start with the two commits you
want to merge, find their closest common parent (a third commit),
and compare the trees corresponding to these three commits.
To get the «base» for the merge, look up the common parent of two
commits:
$ git merge-base <commit1> <commit2>
This prints the name of a commit they are both based on. You should
now look up the tree objects of those commits, which you can easily
do with
$ git cat-file commit <commitname> | head -1
since the tree object information is always the first line in a commit
object.
Once you know the three trees you are going to merge (the one «original»
tree, aka the common tree, and the two «result» trees, aka the branches
you want to merge), you do a «merge» read into the index. This will
complain if it has to throw away your old index contents, so you should
make sure that you’ve committed those—in fact you would normally
always do a merge against your last commit (which should thus match what
you have in your current index anyway).
To do the merge, do
$ git read-tree -m -u <origtree> <yourtree> <targettree>
which will do all trivial merge operations for you directly in the
index file, and you can just write the result out with
git write-tree.
Merging multiple trees, continued
Sadly, many merges aren’t trivial. If there are files that have
been added, moved or removed, or if both branches have modified the
same file, you will be left with an index tree that contains «merge
entries» in it. Such an index tree can NOT be written out to a tree
object, and you will have to resolve any such merge clashes using
other tools before you can write out the result.
You can examine such index state with git ls-files --unmerged
command. An example:
$ git read-tree -m $orig HEAD $target $ git ls-files --unmerged 100644 263414f423d0e4d70dae8fe53fa34614ff3e2860 1 hello.c 100644 06fa6a24256dc7e560efa5687fa84b51f0263c3a 2 hello.c 100644 cc44c73eb783565da5831b4d820c962954019b69 3 hello.c
Each line of the git ls-files --unmerged output begins with
the blob mode bits, blob SHA-1, stage number, and the
filename. The stage number is Git’s way to say which tree it
came from: stage 1 corresponds to the $orig tree, stage 2 to
the HEAD tree, and stage 3 to the $target tree.
Earlier we said that trivial merges are done inside
git read-tree -m. For example, if the file did not change
from $orig to HEAD or $target, or if the file changed
from $orig to HEAD and $orig to $target the same way,
obviously the final outcome is what is in HEAD. What the
above example shows is that file hello.c was changed from
$orig to HEAD and $orig to $target in a different way.
You could resolve this by running your favorite 3-way merge
program, e.g. diff3, merge, or Git’s own merge-file, on
the blob objects from these three stages yourself, like this:
$ git cat-file blob 263414f >hello.c~1 $ git cat-file blob 06fa6a2 >hello.c~2 $ git cat-file blob cc44c73 >hello.c~3 $ git merge-file hello.c~2 hello.c~1 hello.c~3
This would leave the merge result in hello.c~2 file, along
with conflict markers if there are conflicts. After verifying
the merge result makes sense, you can tell Git what the final
merge result for this file is by:
$ mv -f hello.c~2 hello.c $ git update-index hello.c
When a path is in the «unmerged» state, running git update-index for
that path tells Git to mark the path resolved.
The above is the description of a Git merge at the lowest level,
to help you understand what conceptually happens under the hood.
In practice, nobody, not even Git itself, runs git cat-file three times
for this. There is a git merge-index program that extracts the
stages to temporary files and calls a «merge» script on it:
$ git merge-index git-merge-one-file hello.c
and that is what higher level git merge -s resolve is implemented with.
Chapter 10. Hacking Git
This chapter covers internal details of the Git implementation which
probably only Git developers need to understand.
Object storage format
All objects have a statically determined «type» which identifies the
format of the object (i.e. how it is used, and how it can refer to other
objects). There are currently four different object types: «blob»,
«tree», «commit», and «tag».
Regardless of object type, all objects share the following
characteristics: they are all deflated with zlib, and have a header
that not only specifies their type, but also provides size information
about the data in the object. It’s worth noting that the SHA-1 hash
that is used to name the object is the hash of the original data
plus this header, so sha1sum file does not match the object name
for file.
As a result, the general consistency of an object can always be tested
independently of the contents or the type of the object: all objects can
be validated by verifying that (a) their hashes match the content of the
file and (b) the object successfully inflates to a stream of bytes that
forms a sequence of
<ascii type without space> + <space> + <ascii decimal size> +.
<byte> + <binary object data>
The structured objects can further have their structure and
connectivity to other objects verified. This is generally done with
the git fsck program, which generates a full dependency graph
of all objects, and verifies their internal consistency (in addition
to just verifying their superficial consistency through the hash).
A birds-eye view of Git’s source code
It is not always easy for new developers to find their way through Git’s
source code. This section gives you a little guidance to show where to
start.
A good place to start is with the contents of the initial commit, with:
$ git switch --detach e83c5163
The initial revision lays the foundation for almost everything Git has
today, but is small enough to read in one sitting.
Note that terminology has changed since that revision. For example, the
README in that revision uses the word «changeset» to describe what we
now call a commit.
Also, we do not call it «cache» any more, but rather «index»; however, the
file is still called cache.h. Remark: Not much reason to change it now,
especially since there is no good single name for it anyway, because it is
basically the header file which is included by all of Git’s C sources.
If you grasp the ideas in that initial commit, you should check out a
more recent version and skim cache.h, object.h and commit.h.
In the early days, Git (in the tradition of UNIX) was a bunch of programs
which were extremely simple, and which you used in scripts, piping the
output of one into another. This turned out to be good for initial
development, since it was easier to test new things. However, recently
many of these parts have become builtins, and some of the core has been
«libified», i.e. put into libgit.a for performance, portability reasons,
and to avoid code duplication.
By now, you know what the index is (and find the corresponding data
structures in cache.h), and that there are just a couple of object types
(blobs, trees, commits and tags) which inherit their common structure from
struct object, which is their first member (and thus, you can cast e.g.
(struct object *)commit to achieve the same as &commit->object, i.e.
get at the object name and flags).
Now is a good point to take a break to let this information sink in.
Next step: get familiar with the object naming. Read the section called “Naming commits”.
There are quite a few ways to name an object (and not only revisions!).
All of these are handled in sha1_name.c. Just have a quick look at
the function get_sha1(). A lot of the special handling is done by
functions like get_sha1_basic() or the likes.
This is just to get you into the groove for the most libified part of Git:
the revision walker.
Basically, the initial version of git log was a shell script:
$ git-rev-list --pretty $(git-rev-parse --default HEAD "$@") |
LESS=-S ${PAGER:-less}
What does this mean?
git rev-list is the original version of the revision walker, which
always printed a list of revisions to stdout. It is still functional,
and needs to, since most new Git commands start out as scripts using
git rev-list.
git rev-parse is not as important any more; it was only used to filter out
options that were relevant for the different plumbing commands that were
called by the script.
Most of what git rev-list did is contained in revision.c and
revision.h. It wraps the options in a struct named rev_info, which
controls how and what revisions are walked, and more.
The original job of git rev-parse is now taken by the function
setup_revisions(), which parses the revisions and the common command-line
options for the revision walker. This information is stored in the struct
rev_info for later consumption. You can do your own command-line option
parsing after calling setup_revisions(). After that, you have to call
prepare_revision_walk() for initialization, and then you can get the
commits one by one with the function get_revision().
If you are interested in more details of the revision walking process,
just have a look at the first implementation of cmd_log(); call
git show v1.3.0~155^2~4 and scroll down to that function (note that you
no longer need to call setup_pager() directly).
Nowadays, git log is a builtin, which means that it is contained in the
command git. The source side of a builtin is
-
a function called
cmd_<bla>, typically defined inbuiltin/<bla.c>
(note that older versions of Git used to have it inbuiltin-<bla>.c
instead), and declared inbuiltin.h. -
an entry in the
commands[]array ingit.c, and -
an entry in
BUILTIN_OBJECTSin theMakefile.
Sometimes, more than one builtin is contained in one source file. For
example, cmd_whatchanged() and cmd_log() both reside in builtin/log.c,
since they share quite a bit of code. In that case, the commands which are
not named like the .c file in which they live have to be listed in
BUILT_INS in the Makefile.
git log looks more complicated in C than it does in the original script,
but that allows for a much greater flexibility and performance.
Here again it is a good point to take a pause.
Lesson three is: study the code. Really, it is the best way to learn about
the organization of Git (after you know the basic concepts).
So, think about something which you are interested in, say, «how can I
access a blob just knowing the object name of it?». The first step is to
find a Git command with which you can do it. In this example, it is either
git show or git cat-file.
For the sake of clarity, let’s stay with git cat-file, because it
- is plumbing, and
-
was around even in the initial commit (it literally went only through
some 20 revisions ascat-file.c, was renamed tobuiltin/cat-file.c
when made a builtin, and then saw less than 10 versions).
So, look into builtin/cat-file.c, search for cmd_cat_file() and look what
it does.
git_config(git_default_config);
if (argc != 3)
usage("git cat-file [-t|-s|-e|-p|<type>] <sha1>");
if (get_sha1(argv[2], sha1))
die("Not a valid object name %s", argv[2]);
Let’s skip over the obvious details; the only really interesting part
here is the call to get_sha1(). It tries to interpret argv[2] as an
object name, and if it refers to an object which is present in the current
repository, it writes the resulting SHA-1 into the variable sha1.
Two things are interesting here:
-
get_sha1()returns 0 on success. This might surprise some new
Git hackers, but there is a long tradition in UNIX to return different
negative numbers in case of different errors—and 0 on success. -
the variable
sha1in the function signature ofget_sha1()isunsigned, but is actually expected to be a pointer to
char *unsigned. This variable will contain the 160-bit SHA-1 of the given
char[20]
commit. Note that whenever a SHA-1 is passed asunsigned char *, it
is the binary representation, as opposed to the ASCII representation in
hex characters, which is passed aschar *.
You will see both of these things throughout the code.
Now, for the meat:
case 0:
buf = read_object_with_reference(sha1, argv[1], &size, NULL);
This is how you read a blob (actually, not only a blob, but any type of
object). To know how the function read_object_with_reference() actually
works, find the source code for it (something like git grep in the Git repository), and read
read_object_with | grep ":[a-z]"
the source.
To find out how the result can be used, just read on in cmd_cat_file():
write_or_die(1, buf, size);
Sometimes, you do not know where to look for a feature. In many such cases,
it helps to search through the output of git log, and then git show the
corresponding commit.
Example: If you know that there was some test case for git bundle, but
do not remember where it was (yes, you could git grep bundle t/, but that
does not illustrate the point!):
$ git log --no-merges t/
In the pager (less), just search for «bundle», go a few lines back,
and see that it is in commit 18449ab0. Now just copy this object name,
and paste it into the command line
$ git show 18449ab0
Voila.
Another example: Find out what to do in order to make some script a
builtin:
$ git log --no-merges --diff-filter=A builtin/*.c
You see, Git is actually the best tool to find out about the source of Git
itself!
Chapter 11. Git Glossary
Table of Contents
- Git explained
Git explained
alternate object database
-
Via the alternates mechanism, a repository
can inherit part of its object database
from another object database, which is called an «alternate».
bare repository
-
A bare repository is normally an appropriately
named directory with a.gitsuffix that does not
have a locally checked-out copy of any of the files under
revision control. That is, all of the Git
administrative and control files that would normally be present in the
hidden.gitsub-directory are directly present in the
repository.gitdirectory instead,
and no other files are present and checked out. Usually publishers of
public repositories make bare repositories available.
blob object
- Untyped object, e.g. the contents of a file.
branch
-
A «branch» is a line of development. The most recent
commit on a branch is referred to as the tip of
that branch. The tip of the branch is referenced by a branch
head, which moves forward as additional development
is done on the branch. A single Git
repository can track an arbitrary number of
branches, but your working tree is
associated with just one of them (the «current» or «checked out»
branch), and HEAD points to that branch.
cache
- Obsolete for: index.
chain
-
A list of objects, where each object in the list contains
a reference to its successor (for example, the successor of a
commit could be one of its parents).
changeset
-
BitKeeper/cvsps speak for «commit». Since Git does not
store changes, but states, it really does not make sense to use the term
«changesets» with Git.
checkout
-
The action of updating all or part of the
working tree with a tree object
or blob from the
object database, and updating the
index and HEAD if the whole working tree has
been pointed at a new branch.
cherry-picking
-
In SCM jargon, «cherry pick» means to choose a subset of
changes out of a series of changes (typically commits) and record them
as a new series of changes on top of a different codebase. In Git, this is
performed by the «git cherry-pick» command to extract the change introduced
by an existing commit and to record it based on the tip
of the current branch as a new commit.
clean
-
A working tree is clean, if it
corresponds to the revision referenced by the current
head. Also see «dirty».
commit
-
As a noun: A single point in the
Git history; the entire history of a project is represented as a
set of interrelated commits. The word «commit» is often
used by Git in the same places other revision control systems
use the words «revision» or «version». Also used as a short
hand for commit object.As a verb: The action of storing a new snapshot of the project’s
state in the Git history, by creating a new commit representing the current
state of the index and advancing HEAD
to point at the new commit.
commit graph concept, representations and usage
-
A synonym for the DAG structure formed by the commits
in the object database, referenced by branch tips,
using their chain of linked commits.
This structure is the definitive commit graph. The
graph can be represented in other ways, e.g. the
«commit-graph» file.
commit-graph file
-
The «commit-graph» (normally hyphenated) file is a supplemental
representation of the commit graph
which accelerates commit graph walks. The «commit-graph» file is
stored either in the .git/objects/info directory or in the info
directory of an alternate object database.
commit object
-
An object which contains the information about a
particular revision, such as parents, committer,
author, date and the tree object which corresponds
to the top directory of the stored
revision.
commit-ish (also committish)
-
A commit object or an
object that can be recursively dereferenced to
a commit object.
The following are all commit-ishes:
a commit object,
a tag object that points to a commit
object,
a tag object that points to a tag object that points to a
commit object,
etc.
core Git
-
Fundamental data structures and utilities of Git. Exposes only limited
source code management tools.
DAG
-
Directed acyclic graph. The commit objects form a
directed acyclic graph, because they have parents (directed), and the
graph of commit objects is acyclic (there is no chain
which begins and ends with the same object).
dangling object
-
An unreachable object which is not
reachable even from other unreachable objects; a
dangling object has no references to it from any
reference or object in the repository.
detached HEAD
-
Normally the HEAD stores the name of a
branch, and commands that operate on the
history HEAD represents operate on the history leading to the
tip of the branch the HEAD points at. However, Git also
allows you to check out an arbitrary
commit that isn’t necessarily the tip of any
particular branch. The HEAD in such a state is called
«detached».Note that commands that operate on the history of the current branch
(e.g.git committo build a new history on top of it) still work
while the HEAD is detached. They update the HEAD to point at the tip
of the updated history without affecting any branch. Commands that
update or inquire information about the current branch (e.g.gitthat sets what remote-tracking branch the
branch --set-upstream-to
current branch integrates with) obviously do not work, as there is no
(real) current branch to ask about in this state.
directory
-
The list you get with «ls»
dirty
-
A working tree is said to be «dirty» if
it contains modifications which have not been committed to the current
branch.
evil merge
-
An evil merge is a merge that introduces changes that
do not appear in any parent.
fast-forward
-
A fast-forward is a special type of merge where you have a
revision and you are «merging» another
branch’s changes that happen to be a descendant of what
you have. In such a case, you do not make a new merge
commit but instead just update your branch to point at the same
revision as the branch you are merging. This will happen frequently on a
remote-tracking branch of a remote
repository.
fetch
-
Fetching a branch means to get the
branch’s head ref from a remote
repository, to find out which objects are
missing from the local object database,
and to get them, too. See also git-fetch(1).
file system
-
Linus Torvalds originally designed Git to be a user space file system,
i.e. the infrastructure to hold files and directories. That ensured the
efficiency and speed of Git.
Git archive
- Synonym for repository (for arch people).
gitfile
-
A plain file
.gitat the root of a working tree that
points at the directory that is the real repository.
grafts
-
Grafts enables two otherwise different lines of development to be joined
together by recording fake ancestry information for commits. This way
you can make Git pretend the set of parents a commit has
is different from what was recorded when the commit was
created. Configured via the.git/info/graftsfile.Note that the grafts mechanism is outdated and can lead to problems
transferring objects between repositories; see git-replace(1)
for a more flexible and robust system to do the same thing.
hash
- In Git’s context, synonym for object name.
head
-
A named reference to the commit at the tip of a
branch. Heads are stored in a file in
$GIT_DIR/refs/heads/directory, except when using packed refs. (See
git-pack-refs(1).)
HEAD
-
The current branch. In more detail: Your working tree is normally derived from the state of the tree
referred to by HEAD. HEAD is a reference to one of the
heads in your repository, except when using a
detached HEAD, in which case it directly
references an arbitrary commit.
head ref
- A synonym for head.
hook
-
During the normal execution of several Git commands, call-outs are made
to optional scripts that allow a developer to add functionality or
checking. Typically, the hooks allow for a command to be pre-verified
and potentially aborted, and allow for a post-notification after the
operation is done. The hook scripts are found in the
$GIT_DIR/hooks/directory, and are enabled by simply
removing the.samplesuffix from the filename. In earlier versions
of Git you had to make them executable.
index
-
A collection of files with stat information, whose contents are stored
as objects. The index is a stored version of your
working tree. Truth be told, it can also contain a second, and even
a third version of a working tree, which are used
when merging.
index entry
-
The information regarding a particular file, stored in the
index. An index entry can be unmerged, if a
merge was started, but not yet finished (i.e. if
the index contains multiple versions of that file).
master
-
The default development branch. Whenever you
create a Git repository, a branch named
«master» is created, and becomes the active branch. In most
cases, this contains the local development, though that is
purely by convention and is not required.
merge
-
As a verb: To bring the contents of another
branch (possibly from an external
repository) into the current branch. In the
case where the merged-in branch is from a different repository,
this is done by first fetching the remote branch
and then merging the result into the current branch. This
combination of fetch and merge operations is called a
pull. Merging is performed by an automatic process
that identifies changes made since the branches diverged, and
then applies all those changes together. In cases where changes
conflict, manual intervention may be required to complete the
merge.As a noun: unless it is a fast-forward, a
successful merge results in the creation of a new commit
representing the result of the merge, and having as
parents the tips of the merged branches.
This commit is referred to as a «merge commit», or sometimes just a
«merge».
object
-
The unit of storage in Git. It is uniquely identified by the
SHA-1 of its contents. Consequently, an
object cannot be changed.
object database
-
Stores a set of «objects», and an individual object is
identified by its object name. The objects usually
live in$GIT_DIR/objects/.
object identifier (oid)
- Synonym for object name.
object name
-
The unique identifier of an object. The
object name is usually represented by a 40 character
hexadecimal string. Also colloquially called SHA-1.
object type
-
One of the identifiers «commit»,
«tree», «tag» or
«blob» describing the type of an
object.
octopus
- To merge more than two branches.
origin
-
The default upstream repository. Most projects have
at least one upstream project which they track. By default
origin is used for that purpose. New upstream updates
will be fetched into remote-tracking branches named
origin/name-of-upstream-branch, which you can see using
git branch -r.
overlay
-
Only update and add files to the working directory, but don’t
delete them, similar to how cp -R would update the contents
in the destination directory. This is the default mode in a
checkout when checking out files from the
index or a tree-ish. In
contrast, no-overlay mode also deletes tracked files not
present in the source, similar to rsync —delete.
pack
-
A set of objects which have been compressed into one file (to save space
or to transmit them efficiently).
pack index
-
The list of identifiers, and other information, of the objects in a
pack, to assist in efficiently accessing the contents of a
pack.
pathspec
-
Pattern used to limit paths in Git commands.
Pathspecs are used on the command line of «git ls-files», «git
ls-tree», «git add», «git grep», «git diff», «git checkout»,
and many other commands to
limit the scope of operations to some subset of the tree or
working tree. See the documentation of each command for whether
paths are relative to the current directory or toplevel. The
pathspec syntax is as follows:- any path matches itself
-
the pathspec up to the last slash represents a
directory prefix. The scope of that pathspec is
limited to that subtree. -
the rest of the pathspec is a pattern for the remainder
of the pathname. Paths relative to the directory
prefix will be matched against that pattern using fnmatch(3);
in particular, * and ? can match directory separators.
For example, Documentation/*.jpg will match all .jpg files
in the Documentation subtree,
including Documentation/chapter_1/figure_1.jpg.A pathspec that begins with a colon
:has special meaning. In the
short form, the leading colon:is followed by zero or more «magic
signature» letters (which optionally is terminated by another colon:),
and the remainder is the pattern to match against the path.
The «magic signature» consists of ASCII symbols that are neither
alphanumeric, glob, regex special characters nor colon.
The optional colon that terminates the «magic signature» can be
omitted if the pattern begins with a character that does not belong to
«magic signature» symbol set and is not a colon.In the long form, the leading colon
:is followed by an open
parenthesis(, a comma-separated list of zero or more «magic words»,
and a close parentheses), and the remainder is the pattern to match
against the path.A pathspec with only a colon means «there is no pathspec». This form
should not be combined with other pathspec.
top
-
The magic word
top(magic signature:/) makes the pattern
match from the root of the working tree, even when you are
running the command from inside a subdirectory.
literal
-
Wildcards in the pattern such as
*or?are treated
as literal characters.
icase
- Case insensitive match.
glob
-
Git treats the pattern as a shell glob suitable for
consumption by fnmatch(3) with the FNM_PATHNAME flag:
wildcards in the pattern will not match a / in the pathname.
For example, «Documentation/*.html» matches
«Documentation/git.html» but not «Documentation/ppc/ppc.html»
or «tools/perf/Documentation/perf.html».Two consecutive asterisks («
**«) in patterns matched against
full pathname may have special meaning:-
A leading «
**» followed by a slash means match in all
directories. For example, «**/foo» matches file or directory
«foo» anywhere, the same as pattern «foo«. «**/foo/bar»
matches file or directory «bar» anywhere that is directly
under directory «foo«. -
A trailing «
/**» matches everything inside. For example,
«abc/**» matches all files inside directory «abc», relative
to the location of the.gitignorefile, with infinite depth. -
A slash followed by two consecutive asterisks then a slash
matches zero or more directories. For example, «a/**/b»
matches «a/b«, «a/x/b«, «a/x/y/b» and so on. -
Other consecutive asterisks are considered invalid.
Glob magic is incompatible with literal magic.
-
A leading «
attr
-
After
attr:comes a space separated list of «attribute
requirements», all of which must be met in order for the
path to be considered a match; this is in addition to the
usual non-magic pathspec pattern matching.
See gitattributes(5).Each of the attribute requirements for the path takes one of
these forms:-
«
ATTR» requires that the attributeATTRbe set. -
«
-ATTR» requires that the attributeATTRbe unset. -
«
ATTR=VALUE» requires that the attributeATTRbe
set to the stringVALUE. -
«
!ATTR» requires that the attributeATTRbe
unspecified.Note that when matching against a tree object, attributes are still
obtained from working tree, not from the given tree object.
-
«
exclude
-
After a path matches any non-exclude pathspec, it will be run
through all exclude pathspecs (magic signature:!or its
synonym^). If it matches, the path is ignored. When there
is no non-exclude pathspec, the exclusion is applied to the
result set as if invoked without any pathspec.
parent
-
A commit object contains a (possibly empty) list
of the logical predecessor(s) in the line of development, i.e. its
parents.
pickaxe
-
The term pickaxe refers to an option to the diffcore
routines that help select changes that add or delete a given text
string. With the--pickaxe-alloption, it can be used to view the full
changeset that introduced or removed, say, a
particular line of text. See git-diff(1).
plumbing
- Cute name for core Git.
porcelain
-
Cute name for programs and program suites depending on
core Git, presenting a high level access to
core Git. Porcelains expose more of a SCM
interface than the plumbing.
per-worktree ref
-
Refs that are per-worktree, rather than
global. This is presently only HEAD and any refs
that start withrefs/bisect/, but might later include other
unusual refs.
pseudoref
-
Pseudorefs are a class of files under
$GIT_DIRwhich behave
like refs for the purposes of rev-parse, but which are treated
specially by git. Pseudorefs both have names that are all-caps,
and always start with a line consisting of a
SHA-1 followed by whitespace. So, HEAD is not a
pseudoref, because it is sometimes a symbolic ref. They might
optionally contain some additional data.MERGE_HEADand
CHERRY_PICK_HEADare examples. Unlike
per-worktree refs, these files cannot
be symbolic refs, and never have reflogs. They also cannot be
updated through the normal ref update machinery. Instead,
they are updated by directly writing to the files. However,
they can be read as if they were refs, sogit rev-parsewill work.
MERGE_HEAD
pull
-
Pulling a branch means to fetch it and
merge it. See also git-pull(1).
push
-
Pushing a branch means to get the branch’s
head ref from a remote repository,
find out if it is an ancestor to the branch’s local
head ref, and in that case, putting all
objects, which are reachable from the local
head ref, and which are missing from the remote
repository, into the remote
object database, and updating the remote
head ref. If the remote head is not an
ancestor to the local head, the push fails.
reachable
-
All of the ancestors of a given commit are said to be
«reachable» from that commit. More
generally, one object is reachable from
another if we can reach the one from the other by a chain
that follows tags to whatever they tag,
commits to their parents or trees, and
trees to the trees or blobs
that they contain.
reachability bitmaps
-
Reachability bitmaps store information about the
reachability of a selected set of commits in
a packfile, or a multi-pack index (MIDX), to speed up object search.
The bitmaps are stored in a «.bitmap» file. A repository may have at
most one bitmap file in use. The bitmap file may belong to either one
pack, or the repository’s multi-pack index (if it exists).
rebase
-
To reapply a series of changes from a branch to a
different base, and reset the head of that branch
to the result.
ref
-
A name that begins with
refs/(e.g.refs/heads/master)
that points to an object name or another
ref (the latter is called a symbolic ref).
For convenience, a ref can sometimes be abbreviated when used
as an argument to a Git command; see gitrevisions(7)
for details.
Refs are stored in the repository.The ref namespace is hierarchical.
Different subhierarchies are used for different purposes (e.g. the
refs/heads/hierarchy is used to represent local branches).There are a few special-purpose refs that do not begin with
refs/.
The most notable example isHEAD.
reflog
-
A reflog shows the local «history» of a ref. In other words,
it can tell you what the 3rd last revision in this repository
was, and what was the current state in this repository,
yesterday 9:14pm. See git-reflog(1) for details.
refspec
-
A «refspec» is used by fetch and
push to describe the mapping between remote
ref and local ref.
remote repository
-
A repository which is used to track the same
project but resides somewhere else. To communicate with remotes,
see fetch or push.
remote-tracking branch
-
A ref that is used to follow changes from another
repository. It typically looks like
refs/remotes/foo/bar (indicating that it tracks a branch named
bar in a remote named foo), and matches the right-hand-side of
a configured fetch refspec. A remote-tracking
branch should not contain direct modifications or have local
commits made to it.
repository
-
A collection of refs together with an
object database containing all objects
which are reachable from the refs, possibly
accompanied by meta data from one or more porcelains. A
repository can share an object database with other repositories
via alternates mechanism.
resolve
-
The action of fixing up manually what a failed automatic
merge left behind.
revision
- Synonym for commit (the noun).
rewind
-
To throw away part of the development, i.e. to assign the
head to an earlier revision.
SCM
- Source code management (tool).
SHA-1
-
«Secure Hash Algorithm 1»; a cryptographic hash function.
In the context of Git used as a synonym for object name.
shallow clone
-
Mostly a synonym to shallow repository
but the phrase makes it more explicit that it was created by
runninggit clone --depth=...command.
shallow repository
-
A shallow repository has an incomplete
history some of whose commits have parents cauterized away (in other
words, Git is told to pretend that these commits do not have the
parents, even though they are recorded in the commit object). This is sometimes useful when you are interested only in the
recent history of a project even though the real history recorded in the
upstream is much larger. A shallow repository
is created by giving the--depthoption to git-clone(1), and
its history can be later deepened with git-fetch(1).
stash entry
-
An object used to temporarily store the contents of a
dirty working directory and the index for future reuse.
submodule
-
A repository that holds the history of a
separate project inside another repository (the latter of
which is called superproject).
superproject
-
A repository that references repositories
of other projects in its working tree as submodules.
The superproject knows about the names of (but does not hold
copies of) commit objects of the contained submodules.
symref
-
Symbolic reference: instead of containing the SHA-1
id itself, it is of the format ref: refs/some/thing and when
referenced, it recursively dereferences to this reference.
HEAD is a prime example of a symref. Symbolic
references are manipulated with the git-symbolic-ref(1)
command.
tag
-
A ref under
refs/tags/namespace that points to an
object of an arbitrary type (typically a tag points to either a
tag or a commit object).
In contrast to a head, a tag is not updated by
thecommitcommand. A Git tag has nothing to do with a Lisp
tag (which would be called an object type
in Git’s context). A tag is most typically used to mark a particular
point in the commit ancestry chain.
tag object
-
An object containing a ref pointing to
another object, which can contain a message just like a
commit object. It can also contain a (PGP)
signature, in which case it is called a «signed tag object».
topic branch
-
A regular Git branch that is used by a developer to
identify a conceptual line of development. Since branches are very easy
and inexpensive, it is often desirable to have several small branches
that each contain very well defined concepts or small incremental yet
related changes.
tree
-
Either a working tree, or a tree object together with the dependent blob and tree objects
(i.e. a stored representation of a working tree).
tree object
-
An object containing a list of file names and modes along
with refs to the associated blob and/or tree objects. A
tree is equivalent to a directory.
tree-ish (also treeish)
-
A tree object or an object
that can be recursively dereferenced to a tree object.
Dereferencing a commit object yields the
tree object corresponding to the revision’s
top directory.
The following are all tree-ishes:
a commit-ish,
a tree object,
a tag object that points to a tree object,
a tag object that points to a tag object that points to a tree
object,
etc.
unmerged index
-
An index which contains unmerged
index entries.
unreachable object
-
An object which is not reachable from a
branch, tag, or any other reference.
upstream branch
-
The default branch that is merged into the branch in
question (or the branch in question is rebased onto). It is configured
via branch.<name>.remote and branch.<name>.merge. If the upstream branch
of A is origin/B sometimes we say «A is tracking origin/B«.
working tree
-
The tree of actual checked out files. The working tree normally
contains the contents of the HEAD commit’s tree,
plus any local changes that you have made but not yet committed.
worktree
-
A repository can have zero (i.e. bare repository) or one or
more worktrees attached to it. One «worktree» consists of a
«working tree» and repository metadata, most of which are
shared among other worktrees of a single repository, and
some of which are maintained separately per worktree
(e.g. the index, HEAD and pseudorefs like MERGE_HEAD,
per-worktree refs and per-worktree configuration file).

Appendix A. Git Quick Reference
This is a quick summary of the major commands; the previous chapters
explain how these work in more detail.
Creating a new repository
From a tarball:
$ tar xzf project.tar.gz $ cd project $ git init Initialized empty Git repository in .git/ $ git add . $ git commit
From a remote repository:
$ git clone git://example.com/pub/project.git $ cd project
Managing branches
$ git branch # list all local branches in this repo $ git switch test # switch working directory to branch "test" $ git branch new # create branch "new" starting at current HEAD $ git branch -d new # delete branch "new"
Instead of basing a new branch on current HEAD (the default), use:
$ git branch new test # branch named "test" $ git branch new v2.6.15 # tag named v2.6.15 $ git branch new HEAD^ # commit before the most recent $ git branch new HEAD^^ # commit before that $ git branch new test~10 # ten commits before tip of branch "test"
Create and switch to a new branch at the same time:
$ git switch -c new v2.6.15
Update and examine branches from the repository you cloned from:
$ git fetch # update $ git branch -r # list origin/master origin/next ... $ git switch -c masterwork origin/master
Fetch a branch from a different repository, and give it a new
name in your repository:
$ git fetch git://example.com/project.git theirbranch:mybranch $ git fetch git://example.com/project.git v2.6.15:mybranch
Keep a list of repositories you work with regularly:
$ git remote add example git://example.com/project.git
$ git remote # list remote repositories
example
origin
$ git remote show example # get details
* remote example
URL: git://example.com/project.git
Tracked remote branches
master
next
...
$ git fetch example # update branches from example
$ git branch -r # list all remote branches
Exploring history
$ gitk # visualize and browse history $ git log # list all commits $ git log src/ # ...modifying src/ $ git log v2.6.15..v2.6.16 # ...in v2.6.16, not in v2.6.15 $ git log master..test # ...in branch test, not in branch master $ git log test..master # ...in branch master, but not in test $ git log test...master # ...in one branch, not in both $ git log -S'foo()' # ...where difference contain "foo()" $ git log --since="2 weeks ago" $ git log -p # show patches as well $ git show # most recent commit $ git diff v2.6.15..v2.6.16 # diff between two tagged versions $ git diff v2.6.15..HEAD # diff with current head $ git grep "foo()" # search working directory for "foo()" $ git grep v2.6.15 "foo()" # search old tree for "foo()" $ git show v2.6.15:a.txt # look at old version of a.txt
Search for regressions:
$ git bisect start
$ git bisect bad # current version is bad
$ git bisect good v2.6.13-rc2 # last known good revision
Bisecting: 675 revisions left to test after this
# test here, then:
$ git bisect good # if this revision is good, or
$ git bisect bad # if this revision is bad.
# repeat until done.
Making changes
Make sure Git knows who to blame:
$ cat >>~/.gitconfig <<EOF
[user]
name = Your Name Comes Here
email = you@yourdomain.example.com
EOF
Select file contents to include in the next commit, then make the
commit:
$ git add a.txt # updated file $ git add b.txt # new file $ git rm c.txt # old file $ git commit
Or, prepare and create the commit in one step:
$ git commit d.txt # use latest content only of d.txt $ git commit -a # use latest content of all tracked files
Merging
$ git merge test # merge branch "test" into the current branch
$ git pull git://example.com/project.git master
# fetch and merge in remote branch
$ git pull . test # equivalent to git merge test
Sharing your changes
Importing or exporting patches:
$ git format-patch origin..HEAD # format a patch for each commit
# in HEAD but not in origin
$ git am mbox # import patches from the mailbox "mbox"
Fetch a branch in a different Git repository, then merge into the
current branch:
$ git pull git://example.com/project.git theirbranch
Store the fetched branch into a local branch before merging into the
current branch:
$ git pull git://example.com/project.git theirbranch:mybranch
After creating commits on a local branch, update the remote
branch with your commits:
$ git push ssh://example.com/project.git mybranch:theirbranch
When remote and local branch are both named «test»:
$ git push ssh://example.com/project.git test
Shortcut version for a frequently used remote repository:
$ git remote add example ssh://example.com/project.git $ git push example test
Repository maintenance
Check for corruption:
$ git fsck
Recompress, remove unused cruft:
$ git gc
Appendix B. Notes and todo list for this manual
Table of Contents
- Todo list
Todo list
This is a work in progress.
The basic requirements:
-
It must be readable in order, from beginning to end, by someone
intelligent with a basic grasp of the UNIX command line, but without
any special knowledge of Git. If necessary, any other prerequisites
should be specifically mentioned as they arise. -
Whenever possible, section headings should clearly describe the task
they explain how to do, in language that requires no more knowledge
than necessary: for example, «importing patches into a project» rather
than «thegit amcommand»
Think about how to create a clear chapter dependency graph that will
allow people to get to important topics without necessarily reading
everything in between.
Scan Documentation/ for other stuff left out; in particular:
- howto’s
-
some of
technical/? - hooks
- list of commands in git(1)
Scan email archives for other stuff left out
Scan man pages to see if any assume more background than this manual
provides.
Add more good examples. Entire sections of just cookbook examples
might be a good idea; maybe make an «advanced examples» section a
standard end-of-chapter section?
Include cross-references to the glossary, where appropriate.
Add a section on working with other version control systems, including
CVS, Subversion, and just imports of series of release tarballs.
Write a chapter on using plumbing and writing scripts.
Alternates, clone -reference, etc.
More on recovery from repository corruption. See:
https://lore.kernel.org/git/Pine.LNX.4.64.0702272039540.12485@woody.linux-foundation.org/
https://lore.kernel.org/git/Pine.LNX.4.64.0702141033400.3604@woody.linux-foundation.org/
Перевод
Ссылка на автора

Хотите начать работу с Git и GitHub? Вам нужно сотрудничать с командой? Вы работаете над проектом? Вы недавно обнаружили, что вам нужно быть на GitHub, если вы хотите, чтобы кто-то серьезно относился к вам в области технологий?
… вы действительно хотите внести свой вклад в первый проект с открытым исходным кодом?
Это для тебя!

С Git легко начать работу. Если вы быстро читаете (и не тратите много времени на регистрацию и установку), вы можете начать работу на GitHub примерно через десять минут.
Если вы пролистаете всю статью, вы можете попрактиковаться в клонировании существующего репозитория, создании ветки, внесении изменений и создании запроса на извлечение. Попутно вы также можете узнать, как найти свой терминал, использовать команды терминала и редактировать файл уценки (.md)!
Если вы делаете все это, поздравляю!
Вы внесете свой вклад в ваш первый проект с открытым исходным кодом — GitHub Welcome Wall !(Если вы хотите перейти прямо к вкладу с открытым исходным кодом, прокрутите вниз, пока не дойдете до раздела под названием «Давай сделаем это!«)
Эта статья поможет вам освоиться с основами. Есть много вещей, которые нужно изучить, если вы хотите использовать Git и GitHub как профессионал, конечно. Вы можете пойти дальше этой вводной информации! Мы собираемся оставить материал следующего уровня на другое время.
Давайте начнем!
Что такое Git? Что такое GitHub?
ГитВ настоящее время это технология контроля версий, которая подходит практически всем, от разработчиков до дизайнеров.GitHubэто социальная платформа для размещения кода, которая в настоящее время используется чаще, чем любая другая. Это место, где вы можете играть и экспериментировать. Это место, где вы можете найти (и поиграть) самую невероятную информацию с открытым исходным кодом, новейшие технологии, функции и проекты. Это место, где нужно учиться, и место, где можно принять участие. Вы можете хранить код там для работы или для школы, и вы можете взять какой-нибудь приятный код, который вы хотите изучить дальше. Вы даже можете размещать сайтыбесплатнопрямо из вашего хранилища! (Если вы хотите знать, как это сделать, прочитайте эту статью!)

Существует множество способов использовать Git и GitHub, но начинать работу с GitHub не обязательно. Вам не нужно быть каким-то мастером-программистом или кем-то еще. Вы даже можете делать самые важные вещи прямо на сайте GitHub!
Тем не менее, это хорошая идея, чтобы найти свой терминал и получить хоть малейший комфорт с ним. Терминальные команды делают вещи намного быстрее! Я обязательно покажу вам, как начать пользоваться сайтом GitHub. Я также покажу вам некоторые команды терминала, которые вы, возможно, захотите использовать, чтобы сделать свою жизнь немного лучше.
Каждый раз, когда вы видите команду в этой статье, которая включает эти метки:
< >Вы хотите удалить эти метки и заменить то, что находится между ними, своей собственной информацией.Допустим, вы видите что-то вроде
git add <filename>, Это означает, что вы наберете, например,git add hello_world.pyесли вы хотите добавить файл с именем «hello_world.py» в свой репозиторий GitHub.
Я собираюсь дать вам много объяснений здесь, но это все терминальные команды, которые вам действительно нужно знать, чтобы начать:
git clone
git status
git add
git commit -m “ “
git push
Это оно! Это большие! Если у вас есть с этим справиться, вам хорошо идти. Вы можете начать работу над своими проектами немедленно!

Мы также поговорим о
git init
git branch
git merge
git checkout
Возможно, вы работаете с другими людьми или захотите внести изменения и проверить их, прежде чем действительно их зафиксировать. Команды выше — это то, что вам нужно для начала совместной работы.
git help
также очень полезно, если вы только начинаете! Мы тоже это обсудим.
(Если вы работаете на Mac, у вас уже есть терминал! Вы можете найти его, щелкнув по значку увеличительного стекла в верхнем правом углу экрана и выполнив поиск по слову «терминал».)
Шаг 1: Зарегистрируйтесь и установите!
Перейти к GitHub и зарегистрировать аккаунт. Вы можете просто остановиться на этом, и GitHub будет отлично работать. Это хорошая идея, чтобы установить Git если вы еще не сделали Вы можете абсолютно без него начать, но если вы хотите работать на локальном компьютере, то вы хотите установить Git. Вы можете скачать его или установите его через менеджер пакетов вместо.
Теперь зайдите в свой терминал и представьтесь Git! Чтобы установить ваше имя пользователя длякаждый репозиторийна вашем компьютере введите
git config --global user.name "<your_name_here>"
заменяя «»С вашим собственным именем в цитатах. Вы можете использовать любое имя или ручку, которую хотите. Если вы хотите установить свое имя только для одного хранилища, оставьте слово «глобальный» »
Теперь вы можете указать Git свой адрес электронной почты и убедиться, что это тот же адрес электронной почты, который вы использовали при регистрации в GitHub.
git config --global user.email "<your_email@email.com>"
Вашу электронную почту легко сохранить в секрете, и вы можете найти эти инструкции в Эта статья, Вам нужно установить только два флажка в вашей учетной записи GitHub.
Теперь вы готовы начать использовать Git на своем компьютере!

Для начала вы можете создать новый репозиторий на сайте GitHub или выполнитьgit initсоздать новый репозиторий из каталога вашего проекта.
Хранилище состоит из трех «деревьев». Во-первых, эторабочий каталог, который содержит актуальные файлы. Второй являетсяпоказательили область подготовки. Тогда естьголова, который указывает на последний сделанный вами коммит.
Мне уже удобно с терминалом (Вариант 1)
Вот как вы можете начать прямо с терминала:
Если у вас есть каталог проекта, просто перейдите к своему терминалу и в вашем каталоге проекта выполните команду
git init
Если вы хотите инициализировать ваш проект со всеми файлами в каталоге вашего проекта, запустите
git init .
включить все.
Допустим, у вас есть папка для вашего проекта с именем «new_project». Вы можете перейти к этой папке в окне терминала и добавить в нее локальный репозиторий, запустив
cd new_project
git init
Теперь у вас есть новый скрытый каталог с именем.gitв каталоге вашего проекта. Здесь Git хранит то, что ему нужно, чтобы он мог отслеживать ваш проект. Теперь вы можете добавлять файлы в область подготовки один за другим с
git add <filename_one>
или беги
git add .
чтобы добавить все ваши файлы в область подготовки. Вы можете зафиксировать эти изменения с помощью команды
git commit -m "<add a commit message here>"
и если вы довольны своими изменениями, вы можете запустить
git push
протолкнуть ваши изменения до конца. Вы можете проверить, есть ли у вас изменения, чтобы протолкнуть в любое время, запустив
git status
Если вы внесли некоторые изменения, вы можете обновлять файлы одновременно с
git add <filename>
или
git add --all
Затем передайте их с вашим сообщением и протолкните их.
Это оно! Теперь вы можете инициализировать репозиторий, фиксировать файлы, фиксировать изменения и передавать их в основную ветку.
Если у вас есть это, просто прокрутите вниз до «Учимся работать с другими »перейти к ветвлению и сотрудничеству!

Я не знаю, что вы только что сказали (Вариант 2)
Я собираюсь предположить, что любой, кто интересуется вариантом 2, является новичком во всем этом и, возможно, имеет папку, полную файлов (или вы планируете иметь один), который вы хотите поместить на GitHub, и вы просто не знаете как это сделать.
Давайте сделаем это!
Скажем, вы хотите создать новый репозиторий. (Вероятно, так и есть! Именно здесь будет жить ваш проект. Если вы не собираетесь создавать новый репозиторий, вы, вероятно, захотите клонировать существующий репозиторий. Мы поговорим об этом позже, но именно так вы получаете чужой проект и информация, которая вам нужна для вашей работы или курса, который вы выбираете.)
Вашхранилищегде вы будете организовывать свой проект. Вы можете хранить папки, файлы, изображения, видео, электронные таблицы, записные книжки Jupyter, наборы данных и все остальное, что нужно вашему проекту. Прежде чем вы сможете работать с Git, вы должны инициализировать репозиторий для вашего проекта и настроить его так, чтобы Git управлял им. Вы можете сделать это прямо на сайте GitHub.
Это хорошая идея, чтобы включитьПРОЧТИ МЕНЯфайл с информацией о вашем проекте. Вы можете создать один в то же время, когда вы создаете свой репозиторий, щелкнув флажок.
- Перейдите на веб-сайт GitHub, посмотрите в верхнем правом углу, нажмите знак +, а затем нажмите «Новый репозиторий».
- Назовите репозиторий и добавьте краткое описание.
- Решите, хотите ли вы, чтобы это был публичный или частный репозиторий
- Нажмите «Инициализировать этот репозиторий с помощью README», если вы хотите включить файл README. (Я определенно рекомендую сделать это! Это первое, на что люди обратятся, когда проверят ваш репозиторий. Это также отличное место для размещения информации, которая вам необходима, чтобы понять или запустить проект.)


Вы можете полностью начать работать прямо с этого момента, если хотите! Вы можете загружать файлы, редактировать файлы и т. Д. Прямо из своего репозитория на веб-сайте GitHub. Тем не менее, вы не можете быть удовлетворены только этой опцией.
Есть два способа внести изменения в ваш проект. Вы можете вносить изменения в свои файлы / записные книжки на своем компьютере, а также вносить изменения прямо на GitHub.
Допустим, вы хотите внести некоторые изменения в свой файл README прямо на GitHub.
- Сначала зайдите в свой репозиторий.
- Нажмите на имя файла, чтобы вызвать этот файл (например, нажмите «README.md», чтобы перейти к файлу readme).
- Нажмите значок карандаша в верхнем правом углу файла и внесите некоторые изменения.
- Напишите короткое сообщение в поле, которое описывает сделанные вами изменения (и расширенное описание, если хотите).
- Нажмите кнопку «Подтвердить изменения»


Теперь изменения были внесены в файл README в вашем новом хранилище! (Я хочу обратить ваше внимание на маленькую кнопку, которую вы можете отметить на изображении выше, которая позволит вам создать новую ветку для этого коммита и запустить запрос на извлечение. Мы поговорим об этом позже!)
Довольно легко, правда?
Я предпочитаю работать с файлами на своем локальном компьютере, а не пытаться заставить все работать с веб-сайта GitHub, поэтому давайте настроим это сейчас.
Дай мне этот проект!
Возможно, вы захотите клонировать свой новый репозиторий, чтобы вы могли работать с ним на локальном компьютере, или у вас может быть существующий репозиторий, который вы хотите клонировать. (Это то, что вам может понадобиться для проекта или курса.)
Для того, чтобыклонировать хранилищена свой компьютер, перейдите в репозиторий на веб-сайте GitHub и нажмите большую зеленую кнопку с надписью «Клонировать или скачать». (Вы можете загрузить репозиторий прямо здесь и пропустить содержимое терминала, если просто не можете с этим справиться. Но я верю в вас, поэтому продолжайте!) Убедитесь, что на нем написано «Клонировать с HTTPS». Теперь щелкните значок буфера обмена, чтобы скопировать его и вставить в буфер обмена (или выделите эту ссылку и скопируйте ее).

Теперь вы откроете свойТерминали доберитесь до места, где вы хотите, чтобы этот хранилище приземлилось. Вы можете, например, набрать
cd Desktop
чтобы попасть на рабочий стол. Затем клонируйте свой репозиторий, чтобы его было легко найти. Чтобы клонировать репозиторий, вы набираете
git clone <that_thing_you_just_copied>
Просто! (Не забудьте изменить информацию между< >отметки к той строке букв и цифр, которые вы только что скопировали! Также убедитесь, что вы удалили< >.)
Если вы раньше не перемещались в своем терминале, вы можете медленно перемещаться с помощью
cdКомандуйте, пока не доберетесь туда, куда хотите Например, откройте свой терминал и введитеlsперечислить варианты того, куда вы могли бы пойти дальше. Вы можете увидеть «Рабочий стол» в списке, и вы можете просто набратьcd Desktopчтобы попасть на рабочий стол. Тогда вы можете запуститьgit cloneКоманда выше, чтобы клонировать ваш репозиторий прямо на ваш рабочий стол.Вы можете увидеть некоторые имена пользователей вместо вариантов, например «Рабочий стол». В этом случае вам нужно выбрать пользователя, прежде чем вы увидите «Рабочий стол», поэтому выберите пользователя с помощью
cd <user>(замена<user>с именем пользователя), а затем введитеlsснова, чтобы увидеть ваш выбор. Очень вероятно, что сейчас вы увидите «Рабочий стол». Вы будете печататьcd Desktopесли вы видите рабочий стол в списке. А теперь иди с этим мерзавцем!Если вы хотите вернуться на шаг назад в своем терминале, просто введите
cd ..
Теперь у вас есть новый репозиторий GitHub, с которым вы можете работать клонировано прямо на вашем рабочем столе! Эта команда вытащила полную копию хранилища прямо в вашу систему, где вы можете работать с ней, вносить изменения, вносить изменения, фиксировать изменения, а затем отправлять изменения обратно в GitHub.
Вам не нужно помещать хранилище на рабочий стол, если вы этого не хотите. Вы можете клонировать это где угодно. Вы даже можете запустить
git cloneКоманда, как только вы откроете свой терминал. Однако я скажу, что если вам не очень удобно ориентироваться в компьютере, неплохо было бы разместить проект прямо на рабочем столе, где вы сможете его увидеть…
Если вы когда-нибудь захотите поиграть с проектом самостоятельно, вы можетевилкаэто на сайте GitHub вместо клонирования. Найдите в правом верхнем углу экрана кнопку «вилка» и нажмите ее. Это сделает копию репозитория в ваших репозиториях, чтобы вы могли играть самостоятельно, не делая ничего с оригиналом.
Теперь пришло время добавить несколько файлов в ваш проект!

Это все, что мы собираемся сделать:
git status
git add
git commit -m " "
git push
Не о чем беспокоиться!
Я думаю, у вас, вероятно, есть файлы, которые вы хотите поместить в свой новый репозиторий. Идите вперед, найдите ваши файлы и перетащите их в новую папку для репозитория, который вы создали на своем рабочем столе, так же, как вы это обычно делаете с любым набором файлов, которые вы, возможно, захотите переместить в папку.
Теперь проверьтеположение делвашего проекта!
Зайдите в свой терминал и зайдите в папку для своего хранилища. Тогда беги
git status
чтобы увидеть, все ли в курсе. (Если вы просто перетащили некоторые файлы в папку вашего проекта, это определенно не так!) Чтобы добавить один из ваших файлов в хранилище, вы должны запустить
git add <fileneame>
В противном случае вы можете добавить все с
git add --all
или даже
git add .
Это ваши предложенные изменения. Вы можете сделать то же самое с совершенно новыми файлами и с файлами, которые уже есть, но имеют некоторые изменения. Вы на самом деле еще ничего не добавляете. Вы предлагаете Git новые файлы и изменения.
Чтобы зафиксировать изменения, вы запустите процесс, запустив
git commit -m “<commit message>”
Вы вносите изменения в HEAD, но не в удаленный репозиторий. (Убедитесь, что вы заменяете это сообщение в кавычках своим ) После внесения изменений вы делаете «снимок» хранилища с помощью команды «commit». В этот «снимок» вы включите сообщение с -m.
Когда вы сохраняете изменения, это называется фиксацией. Когда вы делаете коммит, вы добавляете сообщение о том, что вы изменили и / или почему вы его изменили. Это отличный способ рассказать другим, что вы изменили и почему.
Теперь ваши изменения находятся в заголовке вашей локальной рабочей копии. Чтобы отправить изменения в удаленный репозиторий, запустите
git push
вставить ваши изменения прямо в ваш репозиторий. Если вы работаете на своем локальном компьютере и хотите, чтобы ваши коммиты также были видны в сети, вы должны передать изменения в git hub с помощью команды git push.
Вы можете увидеть, все ли обновлено в любое время, запустивgit statusкоманда!
Итак, теперь у вас есть репозиторий GitHub, и вы знаете, как добавлять файлы и вносить в него изменения!
Поздравляем !!!
Учимся работать с другими
Совместная работа — это название игры на GitHub!

GitHub поток
Допустим, у вас есть проект, и у вас может быть много разных идей и возможностей в любой момент времени. Некоторые функции могут быть готовы к работе, а некоторые нет. Может быть, вы работаете с другими людьми, которые все делают свое дело. Вот где начинается ветвление!
Филиал — это отдельное пространство, где вы можете опробовать новые идеи. Если вы что-то измените в ветке, это не повлияет на основную ветку, пока вы этого не захотите. Это означает, что вы можете делать с этой веткой все, что захотите, пока не решите, что пришло время объединить ее.
Единственная ветвь, которая собирается навсегда изменить вещи, является основной ветвью. Если вы не хотите, чтобы ваши изменения были развернуты немедленно, внесите их в отдельную ветку и объедините их с основной веткой, когда будете готовы.
Если вы работаете с другими и хотите вносить изменения самостоятельно, или если вы работаете самостоятельно и хотите вносить изменения, не затрагивая основную ветку, вам нужна отдельная ветка. Вы можете создать новую ветку в любое время.
Также довольно просто создать ветку с именем «new_feature» в вашем терминале и переключиться на нее с помощью
git checkout -b new_feature
Как только вы создадите ветку, вы можете внести изменения в эту ветку. Это позволяет легко увидеть, что вы изменили и почему вы это изменили. Каждый раз, когда вы фиксируете свои изменения, вы добавляете сообщение, которое вы можете использовать для описания того, что вы сделали.
Давайте поговорим об оформлении заказа!
git checkout
позволяет проверить хранилище, в котором вы в данный момент не находитесь. Вы можете проверить мастер ветку с
git checkout master
или посмотрите на ветку «new_feature» с
git checkout new_feature
Когда вы закончили работу с веткой, вы можете объединить все свои изменения обратно, чтобы они были видны всем.
git merge new_feature
возьмет все изменения, которые вы внесли в ветку «new_feature», и добавит их в мастер.
Чтобы создать восходящую ветвь, чтобы вы могли отправить свои изменения и установить удаленную ветвь как восходящую, вы добавите свою функцию, запустив
git push --set-upstream origin new_feature
После того, как вы внесете некоторые изменения и решите, что они вам нравятся, вы открываете запрос на включение. Если вы в команде, это когда другие люди в вашей команде могут начать проверять ваши изменения и обсуждать их. Вы можете открыть запрос на удаление в любой момент, будь то, чтобы люди просмотрели ваши окончательные изменения или попросили о помощи, потому что вы застряли на чем-то.
Ummmmm … что? Могу ли я сделать это на сайте?
Вы можете!
Один из способов сделать это — просто проверить кнопку, о которой мы упоминали ранее, когда редактировали файл README. Супер просто!
Вы также можете в любое время создать новую ветку прямо на веб-сайте, перейдя в свой репозиторий, щелкнув раскрывающееся меню в левой и средней части экрана с надписью «Branch: master», введя имя ветви и выбрав Ссылка «Создать ветку» (или нажмите Enter на клавиатуре). Теперь у вас есть две ветви, которые выглядят одинаково! Это отличное место для внесения изменений и их тестирования, прежде чем вы захотите, чтобы они повлияли на основную ветку.

Если вы работаете с отдельной веткой, ваши изменения влияют только на эту ветку.
Если вы довольны своими изменениями и хотите объединить их с главной веткой, вы можете открытьтянуть запрос, Таким образом, если бы вы были в команде, вы бы предложили свои изменения и попросили бы кого-нибудь рассмотреть их или включить ваш вклад и объединить их в свою ветку.
Вы можете открыть запрос на удаление, как только сделаете коммит, даже если вы еще не закончили свой код. Вы можете сделать это прямо на сайте, если вам удобнее. Если вы внесли некоторые изменения в свою ветку и хотите объединить их, вы можете
- Нажмите вкладку запроса на извлечение рядом с верхним центром экрана.
- Нажмите зеленую кнопку «Новый запрос на извлечение»
- Перейдите в поле «Примеры сравнений» и выберите ветку, которую вы сделали, чтобы сравнить с исходной веткой.
- Посмотрите свои изменения, чтобы убедиться, что они действительно то, что вы хотите зафиксировать.
- Затем нажмите большую зеленую кнопку «Создать запрос на извлечение». Дайте ему название и напишите краткое описание ваших изменений. Затем нажмите «Создать запрос на извлечение!»


Теперь, если это ваш репозиторий, вы можете объединить ваш запрос на извлечение, нажав зеленую кнопку «Слить запрос на извлечение», чтобы объединить изменения в мастер. Нажмите «Подтвердить слияние», затем удалите ветвь после того, как ваша ветвь была включена с помощью кнопки «Удалить ветвь» в фиолетовом поле.
Если вы участвуете в проекте, у людей в команде (или у рецензента) могут возникнуть вопросы или комментарии. Если вам нужно что-то изменить, это время! Если все хорошо, они могут развернуть изменения прямо из ветки для окончательного тестирования перед тем, как объединить их. И вы можете развернуть свои изменения, чтобы проверить их в производстве.
Если ваши изменения были проверены, вы можете пойти дальше и объединить ваш код в основную ветку. Пул-запросы сохранят запись ваших изменений, а это значит, что вы можете просмотреть их в любое время, чтобы понять изменения и принятые решения.
Обновить и объединить
Если вы работаете на своем компьютере и хотите иметь самую последнюю версию репозитория, вы перенесете изменения из GitHub с помощьюgit pullкоманда. Чтобы обновить локальный репозиторий до новейшего коммита, запустите
git pull
в вашем рабочем каталоге.
Чтобы объединить другую ветку с вашей активной веткой, используйте
git merge <branch_name>
Git попытается автоматически объединить изменения, но это не всегда возможно. Могут возникнуть конфликты. Если это произойдет, вам придется объединить конфликты вручную. После их изменения вы можете пометить их как объединенные сgit add <filename>, Вы можете просмотреть свои изменения, прежде чем объединить их с
git diff <source_branch> <target_branch>
Вы можете вернуться к главной ветке с помощью
git checkout master
Вы внесете свои изменения, а затем удалите ветку, когда закончите с
git branch -d new_feature
Эта ветвь не доступна никому другому, пока вы не отправите ветку в удаленный репозиторий с помощью
git push origin <branch>
Другие полезные команды
Прежде всего, это мой любимый GitHub шпаргалка, Проверьте это для всех самых полезных команд Git!
Вы можете увидеть историю коммитов репозитория, если вы запустите
git log
Вы можете увидеть коммиты одного человека с
git log --author=<name>
Вы можете увидеть, что было изменено, но еще не поставлено
git diff
Нужна помощь, помня, какую команду вы должны выполнять? Пытаться
git help
чтобы увидеть 21 наиболее распространенных команд. Вы также можете напечатать что-то вроде
git help clone
выяснить, как использовать определенную команду, например, «клон».
Давай сделаем это!

Почему бы не оставить свой след и приветствовать всех, кто здесь, чтобы узнать о Git и GitHub? Мы собираемся создать простую приветственную стену с заметками от всех, кто хочет опробовать Git и GitHub и внести свой вклад в их первый проект с открытым исходным кодом.
Вы можете добавить все, что хотите, к приветственной стене, если будете поддерживать ее в тепле и ободрении. Добавить заметку, добавить изображение, что угодно. Сделайте наш маленький мир лучше, чем бы вы ни были счастливы. (Если вы слишком много думаете (я вас вижу), у меня есть предварительно написанное сообщение в файле README, которое вы можете просто скопировать и вставить.)
- Клонировать хранилище либо на сайте GitHub, либо запустив
git clone https://github.com/bonn0062/github_welcome_wall.git
- Создайте новую ветку и добавьте приветственную и вдохновляющую мысль в файл «welcome_wall.md». Вы можете сделать это на веб-сайте, но я настоятельно рекомендую вам попробовать клонировать репозиторий на ваш компьютер, открыть файл в вашем любимом текстовом редакторе и добавить туда свое сообщение. Это просто хорошее обучение!
- Создать пул-запрос,
- Напишите краткую заметку с описанием ваших изменений и нажмите зеленую кнопку, чтобы создать запрос на извлечение.
Это оно! Если это достойное сообщение, мысль, изображение или идея, я объединю ваш запрос, и вы успешно внесете свой вклад в проект с открытым исходным кодом.
Поздравляем !!! Ты сделал это!
Как всегда, если вы сделаете что-нибудь удивительное с этой информацией, я хотел бы услышать об этом! Оставьте сообщение в разделе ответов или обратитесь в любое время в Twitter @annebonnerdata,
Спасибо за чтение!
Если вы хотите выйти или найти больше интересных статей, пожалуйста, присоединяйтесь ко мне в Простота содержания!
