Требуется руководство для вашей Hyundai H-CMD4028 Автомагнитола? Ниже вы можете просмотреть и загрузить бесплатно руководство в формате PDF. Кроме того, приведены часто задаваемые вопросы, рейтинг изделия и отзывы пользователей, что позволит оптимально использовать ваше изделие. Если это не то руководство, которое вы искали, – свяжитесь с нами.
Ваше устройство неисправно, и в руководстве отсутствует решение? Перейдите в Repair Café для получения бесплатных ремонтных услуг.
Руководство

Рейтинг
Сообщите нам, что вы думаете о Hyundai H-CMD4028 Автомагнитола, оставив оценку продукта. Хотите поделиться вашими впечатлениями от данного изделия или задать вопрос? Вы можете оставить комментарий в нижней части страницы.
Довольны ли вы данным изделием Hyundai?
Да Нет
Будьте первым, кто оценит это изделие
0 голоса
Часто задаваемые вопросы
Наша служба поддержки выполняет поиск полезной информации по изделиям и отвечает на часто задаваемые вопросы. Если вы заметили неточность в наших часто задаваемых вопросах, сообщите нам об этом с помощью нашей контактной формы.
Что такое DAB +? Проверенный
DAB + является преемником сигнала FM и расшифровывается как Digital Audio Broadcasting. Это цифровой сигнал, который позволяет использовать больше каналов в пределах одной полосы пропускания и упрощает переключение между каналами.
Это было полезно (379)
В чем разница между FM и AM? Проверенный
FM и AM — это формы модуляции, используемые для передачи сигнала. FM — это частотная модуляция, а AM — амплитудная модуляция. AM — самая старая форма модуляции. Самая большая разница в том, что сигнал FM намного сильнее сигнала AM.
Это было полезно (196)
В автомагнитолу застрял компакт-диск, что мне делать? Проверенный
В некоторых автомобильных радиоприемниках есть функция извлечения застрявших компакт-дисков. Выключите автомобиль и одновременно нажмите кнопки включения и извлечения и удерживайте их в течение 10 секунд. Если это не помогло, заведите машину и попробуйте еще раз.
Это было полезно (182)
Какого размера автомобильный радиоприемник подходит для моей машины? Проверенный
Существует два стандартных размера автомобильных радиоприемников: 1-DIN и 2-DIN. 1-DIN — это стандартная тонкая версия, а 2-DIN — вдвое больше. Автомобильные радиоприемники 2-DIN часто имеют место для экрана для отображения навигационной информации или воспроизведения фильмов.
Это было полезно (151)

Посмотреть инструкция для Hyundai H-CMD4028 бесплатно. Руководство относится к категории Автомагнитолы, 1 человек(а) дали ему среднюю оценку 8.6. Руководство доступно на следующих языках: русский, английский. У вас есть вопрос о Hyundai H-CMD4028 или вам нужна помощь? Задайте свой вопрос здесь
Не можете найти ответ на свой вопрос в руководстве? Вы можете найти ответ на свой вопрос ниже, в разделе часто задаваемых вопросов о Hyundai H-CMD4028.
В чем разница между FM и AM?
Когда звук считается слишком громким?
Автомобильный радиоприемник не включается, что делать?
Как лучше всего выполнять чистку Автомагнитола?
Инструкция Hyundai H-CMD4028 доступно в русский?
Не нашли свой вопрос? Задайте свой вопрос здесь
МУЛЬТИМЕДИЙНЫЙ
DVD/CD/MP3-РЕСИВЕР СО
ВСТРОЕННЫМ 3.5” TFT-
ДИСПЛЕЕМ И ТВ-ТЮНЕРОМ
MULTIMEDIA DVD/CD/MP3
RECEIVER WITH BUILT-IN 3.5”
TFT DISPLAY AND TV TUNER
Руководство по эксплуатации Instruction manual
H-CMD4028
2 3
Table of contents Table of contents
Dear customer!
Thank you for purchasing our product. For safety, it is strongly recommended to read
this manual carefully before connecting, operating and/or adjusting the product and keep
the manual for reference in the future.
12
12
13
13
13
13
13
13
13
13
13
13
14
14
14
14
14
14
15
15
15
15
15
15
15
15
16
16
17
17
17
17
17
17
17
17
17
17
17
Table of contents
Before you start
Utilization of the product
Important safeguards
Installation/Connection
Installation
General notes
Din Front/Rear-Mount
1. DIN front-mount (Method A)
Dismantling the unit
Trim frame installation
2. DIN rear-mount (Method B)
Detachable control panel
Anti-theft system
Connection
Connection diagram
ISO connection table
Using the ISO connector
Parking wire connection
Reverse cable connection
Operation
Control elements
Front panel
Inner panel
Remote controller
Changing battery
General operations
Reset the unit
Turning the unit on/off
Mode selection
System setting menu
Mute function
Volume control
Setting the sound characteristics
EQ modes
Loudness
BMP and Double Bass
Clock setting
Beep
2
4
4
4
5
5
5
5
5
6
6
6
6
7
7
7
8
8
9
9
9
9
9
10
10
10
11
11
11
11
11
11
11
12
12
12
12
12
12
Button backlight color
Image adjustment
TFT on/off
Subwoofer
AUX in jack
Radio operations
Touch screen
Band select
Audio/Manual tuning
Programming tuner stations
Automatic store/preset scan
Mono/select control
Local radio station search
RDS function
AF function
TA function
PTY (Program Type)
Other parameter setting
TV operations
Touch screen
Full-screen mode
TV and audio system
Search channels
Save channels
Disc/USB/SD/MMC operations
Touch screen
Insert/Eject disc
MP3/DivX/JPEG file playback
Play/pause/stop
Selecting tracks/chapters
Fast forward/rewind
Repeat playback
Random playback
Goto
Programming the playback
OSD function
Zooming in/out
Slow playback
PBC function
Changing angle
Selecting audio language
Selecting subtitle language
Selecting sound channel
Selecting video system
Menu navigation
ID3 tag information
USB/SD/MMC notes
Inserting SD/MMC card/USB device
System setup
System setup
Language setup
Audio setup
Video setup
General information
Handling compact discs
Cleaning discs
Cleaning the unit body
Accessories
Troubleshooting guide
Specification
2 3
Table of contents Table of contents
18
18
18
18
18
18
18
18
18
18
19
19
19
20
21
21
21
21
21
22
23

4
Before you start
If you want to dispose this product, do not mix it with general household waste. There is
a separate collection system for used electronic products in accordance with legislation
that requires proper treatment, recovery and recycling.
Please contact your local authorities for the correct method of disposal. By doing so, you
will ensure that your disposed product undergoes the necessary treatment, recovery and
recycling and thus prevent potential negative effects on the environment and human health.
Utilization of the product
Important safeguards
• Read carefully through the manual to
familiarize yourself with this unit.
• Keep this manual handy as a reference
for operating procedures and precautions. Do
not allow persons who have not read through
this manual to use this unit.
• “CLASS 1 LASER PRODUCT”
This product contains a laser diode of
higher class than 1. Laser beams from the
optical pickup are dangerous to the eyes. To
ensure continued safety, do not remove any
covers or attempt to gain access to the inside
of the product. Refer all servicing to qualified
personnel.
• Do not allow this unit to come into contact
with liquids. Electrical shock could result. Also,
damage to this unit, smoke, and overheating
could result from contact with liquids or dust.
Protect this unit from moisture.
• Make sure that foreign objects do not get
inside the unit; they may cause malfunctions,
or create safety hazards such as electrical
shock or laser beam exposure.
• The beginning of operation is the moment
of the unit installation. Before use the device
in winter it is recommended to heat up the
passenger compartment during 20 seconds or
to the operation temperature.
• Using the unit with the temperature that
goes beyond the operation temperature greatly
decreases the operation resource of the screen
and other components of the unit and can
result in an outage.
• Disconnect the vehicle’s negative battery
terminal while mounting and connecting the
unit.
• The unit is designed for negative
terminal of the battery, which is connected
to the vehicle metal. Please ensure it before
installation.
• When replacing the fuse, be sure to use
one with an identical amperage rating. Using a
fuse with a higher amperage rating may cause
serious damage to the unit.
• Do not allow the speaker wires to be
shorted together when the unit is switched
on. Otherwise it may overload or burn out the
power amplifier.
• Make sure you disconnect the power supply
and aerial if you will not be using the system for a
long period or during a thunderstorm.
• Make sure you disconnect the power
supply if the system appears to be working
incorrectly, is making an unusual sound, has
a strange smell, has smoke emitting from it
or liquids have got inside it. Let a qualified
technician check the system.
• Always keep the volume low enough so that
you can hear sounds from outside the vehicle.
• Should this product fail to operate
properly, contact your dealer or nearest service
center.
5
Installation/Connection
Installation
General notes
• Choose the mounting location where the
unit will not interfere with the normal driving
function of the driver.
• Before finally installing the unit, connect
the wiring and make sure that the unit works
properly.
• Consult with your nearest dealer if
installation requires the drilling of holes or other
modifications of the vehicle.
• Install the unit where it does not get in the
driver’s way and cannot injure the passenger if
there is a sudden stop, like an emergency stop.
• If installation angle exceeds 30° from
horizontal, the unit may not perform properly.
• Avoid installing the unit where it would
be subject to high temperature, such as from
direct sunlight, or from hot air, from the heater,
or where it would be subject to dust, dirt or
excessive vibration.
Din Front/Rear-Mount
This unit can be properly installed either
from ‘Front’ (conventional DIN Front-mount) or
‘Rear’ (DIN Rear-mount installation, utilizing
threaded screw Holes at the sides of the unit
chassis). For details, refer to the following
illustrated installation methods.
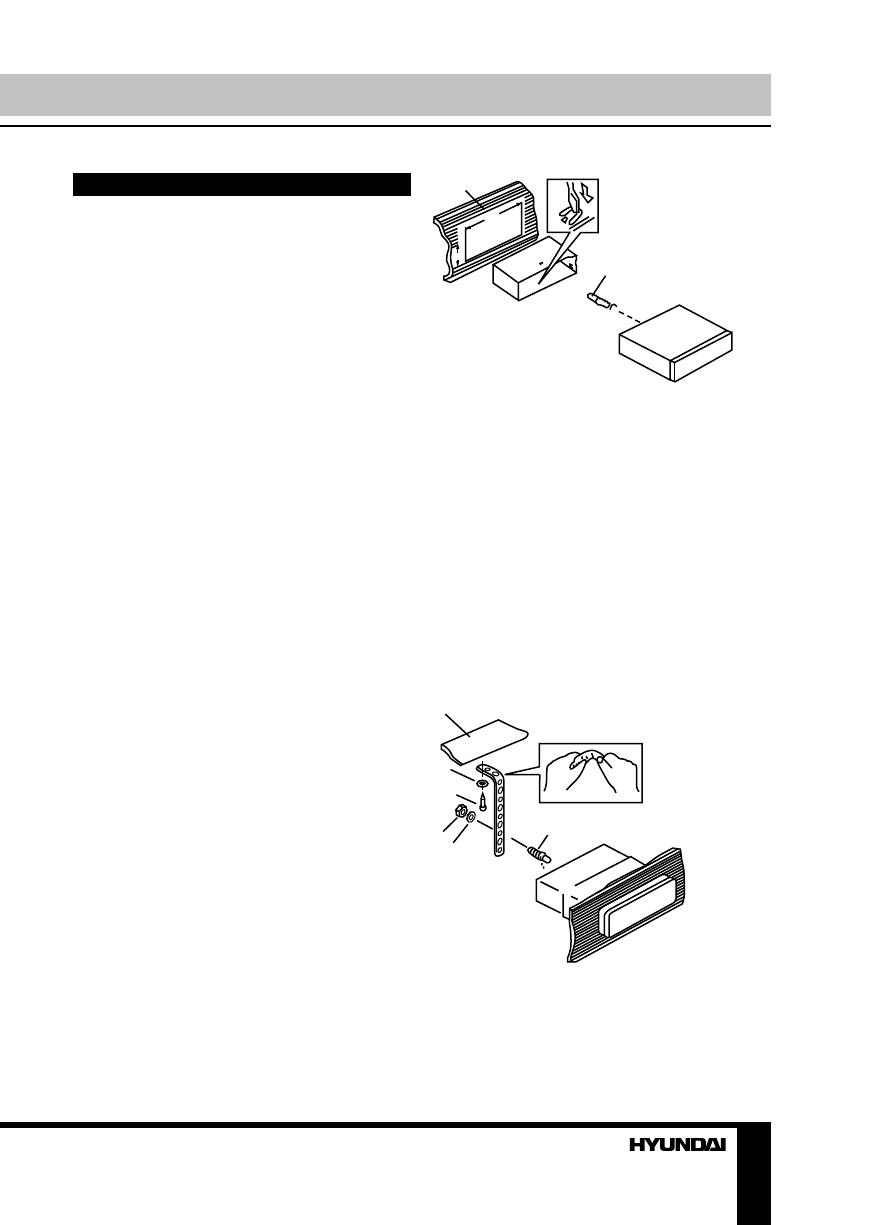
1. DIN front-mount (Method A)
1. Car dashboard
2. Sleeve
3. Screw
4. Nut (5 mm)
5. Spring washer
6. Screw (5 х 25 mm)
7. Metal strap
8. Flat washer
3
2
1
182
53
1. Install the sleeve into the dashboard;
ensure it is installed with the correct side and
there are no obstacles (wires, dashboard
elements, etc) for the unit installation.
2. After installing the sleeve into the
dashboard, bend tabs fitting to the size of the
dashboard to fix the sleeve in place.
3. Use the metal strap to fix the rear side of
the unit. Determine a place for fixing and install
the strap as shown in the picture. You can bend
the strap to the needed angle with your hands.
4. Make the necessary wire connections.
Ensure the connections are correct.
5. Install the unit into the sleeve until the side
locks are fixed.
3
5
4
6
8
1
7
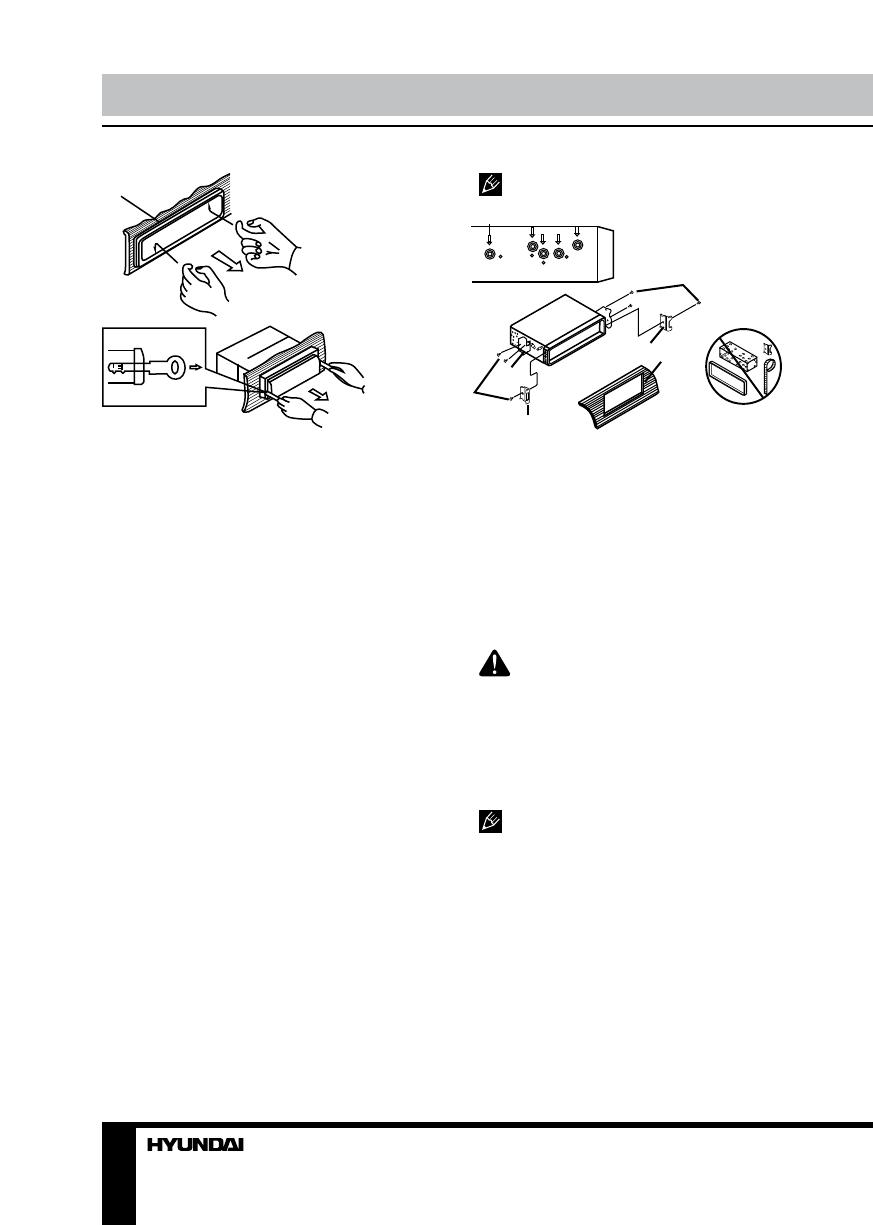
Dismantling the unit
a – Trim frame
b – Frame uninstall direction
c – Release key insertion
6
Installation/Connection
в
б
а
1. Switch off the unit and detach the front
panel.
2. Insert your fingers into the groove in the
front side of the trim frame (apply some effort to
detach the frame). Pull the frame to detach it.
3. Insert the supplied release keys into the
both sides of the unit body to click, as shown
in the picture. To extract the unit from the
dashboard, pull the release keys or the unit
body to pull it out. Before detaching the unit,
ensure it is not fixed with the metal strap.
Trim frame installation
To install the trim frame, press it to the unit
body and push it to fix it in place. This should
be done before installing the front panel;
otherwise you are not able to install the trim
frame. When the trim frame being installed,
the side with the groove should face down and
fixed first.
2. DIN rear-mount (Method B)
For this method, use the screw holes in the
lateral sides of the unit. Fix the unit with the
help of the factory radio mounting brackets.
1. Select a position in which the screw holes
of the brackets (3) are aligned with the screw
holes in the unit body, and screw in two screws
(2) in each side.
2. Screw.
3. Factory radio mounting brackets.
4. Vehicle dashboard.
5. Lock (remove this part).
The outer trim frame and mounting
sleeve are not used for method of installation.
2
2
5
5
4
3
Detachable control panel
Install the fastening hole on the right side of
the front panel into the right fastening of the
unit. Then insert the left fastening on the panel
into the fixing hole on the left part of the unit.
Press on the upper right part of the panel until
a click. Ensure that the panel is properly fixed.
To detach the front panel, press OPEN
button, then distract the left side of the panel
from the fastening of the unit.
The control panel can easily be
damaged by shocks. After removing it, place
it in a protective case and be careful not to
drop it or subject it to strong shocks. The rear
connector that connects the main unit and the
control panel is an extremely important part. Be
careful not to damage it by pressing on it with
fingernails, pens, screwdrivers, etc.
If the control panel is dirty, wipe off the
dirt with soft, dry cloth only. And use a cotton
swab soaked in isopropyl alcohol to clean the
socket on the back of the control panel.
Anti-theft system
The front panel of this unit can be stored in
the included protective case when not in used
and carried away when you leave the vehicle
to deter theft.
Switch off the power of the unit. Detach the
front panel, then put it to the protective case
and take it with you.
7
Installation/Connection
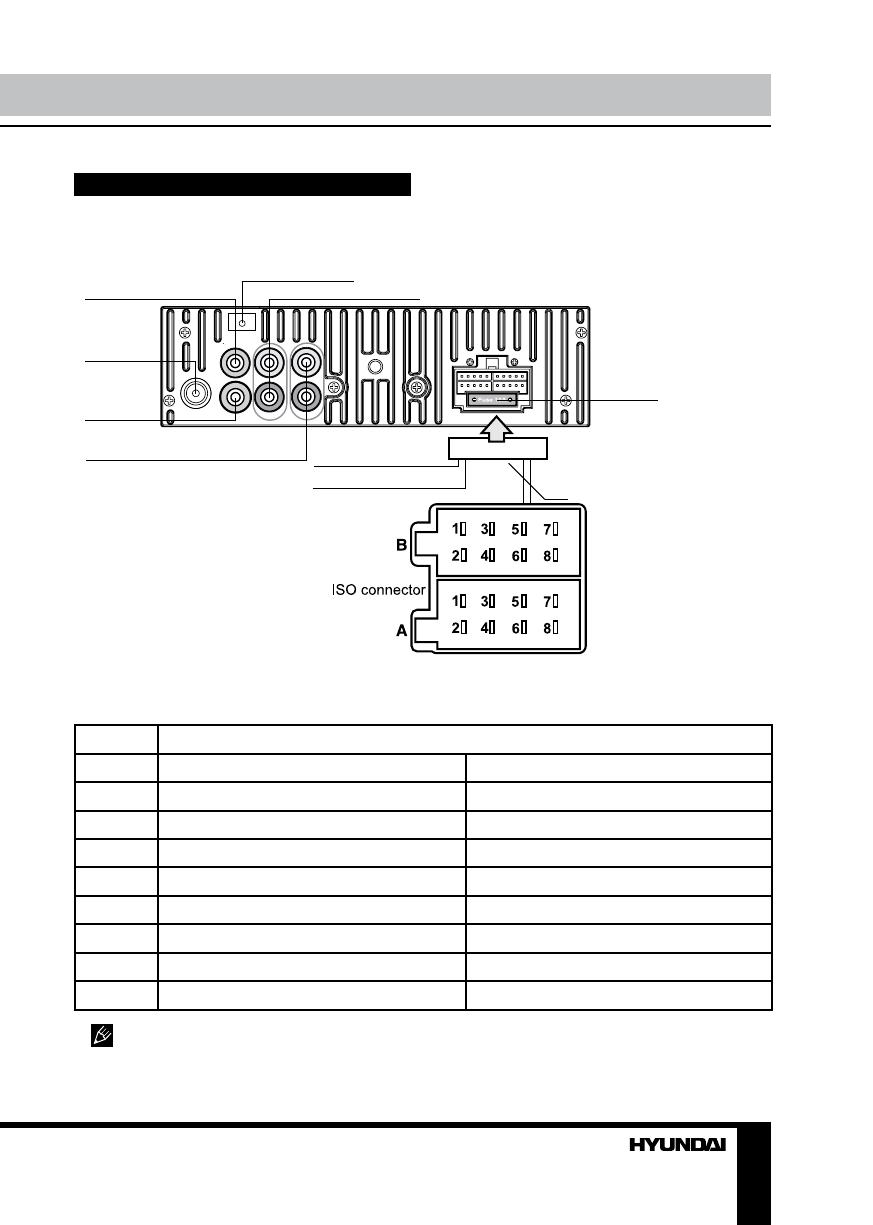
Connection
Connection diagram
Fuse 10 A
Parking (purple)
Reverse (pink)
RCA line out (left=white; right=red)
Back view
camera input
Antenna
socket
Video out Subwoofer out x 2
TV-antenna input
12
ISO connection table
Location Function
Connector A Connector B
1 — Rear right (+) — Blue
2 — Rear right (-) — Blue/White
3 — Front right (+) — Grey
4 Battery +12V/Yellow Front right (-) — Grey/White
5 Power antenna/Orange Front left (+) — Green
6 — Front left (-) — Green/White
7 Ignition key (+12V)/Red Rear left (+) — Brown
8 Ground/Black Rear left (-) — Brown/White
Power antenna wire is intended for power supply of the antenna and for remote control of
an additional amplifier.
8 9
Installation/Connection Operation
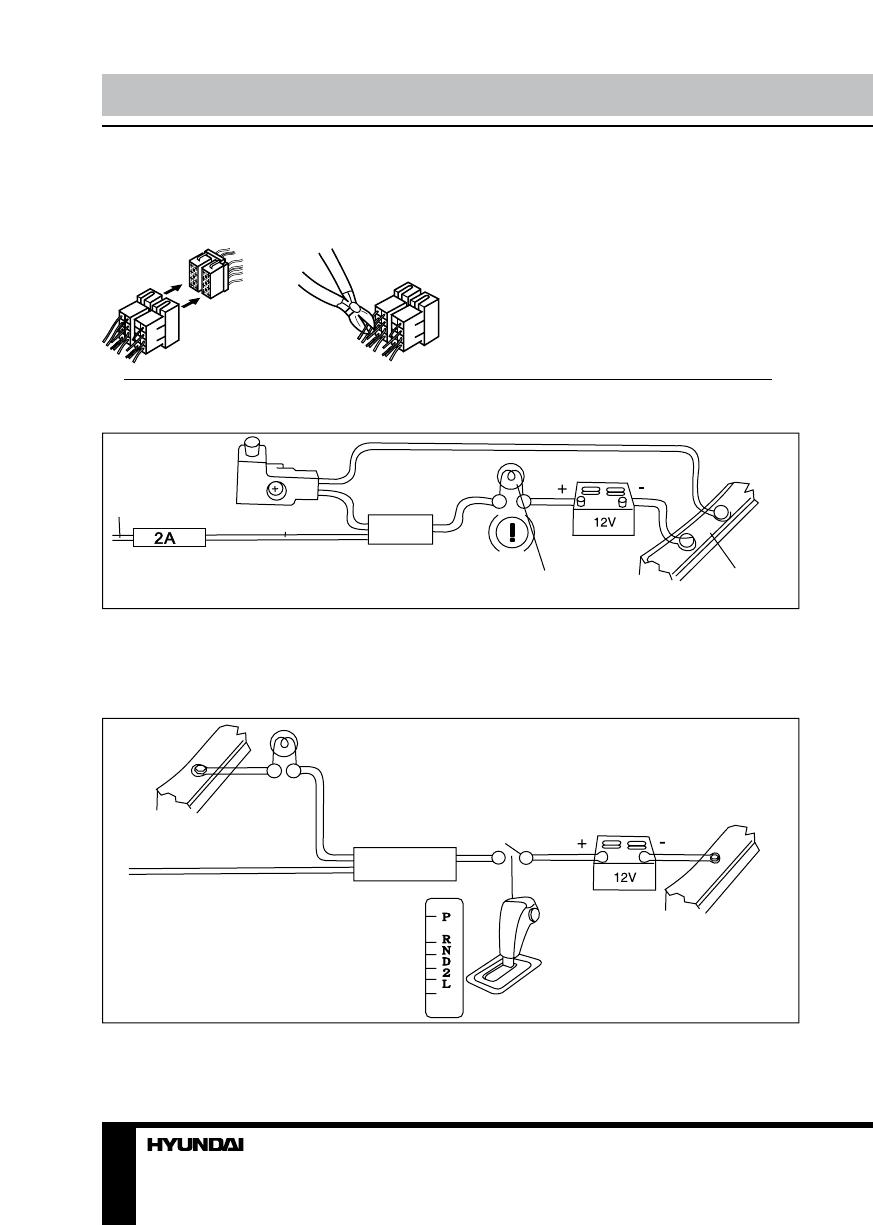
Using the ISO Connector
1. If your car is equipped with the ISO
connector, then connect the ISO connectors as
illustrated.
1 2
2. For connections without the ISO
connectors, check the wiring in the vehicle
carefully before connecting, incorrect connection
may cause serious damage to this unit.
Cut the connector, connect the colored leads
of the power cord to the car battery as shown
in the colour code table above for speaker and
power cable connections.
Parking wire connection
Parking brake lead
Brake light
Car frame
Battery
Purple Wire
If Parking cable is connected to hand brake switch, the video display of the TFT monitor will be
controlled by driving status. When the car is moving ahead, if the video disc is played, the screen
shows warning and blank screen. The warning screen will prevent the driver from watching images.
Reverse driving cable connection
Car frame
Car frame
Rear view video camera lead
Reverse driving light
Gearbox
Pink wire
Battery
If the rear view video camera is connected, the unit automatically switches to camera mode
during reverse driving. The unit returns to the original work mode after the reverse driving is done.

8 9
Installation/Connection Operation
Control elements
Front panel
1. PWR/TFT/OFF button
2. BND/NP/SUB button
3. TA button
4. SCN button
5. SELECT button/VOLUME regulator
6. AF button
7. MOD/MUT button
8. NEXT button
9. TFT display
1 2 3 4 5 6 7 8 9 10 11
12 13 14 15 16 17
10. USB port
11. OPEN button
12. APS/TYPE/AUDIO button
13. PTY/PLAY/PAUSE button
14. CLK button
15. PREVIOUS button
16. AUX input
17. IR-sensor
Inner panel
1 2 3 4 5
1. Disc loading slot
2. SD/MMC memory card slot
3. RESET button (hole)
4. Panel status indicator
5. EJECT button
Pressing RESET hole will erase the clock
setting and stored stations.
Panel status indicator lights up when you flip
down the panel and flashes when you remove
the panel.
10
Operation
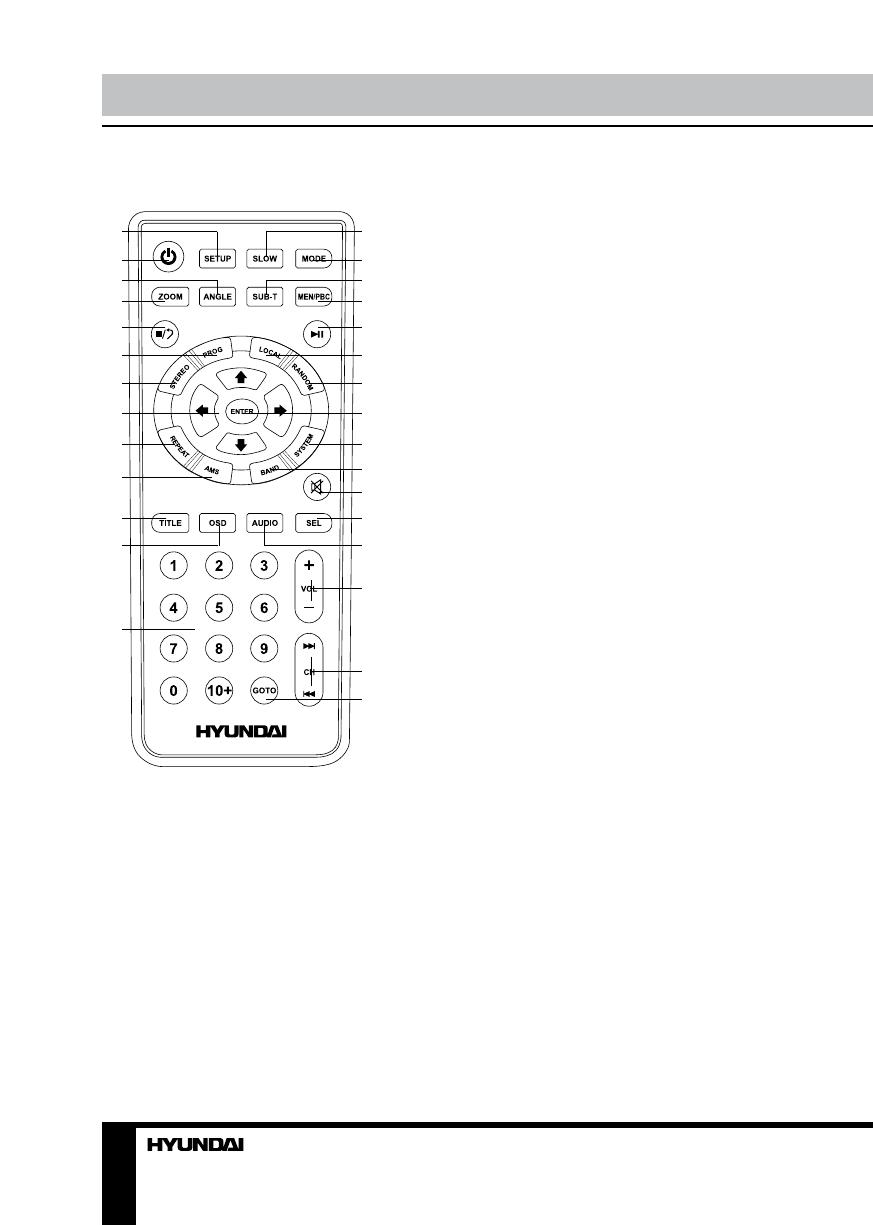
Remote controller
1
2
3
4
5
6
7
8
9
10
11
12
13
14
15
16
17
18
19
20
21
22
23
24
25
26
27
28
29
1. SETUP button
2. POWER button
3. ANGLE button
4. ZOOM button
5. STOP button
6. PROG button
7. STEREO button
8. Cursor (UP/DOWN/LEFT/RIGHT) buttons
9. REPEAT button
10. AMS button
11. TITLE button
12. OSD button
13. Number buttons
14. SLOW button
15. MODE button
16. SUB-T button
17. MEN/PBC button
18. PLAY/PAUSE button
19. LOCAL button
20. RANDOM button
21. ENTER button
22. SYSTEM button
23. BAND button
24. MUTE button
25. SEL button
26. AUDIO button
27. VOL+/VOL- buttons
28. PREVIOUS/NEXT buttons
29. GOTO button
Changing the battery
1. Press the catch and at the same time pull
out the battery tray.
2. Insert the 1 x lithium battery, type CR
2025 3V with (+) mark facing up. Insert the
battery tray into the remote control.

11
Operation
System setting menu
To adjust parameters of the system you can
use the touchable menu consisting of 2 pages:
SETTINGS and SOUND. SETTINGS page
is available if you touch SETUP icon in Main
menu, or if you touch SETTINGS icon in Radio,
TV or Aux mode. SOUND page is available if
you touch SOUND icon in Radio, TV or Aux
mode. Each page contains touch icons enabling
you to perform the operations described below.
Mute function
Press MUTE button on the RC or press and
hold MOD/MUT button on the panel to turn off
the sound. Or touch MUTE icon available in
SOUND page or in Radio interface. “MUTE ON”
appears on the display. Press the button again
or adjust volume to resume the sound output.
Volume control
Press VOL+/VOL- buttons on the RC or
General operations
Reset the unit
Operating the unit for the first time or after
replacing the car battery, you must reset the
unit. Press RESET button (hole) with a pointed
object, such as a ballpoint pen, to set the unit
to initial state.
When some errors occur, you can also
press RESET button to resume to normal, and
it will erase some memorized functions.
Turning the unit on/off
Press any button on the panel or the RC
(except OPEN button) to turn on the unit. Press
and hold POWER/TFT OFF button on the
panel or press POWER button on the RC to
turn off the unit.
Mode selection
Repeatedly press MOD/MUT button on the
panel or MODE button on the RC to select a
mode: Radio => AUX => TV => Disc => USB
=> Memory card. Or in the Main menu touch
the icon of the needed mode. The Main menu
is available on the touch screen after you touch
the blue arrow icon in the top right corner of the
screen while in any mode.
Bluetooth
The Disc, Card and USB modes are
only available when corresponding storages
are connected to the unit. Bluetooth mode is
not supported by this unit.

12 13
Operation Operation
rotate VOLUME regulator on the panel to
decrease or increase sound volume level. Or
touch + and – icons referring to VOL item in
SOUND page.
Setting the sound characteristics
Press repeatedly SELECT button on the
panel or SEL button on the RC to select the
audio setting: VOL (volume) => BAS (bass) =>
TRE (treble) => BAL (balance) => FAD (fader).
Press VOL+/VOL- buttons on the RC or rotate
VOLUME regulator on the panel to adjust the
selected item. Balance is to adjust the balance
between the left and right speakers. Fader is to
adjust the balance between the rear and front
speakers. Or touch + and – icons referring to
corresponding parameter in SOUND page.
After you have reached your desired effect,
leave the unit idle in order for the new setting
to take effect.
If the equalizer is set on, bass and treble
are not adjustable.
EQ modes
Press repeatedly SELECT button on the
panel or SEL button on the RC until the display
shows EQ OFF. Press VOL+/VOL- buttons
on the RC or rotate VOLUME regulator on the
panel to choose an equalizer effect: POP =>
ROCK => CLASS => FLAT => EQ OFF. Or
touch repeatedly EQ icon available in SOUND
page. After you have reached your desired
effect, leave the unit idle in order for the new
setting to take effect.
Loudness
Press repeatedly SELECT button on the
panel or SEL button on the RC until the display
shows LOUD ON (LOUD OFF). Press VOL+/
VOL- buttons on the RC or rotate VOLUME
regulator on the panel to select between
LOUD ON/LOUD OFF. Or touch LOUD icon
available in SOUND page. LOUD function is
to emphasize the bass output; the word LOUD
ON indicates that the LOUD mode is on.
Best Music Position and Double Bass
In SOUND page touch MBP icon to select
left (L) or Right (R) channel for best music
position. Touch DBAS icon to switch on or off
double bass function.
Clock setting
Press CLK button on the panel to show the
time on the display. Press and hold it, the hour
will be in yellow. Rotate VOLUME regulator on
the panel or press VOL+/VOL- buttons on the RC
to adjust the hour. Press SEL button on the RC
or SELECT button on the panel, the minute will
be in yellow. Rotate VOLUME regulator on the
panel or press VOL+/VOL— buttons on the RC to
adjust minutes. Press CLK button to confirm.
Or touch + and – icons referring to HOUR
and MIN item in SOUND page to set hours and
minutes correspondingly.
Beep
Press repeatedly SEL button on the RC until
the display shows BEEP ON (BEEP OFF).
Press VOL+/VOL- buttons on the RC to select
between BEEP ON (beep sound will be heard
when buttons are pressed) and BEEP OFF.
Or touch BEEP icon in SOUND page to switch
beep on of off. After you have reached your
desired effect, leave the unit idle in order for
the new setting to take effect.
Button backlight color
Press repeatedly SELECT button on the
panel or SEL button on the RC until the display
shows COLOR1 (COLOR2). Press VOL+/VOL-
buttons on the RC or rotate VOLUME regulator
on the panel to select between COLOR1
(green button backlight) and COLOR2 (red
button backlight). After you have reached your
desired effect, leave the unit idle in order for
the new setting to take effect.
Image adjustment
In SETTINGS page touch + and – icons
referring to Brightness, Contrast, Color and
Hue item to adjust corresponding parameter of
the image.
12 13
Operation Operation
TFT on/off
Press POWER/TFT OFF button on the panel
to switch the TFT display off. Press the button
again to switch the display on.
Subwoofer
Press repeatedly SELECT button on the
panel or SEL button on the RC until the display
shows SUB ON (SUB OFF). Press VOL+/VOL-
buttons on the RC or rotate VOLUME regulator
on the panel to select between SUB ON/SUB
OFF. Or press and hold BND/NP/SUB button
on the panel to switch on or off the subwoofer
output. After you have reached your desired
effect, leave the unit idle in order for the new
setting to take effect.
An external amplifier is required to
operate the subwoofer.
AUX in jack
AUX-in jack is intended for connecting
external audio equipment to amplify the
sound. If connection is made correctly, the
audio signal from the external source will be
translated through the acoustics of the head
unit. This enables to adjust the volume and
quality of the sounding. For example, you can
connect an MP3-player to listen to tracks using
the car acoustic system.
Radio operations
Touch screen
In Radio mode touchable interface is
available enabling you to perform various
operations. The touch menu consists of two
pages. Touch
icon in the right bottom part
of the screen to switch between two pages.
Band select
Press repeatedly BND/NP/SUB button on
the panel or BAND button on the RC or touch
repeatedly BND icon on the screen to select your
desired radio band in Radio mode: FM1, FM2,
FM3, AM1 (MW1), AM2 (MW2). In each set of
the bands you can store up to 6 preset stations,
making total 30 preset memory stations.
Auto/Manual tuning
• Manual tuning: Press PREVIOUS/NEXT
buttons on the panel or on the RC or touch
repeatedly
and icons on the screen to
manually adjust the radio frequency.
• Auto tuning: Press and hold PREVIOUS/
NEXT buttons on the panel or on the RC or
touch
and icon on the screen, the radio
will seek to the next up or down strong and
clear frequency station automatically. Repeat
this action to seek for other desired stations.
To stop automatic search, press NEXT or
PREVIOUS button on the panel or on the RC
or touch
and icon on the screen.
Programming tuner stations
There are six numbered preset buttons on
the RC (1~6) and six number icons (P1~P6) in
the bottom of the screen, under which you can
store and recall stations for each band. Select
the needed frequency, then press and hold a
preset button. The station will be saved in the
memory under the corresponding number. To
recall a stored station, press the corresponding
preset button.
Automatic store/preset scan
• Automatic store: Press and hold AUDIO/
TYPE/APS button on the panel or AMS button
on the RC, or touch and hold AMS icon on the
screen. SCAN will be displayed. The radio will
automatically store the 6 strongest available
stations to the 6 preset memories of the current
band. To stop auto store, press this button again.
• Preset scan: Press AUDIO/TYPE/APS
button on the panel or AMS button on the RC,
or touch AMS icon on the screen. INTRO will
be flashing. The receiver will scan the saved
stations in all bands for 5 seconds.
Mono/Stereo control (in FM radio mode)
Press repeatedly SELECT button on the
panel or SEL button on the RC until the display

14
Operation
shows ST ON (ST OFF). Press VOL+/VOL-
buttons on the RC or rotate VOLUME regulator
on the panel to select between ST ON/OFF. ST
ON means stereo reception of the signal; ST
OFF means mono reception mode. Or press
STEREO button on the RC or touch MO/ST
icon on the screen to switch stereo reception
on/off. Improvement of reception of distant
stations can be done by selecting mono mode,
which may cut down some reception noise.
Local radio station search
Press repeatedly SELECT button on the
panel or SEL button on the RC until the display
shows LOC ON (LOC OFF). Press VOL+/VOL-
buttons on the RC or rotate VOLUME regulator
on the panel to select between LOC ON/OFF.
LOC ON means that only local stations are
received; LOC OFF means that both local and
distant stations with weak and strong signal are
received. Or press LOCAL button on the RC
or touch LOC/DX icon on the screen to switch
between local and distant station reception.
RDS function
RDS (Radio Data System) service availability
varies with areas. Please understand if RDS
service is not available in you area, the
following service is not available, either.
AF (Alternative Frequencies)
function
Press AF button on the panel or touch AF
icon on the screen to turn the AF function on
or off. When the function is on, AF symbol will
blink on the display.
When the radio signal strength is poor,
enabling the AF function will allow the unit to
automatically search another station with the
same PI (Program Identification) as the current
station but with a stronger signal, so that you
do not have to retune the stations when driving
between different transmitter coverage areas.
PS (Program Service name): the name of
station will be display instead of frequency.
If RDS service is not available in your area,
turn off the AF mode.
TA (Traffic Alarm) function
Press TA button on the panel or touch TA icon
on the screen to turn TA function on or off. When
on, the TA symbol will show on the display.
In TA mode traffic program will be
automatically searched, until the program
is received. When traffic announcement is
received the unit will temporarily switch to the
tuner mode (regardless of the current mode)
and begin broadcasting the announcement.
After the traffic announcement is over, it will
return to the previous mode and volume level.
To interrupt traffic announcement press TA
button shortly; it will not switch off the TA mode.
PTY (Program Type)
This radio will allow you to select the type of
program required, and will search for a station
broadcasting that type of program.
Press PTY/PLAY/PAUSE button on the panel
or touch PTY icon on the screen to show the
music type. Then press 1 — 6 number buttons
to choose different music programs available.
Press twice PTY/PLAY/PAUSE button on
the panel or touch PTY icon on the screen to
show the speech type program. Then press 1
— 6 number buttons to choose different speech
programs. Each number button will show 2 or
3 different speech programs for you to choose:
Pop, Rock, Easy, Light, Classics, Other, Jazz,
Country, Nation, Oldies, Folk, News, Affairs,
Info, Sport, Educate, Drama, Culture, Science,
Varied, Weather, Finance, Children, Social,
Religion, Phone IN, Travel, Leisure, Document).
When PTY is selected, the radio starts to
search corresponding PTY information, and
stops if the PTY information is detected. If no
buttons are pressed within several seconds,
previously selected PTY is searched. During 1
loop, if desired PTY is not found, the unit will
return to previous mode. Press PTY/PLAY/
PAUSE button on the panel or touch PTY icon
on the screen for the 3rd time to switch the
PTY function off.
15
Operation
Other parameter setting
To choose the corresponding parameter,
press and hold SELECT button on the panel or
SEL button on the RC, then press it repeatedly
until the display shows the needed parameter.
Press VOL+/VOL- buttons on the RC or rotate
VOLUME regulator on the panel to choose the
needed option. After choosing, please leave
the unit idle to activate.
• TA ALARM/TA SEEK: In TA SEEK mode,
the unit will seek for traffic announcement
program; in TA ALARM mode, the alarm is set
off. Or you can touch TASET icon on the screen
to switch between TA ALARM/TA SEEK.
• PI SOUND/MUTE: Choose either PI sound
or PI mute. PI sound refers to the reception
noise when the AF function tries to scan
alternative frequency.
• RETUNE S/L: RETUNE refers to the time
period the unit allows for radio scan when
reception is interrupted. SHORT represents
a time period of 30 seconds and LONG
represents a time period of 90 seconds. Or
you can touch RETUNE icon on the screen to
switch between RETUNE S/RETUNE L.
• MASK DPI/ALL: During MASK DPI mode,
the unit will mask only the AF which has different
PI, this is the default mode; during MASK ALL
mode, the unit will mask the AF which has
different PI and no RDS signal with high field
strength. Or you can touch MASK icon on the
screen to switch between MASK DPI/ALL.
TV operations
Touch screen
In TV mode touchable interface is available
enabling you to perform various operations.
Full-screen mode
When the TV image is in full-screen format,
touch the screen to go to TV touchable
interface. When in the interface, touch ENTER
button on the screen to go to full-screen mode.
TV and audio system
Touch SYS button on the screen to select
one of the available TV systems. Touch AUDI
button on the screen to select one of the
available sound systems.
Search channels
Touch SCAN button on the screen or press
APS/L/R button on the panel or AMS button
on the RC to automatically search and save
all available TV-channels. Touch and
icon on the screen to search nearest available
station downwards or upwards.
Save channels
• When a channel is found, touch and hold
a channel cell on the screen or press and
hold a number button on the RC. The current
channel will be saved on the corresponding
number position. To call a saved station, touch
a channel cell on the screen or press a number
button on the RC.
• Press PREVIOUS/NEXT buttons on the
RC or panel or touch and icons on the
screen to go to previous or next saved channel.
Disc/USB/SD/MMC operations
Touch screen
In Disc/USB/Card mode touchable interface
is available enabling you to perform various
operations. The touchable menu is available
if during playback you touch the screen in the
bottom. The menu is displayed in the bottom
part of the screen and consists of three pages.
For details please see the table below:
Icon Operation
Play/pause
Stop
Rewind
16
Operation
Fast forward
Previous
Next
Back to main menu
To next page
Audio
OSD
UP cursor
DOWN cursor
LEFT cursor
RIGHT cursor
OK (confirmation)
To next page
Menu
Angle
Repeat
Title
Subtitle
NUM
NUM (number pad)
+
Zoom
To next page
The operations are detailed below.
Insert/Eject disc
• Open the front panel and insert a disc into
the disc slot with label side up. The disc will be
automatically loaded into the unit. The first file
in the root folder will be played. Close the front
panel.
• Open the front panel and press EJECT
button to eject the disc from the slot. If the disc
is not removed from the slot within several
seconds, it will be automatically loaded into
the slot again. When the disc is ejected and
removed, the unit will automatically switch to
another mode.
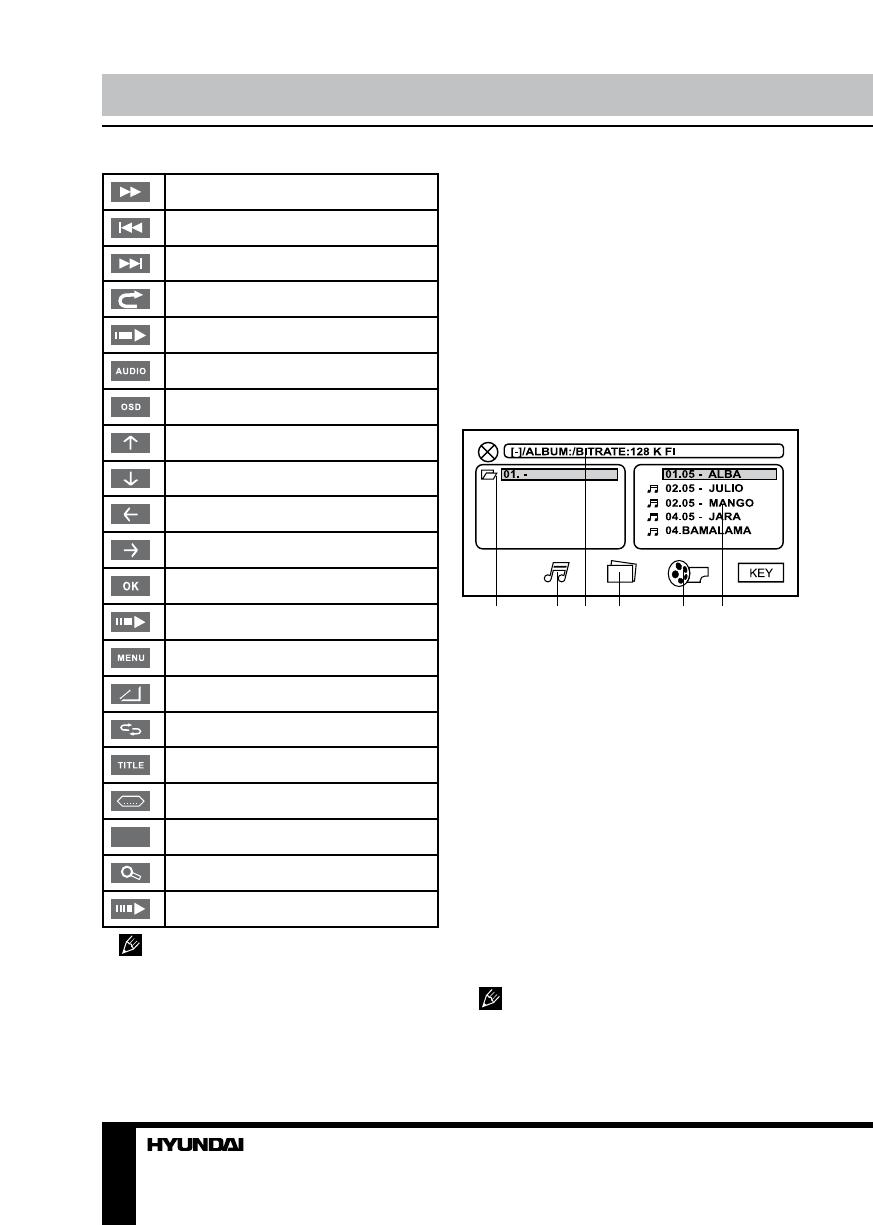
MP3/DivX/JPEG file playback
When you insert a storage containing MP3/
DivX/JPEG files, the screen will show following
interface:
1 2 3 4 5 6
1. Folder list
2. Audio file icon
3. Current file info
4. Photo file icon
5. Video file icon
6. File list
You can select the needed folder or file by
pressing cursor buttons. Press ENTER button
on the RC or touch OK icon on the screen to
confirm your selection.
If you are using a multi-format storage,
press cursor buttons to select between music,
photo and video files (the corresponding icon
will be framed), then press ENTER button
on the RC or touch OK icon on the screen to
confirm your selection. Or directly touch Audio,
Photo or Video file icon to go to playback of
corresponding files.
Manufacturer guarantees regular
playback of licensed discs only. Some AVI
files cannot be played due to their parameters
and recording conditions. Video files more

17
Operation
than 2 Gb having AVI extension can be played
partially.
Play/Pause/Stop
During playback press PLAY/PAUSE button
on the RC or touch Play/pause icon to pause
playback. Do this operation again to resume
playback. To stop playback, press STOP
button on the RC or touch Stop icon.
Selecting tracks/chapters
During playback press PREVIOUS button on
the panel or on the RC or touch Previous icon
to play the previous track/chapter (depending
on the format). Press NEXT button on the panel
or on the RC or touch Next icon to play the next
track/chapter. Press number buttons (0-9) on
the RC or touch NUM icon, then touch number
icons to select the desired track/chapter.
Fast forward/rewind
Press and hold repeatedly PREVIOUS or
NEXT button on the panel or on the RC or
touch Rewind or Fast forward icon for fast
backward or forward playing correspondingly.
With each pressing the playback speed will
increase as follows: x2 => x4 => x8 => x20
=> Normal. While fast playback, press PLAY/
PAUSE button on the RC or touch Play/pause
icon to resume normal speed.
Repeat playback
Press REPEAT button on the RC repeatedly
or touch Repeat icon for repeat playing in
different modes: track/chapter repeat, folder
repeat, disc repeat, repeat cancel (depending
on the format used).
Random playback
Press RANDOM button on the RC to
activate random playing mode. Press one more
time to return to normal playing.
GOTO
Press GOTO button to show the playback
parameters for the current chapter/track/time
(track/title/chapter number or time). Press cursor
buttons to navigate between the parameters
and use number buttons to input needed
settings. Press ENTER button on the RC to start
playback from the set number or time.
Programming the playback
• Press PROG button on the RC to open
program menu.
• Use cursor buttons to select the program
position and use number buttons to input the
desired track/title/chapter (depending on the
disc type).
• Press PLAY/PAUSE button to start
program play, or move the cursor to select
PLAYING and press ENTER button on the RC
to play.
• Move the cursor to CLEAR, press ENTER
button on the RC to delete the programmed
list. Press PROG button to quit programming.
OSD (On Screen Display) function
Press OSD button on the RC or touch OSD
icon repeatedly to show current playback
information, such as number of track/chapter/
title, current track/chapter/title time elapsed/
remaining, total track/chapter/title time
remaining (depending on the disc type).
Zooming in/out
During playback of video or images, press
repeatedly ZOOM button on the RC or touch
Zoom icon, the picture will be zoomed in the
sequence: X2 =>X3 =>X4 =>X1/2 => X1/3 =>
X1/4 => Normal. When the image is zoomed
in, you can move it by pressing cursor buttons.
Slow playback
During playback press repeatedly SLOW
button on the RC to select the speed of slow
playback: 1/2 => 1/3 => 1/4 => 1/5 => 1/6 =>
1/7 => Normal. While slow playback, press
PLAY/PAUSE button on the RC or touch Play/
Pause icon to resume normal playback.
PBC (Playback Control) function (for

18
Operation
VCD only)
This function is only available for the VCD
with PBC function. Press and hold MEN/PBC
button on the RC to set PBC on/off; when PBC
is off, the screen will show PBC menu if you
switch PBC on. If the menu consists of a list
of titles, you can select a desired one using
number buttons on the RC.
Changing angle (for DVD only)
Press ANGLE button on the RC or touch
Angle icon to playback images at different
camera angles. If a disc doesn’t support multi-
angle playback, this function will not work.
Selecting audio language (for DVD
only)
During DVD disc playback, press AUDIO
button on the RC repeatedly or touch Audio
icon to select the audio language to listen. This
function will not work if a disc does not support
multi-language audio.
Selecting subtitle language (for DVD
only)
If your DVD disc supports multi-language
subtitle, press SUB-T button on the RC
repeatedly or touch Subtitle icon to switch
among disc-supported languages.
Selecting sound channel
During VCD/CD disc playback repeatedly
press AUDIO button on the RC or touch Audio
icon to select the channel: Mono left => Mono
right => Stereo.
Selecting video system
While video playback, press repeatedly
SYSTEM button on the RC or BND/NP/SUB
button on the panel to select the video system
(NTSC/PAL/PAL60/AUTO).
Menu navigation
• Press MEN/PBC button on the RC or
touch Menu icon to activate the disc menu list
on the screen. Choose the desired item with
cursor buttons. Press ENTER button on the RC
or touch OK icon to confirm the selected item
and start playing.
• When playing a DVD, press TITLE button
on the RC or touch Title icon to go to the title
list of the disc.
Title and menu are only available if the
disc has these functions.
ID3 Tag function
If an MP3 file has ID3-tag information in
the supported format, such information will be
displayed while playback
USB/SD/MMC notes
• USB format supports 2.0. Capacity: up to
32 Gb.
• For correct and satisfactory operation,
licensed SD/MMC memory cards of famous
brands should be used with this unit. Avoid
using memory cards of unknown brands.
Capacity: up to 32 Gb.
Inserting SD/MMC card/USB device
Insert an MMC/SD card or a USB device into
MMC/SD slot or USB slot. Then the playing
mode will be changed into Card or USB mode
automatically. The first card/USB device track
playback will start. If the unit is afterwards
switched to another mode, press MOD/MUT
button on the panel or MODE button on the RC
to select USB or memory card mode. Or touch
corresponding icon in the Main menu.
All the operations with files stored in
a memory card or USB are the same as
described in Disc Operations for file discs.
System setup
Press SETUP button on the RC to display
setup screen, use LEFT/RIGHT cursor buttons
and ENTER button to select the desired setup
page: System, Language, Audio, Video. In the
selected page select an option using UP/DOWN
cursor buttons, then press RIGHT cursor button
19
Operation
to go to setting list. Use UP/DOWN cursor
buttons to select the needed setting. Press
ENTER button on the RC to confirm.
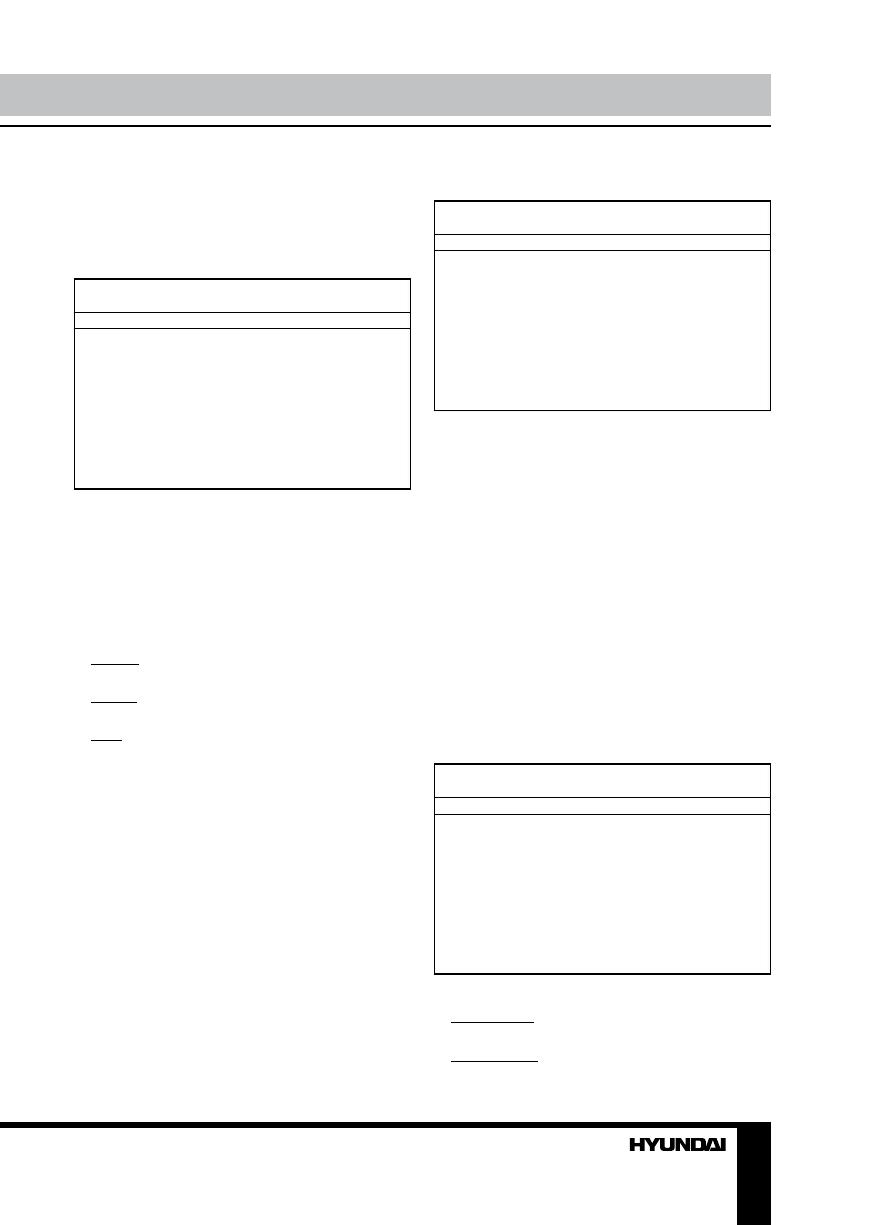
System setup
SYSTEM SETUP
TV SYSTEM
SCREEN SAVER
TV TYPE
PASSWORD
RATING
DEFAULT
TV system
Select the TV system in the setting menu
(NTSC, PAL, AUTO).
Screen saver
The screen saver appears if disc stops for
more than 3 minutes.
TV type
Select TV type to watch wide screen movies.
4:3 PS: For 4:3 TV, left and right edges will
be cut.
4:3 LB: For 4:3 TV, black bars will appear on
top and bottom.
16:9: For 16:9 wide screen TV.
Password
Change the password. The initial factory
password is 0000. You can set your own
password. If you forget your own password,
you can use 0000 as general password.
Rating
The control level is for parental to control
playing content and protect your children from
violence and erotic. The disc, the level of which
is higher than the setting level can not be played.
The rating can be selected only under the
password unlocked status, and the limits can be
worked only under the password locked status.
Default
Reset all settings to default values.
Language setup
LANGUAGE SETUP
OSD LANGUAGE
AUDIO LANGUAGE
SUBTITLE LANGUAGE
MENU LANGUAGE
OSD language
Select the language to be used for the on-
screen display.
Audio language
Select the language to be used for the audio.
You can select a preferred audio from those
included on the DVD video disk.
Subtitle language
Select the language to be used for the
Subtitles. You can select a preferred subtitle
from those included in the DVD Video disk.
Menu language
Select the language to be used for the Menu.
You can select a preferred audio from those
included on the DVD.
Audio setup
AUDIO SETUP
AUDIO OUT
KEY
Audio out
SPDIF OFF: Analog or optical output has no
output signal.
SPDIF/RAW: When the unit is connected to
20 21
Operation General information
a power amplifier by the analog or optical port,
please select this item; the power amplifier you
connected must have the decode function of
Dolby Digital, DTS or MPEG.
SPDIF/PCM: When the player is connected
to a 2-channel digital stereo amplifier, please
select this item.
Key
Select key UP/DOWN according to your
preference.
Video setup
VIDEO SETUP
BRIGHTNESS
CONTRAST
HUE
SATURATION
SHARPNESS
Set a parameter with UP/DOWN cursor
buttons: Brightness, Contrast, Hue, Saturation,
Sharpness.
Просмотр
Доступно к просмотру 47 страниц. Рекомендуем вам скачать файл инструкции, поскольку онлайн просмотр документа может сильно отличаться от оригинала.
-
H-CMD4028
МУЛЬТИМЕДИЙНЫЙ
MULTIMEDIA DVD/CD/MP3              DVD/CD/MP3-РЕСИВЕР СО
RECEIVER WITH BUILT-IN 3.5”               ВСТРОЕННЫМ 3.5” TFT-
TFT DISPLAY AND TV TUNER            ДИСПЛЕЕМ И ТВ-ТЮНЕРОМ
Instruction manual              Руководство по эксплуатации
-
Table of contents                                                                                                           Table of contents
Dear customer!
Thank you for purchasing our product. For safety, it is strongly recommended to read
this manual carefully before connecting, operating and/or adjusting the product and keep
the manual for reference in the future.
Table of contents                2    Button backlight color        12
Before you start                 4    Image adjustment              12
Utilization of the product       4    TFT on/off                    12
Important safeguards             4    AUX in jack                   12
Installation/Connection          5  Radio operations                13
Installation                     5    Touch screen                  13
General notes                  5    Band select                   13
Din Front/Rear-Mount           5    Audio/Manual tuning           13
1. DIN front-mount (Method A)  5    Programming tuner stations    13
Dismantling the unit           6    Automatic store/preset scan   13
Trim frame installation        6    Mono/select control           13
2. DIN rear-mount (Method B)   6    Local radio station search    13
Detachable control panel       6    RDS function                  13
Anti-theft system              7    AF function                   14
Connection                       7    TA function                   14
Connection diagram             7    PTY (Program Type)            14
ISO connection table           8    Other parameter setting       14
Using the ISO connector        8  TV operations                   15
Parking wire connection        9    Touch screen                  15
Reverse cable connection       9    Full-screen mode              15
Operation                        9    TV and audio system           15
Control elements                 9    Search channels               15
Front panel                    9    Save channels                 15
Inner panel                10  Disc/USB/SD/MMC operations      15
Remote controller               10    Touch screen                  15
Changing battery           10    Insert/Eject disc             16
General operations              11    MP3/DivX/JPEG file playback   16
Reset the unit                11    Play/pause/stop               16
Turning the unit on/off       11    Selecting tracks/chapters     16
Mode selection                11    Fast forward/rewind           16
System setting menu           11    Repeat playback               17
Mute function                 11    Random playback               17
Volume control                11    Goto                          17
Setting the sound characteristics  12  Programming the playback   17
EQ modes                      12    OSD function                  17
Loudness                      12    Zooming in/out                17
BMP and Double Bass           12    Slow playback                 17
Clock setting                 12    PBC function                  17
Beep                          12    Changing angle                17
2                                                                                                                                                  3
-
Table of contents                                   Table of contents
Selecting audio language     17
Selecting subtitle language  17
Selecting sound channel      18
Selecting video system       18
Menu navigation              18
ID3 tag information          18
USB/SD/MMC notes             18
Inserting SD/MMC card/USB device  18
System setup                    18
System setup               18
Language setup               19
Audio setup                  19
Video setup                  19
General information             20
Handling compact discs          20
Cleaning discs               20
Cleaning the unit body          20
Accessories                     20
Troubleshooting guide           21
Specification                   22
2                                                                          3
- 1
- 2
- 3
- 4
- 47
(скачивание инструкции бесплатно)
Формат файла: PDF
Доступность: Бесплатно как и все руководства на сайте. Без регистрации и SMS.
Дополнительно: Чтение инструкции онлайн

МУЛЬТИМЕДИЙНЫЙ
DVD/CD/MP3-РЕСИВЕР СО
ВСТРОЕННЫМ 3.5” TFT-
ДИСПЛЕЕМ И ТВ-ТЮНЕРОМ
MULTIMEDIA DVD/CD/MP3
RECEIVER WITH BUILT-IN 3.5”
TFT DISPLAY AND TV TUNER
Руководство по эксплуатации
Instruction manual
H-CMD4028
Страница:
(1 из 47)
навигация

1

2

3

4

5

6

7

8

9

10

11

12

13

14

15

16

17

18

19

20

21

22

23

24

25

26

27

28

29

30

31

32

33

34

35

36

37

38

39

40

41

42

43

44

45

46

47
Оглавление инструкции
- Страница 1 из 48
H-CMD4028 MULTIMEDIA DVD/CD/MP3 RECEIVER WITH BUILT-IN 3.5” TFT DISPLAY AND TV TUNER Instruction manual МУЛЬТИМЕДИЙНЫЙ DVD/CD/MP3-РЕСИВЕР СО ВСТРОЕННЫМ 3.5” TFTДИСПЛЕЕМ И ТВ-ТЮНЕРОМ Руководство по эксплуатации - Страница 2 из 48
Table of contents Dear customer! Thank you for purchasing our product. For safety, it is strongly recommended to read this manual carefully before connecting, operating and/or adjusting the product and keep the manual for reference in the future. Table of contents Before you start Utilization of - Страница 3 из 48
Table of contents Selecting audio language Selecting subtitle language Selecting sound channel Selecting video system Menu navigation ID3 tag information USB/SD/MMC notes Inserting SD/MMC card/USB device System setup System setup Language setup Audio setup Video setup General information Handling - Страница 4 из 48
Before you start Utilization of the product If you want to dispose this product, do not mix it with general household waste. There is a separate collection system for used electronic products in accordance with legislation that requires proper treatment, recovery and recycling. Please contact your - Страница 5 из 48
Installation/Connection 1 Installation General notes • Choose the mounting location where the unit will not interfere with the normal driving function of the driver. • Before finally installing the unit, connect the wiring and make sure that the unit works properly. • Consult with your nearest - Страница 6 из 48
Installation/Connection The outer trim frame and mounting sleeve are not used for method of installation. а 2 б в 5 4 3 2 5 1. Switch off the unit and detach the front panel. 2. Insert your fingers into the groove in the front side of the trim frame (apply some effort to detach the frame). Pull the - Страница 7 из 48
Installation/Connection Connection Connection diagram Reverse (pink) Parking (purple) TV antenna Video output (yellow) Radio antenna socket Rear view camera input (yellow) RCA line out (left=white; right=red) ISO connection table Location Function Connector A Connector B 1 — Rear right (+) — Blue 2 - Страница 8 из 48
Installation/Connection Using the ISO Connector 1. If your car is equipped with the ISO connector, then connect the ISO connectors as illustrated. 1 2 2. For connections without the ISO connectors, check the wiring in the vehicle carefully before connecting, incorrect connection may cause serious - Страница 9 из 48
Operation Control elements 1. 2. 3. 4. 5. 6. 7. 8. 9. 1 Front panel PWR/TFT/OFF button BND/NP button TA button SCN button SELECT button/VOLUME regulator AF button MOD/MUT button NEXT button TFT display 10. USB port 11. OPEN button 12. APS/TYPE/AUDIO button 13. PTY/PLAY/PAUSE button 14. CLK button - Страница 10 из 48
Operation Remote controller 1 14 2 3 4 15 16 17 5 18 6 19 7 20 8 21 9 22 10 23 11 25 12 26 24 27 13 28 29 1. SETUP button 2. POWER button 3. ANGLE button 4. ZOOM button 5. STOP button 6. PROG button 7. STEREO button 8. Cursor (UP/DOWN/LEFT/RIGHT) buttons 9. REPEAT button 10. AMS button 11. TITLE - Страница 11 из 48
Operation General operations System setting menu Reset the unit Operating the unit for the first time or after replacing the car battery, you must reset the unit. Press RESET button (hole) with a pointed object, such as a ballpoint pen, to set the unit to initial state. When some errors occur, you - Страница 12 из 48
Operation selected item. Balance is to adjust the balance between the left and right speakers. Fader is to adjust the balance between the rear and front speakers. Or touch + and – icons referring to corresponding parameter in SOUND page. After you have reached your desired effect, leave the unit - Страница 13 из 48
Operation unit. This enables to adjust the volume and quality of the sounding. For example, you can connect an MP3-player to listen to tracks using the car acoustic system. memory under the corresponding number. To recall a stored station, press the corresponding preset button. Automatic - Страница 14 из 48
Operation varies with areas. Please understand if RDS service is not available in you area, the following service is not available, either. AF (Alternative Frequencies) function Press AF button on the panel or touch AF icon on the screen to turn the AF function on or off. When the function is on, - Страница 15 из 48
Operation the unit will mask only the AF which has different PI, this is the default mode; during MASK ALL mode, the unit will mask the AF which has different PI and no RDS signal with high field strength. Or you can touch MASK icon on the screen to switch between MASK DPI/ALL. TV operations Touch - Страница 16 из 48
Operation 3. Current file info 4. Photo file icon 5. Video file icon 6. File list Angle Repeat Title Subtitle NUM + NUM (number pad) Zoom To next page The operations are detailed below. Insert/Eject disc • Open the front panel and insert a disc into the disc slot with label side up. The disc will - Страница 17 из 48
Operation increase as follows: x2 => x4 => x8 => x20 => Normal. While fast playback, press PLAY/ PAUSE button on the RC or touch Play/pause icon to resume normal speed. Repeat playback Press REPEAT button on the RC repeatedly or touch Repeat icon for repeat playing in different modes: track/chapter - Страница 18 из 48
Operation subtitle, press SUB-T button on the RC repeatedly or touch Subtitle icon to switch among disc-supported languages. Selecting sound channel During VCD/CD disc playback repeatedly press AUDIO button on the RC or touch Audio icon to select the channel: Mono left => Mono right => Stereo. mode - Страница 19 из 48
Operation be cut. 4:3 LB: For 4:3 TV, black bars will appear on top and bottom. 16:9: For 16:9 wide screen TV. Password Change the password. The initial factory password is 0000. You can set your own password. If you forget your own password, you can use 0000 as general password. Rating The control - Страница 20 из 48
General information Handling compact discs • Do not insert anything other than a CD into the CD loading slot. • Do not use cracked, chipped, warped, or otherwise damaged discs as they may cause skipping or noise damage the player. • Handle the disc only by the edges (as shown in the picture). To - Страница 21 из 48
General information Troubleshooting Below is a table describing simple measures that can help you eliminate most problems likely to emerge when this unit is in use. If below measures do not help, turn to a service center or to the nearest dealer. Symptom Cause Solution No power The car ignition is - Страница 22 из 48
General information Specifications General Power supply Maximum power output Unit dimensions/Net weight Gift box dimensions/Gross weight Temperature range Discplay Display Aspect ratio Resolution Brightness Contrast View angle TV tuner TV system FM stereo radio Frequency range Presettable stations - Страница 23 из 48
Содержание Уважаемый покупатель! Благодарим Вас за покупку нашего изделия. Чтобы понять, как правильно и безопасно пользоваться Вашей моделью изделия, рекомендуется тщательно изучить настоящее руководство перед подключением, регулировкой и эксплуатацией изделия. Сохраняйте руководство для - Страница 24 из 48
Содержание Перемотка вперед/назад Повторное воспроизведение Случайное воспроизведение Воспроизведение по заданным параметрам Программирование воспроизведения Отображение информации на дисплее Изменение масштаба Замедленное воспроизведение Функция PBC Угол просмотра Выбор языка аудио Выбор языка - Страница 25 из 48
Перед началом эксплуатации Утилизация изделия Если вы желаете утилизировать данное изделие, не выбрасывайте его вместе с обычным бытовым мусором. Существует отдельная система сбора использованных электронных изделий в соответствии с законодательством, которая предполагает соответствующее обращение, - Страница 26 из 48
Перед началом эксплуатации соприкасаться друг с другом или с корпусом автомобиля после включения устройства. В противном случае усилитель может быть перегружен или выйти из строя. • Убедитесь, что источник питания и антенна отключены, если Вы не будете пользоваться устройством в течение длительного - Страница 27 из 48
Установка/Подключение Установка Общая информация • Перед окончательной установкой устройства временно подключите все провода и убедитесь, что все соединения выполнены верно, а устройство и система работают правильно. • Для обеспечения правильной установки устройства используйте только те детали, - Страница 28 из 48
Установка/Подключение ключения. 5. Установите магнитолу в монтажный кожух до фиксации боковых защелок. 1 7 8 6 4 Установка декоративной рамки Для установки декоративной рамки прижмите ее к корпусу устройства и нажмите, чтобы вставить на место. Это необходимо сделать до установки передней панели, - Страница 29 из 48
Установка/Подключение Система против кражи 2 5 3 4 2 5 Если данное устройство не используется, переднюю панель можно отсоединить и поместить в защитный футляр, входящий в комплект поставки. Панель в футляре можно взять с собой, когда Вы покидаете автомобиль. Это позволяет избежать кражи панели. - Страница 30 из 48
Установка/Подключение Подключение Схема электрических соединений Задняя передача (розовый) Парковочный (фиолетовый) ТВ-антенна Видеовыход (желтый) Разъем для радиоантенны Вход для камеры заднего вида (желтый) Линейный выход RCA (лев=бел.; правый=красн.) ISO-коннектор Предохранитель 10 A - Страница 31 из 48
Установка/Подключение Использование разъема ISO 1. Если в Вашем автомобиле есть разъем ISO, произведите подключение, как показано на рисунке. 2. Для подключений без разъемов ISO внимательно проверьте все провода перед подключением, неправильное подключение может привести к повреждениям изделия. - Страница 32 из 48
Управление устройством Элементы управления 1. 2. 3. 4. 5. 6. 7. 8. 9. Передняя панель Кнопка PWR/TFT/OFF Кнопка BND/NP Кнопка TA Кнопка SCN Кнопка SELECT/регулятор VOLUME Кнопка AF Кнопка MOD/MUT Кнопка NEXT TFT-дисплей 10. USB-порт 11. Кнопка OPEN 12. Кнопка APS/TYPE/AUDIO 13. Кнопка - Страница 33 из 48
Управление устройством Пульт дистанционного управления 1 14 2 3 4 15 16 17 5 18 6 19 7 20 8 21 9 22 10 23 11 25 12 26 24 27 13 28 29 1. Кнопка SETUP 2. Кнопка POWER 3. Кнопка ANGLE 4. Кнопка ZOOM 5. Кнопка STOP 6. Кнопка PROG 7. Кнопка STEREO 8. Кнопки курсора (ВВЕРХ/ВНИЗ/ВЛЕВО/ ВПРАВО) 9. Кнопка - Страница 34 из 48
Управление устройством Основные операции Сброс настроек устройства Включая устройство в первый раз или после замены батареи, Вы должны переустановить его. Нажмите кнопку (отверстие) RESET на внутренней панели острым предметом; будут установлены заводские настройки. При нарушении функционирования - Страница 35 из 48
Управление устройством + и –, относящиеся к параметру VOL на странице SOUND. Регулировка параметров звука Нажимайте кнопку SELECT на панели или кнопку SEL на ПДУ для выбора одного из параметров звука: BAS (низкие частоты) =>TRE (высокие частоты) => BAL (баланс между правым и левым динамиками) => - Страница 36 из 48
Управление устройством Подсветка кнопок Нажимайте кнопку SELECT на панели или кнопку SEL на ПДУ до отображения на дисплее надписи COLOR1 (COLOR2). Вращайте регулятор VOLUME на панели или нажимайте кнопки VOL+/VOL- на ПДУ для переключения между COLOR1 (зеленая подсветка кнопок) и COLOR2 (красная - Страница 37 из 48
Управление устройством AMS. На дисплее отобразится надпись SCAN. 6 самых сильных доступных станций в текущем диапазоне будут автоматически сохранены в памяти под цифрами 1~6. Чтобы остановить автоматическое сохранение, снова нажмите эту кнопку. • Сканирование: Нажмите кнопку AUDIO/ TYPE/APS на - Страница 38 из 48
Управление устройством типа программы. Нажмите кнопку PTY/PLAY/PAUSE на панели или сенсорную кнопку PTY, чтобы выбрать категорию музыкальных программ. Затем нажимайте кнопки с цифрами 1-6, чтобы выбрать разные типы музыкальных программ. Нажмите дважды кнопку PTY/PLAY/ PAUSE на панели или сенсорную - Страница 39 из 48
Управление устройством В режиме MASK DPI устройство маскирует только альтернативные частоты с разными информационными программами. В режиме MASK ALL устройство маскирует и информационные программы, и станции, не поддерживающие RDS. Также для переключения между MASK DPI и MASK ALL Вы можете нажимать - Страница 40 из 48
Управление устройством ВЛЕВО ВПРАВО OK (подтверждение) Следующая страница Menu Angle Повтор Title Subtitle NUM + NUM (цифровая страница) Масштаб Следующая страница Более подробное описание операций приводится ниже. Загрузка/извлечение диска • Откройте переднюю панель и вставьте диск в слот - Страница 41 из 48
Управление устройством ную кнопку Play/pause, чтобы установить воспроизведение на паузу. Выполните это действие еще раз, чтобы продолжить воспроизведение. Для остановки воспроизведения нажмите кнопку STOP на ПДУ или сенсорную кнопку Stop. Выбор треков/глав Во время воспроизведения нажмите кнопку - Страница 42 из 48
Управление устройством Zoom для увеличения или уменьшения масштаба изображения в следующем порядке: X2 => X3 => X4 => X1/2 => X1/3 => X1/4 => нормальный масштаб. Вы можете перемещать приближенное изображение с помощью кнопок курсора. Замедленное воспроизведение Во время воспроизведения нажимайте - Страница 43 из 48
Управление устройством Установка USB/SD/MMC-носителя Установите USB носитель или карту памяти в соответствующий слот на передней панели. Устройство автоматически переключится в режим USB или SD/MMC карты. Если устройство находится в другом режиме, нажимайте кнопку MOD на панели или кнопку MODE на - Страница 44 из 48
Управление устройством Установка языка Настройки видео УСТАНОВКА ЯЗЫКА НАСТРОЙКИ ВИДЕО ЯЗЫК МЕНЮ ЯЗЫК АУДИО ЯЗЫК СУБТИТР МЕНЮ ДИСКА ЯРКОСТЬ КОНТРАСТНОСТЬ ОТТЕНОК НАСЫЩЕННОСТЬ РЕЗКОСТЬ Язык меню: Выберите язык экранного меню. Язык аудио: Выберите язык аудио. Язык субтитров: Выберите язык субтитров. - Страница 45 из 48
Общая информация Обращение с компакт-дисками • Не вставляйте в слот для загрузки компакт-диска ничего, кроме компактдисков. • Не используйте диски с трещинами, отколотыми краями, деформированные диски или диски с другими повреждениями, поскольку такие диски могут вызвать искажение звука, шумы или - Страница 46 из 48
Общая информация Руководство по устранению неисправностей Ниже приводится таблица, в которой описаны простые проверки, способные помочь Вам устранить большую часть проблем, могущих возникнуть при использовании данного устройства. Если нижеуказанные меры не помогли, обратитесь в сервисный центр или - Страница 47 из 48
Общая информация Не работает автонастройка радиостанций Радиостанции имеют слишком слабый сигнал. Настраивайтесь на станции вручную. Технические характеристики Общие Источник питания Максимальная выходная мощность Размеры устройства/вес нетто Размеры коробки/вес брутто Диапазон температур Дисплей - Страница 48 из 48
Инструкцию для Hyundai H-CMD4028 на русском языке, в формате pdf можно скачать с нашего сайта. Наш каталог предоставляем Вам инструкцию производителя фирмы Hyundai, которая была взята из открытых источников. Ознакомившись с руководством по эксплуатации от Hyundai, Вы на все 100% и правильно сможете воспользоваться всеми функциями устройства.
Для сохранения инструкции «Автомобильная магнитола с DVD + монитор Hyundai H-CMD4028» на русском языке на вашем компьютере либо телефоне, нажмите кнопку «Скачать инструкцию». Если активна кнопка «Инструкция онлайн», то Вы можете просмотреть документ (manual), в своём браузере онлайн.
Если у Вас нет возможности скачать инструкцию по эксплуатации либо просмотреть её, Вы можете поделиться ссылкой на эту страницу в социальных сетях и при удобном моменте скачать инструкцию. Либо добавьте эту страницу в закладки Вашего браузера, нажав кнопку «Добавить страницу в закладки браузера».