| Автор | Сообщение |
|---|---|
|
Заголовок сообщения: ICOM IC-R30 – сканирующий приёмник
|
|
|
Участник форума
Позывной CB: Россиянин
Показать полные данные |
ICOM IC-R30 Вложение:
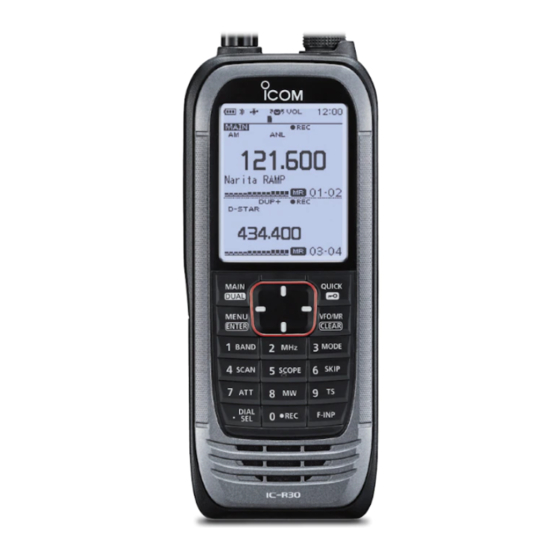
Прикупил себе новую игрушку, Айкомовский Флагман среди сканирующих приёмников ICOM IC-R30 Icom ICR30 имеет ряд уникальных особенностей, которые не встречались ранее у сканирующих приёмников не только у фирмы Icom, но и у других производителей, включая Uniden, GRECOM, Yaesu, Yupiteru, Whistler и др.: Если на ICOM IC-R30 включить GPS, запись звука, задать границы поиска с шагом, модуляцией и т.д. а потом включить сканирование и оставить его на некоторое время, то случится маленькое волшебство))) Кратенько, приёмник имеет такие возможности: Небольшой обзор на русском языке на Ютубе: Последний раз редактировалось Россиянин 30 окт 2020, 01:47, всего редактировалось 1 раз. |
| Вернуться наверх |
|


|
Россиянин |
Заголовок сообщения: Re: ICOM IC-R30 – сканирующий приёмник
|
|
Участник форума
Позывной CB: Россиянин
Показать полные данные |
Давно облизывался на этот радиоприёмник, но останавливал совсем не гуманный ценник… Купил себе приёмничек вот в этом интернет-магазине ML&S Martin Lynch and Sons Ltd https://www.hamradio.co.uk/ ссылка на этот приёмник в этом магазине https://www.hamradio.co.uk/receivers-an … d-7833.php Цену смотреть ту, которая мелким шрифтом в скобочках, которая (EXC. VAT) сразу, там-же, докупил дополнительный отсек для батареек АА и кожаный чехольчик. Отсек для батареек BP-293: https://www.hamradio.co.uk/accessories- … d-8778.php Чехольчик LC-189: https://www.hamradio.co.uk/accessories- … d-8779.php И всё это, с учётом волшебного промо-кода, обошлось мне менее 400 фунтов вместе с доставкой и таможенным сбором. Заветная посылочка. Распаковка: Вложение:
Вложение:
Вложение:
Вложение:
Вложение:
Вложение:
Вложение:
Вложение:
Вложение:
Последний раз редактировалось Россиянин 28 окт 2020, 09:10, всего редактировалось 3 раз(а). |
| Вернуться наверх |
|
|
Россиянин |
Заголовок сообщения: Re: ICOM IC-R30 – сканирующий приёмник
|
|
Участник форума
Позывной CB: Россиянин
Показать полные данные |
|
| Вернуться наверх |
|
|
Россиянин |
Заголовок сообщения: Re: ICOM IC-R30 – сканирующий приёмник
|
|
Участник форума
Позывной CB: Россиянин
Показать полные данные |
C иностранными языками у меня всё плохо… Дал задание домашнему роботу-пылесосу выполнить перевод инструкций на русский язык. Вроде, справился))) Инструкция пользователя ICOM IC-R30 (Базовая) RU Вложение: Инструкция пользователя ICOM IC-R30 (Расширенная) RU Вложение: Инструкции в формате djvu (люблю этот формат: размер файла минимальный при высочайшем качестве картинки) |
| Вернуться наверх |
|
|
Россиянин |
Заголовок сообщения: Re: ICOM IC-R30 – сканирующий приёмник
|
|
Участник форума
Позывной CB: Россиянин
Показать полные данные |
Дистанционное управление приёмником ICOM IC-R30 со Смартфона. Вложение:
Приёмником ICOM IC-R30 можно полноценно управлять ДИСТАНЦИОННО со смартфона с помощью специального приложения. RS-R30I для Apple (Смотри страницу 8-5 РАСШИРЕННОГО Руководства пользователя), или Ссылка на приложение в Google Play: https://play.google.com/store/apps/deta … r30a&hl=ru Следует отметить, что эта программа — это просто пульт дистанционного управления. Звук она не передаёт. Последний раз редактировалось Россиянин 21 окт 2020, 21:48, всего редактировалось 1 раз. |
| Вернуться наверх |
|
|
Россиянин |
Заголовок сообщения: Re: ICOM IC-R30 – сканирующий приёмник
|
|
Участник форума
Позывной CB: Россиянин
Показать полные данные |
Драйвер для Windows 7….10 для приёмника ICOM IC-R30 Прежде чем первый раз подключить радиоприёмник к компьютеру, обязательно! сперва установите драйвер с сайта ICOM. Драйвер для Windows x 32 Вложение: Драйвер для Windows x 64 Вложение: После установки Драйвера, компьютер желательно перезагрузить и только потом коннектить с приёмником ICOM IC-R30 |
| Вернуться наверх |
|
|
Россиянин |
Заголовок сообщения: Re: ICOM IC-R30 – сканирующий приёмник
|
|
Участник форума
Позывной CB: Россиянин
Показать полные данные |
Софт для ICOM IC-R30 Для импорта, экспорта и редактирования каналов памяти и управления настройками радиоприёмника есть Софт. Очень удобно всё это делать с компьютера на большом экране, а не тыкаться по кнопочкам на самом приёмнике. У меня есть две программы: ICOM CS-R30 работает напрямую с приёмником через USB-кабель и предоставляет полный набор и доступ ко всем функциям. ARC30 programming software – не умеет работать с приёмником напрямую, а только путём переноса файлов на карте памяти microSD (импорт и экспорт настроек через карту памяти) Я себе установил обе программы и пока ещё не решил какая лучше и удобнее. Так видимо и дальше придётся использовать обе прораммы, для разных операций – разные программы. Вложение: Вложение: _______________________________Дополнительно: Для программы ICOM CS-R30 Programming Cloning Software сделал русский Файл Справки. Вложение: Последний раз редактировалось Россиянин 07 ноя 2020, 00:48, всего редактировалось 1 раз. |
| Вернуться наверх |
|
|
Россиянин |
Заголовок сообщения: Re: ICOM IC-R30 – сканирующий приёмник
|
|
Участник форума
Позывной CB: Россиянин
Показать полные данные |
Если кому вдруг нужны Русские Инструкции без кружочков и квадратиков и (или) coфтинки с лeкaрcтвом, пишите мне на почту ityxv@yandex.ru Договоримся. |
| Вернуться наверх |
|
|
Россиянин |
Заголовок сообщения: Re: ICOM IC-R30 – сканирующий приёмник
|
|
Участник форума
Позывной CB: Россиянин
Показать полные данные |
Прошивки ICOM IC-R30 На сайте ICOM периодически выкладывают обновлённые прошивки для этого радиоприёмника. На сегодняшний день, самые свежие прошивки v1.10: Вложение:
и Вложение:
Это разные версии прошивок для радиоприёмников в Американском и Европейском исполнении. У меня приёмник приехал уже с самой последней прошивкой, поэтому я пока не шился. Вложение:
______________________________________________________ 31 окт. 2020 На сайте Icom выложили свежие прошивки для ICOM IC-R30 Version 1.11 Изменения с версии 1.10 Для Европейской версии ICOM IC-R30 Вложение: Для Американской версии ICOM IC-R30 Вложение: Я прошился. Всё удачно получилось. Ничего сложного. Вложение:
Последний раз редактировалось Россиянин 09 ноя 2020, 01:13, всего редактировалось 6 раз(а). |
| Вернуться наверх |
|
|
Россиянин |
Заголовок сообщения: Re: ICOM IC-R30 – сканирующий приёмник
|
|
Участник форума
Позывной CB: Россиянин
Показать полные данные |
Пока особо мне сказать про этот приёмник нечего. Я только приступил к изучению. Могу порекомендовать почитать пару форумов, кому интересно https://www.radioscanner.ru/forum/topic50397.html тут: https://www.radioscanner.ru/rating/item/1704/ и https://forums.radioreference.com/forum … eivers.84/ На форумах советуют обязательно защищать стекло дисплея, сильно царапается. Поэтому сразу прикупил себе чехол. С чехлом был один косяк: с пристёгнутым родным аккумулятором чехол надевается и садится хорошо. А вот с пристёгнутым отсеком для батареек АА приёмник чуть-чуть жирнее и в чехол не влазил. Вложение:
Вложение:
Вложение:
Последний раз редактировалось Россиянин 22 окт 2020, 09:39, всего редактировалось 2 раз(а). |
| Вернуться наверх |
|
|
Россиянин |
Заголовок сообщения: Re: ICOM IC-R30 – сканирующий приёмник
|
|
Участник форума
Позывной CB: Россиянин
Показать полные данные |
Недостатки ICOM IC-R30 Ну и небольшая ложка дёгтя в бочке мёда. Что сразу бросается в глаза: 1. В этом приёмнике нет DMR. Это беда всех Айкомов. 7. Этот приёмник не умеет сам определять тип модуляции. Тупо, какой тип модуляции установишь в настройках, так он и будет работать. Но можно сделать пред установки типа модуляции по Бэндам. Тогда при сканировании, тип модуляции будет перескакивать автоматом. Вложение:
Последний раз редактировалось Россиянин 03 ноя 2020, 00:21, всего редактировалось 2 раз(а). |
| Вернуться наверх |
|
|
Россиянин |
Заголовок сообщения: Re: ICOM IC-R30 – сканирующий приёмник
|
|
Участник форума
Позывной CB: Россиянин
Показать полные данные |
Активная антенна от китайцев. Поставил себе на работе для этого радиоприёмника на крышу активную антенну. Покупал здесь: https://aliexpress.ru/item/400091859406 … 33edcg6jr4 Антенна, на удивление, оказалась очень качественно изготовлена. И в работе себя показала на Отлично. Основное назначение этой антенны = ДВ, СВ, КВ. Здесь у неё всё замечательно с усилением. Антенна состоит из двух частей: внутренней (модуль питания) и наружной (сама антенна со встроенным усилителем) Внутренняя часть (модуль питания) содержит в себе Аккумулятор, схемку заряда аккумулятора и радиочастотные цепи согласования с приёмником. Заряжается аккумулятор через гнездо micro-USB. Фото внутри (комнатный блок): Вложение:
Наружная часть: сама антенна (обычное кольцо из нержавеющей проволоки) и коробочка с усилителем. Усилитель залит монолитно (не разборный и не ремонто пригодный) Не знаю как он переживёт весенние грозы… Возможно, надо заранее озаботиться и прикупить где-то запасной… Фото внутри (усилитель): Вложение:
Антенна в сборе: Вложение:
Вложение:
Вся конструкция в работе: Вложение:
В комплекте шёл готовый кабель снижения с разъёмами, длиной 10 метров. Мне он оказался коротковат. Пришлось сделать самодельный, более длинный. Но может оно и к лучшему. Родной кабель снижения очень тоненький — наверняка, имеет очень сильное затухание (потери) При установке антенны на крыше, сориентировал её на запад-восток. т.к. с севера и юга, вроде, особо принимать нечего. Внимание! Это приёмная антенна. Передавать она не умеет. _______________________________________ Примеры приёма Записал несколько аудио файлов — примеров, как ICOM IC-R30 принимает на ЭТУ антенну на разных частотах. Вложение: Последний раз редактировалось Россиянин 29 ноя 2020, 23:15, всего редактировалось 9 раз(а). |
| Вернуться наверх |
|
|
Россиянин |
Заголовок сообщения: Re: ICOM IC-R30 – сканирующий приёмник
|
|
Участник форума
Позывной CB: Россиянин
Показать полные данные |
Аккумуляторы АА для батарейного отсека BP-293 Прикупил для этого радиоприёмника аккумуляторы Энелупы (белые) Вложение:
Вложение:
Помониторил цены по Ижевску. Самая низкая цена оказалась в магазинчике ДатаЛэнд (в Доме Быта) http://www.dataland.ru 380 руб./штука Провёл испытание: на сколько часов работы ICOM IC-R30 хватит этих аккумуляторов. Радиоприёмник выключился через 11 часов 8 минут непрерывной работы. Я считаю, это хороший результат. До этого немного поэкспериментировал с аккумуляторами которые у меня были в наличии (в основном китайские и сильно уставшие, но ещё имеющие приличную ёмкость, некоторые более 2000 мАч) ICOM IC-R30 аккумуляторы бережёт. При достижении напряжения 3.0 v — радиоприёмник отключается. Но делает это, зараза, молча, без малейшего предупреждения. Не издаёт ни единого писка, или голосового предупреждения. Просто выключается и всё… Измерил реальную ёмкость Энелупов зарядкой BT-C3100. Последний раз редактировалось Россиянин 05 ноя 2020, 21:56, всего редактировалось 1 раз. |
| Вернуться наверх |
|
|
Россиянин |
Заголовок сообщения: Re: ICOM IC-R30 – сканирующий приёмник
|
|
Участник форума
Позывной CB: Россиянин
Показать полные данные |
Radio Discovery Tool RDT Ещё одна программа-помощник: RDT v2.1 Pro Радиоприёмник ICOM IC-R30 записывает на карту памяти microSD все принятые сигналы (Аудио файлы) и прикрепляет к ним метаданные: Частота, Дата, Время, географические Координаты, Высота, Скорость, Вектор движения, Сила сигнала по S-метру, Тип модуляции, ID вызываемого/вызывающего, код сети и прочая информация. Программа Radio Discovery Tool позволяет представить всю эту информацию в удобочитаемом виде в форме таблицы, или интерактивной карты Гугл, где будет представлено: Весь маршрут движения (трек) и каждое событие в виде отдельной геометки. Если кликнуть на любую метку, будут показаны: вся прикреплённая информация + можно прослушать аудио файл. Вложение:
Вложение:
Сайт программы https://www.icomrdt.com/home Прежде чем установить саму программу, надо сначала в Windows установить Microsoft .NET Framework 4.8 Веб установщик Microsoft .NET Framework 4.8 Вложение: Так же, на компьютере должна быть установлена программа Google Планета Земля Pro Веб установщик Google Earth Pro RU Вложение:
Потом, уже можно установить саму программу RDT RDT v2.1.70.0 Pro (trial version) Вложение: Это Триал версия программы. 14 дней она работает нормально, потом её надо удалить, почистить реестр и установить вновь. Ну, или как нибудь поломать программку (применить например Trial Freezer, или что-то подобное) Английская Инструкция к Программе RDT v2.1 Вложение: Русская Инструкция к Программе RDT v2.1 Вложение: Кратенько о функциях RDT Pro: Преобразование голосовых журналов в файл KML, доступный для чтения в Google Планета Земля и других -Преобразует несколько файлов за один раз, чтобы увидеть всю дорожку за период времени файла. Отображаемые данные приёма включают: Преобразование файлов журнала GPS в файл KML, доступный для чтения программой Google Планета Земля и другими. Ползунок времени Google Планета Земля позволяет пользователю увеличивать масштаб в определенное время (по умолчанию используется стандартное время GMT — настройте отображение по местному времени). ____________________________________ 27 окт. 2021 Вложение: Последний раз редактировалось Россиянин 27 окт 2021, 20:34, всего редактировалось 1 раз. |
| Вернуться наверх |
|
|
Россиянин |
Заголовок сообщения: Re: ICOM IC-R30 – сканирующий приёмник
|
|
Участник форума
Позывной CB: Россиянин
Показать полные данные |
Поигрался немного с измерениями КСВ родной антенны ICOM IC-R30 У меня всегда вызывают очень большие сомнения всякие разговоры про какое-то там мифическое КСВ у штыревой телескопической антенны для радиоприёмника. Тем не менее, решил прикрутить антенну ICOM IC-R30 к анализатору N1201SA и поглядеть на картинки. N1201SA позволяет просканировать антенну в диапазоне от 137 МГц до 2,7 ГГц Антенна выдвинута на всю длину: Вложение:
Видно, что КСВ гуляет по синусоиде на всём участке измерения примерно от 2 до 11, и с повышением частоты чуть ухудшается. Минимумы примерно вот в этих точках: 130, 330, 540, 750, 970, 1170, 1400, 1600, 1800, 2000, 2230, 2450 и 2650 МГц Антенна полностью сложена (все колена задвинуты друг в друга) Вложение:
Видно, что на весь частотный диапазон осталось всего три резонанса 440, 1260 и 2050 МГц. На 440 МГц КСВ почти идеальная единица. С понижением частоты ниже 400 МГц КСВ улетает в бесконечность. Можно поиграться с регулировкой длины антенны и подобрать идеальный размерчик (резонанс) под каждую конкретную частоту, диапазон… Но вот честно, не вижу в этом смысла! Моё мнение не поменялось: работать с выдвинутой на всю длину антенной и не заморачиваться, не существует для телескопической антенны на радиоприёмнике никакого КСВ. |
| Вернуться наверх |
|
|
Таксист |
Заголовок сообщения: Re: ICOM IC-R30 – сканирующий приёмник
|
|
Модератор
Имя: Александр Позывной CB: Таксист Оборудование: lemm 2001 Автомобиль: Kia Rio Радиолюбительский позывной: R4WBI
Показать полные данные |
Серьёзный труд _________________ |
| Вернуться наверх |
|

|
Россиянин |
Заголовок сообщения: Re: ICOM IC-R30 – сканирующий приёмник
|
|
Участник форума
Позывной CB: Россиянин
Показать полные данные |
О разновидностях ICOM IC-R30 Существует несколько разновидностей ICOM IC-R30 с разной локализацией по странам. USA-01 version — кастрированная версия. EUR-01 version — тоже не полная версия. USA-02 version — самая полная версия. Но, как оказалось, есть ещё чисто Японская версия для внутреннего рынка. Я списался с одним счастливым обладателем японской версии IC-R30 и попросил сделать несколько фотографий: Вложение:
Вложение:
Вложение:
Вложение:
Вложение:
Вложение:
Очень жаль, что у меня этой информации не было раньше… Купить японскую версию ICOM IC-R30 можно например на японском аукционе Yahoo Есть ещё eBay. Также, могут возникнуть сложности с обновлением прошивки для приёмника чисто японской версии. Мне пока не удалось найти место откуда японцы это дело качают. |
| Вернуться наверх |
|
|
Россиянин |
Заголовок сообщения: Re: ICOM IC-R30 – сканирующий приёмник
|
|
Участник форума
Позывной CB: Россиянин
Показать полные данные |
Поступила информация, что в японской версии ICOM IC-R30 тоже не всё слава Богу… лядь! это убивает всю ценность и привлекательность японской версии. Тут тебе и почти весь диапазон SATCOM выпадает, и часть UHF и ещё много чего интересного… Таким образом, всётаки по соотношению Возможности/Полезность/Доступность/Цена, самая правильная это — Европейская версия #12 EURO1 |
| Вернуться наверх |
|
|
Печенег |
Заголовок сообщения: Re: ICOM IC-R30 – сканирующий приёмник
|
|
Участник форума
Имя: Александр Позывной CB: Печенег Оборудование: В машине Yosan Stealth 5, Антенна Optim 2001. Автомобиль: Ларгус Радиолюбительский позывной: R4WACC
Показать полные данные |
По поводу питания, в моем IC-R5 та же фигня, жрет не все аккумуляторы, а батарейками после приемника можно ещё очень долго фонарики кормить. Очень уж требовательный по питанию аппарат. |
| Вернуться наверх |
|

|
Игорь01 |
Заголовок сообщения: Re: ICOM IC-R30 – сканирующий приёмник
|
|
Участник форума
Имя: Игорь
Показать полные данные |
И все-таки, почему не Aor ar-DV10? |
| Вернуться наверх |
|
|
Россиянин |
Заголовок сообщения: Re: ICOM IC-R30 – сканирующий приёмник
|
|
Участник форума
Позывной CB: Россиянин
Показать полные данные |
Aor ar-DV10 1. Aor ar-DV10 пздц, какой дорогой! 2. Aor ar-DV10 — сырой глючный и косячный. Большинство проблем уберётся последующими перепрошивками. 3. На американских форумах у владельцев Aor ar-DV10 к нему большие претензии. Все пытаются от него избавиться. |
| Вернуться наверх |
|
|
Игорь01 |
Заголовок сообщения: Re: ICOM IC-R30 – сканирующий приёмник
|
|
Участник форума
Имя: Игорь
Показать полные данные |
Благодарю за пояснения. Сам хочу разобраться в них. |
| Вернуться наверх |
|
|
Россиянин |
Заголовок сообщения: Re: ICOM IC-R30 – сканирующий приёмник
|
|
Участник форума
Позывной CB: Россиянин
Показать полные данные |
Выбор только за Вами. |
| Вернуться наверх |
|
|
Россиянин |
Заголовок сообщения: Re: ICOM IC-R30 – сканирующий приёмник
|
|
Участник форума
Позывной CB: Россиянин
Показать полные данные |
Universal Scanner AudioPlayer v3.0.1 Ещё одна программа-помощник. Вложение:
Программа бесплатная и свободно распространяется самим автором. https://forums.radioreference.com/threa … #post-3408 Радиоприёмник ICOM IC-R30 записывает на карту памяти microSD все принятые сигналы (Аудио файлы) и прикрепляет к ним метаданные: Частота, Дата, Время, географические Координаты, Высота, Скорость, Вектор движения, Сила сигнала по S-метру, Тип модуляции, ID вызываемого/вызывающего, код сети и прочая информация. Программа Universal Scanner AudioPlayer v3.0.1 позволяет представить всю эту информацию в удобочитаемом виде в форме таблицы. Вложение:
Можно так же, посмотреть видео на Ютубе: https://www.youtube.com/watch?v=dLYwSCH … e=emb_logo Для правильного функционирования Universal Scanner AudioPlayer, в Windows должен быть установлен Microsoft .NET Framework 4.8 Вложение: Сама Программа Universal Scanner AudioPlayer v3.0.1 работает без инсталяции. Просто, запускаете UniversalScannerAudioPlayer.exe и пользуетесь. Вложение: Или, всегда можно скачать самую свежую версию программы по ссылке: http://www.mediafire.com/file/aub01jii3 … r.zip/file (если у кого проблемы с настройками безопасности сайтов, ошибка 403 Программа ещё в процессе допиливания, возможны мелкие баги и вылеты. _________________________________Вышла новая версия Universal Scanner AudioPlayer v3.0.2 (2020-12-02) UniversalScannerAudioPlayer v3.0.2 (2020-12-02) Вложение: _________________________________Вышла новая версия Universal Scanner Audio Player v3.0.3 (2021-01-05) -Добавлена инструкция на русском языке! -Изменён процесс экспорта CSV и M3U и имена файлов по умолчанию. Теперь в качестве имени файла используется текущая дата и время. * теперь программа может анализировать следующие типы передачи (если не идентифицированный сканер записывает это в файл): Вложение: _____________________________________ И ещё свежее: Вложение: Вложение: Последний раз редактировалось Россиянин 13 май 2022, 14:46, всего редактировалось 3 раз(а). |
| Вернуться наверх |
|
|
Россиянин |
Заголовок сообщения: Re: ICOM IC-R30 – сканирующий приёмник
|
|
Участник форума
Позывной CB: Россиянин
Показать полные данные |
В автомобиле: При использовании Приёмника в автомобиле, Иногда необходимо прослушать/просканировать эфир во время поездки на автомобиле, или на длительной стоянке, не выходя из салона автомобиля. К счастью, есть китайцы, которые за недорого уже скопировали в металле любую вашу мысль или желание))) https://aliexpress.ru/item/32836385843. … 5039155369 Экспресс-крепление антенны на окно автомобиля `Nagoya RB-CLP` Вложение:
Эта приспособа легко закрепляется на стекло любой боковой форточки автомобиля. Есть также модификации этой приспособы с обратным расположением разъёма SMA, или с разъёмом BNC Заказал себе. Когда приедет, похвастаюсь. |
| Вернуться наверх |
|
-
Contents
-
Table of Contents
-
Bookmarks
Related Manuals for Icom IC-R30
Summary of Contents for Icom IC-R30
-
Page 1
ADVANCED MANUAL COMMUNICATIONS RECEIVER INTRODUCTION iR30 1 POWER SUPPLY 2 microSD CARD 3 RECORDING AND PLAYING BACK 4 MEMORY OPERATION 5 GPS OPERATION 6 MENU SCREEN 7 OTHER FUNCTIONS 8 Bluetooth OPERATION ® 9 UPDATING THE FIRMWARE 10 OPTIONS 11 SPECIFICATIONS… -
Page 2
INTRODUCTION Thank you for choosing this Icom product. This product is designed and built with Icom’s state of the art technology and craftsmanship. With proper care, this product should provide you with years of trouble-free operation. ■ About the IC-R30 manuals The following manuals are supplied for your IC-R30. -
Page 3
INTRODUCTION Functions of Adobe Acrobat Reader ® ® ® The following functions and features can be used with Adobe Acrobat Reader. • Keyword search Click “Find” (Ctrl+F) or “Advanced Search” (Shift+Ctrl+F) in the Edit menu to open the search screen. This is convenient when searching for a particular word or phrase in this manual. -
Page 4
INTRODUCTION Functions of Adobe Acrobat Reader (Continued) ® ® ® • Printing out the desired pages. Click “Print” in the File menu, and then select the paper size and page numbers you want to print. * The printing setup may differ, depending on the printer. Refer to your printer’s instruction manual for details. -
Page 5
INTRODUCTION Entering and editing text The usable characters are alphabets, numbers and symbols. To enter characters • To insert a text, move the cursor to a place to enter, then push the keypad. L You can elect a character by rotating [DIAL], or pushing D-pad (Up) or D-pad (Down). •… -
Page 6
INTRODUCTION Entering and editing text (Continued) D Usable characters The usable characters and symbols, and the maximum characters differ, depending on the item. See the following list for details. Maximum Illegal Category Item Character type Ref. characters characters Memory name [AB] [ab] [12] [!”#] 16 –… -
Page 7
INTRODUCTION Entering and editing text (Continued) D How to enter Example: Entering “2m Call” as a Memory name of channel 00 in group 00. Push [VFO/MR] to enter the Memory mode. Push [MW]. Select “Manage Memory.” (Rotate [DIAL] to select it, then push [ENTER].) Select group “00.”… -
Page 8
INTRODUCTION About the air ventilation holes There are air ventilation holes on the receiver body and battery pack/case that adjust the air pressure inside of the receiver. L Applying a sticker over the ventilation hole blocks the air pressure adjustment, and may decrease the audio output level. -
Page 9
Section POWER SUPPLY ■ About the Battery Case ……………………………………… 1-2 D Battery life …………………………………………………… 1-2 D About the battery replacement …………………………… 1-2 D About the safety use of battery case ……………………… 1-3 ■ Charging with a USB cable ………………………………… 1-4… -
Page 10: About The Battery Case
POWER SUPPLY ■ About the Battery Case z Remove the battery case, then install three AA (LR6) size alkaline batteries, as described below. Be sure to observe the correct polarity. Battery case Install three AA (LR6) (Optional BP-293) size alkaline batteries D Battery life The approximate battery life (operating time) is approximately 4 hours under the following assumptions:…
-
Page 11: Power Supply
TIP: • The BP-293 meets IPX4 requirements for waterproof protection, only when it is attached to the IC-R30. • The batteries may seem to have low capacity when used in low temperatures. Keep the case warm in low temperature environments.
-
Page 12: Charging With A Usb Cable
POWER SUPPLY ■ Charging with a USB cable You can charge the battery pack with the supplied USB cable (A-microB type). Power adapter or external battery (User supplied) USB cable Turn OFF (A-microB type) To a USB port NOTE: • BE SURE to turn OFF the receiver before charging the battery pack. Otherwise the attached battery pack cannot be charged completely, or it will take much longer to charge.
-
Page 13: Table Of Contents
Section microSD Card ■ About data saved on a microSD card………………………… 2-2 ■ Saving data onto the microSD card ………………………… 2-2 ■ Loading the saved data from the microSD card …………… 2-4 ■ Backing up the data from a microSD card onto a PC ……… 2-5 D About the microSD card’s folder ……………………………
-
Page 14: Microsd Card Section
microSD Card ■ About data saved on a microSD card • Receiver data Memory channel contents, receiver settings, and so on. • Recorded audio Recorded received audio data. • Receive history Receive history log (Digital signal). • Position data from the GPS receiver Position data from the internal GPS receiver.
-
Page 15
microSD Card ■ Saving data onto the microSD card Saving with a different file name [MENU] > SD Card > Save Setting Push [MENU]. Select “Save Setting” in the “SD Card” menu. (Rotate [DIAL] to select it, then push [ENTER].) Select “<<New File>>.”… -
Page 16: Loading The Saved Data From The Microsd Card
The saved memory channels, item settings on the menu screen can be copied to another IC-R30. This function is convenient when sharing data with other IC-R30s. L Saving the current data on to a microSD card is recommended before loading the data.
-
Page 17: Backing Up The Data From A Microsd Card Onto A Pc
Setting o Voice !0 yyyymmdd !0 yyyymmdd q IC-R30 folder y Gps folder The folders created in the IC-R30 are in GPS logging data is stored in the “log” this folder. format. w Csv folder u RXLog folder Contains the GPS Memory, Memory RX record log data is stored in the “csv”…
-
Page 18: D Making A Backup File On A Pc
TIP: You can also read or write the data using the microSD card and a card reader (user supplied), without a USB cable. Remove the microSD card that contains the data from the IC-R30, then read it on the PC using the card reader.
-
Page 19
microSD Card ■ Backing up the data stored on the microSD card onto a PC D Making a backup file on a PC (Continued) Operation on the PC NOTE: If the “AutoPlay” screen is not displayed as shown below, click the Folder icon on the task bar. -
Page 20
Card ■ Backing up the data stored on the microSD card onto a PC D Making a backup file on a PC (Continued) To disconnect the IC-R30 from the PC, click the “Eject Mass Storage Device.” Click Right-click Safe To Remove Hardware” is displayed, disconnect the USB cable from the… -
Page 21: Importing Or Exporting A Csv Format File
When you export the data in a CSV format file using the CS-R30 (option), make sure to name it using 10 characters or less. TIP: CSV is a file format that is used to read or write the IC-R30’s setting data. You can import the setting data to a PC, and edit it using the CS-R30.
-
Page 22: D Importing
Select the CSV file to import. • A confirmation dialog is displayed. Select “YES,” and then push [ENTER]. • Starts to import. L After importing ends, “COMPLETED! Restart the IC-R30.” is displayed. Restart the IC-R30 to complete the importing. 2-10…
-
Page 23: D Exporting
microSD Card ■ Importing or Exporting a CSV format file D Exporting Saving as a new file Example: Exporting memory channels. [MENU] > SD Card > Import/Export > Export Push [MENU]. Select “Export” in the “SD Card” menu. (Rotate [DIAL] to select it, then push [ENTER].) Select “Memory CH,”…
-
Page 24
Section RECORDING AND PLAYING BACK ■ Recording ………………………………………………………… 3-2 D Starting recording …………………………………………… 3-2 D Stopping recording …………………………………………… 3-2 ■ Playing back ……………………………………………………… 3-3 D Playback screen ……………………………………………… 3-4 ■ Player/recorder set screen ……………………………………… 3-5 ■ Deleting a file or folder ………………………………………… 3-6 D Deleting a folder ………………………………………………… -
Page 25: Recording And Playing Back
RECORDING AND PLAYING BACK ■ Recording The microSD and microSDHC cards are not supplied by Icom. User supplied. D Starting recording z Push [zREC]. • “Recording started…” is briefly displayed. TIP: • “ ” is displayed during recording. • “…
-
Page 26: Playing Back
RECORDING AND PLAYING BACK ■ Playing back [MENU] > RX Recorder > Play Files Push [MENU]. Select “Play Files” in the “RX Recorder” menu. (Rotate [DIAL] to select it, and then push [ENTER].) • The folder list is displayed. Select a folder that contains the file you want to playback, and then push [ENTER]. •…
-
Page 27: D Playback Screen
RECORDING AND PLAYING BACK ■ Playing back (Continued) D Playback screen Clockwise: Fast Forward The number of file being played back/ Counter Clockwise: Fast Rewind The total number of recorded files. Open the Playback Recording start Menu screen date and time Frequency and mode.
-
Page 28: Player/Recorder Set Screen
RECORDING AND PLAYING BACK ■ Player/recorder set screen You can change the recording settings on the RX RECORDER screen. And you can also change the fast forward or rewind skip time on the PLAYER SET screen. Recording condition [MENU] > RX Recorder > Recorder Set > RX REC Condition Set to “Always”…
-
Page 29: Deleting A File Or Folder
RECORDING AND PLAYING BACK ■ Deleting a file or folder NOTE: Deleted file or folder cannot be recalled. All the files in the folder are also deleted. Before deleting any file or folder, back up the data onto your PC. D Deleting a folder [MENU] >…
-
Page 30: D Deleting A File
RECORDING AND PLAYING BACK ■ Deleting a file or folder (Continued) D Deleting a file [MENU] > RX Recorder > Play Files Push [MENU]. Select “Play Files” in the “RX Recorder” menu. (Rotate [DIAL] to select it, and then push [ENTER].) •…
-
Page 31: Checking The File Information
RECORDING AND PLAYING BACK ■ Checking the file information The IC-R30 can display the recorded file’s receive frequency, mode, date, and so on. [MENU] > RX Recorder > Play Files Push [MENU]. Select “Play Files” in the “RX Recorder” menu.
-
Page 32: Checking Sd Card Information
RECORDING AND PLAYING BACK ■ Checking the file information (Continued) File information examples z Rotate [DIAL] in the information window, to change the information display. L Some items are not displayed, depending on the receive mode. ■ Checking SD card information [MENU] >…
-
Page 33: Playing Back On A Pc
• A confirmation dialog is displayed. Select “YES,” and then push [ENTER]. • The IC-R30 is connected to the PC in the SD Card mode, and the SD card folder is displayed on the PC screen. L If the SD card folder is not displayed, click “Open folder to view files” to open the SD card folder.
-
Page 34
RECORDING AND PLAYING BACK ■ Playing back on a PC (Continued) Double-click the “IC-R30” folder. Double-click Double-click the “Voice” folder. Double-click Double-click the folder that contains the file you wan to play. (Example: 20180403) Double-click Double-click the file to play. (Example: 20180403_06581.wav) Double-click •… -
Page 35
Section MEMORY OPERATION ■ General description …………. 4-2 D Memory channel contents ……..4-2 ■ Memory management ……….4-3 D Memory channel tree view ……..4-3 D Checking a Memory channel contents ….4-3 ■ Selecting a memory channel ……..4-4 D Selecting with [DIAL] ………. -
Page 36: Memory Operation
MEMORY OPERATION ■ General description The Memory mode is very useful to quickly select often-used operating settings. The receiver has 2000 regular memory channels and 100 memory groups. Up to 100 channels can be assigned to a group. NOTE: Memory data may be erased by static electricity, electric transients, and other causes. In addition, they can be erased by a malfunction and during repairs.
-
Page 37: Memory Management
MEMORY OPERATION ■ Memory management D Memory channel tree view Group 00 Manage Memory Group 99 A:Auto MW CH* S:SKIP CH* Automatically writes when a signal is received. Skips the set frequency during a scan. (Hold down [SKIP] for 1 second.) D Checking a Memory channel contents [MENU] >…
-
Page 38: Selecting A Memory Channel
MEMORY OPERATION ■ Selecting a memory channel D Selecting with [DIAL] Push [VFO/MR] to select the Memory mode. Push [BAND] to select a group. Rotate [DIAL] to select a Memory channel. D Selecting with the keypad Push [VFO/MR] to select a Memory mode. Push [BAND] to select a group.
-
Page 39: Writing A Memory Channel
MEMORY OPERATION ■ Writing a memory channel D Selecting and Writing a channel The channel is written to the selected channel. Example: Writing 145.000 MHz to channel 16 in group 00. Push [VFO/MR] to select the VFO mode. Rotate [DIAL] to set the frequency and receive mode and so on. Push [MW].
-
Page 40
MEMORY OPERATION ■ Writing a memory channel (Continued) D Write to a New Channel The contents such as frequency and operating mode are written to a blank channel in the selected group. Example: Writing 145.000 MHz to a blank channel. Push [VFO/MR] to select the VFO mode. -
Page 41: D Write To The Selected Channel
MEMORY OPERATION ■ Writing a memory channel (Continued) D Write to the Selected Channel The selected channel is overwritten. Example: Writing 145.000 MHz to channel 08 in group 00. Push [VFO/MR] to select the Memory mode. Rotate [DIAL] to select the channel to be written. Push [VFO/MR] to select the VFO mode.
-
Page 42: Copying Memory Contents To The Vfo
MEMORY OPERATION ■ Copying Memory contents to the VFO You can copy the Memory contents to the VFO. Example: Copying the contents of channel 00 in group 00 to the VFO. Push [VFO/MR] to select the Memory mode. Rotate [DIAL] to select the channel. •…
-
Page 43: Copying The Memory Contents To Another Channel
MEMORY OPERATION ■ Copying the Memory contents to another channel Example: Copying the contents of channel 03 to channel 46 in the same group (group 00). Push [MW]. Select “Manage Memory.” (Rotate [DIAL] to select it, and then push [ENTER].) Select the group.
-
Page 44: Moving The Memory Contents To Another Channel In A Different Group
MEMORY OPERATION ■ Moving the Memory contents to another channel in a different group Example: Copying the contents of channel 03 to channel 20 in group 01. Push [MW]. Select “Manage Memory.” (Rotate [DIAL] to select it, and then push [ENTER].) Select the group.
-
Page 45: Inserting A Blank Channel
MEMORY OPERATION ■ Inserting a blank channel You can insert a blank channel between 2 Memory channels. This function is convenient to organize your memory channels. Example: Inserting a blank channel between channel 5 and 6. Push [MW]. Select “Manage Memory.” (Rotate [DIAL] to select it, and then push [ENTER].) Select the group.
-
Page 46: Entering A Group/Memory Name
MEMORY OPERATION ■ Entering a group/memory name You can assign a name of up to 16 characters to each channel group (00 ~ 99) and memory channel. L You cannot change the group name of Auto MW and Skip channels (Groups “A” and “S”). Push [MW].
-
Page 47: Selecting A Memory Name Display
MEMORY OPERATION ■ Selecting a memory name display While in the memory mode, the entered memory name can be displayed in 3 different styles. You can select a display type. Push [VFO/MR] to select the Memory mode. Push [QUICK]. Select “Display Type.” (Rotate [DIAL] to select it, and then push [ENTER].) Select a display type.
-
Page 48: Clearing A Memory Contents
MEMORY OPERATION ■ Clearing a Memory contents Contents of entered memories can be cleared (erased), if desired. L The cleared channel becomes a blank channel. L You can also clear the Auto MW and Skip channels (Groups “A” and “S”). NOTE: Cleared memory channel contents cannot be restored.
-
Page 49
Section GPS OPERATION ■ GPS operation features……….5-2 ■ Before starting GPS operation ……..5-2 D Checking the GPS signal ……..5-2 ■ GPS format types …………5-3 ■ Checking your GPS location ……..5-4 D Displaying Position Data ……… 5-4 D GPS POSITION screens and their meanings .. -
Page 50: Gps Operation Features
GPS OPERATION ■ GPS operation features GPS Memory (p. 5-15) You can enter up to 300 GPS Memories in the receiver. By adding destination position information in a GPS Memory, you can effectively use the GPS Alarm function. The position information that you acquired can also be entered in a GPS Memory. GPS Alarm function (p.
-
Page 51: Gps Format Types
GPS OPERATION ■ GPS format types GPS position data has 2 TX modes, D-PRS and NMEA. Moreover, with the D-PRS mode data, 5 position formats. Position (Mobile station/Base station), Object, Item, and Weather, are selectable. Examples: When the caller’s TX format is D-PRS Position (Mobile) D-PRS D-PRS is a function that simultaneously sends position data received from the internal or external GPS receiver,…
-
Page 52: Checking Your Gps Location
GPS OPERATION ■ Checking your GPS location You can check your current location. D Displaying Position Data Confirm is displayed. Push [QUICK]. Select “GPS Position.” (Rotate [DIAL] to select it, and then push [ENTER].) • Displays the GPS POSITION screen. Rotate [DIAL].
-
Page 53: D Gps Position Screens And Their Meanings
GPS OPERATION ■ Checking your GPS location (Continued) D GPS POSITION screens and their meanings L Information • Pushing [QUICK] to change the compass direction. (p. 5-12) • About the Grid Locator (p. 5-10) • About the Course (p. 5-10) Example for the GPS POSITION screens: GPS Memory: Tokyo Skytree…
-
Page 54
GPS OPERATION ■ Checking your GPS location D GPS POSITION screens and their meanings (Continued) RX screen (D-STAR station’s location information) The displayed itemʼs meanings may differ, and some data may not be displayed, depending on the callerʼs GPS TX Mode and TX format. (p. 5-3) L Pushing [QUICK] to change the band (Main/Sub). -
Page 55: D About The Rx Screen
GPS OPERATION ■ Checking your GPS location (Continued) D About the RX screen D-PRS Position (Base) Position (Mobile) Moving symbol Course direction Speed and course For a base station, and speed you are heading operating conditions are displayed. Object Item For an Item station, Time is not displayed.
-
Page 56
GPS OPERATION ■ Checking your GPS location D About the RX screen (Continued) Weather Time that the caller sent the Weather data. NMEA L Symbol or SSID is not displayed when the TX format is NMEA. TIP: About the SSID To assist in identifying a station’s type, designated call sign SSIDs are used in D-PRS (or APRS ), according to a common guideline. -
Page 57
GPS OPERATION ■ Checking your GPS location D About the RX screen (Continued) Selectable Symbol list Recreational Sheriff Truck Radio Vehicle Digipeater Shuttle Node Icom Radio Gateway SSTV Rover Aircraft Overlayed Small Repeater Aircraft Station Ship Red Cross Overlayed (powerboat) -
Page 58: D About The Grid Locator
GPS OPERATION ■ Checking your GPS location (Continued) D About the Grid Locator Grid Locator (GL) is a position compressed into a 6 character code, calculated by the longitude and the latitude. The locator is simply calculated by dividing the earth surface into squares. It is used to find the area of a transceiver station.
-
Page 59: D Setting The Display Type (Main/Sub)
GPS OPERATION ■ Checking your GPS location (Continued) D Setting the display type (MAIN/SUB) You can select the display type for the “GPS POSITION” screen. Display the “GPS POSITION” screen. Rotate [DIAL] to select the “RX” screen. Push [QUICK]. Select “Display Select(MAIN/SUB).” (Rotate [DIAL] to select it, then push [ENTER].) Select the display type.
-
Page 60: D Changing The Compass Direction
GPS OPERATION ■ Checking your GPS location (Continued) D Changing the Compass Direction You can set the compass direction to Heading Up, North Up, or South Up. Push [QUICK]. Select “GPS Position.” (Rotate [DIAL] to select it, then push [ENTER].) •…
-
Page 61: D Saving Your Own Or A Received Station’s Location
GPS OPERATION ■ Checking your GPS location (Continued) D Saving your own or a received station’s location You can save your own location and the caller station’s location. The GPS Memory has a total of 300 channels, and the channels can be assigned into one of 27 banks, A ~ Z, and (No Group).
-
Page 62: Checking Gps Information (Sky View Screen)
GPS OPERATION ■ Checking GPS information (Sky view screen) This screen is used to view GPS satellite information . The GPS Information displays the quantity, signal power, and position of the GPS satellites. The sky view screen displays the position of GPS satellites. The screen also displays the direction, elevation angle, satellite numbers, and their receiving signal strength status.
-
Page 63: Gps Memory
You can save the GPS Memory up to 300 channels, and conveniently saved in up to 27 groups, from A ~ Z and “(No Group).” The A to Z groups can also be named. Memory channel tree view GPS Memory (No Group) A: ICOM Icom America B: HAM festa Dayton Hamvention C: Railroad Friedrichshafen Group names are just examples.
-
Page 64
GPS OPERATION ■ GPS Memory D Adding a GPS Memory (Continue) 2. Entering a GPS Memory name Select “NAME.” (Rotate [DIAL] to select it, and then push [ENTER].) Enter a GPS Memory name of up to 16 characters. L Refer to page iv for details of character entry. After entering, push [ENTER]. -
Page 65
GPS OPERATION ■ GPS Memory D Adding a GPS Memory (Continue) 5. Entering the GPS Memory latitude Select “LATITUDE.” Push D-pad (Right) or D-pad (Left) to move the cursor to select a digit to enter. Rotate [DIAL] to set the latitude. L Information •… -
Page 66
GPS OPERATION ■ GPS Memory D Adding a GPS Memory (Continue) 8. Selecting a GPS Memory group Select “GROUP.” (Rotate [DIAL] to select it, and then push [ENTER].) Select the group between (No Group) and A ~ Z. L You can save up to 300 Memories in each group. After selecting, push [ENTER]. -
Page 67: D Entering The Gps Memory Group Name
GPS OPERATION ■ GPS Memory (Continued) D Entering the GPS Memory group name You can enter a name for each GPS Memory group. [MENU] > GPS > GPS Memory Push [MENU]. Select “GPS Memory” in the “GPS” menu. (Rotate [DIAL] to select it, and then push [ENTER].) Select the group that the name to be entered, then push [QUICK].
-
Page 68: D Deleting Gps Memory
GPS OPERATION ■ GPS Memory (Continued) D Deleting GPS Memory There are 2 ways to delete the Memories: •Deletes all GPS Memory in a group. •Deletes a specific GPS Memory. NOTE: Deleted GPS Memories cannot be restored. Example: Deleting all GPS Memories in the selected group. [MENU] >…
-
Page 69: D Rearranging The Display Order Of The Gps Data
GPS OPERATION ■ GPS Memory (Continued) D Rearranging the display order of the GPS data You can move the entered GPS Memories to rearrange their display order in the selected GPS Memory group. In order to move the GPS Memory out of their assigned Memory group, edit and move, and then save.
-
Page 70: Gps Alarm
GPS OPERATION ■ GPS Alarm The receiver can sound a GPS Alarm when a target station or position comes into the alarm area. This function can be set to a caller station, all GPS Memories, a selected GPS Memory group, or a selected GPS Memory. Alarm Area (Group) (Setting plural stations) When “All Memories”…
-
Page 71: D Setting The Gps Alarm Function To All Memories
GPS OPERATION ■ GPS Memory (Continued) D Setting the GPS Alarm function to All Memories NOTE: Even if “RX” is selected in step 4, when the received signal has no position data, the GPS Alarm does not sound. [MENU] > GPS > GPS Alarm Push [MENU].
-
Page 72: Gps Logger Function
GPS OPERATION ■ GPS Logger function The GPS Logger function enables you to save the position data from a GPS receiver onto a microSD card as a log. The GPS Logger saves Latitude, Longitude, Altitude, Positioning state, Course, Speed, Date, and Time. If you use this GPS Logger while driving, you can check your driving history on a mapping application.
-
Page 73: D Confirming The Gps Logger Function
GPS OPERATION ■ GPS Logger function (Continued) D Confirming the GPS Logger function Confirm the GPS Logger function is turned ON. When the GPS Logger function is ON, the receiver saves position data from the GPS receiver onto a microSD card at a set time interval. L The saved GPS sentences are GGA, RMC, GSA, and VTG.
-
Page 74: D Setting The Gps Record Sentence
GPS OPERATION ■ GPS Logger function (Continued) D Setting the GPS record sentence Select the GPS sentence for the GPS Logger function. Select only required sentences to reduce the data volume. See the contents table shown below before selecting. [MENU] > GPS > GPS Logger > Record Sentence Push [MENU].
-
Page 75: D Viewing The Log Data On A Pc
D Viewing the log data on a PC You can display your log data on a PC. L Windows 10 is used for these instructions. Connect the IC-R30 to a PC using the supplied USB cable. Push [MENU]. Select the “SD Card Mode” on the MENU screen.
-
Page 76: D The <> Mode
GPS OPERATION ■ GPS Logger function (Continued) D The <<GPS Logger Only>> mode The receiver has an exclusive GPS Logger mode where only the GPS Logger functions. This mode is useful when you are traveling and do not want to use the receiver for communication, but you do want to use just the GPS Logger.
-
Page 77
GPS OPERATION ■ GPS Logger function D The <<GPS Logger Only>> mode (Continued) The <<GPS Logger Only>> mode screen Latitude Compass direction: Longitude South Up Grid locator Altitude Speed TIP: • When GPS Logger is set to “OFF,” the a dialog is displayed. (MENU >… -
Page 78
Section MENU SCREEN ■ MENU screen ………….. 6-2 D MENU screen operation………. 6-2 D Selecting a Menu item ……….6-3 ■ Near Station …………..6-4 ■ Scan …………….6-4 ■ Manage Memory …………6-6 ■ RX Recorder …………… 6-7 ■ GPS…………….6-9 ■… -
Page 79: Menu Screen
MENU SCREEN ■ MENU screen The MENU screen is displayed after pushing [MENU]. You can use the MENU screen to change settings. MENU screen structure TIP: The MENU screen is constructed in a tree structure. You may go to the next tree level, or go back a level, depending on the selected item.
-
Page 80: D Selecting A Menu Item
MENU SCREEN D Selecting a Menu item Example: Set “Auto Power OFF” to “30 min.” [MENU] > Function > Auto Power OFF Push [MENU]. Select “Auto Power OFF,” in the “Function” menu. (Rotate [DIAL] to select it, and then push [ENTER].) Select “30min,”…
-
Page 81: Near Station
MENU SCREEN ■ Near Station Near Station [MENU] > Near Station Displays nearest stations saved in the Memory channel. z Select a Memory channel, and then push [ENTER] to receive. L Maximum of 50 stations are displayed. L Stations within 160 km are displayed. NOTE: •…
-
Page 82
MENU SCREEN ■ Scan (Continued) Program Skip (Default: ON) [MENU] > Scan > Program Skip Turn the Program Skip Scan function ON or OFF for a VFO scan. This function enables the receiver to skip the unwanted frequencies that are entered as a Memory channel and is set to “PSKIP.”… -
Page 83: Manage Memory
MENU SCREEN ■ Scan (Continued) Auto MW SCAN Memory Clear (Default: Display Dialog) [MENU] > Scan > Auto MW SCAN Memory Clear Select whether or not to delete “A:Auto MW” Channel contents when the auto memory write scan starts. • OFF: Does not delete “A:Auto MW”…
-
Page 84: Rx Recorder
MENU SCREEN ■ RX Recorder <<REC Start>> / <<REC Stop>> [MENU] > RX Recorder > <<REC Start>> / <<REC Stop>> Select, and then push [ENTER] to start or stop recording. L BE SURE to insert a microSD card. L If you turned OFF the receiver without stop recording, the receiver automatically starts recording when you turned ON next time.
-
Page 85
MENU SCREEN ■ RX Recorder (Continued) File Split (Default: ON) [MENU] > RX Recorder > Recorder Set > File Split Turn the File Split function ON or OFF. • OFF: The recored audio saved to a file, until its size exceeds 2 GB. When the file size exceeds 2 GB, a new file is generated. -
Page 86: Gps
MENU SCREEN ■ GPS GPS Information [MENU] > GPS > GPS Information Displays the GPS satellite direction, elevation, satellite number, and receiving status. See page 5-14 for details. GPS Position [MENU] > GPS > GPS Position Displays position data shown below. See page 5-4 for details. L Rotate [DIAL] to change between MY, RX, MEM, and ALM screen.
-
Page 87
MENU SCREEN ■ GPS (Continued) Alarm Area (Group) (Default: 0.25′) [MENU] > GPS > GPS Alarm > Alarm Area (Group) Set the GPS active alarm range. When a target enters in this set active alarm range, the GPS Alarm sounds. L When Alarm Select (p. -
Page 88
MENU SCREEN ■ GPS (Continued) Alarm Area (RX/Memory) (Default: Both) [MENU] > GPS > GPS Alarm > Alarm Area (RX/Memory) Select the GPS active alarm range. When a target enters in the active alarm range, the GPS Alarm sounds and the GPS alarm icon blinks. -
Page 89
MENU SCREEN ■ GPS (Continued) GPS Logger (Default: ON) [MENU] > GPS > GPS Logger > GPS Logger Turn the GPS Logger function ON or OFF. This function logs the position, altitude, course, speed, and number of satellites being used. L BE SURE to insert a microSD card. -
Page 90: Rx History
MENU SCREEN ■ GPS (Continued) Power Save (Internal GPS) (Default: Auto) [MENU] > GPS > GPS Set > Power Save (Internal GPS) Select whether or not to use the Power Save function for the internal GPS receiver. When this function is ON, and if the GPS receiver does not receive signals from a satellite for 5 minutes, the function turns OFF the GPS receiver for this set period of time.
-
Page 91: Digital Set
MENU SCREEN ■ Digital Set Bass (Default: Normal) [MENU] > Digital Set > Tone Control > D-STAR/P25/dPMR/NXDN/DCR > Bass Select the audio bass filter level. • Cut: Reduces the low frequencies. • Normal: Normal tone balance. • Boost: Increases the low frequencies. Treble (Default: Normal) [MENU] >…
-
Page 92
MENU SCREEN ■ Digital Set (Continued) Separator/Decimal (Default: Sep [,] Dec [.]) [MENU] > Digital Set > RX Log > CSV Format > Separator/Decimal Select the separator and decimal character for the csv format. • Sep [,] Dec [.]: Separator is “,” and Decimal is “.” •… -
Page 93: Speech
MENU SCREEN ■ Digital Set (Continued) Fast Unmute (NXDN) (Default: ON) [MENU] > Digital Set > Fast Unmute (NXDN) Selects the mute state for the Encryption function in the NXDN mode. This function releases the mute without confirming whether or not the encryption key matches.
-
Page 94
MENU SCREEN ■ SPEECH (Continued) MODE SPEECH (Default: OFF) [MENU] > SPEECH > MODE SPEECH Turn the Receive Mode Speech function ON or OFF. When this function is ON, the selected receive mode is announced. L While the VFO scanning, the receive mode is announced when you change the mode. •… -
Page 95: Function
MENU SCREEN ■ Function Auto Power OFF (Default: OFF) [MENU] > Function > Auto Power OFF Select whether or not to automatically turn OFF the receiver after inactivity for this set period of time. L “AUTO POWER OFF” is displayed and beeps sound 5 seconds before turning OFF the receiver.
-
Page 96
MENU SCREEN ■ Function (Continued) Monitor (Default: Push) [MENU] > Function > Monitor Select an option for the [SQL] Monitor function. (BASIC MANUAL Section 3) • Push: Hold down [SQL] to monitor the frequency. Release to stop monitoring. • Hold: Push [SQL] momentarily to monitor the frequency and push momentarily again to cancel it. -
Page 97
(Default: 9C) [MENU] > Function > CI-V > CI-V Address To distinguish equipment, each CI-V receiver or transceiver has its own Icom standard address in hexadecimal code. The receiver’s default address is 9C. When 2 or more receivers are controlled through a PC at the same time, set a different address for each receiver. -
Page 98
It temporarily stops recording and logging. TIP: Removing the receiver in the SD card mode Click “ ,” and then click “Eject IC-R30.” Confirm “Safe To Remove Hardware” is displayed, and then remove the USB cable from the PC. -
Page 99: Display
MENU SCREEN ■ Function (Continued) USB Serialport Function (Default: CI-V (Echo Back OFF)) [MENU] > Function > USB Serialport Function Set the Serialport function for the USB connection to data device, PC and so on. • CI-V (Echo Back OFF): The CI-V command is input or output through the USB port.
-
Page 100
MENU SCREEN ■ Display (Continued) LCD Contrast (Default: 5) [MENU] > Display > LCD Contrast Set the LCD Contrast level to between 1 (the lowest) and 10 (the highest). RX Popup (Default: Normal) [MENU] > Display > RX Popup Select whether or not to display the pop-up when you receive a digital signal. •… -
Page 101
MENU SCREEN ■ Display (Continued) Scroll Speed (Default: Fast) [MENU] > Display > Scroll Speed Set the scrolling speed of the message, call sign, or other text, that is displayed on the screen. • Slow: The scroll speed is slow. •… -
Page 102
MENU SCREEN ■ Display (Continued) Temperature (Default: ºF) [MENU] > Display > Display Unit > Temperature Select either the degrees ºC or ºF format to display the temperature. Barometric (Default: inHg) [MENU] > Display > Display Unit > Barometric Select either the hPa, mb, mmHg, or inHg format to display the barometric pressure. Rainfall (Default: inch) [MENU] >… -
Page 103
MENU SCREEN ■ Display (Continued) System Language (Default: English) [MENU] > Display > System Language Set the system language of the receiver. • English: The system language of the receiver is English. Only alphabetical characters (A to Z, a to z, 0 to 9) and symbols (! » # $ % & ‘ ( ) * + , — . -
Page 104: Sounds
MENU SCREEN ■ Sounds Earphone Mode (Default: OFF) [MENU] > Sounds > Earphone Mode Turn the Earphone mode ON or OFF. This function automatically reduces the audio volume level to a comfortable level, to use an earphone. L The audio volume level of the internal speaker also reduced. •…
-
Page 105
MENU SCREEN ■ Sounds (Continued) Home CH Beep (Default: ON) [MENU] > Sounds > Home CH Beep Turn the Home CH Beep ON or OFF. • OFF: No beep sounds. • ON: A beep sounds when the Home CH frequency or the Home CH memory is selected. -
Page 106: Time Set
MENU SCREEN ■ Time Set DATE [MENU] > Time Set > Date/Time > DATE Manually set the date to between 2000/01/01 and 2099/12/31. TIME [MENU] > Time Set > Date/Time > TIME Manually set the time that is displayed at the top of the screen. The time is displayed in the 24 hour format.
-
Page 107
120 seconds. Custom Key Beep (Default: OFF) [MENU] > Bluetooth Set > Headset Set > Icom Headset > Custom Key Beep Set the beep sound when the optional VS-3 headsetʼs Custom Key ([PTT]/[PLAY]/[FWD]/ [RWD]) is pushed. -
Page 108
MENU SCREEN ■ Bluetooth Set (Continued) Custom Key (Default: [FWD] : UP, [RWD] : DOWN) [MENU] > Bluetooth Set > Headset Set > Icom Headset > Custom Key The following functions can be assigned to the optional VS-3 Bluetooth ʼs ®… -
Page 109
MENU SCREEN ■ Bluetooth Set Custom Key (Continued) Function Description MODE Push to change the receive mode. Push to turn the Duplex mode ON or OFF, and the shift direction (-DUP/+DUP). PRIO Push to turn the Priority Scan ON or OFF. In the VFO mode, hold down to save the frequency displayed in the MAIN band in the Memory channel. -
Page 110: Sd Card
MENU SCREEN ■ SD Card Load Setting [MENU] > SD Card > Load Setting Select a setting file to load from the list. Save Setting [MENU] > SD Card > Save Setting Save the setting file. Import [MENU] > SD Card > Import/Export > Import Import Memory Channel, P-Scan Edge, or GPS Memory data in the csv format file.
-
Page 111: Others
MENU SCREEN ■ SD Card (Continued) Format [MENU] > SD Card > Format Formats the microSD card, deleting all data. Unmount [MENU] > SD Card > Unmount Electrically unmounts the microSD card while the receiver is ON. ■ Others Battery Level [MENU] >…
-
Page 112
Section OTHER FUNCTIONS ■ Tone squelch operation ……….7-2 D Tone squelch frequency setting ……7-2 ■ D.SQL (Digital Squelch) function …….. 7-4 D Digital Code Squelch ……….7-4 D Network Access Code (NAC) ……..7-4 D Group Code (COM ID) ……….7-5 D CC ……………. -
Page 113: Tone Squelch Operation
OTHER FUNCTIONS ■ Tone squelch operation The Tone squelch opens only when you receive a signal that includes a matching subaudible tone. L Refer to section 4 in the BASIC MANUAL for Tone scan or Code scan. D Tone squelch frequency setting <MODE>…
-
Page 114
OTHER FUNCTIONS ■ Tone squelch operation D Tone squelch frequency setting (Continued) Tone Frequency (Hz) 67.0 88.5 114.8 151.4 177.3 203.5 250.3 69.3 91.5 118.8 156.7 179.9 206.5 254.1 71.9 94.8 123.0 159.8 183.5 210.7 74.4 97.4 127.3 162.2 186.2 218.1 77.0 100.0 131.8 165.5 189.9 225.7 79.7… -
Page 115: D.sql (Digital Squelch) Function
OTHER FUNCTIONS ■ D.SQL (Digital Squelch) function D Digital Code Squelch (CSQL) <MODE> D-STAR The squelch opens only when you receive a D-STAR signal that includes a matching CSQL (Code Squelch). • Selectable codes: 00 ~ 99 Push [QUICK]. Select “D.SQL.” (Rotate [DIAL] to select it, and then push [ENTER].) Select “CSQL (00).”…
-
Page 116: D Group Code (Com Id)
OTHER FUNCTIONS ■ D.SQL (Digital Squelch) function (Continued) D Group Code (COM ID) <MODE> dPMR The squelch opens only when you receive a dPMR (Tier1) signal that includes a matching COM ID (Common ID). • Selectable codes: 1 ~ 255 Push [QUICK].
-
Page 117: D Radio Access Number (Ran)
OTHER FUNCTIONS ■ D.SQL (Digital Squelch) function (Continued) D Radio Access Number (RAN) <MODE> NXDN- and NXDN- The squelch opens only when you receive a NXDN signal that includes a matching RAN. • Selectable codes: 0 ~ 63 Push [QUICK]. Select “D.SQL.”…
-
Page 118: Descrambler Function
OTHER FUNCTIONS ■ Descrambler function <MODE> dPMR You can descramble the scrambled dPMR (Tire2 Mode1/Mode2) communication by entering the appropriate key. • Selectable keys: 1 ~ 32767 Push [QUICK]. Select “SCRAM.” (Rotate [DIAL] to select it, then push [ENTER].) Select “ON (1).” Select the key.
-
Page 119: Receive History Log
OTHER FUNCTIONS ■ Receive history log <MODE> Digital When a digital is received, the call signs, IDs and so on are stored in the RX history. Up to 50 log entries can be stored. • When you receive the 51th call, the oldest history will be deleted. •…
-
Page 120: D Rx History Items In The D-Star Mode
OTHER FUNCTIONS ■ Receive history log (Continued) D RX history items in the D-STAR mode The first page of the “RX HISTORY” screen q Log number (RX01~50) w Time and Date e Receive frequency r Receive mode t Digital Code squelch code y Caller call sign (The call sign of the caller station.) u Called call sign (The call sign of the called station.) i Message (Any message included in the received call,…
-
Page 121
OTHER FUNCTIONS ■ Receive history log D RX history items in the D-STAR mode (Continued) Contents of the detail screen The contents of the detail screen differ, whether position data is included in received data or not. Position data that is included in received data can be divided into 5 categories. Depending on the caller’s TX mode or TX format, the displayed items and these meanings differ. -
Page 122
OTHER FUNCTIONS ■ Receive history log D RX history items in the D-STAR mode (Continued) Common items CALLER Displays the caller station’s name* CALLED Displays the called station’s name* Displays the name of the repeater that was accessed by the caller station. -
Page 123
OTHER FUNCTIONS ■ Receive history log D RX history items in the D-STAR mode (Continued) When the caller’s TX format is D-PRS Position (Mobile/Base station) Compass* Displays the caller’s direction from your position. Latitude Displays the caller’s latitude. Longitude Displays the caller’s longitude. Displays the grid locator based on the caller’s latitude and longitude. -
Page 124
OTHER FUNCTIONS ■ Receive history log D RX history items in the D-STAR mode (Continued) When the caller’s TX format is D-PRS Object/Item Compass* Displays the Object/Item’s direction from your position. Latitude Displays the Object/Item’s latitude. Longitude Displays the Object/Item’s longitude. Displays the grid locator based on the Object/Item’s latitude and longitude. -
Page 125: D Rx History Screen (P25)
OTHER FUNCTIONS ■ Receive history log (Continued) D RX History screen (P25) q History number (RX01~50) w Received date and time e Receive frequency r Receive mode t Network Access Code y Caller’s ID u Called station’s ID (Call type) Call Type: “ALL,”…
-
Page 126
Called station’s ID (Call type) Call Type: “ALL,” “IND” (Individual), or “GRP” (Group) * If the received call is not an Individual call, or the DCR transceiver manufacturer is not Icom, only the User Code is displayed. TIP: Deleting a history log Push [QUICK] on the “RX HISTORY”… -
Page 127: Duplex Operation
OTHER FUNCTIONS ■ Duplex operation The Duplex operation shifts the transmit frequency up or down from the receive frequency by an offset. You can receive a communication that uses different frequencies for transmitting and receiving (Duplex), by setting the frequency offset and shift direction. While monitoring, the displayed frequency automatically changes to the transceiver transmit frequency (Repeater input frequency).
-
Page 128: D Setting The Duplex Direction And Frequency Offset
OTHER FUNCTIONS ■ Duplex operation (Continued) D Setting the Duplex direction and frequency offset Push [QUICK]. Select “DUP.” (Rotate [DIAL] to select it, and then push [ENTER].) Select the Duplex direction. • OFF: For simplex operation (the receive and transmit frequencies are the same). •…
-
Page 129: Home Channel Function
OTHER FUNCTIONS ■ Home channel function Home channels are often-used frequencies you can preset in the receiver’s VFO mode and Memory mode. D Home channel setting Example: In the VFO mode Select a mode (VFO or Memory), frequency or channel in which you want to set the Home channel.
-
Page 130: Resetting
[MENU] > Others > Reset > Partial Reset Push [MENU]. Select “Partial Reset” in the “Others” menu. (Rotate [DIAL] to select it, and then push [ENTER].) • A confirmation dialog appears. Select “YES,” then push [ENTER]. • After resetting, the IC-R30 will automatically restart. 7-19…
-
Page 131: D All Reset
(Rotate [DIAL] to select it, and then push [ENTER].) • A confirmation dialog appears. Select “NEXT,” then push [ENTER]. • Another confirmation dialog is displayed. Select “YES,” then push [ENTER]. • After “ALL RESET” is displayed, the IC-R30 will automatically restart. 7-20…
-
Page 132: Usb Driver Installation
• A USB 1.1, 2.0, or 3.0 port NOTE: • Icom is not responsible for problems using a PC with one of the above OSs installed. • In this installation guide, the above OSs are described as “Windows 10,” “Windows 8.1,”…
-
Page 133: D Installation
OTHER FUNCTIONS ■ USB driver installation (Continued) D Installation L These instructions are based on Microsoft Windows ® ® NOTE: • NEVER connect the USB cable between the receiver and the PC until AFTER the USB driver has been installed. •…
-
Page 134
• Windows starts installing the driver. After the installation has completed, click <Finish>. Click Connect the USB cable between the IC-R30* and the PC. Then, turn ON the radio’s power. * Confirm that the IC-R30’s “USB Connect” is set to “Serialport” on the Menu screen. -
Page 135: D Confirming The Port Number
OTHER FUNCTIONS ■ USB driver installation (Continued) D Confirming the port number After the driver installation has been completed, confirm the port connection and port number. Click the folder icon on the taskbar. Right-click “This PC,” and then click “Properties.” q Right-click w Click 3.
-
Page 136: Cloning Function
■ Cloning function The receiver has a data cloning capability. This function is useful when you want to copy all of the entered contents from one IC-R30 to another. You can also clone with a PC, using the optional CS-R30 software.
-
Page 137: D Receiver-To-Receiver Cloning Using A Microsd Card
OTHER FUNCTIONS ■ Cloning function (Continued) D Receiver-to-Receiver cloning using a microSD card You can clone receivers using a microSD card. L Recorded voice memories are not included in the cloning data. To play back the master receiver’s voice memory, insert the microSD card into a sub receiver, or make a copy onto the sub receiver’s microSD card using a PC.
-
Page 138
Select “YES.” • Starts the file check. After checking, starts settings data loading. • After loading, “COMPLETED! Restart the IC-R30.” is displayed. Restart the receiver. TIP: The setting data are saved in the “icf” file format that is used in the CS-R30 . -
Page 139: D Cloning From A Pc Using A Microsd Card
Select “SD Card Mode.” Select “YES,” and then push [ENTER]. • Displays the IC-R30 folder on the PC screen. Save the setting data as an “icf” file, then put it into the “Setting” folder in the “IC- R30” folder on the microSD card.
-
Page 140: Ci-V Information
CI-V settings using the MENU list screen. ([MENU] > Function > CI-V) Before connecting the IC-R30 to a PC using the supplied USB cable, set the “USB Connect” item to “Serialport,” and set the “USB Serialport Function” to “CI-V (Echo Back ON)”…
-
Page 141
9 V ~ 15 V DC RS-232C cable CT-17 3-conductor 3.5(d) mm plug must be used. 3-conductor 3.5(d) mm plug must be used. IC-R30 ● Connections (IC-R30 side) Less than 4.5(d) mm *No speaker is necessary for the CT-17 side. 7-30… -
Page 142: D Data Format
D Data format The CI-V system can be operated using the following data formats. Data formats differ, depending on the command numbers. A data area or sub command is added to some commands. Controller to IC-R30 FE FE Data area FE FE…
-
Page 143
OTHER FUNCTIONS ■ CI-V information (Continued) D Command table Cmd. Sub cmd. Data Description See p. 7-36 Output the frequency data for transceive See p. 7-36 Output the receive mode for transceive See p. 7-36 Read the receive frequency See p. 7-36 Read the receive mode See p. -
Page 144
OTHER FUNCTIONS ■ CI-V information D Command table (Continued) Cmd. Sub cmd. Data Description 00/01 Send/read the NXDN digital squelch (D.SQL) setting (00=OFF, 01=RAN) 00/01 Send/read the DCR digital squelch (D.SQL) setting (00=OFF, 01=UC) 00/01 Send/read the dPMR SCRAMBLER function status (00=OFF, 01=ON) 00/01 Send/read the NXDN ENCRYPTION function status… -
Page 145
OTHER FUNCTIONS ■ CI-V information D Command table (Continued) Cmd. Sub cmd. Data Description 00/01 Send/read the D-STAR RX GPS/D-PRS message output setting (00=Transceive OFF, 01=Transceive ON) See p. 7-45 Output the D-STAR RX GPS/D-PRS message for transceive See p. 7-45 Read the D-STAR RX GPS/D-PRS message 00/01 Send/read the D-STAR RX CSQL code output setting… -
Page 146: D Command Table
When sending the power ON command (18 01), you need to repeatedly send “FE” for 13 milliseconds before the standard format. The following is the approximate number of needed repetitions. (Not necessary when the IC-R30 is connected through the [USB] connector.) •…
-
Page 147: D Commands
OTHER FUNCTIONS ■ CI-V information D Commands • Receive frequency Command: 00, 03, 05 L Only when the 10 Hz digit is 2 or 7, the 1 Hz digit is fixed to 5. • Receive mode Command: 01, 04, 06 Receive Receive mode…
-
Page 148: Offset Frequency
OTHER FUNCTIONS ■ CI-V information D Commands (Continued) • Offset frequency Command: 0D X X X X L When the 100 MHz digit is 0, the 10 MHz digit is 0 ~ 9. When the 100 MHz digit is 1, the 10 MHz digit is 0 ~ 5. •…
-
Page 149
OTHER FUNCTIONS ■ CI-V information D Commands (Continued) • Tone squelch frequency setting q※ Command: 1B 01 0 0 X X X X *Not necessary when setting a frequency. See page 7-3 for the tone frequency list. • DTCS code and polarity setting Command : 1B 02 0 X 0 X X X 0: Normal… -
Page 150
OTHER FUNCTIONS ■ CI-V information D Commands (Continued) • Digital code squelch (CSQL) code (D-STAR) Command : 1B 07, 20 0501, 20 0502 Once position: 0 ~ 9 10th position: 0 ~ 9 • COM ID (dPMR) Command : 1B 08 0 X X X Once position: 0 ~ 9 10th position: 0 ~ 9… -
Page 151
OTHER FUNCTIONS ■ CI-V information D Commands (Continued) • D-STAR RX Call sign Command: 20 0001, 20 0002 e ~ !0 !1 ~ !4 q, w • • • • • • !5 ~ @2 @3 ~ #0 #1 ~ #8 X X •… -
Page 152
OTHER FUNCTIONS ■ CI-V information D Commands (Continued) • D-STAR RX message Command: 20 0101, 20 0102 q ~ @0 @1 ~ @8 @9 ~ #2 X X • • • • • • • • • q ~ @0 : Message (20 characters) @1 ~ @8 : Call sign of the CALLER station (8 characters) @9 ~ #2 : Note of the CALLER station (4 characters) L FF: No signal has been received since the power was turned ON. -
Page 153
OTHER FUNCTIONS ■ CI-V information D Commands (Continued) • D-STAR GPS/D-PRS data Command: 20 0301, 20 0302 Data number and description: Data number Description D-PRS–Position D-PRS–Object D-PRS–Item D-PRS–Weather • GPS/D-PRS data— Position Data q ~ o !2 ~ !6 • • • •… -
Page 154
OTHER FUNCTIONS ■ CI-V information D Commands (Continued) • GPS/D-PRS data— Object Command: 20 0301, 20 0302 Data q ~ o !2 ~ !6 • • • • • • X X X X X X !7 ~ @2 @3 ~ @6 •… -
Page 155
OTHER FUNCTIONS ■ CI-V information D Commands (Continued) • GPS/D-PRS data— Item Command: 20 0301, 20 0302 Data !2 ~ !6 q ~ o • • • • • • X X X X X X !7 ~ @2 @3 ~ @6 •… -
Page 156
OTHER FUNCTIONS ■ CI-V information D Commands (Continued) • GPS/D-PRS data— Weather Command: 20 0301, 20 0302 Data q ~ o !2 ~ !6 • • • • • • X X X X X X !7 ~ @2 @3 ~ @9 •… -
Page 157
OTHER FUNCTIONS ■ CI-V information D Commands (Continued) • P25 RX ID Command: 20 0601, 20 0602 e ~ i q, w 0 X 0 X 0 X 0 X 0 (Fixed) o ~ !4 !5 ~ !7 0 X 0 X 0 X 0 X 0 X 0 (Fixed) q Header flag data (First byte) -
Page 158
OTHER FUNCTIONS ■ CI-V information D Commands (Continued) • dPMR RX ID Command: 20 0801, 20 0802 e ~ y u ~ !0 !1 , !2 q, w • • • • • • 0 (Fixed) q Header flag data (First byte) Data Description bit7… -
Page 159
OTHER FUNCTIONS ■ CI-V information D Commands (Continued) • NXDN RX ID Command: 20 0A01, 20 0A02 e ~ t y ~ i q, w 0 X X X X X X X X X 0 (Fixed) q Header flag data (First byte) Data Description bit7… -
Page 160
OTHER FUNCTIONS ■ CI-V information D Commands (Continued) • DCR RX ID Command: 20 0C01, 20 0C02 e ~ y q, w 0 X 0 X 0 (Fixed) u ~ !0 !1 , !2 0 X 0 X 0 (Fixed) q Header flag data (First byte) Data Description… -
Page 161
OTHER FUNCTIONS ■ CI-V information D Commands (Continued) • P25 RX status data Command: 20 0701, 20 0702 Data Function Description bit7 (Fixed) — bit6 0/1 — (Reserved) bit5 0/1 Receive While receiving a P25 signal, “1” is returned. (Regardless of NAC) status bit4 0/1 Last call When the last call was finished by a user, “1”… -
Page 162
OTHER FUNCTIONS ■ CI-V information D Commands (Continued) • NXDN RX Status data Command: 20 0B01, 20 0B02 Data Function Description bit7 (Fixed) — bit6 0/1 — (Reserved) bit5 0/1 NXDN mode When the received NXDN signal is «Narrow,» “1” is returned. bit4 0/1 Receive status While receiving an NXDN signal, “1”… -
Page 163
OTHER FUNCTIONS ■ CI-V information D Commands (Continued) MY POSITION DATA • MY position data Command: 23 00 MY POSITION DATA t: Latitude (ddºmm.mmm format) !1 : Longitude (dddºmm.mmm format) GPS MANUAL DATA !5 : Altitude (0.1 meter steps) !6 , !7 : Course (1 degree steps) @0 : Speed (0.1 km/h steps) @7 : Date (UTC: yyyymmddHHMMSS) * y: Year, m: Month, d: Day, H: Hour, M: Minute, S: Second… -
Page 164
……….. 8-2 ® D Turning ON the Bluetooth function ……8-2 ■ Setting the headset …………. 8-3 D AF Output…………..8-3 D About the Icom headset (VS-3)……. 8-4 ■ Editing the Bluetooth unit name ……… 8-5 ® ■ Initializing the Bluetooth unit …….. -
Page 165: Operating Bluetooth
® Bluetooth OPERATION ■ Operating Bluetooth ® The receiver has a built-in Bluetooth unit. You can connect Bluetooth headsets, or other Bluetooth devices. When you connect a Bluetooth headset to the receiver, you can wirelessly receive. L The communication range of Bluetooth is approximately 10 meters (33 feet). L These instructions describe pairing with the VS-3 Bluetooth , as an example.
-
Page 166: Setting The Headset
® Bluetooth OPERATION ■ Setting the headset D AF Output Select the AF Output device. If “AF Output” is set to “Headset & Speaker,” you can hear audio from both a connected Bluetooth headset and the receiver’s speaker. [MENU] > Bluetooth Set > Headset Set > AF Outpt Push [MENU].
-
Page 167: D About The Icom Headset (Vs-3)
OPERATION ■ Setting the headset (Continued) D About the Icom headset (VS-3) You can set the detailed settings of the optional VS-3 Bluetooth headset. Also, you can assign a key function to [PLAY], [FWD], and [RWD] on the VS-3’s “Custom Key”…
-
Page 168: Editing The Bluetooth ® Unit Name
® Bluetooth OPERATION ■ Editing the Bluetooth unit name ® You can edit the Bluetooth unit name. After initializing the unit, the edited name remains. [MENU] > Bluetooth Set > Bluetooth Device Information Push [MENU]. Select “Bluetooth Device Information” in the “Bluetooth Set” menu. (Rotate [DIAL] to select it, and then push [ENTER].) Push [QUICK], then [ENTER].
-
Page 169: Initializing The Bluetooth ® Unit
■ The maximum number of paired devices You can pair 2 types of the Bluetooth devices: Headset and Data device. Up to 5 Bluetooth devices can be paired with the IC-R30. (Headset 1~4, Data device 1~4) Bluetooth devices paired with the IC-R30…
-
Page 170
Section UPDATING THE FIRMWARE ■ Preparation…………..9-2 D Firmware update caution ……..9-2 D Required equipment……….9-2 D Checking the firmware version…….. 9-3 ■ Updating the firmware ……….9-4… -
Page 171: Updating The Firmware
UPDATING THE FIRMWARE ■ Preparation You can update the IC-R30’s firmware using an SD card. Updating the firmware may add new functions and improves performance parameters. You can download the latest firmware from the Icom website. http://www.icom.co.jp/world/index.html D Firmware update caution L Update the firmware at your own risk.
-
Page 172
UPDATING THE FIRMWARE ■ Preparation (Continued) D Checking the firmware version You can check the firmware version on the MENU screen. [MENU] > Others > Information > Version Push [MENU]. Select “Version” in the “Others” menu. (Rotate [DIAL] to select it, and then push [ENTER].) •… -
Page 173
Windows ® ® 1. Downloading the firmware file Access the following URL and download the firmware file. http://www.icom.co.jp/world/ Click <Support>. Click “Firmware Updates/Software Downloads.” Click the desired firmware file link. Read “Regarding this Download Service” carefully, and then click <Agree>. -
Page 174
• A confirmation dialog appears. Select “YES.” • Displays the IC-R30 folder on the PC screen. Copy the downloaded firmware data into the IC-R30 folder on the SD card. Copy After the SD card removal operation (p. 2-8), disconnect the IC-R30 from the… -
Page 175
If you turn OFF the receiver, or if a power failure occurs while updating, the firmware may be damaged and you may have to send the receiver back to the nearest Icom distributor for repair. This type of repair is out of warranty, even if the receiver warranty period is still valid. -
Page 176
• The updating starts. L If you want to cancel the updating, select “NO.” L After the updating finishes, the IC-R30 will automatically restart. TIP: To check the firmware version after the updating, see “Checking the firmware version (p. 9-3)” for details. -
Page 177
Section OPTIONS ■ About the optional products ………. 10-2 ■ Option list …………..10-2 10-1… -
Page 178
Approved Icom optional equipment is designed for optimal performance when used with an Icom receiver. Icom is not responsible for the destruction or damage to an Icom receiver in the event the Icom receiver is used with equipment that is not manufactured or approved by Icom. -
Page 179
Section SPECIFICATIONS ■ General …………..11-2 ■ Receiver …………..11-2 ■ About the Bluetooth unit ……….11-4 ■ BC-223 Charger …………11-4 ■ BP-287 Battery pack ……….11-4 11-1… -
Page 180: Specifications
SPECIFICATIONS ■ General • Frequency coverage: [A band] USA-01 version 0.100000 ~ 821.999990 MHz 851.000000 ~ 866.999990 MHz 896.000000 ~ 3304.999990 MHz USA-02 version 0.100000 ~ 3304.999990 MHz EUR-01 version 0.100000 ~ 3304.999990 MHz [B band] USA-01 version 108.000000 ~ 520.000000 MHz USA-02 version 108.000000 ~ 520.000000 MHz EUR-01 version…
-
Page 181
SPECIFICATIONS ■ Receiver (Continued) • Sensitivity for all versions: Frequency range Sensitivity Squelch Sensitivity Mode (MHz) (μV) (μV) 0.495000 ~ 1.899990 – 1.900000 ~ 14.999990 0.25 SSB/CW 15.000000 ~ 29.999990 (10 dB S/N) 50.000000 ~ 53.999990 144.000000 ~ 147.999990 430.000000 ~ 449.999990 0.32 0.495000 ~ 1.899990 1.900000 ~ 14.999990 (10 dB S/N) -
Page 182
SPECIFICATIONS ■ About the Bluetooth unit Version: Bluetooth Ver.4.2 Transmission power: Class2 Profiles: HFP, HSP, SPP Maximum number of pairing devices: 5 devices (Headset and Data device) (Headset 1~4, Data device 1~4) Default device name: “ICOM BT-003” Pass key: “0000” ■ BC-223 Charger Input voltage: DC 12 ~ 16 V (Used with the BC-123S power adapter) Operating temperature range: 15°C ~ 40°C (59°F ~ 104°F) Dimensions: 87 (W) × 47.3 (H) × 71 (D) mm, 3.4 (W) × 1.9 (H) × 2.8 (W) in (Projections not included) Weight: Approximately 120 g, 4.2 oz (Power adapter not included) ■ BP-287 Battery pack… -
Page 183
1-1-32 Kamiminami, Hirano-ku, A7447-2EX-1 Osaka 547-0003, Japan © 2018 Icom Inc.
Icom IC-R30 — приёмник от японской компании Iсom успешно принимает цифровые передачи, такие как APCO25, IDAS (он же NEXEDGE/NXDN), dPMR и D-STAR, имеет встроенный Bluetooth и GPS, а также функцию беспроводного управления через приложение в смартфоне на Android и IOS (Apple).

Частотное исполнение 0,1-3305 МГц (возможны пропуски частот) *
- Тип приемника: супергетеродин с тройным преобразованием + преобразование вниз (диапазон A); супергетеродин с двойным преобразованием (диапазон B, а также WFM в диапазоне A)
- 2000 каналов памяти, 100 групп, 100 пропусков частот, 8 символов для имен каналов
- Крупный ЖК-дисплей с диагональю 2.3″ (58 мм)
- Навигационный элемент типа джойстик на 4 направления
- Слот для карт памяти microSD/microSDHC (до 32 Гбайт)
- Приём двух частот одновременно
- Запись двух частот одновременно на карту microSD (ведется в формате WAV с одновременной фиксацией силы принятого сигнала и времени)
- Встроенный GPS-приёмник, фиксирующий координаты и высоту над уровнем моря и ведущий запись данных на карту памяти (до 300 точек)
- Встроенный интерфейс Bluetooth: версия 4.2, поддерживаются профили HFP, HSP, SPP
- Увеличенная скорость сканирования — до 150/200 частот в секунду (в зависимости от диапазона)
- Поддерживаемые аналоговые модуляции: AM, AM-N, FM, FM-N, WFM, USB, LSB, CW
- Поддерживаемые цифровые модуляции: APCO25 (P25), IDAS (NEXEDGE/NXDN), dPMR, D-STAR, DCR
- Встроенная ферритовая антенна для приема AM-радиовещания
- Функция АПЧ (автоподстройка по частоте)
- Функция ANL (автоматический ограничитель шумов)
- Функция NB (Noise Blanler) для режимов SSB и CW
- Функция регулировки усиления по ВЧ (дискретно, в 10 ступеней)
- Встроенный аттенюатор (3 ступени)
- Тоновый шумоподавитель CTCSS (PL)/DCTS (DPL)
- Функция VSC: шумоподавление по отсутствию признаков голоса в сигнале
- Двойной приём: функция позволяет вести одновременный приём на 2 разных частотах в 2 разных модуляциях
- Виды сканирования:
- Сканирование близрасположенных станций (до 50 шт. в радиусе до 160 км)
- Программируемое сканирование — автозапись в память до 200 частот
- Приоритетное сканирование — проверка активности на канале каждые 5 секунд при работе с VFO
- Поиск тонов CTCSS (PL)/DCTS (DPL)
- Сканирование по границам поддиапазонов
- Сканирование по банкам памяти
- Еще минимум 3 других вида сканирования
- Встроенный спектроскоп, позволяющий оценить занятость радиочастот (активность станций) в выбранном участке
- Голосовой помощник — функция, озвучивающая частоту и текущий режим работы приемника (особенно удобен, когда используется Bluetooth-гарнитура, а сам приемник убран, например, в сумку)
- Высокий стандарт пылевлагозащиты: IP57 (возможность погружения в воду до 1 метра до 30 минут)
- Соответствие военной спецификации MIL-STD-810-G
- Встроенный Li-Ion АКБ для длительной работы приемника (до 8 часов 20 минут от одного заряда)
- Функция подзаряда от USB-порта за 5 часов (требуется ток в 1А)
- В случае, если требуется работа от стандартных батареек AA, доступен аксессуар Icom BP-293 (т.н. «батарейный кейс»)
- Опция: Bluetooth-гарнитура Icom VS-3 с функцией пульта дистанционного управления. Доступны клавиши вверх/вниз, а также 4 клавиши, программируемые пользователем
- Возможность программирования с ПК при помощи ПО Icom CS-R30
- Функция энергосбережения (3 режима работы)
- Блокировка клавиатуры и функциональных клавиш
- Встроенные часы
- Антенный разъём: SMA 50 Ом
- Чувствительность: от 0,25 мкВ (в зависимости от диапазона и типа модуляции)
- Габариты: 53 x 143 x 30.5 мм (ШВГ)
- Масса: 200 г. только приёмник, и 310 г. с антенной и штатным аккумулятором
Уникальные особенности модели
Icom ICR30 имеет ряд уникальных особенностей, которые не встречались ранее не только у фирмы Icom, но и у других производителей, включая Uniden, GRECOM, Yaesu, Yupiteru, Whistler и др.:
- Двойной одновременный приём в разных режимах
- Двойная одновременная запись в разных режимах
- Встроенный GPS-приемник
- Пульт дистанционного управления
- Передача голоса по Bluetooth
- Пылевлагозащита IP57
Комплект поставки (может варьироваться от версии и поставки)
- Приёмник IC-R30 версия #16 (США) *
- Аккумулятор Li-Ion Icom BP-287
- Настольное зарядное устройство Icom BC-223
- Адаптер питания Icom BC-123SA (90-240 В, 50-60 Гц, вилка американского типа)
- USB-кабель для зарядки и обмена данными с ПК
- Телескопическая антенна
- Клипса для поясного ношения Icom MB-133
- Ремешок на руку
* В версии #16 (США) имеются пропуски частот: 822.000 — 851.000, 867.000 — 896.000 МГц, которые не оказывают никакого негативного влияния на результаты сканирования, так как в в этих участках нет сигналов, которые могли бы быть приняты Icom R-30. Данные участки предназначены только для цифровой сотовой связи, которая не может быть прослушана при помощи Iсom R30.

См. канал в ![]() Telegram
Telegram
Похожие записи:
Просмотрено:
2 408
Icom IC-R30 — новый приёмник от японской компании Iсom успешно принимает цифровые передачи, такие как APCO25, IDAS (он же NEXEDGE/NXDN), dPMR и D-STAR, имеет встроенный Bluetooth и GPS, а также функцию беспроводного управления через приложение в смартфоне на Android и IOS (Apple).
Частотное исполнение 0,1-3305 МГц (возможны пропуски частот) *
- Тип приемника: супергетеродин с тройным преобразованием + преобразование вниз (диапазон A); супергетеродин с двойным преобразованием (диапазон B, а также WFM в диапазоне A)
- 2000 каналов памяти, 100 групп, 100 пропусков частот, 8 символов для имен каналов
- Крупный ЖК-дисплей с диагональю 2.3″ (58 мм)
- Навигационный элемент типа джойстик на 4 направления
- Слот для карт памяти microSD/microSDHC (до 32 Гбайт)
- Прием двух частот одновременно
- Запись двух частот одновременно на карту microSD (ведется в формате WAV с одновременной фиксацией силы принятого сигнала и времени)
- Встроенный GPS-приемник, фиксирующий координаты и высоту над уровнем моря и ведущий запись данных на карту памяти (до 300 точек)
- Встроенный интерфейс Bluetooth: версия 4.2, поддерживаются профили HFP, HSP, SPP
- Увеличенная скорость сканирования — до 150/200 частот в секунду (в зависимости от диапазона)
- Поддерживаемые аналоговые модуляции: AM, AM-N, FM, FM-N, WFM, USB, LSB, CW
- Поддерживаемые цифровые модуляции: APCO25 (P25), IDAS (NEXEDGE/NXDN), dPMR, D-STAR, DCR
- Встроенная ферритовая антенна для приема AM-радиовещания
- Функция АПЧ (автоподстройка по частоте)
- Функция ANL (автоматический ограничитель шумов)
- Функция NB (Noise Blanler) для режимов SSB и CW
- Функция регулировки усиления по ВЧ (дискретно, в 10 ступеней)
- Встроенный аттенюатор (3 ступени)
- Тоновый шумоподавитель CTCSS (PL)/DCTS (DPL)
- Функция VSC: шумоподавление по отсутствию признаков голоса в сигнале
- Двойной прием: функция позволяет вести одновременный прием на 2 разных частотах в 2 разных модуляциях
- Виды сканирования:
- Сканирование близрасположенных станций (до 50 шт. в радиусе до 160 км)
- Программируемое сканирование — автозапись в память до 200 частот
- Приоритетное сканирование — проверка активности на канале каждые 5 секунд при работе с VFO
- Поиск тонов CTCSS (PL)/DCTS (DPL)
- Сканирование по границам поддиапазонов
- Сканирование по банкам памяти
- Еще минимум 3 других вида сканирования
- Встроенный спектроскоп, позволяющий оценить занятость радиочастот (активность станций) в выбранном участке
- Голосовой помощник — функция, озвучивающая частоту и текущий режим работы приемника (особенно удобен, когда используется Bluetooth-гарнитура, а сам приемник убран, например, в сумку)
- Высокий стандарт пылевлагозащиты: IP57 (возможность погружения в воду до 1 метра до 30 минут)
- Соответствие военной спецификации MIL-STD-810-G
- Встроенный Li-Ion АКБ для длительной работы приемника (до 8 часов 20 минут от одного заряда)
- Функция подзаряда от USB-порта за 5 часов (требуется ток в 1А)
- В случае, если требуется работа от стандартных батареек AA, доступен аксессуар Icom BP-293 (т.н. «батарейный кейс»)
- Опция: Bluetooth-гарнитура Icom VS-3 с функцией пульта дистанционного управления. Доступны клавиши вверх/вниз, а также 4 клавиши, программируемые пользователем
- Возможность программирования с ПК при помощи ПО Icom CS-R30
- Функция энергосбережения (3 режима работы)
- Блокировка клавиатуры и функциональных клавиш
- Встроенные часы
- Антенный разъем: SMA 50 Ом
- Чувствительность: от 0,25 мкВ (в зависимости от диапазона и типа модуляции)
- Габариты: 53 x 143 x 30.5 мм (ШВГ)
- Масса: 200 г. только приемник, и 310 г. с антенной и штатным аккумулятором
Уникальные особенности модели
Icom ICR30 имеет ряд уникальных особенностей, которые не встречались ранее не только у фирмы Icom, но и у других производителей, включая Uniden, GRECOM, Yaesu, Yupiteru, Whistler и др.:
- Двойной одновременный прием в разных режимах
- Двойная одновременная запись в разных режимах
- Встроенный GPS-приемник
- Пульт дистанционного управления
- Передача голоса по Bluetooth
- Пылевлагозащита IP57
Комплект поставки (может варьироваться от версии и поставки)
- Приемник IC-R30 версия #16 (США) *
- Аккумулятор Li-Ion Icom BP-287
- Настольное зарядное устройство Icom BC-223
- Адаптер питания Icom BC-123SA (90-240 В, 50-60 Гц, вилка американского типа)
- USB-кабель для зарядки и обмена данными с ПК
- Телескопическая антенна
- Клипса для поясного ношения Icom MB-133
- Ремешок на руку
* В версии #16 (США) имеются пропуски частот: 822.000 — 851.000, 867.000 — 896.000 МГц, которые не оказывают никакого негативного влияния на результаты сканирования, так как в в этих участках нет сигналов, которые могли бы быть приняты Icom R-30. Данные участки предназначены только для цифровой сотовой связи, которая не может быть прослушана при помощи Iсom R30.