инструкцияFujifilm Instax mini LiPlay

EN
DE
FR
ES
TW
KO
PT
RU
IT
NL
PL
CS
SK
HU
BODM1P102-200
User’s Guide/Safety Precautions
Bedienungsanleitung/Sicherheitsmaßnahmen
Guide d’utilisation/Précautions de sécurité
Manual de instrucciones/Precauciones de seguridad
使用說明書/安全注意事項
사용설명서/안전을 위한 주의사항
Manual de Utilização/Precauções de segurança
Руководство пользователя/меры предосторожности
Guida per l’Utente/Precauzioni per la sicurezza
Gebruikershandleiding/Veiligheidsmaatregelen
Instrukcja obsługi/Wskazówki bezpieczeństwa
Uživatelská příručka/Bezpečnostní opatření
Používateľská príručka/Bezpečnostné pokyny
Használati útmutató/Biztonsági óvintézkedések
BO-DM1_14lang.indb 1 2019/2/14 16:22:45
Посмотреть инструкция для Fujifilm Instax mini LiPlay бесплатно. Руководство относится к категории Фотокамеры, 4 человек(а) дали ему среднюю оценку 8.3. Руководство доступно на следующих языках: русский, английский. У вас есть вопрос о Fujifilm Instax mini LiPlay или вам нужна помощь? Задайте свой вопрос здесь

Главная
| Fujifilm | |
| Instax mini LiPlay | 1012179 | |
| Фото камера | |
| 4547410413182 | |
| русский, английский | |
| Руководство пользователя (PDF), Буклет по продукции (PDF) |
Технические характеристики
| Цвет товара | Белый |
| Тип дисплея | ЖК |
| Совместимые карты памяти | MicroSD (TransFlash) |
| Размер изображения | 62 x 46 mm |
| Поставляемые кабели | USB |
| Встроенный микрофон | Да |
| Максимальное число установки диафрагмы | 2 |
| Фокусировка | Авто |
| Нормальное фокусное расстояние | 10 — ∞ m |
| Баланс белого | Авто |
| Автоспуск | Да |
| Задержка автоcпуска | 2, 10 s |
| Размер пленки | 86 x 54 mm |
| Поддерживаемые форматы изображения | JPEG |
| Время распечатывания (мин.) | 12 s |
| Диагональ экрана | 2.7 « |
| Диапазон температур при эксплуатации | 5 — 40 °C |
| Встроенный экран | Да |
Энергопитание
| Питание от батареи | Да |
| Аккумуляторная батарея | Да |
| Технология батареи | Литий-ионная (Li-Ion) |
| Время работы батареи (упаковок пленки) | 10 |
| Время подзарядки батареи | 3 h |
Порты и интерфейсы
| USB порт | Да |
| Тип USB коннектора | Micro-USB B |
Сеть
Вспышка
| Встроенная вспышка | Да |
| Режимы вспышки | Flash off, Flash on, Suppressed |
| Диапазон вспышки | 0.5 — 1.5 m |
Затвор
| Наивысшая скорость выдержки камеры | 1/8000 s |
| Самая низкая скорость выдержки камеры | 0.25 s |
Содержимое упаковки
| Наручный ремешок | Да |
| Руководство пользователя | Да |
Экспозиция
| Коррекция световой экспозиции | ± 2EV (1/3EV step) |
Вес и размеры
| Вес | 255 g |
| Высота | 122.9 mm |
| Глубина | 36.7 mm |
| Ширина | 82.5 mm |
показать больше
Не можете найти ответ на свой вопрос в руководстве? Вы можете найти ответ на свой вопрос ниже, в разделе часто задаваемых вопросов о Fujifilm Instax mini LiPlay.
Не нашли свой вопрос? Задайте свой вопрос здесь
Fujifilm INSTAX mini LiPlay Instant Camera Manual
Before Use
Before using the camera, check the following has been included.
Supplied Accessories
Notes on Disposing of the Camera
A built-in lithium ion battery is used for this camera.
When you dispose of the camera, follow your local regulations and dispose of it properly.
Please refer to the supplied CONTACT INFORMATION sheet for inquiry.
Do not remove the built-in battery by yourself; otherwise, you may be injured.
Disposal of Electric and Electronic Equipment inPrivate Households
Disposal of used Electrical & ElectronicEquipment
(Applicable in the European Union and other European countries with separate collection systems)
For customers in Turkey:
EEE Complies with Directive
About This Camera
Main Features
- The «INSTAX mini LiPlay» is the most compact INSTAX product available on the market
- You can perfectly position your photo using the LCD monitor and save the image onto the camera memory or micro SD card
- You can select a photo from your photo library and print it using the INSTAX print feature
- You can edit your photos by using 10 photo frames and 6 filters
- You can save your photos with the recorded sound
- Stylish and luxurious design
- Equipped with selfie mirror to easily position selfies
Functions Available with the Smartphone App
- Sound function
Record sound with the camera, convert it to QR code and print the QR code on a photo (Print with sound). Sound is played when QR codes printed with the INSTAX print feature are read with your smartphone. - Remote shooting function
Control the camera with your smartphone for remote shooting of photos. - Shortcut function
You can select photo frames on your smartphone and assign the frames to the 3 shortcut buttons located on the side of the camera. - Direct print
Transfer a photo from your smartphone to the camera, and print it with the INSTAX print feature. Before sending the photo, you can use the smartphone app to move, rotate, zoom in, zoom out, or crop the photo.
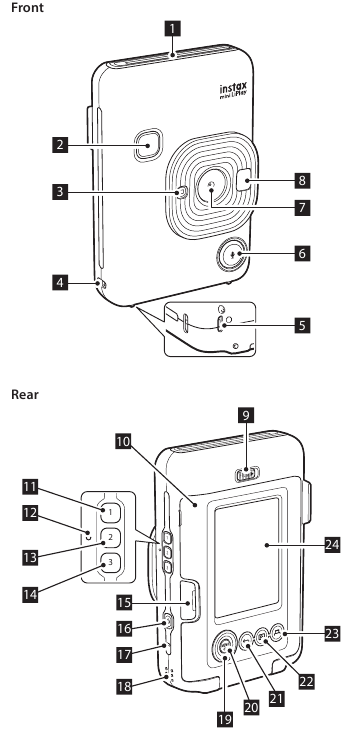
Part Names
- Film ejection slot
- Shutter button
- Flash/Self-timer lamp
- Strap hook
- USB port
(Sound) button
- Lens
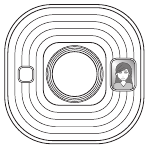
- Selfie mirror
- Film door lock
- Film door
(Shortcut 1) button
- Reset button*
(Shortcut 2) button
(Shortcut 3) button
- Micro SD card slot
(Power) button
- Microphone
- Speaker
- Cross key (
)
- MENU/OK button
(Back) button
(Playback) button
(Print) button
- LCD monitor
LCD Monitor
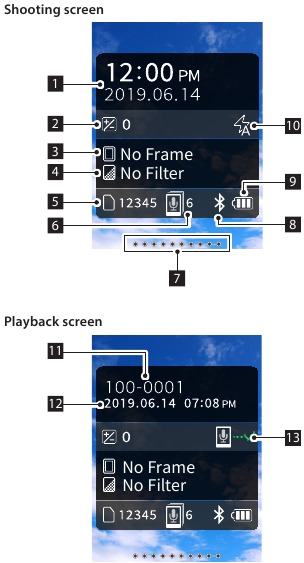
The shooting screen displays on the LCD monitor when the power is switched on.
- To switch from the shooting screen to the playback screen, press
(Playback).
- To switch from the playback screen to the shooting screen, press the shutter button.
While the shooting screen or playback screen is displayed, press (Back) to display the following information on the LCD monitor.
- Current date and time
- Exposure
- Frame name
- Filter name
- Number of images available*
- Number of prints with sound images waiting to be sent
- Remaining film indicator
- Bluetooth connection status indicator
- Battery level indicator
- Flash indicator
- Frame No. indicator
- Shooting date/time information
- Transmission status indicator of print with sound images
*When using the internal memory, 
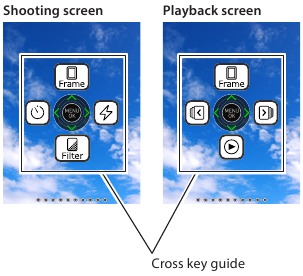
Cross Key Guide Display
When starting up or switching screens (Shooting screen Playback screen), the cross key guide appears for a short time.
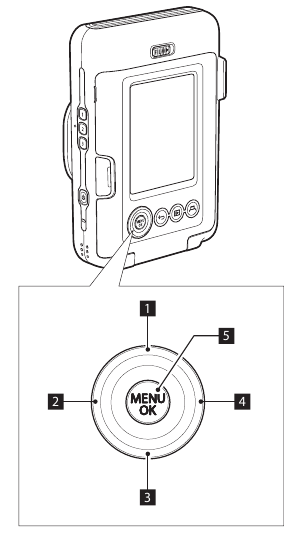
Using the Cross Key
The ( 

Move up
Move left
Move down
Move right
- Menu display/Make selection
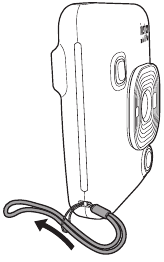
Attaching the Strap
Attach the strap as shown below.
- Put the strap around your wrist when carrying the camera or taking photos to avoid dropping the camera.
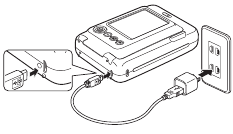
Charging the Battery
Turn off the camera before charging the battery. Battery will not charge if the camera is powered on.
Ensure USB is correctly attached as indicated.
Connect the camera and a USB AC adapter supplied with your smartphone using the supplied USB cable, then connect the USB AC adapter to an indoor power outlet.
- Charging time is approximately 2 to 3 hours.
Charging Status Indication
| While charging | Self-timer lamp lights up. |
| Charging finished | Self-timer lamp goes off. |
| Charging error | Self-timer lamp flashes. |
Charging from a PC:
- Connect the camera and PC directly. Do not connect via a USB hub or keyboard.
- If the PC goes into sleep mode while charging, charging is discontinued. To continue charging, exit sleep mode and then reconnect the USB cable.
- The battery may not charge depending on the specifications, settings or conditions of the PC.
Note
- The battery cannot be removed.
- The battery has not been charged during manufacture. Please charge the battery fully before use.
- For notes about the battery, please refer to «Simple Camera Care».
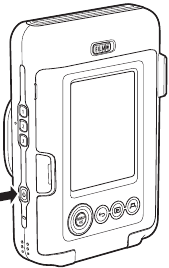
Powering on/off
Press and hold 
Checking the Battery Level
The battery level is displayed on the LCD monitor when pressing (Back) on the shooting screen or playback screen.
- If you do not use the camera for a certain period of time, it will turn off automatically. You are able to set the amount of time until the power is turned off.
- During shooting mode, press
(Playback) to display the playback screen and enter playback mode.
- Press the shutter button fully during playback mode to display the shooting screen and select shooting mode.
Initial Settings
When turning the camera on for the first time after purchase, a screen will be displayed automatically to set the language, date and time, and also to pair a smartphone.
Please install the «INSTAX mini LiPlay» app on your smartphone before carrying out pairing registration.
- If you are using an Android OS smartphone, please search for «INSTAX mini LiPlay» in Google Play Store and install it. *Requirements for Android OS smartphones: Android Ver. 5.0 or higher with Google Play Store installed
- If you are using an iOS smartphone, please search for «INSTAX mini LiPlay» in the App Store and install it. *Requirements for iOS smartphones: iOS Ver. 10 or higher
Depending on your smartphone model, you may not be able to use «INSTAX mini LiPlay» even if you have installed it and your smartphone meets the above requirements.
This setting can also be configured later If you want to configure the settings later or reconfigure the settings, set the [LANG], [DATE/TIME] and [Bluetooth SETTINGS] in the SET-UP MENU
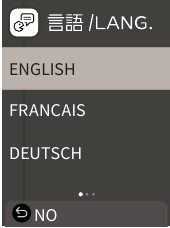
- Turn on the power
- When you turn on the power for the first time after purchase, the Language Setting (/LANG.) screen is displayed.
- Select the language you wish to use and press [MENU/OK]
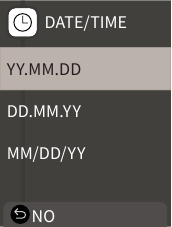
- Set the date order and press [MENU/OK] DATE/TIME
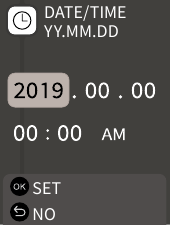
- Set the year, month, day, hour and minute then press [MENU/OK]
Move the cursor by using, then change the number using
.
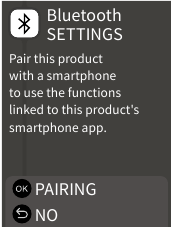
Next, configure the pairing settings. - Press [MENU/OK]
- If you do not wish to set pairing, press
(Back) to finish the initial settings.
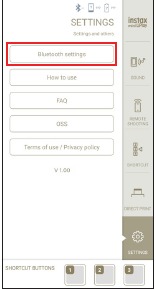
- Launch the smartphone app «INSTAX mini LiPlay» and press [SETTINGS]
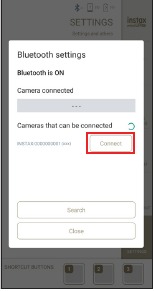
- Press [Bluetooth settings] on the smartphone app
- Press [Connect] on the smartphone app
- You can confirm camera’s OWN NAME by accessing the Set-up Menu.
Next, select the menu items in the following order: [Bluetooth SETTINGS], [INFORMATION], [OWN NAME].
- Allow pairing
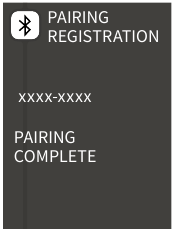
- Confirm that pairing registration is complete
When pairing registration is complete, the screen changes to the shooting screen.
Loading/Unloading the Film Pack
Loading the Film Pack
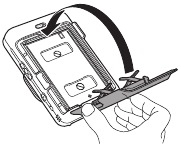
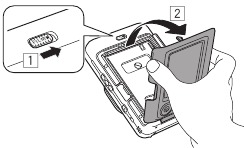
- Slide the film door lock and open the film door
- Insert film pack by aligning the yellow marks
- Close the film door
- Remove the black film cover that is automatically rejected
Unloading a Used Film Pack
- Slide the film door lock and open the film door
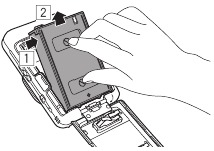
- Grasp the rectangular holes on the film pack, then pull film pack out from the camera
Basic Shooting and Playback
Shooting
The following steps describe the basic shooting procedure.
- Turn on the power
- Hold the camera
- Configure the frame and filter, etc as needed
- Decide the composition to shoot
- Press the shutter button halfway to focus on the subject
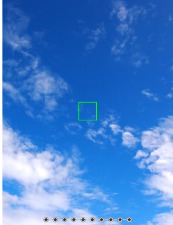
A beep will sound and the green AF frame will display on LCD monitor.
When the subject is in focus
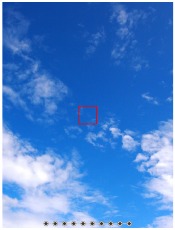
A red AF frame will display on the LCD monitor. Either change the composition or use the AF/AE lock.
When the subject is not in focus - Press the shutter button down fully to take a photo
The photo is taken and the image is saved to the internal memory or memory card.
- For the steps on how to print an image you have taken, please refer to «Printing».
- When shooting, steady your arms against your body and hold the camera firmly with both hands.
- Be careful not to touch the camera lens when pressing the shutter button.
- Gently press the shutter button fully to take a picture, ensuring that the camera does not move or shake.
- Be careful not to cover the flash or lens with your fingers or the strap.
- The flash may fire when you fully press the shutter button to take a picture in low light or backlit conditions. You can change the flash settings so that the flash does not fire.
Notes on the internal memory
- When the internal memory is full, the shutter does not release and you cannot shoot photos. Please delete some images or use a memory card.
- If the camera experiences a malfunction, images in the internal memory may be corrupted or lost.
- It is recommended that you copy important images to another media format (Hard disk, CD-R, CD-RW, DVD-R, etc.) as a backup.
- If you submit your camera for repair, we cannot guarantee the integrity of the data in the internal memory.
- When repairing the camera, we may need to check the data in the internal memory.
Playing Back Images
You can play back images on the LCD monitor.
- Turn on the power
- Press
(Playback)
The last image taken is displayed. - Press
or
to select the image you want to play back
- Press the shutter button fully to return to the Shooting screen.
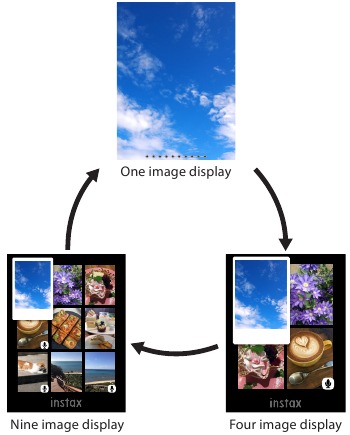
Changing the Playback Screen Display
You can zoom in on the image and change the number of images displayed on the LCD monitor.
Zooming images
- Select the image you want to zoom in on and press [MENU/OK]
The playback menu is displayed. - Press
or
to select [ZOOM]
- Press [MENU/OK]
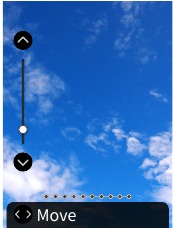
The zoom screen is displayed. - Zoom in or out of the image with
and
Change the Number of Images Displayed
While displaying the playback screen, press 
Printing
You can print the images using the following procedure.
- Turn on the power
- Press
(Playback)
The last image taken is displayed. - Press
or
to select the image you want to print
- Select desired settings such as frame and zoom
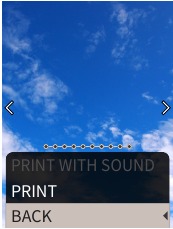
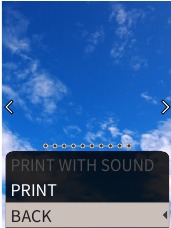
- Press
(Print)
- Press
or
to select [PRINT] or [PRINT WITH SOUND]
Note
To print with sound, it is necessary to link with the sound function of the smartphone app. - Press [MENU/OK]
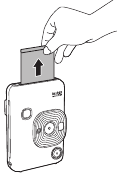
Printing starts.
- When the sound of film unloading stops, hold the top of the film and remove it
Note
Be careful not to obstruct the film ejection slot with your fingers or the strap.
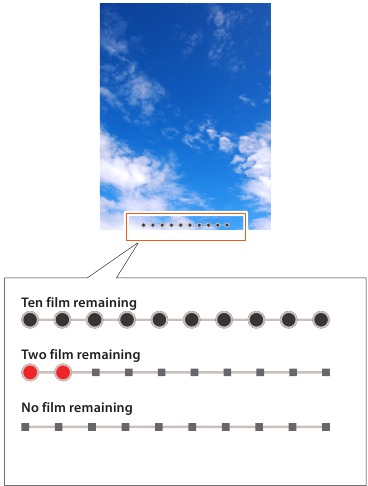
Remaining Film Indicator
The remaining number of film is indicated by the dots at the bottom of the screen. Each time a film is printed, a dot changes to a small square. The dots will display in red when the number of film remaining is 2 or less.
- For handling of the film, please refer to the FUJIFILM Instant Film «INSTAX mini» instruction manual.
- Film development takes about 90 seconds (the time varies depending on the ambient temperature).
Selecting the Frame and Filter
Selecting the Frame
Follow the procedure below to select the frame type.
- On the shooting screen or playback screen, press
The following guide is displayed. - Press or to select the frame type
- Press or [MENU/OK]
The frame is applied and the display returns to the previous screen.
- Press
(Back) to return to the previous screen without applying the frame.
- To cancel the frame you have applied, select «No Frame» under frame type.
You can also press a shortcut button to select the frame assigned to that button.
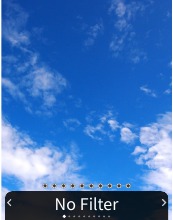
Selecting the Filter
Follow the procedure below to select the filter type.
- On the shooting screen, press
The following guide is displayed. - Press
or
to select the filter type
- Press
or [MENU/OK]
The filter is applied and the display returns to the previous screen.
- Press
(Back) to return to the previous screen without applying the filter.
- To cancel the filter you have applied, select «No Filter» under filter type.
Recording Sound in Images
This camera allows recorded sound to be recorded in images.
Recording Sound When Shooting
You can switch between two recording modes, [After shooting] and [Before & after], to suit to your preferences or purpose of use.
The recording mode can be switched in Rec Settings of the shooting menu.
Recording Sound Immediately after Shooting When After shooting Is Set
- Press
(Sound) on the shooting screen
An explanation on the recording mode is displayed. - Press [MENU/OK] or
(Sound)
The recording mode starts, and a recording icon is displayed at the top right of the screen. - Press the shutter button halfway to focus on the subject
- Press the shutter button down fully
Recording starts after shooting.
- The maximum recording time is approximately 10 seconds. After approximately 10 seconds elapse, recording ends and the screen changes automatically.
- If you press
(Sound) again during recording, recording ends at that point in time.
- Press [MENU/OK] to print with sound
Note
To print with sound, it is necessary to link with the sound function of the smartphone app.
Recording Sound before and after Shooting When Before & after Is Set
- Press
(Sound) on the shooting screen
The recording mode starts, and a recording animation is displayed at the bottom of the screen.
- Press the shutter button halfway to focus on the subject
- Press the shutter button down fully
A photo is taken and sound is recorded for the 5 seconds before and 5 seconds after you pressed the shutter button fully.
- To exit the recording mode, press
(Sound) again.
Recording Sound When Playing Back
- Press
(Sound) on the single image playback screen
An explanation on the recording mode is displayed. - Press [MENU/OK] or
(Sound)
The recording starts, and a recording icon is displayed at the center of the screen.
- The maximum recording time is approximately 10 seconds. After approximately 10 seconds elapse, recording ends automatically.
- If you press
(Sound) again during recording, recording ends at that point in time.
- Press
to check the recording
The recording is played back.
Various Types of Shooting
Shoot Using the Self-timer
Use the self-timer for group photos or to prevent the camera from shaking.
- On the shooting screen, press
The following guide is displayed. - Press
or
to select [2 SEC] or [10 SEC]
- Press [MENU/OK] or
An icon showing the self-timer length that has been set will display in the upper right of the screen.
- Press
(Back) to return to the previous screen without applying the setting.
- Fully press the shutter button
If you selected [2 SEC]:
When you press the shutter button, the self-timer lamp blinks.
If you selected [10 SEC]:
When you press the shutter button, the self-timer lamp lights up and blinks for 3 seconds before shooting.
Press 
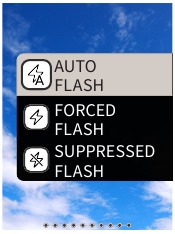
Shooting Using the Flash
Use the flash to shoot at night or in dark environments. You can change the flash setting to prevent the flash from firing.
- On the shooting screen, press
The following guide is displayed. - Press
or
to select the flash setting
- For details about the flash settings, please refer to «Types of Flash».
- Press [MENU/OK] or
- Fully press the shutter button
- If you press the shutter button whilst the flash is charging, the self-timer lamp will blink and the shutter will not release.
Types of Flash

The flash fires automatically if the surroundings are dark. This setting is suitable for most situations.

The flash fires regardless of the surrounding brightness. Use when the subject is dark due to backlighting.

The flash does not fire even when the surroundings are dark.
This setting is suitable for shooting in places where flash photography is prohibited.
It is recommended to stabilize the camera on a table, etc. when using suppressed flash in dark surroundings.
Taking a Photo of Yourself (Selfie)
You can take a photo of yourself using the selfie mirror.
- Hold the camera firmly with the lens 30cm to 50cm from your face
- Hold the camera firmly, as it is particularly prone to camera shake in dark environments.
- Check your composition in the selfie mirror and shoot
- Do not stare at the flash when shooting. Staring at the flash may temporarily effect vision.
Shooting Using the AF/AE Lock
When shooting, holding the shutter button halfway locks the focus, called «AF lock». The brightness or exposure will also be locked called «AE lock». This will be useful when you want to place the subject outside the center of the screen whilst shooting.
- Press the shutter button halfway to focus on the subject
When you press the shutter button halfway, AF and AE are locked. - Decide upon your composition while pressing the shutter button halfway
- Press the shutter button fully to shoot
It is recommended to use the AE/AF lock when shooting the following subjects, as they can be difficult to focus on.
- Shiny subjects such as a mirror or car body
- Subjects that are moving at high speed
- Subjects on the other side of a glass
- Dark subjects that absorb light without reflecting it such as hair or fur
- Non-solid subjects such as smoke or flames
- Subject with little contrast with the background (such as a person wearing clothes with the same color as the background)
- When there is a large contrast difference in the AF frame and the subject is close to it (such as a subject in front of a background with a strong contrast)
Printing from Print History
You can find images printed previously and retain the settings (such as image effects) for printing. You can print the images you have taken previously using the following procedure.
- Press [MENU/OK] on the playback screen
The playback menu is displayed. - Press
or
and select [PRINT HISTORY]
- Press [MENU/OK]
- Press
or
to select the image you want to print
- Press
(Print)
- Press
or
to select [PRINT] or [PRINT WITH SOUND]
Note
To print with sound, it is necessary to link with the sound function of the smartphone app. - Press [MENU/OK]
Printing starts.
- To print with sound, use to change the print position of the QR Code as needed.
- To cancel printing, select [BACK] or press (Back).
- When the sound of the film unloading stops, hold the top of the film and remove it
Note
Be careful not to obstruct the film ejection slot with your fingers or the strap.
Using a Memory Card
The camera can save approximately 45 images in the internal memory, but you can save more images by using a memory card.
Notes on memory card
- Micro SD and micro SDHC memory cards are compatible with this camera. Using a memory card other than the specified type may cause damage to the camera.
- Because memory cards are small, infants may accidentally swallow them. Keep out of reach of children. Please consult your doctor immediately if an infant swallows a memory card.
- Do not turn off the camera or remove the memory card while formatting the memory card or recording or erasing data
Doing so may damage the memory card - Do not use or store a memory card in an environment prone to strong static electricity or electrical noise.
- If you insert a memory card charged with static electricity into the camera, the camera may malfunction. If this happens, turn off the power and then turn it on again.
- Do not put a memory card in your trouser pocket. When you sit down, stress may be applied to the memory card causing it to break.
- When you remove a memory card after prolonged use, it may be warm, but this is normal.
- Do not attach labels, etc. onto memory cards. Labels may become unattached from the memory card whilst being inserted and removed from the camera which may cause the camera to malfunction.
Notes on using a memory card in a PC
- Be sure to use the camera to format unused memory cards and memory cards used on the PC and other devices before use.
- When you format a memory card with the camera, shoot and record images, a folder is automatically created. Do not use a computer to change or delete the memory card folder names or file names. The memory card may become unusable by the camera.
- Please do not use the PC to delete images from the memory card. Always use the camera to delete images from the memory card.
- When editing an image file, copy or move the image file to a hard disk, etc. for editing.
Inserting a Memory Card
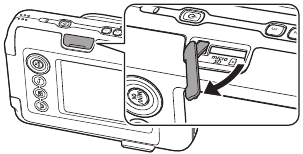
- Open the card slot cover
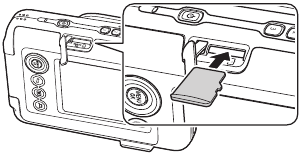
- Insert the memory card all the way until a click is heard. Ensure the correct orientation is used as shown below
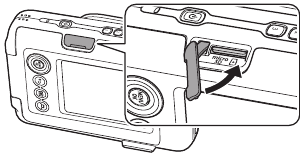
- Close the card slot cover
- When removing a memory card, push against the memory card with your finger and slowly release your finger from the card. The lock is released and the memory card can be removed.
Note
Take care when removing a memory card, it may be ejected forcefully if you release your finger suddenly. Please release the card gently.
You can change various settings related to shooting from the shooting menu.
- Press [MENU/OK] on the shooting screen
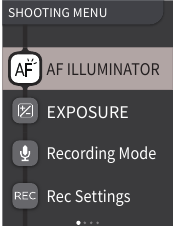
The shooting menu displays. SHOOTING MENU - Press
or
to select the item to set
- For a description of each item, please refer to «Shooting Menu Items».
- Change the settings
- Press [MENU/OK]
The settings are applied and the display returns to the shooting screen.
[AF ILLUMINATOR]
If you select ON, the AF Illuminator will be lit during the period from when you press the shutter button halfway until the subject is in focus, making it easier to focus on dark subjects.
- Depending on the scene, it may be difficult to focus even if the flash is used.
- When shooting close to the subject, the effect of the AF Illuminator may not be sufficient.
- Do not use the AF illuminator in close proximity to human eyes.
[EXPOSURE]
Adjust the brightness of the image. Exposure is used when the subject is too bright or too dark, or when the contrast between the subject and the background (difference in brightness) is large.
- The set exposure value is retained even after moving the image data to a PC, etc.
[Recording Mode]
Starts the recording mode set in [Rec Settings].
[Rec Settings]
Switches to [After shooting] or [Before & after].
For a description of the following items, please refer to «Using the Set-up Menu».
[PRINT SETTINGS] / [Bluetooth SETTINGS] / [CROSS KEY GUIDE] / [DATE/TIME] / [LANG.] / [SOUND SET-UP] / [PLAYBACK VOLUME] / [AUTO POWER OFF] / [RESET] / [FRAME DATA RESET] / [FORMAT] / [FIRMWARE UPGRADE]
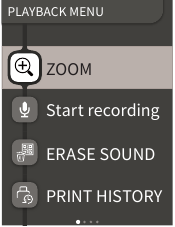
You can change various settings related to playback from the playback menu.
- Press [MENU/OK] on the playback screen
The playback menu is displayed. - Press
or
to select the item
- For a description of each item, please refer to «Playback Menu Items».
- Change the settings
- Press [MENU/OK]
The settings are applied and the display returns to the previous screen.
[ZOOM]
Please refer to «Zooming images».
[Start recording]
Records sound in images. In the case of images with sound already recorded, the sound will be overwritten.
[ERASE SOUND]
Erases only the sound from images with sound.
[PRINT HISTORY]
- Display up to the last 50 images that were printed.
- Select an image and press
(Print) to start printing.
- You can clear the print history one image at a time by pressing [MENU/OK].
[ERASE]
You can erase images one by one or erase them all at once.
[IMAGE ROTATE]
Display an image rotated by 90 degrees.
[COPY]
Copy images from the internal memory to a memory card or from a memory card to the internal memory.
Follow the procedure below.
- Select [COPY] from the playback menu
- Select the copy destination and press [MENU/OK]
- Select [FRAME] or [ALL FRAMES] and press [MENU/OK] If you selected [ALL FRAMES], copying starts. If you selected [FRAME], proceed to step 4.
- Press
or
to select the image to copy
- Press
or
to select [COPY]
- Press [MENU/OK]
For a description of the following items, please refer to «Using the Set-up Menu».
[PRINT SETTINGS] / [Bluetooth SETTINGS] / [CROSS KEY GUIDE] / [DATE/TIME] / [LANG.] / [SOUND SET-UP] / [PLAYBACK VOLUME] / [AUTO POWER OFF] / [RESET] / [FRAME DATA RESET] / [FORMAT] / [FIRMWARE UPGRADE]
Follow the procedure below to change settings with the set-up menu.
- On the shooting screen or playback screen, press [MENU/OK]
- Press
or
to select the item to set
- For a description of each item, please refer to «Set-up Menu Items».
- Change the settings
- Press [MENU/OK]
The settings are applied and the display returns to the previous screen.
[PRINT SETTINGS]
Change the print position and print color of the QR Code printed on print with sound.
Note
To print with sound, it is necessary to link with the sound function of the smartphone app.
[Default QR Code Position]:
Change the default QR code position.
[QR Code Color]:
Change the QR Code printing color.
Bluetooth SETTINGS
Please install the smartphone app on your smartphone before pairing registration.
[PAIRING REGISTRATION]:
When you connect with your smartphone via Bluetooth for the first time, you will need to pair the devices. Please refer to the following procedure for pairing.
- Select [Bluetooth SETTINGS] from the playback menu
- Select [PAIRING REGISTRATION] and press [MENU/OK]
- Press [SETTINGS] on the smartphone app
- Press [Bluetooth settings] on the smartphone app
- Press [Connect]
- Allow pairing
[DELETE PAIRING REG]:
You can delete information of a smartphone registered for pairing.
[INFORMATION]:
Displays the Bluetooth address, name, and registered terminal name of the main unit.
[CROSS KEY GUIDE]
Sets whether to show or hide the cross key guide.
[DATE/TIME]
Set the date and time.
[DATE STAMP]
Writes the date to images. Select [OFF] if you want to remove the date written to images.
[LANG]
Set the language to be displayed on the LCD monitor.
[SOUND SET-UP]
Set the volume of the operation sound, shutter volume and start up sound. Select [OFF] if you want to turn off the sound.
[PLAYBACK VOLUME]
Set the playback volume of the recorded sounds.
[AUTO POWER OFF]
Sets the time until the power is automatically turned off when the camera is not in use.
[RESET]
Resets the settings to the default settings.
The date and time set in date/time are not reset.
[FRAME DATA RESET]
Resets the default frame settings used for the shortcut buttons.
[FORMAT]
Format the camera’s internal memory or a memory card inserted in the card slot. All saved images will be deleted.
[FIRMWARE UPGRADE]
Upgrade the firmware version.
Insert the memory card containing the firmware into the card slot and follow the instructions on the screen.
Download the latest firmware from the FUJIFILM website.
Functions Available by Linking with the Smartphone App
The following functions can be used by linking with the smartphone app «INSTAX mini LiPlay».
Sound Function
You can convert the sound recorded by the camera into a QR Code and print it together with an image (Print with sound).
- The sound is played when the QR code printed with a sound image is read by a smartphone, etc.
- You can play or delete the sound on images with sound that you have previously printed using the smartphone app.
Note
If you delete an image with sound using the smartphone application, the sound will no longer be able to be played even if the QR Code is read.
Remote Shooting Function
You can set flash and self-timer options with the smartphone app and shoot remotely.
Shortcut Function
The three shortcut buttons on the side of the camera can be set in the smartphone app.
Direct Print Function
You can send an image from your smartphone to the camera and print it with the INSTAX printing function. Before sending, you can move, rotate and zoom the image with the smartphone app.
Specifications
Camera Function
| Image sensor | 1/5 type CMOS primary color filter |
| Number of recorded pixels | 2560 × 1920 pixels |
| Storage media | Internal memory, micro SD/micro SDHC memory card |
| Storage capacity | Approximately 45 images in internal memory, approximately 850 images per 1 GB in micro SD/micro SDHC memory card |
| Recording method | DCF compliant Exif Ver 2.3 |
| Focus distance | f = 28 mm (35 mm film equivalent) |
| Aperture | F2.0 |
| Auto focus | Single AF (with AF Illuminator) |
| Shooting distance | 10 cm to ∞ |
| Shutter speed | 1/4 second to 1/8000 second (automatic switching) |
| Shooting sensitivity | ISO100 to 1600 (automatic switching) |
| Exposure control | Program AE |
| Exposure | − 2.0 EV to +2.0 EV (1/3 EV step) |
| Metering method | TTL 256 split metering, multi metering |
| White balance | Auto |
| Flash | Auto flash / Forced flash/Suppressed flash Shooting range with flash: Approximately 50 cm to 1.5 m |
| Self-timer | Approximately 2 seconds / approximately 10 seconds |
| Image effects | 6 filters, 10 frames (3 available with shortcuts) |
| Sound recording | Possible to record sound when shooting or playing back single image. Possible to overwrite. |
Print Function
| Film used | FUJIFILM instant film «INSTAX mini» (sold separately) |
| Number of films | 10 films/pack |
| Film size | 86 mm × 54 mm |
| Screen size | 62 mm × 46 mm |
| Print pixel count | 800 × 600 dots |
| Print resolution | 12.5 dots / mm (318 dpi, 80 μ m dot pitch) |
| Print gradation | RGB gradation of 256 colors |
| Printable image format | JPEG images taken with this unit |
| Print output time | Approximately 12 seconds |
| Print function | Images in the internal memory and images in the memory card can be printed |
| Reprint | Reprint is possible for images stored in Print history (up to 50) |
Other
| Smartphone app linked functions | Sound playback function from printed images, smartphone image print function, remote shooting function, frame selection function |
| LCD monitor | 2.7-inch TFT color LCD monitor Pixel count: Approximately 230,000 dots |
| External interface | Micro USB Micro-B (for charging only) |
| Power supply | Lithium ion battery (internal type: not removable) |
| Charging function | Built-in battery |
| Possible number of printed images | Approximately 100 (from full charge) *The number of prints depends on the usage conditions. |
| Charging time | Approximately 2-3 hours *Charging time depends on the temperature. |
| Main unit dimensions | 82.5 mm × 122.9 mm × 36.7 mm (excluding projecting parts) |
| Main unit weight | Approximately 255 g |
| Operating environment | Temperaturee: +5 º C to +40 º C Humidity: 20% to 80% (no condensation) |
*The above specifications are subject to change for performance improvement.
Troubleshooting
Please check the following items before considering a problem to be a malfunction. If the problem persists even after taking action, please contact our service center for repair or visit the website below.
FUJIFILM website: http://www.fujifilm.com/
If the following problem occurs…
| Problem | Possible causes and solutions |
| I cannot turn on the camera. | The battery may be exhausted. Please charge the camera. |
| The battery is exhausted quickly. | If you use the camera in a very cold environment, the battery will drain quickly. Please keep the camera warm before shooting. |
| Camera shuts down during use. | The battery level may be low. Please charge the camera. |
| Charging does not start. |
|
| It takes too long to charge. | At low temperatures, charging may take some time. |
| The self-timer lamp flashes while charging. | Charge the battery in a temperature range of +5°C to +40°C. If you cannot charge the battery within this range, please contact our support center. |
| I cannot shoot when I press the shutter button. |
|
| I cannot focus the camera. | Use the AF/AE lock to shoot subjects that are difficult to focus on. |
| The flash does not fire. | Check that the suppressed flash setting has not been selected. Select a setting other than the suppressed flash setting. |
| Even though the flash fired, the image is dark. |
|
| The image is blurred. |
|
| The camera does not work properly. |
|
| The film pack does not load or does not load smoothly. |
|
| The film does not unload. |
|
| Some or all of the finished prints are white. | Do not open the film door until all film exposures have been used. Unexposed film will be prematurely exposed if the door is opened. Prematurely exposed film will be white with no images. |
| The print is uneven. |
|
Documents / Resources
References
Fujifilm [Global]
Download manual
Here you can download full pdf version of manual, it may contain additional safety instructions, warranty information, FCC rules, etc.
Download Fujifilm INSTAX mini LiPlay Instant Camera Manual

[МОМЕНТАЛЬНАЯ ПЕЧАТЬ + ЦИФРОВЫЕ ТЕХНОЛОГИИ]
Руководство пользователя (полная версия)
RU
INSTAX MINI HM1
BODM1P301-800
Содержание
Перед использованием ���������������������������������������������������������3
Примечания по утилизации фотокамеры ������������������������ 3
Информация об этой фотокамере ��������������������������������������3
Основные функции �������������������������������������������������������������������������3
Функции, доступные при использовании приложения
смартфона �����������������������������������������������������������������������������������������3
Наименования деталей ���������������������������������������������������������4
ЖК-монитор�������������������������������������������������������������������������������5
Использование кнопки выбора ������������������������������������������6
Присоединение ремешка ������������������������������������������������������6
Зарядка батареи ����������������������������������������������������������������������7
Индикация состояния зарядки ���������������������������������������������������7
Включение/выключение питания ��������������������������������������7
Проверка уровня заряда батареи ����������������������������������������������7
Начальные настройки ������������������������������������������������������������ 8
Установка/извлечение картриджа с фотобумагой
«INSTAX mini» ���������������������������������������������������������������������������� 9
Установка картриджа с фотобумагой ���������������������������������������9
Удаление использованного картриджа с фотобумагой ��� 10
Различные виды съемки �����������������������������������������������������15
Съемка с использованием автоспуска����������������������������������� 15
Съемка с использованием вспышки �������������������������������������� 15
Съемка автопортрета (селфи) �������������������������������������������������� 16
Съемка с использованием фиксации АФ/АЭ ����������������������� 16
Печать из PRINT HISTORY �����������������������������������������������������17
Использование карты памяти �������������������������������������������17
Установка карты памяти ������������������������������������������������������������ 17
Использование SHOOTING MENU ��������������������������������������18
Использование PLAYBACK MENU ��������������������������������������19
Использование меню настройки ��������������������������������������19
Функции, доступные при подключении к приложению
для смартфона ������������������������������������������������������������������������20
Функция звука ������������������������������������������������������������������������������ 20
Функция удаленной съемки ����������������������������������������������������� 20
Функция быстрого выбора ������������������������������������������������������� 20
Функция прямой печати ������������������������������������������������������������ 20
Технические характеристики ���������������������������������������������21
Поиск и устранение неисправностей ������������������������������22
Основные операции съемки и воспроизведения ��������10
Съемка �������������������������������������������������������������������������������������������� 10
Воспроизведение изображений ��������������������������������������������� 11
Изменение для отображения экрана воспроизведения
��� 11
Печать ���������������������������������������������������������������������������������������12
Индикатор оставшихся листов фотобумаги ������������������������� 13
Выбор рамки и фильтра �������������������������������������������������������13
Выбор рамки ��������������������������������������������������������������������������������� 13
Выбор фильтра ����������������������������������������������������������������������������� 13
Добавление звука к изображениям ���������������������������������14
Добавление звука при съемке ������������������������������������������������� 14
Добавление звука при воспроизведении ���������������������������� 15
2
ВАЖНАЯ ИНФОРМАЦИЯ ПО БЕЗОПАСНОСТИ ����������������23
Правила обращения с фотокамерой �������������������������������������� 23
Устройства Bluetooth®: Внимание! ������������������������������������������ 24
RU
Перед использованием
До начала использования камеры проверьте комплектацию и
прочтите руководство пользователя.
Аксессуары в комплекте
• Кабель USB для зарядки (1)
• Руководство пользователя
• Ремешок (1)
(1)
Примечания по утилизации фотокамеры
Для этой фотокамеры используется встроенная литийионная батарея�
Когда будете выбрасывать фотокамеру, следуйте местным
правилам и нормам и утилизируйте ее должным образом.
Для получения дополнительных сведений обратитесь к
прилагаемому листу «КОНТАКТНАЯ ИНФОРМАЦИЯ».
Если ваша страна или регион отсутствуют на этом листе,
обратитесь к местному дистрибьютору.
ВНИМАНИЕ!
Не вынимайте встроенную батарею самостоятельно, в
противном случае это может привести к травме.
Утилизация электрического и электронного
оборудования для домашнего использования
Утилизация отработанного электрического и
электронного оборудования
(Применимо в Европейском Союзе и других
европейских странах с системой раздельного
сбора мусора).
Этот значок на изделии или в руководстве и в гарантийных
документах и/или на упаковке изделия означает, что данное
изделие по окончании своего срока службы не должно
утилизироваться как бытовые отходы. Вместо этого оно
должно быть сдано в соответствующий приемный пункт
переработки электрического и электронного оборудования.
Правильная утилизация этого устройства поможет
предотвратить возможные негативные последствия для
окружающей среды и здоровья людей, которые могли бы быть
вызваны неправильной утилизацией данного устройства.
Переработка материалов поможет сохранить природные
ресурсы. Для получения более подробной информации об
обработке, утилизации и переработке этого устройства
обращайтесь в местные органы власти, службу сбора бытовых
отходов или в магазин, где приобретено это изделие.
В странах за пределами ЕС: Если вы планируется выбросить
данное изделие, свяжитесь с местными органами власти и
узнайте правильный способ утилизации.
Информация об этой фотокамере
Основные функции
● Самый маленький продукт instax, доступный на рынке�
● Можно идеально расположить снимок с помощью
ЖК-монитора и сохранить изображение в памяти
фотокамеры или на карте micro SD�
● Можно выбрать изображение из своей библиотеки
фотографий и распечатать его, используя функцию печати
instax�
● Можно редактировать свои фотографии, используя 10
кадров и 6 фильтров�
● Можно сохранить свои снимки с записанным звуком�
● Стильный и роскошный дизайн�
● Фотокамера оснащена зеркальцем на передней панели,
чтобы легко и просто снимать селфи�
Функции, доступные при использовании
приложения смартфона
● Функция звука
Запишите звук с помощью фотокамеры, преобразуйте его в
QR-код и напечатайте QR-код на фотографии (PRINT WITH
SOUND). Звук воспроизводится, когда QR-коды,
напечатанные с помощью функции печати instax,
считываются вашим смартфоном.
● Удаленное управление фотокамерой
Управляйте фотокамерой с помощью смартфона для
удаленной фотосъемки.
● Функция быстрого выбора
Можно выбирать фоторамки на своем смартфоне и
присваивать рамки 3 кнопкам быстрого выбора,
расположенным на боковой панели фотокамеры.
● Прямая печать
Передайте изображение со своего смартфона на фотокамеру
и распечатайте его с помощью функции печати instax. Перед
отправкой фотографии можно использовать приложение
для смартфона, чтобы переместить, повернуть, увеличить,
уменьшить или обрезать фотографию.
Данный символ на батареях или
аккумуляторах указывает на то, что данные
изделия нельзя утилизировать вместе с
бытовыми отходами.
EEE соответствует Директиве�
3
Наименования деталей
Передняя часть
1
2
3
4
Задняя часть
10
11
12
13
14
1
2
3
1
2
3
15
16
17
18
19
1 Отверстие для вывода отпечатков
2 Кнопка спуска затвора
3 Вспышка/Индикатор автоспуска
4 Крепление для ремешка
5 Порт USB
6 Кнопка
8
7
6
7 Объектив
8 Зеркальце для селфи
9 Блокиратор крышки отсека для фотобумаги
(Звук)
10 Крышка отсека для фотобумаги
(Кнопка быстрого выбора 1)
11
5
9
12 Кнопка перезапуска*
(Кнопка быстрого выбора 2)
13
(Кнопка быстрого выбора 3)
14
15 Гнездо для карты памяти Micro SD
16 Кнопка
(Питание)
17 Микрофон
FI LM
24
18 Динамик
19 Кнопка выбора (
20 Кнопка MENU/OK
21 Кнопка
22 Кнопка
23 Кнопка
(Назад)
(Воспроизведение)
(Печать)
)
23
24 ЖК-монитор
*Если фотокамера не работает должным образом, нажмите
кнопку перезапуска, чтобы перезагрузить фотокамеру.
20
22
21
4
ЖК-монитор
При включении питания на ЖК-мониторе отображается экран
съемки.
• Чтобы переключиться с экрана съемки на экран
воспроизведения, нажмите (Воспроизведение).
• Чтобы переключиться с экрана воспроизведения на экран
съемки, нажмите кнопку спуска затвора.
Когда отображается экран съемки или экран воспроизведения,
нажмите (Назад), чтобы отобразить на ЖК-мониторе
следующую информацию.
Экран съемки
1
2
3
4
5
6
Экран воспроизведения
11
12
No Frame
No Filter
7
10
9
8
RU
1 Текущая дата и время
2 Экспозиция
3 Тип рамки
4 Тип фильтра
5 Количество доступных изображений*
6 Количество изображений PRINT WITH SOUND,
ожидающих отправки
7 Индикатор оставшихся листов фотобумаги
8 Индикатор состояния соединения Bluetooth
9 Индикатор уровня заряда батареи
10 Индикатор вспышки
11 Индикатор номера кадра
12 Информация о дате/времени съемки
13 Индикатор состояния передачи для изображений PRINT
WITH SOUND
*Когда используется INTERNAL MEMORY, отображается
Значок отображается красным, если количество доступных
изображений не превышает 10.
■ Отображение CROSS KEY GUIDE
При запуске или переключении экранов (Экран съемки
Экран воспроизведения), на короткое время появляется CROSS
KEY GUIDE.
Экран съемки Экран воспроизведения
.
No Frame
No Filter
13
CROSS KEY GUIDE
5
Использование кнопки выбора
Присоединение ремешка
Кнопки (вверх, вниз, влево и вправо) используются
для выбора пунктов меню или для вызова функций,
назначенных кнопкам . Кнопка [MENU/OK]
используется для отображения меню или для подтверждения
выбора.
1
5
Присоедините ремешок, как показано на рисунке ниже.
• Когда носите фотокамеру или делаете снимки, наденьте
ремешок на запястье, чтобы не уронить фотокамеру.
2 4
3
1 Движение вверх
Движение влево
2
Движение вниз
3
Движение вправо
4
5 Отобразить меню/Сделать выбор
6
RU
Зарядка батареи
Выключите фотокамеру перед зарядкой батареи. Батарея не
будет заряжаться, если фотокамера включена.
Обязательно подключайте кабель в указанном положении.
FILM
Соедините фотокамеру и сетевой переходник с разъемом USB
из комплекта поставки своего смартфона с помощью
прилагаемого кабеля USB, а затем вставьте сетевой переходник
с разъемом USB в сетевую розетку в помещении.
• Время зарядки составляет приблизительно 2–3 часа.
Индикация состояния зарядки
Выполняется
зарядка
Зарядка окончена Индикатор автоспуска гаснет.
Ошибка зарядки Индикатор автоспуска мигает.
Зарядка от ПК:
• Соедините фотокамеру и ПК напрямую. Не соединяйте
через концентратор USB или клавиатуру.
• Если во время зарядки компьютер переходит в спящий
режим, зарядка прекращается. Чтобы продолжить
зарядку, выйдите из спящего режима, а затем снова
подключите кабель USB.
• Батарея может не заряжаться в зависимости от
технических характеристик, настроек или состояния ПК.
Примечание
• Батарея не извлекается.
• Батарея поставляется незаряженной. Пожалуйста, перед
использованием полностью зарядите батарею.
• Примечания относительно батареи см. в разделе
«Правила обращения с фотокамерой». (стр. 23)
Индикатор автоспуска горит.
Включение/выключение питания
Для включения или выключения питания нажмите и
удерживайте (Питание).
Проверка уровня заряда батареи
Уровень заряда батареи отображается на ЖК-мониторе, если
нажать (Назад) на экране съемки или экране
воспроизведения.
Индикация Уровень заряда батареи
Достаточный уровень заряда.
Уровень заряда не более половины.
Рекомендуется зарядка.
Недостаточный уровень заряда. Пожалуйста,
зарядите батарею как можно скорее.
• Когда уровень заряда батареи низкий, в нижнем правом углу
ЖК-монитора отображается значок
• Когда батарея полностью разряжена, на ЖК-мониторе
появляется значок и питание выключается.
• Если фотокамера не используется в течение
определенного периода, она автоматически выключается.
Можно установить время, по истечении которого питание
будет выключаться. (стр. 20)
• Во время работы режима съемки нажмите
(Воспроизведение), чтобы отобразить экран
воспроизведения и войти в режим воспроизведения.
• В режиме воспроизведения нажмите кнопку спуска
затвора до конца, чтобы отобразить экран съемки и
выбрать режим съемки.
.
7
Начальные настройки
При включении фотокамеры в первый раз после покупки,
автоматически отобразится экран, чтобы установить язык, дату
и время, а также чтобы выполнить сопряжение со смартфоном.
Пожалуйста, перед выполнением регистрации сопряжения
установите приложение «INSTAX mini LiPlay» на своем
смартфоне.
• Если используется смартфон с ОС Android, найдите
приложение «INSTAX mini LiPlay» в Google Play Store и
установите его.
*Требования к смартфонам с ОС Android: Android версии
5.0 или выше с установленным Google Play Store
• Если используется смартфон с iOS, найдите приложение
«INSTAX mini LiPlay» в App Store и установите его.
*Требования к смартфонам iOS: iOS версии 10 или выше
В зависимости от модели смартфона, возможно, вы не
сможете использовать «INSTAX mini LiPlay», даже если его
установили и ваш смартфон удовлетворяет вышеуказанным
требованиям.
Установите год, месяц, день, часы и минуты,
4
затем нажмите [MENU/OK]
Переместите курсор с помощью , затем измените
число с помощью .
DATE/TIME
YY.MM.DD
SET
NO
Далее выполните настройки сопряжения.
Нажмите [MENU/OK]
5
Эту настройку также можно сконфигурировать позже� Чтобы
выполнить настройки позже или изменить настройки,
установите [言語/LANG�], [DATE/TIME] и [Bluetooth SETTINGS]
в МЕНЮ НАСТРОЙКИ�
Включите питание
1
•При включении питания в первый раз после покупки,
отображается экран настройки языка (言語//LANG.).
Выберите язык, который хотите использовать, и
2
нажмите [MENU/OK]
ENGLISH
FRANCAIS
DEUTSCH
NO
Установите формат даты и нажмите [MENU/OK]
3
Bluetooth
SETTINGS
Pair this product
with a smartphone
to use the functions
linked to this product’s
smartphone app.
PAIRING
NO
•Если не хотите устанавливать сопряжение, нажмите
(Назад), чтобы завершить установку начальных
настроек.
Запустите приложение для смартфона «INSTAX
6
mini LiPlay» и нажмите [SETTINGS]
DATE/TIME
YY.MM.DD
DD.MM.YY
MM/DD/YY
NO
8
Фотоаппараты Fujifilm Instax Mini Liplay Stone White Bundle — инструкция пользователя по применению, эксплуатации и установке на русском языке. Мы надеемся, она поможет вам решить возникшие у вас вопросы при эксплуатации техники.
Вы можете скачать инструкцию к Fujifilm Instax Mini Liplay Stone White Bundle по ссылке ниже, если не хотите ждать загрузки. Если остались вопросы, задайте их в комментариях после инструкции.
«Загружаем инструкцию», означает, что нужно подождать пока файл загрузится и можно будет его читать онлайн. Некоторые инструкции очень большие и время их появления зависит от вашей скорости интернета.
Остались вопросы?
Не нашли свой ответ в руководстве или возникли другие проблемы? Задайте свой вопрос в форме ниже с подробным описанием вашей ситуации, чтобы другие люди и специалисты смогли дать на него ответ. Если вы знаете как решить проблему другого человека, пожалуйста, подскажите ему

Часто задаваемые вопросы
Как посмотреть инструкцию к Fujifilm Instax Mini Liplay Stone White Bundle?
Необходимо подождать полной загрузки инструкции в сером окне на данной странице или скачать кликнув по специальной кнопке.
Руководство на русском языке?
Все наши руководства представлены на русском языке или схематично, поэтому вы без труда сможете разобраться с вашей моделью
Как можно распечатать инструкцию?
Скачайте ее по специальной кнопке над формой чтения на ваше устройства и отправьте на печать.
Инструкцию для Fujifilm Instax Mini LiPlay Elegant Black на русском языке, в формате pdf можно скачать с нашего сайта. Наш каталог предоставляем Вам инструкцию производителя фирмы Fujifilm, которая была взята из открытых источников. Ознакомившись с руководством по эксплуатации от Fujifilm, Вы на все 100% и правильно сможете воспользоваться всеми функциями устройства.
Для сохранения инструкции «Картридж для фотоаппарата Fujifilm Instax Mini LiPlay Elegant Black» на русском языке на вашем компьютере либо телефоне, нажмите кнопку «Скачать инструкцию». Если активна кнопка «Инструкция онлайн», то Вы можете просмотреть документ (manual), в своём браузере онлайн.
Если у Вас нет возможности скачать инструкцию по эксплуатации либо просмотреть её, Вы можете поделиться ссылкой на эту страницу в социальных сетях и при удобном моменте скачать инструкцию. Либо добавьте эту страницу в закладки Вашего браузера, нажав кнопку «Добавить страницу в закладки браузера».


 (Sound) button
 (Shortcut 1) button
 (Shortcut 2) button
 (Shortcut 3) button
 )
) (Back) button
 (Playback) button
 (Print) button
 Move up
 Move left
 Move down
 Move right
 (Back) to finish the initial settings.



 (Playback)






 (Print) to start printing.


