-
Драйверы
22
-
Инструкции по эксплуатации
4
Языки:
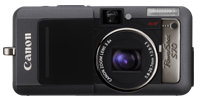
Canon PowerShot S70 инструкция по эксплуатации
(180 страниц)
- Языки:Русский
-
Тип:
PDF -
Размер:
3.58 MB -
Описание:
Фотокамера
Просмотр
Canon PowerShot S70 инструкция по эксплуатации
(178 страниц)
- Языки:Итальянский
-
Тип:
PDF -
Размер:
4.32 MB -
Описание:
Please use Acrobat Reader v5.0 or later to view these files.
Просмотр
Canon PowerShot S70 инструкция по эксплуатации
(178 страниц)
- Языки:Нидерландский
-
Тип:
PDF -
Размер:
4.41 MB -
Описание:
Please use Acrobat Reader v5.0 or later to view these files.
Просмотр
Canon PowerShot S70 инструкция по эксплуатации
(178 страниц)
- Языки:Немецкий
-
Тип:
PDF -
Размер:
4.34 MB -
Описание:
Please use Acrobat Reader v5.0 or later to view these files.
Просмотр
На NoDevice можно скачать инструкцию по эксплуатации для Canon PowerShot S70. Руководство пользователя необходимо для ознакомления с правилами установки и эксплуатации Canon PowerShot S70. Инструкции по использованию помогут правильно настроить Canon PowerShot S70, исправить ошибки и выявить неполадки.


Данная инструкция на русском языке предназначена для фотокамеры
Canon PowerShot S60, S70, описывает принцип работы и основные моменты эксплуатации устройства.
Производитель настойчиво рекомендует перед включением фотокамеры
внимательно изучить настоящую инструкцию.
Инструкция для фотокамеры
представлена в формате PDF. Все современные браузеры уже поддерживают данный формат и сложностей с открытием файла возникнуть не должно.
Но если открыть инструкцию все же не удается, то необходимо установить на компьютер программу для чтения PDF файлов, например, Acrobat Reader. Если у вас возникли сложности с открытием инструкции на смартфоне под управлением Android, нужно установить, например, Adobe Acrobat Reader.
Комментарии (0)
Комментарии про другие Фотокамеры
Другие Фотокамеры Canon

Выберите категорию материалов поддержки
-
Поиск драйверов последней версии для вашего продукта
-
ПО для удобства использования наших продуктов
-
Полезные руководства для эффективного использования продукта
-
Обзор приложений для вашего продукта
-
Поиск встроенного ПО последней версии для вашего продукта
-
Нужна помощь? Посмотрите раздел часто задаваемых вопросов
-
Посмотрите последние новости о вашем продукте
-
Технические характеристики
Ознакомьтесь с техническими характеристиками вашего продукта
Left Right
Вам также может понадобиться…

Свяжитесь с нами
Свяжитесь со службой поддержки продукции для дома по телефону или электронной почте

Canon ID
Регистрация продукта и управление аккаунтом Canon ID

Ремонт
Поиск центров по ремонту оборудования, полезная информация по процессу ремонта
или

CDI-E153-010
XXXXXXXX
The following manuals are supplied with your camera. Please refer to them
as need be.
Contents of This Guide
Reference Guides
Included accessories and separately
sold equipment information
System Map
1.
Install the battery pack and
the CF card.
2.
Quick Start
Shoot images with the camera.
3.
Play back the images.
Camera User Guide
4.
Erase any unwanted images.
Learn the names of camera
components.
Direct Print User Guide
5.
Print the images.
6.
Install the software.
Printer User
Connect the camera to a
computer.
• Camera User Guide
• Software Starter Guide
7.
Download the images to a
computer.
These PDF format manuals are
What you can do with the
available on the Canon
software
website. Please download
them from the following URL:
The various ways of using the
http://web.canon.jp/Imaging/
software
information-e.html
3
Playing back the Images
A.
Press the
(Playback) button.
➜
Quick Reference
Camera User Guide
Flash
Press the
button to switch between flash modes.
Some settings are not available with certain shooting modes.
When the red-eye reduction function
is on
Auto with red-eye reduction
Flash on with red-eye reduction
Flash off
Flash range: 55 cm – 2.0 m (1.8 – 6.6 ft.) (telephoto)/55 cm – 4.2 m
(1.8 – 14 ft.) (wide angle)
* Red-eye reduction: This feature reduces the effect of light reflecting back
from the eyes and making them appear red.
Macro Mode
Press the
button to display
on the LCD monitor.
Use this mode to shoot close-ups of flowers or small objects.
* Recordable Area at Minimum Shooting Range
<Shooting Distance>
At wide angle end: 64 x 47 mm (2.5 x 1.9 in.)
<From the front of lens: 4 cm (1.6 in.)>
At telephoto end: 106 x 80 mm (4.2 x 3.2 in.)
<From the front lens: 30 cm (1 ft.)>
5
Printing with a Direct Print Compatible Printer
A.
Connect the camera to the printer and turn on the
printer´s power.
Interface Cable
Camera
© 2004 CANON INC.
1
Preparing the Camera
A.
Charge the battery pack.
Place the battery pack in the battery charger and plug the charger into
a power outlet or attach the power cord to the battery charger and
plug the other end into a power outlet.
The charge indicator lights red while charging and changes to green
when the battery pack is charged. Charging the battery pack takes
This
approximately 90 minutes.
Guide
Guide
• Battery charger model names and types vary by region.
B.
Slide the CF card slot / battery cover
and open the cover.
Supplied with
C.
a printer
Hold back the battery lock in the
Guide
direction of the arrow with the corner
of the battery pack, then insert the
battery pack.
D.
Insert the CF card.
• ZoomBrowser EX
Software User Guide
Insert the CF card with its label facing
• ImageBrowser
towards you, and push the card in
Software User Guide
until the CF card eject button fully
extends.
E.
Close the cover.
➜
Camera User Guide
B.
Play back the images.
Use the B or A arrow on the omni selector to display
the image you wish to see.
Switching between Shooting/Playback
Shooting:
Open the lens cover. When the
lens cover is already open, press
When the red-eye
the shutter button halfway.
reduction function is off
Auto
Flash on
Flash off
Changing the Displayed Information
Press the DISPLAY button to switch the displayed information as follows.
Shooting Mode:
LCD Monitor (No Information)
LCD Monitor (Information View)
LCD Monitor — Off
B.
,
camera’s LCD monitor, indicating that the printer is ready
to print.
* The displayed icon may vary depending on the printer model.
Printers
PRINTED IN JAPAN
➜
Camera User Guide
Charge
Indicator
Battery Lock
CF Card
Eject Button
4
Erase an Image
A.
In Playback mode, use the B or A
arrow on the omni selector to
select the image you wish to erase
(
) and press the
A Button
B Button
Playback:
Press the
(Playback) button.
Playback Mode:
Standard Display
Detailed Display
No Information
➜
Direct Print User Guide
or
appears* in the upper left corner of the
2
➜
Shooting
Camera User Guide
A.
Open the lens cover and set the shooting mode dial to
The power/mode indicator lights orange.
B.
Set the date and time (first time the camera is powered on).
Use the B or A arrow on the omni selector to select the items you
wish to set, and use the C or D arrow to change the value.
Check that the date and time shown are correct, then press the SET
button.
C.
Aim the camera at the subject and adjust the zoom to
achieve the desired composition. See «Zoom» in the «Quick
Reference.»
D.
Focus and shoot.
Press the shutter button
halfway to focus
(The camera
.
focuses and two beeps sound.)
➜
Camera User Guide
B.
When the confirmation screen appears, check that
[Erase] is selected and press the SET button.
Select [Cancel] using the B or A arrow on the omni selector to
button (
).
cancel without erasing.
Shooting Modes
: AUTO
The camera automatically selects settings.
: Portrait
The background is blurred and the subject is
in clear focus.
: Landscape
For shooting landscape scenes.
: Night Scene
For photographing human subjects against the backdrop of an
evening sky or a night scene.
: Fast Shutter
For shooting fast moving objects.
: Slow Shutter
For shooting moving objects to make them appear blurred,
such as river rapids.
: Stitch Assist
Images shot in Stitch Assist mode can be merged together on a
computer to make a single panoramic image.
: Movie
For shooting movies.
Zoom
Wide Angle
Zoom out from the subject.
Telephoto
Zoom in on the subject.
* The zoom can be adjusted from 28 to
100 mm (35mm film equivalent).
In addition, there are functions that can be set in each shooting mode. For
details see «Functions Available in Each Shooting Mode» at the end of the
Camera User Guide.
C.
Choose the image you wish to print and press
the
button.
The
button will blink blue and printing of the image will
start.
.
Press the shutter button all
the way to shoot.
Please turn over
© 2004 CANON INC.
!
Ознакомьтесь с разделом
Прочитайте это в первую очередь
(стр. 4).
!
Также ознакомьтесь с
Вводным руководством по программному обеспечению
и
Руководством по прямой печати
.
Руководство пользователя камеры
РУССКИЙ
ЦИ
Ф
РО
В
АЯ
К
АМ
ЕР
А
Р
ук
ов
од
ст
во
по
ль
зо
ва
те
ля
Посмотреть инструкция для Canon Powershot S70 бесплатно. Руководство относится к категории Фотокамеры, 1 человек(а) дали ему среднюю оценку 5.1. Руководство доступно на следующих языках: английский. У вас есть вопрос о Canon Powershot S70 или вам нужна помощь? Задайте свой вопрос здесь
Не можете найти ответ на свой вопрос в руководстве? Вы можете найти ответ на свой вопрос ниже, в разделе часто задаваемых вопросов о Canon Powershot S70.
Какой вес Canon Powershot S70?
Какой размер экрана Canon Powershot S70?
Какая высота Canon Powershot S70?
Какая ширина Canon Powershot S70?
Какая толщина Canon Powershot S70?
Инструкция Canon Powershot S70 доступно в русский?
Не нашли свой вопрос? Задайте свой вопрос здесь


