 03:55
03:55
Подключаем AUX к магнитоле JVC KD-G511
 10:34
10:34
Автомагнитолы JVC. Обновленный модельный ряд. Головные устройства JVC.
 05:43
05:43
Новинки от JVC. Новый модельный ряд. Бюджетные модели JVC. Автомагнитолы.
 26:38
26:38
Реально процессорная автомагнитола JVC KD-X362BT!? Что ожидать, распаковка, обзор настроек
 02:33
02:33
Обновление прошивки автомагнитолы JVC KD-X560BT
 03:03
03:03
Автомагнитола JVC KD-R492
 23:34
23:34
Обзор автомагнитолы JVC KD-R472. Дисковый бюджетник.
 03:15
03:15
Автомагнитола JVC KD-T801BT
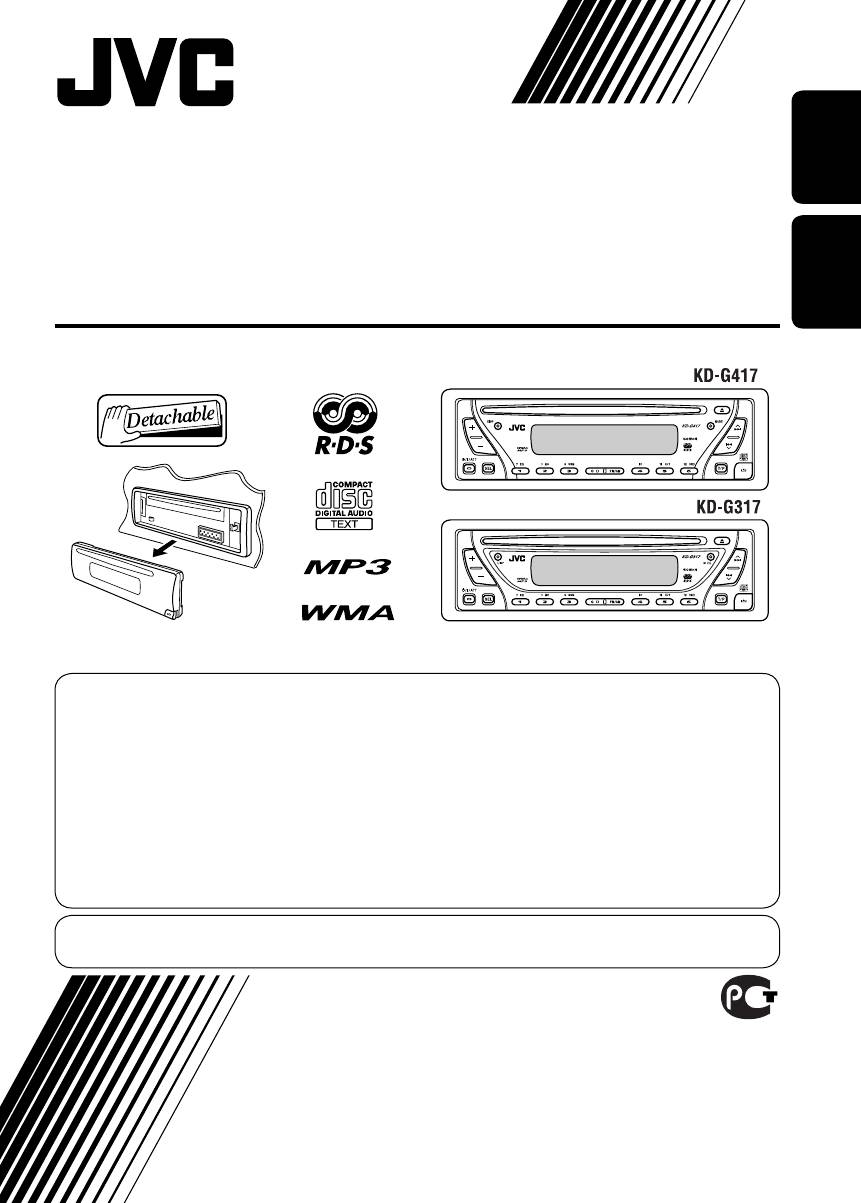
ENGLISH Р УCCKИЙ CD RECEIVER РЕСИВЕР С ПРОИГРЫВАТЕЛЕМ КОМПАК…
Instructions, Cd receiver, English р уcckий
- Изображение
- Текст
ENGLISH
Р
УCCKИЙ
CD RECEIVER
РЕСИВЕР С ПРОИГРЫВАТЕЛЕМ КОМПАКТ-ДИСКОВ
KD-G417/KD-G317
For installation and connections, refer to the separate manual.
Указания по установке и выполнению соединений приводятся в отдельной инструкции.
INSTRUCTIONS
ИНСТРУКЦИИ ПО ЭКСПЛУАТАЦИИ
GET0261-001B
[EE]
В соответствии с Законом Российской Федерации “О защите прав потре бителей” срок службы
(годности) данного товара “по истечении которого он может представлять опасность для жизни,
здоровья потребителя, причинять вред его имуществу или окружающей среде” составляет семь (7)
лет со дня производства. Этот срок является временем, в течение которого потребитель данного
товара может безопасно им пользоваться при условии соблюдения ин струк ции по эксплуатации
данного товара, проводя необходимое обслуживание, включающее замену расходных материалов
и/или соответствующее ремонтное обеспечение в специализированном сервисном центре.
Дополнительные косметические материалы к данному товару, поставляе мые вместе с ним, могут
храниться в течение двух (2) лет со дня его производства.
Срок службы (годности), кроме срока хранения дополнительных космети ческих материалов,
упомянутых в предыдущих двух пунктах, не затрагивает никаких других прав потребителя, в
частности, гарантийного свидетельства JVC, которое он может получить в соответствии с законом о
правах потребителя или других законов, связанных с ним.
For canceling the display demonstration, see page 7.
Информацию об отмене демонстрации функций дисплея см. на стр. 7.
Cover_KD-G417_G317[EE]f.indd 2
Cover_KD-G417_G317[EE]f.indd 2
3/18/05 11:29:58 AM
3/18/05 11:29:58 AM

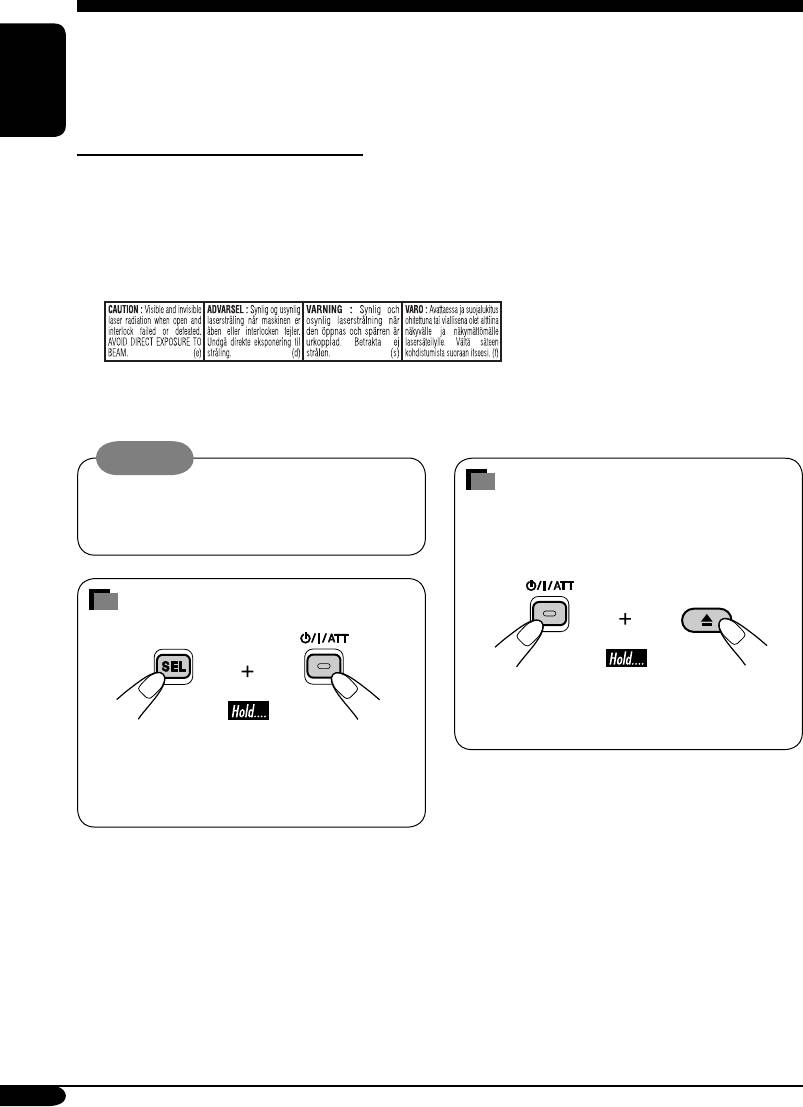
English, How to reset your unit, How to forcibly eject a disc
Страница 2
- Изображение
- Текст
2
ENGLISH
Thank you for purchasing a JVC product.
Please read all instructions carefully before operation, to ensure your complete understanding and to
obtain the best possible performance from the unit.
IMPORTANT FOR LASER PRODUCTS
1. CLASS 1 LASER PRODUCT
2. CAUTION: Do not open the top cover. There are no user serviceable parts inside the unit; leave
all servicing to qualified service personnel.
3. CAUTION: Visible and invisible laser radiation when open and interlock failed or defeated.
Avoid direct exposure to beam.
4. REPRODUCTION OF LABEL: CAUTION LABEL, PLACED OUTSIDE THE UNIT.
Warning:
If you need to operate the receiver while
driving, be sure to look ahead carefully or
you may be involved in a traffic accident.
How to reset your unit
• This will reset the microcomputer. Your
preset adjustments will also be erased.
• If a disc is loaded, it will eject. Be careful
not to drop the disc.
How to forcibly eject a disc
If a disc cannot be recognized by the
receiver or cannot be ejected, ejects the disc
as follows.
• If this does not work, reset your receiver.
• Be careful not to drop the disc when it
ejects.
EN02-05KD-G417_G317[EE]f.indd 2
EN02-05KD-G417_G317[EE]f.indd 2
3/18/05 11:30:24 AM
3/18/05 11:30:24 AM

3
ENGLISH
How to reset your unit ……………………… 2
How to forcibly eject a disc ………………. 2
How to read this manual …………………… 4
How to use the MODE button …………… 4
Control panel
—
KD-G417/KD-G317
…………… 5
Parts identification …………………………… 5
Getting started ………………….. 6
Basic operations …………………………….
6
Canceling the display demonstrations … 7
Setting the clock ……………………………… 7
Radio operations ………………. 8
Listening to the radio ……………………… 8
Storing stations in memory ……………….. 9
Listening to a preset station ………………. 10
FM RDS operations …………….. 11
Searching for your favorite FM RDS
programme ………………………………… 11
Storing your favorite programmes ……… 12
Using the standby receptions …………….. 12
Tracking the same programme
—Network-Tracking Reception …….. 13
Disc operations …………………. 14
Playing a disc ………………………………. 14
Changing the display information ……… 16
Selecting the playback modes ……………. 17
Sound adjustments ……………. 18
Selecting preset sound modes
(C-EQ: custom equalizer) ……………… 18
Adjusting the sound …………………………. 19
General settings — PSM ……… 20
Basic procedure ………………………………. 20
Detaching the control
panel ……………………………. 22
Using the remote controller
—
RM-RK60
………………………. 23
Main elements and features ………………. 23
Maintenance …………………….. 24
More about this receiver …….. 25
Troubleshooting ………………… 27
Specifications ……………………. 29
For safety….
• Do not raise the volume level too much, as
this will block outside sounds, making driving
dangerous.
• Stop the car before performing any
complicated operations.
Contents
Temperature inside the car….
If you have parked the car for a long time in
hot or cold weather, wait until the temperature
in the car becomes normal before operating the
unit.
EN02-05KD-G417_G317[EE]f.indd 3
EN02-05KD-G417_G317[EE]f.indd 3
3/18/05 11:30:25 AM
3/18/05 11:30:25 AM

English how to read this manual, How to use the mode button
Страница 4
- Изображение
- Текст
4
ENGLISH
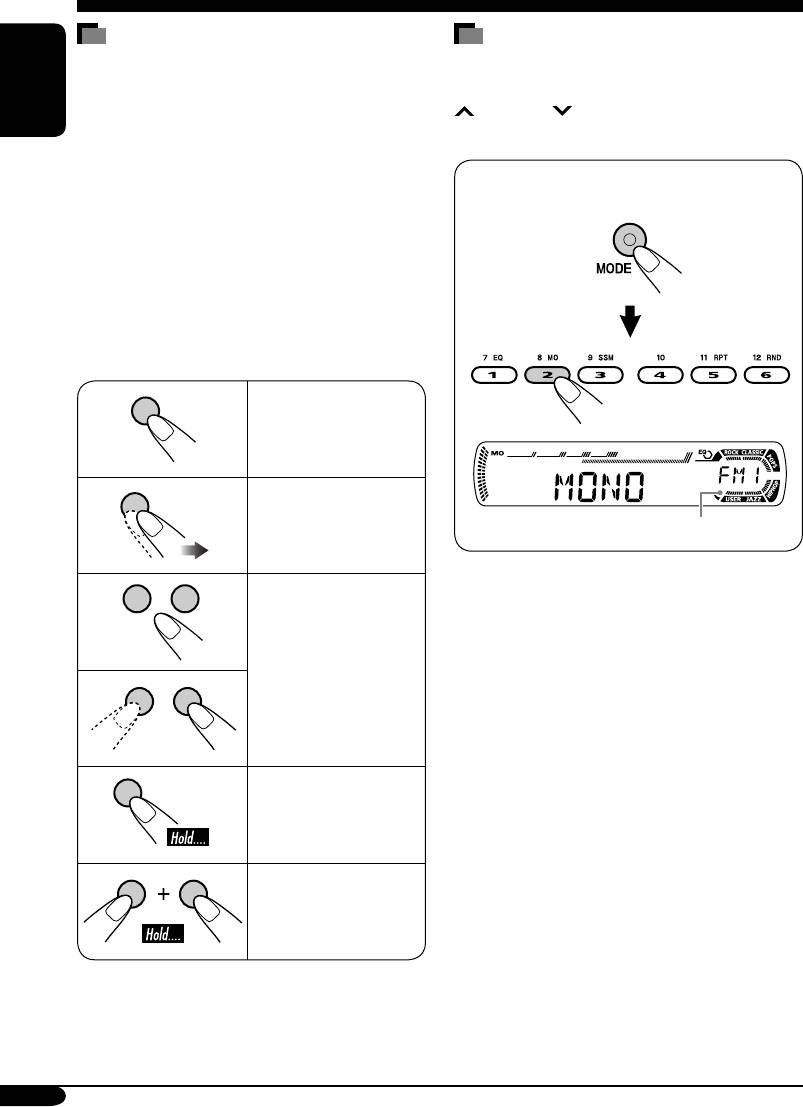
How to read this manual
The following methods are used to make the
explanations simple and easy-to-understand:
• Some related tips and notes are explained in
“More about this receiver” (see page 25).
• Only for KD-G417: This receiver can
show the Russian fonts, if a CD Text or an
MP3/WMA files containing Russian text
information is inserted.
(See “Available characters on the display” on
page 24.)
• The control panel illustrations used for
explanation in this manual is KD-G317.
• Button operations are mainly explained with
the illustrations as follows:
Press briefly.
Press repeatedly.
Press either one.
Press and hold until
your desired response
begins.
Press and hold both
buttons at the same
time.
How to use the MODE button
If you press MODE, the receiver goes into
functions mode, then the number buttons and
¢/4 buttons work as different
function buttons.
Ex.: When number button 2 works as
MO (monaural) button.
Time countdown indicator
To use these buttons for original functions
again after pressing MODE, wait for
5 seconds without pressing any of these buttons
until the functions mode is cleared.
• Pressing MODE again also clears the
functions mode.
EN02-05KD-G417_G317[EE]f.indd 4
EN02-05KD-G417_G317[EE]f.indd 4
3/18/05 11:30:25 AM
3/18/05 11:30:25 AM

5
ENGLISH
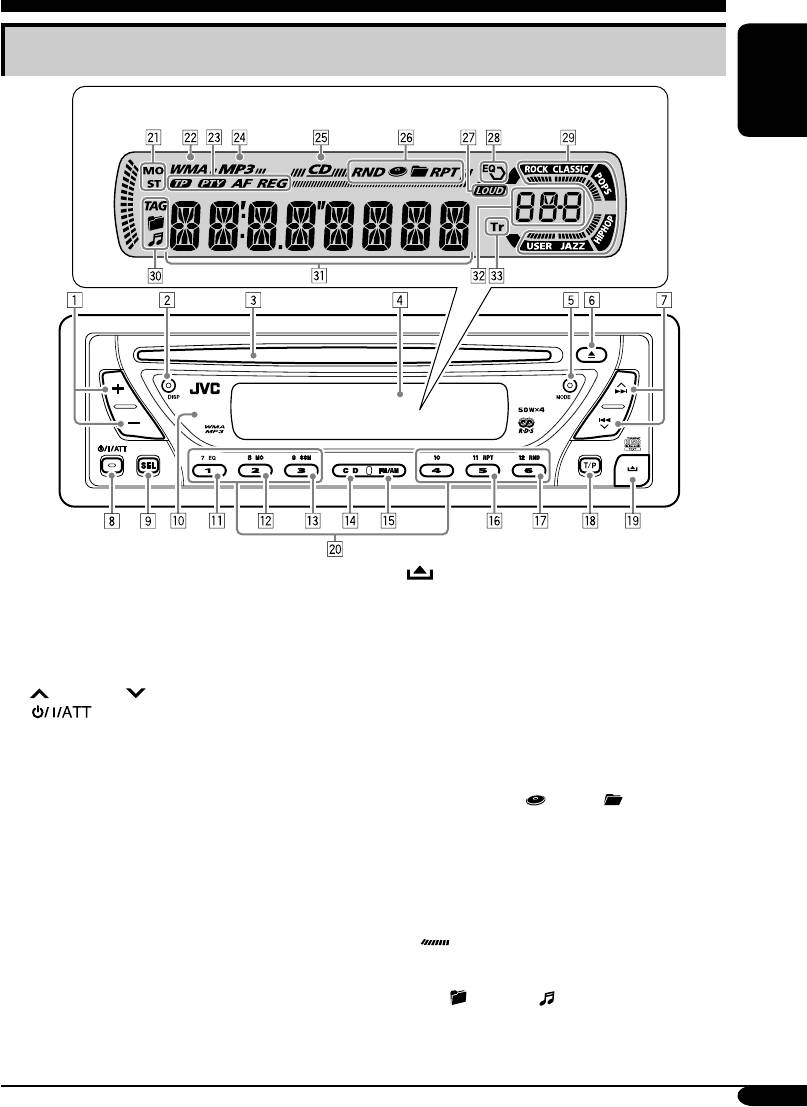
Control panel —
KD-G417/KD-G317
Parts identification
1 +/– buttons
2 DISP (display) button
3 Loading slot
4 Display window
5 MODE button
6
0 (eject) button
7
¢/4 buttons
8
(standby/on/attenuator) button
9 SEL (select) button
p Remote sensor
• You can control this receiver with an
optionally purchased remote controller.
• DO NOT expose the remote sensor to
strong light (direct sunlight or artificial
lighting).
q EQ (equalizer) button
w MO (monaural) button
e SSM (Strong-station Sequential Memory)
button
r CD button
t FM/AM button
y RPT (repeat) button
u RND (random) button
i T/P (traffic programme/programme type)
button
o
(control panel release) button
; Number buttons
Display window
a Tuner reception indicators—MO (monaural),
ST (stereo)
s WMA indicator
d RDS indicators—TP, PTY, AF, REG
f MP3 indicator
g CD indicator
h Playback mode / item indicators—
RND (random),
(disc),
(folder),
RPT (repeat)
j LOUD (loudness) indicator
k EQ (equalizer) indicator
l Sound mode (C-EQ: custom equalizer)
indicators—ROCK, CLASSIC, POPS,
HIP HOP, JAZZ, USER
•
also works as the time countdown
indicator.
/ Disc information indicators—TAG (ID3
Tag),
(folder),
(track/file)
z Main display
x Source display / Volume level indicator
c Tr (track) indicator
Display window
EN02-05KD-G417_G317[EE]f.indd 5
EN02-05KD-G417_G317[EE]f.indd 5
3/18/05 11:30:25 AM
3/18/05 11:30:25 AM

6
ENGLISH
Getting started
Basic operations
~
Ÿ
You cannot select “CD” as the playback
source if there is no disc in the loading
slot.
!
Volume level appears.
Volume level indicator
⁄
Adjust the sound as you want.
(See pages 18 and 19.)
To drop the volume in a moment (ATT)
To restore the sound, press it
again.
To turn off the power
Caution on volume setting:
Discs produce very little noise compared
with other sources. Lower the volume
before playing a disc to avoid damaging
the speakers by the sudden increase of the
output level.
EN06-11KD-G417_G317[EE]f.indd 6
EN06-11KD-G417_G317[EE]f.indd 6
3/18/05 11:30:41 AM
3/18/05 11:30:41 AM

Canceling the display demonstrations, Setting the clock
Страница 7
- Изображение
- Текст
7
ENGLISH
Canceling the display
demonstrations
If no operations are done for about 20 seconds,
display demonstration starts.
[Initial: DEMO ON]—see page 20.
1
2
3
4
Finish the procedure.
To activate the display demonstration
In step
3 above…
Setting the clock
1
2
Set the hour and minute.
1 Select “CLOCK H” (hour), then
adjust the hour.
2 Select “CLOCK M” (minute),
then adjust the minute.
3
Finish the procedure.
To check the current clock time when the
power is turned off
EN06-11KD-G417_G317[EE]f.indd 7
EN06-11KD-G417_G317[EE]f.indd 7
3/18/05 11:30:42 AM
3/18/05 11:30:42 AM

8
ENGLISH
Radio operations
Listening to the radio
~
Lights up when receiving an FM stereo
broadcast with sufficient signal strength.
Selected band appears.
Ÿ
Start searching for a station.
When a station is received, searching
stops.
To stop searching, press the same
button again.
Note:
FM1 and FM2: 87.5 MHz – 108.0 MHz
FM3: 65.00 MHz – 74.00 MHz
To tune in to a station manually
In step
Ÿ
on the left…
1
2 Select the desired station frequencies.
EN06-11KD-G417_G317[EE]f.indd 8
EN06-11KD-G417_G317[EE]f.indd 8
3/18/05 11:30:42 AM
3/18/05 11:30:42 AM

9
ENGLISH
Storing stations in memory
You can preset six stations for each band.
FM station automatic presetting —
SSM (Strong-station Sequential
Memory)
1
Select the FM band (FM1 – FM3)
you want to store into.
2
3
“SSM” flashes, then disappears when
automatic presetting is over.
Local FM stations with the strongest signals are
searched and stored automatically in the FM
band.
When an FM stereo broadcast is hard to
receive
1
2
Lights up when monaural mode is activated.
Reception improves, but stereo effect will
be lost.
To restore the stereo effect, repeat the same
procedure so that the MO indicator goes off.
EN06-11KD-G417_G317[EE]f.indd 9
EN06-11KD-G417_G317[EE]f.indd 9
3/18/05 11:30:42 AM
3/18/05 11:30:42 AM

Listening to a preset station, English manual presetting
Страница 10
- Изображение
- Текст
10
ENGLISH
Manual presetting
Ex.: Storing FM station of 92.5 MHz into the
preset number 4 of the FM1 band.
1
2
3
Preset number flashes for a while.
Listening to a preset station
1
2
Select the preset station (1 – 6) you
want.
To check the current clock time while
listening to an FM (non-RDS) or AM station
• For FM RDS stations, see page 13.
EN06-11KD-G417_G317[EE]f.indd 10
EN06-11KD-G417_G317[EE]f.indd 10
3/18/05 11:30:43 AM
3/18/05 11:30:43 AM

Комментарии
Страницы и текст этой инструкции
 Инструкция автомагнитолы JVC KD-G417
 Информация отображена на картинке
 Информация отображена на картинке
 Информация отображена на картинке
 Информация отображена на картинке
Как использовать наш сайт инструкций OnlineManuals.ru
Наша цель состоит в том, чтобы предоставить вам быстрый доступ к содержанию инструкции для автомагнитолы JVC KD-G417.
С помощью онлайн просмотра, Вы можете быстро просмотреть содержимое инструкции и найти решение проблемы с автомагнитолы JVC KD-G417.
Для Вашего удобства
Если листать руководство пользователя автомагнитолы JVC KD-G417 прямо на сайте, не очень удобно для Вас, есть два возможных решения:
• Просмотр в полноэкранном режиме — легко просмотреть руководство пользователя (без загрузки его на свой компьютер), Вы можете использовать режим полноэкранного просмотра.
Для просмотра инструкции пользователя автомагнитолы JVC KD-G417 на полном экране, используйте кнопку «Открыть в Pdf-viewer».
• Загрузка на компьютер — Вы можете также скачать Инструкция автомагнитолы JVC KD-G417 на свой компьютер и сохранить его в файлах.
Многие люди предпочитают читать документы не на экране, а в печатной версии.
Возможность печати руководства пользователя также была предусмотрена на нашем сайте,
и вы можете использовать ее, нажав на иконку «печать» в Pdf-viewer.
Нет необходимости печатать все руководство автомагнитолы JVC KD-G417, можно выбрать только нужные страницы инструкции.
ENGLISH
Р
УCCKИЙ
CD RECEIVER
РЕСИВЕР С ПРОИГРЫВАТЕЛЕМ КОМПАКТ-ДИСКОВ
KD-G417/KD-G317
For installation and connections, refer to the separate manual.
Указания по установке и выполнению соединений приводятся в отдельной инструкции.
INSTRUCTIONS
ИНСТРУКЦИИ ПО ЭКСПЛУАТАЦИИ
GET0261-001B
[EE]
В соответствии с Законом Российской Федерации “О защите прав потре бителей” срок службы
(годности) данного товара “по истечении которого он может представлять опасность для жизни,
здоровья потребителя, причинять вред его имуществу или окружающей среде” составляет семь (7)
лет со дня производства. Этот срок является временем, в течение которого потребитель данного
товара может безопасно им пользоваться при условии соблюдения ин струк ции по эксплуатации
данного товара, проводя необходимое обслуживание, включающее замену расходных материалов
и/или соответствующее ремонтное обеспечение в специализированном сервисном центре.
Дополнительные косметические материалы к данному товару, поставляе мые вместе с ним, могут
храниться в течение двух (2) лет со дня его производства.
Срок службы (годности), кроме срока хранения дополнительных космети ческих материалов,
упомянутых в предыдущих двух пунктах, не затрагивает никаких других прав потребителя, в
частности, гарантийного свидетельства JVC, которое он может получить в соответствии с законом о
правах потребителя или других законов, связанных с ним.
For canceling the display demonstration, see page 7.
Информацию об отмене демонстрации функций дисплея см. на стр. 7.
Cover_KD-G417_G317[EE]f.indd 2
Cover_KD-G417_G317[EE]f.indd 2
3/18/05 11:29:58 AM
3/18/05 11:29:58 AM
KD-G417/KD-G317
Installation/Connection Manual
GET0261-002B
[EE]
ENGLISH
This receiver is designed to operate on 12 V DC, NEGATIVE ground electrical systems. If
your vehicle does not have this system, a voltage inverter is required, which can be purchased
at JVC IN-CAR ENTERTAINMENT dealers.
Parts list for installation and connection
The following parts are provided for this receiver.
After checking them, please set them correctly.
A / B
Hard case/Control panel
F
G
Washer (ø5)
Lock nut (M5)
INSTALLATION (IN-DASH MOUNTING)
The following illustration shows a typical installation. If you have any questions or require
information regarding installation kits, consult your JVC IN-CAR ENTERTAINMENT dealer or a
company supplying kits.
• If you are not sure how to install this receiver correctly, have it installed by a qualified technician.
Removing the receiver /
Before removing the receiver, release the rear section.
Insert the two handles, then
pull them as illustrated so
that the receiver can be
removed.
TROUBLESHOOTING
• The fuse blows.
* Are the red and black leads connected correctly?
• Power cannot be turned on.
* Is the yellow lead connected?
• No sound from the speakers.
* Is the speaker output lead short-circuited?
• Sound is distorted.
* Is the speaker output lead grounded?
* Are the «–» terminals of L and R speakers grounded in common?
• Noise interfere with sounds.
* Is the rear ground terminal connected to the car’s chassis using shorter and thicker cords?
• Receiver becomes hot.
* Is the speaker output lead grounded?
* Are the «–» terminals of L and R speakers grounded in common?
• This receiver does not work at all.
* Have you reset your receiver?
C
Sleeve
H
Mounting bolt (M5 x 20 mm)
*
1
When you stand the receiver, be
careful not to damage the fuse on
the rear.
*
1
When using the optional stay /
Fire wall
Dashboard
Install the receiver at an
angle of less than 30˚.
D
Trim plate
I
Rubber cushion
•
Do the required electrical connections.
When installing the receiver without using the sleeve /
In a Toyota for example, first remove the car radio and install the receiver in
Stay (option)
its place.
Flat type screws
(M5 x 8 mm)*
*
Bracket*
Screw (option)
Note
: When installing the receiver on the mounting bracket,
make sure to use the 8 mm-long screws. If longer screws
are used, they could damage the receiver.
•
*
•
*
•
*
•
*
*
•
*
•
*
*
•
*
1
0405DTSMDTJEIN
EN, RU
E
Power cord
J
Handles
Bend the appropriate tabs to hold
the sleeve firmly in place.
* Not included for this receiver.
*
*
Flat type screws
(M5 x 8 mm)*
Bracket*
*
*
ENGLISH
CD RECEIVER
РЕСИВЕР С ПРОИГРЫВАТЕЛЕМ КОМПАКТ-ДИСКОВ
РУCCKИЙ
KD-G417/KD-G317
For installation and connections, refer to the separate manual.
Указания по установке и выполнению соединений приводятся в отдельной инструкции.
В соответствии с Законом Российской Федерации “О защите прав потре бителей” срок службы
(годности) данного товара “по истечении которого он может представлять опасность для жизни,
здоровья потребителя, причинять вред его имуществу или окружающей среде” составляет семь (7)
лет со дня производства. Этот срок является временем, в течение которого потребитель данного
товара может безопасно им пользоваться при условии соблюдения ин струк ции по эксплуатации
данного товара, проводя необходимое обслуживание, включающее замену расходных материалов
и/или соответствующее ремонтное обеспечение в специализированном сервисном центре.
Дополнительные косметические материалы к данному товару, поставляе мые вместе с ним, могут
храниться в течение двух (2) лет со дня его производства.
Срок службы (годности), кроме срока хранения дополнительных космети ческих материалов,
упомянутых в предыдущих двух пунктах, не затрагивает никаких других прав потребителя, в
частности, гарантийного свидетельства JVC, которое он может получить в соответствии с законом о
правах потребителя или других законов, связанных с ним.
For canceling the display demonstration, see page 7.
Информацию об отмене демонстрации функций дисплея см. на стр. 7.
INSTRUCTIONS
ИНСТРУКЦИИ ПО ЭКСПЛУАТАЦИИ
GET0261-001B
[EE]
Cover_KD—G417_G317[EE]f.indd 2Cover_KD-G417_G317[EE]f.indd 2 3/18/05 11:29:58 AM3/18/05 11:29:58 AM
Thank you for purchasing a JVC product.
Please read all instructions carefully before operation, to ensure your complete understanding and to
obtain the best possible performance from the unit.
ENGLISH
IMPORTANT FOR LASER PRODUCTS
1. CLASS 1 LASER PRODUCT
2. CAUTION: Do not open the top cover. There are no user serviceable parts inside the unit; leave
all servicing to qualified service personnel.
3. CAUTION: Visible and invisible laser radiation when open and interlock failed or defeated.
Avoid direct exposure to beam.
4. REPRODUCTION OF LABEL: CAUTION LABEL, PLACED OUTSIDE THE UNIT.
Warning:
How to forcibly eject a disc
If you need to operate the receiver while
driving, be sure to look ahead carefully or
If a disc cannot be recognized by the
you may be involved in a traffic accident.
receiver or cannot be ejected, ejects the disc
as follows.
How to reset your unit
• If this does not work, reset your receiver.
• Be careful not to drop the disc when it
ejects.
• This will reset the microcomputer. Your
preset adjustments will also be erased.
• If a disc is loaded, it will eject. Be careful
not to drop the disc.
2
EN02—05KD—G417_G317[EE]f.indd 2EN02-05KD-G417_G317[EE]f.indd 2 3/18/05 11:30:24 AM3/18/05 11:30:24 AM

Contents
How to reset your unit ……………………… 2
Sound adjustments ……………. 18
How to forcibly eject a disc ………………. 2
Selecting preset sound modes
How to read this manual …………………… 4
(C-EQ: custom equalizer) ……………… 18
How to use the MODE button …………… 4
Adjusting the sound …………………………. 19
ENGLISH
Control panel
General settings — PSM ……… 20
— KD-G417/KD-G317 …………… 5
Basic procedure ………………………………. 20
Parts identification …………………………… 5
Detaching the control
Getting started ………………….. 6
panel ……………………………. 22
Basic operations ……………………………. 6
Canceling the display demonstrations … 7
Using the remote controller
Setting the clock ……………………………… 7
— RM-RK60 ………………………. 23
Main elements and features ………………. 23
Radio operations ………………. 8
Listening to the radio ……………………… 8
Maintenance …………………….. 24
Storing stations in memory ……………….. 9
Listening to a preset station ………………. 10
More about this receiver …….. 25
FM RDS operations …………….. 11
Troubleshooting ………………… 27
Searching for your favorite FM RDS
Specifications ……………………. 29
programme
………………………………… 11
Storing your favorite programmes ……… 12
Using the standby receptions …………….. 12
Tracking the same programme
—Network-Tracking Reception …….. 13
Disc operations …………………. 14
Playing a disc ………………………………. 14
Changing the display information ……… 16
Selecting the playback modes ……………. 17
For safety….
Temperature inside the car….
• Do not raise the volume level too much, as
If you have parked the car for a long time in
this will block outside sounds, making driving
hot or cold weather, wait until the temperature
dangerous.
in the car becomes normal before operating the
• Stop the car before performing any
unit.
complicated operations.
3
EN02—05KD—G417_G317[EE]f.indd 3EN02-05KD-G417_G317[EE]f.indd 3 3/18/05 11:30:25 AM3/18/05 11:30:25 AM
How to read this manual
How to use the MODE button
The following methods are used to make the
If you press MODE, the receiver goes into
explanations simple and easy-to-understand:
functions mode, then the number buttons and
• Some related tips and notes are explained in
¢/4 buttons work as different
ENGLISH
“More about this receiver” (see page 25).
function buttons.
• Only for KD-G417: This receiver can
show the Russian fonts, if a CD Text or an
Ex.: When number button 2 works as
MP3/WMA files containing Russian text
MO (monaural) button.
information is inserted.
(See “Available characters on the display” on
page 24.)
• The control panel illustrations used for
explanation in this manual is KD-G317.
• Button operations are mainly explained with
the illustrations as follows:
Press briefly.
Press repeatedly.
Time countdown indicator
To use these buttons for original functions
again after pressing MODE, wait for
5 seconds without pressing any of these buttons
until the functions mode is cleared.
• Pressing MODE again also clears the
Press either one.
functions mode.
Press and hold until
your desired response
begins.
Press and hold both
buttons at the same
time.
4
EN02—05KD—G417_G317[EE]f.indd 4EN02-05KD-G417_G317[EE]f.indd 4 3/18/05 11:30:25 AM3/18/05 11:30:25 AM
Control panel — KD-G417/KD-G317
Parts identification
Display window
ENGLISH
1 +/– buttons
o
(control panel release) button
2 DISP (display) button
; Number buttons
3 Loading slot
4 Display window
Display window
5 MODE button
a Tuner reception indicators—MO (monaural),
6 0 (eject) button
ST (stereo)
7
¢/4 buttons
s WMA indicator
8
(standby/on/attenuator) button
d RDS indicators—TP, PTY, AF, REG
9 SEL (select) button
f MP3 indicator
p Remote sensor
g CD indicator
• You can control this receiver with an
h Playback mode / item indicators—
optionally purchased remote controller.
RND (random),
(disc), (folder),
• DO NOT expose the remote sensor to
RPT (repeat)
strong light (direct sunlight or artificial
j LOUD (loudness) indicator
lighting).
k EQ (equalizer) indicator
q EQ (equalizer) button
l Sound mode (C-EQ: custom equalizer)
w MO (monaural) button
indicators—ROCK, CLASSIC, POPS,
e SSM (Strong-station Sequential Memory)
HIP HOP, JAZZ, USER
button
•
also works as the time countdown
r CD button
indicator.
t FM/AM button
/ Disc information indicators—TAG (ID3
y RPT (repeat) button
Tag),
(folder), (track/file)
u RND (random) button
z Main display
i T/P (traffic programme/programme type)
x Source display / Volume level indicator
button
c Tr (track) indicator
5
EN02—05KD—G417_G317[EE]f.indd 5EN02-05KD-G417_G317[EE]f.indd 5 3/18/05 11:30:25 AM3/18/05 11:30:25 AM