ENGLISHDEUTSCH
CD RECEIVER
CD-RECEIVER
РЕСИВЕР С ПРОИГРЫВАТЕЛЕМ КОМПАКТ-ДИСКОВ
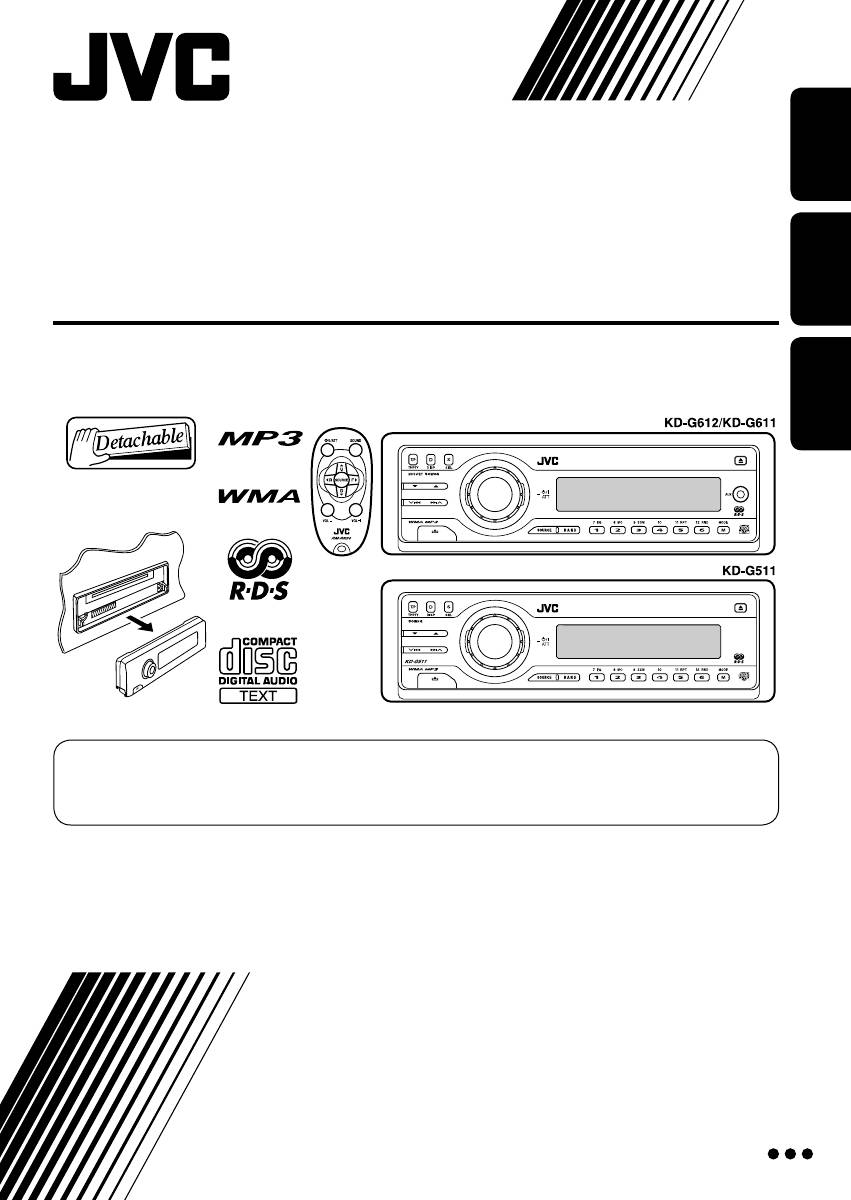
KD-G612/KD-G611/KD-G511
РУCCKИЙ
For canceling the display demonstration, see page 8.
Zum Abbrechen der Displaydemonstration siehe Seite 8.
Информацию об отмене демонстрации функций дисплея см. на стр. 8.
For installation and connections, refer to the separate manual.
Für den Einbau und die Anschlüsse siehe das eigenständige Handbuch.
Указания по установке и выполнению соединений приводятся в отдельной инструкции.
INSTRUCTIONS
BEDIENUNGSANLEITUNG
ИНСТРУКЦИИ ПО ЭКСПЛУАТАЦИИ
GET0266-006A
[EY]
Cover_KD—G612[EY]006A_f.indd 2Cover_KD-G612[EY]006A_f.indd 2 11/12/04 8:59:17 PM11/12/04 8:59:17 PM
Thank you for purchasing a JVC product.
Please read all instructions carefully before operation, to ensure your complete understanding and to
obtain the best possible performance from the unit.
ENGLISH
IMPORTANT FOR LASER PRODUCTS
1. CLASS 1 LASER PRODUCT
2. CAUTION: Do not open the top cover. There are no user serviceable parts inside the unit; leave
all servicing to qualified service personnel.
3. CAUTION: Visible and invisible laser radiation when open and interlock failed or defeated.
Avoid direct exposure to beam.
4. REPRODUCTION OF LABEL: CAUTION LABEL, PLACED OUTSIDE THE UNIT.
Warning:
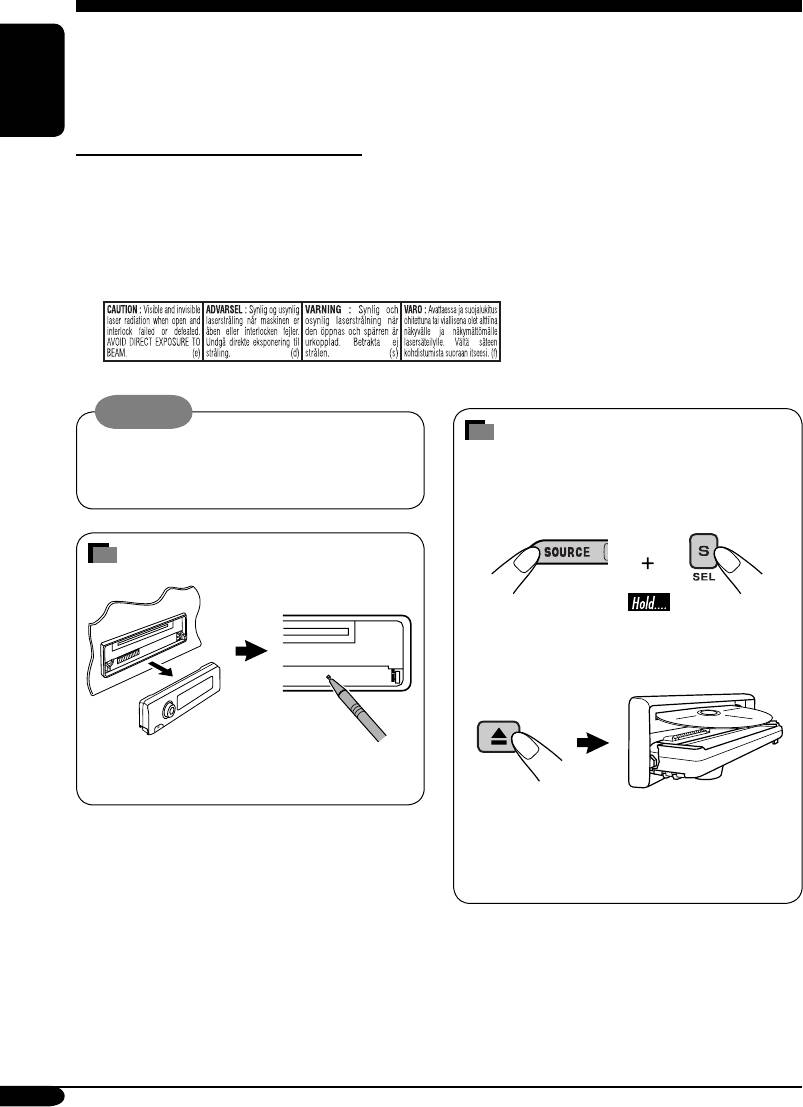
How to forcibly eject a disc
If you need to operate the receiver while
driving, be sure to look ahead carefully or
If a disc cannot be recognized by the
you may be involved in a traffic accident.
receiver or cannot be ejected, ejects the disc
as follows.
How to reset your unit
“PLEASE” and “EJECT” appear alternately
on the display.
This will reset the microcomputer. Your
preset adjustments will also be erased.
• If this does not work, try to reset your
receiver.
• Be careful not to drop the disc when it
ejects.
For security reasons, a numbered ID card is provided with this receiver, and the same ID number is
imprinted on the receiver’s chassis. Keep the card in a safe place, as it will help the authorities to
identify your receiver if stolen.
2
EN02—05_G612[EX_EU]f.indd 2EN02-05_G612[EX_EU]f.indd 2 11/26/04 9:19:35 AM11/26/04 9:19:35 AM

Contents
How to reset your unit ……………………… 2
Sound adjustments ……………. 20
How to forcibly eject a disc ………………. 2
Selecting preset sound modes
How to read this manual …………………… 4
(C-EQ: custom equalizer) ……………… 20
How to use the M MODE button ……….. 4
Adjusting the sound …………………………. 21
ENGLISH
Control panel
General settings — PSM ……… 22
—
KD-G612/KD-G611/KD-G511
…. 5
Basic procedure ………………………………. 22
Parts identification …………………………… 5
Other main functions …………. 25
Remote controller —
RM-RK50
… 6
Assigning titles to the sources …………… 25
Main elements and features ………………. 6
Detaching the control panel ………………. 26
Getting started ………………….. 7
External component operations
… 27
Basic operations ……………………………. 7
Playing an external component ………… 27
Canceling the display demonstrations … 8
DAB tuner operations
……………. 28
Setting the clock ……………………………… 8
Listening to the DAB tuner ………………. 28
Radio operations ………………. 9
Storing DAB services in memory ………. 29
Listening to the radio ……………………… 9
Tuning in to a preset DAB service …….. 29
Storing stations in memory ……………….. 10
Tracing the same programme
Listening to a preset station ………………. 10
—Alternative Reception ……………….. 29
FM RDS operations …………….. 11
Maintenance …………………….. 30
Searching for your favorite FM RDS
More about this receiver …….. 31
programme
………………………………… 11
Storing your favorite programmes ……… 12
Troubleshooting ………………… 34
Using the standby receptions …………….. 12
Specifications ……………………. 37
Tracking the same programme
—Network-Tracking Reception …….. 13
Disc operations …………………. 14
Playing a disc in the receiver …………… 14
Playing discs in the CD changer ……….. 15
Other main functions ……………………….. 17
Changing the display information ……… 18
Selecting the playback modes ……………. 19
The receiver is equipped with the steering
wheel remote control function.
• See the Installation/Connection Manual
(separate volume) for connection.
*For safety….
*Temperature inside the car….
• Do not raise the volume level too much, as
If you have parked the car for a long time in
this will block outside sounds, making driving
hot or cold weather, wait until the temperature
dangerous.
in the car becomes normal before operating the
• Stop the car before performing any
unit.
complicated operations.
3
EN02—05_G612[EX_EU]2.indd 3EN02-05_G612[EX_EU]2.indd 3 11/1/04 6:24:37 PM11/1/04 6:24:37 PM
How to read this manual
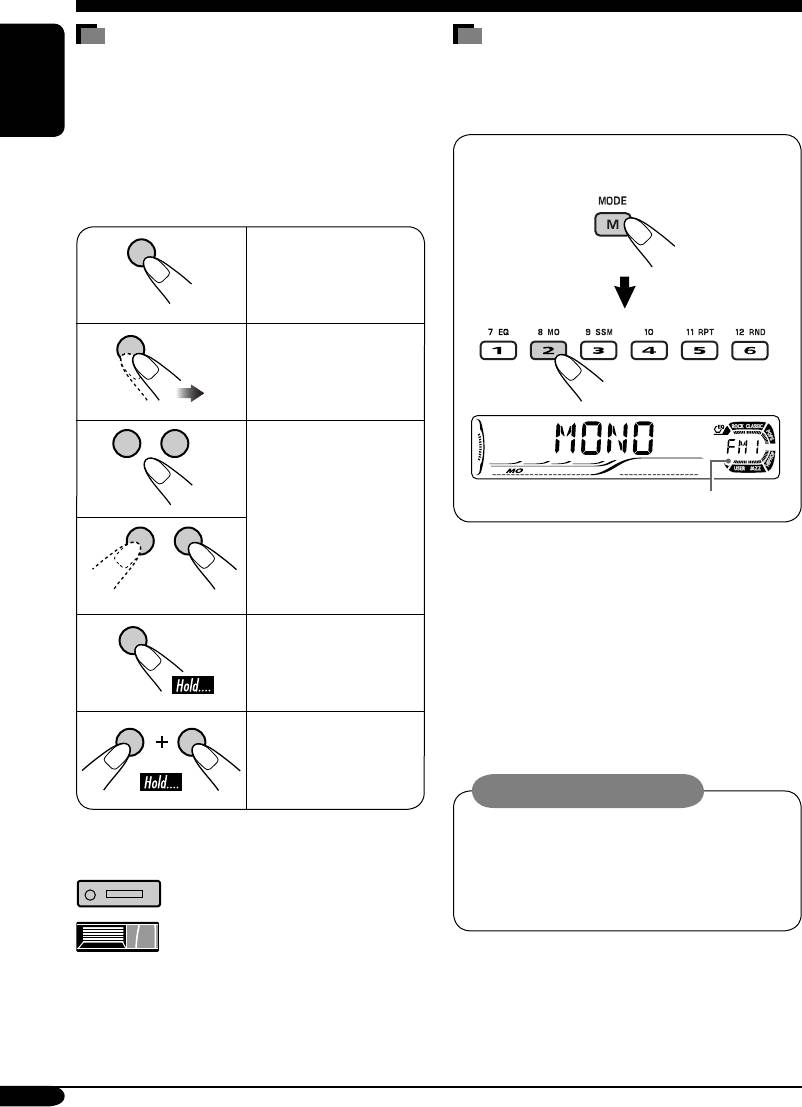
How to use the M MODE button
The following methods are used to made the
If you press M MODE, the receiver goes into
explanations simple and easy-to-understand:
functions mode, then the number buttons and
• Some related tips and notes are explained in
5/∞ buttons work as different function buttons.
ENGLISH
“More about this receiver” (see pages
31 – 33).
Ex.: When number button 2 works as
• Button operations are mainly explained with
MO (monaural) button.
the illustrations as follows:
Press briefly.
Press repeatedly.
Time countdown indicator
Press either one.
To use these buttons for original functions
again after pressing M MODE, wait for
5 seconds without pressing any of these buttons
until the functions mode is cleared.
• Pressing M MODE again also clears the
Press and hold until
functions mode.
your desired response
begins.
Press and hold both
buttons at the same
time.
Caution on volume setting:
Discs produce very little noise compared
with other sources. Lower the volume
The following marks are used to indicate…
before playing a disc to avoid damaging
the speakers by the sudden increase of the
: Built-in CD player operations.
output level.
: External CD changer operations.
4
EN02—05_G612[EX_EU]1.indd 4EN02-05_G612[EX_EU]1.indd 4 10/26/04 8:56:16 PM10/26/04 8:56:16 PM

Control panel — KD-G612/KD-G611/KD-G511
Parts identification
Display window
ENGLISH
1 5 (up) / ∞ (down) buttons
Display window
2 T/P TP/PTY (traffic programme/programme
a Disc information indicators—TAG (ID3
type) button
Tag),
(folder), (track/file)
3 D DISP (display) button
s Main display
4 S SEL (select) button
d Source display / Volume level indicator
5 • Control dial
f EQ (equalizer) indicator
•
(standby/on attenuator) button
g Sound mode (C-EQ: custom equalizer)
6 Display window
indicators—ROCK, CLASSIC, POPS,
7 Remote sensor
HIP HOP, JAZZ, USER
• DO NOT expose the remote sensor to
•
also works as the time countdown
strong light (direct sunlight or artificial
indicator and level meter during play (see
lighting).
page 23).
8 0 (eject) button
h Disc type indicators—WMA, MP3
9
4/¢ buttons
j Tuner reception indicators—ST (stereo),
p
(control panel release) button
MO (monaural)
q SOURCE button
k RDS indicators—TP, PTY, AF, REG
w BAND button
l Playback source indicators—
e Number buttons
CH: Lights up only when CD-CH is selected
r EQ (equalizer) button
as the playback source.
t MO (monaural) button
DISC: Lights up for the built-in CD player.
y SSM (Strong-station Sequential Memory)
/ Playback mode / item indicators—
button
RND (random),
(disc), (folder),
u RPT (repeat) button
RPT (repeat)
i RND (random) button
z LOUD (loudness) indicator
o M MODE button
x Tr (track) indicator
;
AUX (auxiliary) input jack
• Only for KD-G612/KD-G611.
• NOT compatible with digital signals.
5
EN02—05_G612[EX_EU]f.indd 5EN02-05_G612[EX_EU]f.indd 5 11/24/04 10:00:39 PM11/24/04 10:00:39 PM

Remote controller — RM-RK50
•
RM-RK50 is supplied for KD-G612/KD-G611.
• KD-G511 can be remotely controlled as
Main elements and features
instructed here (with an optionally purchased
remote controller—recommended to use
ENGLISH
RM-RK50).
Installing the lithium coin battery
(CR2025)
1 (standby/on/attenuator) button
• When operating, aim the remote controller
• Turns on and off the power and also
directly at the remote sensor on the
attenuates the sound.
receiver. Make sure there is no obstacle in
2 5 U (up) / D (down) ∞ buttons
between.
• 5 U: Changes the FM/AM/DAB bands.
• D ∞: Changes the preset stations (or
Warning:
services).
• Store the battery in a place where children
• Changes the folder of the MP3/WMA
cannot reach to avoid risk of accident.
discs.
• To prevent the battery from over-heating,
• While playing an MP3 disc on an
cracking, or starting a fire:
MP3-compatible CD changer:
– Do not recharge, short, disassemble, or
– Changes the disc if pressed briefly.
heat the battery or dispose of it in a fire.
– Changes the folder if pressed and held.
– Do not leave the battery with other
3 VOL – / VOL + buttons
metallic materials.
• Adjusts the volume level.
– Do not poke the battery with tweezers or
4 SOUND button
similar tools.
• Selects the sound mode (C-EQ: custom
– Wrap the battery with tape and insulate
equalizer).
when throwing away or saving it.
5 SOURCE button
• Selects the source.
6 2 R (reverse) / F (forward) 3 buttons
Caution:
• Searches for stations (or services) if
pressed briefly.
• Searches for ensembles if pressed and
held.
• Fast-forwards or reverses the track if
pressed and held.
• Changes the tracks of the disc.
6
EN06—11_G612[EX_EU]2.indd 6EN06-11_G612[EX_EU]2.indd 6 11/1/04 5:54:13 PM11/1/04 5:54:13 PM
Страницы и текст этой инструкции
 Инструкция автомагнитолы JVC KD-G611
 Информация отображена на картинке
 Информация отображена на картинке
 Информация отображена на картинке
 Информация отображена на картинке
Как использовать наш сайт инструкций OnlineManuals.ru
Наша цель состоит в том, чтобы предоставить вам быстрый доступ к содержанию инструкции для автомагнитолы JVC KD-G611.
С помощью онлайн просмотра, Вы можете быстро просмотреть содержимое инструкции и найти решение проблемы с автомагнитолы JVC KD-G611.
Для Вашего удобства
Если листать руководство пользователя автомагнитолы JVC KD-G611 прямо на сайте, не очень удобно для Вас, есть два возможных решения:
• Просмотр в полноэкранном режиме — легко просмотреть руководство пользователя (без загрузки его на свой компьютер), Вы можете использовать режим полноэкранного просмотра.
Для просмотра инструкции пользователя автомагнитолы JVC KD-G611 на полном экране, используйте кнопку «Открыть в Pdf-viewer».
• Загрузка на компьютер — Вы можете также скачать Инструкция автомагнитолы JVC KD-G611 на свой компьютер и сохранить его в файлах.
Многие люди предпочитают читать документы не на экране, а в печатной версии.
Возможность печати руководства пользователя также была предусмотрена на нашем сайте,
и вы можете использовать ее, нажав на иконку «печать» в Pdf-viewer.
Нет необходимости печатать все руководство автомагнитолы JVC KD-G611, можно выбрать только нужные страницы инструкции.
Магнитолы JVC KD-G611 — инструкция пользователя по применению, эксплуатации и установке на русском языке. Мы надеемся, она поможет вам решить возникшие у вас вопросы при эксплуатации техники.
Вы можете скачать инструкцию к JVC KD-G611 по ссылке ниже, если не хотите ждать загрузки. Если остались вопросы, задайте их в комментариях после инструкции.
«Загружаем инструкцию», означает, что нужно подождать пока файл загрузится и можно будет его читать онлайн. Некоторые инструкции очень большие и время их появления зависит от вашей скорости интернета.
Полезные видео
Остались вопросы?
Не нашли свой ответ в руководстве или возникли другие проблемы? Задайте свой вопрос в форме ниже с подробным описанием вашей ситуации, чтобы другие люди и специалисты смогли дать на него ответ. Если вы знаете как решить проблему другого человека, пожалуйста, подскажите ему


Часто задаваемые вопросы

Как посмотреть инструкцию к JVC KD-G611?
Необходимо подождать полной загрузки инструкции в сером окне на данной странице или скачать кликнув по специальной кнопке.
Руководство на русском языке?
Все наши руководства представлены на русском языке или схематично, поэтому вы без труда сможете разобраться с вашей моделью
Как можно распечатать инструкцию?
Скачайте ее по специальной кнопке над формой чтения на ваше устройства и отправьте на печать.
- Manuals
- Brands
- JVC Manuals
- Car Receiver
- KD-G611
Manuals and User Guides for JVC KD-G611. We have 6 JVC KD-G611 manuals available for free PDF download: Instructions For Use Manual, Instruction Manual, Instructions Manual, Service Manual, Schematic Diagrams, Installation & Connection Manual
РУCCKИЙ DEUTSCH ENGLISH CD RECEIVER CD-RECEIVER РЕСИВЕР С ПРОИГРЫВАТЕЛЕМ КОМПАКТ-ДИСКОВ KD-G612/KD-G611/KD-G511 For canceling the display demonstration, see page 8. Zum Abbrechen der Displaydemonstration siehe Seite 8. Информацию об отмене демонстрации функций дисплея см. на стр. 8. For
ENGLISH Thank you for purchasing a JVC product. Please read all instructions carefully before operation, to ensure your complete understanding and to obtain the best possible performance from the unit. IMPORTANT FOR LASER PRODUCTS 1. CLASS 1 LASER PRODUCT 2. CAUTION: Do not open the top cover.
2 2 4 4 Sound adjustments ……………. 20 Selecting preset sound modes (C-EQ: custom equalizer) ……………… 20 Control panel — KD-G612/KD-G611/KD-G511…. 5 General settings — PSM ……… 22 How to reset your unit ……………………… How to forcibly eject a disc
ENGLISH How to read this manual The following methods are used to made the explanations simple and easy-to-understand: • Some related tips and notes are explained in “More about this receiver” (see pages 31 – 33). • Button operations are mainly explained with the illustrations as follows: How to
KD-G612/KD-G611/KD-G511 ENGLISH Control panel — Parts identification Display window 1 5 (up) / ∞ (down) buttons 2 T/P TP/PTY (traffic programme/programme type) button 3 D DISP (display) button 4 S SEL (select) button 5 • Control dial (standby/on attenuator) button • 6 Display window 7 Remote sensor
ENGLISH Remote controller — RM-RK50 • RM-RK50 is supplied for KD-G612/KD-G611. • KD-G511 can be remotely controlled as instructed here (with an optionally purchased remote controller—recommended to use RM-RK50). Main elements and features Installing the lithium coin battery (CR2025) 1 • When
Basic operations * The control panel illustrations used for explanation in this manual is KD-G612/ KD-G611. ~ ENGLISH Getting started ⁄ Ÿ Volume level appears. Volume level indicator You cannot select some sources if they are not ready. * Only for KD-G612/KD-G611. ! @ Adjust the sound as you want.
ENGLISH Canceling the display demonstrations Setting the clock 1 If no operations are done for about 20 seconds, display demonstration starts. [Initial: DEMO ON]—see page 22. 1 2 2 Set the hour, minute, and clock system. 1 Select “CLOCK H” (hour), then adjust the hour. 2 Select “CLOCK M” (minute),
ENGLISH Radio operations Listening to the radio To tune in to a station manually ~ In step ! on the left… 1 Ÿ Selected band appears. Lights up when receiving an FM stereo broadcast with sufficient signal strength. 2 Select the desired station frequencies. When an FM stereo broadcast is hard to
ENGLISH Storing stations in memory 2 You can preset six stations for each band. FM station automatic presetting— SSM (Strong-station Sequential Memory) 3 1 4 2 Select the FM band (FM1 – FM3) Preset number flashes for a while. you want to store into. Listening to a preset station 1 3 2 4 “SSM”
ENGLISH FM RDS operations Searching for your favorite FM RDS programme You can tune in to a station broadcasting your favorite programme by searching for a PTY code. ~ The last selected PTY code appears. Ÿ Select one of your favorite programme type. ! Start searching for your favorite programme. If
ENGLISH What you can do with RDS RDS (Radio Data System) allows FM stations to send an additional signal along with their regular programme signals. By receiving the RDS data, this receiver can do the following: • Programme Type (PTY) Search (see page 11) • Standby Reception of Traffic
PTY Standby Reception allows the receiver to switch temporarily to your favorite PTY programme from any source other than AM. To activate and select your favorite PTY code for PTY Standby Reception, see page 23. The PTY indicator either lights up or flashes. • If the PTY indicator lights up, PTY
ENGLISH Disc operations Playing a disc in the receiver All tracks will be played repeatedly until you change the source or eject the disc. About MP3 and WMA discs MP3 and WMA (Windows Media® Audio) “tracks” (words “file” and “track” are used interchangeably) are recorded in “folders.” • When
ENGLISH Playing discs in the CD changer About the CD changer ~ It is recommended to use the JVC MP3compatible CD changer with your receiver. • You can also connect other CH-X series CD changers (except CH-X99 and CH-X100). However, they are not compatible with MP3 discs, so you cannot play back MP3
ENGLISH • When the current disc is an MP3 disc: To fast-forward or reverse the track Fast-forwards. Folder name* Reverses. To go to the next or previous tracks Selected folder number Disc information appears automatically (see page 18). Elapsed playing Current track time number To the following
2 To select a number from 01 – 06: ENGLISH To locate a particular track (for CD) or folder (for MP3 or WMA discs) directly First time you press +10 or –10 button, the track skips to the nearest higher or lower track with a track number of multiple ten (ex. 10th, 20th, 30th). Then each time you
ENGLISH Changing the display information While playing an audio CD or a CD Text ( / ) *1 For KD-G612/KD-G611: If no title is assigned to an audio CD, “NO NAME” appears. To assign a title to an audio CD, see page 25. For KD-G511: “NO NAME” appears. While playing an MP3 ( / ) or WMA ( ) disc • When
ENGLISH Selecting the playback modes You can use only one of the following playback modes at a time. 1 2 Select your desired playback mode. Mode Repeat play Plays repeatedly TRK RPT: The current track. • RPT lights up. FLDR RPT*1: All tracks of the current folder. • and RPT light up. DISC RPT*2:
ENGLISH Sound adjustments Selecting preset sound modes (C-EQ: custom equalizer) You can select a preset sound mode suitable to the music genre. ~ Ÿ Ex.: When “ROCK” is selected Indication For: Preset values BAS*1 TRE*2 LOUD*3 USER (Flat sound) 00 00 OFF ROCK Rock or disco music +03 +01 ON CLASSIC
You can adjust the sound characteristics to your preference. 1 Ex.: When “TRE” is selected 2 Indication To do: Range BAS*1 (bass) Adjust the bass. –06 (min.) to +06 (max.) TRE*1 (treble) Adjust the treble. –06 (min.) to +06 (max.) FAD*2 (fader) Adjust the front and rear speaker balance. R06 (Rear
ENGLISH General settings — PSM 3 Adjust the PSM item selected. Basic procedure You can change PSM (Preferred Setting Mode) items listed in the table that follows. 1 4 Repeat steps 2 and 3 to adjust the other PSM items if necessary. 2 Select a PSM item. 5 Finish the procedure. Ex.: When you select
Selectable settings, [reference page] AF-REG Alternative frequency/ regionalization reception When the received signals from the current station become weak… AF: [Initial]; Switches to another station (the programme may differ from the one currently received), [13]. • The AF indicator lights up.
ENGLISH Indications Selectable settings, [reference page] TEL Telephone muting MUTING 1/MUTING 2: Select either one which mutes the sounds while using the cellular phone. OFF: [Initial]; Cancels. SCROLL*1 Scroll ONCE: [Initial]; Scrolls the disc information once. AUTO: Repeats scrolling (5-seconds
Other main functions 3 Assign a title. ENGLISH Assigning titles to the sources 1 Select a character. This section is only for KD-G612/KD-G611. You can assign titles to CDs (both in this receiver and in the CD changer). Maximum number of characters Sources CDs/CD-CH Up to 32 characters (up to 30
ENGLISH Detaching the control panel Attaching the control panel When detaching or attaching the control panel, be careful not to damage the connectors on the back of the control panel and on the panel holder. Detaching the control panel Before detaching the control panel, be sure to turn off the
ENGLISH External component operations Playing an external component Portable MD player, etc. For KD-G511: For KD-G612/KD-G611: You can connect an external component to the CD changer jack on the rear using the Line Input Adapter KS-U57 (not supplied), and another to the AUX (auxiliary) input jack
ENGLISH DAB tuner operations Listening to the DAB tuner ~ 2 Select the desired ensemble frequencies. Ÿ ! What is DAB system? Start searching for an ensemble. When an ensemble is received, searching stops. To stop searching, press the same button again. ⁄ Select a service (either primary or
You can preset six DAB services (primary) for each band. 1 Perform steps ~ to ⁄ on page 28, to select a service you want. 2 Select the preset number (1 – 6) you want to store into. Preset number flashes for a while. Tracing the same programme— Alternative Reception You can keep listening to the
ENGLISH Maintenance How to clean the connectors Frequent detachment will deteriorate the connectors. To minimize this possibility, periodically wipe the connectors with a cotton swab or cloth moistened with alcohol, being careful not to damage the connectors. To keep discs clean A dirty disc may
Basic operations FM RDS operations Turning on the power • Network-Tracking Reception requires two types of RDS signals—PI (Programme Identification) and AF (Alternative Frequency) to work correctly. Without receiving these data correctly, NetworkTracking Reception will not operate. • If a Traffic
ENGLISH Playing a CD-R or CD-RW Playing an MP3/WMA disc • Use only “finalized” CD-Rs or CD-RWs. • This receiver can play back only the files of the same type which is first detected if a disc includes both audio CD (CD-DA) files and MP3/WMA files. • This receiver can play back multi-session discs;
Changing the source • If you change the source, playback also stops (without ejecting the disc). Next time you select “CD” for the playback source, disc play starts from where it has been stopped previously. Ejecting a disc • If the ejected disc is not removed within 15 seconds, the disc is
ENGLISH Troubleshooting What appears to be trouble is not always serious. Check the following points before calling a service center. Symptoms FM/AM Disc playback Remedies The volume level is set to the minimum level. Adjust it to the optimum level. Connections are incorrect. Check the cords and
MP3/WMA playback • Disc cannot be played back. Causes ENGLISH Symptoms Remedies No MP3/WMA tracks are recorded on the disc. Change the disc. MP3/WMA tracks do not have the extension code <.mp3> or <.wma> in their file names. Add the extension code <.mp3> or <.wma> to their file names. MP3/WMA
ENGLISH CD changer Symptoms Causes Remedies • “NO DISC” appears on the display. No disc is in the magazine. Insert disc into the magazine. Disc is inserted upside down. Insert disc correctly. • “NO MAG” appears on the display. No magazine is loaded in the Insert the magazine. CD changer. • “RESET
AUDIO AMPLIFIER SECTION Maximum Power Output: Front: 50 W per channel Rear: 50 W per channel Continuous Power Output (RMS): Front: 19 W per channel into 4 Ω, 40 Hz to 20 000 Hz at no more than 0.8% total harmonic distortion. Rear: 19 W per channel into 4 Ω, 40 Hz to 20 000 Hz at no more than 0.8%
DEUTSCH Wir danken Ihnen für den Kauf eines JVC Produkts. Bitte lesen Sie die Anleitung vollständig durch, bevor Sie das Gerät in Betrieb nehmen, um sicherzustellen, daß Sie alles vollständig verstehen und die bestmögliche Leistung des Geräts erhalten. WICHTIG FÜR LASER-PRODUKTE 1. LASER-PRODUKT
Inhalt 2 2 4 4 Bedienfeld — KD-G612/KD-G611/KD-G511…. 5 Beschreibung der Teile …………………….. Fernbedienung — RM-RK50 5 ….. 6 Hauptelemente und Merkmale…………… 6 Erste Schritte …………………….. 7 Grundlegende Bedienung …………………. 7 Abbrechen der
DEUTSCH Wie Sie diese Anleitung lesen Die folgenden Methoden werden eingesetzt, um die Erklärungen einfach und leichtverständlich zu gestalten: • Einige zugehörige Tipps und Hinweise werden unter „Weitere Informationen zu Ihrem Receiver“ gegeben (siehe Seiten 31 – 33). • Tastenfunktionen werden im
Bedienfeld — KD-G612/KD-G611/KD-G511 Beschreibung der Teile DEUTSCH Displayfenster 1 5 (höher) / ∞ (niedriger)-Tasten 2 T/P TP/PTY (Verkehrsprogramm/ Programmtyp)-Taste 3 D DISP (Display)-Taste 4 S SEL (Wählen)-Taste 5 • Steuerregler (Standby/Ein-Dämpfung)-Taste • 6 Displayfenster 7
Fernbedienung — RM-RK50 DEUTSCH • RM-RK50 ist für KD-G612/KD-G611 mitgeliefert. • KD-G511 kann wie hier beschrieben ferngesteuert werden (mit einer getrennt erhältlichen Fernbedienung—empfohlen wird Verwendung von RM-RK50). Hauptelemente und Merkmale Einsetzen der Lithiumknopfbatterie (CR2025) 1 •
Erste Schritte * Die BedienfeldAbbildungen, die in dieser Anleitung für Erklärungen verwendet werden, zeigen KD-G612/ KD-G611. ~ DEUTSCH Grundlegende Bedienung ⁄ Ÿ Hier erscheint der Lautstärkepegel. Lautstärkepegelanzeige Sie können bestimmte Quellen nicht wählen, wenn diese nicht bereit sind. *
DEUTSCH Abbrechen der DisplayDemonstrationen Wenn ca. 20 Sekunden lang keine Bedienung erfolgt, startet die Display-Demonstration. [Anfänglich: DEMO ON]—siehe Seite 22. 1 2 Einstellung der Uhr 1 2 Stellen Sie Stunde, Minute und Zeitformat ein. 1 Wählen Sie „CLOCK H“ (Stunde), und stellen Sie dann
Bedienung des Tuners DEUTSCH Rundfunkempfang So stellen Sie manuell Sender ein ~ Im Schritt ! links… 1 Ÿ Der gewählte Wellenbereich erscheint. Leuchtet auf, wenn eine UKWStereosendung mit ausreichender Signalstärke empfangen wird. 2 Wählen Sie die gewünschten Empfangsfrequenzen. Wenn Sie
Speichern von Sendern DEUTSCH Sie können für jedes Frequenzband bis zu sechs Sender voreinstellen. 2 3 Automatische Voreinstellung von UKW-Sendern—SSM (Sequentieller Speicher für starke Sender) 1 4 2 Wählen Sie den UKWDie Festsendernummer blinkt eine Zeit lang. Frequenzbereich (FM1 – FM3), auf dem
UKW-RDS-Funktionen DEUTSCH Suche nach bevorzugten UKW-RDS-Sendungen Um eine bestimmte Sendung einzustellen, können Sie nach deren PTY-Code suchen. ~ ! Beginnen Sie die Suche nach Ihrer bevorzugten Sendung. Der zuletzt gewählte PTY-Code erscheint. Ÿ Wählen Sie einen ihres gewünschten Programmtyps.
DEUTSCH Funktionen von RDS Das RDS-Verfahren (Radio Data System) ermöglicht UKW-Sendern, außer dem Programmsignal weitere Informationen zu versenden. Beim Empfang von RDS-Daten sind auf dem Receiver folgende Funktionen verfügbar: • Programmtypsuche (PTY-Suchlauf) (siehe Seite 11) • Standby-Empfang
PTY-Standby erlaubt es dem Receiver, von der aktuellen Signalquelle außer AM kurzzeitig auf Ihr bevorzugtes PTY-Programm umzuschalten. Zum Aktivieren und Wählen Ihres bevorzugten PTY-Codes für PTYStandbyempfang siehe Seite 23. Die PTY-Anzeige leuchtet auf oder blinkt. • Wenn die PTY-Anzeige
Bedienung der Disk DEUTSCH Abspielen einer Disk im Receiver Alle Titel werden wiederholt abgespielt, bis Sie die Quelle umschalten oder die Disk ausschieben. Über MP3/WMA-Disks MP3- und WMA (Windows Media® Audio)„Titel“ (die Wörter „Datei“ und „Titel“ werden in dieser Anleitung mit gleicher
DEUTSCH Abspielen von Disks im CD-Wechsler Über den CD-Wechsler ~ Es wird empfohlen, einen MP3-kompatiblen CD-Wechsler von JVC mit Ihrem Receiver zu verwenden. • Sie können auch andere CD-Wechsler der CH-X-Serie anschließen (ausgenommen CH-X99 und CH-X100). Allerdings sind diese nicht kompatibel
DEUTSCH • Wenn die aktuelle Disk eine MP3-Disk ist: So spulen Sie Titel vor oder zurück Vorspulen. Ordnername* Rückspulen. Gewählte Ordnernummer So springen Sie zum nächsten oder zum vorherigen Titel Die Disk-Information erscheint automatisch (siehe Seite 18). Verstrichene Spielzeit Aktuelle
2 Beim ersten Drücken der Taste +10 oder –10 springt der Titel zum nächsthöheren oder -niedrigeren Titel mit einer Titelnumer eines Mehrfachens von Zehn (Bsp. 10., 20., 30.). Bei jedem weiteren Drücken der Taste können Sie anschließend 10 Titel überspringen. • Nach dem letzten Titel wird der erste
DEUTSCH Ändern der Displayinformation Beim Einsetzen einer Audio-CD oder CD-Text ( / ) *1 Bei KD-G612/KD-G611: Wenn einer Audio-CD keine Betitelung zugewiesen ist, erscheint „NO NAME“. Zum Zuweisen einer Betitelung zu einer CD siehe Seite 25. Bei KD-G511: „NO NAME“ erscheint. Beim Abspielen einer
Auswählen von Wiedergabemodi Sie können jeweils einen der folgenden Wiedergabe-Modi verwenden. DEUTSCH 1 2 Wählen Sie Ihren gewünschten Wiedergabemodus. Modus Wiederholungswiedergabe Wiederholt die Wiedergabe TRK RPT: Aktueller Titel. • RPT leuchtet auf. FLDR RPT*1: Alle Titel des aktuellen
Klangeinstellungen DEUTSCH Wählen der vorgegebenen Klangmodi (C-EQ: Spezieller Equalizer) Sie können eine Vorwahl-Klangmodus wählen, der dem Musikgenre entspricht. ~ Ÿ Anzeige Für: BAS*1 TRE*2 LOUD*3 USER (Unbeeinflusster Klang) 00 00 OFF ROCK Rock- oder Discomusik +03 +01 ON +01 –02 OFF Leichte
Sie können die Klangeigenschaften nach Wunsch einstellen. 1 Beisp.: Wenn „TRE“ gewählt ist Anzeige BAS*1 Funktion: Bereich (Tiefen) Stellen Sie die Tiefen ein. –06 (min.) bis +06 (max.) TRE*1 (Höhen) Stellen Sie die Höhen ein. –06 (min.) bis +06 (max.) FAD*2 (Fader) Stellen Sie die Balance zwischen
Allgemeine Einstellungen — PSM 3 Stellen Sie den gewählten PSM- Grundlegendes Verfahren Gegenstand ein. DEUTSCH Sie können die PSM (Präferenzeinstellungsmodus)-Gegenstände in der nachstehenden Tabelle anpassen. 1 4 Wiederholen Sie die Schritte 2 und 3 zur Einstellung der anderen PSMGegenstände,
Wählbare Einstellungen, [Bezugsseite] AF-REG AlternativFrequenzen/ Regionalisierung -Empfang Wenn die vom aktuellen Sender empfangenen Signale schwach werden… AF: [Anfänglich]; Schaltet zu einem anderen Sender um (dabei handelt es sich möglicherweise nicht um die aktuell empfangene Sendung),
DEUTSCH Anzeigen Wählbare Einstellungen, [Bezugsseite] TEL Telefon stummschalten MUTING 1/MUTING 2: Eine Einstellung wählen, bei der der Ton bei Verwendung des Mobiltelefons stummgeschaltet ist. OFF: [Anfänglich]; Hebt auf. SCROLL*1 Blättern ONCE: AUTO: [Anfänglich]; Blättert einmal durch die
Weitere Hauptfunktionen Zuweisung von Betitelungen zu den Quellen 3 Eine Betitelung zuweisen. 1 Wählen Sie ein Zeichen. DEUTSCH Dieser Abschnitt gilt nur für KD-G612/KDG611. Sie können CDs Betitelungen zuweisen (in diesem Receiver und im CD-Wechsler). Quelle CDs/CD-CH Maximale Zeichenzahl Bis zu 32
DEUTSCH Abnehmen des Bedienfelds Anbringen des Bedienfelds Beim Abnehmen oder Anbringen des Bedienfelds achten Sie darauf, nicht die Steckverbinder an der Rückseite des Bedienfelds und am Bedienfeldhalter zu beschädigen. Abnehmen des Bedienfelds Vor dem Abnehmen des Bedienfeld immer die
Bedienung von externen Komponenten DEUTSCH Abspielen einer externen Tonquelle Bei KD-G511: Bei KD-G612/KD-G611: Sie können eine externe Komponente an die CD-Wechsler-Buchse an der Rückseite mit dem Line-Eingangsadapter KS-U57 (nicht mitgerliefert) anschließen, und eine andere an die AUX (Hilfs-)
DAB-Tuner-Funktionen DEUTSCH DAB-Tuner-Empfang ~ 2 Wählen Sie die gewünschten EnsembleFrequenzen. Ÿ ! Was ist das DAB-System? Starten Sie die Suche nach einem Ensemble. Wenn ein Ensemble empfangen wird, stoppt der Suchlauf. Um den Suchlauf zu stoppen, betätigen Sie die gleiche Taste erneut. ⁄
Sie können sechs DAB-Dienste (Primärdienste) für jedes Frequenzband vorwählen. 1 Führen Sie die Schritte ~ bis ⁄ auf Seite 28 aus, um einen gewünschten Dienst zu wählen. 2 Wählen Sie die Festsendernummer (1 – 6), unter der gespeichert werden soll. Dynamische Programmverfolgung— Alternativempfang
Wartung DEUTSCH Reinigen der Anschlüsse Durch häufiges Einstecken und Abtrennen werden die Anschlüsse verschlissen. Um diese Gefahr zu minimieren, sollten Sie die Anschlüsse mit einem mit Alkohol befeuchteten Wattetupfer oder Lappen reinigen, wobei darauf geachtet werden muss, die Anschlusskontakte
Grundlegende Bedienung UKW-RDS-Funktionen Einschalten • Netzwerk-Tracking-Empfang erfordert zwei Typen von RDS-Signalen—PI (Programmkennung) und AF (Alternativfrequenz) zur richtigen Funktion. Ohne richtigen Empfang dieser Daten arbeitet Netzwerk-Tracking-Empfang nicht. • Wenn eine Verkehrsansage
DEUTSCH Wiedergabe einer CD-R oder CD-RW Wiedergabe einer MP3/WMA-Disk • Verwenden Sie nur „finalisierte“ CD-Rs oder CD-RWs. • Dieser Receiver kann nur die Dateien des gleichen Typs wie zuerst erkannt abspielen, wenn eine Disk sowohl Audio-CD (CD-DA) als auch MP3/WMA-Dateien enthält. • Dieser
Ändern der Quelle • Wenn Sie die Quelle ändern, stoppt die Wiedergabe ebenfalls (ohne dass die Disk ausgeworfen wird). Wenn Sie zum nächsten Mal „CD“ als Wiedergabequelle wählen, startet die Disk-Widdergabe von der Stelle, wo die Wiedergabe vorher abgebrochen wurde. Auswerfen einer Disk • Wenn die
Störungssuche Was wie eine Betriebsstörung erscheint, muss nicht immer ein ernstes Problem darstellen. Gehen Sie die folgenden Prüfpunkte durch, bevor Sie sich an den Kundendienst wenden. Allgemeines • Es kommt kein Ton von den Lautsprechern. Disk-Wiedergabe UKW/AM DEUTSCH Symptome Ursachen
MP3/WMA-Wiedergabe • Die Disk kann nicht wiedergegeben werden. Ursachen Abhilfen Keine MP3/WMA-Titel sind auf der Disk aufgezeichnet. Wechseln Sie die Disk. MP3/WMA-Titel haben nicht die Erweiterung <.mp3> oder <.wma> in ihren Dateinamen. Fügen Sie die Erweiterung <.mp3> oder <.wma> zu ihren
Symptome CD-Wechsler DEUTSCH • „NO DISC“ erscheint im Display. Ursachen Abhilfen Es ist keine Disk im Magazin. Setzen Sie eine Disk in das Magazin ein. Die Disk wurde verkehrt herum eingelegt. Disk richtig einsetzen. • „NO MAG“ erscheint im Display. Es ist kein Magazin im CDWechsler eingesetzt. Das
Technische Daten Max. Ausgangsleistung: Vorne: 50 W pro Kanal Hinten: 50 W pro Kanal Sinus-Ausgangsleistung (eff.): Vorne: 19 W pro Kanal an 4 Ω, 40 Hz bis 20 000 Hz bei nicht mehr als 0,8% Klirrfaktor. Hinten: 19 W pro Kanal an 4 Ω, 40 Hz bis 20 000 Hz bei nicht mehr als 0,8% Klirrfaktor.
Благодарим Вас за приобретение изделия JVC. Перед тем, как приступать к эксплуатации, пожалуйста, внимательно прочитайте все инструкции с тем, чтобы полностью изучить и обеспечить оптимальную работу этого устройства. РУCCKИЙ ВАЖНО ДЛЯ ЛАЗЕРНОЙ АППАРАТУРЫ 1. ЛАЗЕРНАЯ АППАРАТУРА КЛАССА 1 2.
Содержание 2 2 4 4 Панель управления — KD-G612/KD-G611/KD-G511………… 5 Расположение кнопок …………………….. 5 Пульт дистанционного управления — RM-RK50 …………. 6 Основные элементы и функции ……… 6 Начало работы ……………………….. 7 Основные операции
РУCCKИЙ Как пользоваться данным руководством Для того, чтобы сделать объяснения простыми и понятными, используются следующие методы: • Некоторые советы и примечания приведены в разделе “Дополнительная информация о приемнике” (см. стр. 31 – 33). • Операции, выполняемые с использованием кнопок, в
Панель управления — KD-G612/KD-G611/KD-G511 Расположение кнопок РУCCKИЙ Окно дисплея 1 Кнопки 5(вверх) / ∞ (вниз) 2 Кнопка T/P TP/PTY (программа движения транспорта/тип программы) 3 Кнопка D DISP (дисплей) 4 Кнопка S SEL (выбор) 5 • Диск управления • Кнопка (резервный/работающий аттенюатор) 6 Окно
Пульт дистанционного управления — RM-RK50 • RM-RK50 поставляется для KD-G612/KD-G611. • Дистанционное управление KD-G511 может осуществляться в соответствии с изложенными здесь инструкциями (с помощью дополнительно приобретаемого пульта дистанционного управления —рекомендуется для использования
Начало работы Основные операции * В данном ~ ⁄ Ÿ Отображается уровень громкости. Если некоторые источники не готовы, их невозможно выбрать. * Только для KD-G612/KD-G611. ! РУCCKИЙ руководстве для объяснения используются иллюстрации панели управления KD-G612/KD-G611. Индикатор уровня громкости @
Отмена демонстрации функций дисплея Если в течение 20 секунд не будет выполнено операций, начнется демонстрация функций дисплея. [По умолчанию: DEMO ON]—см. стр. 22. РУCCKИЙ 1 2 Настройка часов 1 2 Установите час, минуту и формат времени—12- или 24-часовой. 1 Выберите “CLOCK H” (час) и настройте
Операции с радиоприемником ~ Настройка на радиостанцию вручную В действии ! слева… 1 РУCCKИЙ Прослушивание радио Ÿ Появится выбранный диапазон. Данный индикатор отображается при приеме стереосигнала FM-передачи достаточной силы. 2 Выберите частоты желаемых радиостанций. При слабом
Сохранение радиостанций РУCCKИЙ Для каждого диапазона частот можно запрограммировать 6 радиостанций. Автоматическое программирование FM-радиостанций—SSM (Strongstation Sequential Memory —последовательная память для радиостанций с устойчивым сигналом) 2 3 4 1 Запрограммированный номер мигает
Операции с FM RDS Посредством поиска кода PTY можно настроиться на радиостанцию, передающую Вашу любимую программу. ! Запустите поиск любимой программы. РУCCKИЙ Поиск любимой программы FM RDS ~ Появляется последний выбранный код PTY. Ÿ Если есть радиостанция, передающая в эфир программу того же
РУCCKИЙ Что можно делать с помощью RDS Система RDS (Radio Data System) позволяет FM-радиостанциям отправлять дополнительный сигнал вместе с обычными сигналами программ. При приеме данных RDS приемник может выполнять следующие операции: • Поиск типа программы (PTY) (см. стр. 11) • Резервный прием
Резервный прием PTY позволяет приемнику временно переключаться на любимую программу с любого источника, кроме радиостанции AM. Информацию об активации и выборе предпочитаемого кода PTY для функции резервного приема PTY см. на стр. 23. Индикатор PTY либо загорается, либо мигает. • Если индикатор PTY
Операции с дисками Воспроизведение диска в приемнике РУCCKИЙ Все дорожки будут воспроизводиться последовательно до тех пор, пока не произойдет смена источника или не будет извлечен диск. О дисках MP3 и WMA “Дорожки” MP3 и WMA (Windows Media® Audio) (слова “файл” и “дорожка” взаимозаменяемы в данном
Об устройстве автоматической смены компакт-дисков ~ Для подключения к данному приемнику рекомендуется использовать устройство автоматической смены компакт-дисков компании JVC, совместимое с MP3. • Кроме того, можно подключать другие устройства автоматической смены компактдисков серии CH-X (кроме
• Если текущий диск имеет формат MP3: Быстрая перемотка дорожки вперед или назад Имя папки* Прокрутка вперед. РУCCKИЙ Прокрутка назад. Выбранный номер папки Переход к следующим или предыдущим дорожкам Информация диска отображается автоматически (см. стр. 18). Истекшее время Номер текущей
2 При первом нажатии кнопки +10 или –10 осуществляется переход на ближайшую дорожку с большим или меньшим номером, кратным 10 (например, 10, 20 или 30). При каждом нажатии кнопки осуществляется переход на 10 дорожек. • После последней дорожки будет выбрана первая и наоборот. Выбор номера 01 – 06:
Изменение информации на дисплее / РУCCKИЙ При воспроизведении звукового компакт-диска или CD-текста ( ) *1 Для KD-G612/KD-G611: Если звуковому компакт-диску не присвоено название, на дисплее появляется надпись “NO NAME”. Информацию о присвоении названия звуковому компактдиску см. на стр. 25. Для
Выбор режимов воспроизведения В одно и то же время возможна работа только в одном из следующих режимов воспроизведения. 2 Выберите необходимый режим воспроизведения. Повторное воспроизведение Режим Повторное воспроизведение TRK RPT: Пример: Eсли в приемнике во время воспроизведения диска MP3
Настройки звучания РУCCKИЙ Выбор запрограммированных режимов звучания (C-EQ: настраиваемый эквалайзер) Можно выбрать режим звучания, соответствующий музыкальному жанру. ~ Ÿ Индикатор USER (Бемольный звук) 00 00 OFF ROCK Музыка в стиле рок или диско +03 +01 ON CLASSIC Классическая +01 музыка –02 OFF
Характеристики звучания можно настроить по своему желанию. 1 Пример: Если выбрано “TRE” Индикатор Диапазон Настройте –06 (мин.) низкие частоты. до +06 (макс.) TRE*1 (верхние частоты) Настройте –06 (мин.) верхние частоты. до +06 (макс.) FAD*2 (микшер) Настройка баланса передних и задних динамиков.
Общие настройки — PSM 3 Настройте выбранный параметр Стандартная процедура PSM. Можно изменять параметры PSM (предпочитаемый режим настройки), которые перечислены в таблице ниже. 1 РУCCKИЙ 4 Повторите действия 2 и 3 для настройки других параметров PSM, если необходимо. 2 Выберите параметр PSM. 5
Выбираемые настройки, [страница для справки] AF-REG Прием на альтернативных частотах/прием региональных передач Когда принимаемые от текущей радиостанции сигналы становятся слабыми… AF: [По умолчанию]; Переключение на другую радиостанцию (программа может отличаться от принимаемой в настоящее
РУCCKИЙ Индикация Выбираемые настройки, [страница для справки] TEL Отключение звука телефона MUTING 1/MUTING 2: Выберите любой из параметров, обеспечивающий отключение звука при использовании сотового телефона. OFF: [По умолчанию]; Отмена. SCROLL*1 Прокрутка ONCE: [По умолчанию]; однократная
Другие основные функции Присвоение названий источникам 3 Присвоение названия. 1 Выберите символ. Данный раздел относится только к модели KD-G612/KD-G611. Источники звука Максимальное число символов Компакт-диски До 32 символов (до 30 или CD-CH дисков) 2 Перейдите к положению следующего
Отсоединение панели управления Подключение панели управления При отсоединении или подсоединении панели управления следует соблюдать меры предосторожности во избежание повреждения разъемов в задней части панели управления и на ее держателе. РУCCKИЙ Отсоединение панели управления Прежде чем
Операции с внешними устройствами Для KD-G612/KD-G611: Можно подключить одно внешнее устройство к расположенному сзади разъему устройства автоматической смены компакт-дисков, используя адаптер линейного входа KS-U57 (не поставляется), а другое – к входному разъему AUX (дополнительный) на панели
Операции с тюнером DAB РУCCKИЙ Прослушивание тюнера DAB 2 Выберите частоты необходимых блоков трансляции. ~ Ÿ ! Что такое система “DAB”? Запустите поиск блока трансляции. При обнаружении нескольких служб поиск прекращается. Чтобы остановить поиск, нажмите эту же кнопку еще раз. ⁄ Выберите службу
Для каждого диапазона частот можно запрограммировать шесть служб DAB (основные службы). 1 Выполняйте действия ~ – ⁄ (стр. 28) для выбора необходимой службы. 2 Выберите запрограммированный номер (1 – 6) для которого необходимо выполнить сохранение. Запрограммированный номер мигает некоторое время.
Обслуживание Очистка разъемов Хранение дисков в чистом виде При частом отсоединении разъемы загрязняются. Чтобы снизить уровень загрязнения, периодически проводите очистку разъемов с помощью ватных валиков или ткани, смоченных спиртом, соблюдая при этом меры предосторожности во избежание
Основные операции Операции с FM RDS Включение питания • Для правильной работы функции сетьотслеживающего приема требуется два типа сигналов RDS—PI (идентификация программы) и AF (альтернативная частота). Если прием указанных данных осуществляется неправильно, функция сеть-отслеживающего приема не
РУCCKИЙ Воспроизведение компакт-дисков однократной и многократной записи • Используйте только “завершенные” компакт-диски однократной и многократной записи. • Данный приемник может воспроизводить только файлы одного типа, который первым будут распознан, если на диске содержатся файлы как в ф ормате
Смена источника звука • При смене источника сигнала воспроизведение прекращается (извлечения диска не происходит). При повторном выборе “CD” в качестве источника звука воспроизведение диска начнется с того места, где оно было остановлено. Извлечение диска • Если в течение 15 секунд извлеченный диск
Устранение проблем Не всякое нарушение в работе устройства является результатом его неисправности. Перед обращением в сервисный центр проверьте следующее. Симптомы Общие сведения Воспроизведение диска FM/AM РУCCKИЙ • Не слышен звук динамиков. Причины Способы устранения Установлен на минимальный
Воспроизведение MP3/WMA • Диск не воспроизводится. Причины Способы устранения На диске нет дорожек MP3 Смените диск. и WMA. В именах дорожек MP3 и WMA нет расширения <.mp3> или <.wma>. Добавьте к именам файлов расширение <.mp3> или <.wma>. Дорожки MP3 и WMA записываются в формате, не совместимом с
Симптомы Устройство автоматической смены компакт-дисков РУCCKИЙ • На дисплее появляется надпись “NO DISC”. Причины Способы устранения Нет диска в загрузочном устройстве. Вставьте диск в загрузочное отверстие. Диск вставлен неправильной стороной. Вставьте диск правильно. • На дисплее появляется
БЛОК УСИЛИТЕЛЕЙ ЗВУКА Максимальная выходная мощность: Передние: 50 Вт на каждый канал Задние: 50 Вт на каждый канал Длительная выходная мощность (RMS): Передние: 19 Вт на канал в при 4 Ω, от 40 Гц до 20 000 Гц и не более чем 0,8% общего гармонического искажения. Задние: 19 Вт на канал в при 4 Ω, от
Having TROUBLE with operation? Please reset your unit Refer to page of How to reset your unit Haben Sie PROBLEME mit dem Betrieb? Bitte setzen Sie Ihr Gerät zurück Siehe Seite Zurücksetzen des Geräts Затруднения при эксплуатации? Пожалуйста, перезагрузите Ваше устройство Для получения информации о
Instructions CD RECEIVER KD-G612/KD-G611/KD-G511