-
Bookmarks
Quick Links
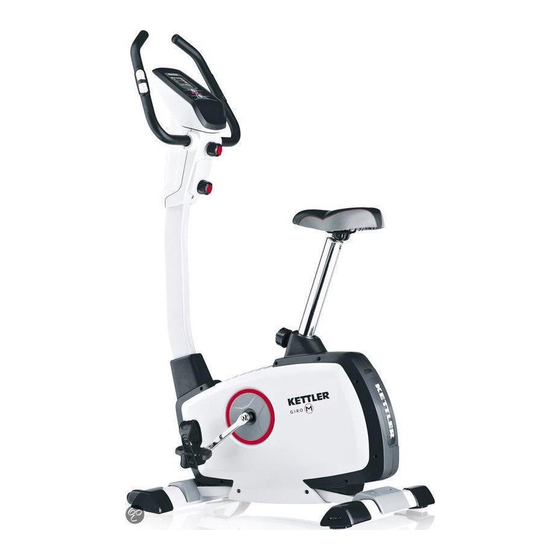
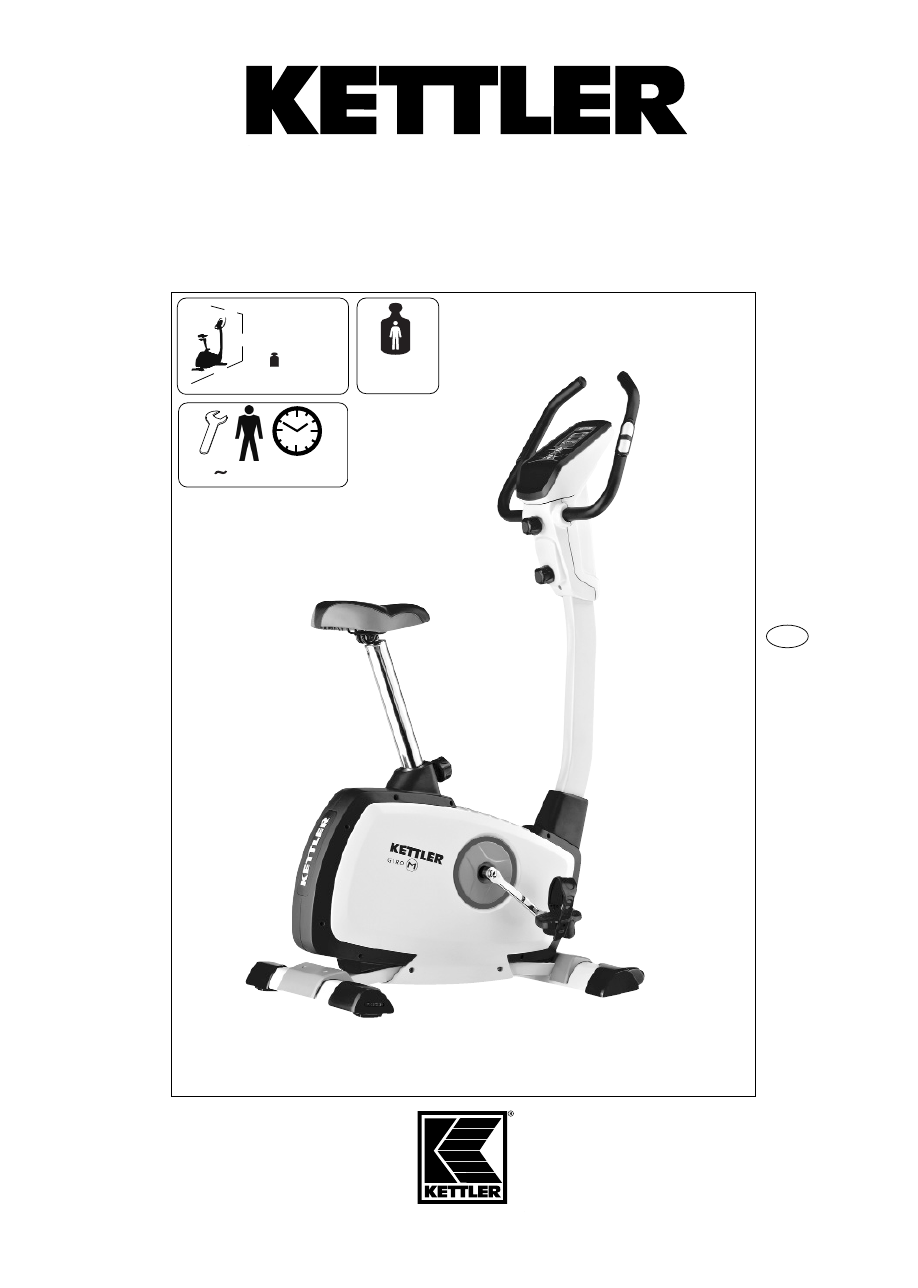
Montageanleitung „GIRO M
A
84 cm
B
B
54 cm
C
143 cm
C
30 kg
A
30 – 40 Min.
Art.-Nr. 07630-000
max.
110 kg
«
D
GB
F
NL
E
I
PL
P
DK
CZ
Abb. ähnlich
Summary of Contents for Kettler Giro-M
-
Page 1
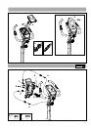
“ Montageanleitung „GIRO M Art.-Nr. 07630-000 84 cm 54 cm 143 cm 30 kg max. 110 kg 30 – 40 Min. Abb. ähnlich… -
Page 2: For Your Safety
• Damaged components may endanger your safety or reduce the lifetime of the equipment. For this reason, worn or damaged parts should be replaced immediately and the equipment taken out of use until this has been done. Use only original KETTLER spare parts. Handling the equipment…
-
Page 3: Instructions For Assembly
Waste Disposal When ordering spare parts, always state the full article number, KETTLER products are recyclable. At the end of its useful life please spare-partnumber, the quantity required and the S/N of the product dispose of this article correctly and safely (local refuse sites).
-
Page 4: Checkliste (Packungsinhalt)
Checkliste (Packungsinhalt) – GB – Checklist (contents of packaging) – E – Lista de control (contenido del paquete) – P – Lista de verificação (conteúdo da embalagem) – F – Checklist (verpakkingsinhoud) – I – Lista di controllo (contenuto del pacco) –…
-
Page 5
Messhilfe für Verschraubungsmaterial – GB – Measuring help for screw connections – PL – Wzornik do połączeń śrubowych – F – Gabarit pour système de serrage – P – Auxiliar de medição para materiais de aparafusamento – NL – Meethulp voor schroefmateriaal –… -
Page 6
Klick… -
Page 7
M 8×16=20Nm Ø 8 Ø 7 Ø 7 M 7×30… -
Page 8
M 5×14 Ø 7 Ø 7 M 7×50 Ø 7×25 M 5 x14… -
Page 9
Klick M 5 x14 3×25… -
Page 10
Handhabungshinweise – GB – Handling – E – Instrucciones de manejo – P – Nota sobre o manuseamento – F – Indication relative à la manipulation – I – Avvertenze per il maneggio – DK – Håndtering – NL – Bedieningsinstruktie –… -
Page 11
Zubehörbestellung – GB – Accessories ordering – F – La commande d’accessoires 07937-600 – NL – Accessoires bestellen – E – Para pedidos de accesorios – I – L’ordine di accessori – PL – Akcesoria zamawiania – P – Acessórios ordenação 07937-650 –… -
Page 12
Ersatzteilzeichnung… -
Page 13
Ersatzteilbestellung – GB – Spare parts order – PL – Zamówiene części zamiennych – F – Commande de pièces de rechange – P – Encomenda de peças sobressalentes – NL – Bestelling van reserveonderdelen – DK – Bestilling af reservedele –… -
Page 14
Batteriewechsel – GB – Battery change A weak or an extinguished computer display makes a battery change necessary. The computer is equipped with two batteries. Perform the battery change as described below: Remove the lid of the battery compartment and replace the bat- ■… -
Page 16
HEINZ KETTLER GmbH & Co. KG · Postfach 1020 · D — 59463 Ense -Parsit www.kettler.de docu 2977a/09.11…

PDF инструкция · 104 страниц(ы) английский
инструкцияKettler Giro M

D
GB
F
NL
E
2-11
12-21
22-31
32-41
42-51
52-61
62-71
72-81
82-91
92-101
I
PL
CZ
P
DK
ST 33xx-68
Computer- und Trainingsanleitung
ST 33xx-68
Посмотреть инструкция для Kettler Giro M бесплатно. Руководство относится к категории Тренажеры, 14 человек(а) дали ему среднюю оценку 8. Руководство доступно на следующих языках: английский. У вас есть вопрос о Kettler Giro M или вам нужна помощь? Задайте свой вопрос здесь
Главная
| Kettler | |
| Giro M | 07630-000 | |
| Тренажер | |
| 4001397348603 | |
| английский | |
| Руководство пользователя (PDF) |
Вес и размеры
| Ширина | 540 mm |
| Глубина | 900 mm |
| Высота | 1370 mm |
| Вес махового колеса | 6000 g |
Свойства
| отображаемые тренировочные параметры | Distance, expected final score, Speed |
| Опционные измерения сердечного ритма | Cardio pulse set, Ear sensor |
| Транспортные колеса | Да |
| Максимальный вес пользователя | 110 kg |
| Движущая система | V-ремень |
показать больше
Не можете найти ответ на свой вопрос в руководстве? Вы можете найти ответ на свой вопрос ниже, в разделе часто задаваемых вопросов о Kettler Giro M.
Сколько часов в неделю нужно тренироваться взрослому человеку?
Какой максимально допустимый пульс взрослого человека?
Какая высота Kettler Giro M?
Какая ширина Kettler Giro M?
Какая толщина Kettler Giro M?
Инструкция Kettler Giro M доступно в русский?
Не нашли свой вопрос? Задайте свой вопрос здесь
(скачивание инструкции бесплатно)
Формат файла: PDF
Доступность: Бесплатно как и все руководства на сайте. Без регистрации и SMS.
Дополнительно: Чтение инструкции онлайн
Art.-Nr. 07630-000
Der Umwelt zuliebe: wir drucken auf 100% Altpapier!
Abb. ähnlich
RUS
A
C
B
A
84 cm
B
54 cm
C
143 cm
30 kg
max.
110 kg
30 – 40 Min.
Руководство
по
сборке
и
эксплуатации
Велотренажер
«Giro M»
Страница:
(1 из 16)
навигация

1

2
3
4
5
6
7
8
9
10

11

12
13
14

15
16
Оглавление инструкции
- Страница 1 из 17
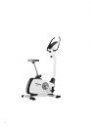
Руководство по сборке и эксплуатации Велотренажер «Giro M» Art.-Nr. 07630-000 B C A A B C 84 cm 54 cm 143 cm 30 kg max. 110 kg 30 – 40 Min. Der Umwelt zuliebe: wir drucken auf 100% Altpapier! RUS Abb. ähnlich - Страница 2 из 17
RUS Важные указания Пожалуйста, внимательно прочтите эту инструкцию перед монтажом и первым использованием. В ней содержатся важные указания по технике безопасности, а также по использованию и техническому обслуживанию устройства. Сохраните эту инструкцию — она может пригодиться вам в будущем, - Страница 3 из 17
• Если во время работы устройства слышен тихий шум, создаваемый маховиком, это никак не влияет на работу устройства. Шумы, появляющиеся при вращении педалей в обратную сторону, обусловлены техническими причинами и также не свидетельствуют о каких-либо неполадках. • Используйте для регулярной - Страница 4 из 17
Checkliste (Packungsinhalt) – GB – Checklist (contents of packaging) – FIN – Tarkastusluettelo (Pakkauksen sisältö) –S– – EST – Kontrollnimekiri (pakendi sisu) Kontrollista (förpackningens innehåll) – LT – Patikros sąrašas (pakuotės turinys) – RUS – Контрольный список – LV – Pārbaudes saraksts - Страница 5 из 17
Messhilfe für Verschraubungsmaterial – GB – Measuring help for screw connections –S– – LV – mērīšanas palīgierīce saskrūves materiālam Mäthjälp för fastskruvmaterial – LT – Kaip matuoti priveržimo priemones – RUS – Размеры крепежного материала – FIN – Ruuvausmateriaalin mittausapu – EST – Abiks - Страница 6 из 17
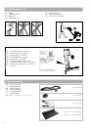
2 R L 3 A D B C B E G ! Klick 20 - Страница 7 из 17
4 C B a D F b c d E A/E A 4x M 8×16=20Nm Ø8 5 A B C C 1x M 7×30 Ø7 Ø7 21 - Страница 8 из 17
6 B C E A A/D E 1x D M 7×50 Ø 7×25 Ø7 Ø7 1x M 5×14 7 C D B D C A A/D 4x 22 M 5 x14 - Страница 9 из 17
8 B Klick A A 9 D A C D C B A D A/C 2x M 5 x14 4x 3×25 23 - Страница 10 из 17
Handhabungshinweise – GB – Handling –S– – LV – Lietošanas norādes Produktens hantering – LT – Eksploatacijos instrukcija – RUS – Указания по обращению – FIN – Käyttöohjeet – EST – Käsitsemisjuhised –D– Beispiel Typenschild – Seriennummer – GB – Example Type label – Serial number –S– Exempel - Страница 11 из 17
– RUS – Замена батареек A B C – LT – Baterijos keitimas Jeigu vaizdas kompiuteryje yra neryškus arba dingstą, būtina pakeisti bateriją. Kompiuteryje yra dvi baterijos. Baterijas keiskite taip: • Nuimkite baterijų skyriaus dangtį ir senas baterijas pakeiskite naujomis AA 1,5 V tipo baterijomis. • - Страница 12 из 17
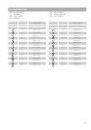
Ersatzteilzeichnung 3 2 1 5 6 26 7 25 8 4 21 9 30 12 20 11 13 19 20 10 16 10 16 14 15 18 29 24 17 28 23 22 23 27 28 - Страница 13 из 17
Ersatzteilbestellung – GB – Spare parts order –S– – LV – Rezerves daļas, lai Reservdelar för – LT – Atsarginės dalys, kad – RUS – Заказ запчастей – FIN – Varaosat järjestys – EST – Varuosad et 07630-000 07630-000 1 1x 68003740 16 1x 68003504 2 1x 68003980 17 1x 68003988 3 1x 68003871 18 1x 68003526 - Страница 14 из 17
30 - Страница 15 из 17
31 - Страница 16 из 17
HEINZ KETTLER GmbH & Co. KG · Postfach 1020 · D — 59463 Ense -Parsit www.kettler.de docu 2977/06.11 - Страница 17 из 17
ST 33xx-68 Тренировочный компьютер и эксплуатация ST 33xx-68 RUS GIRO M RIVO M
Рекомендации по проведению тренировок и руководство по эксплуатации RUS Оглавление • Дистанция 77 Указания по технике безопасности 2 • Энергия (кДж/ккал) 77 • Ввод возраста (10-99) 77 • Настройка звукового сигнала (да/нет) 77 • Выбор целевого пульса 77 • Сервис 72 • Безопасность пользователя 72
Краткое описание У электронного модуля есть область функций с кнопками и область индикации (дисплей) с изменяющимися знаками и графикой. Область индикации Дисплей Область функций Кнопки Краткое руководство Область функций Ниже объясняется назначение четырех кнопок. Подробности относительно
Рекомендации по проведению тренировок и руководство по эксплуатации Краткое руководство Область индикации/дисплей Область индикации (дисплей) информирует пользователя о выполнении различных функций. Частота шагов (RPM) 14-130 [1/мин.] 1 сегмент = 2 [1/мин.] Пульс (PULSE) G Максимальный пульс
Расход энергии Значение: 0 – 9999 Одометр > Путь, к(м) Время (TIME) Значение: 0:00 – 99:59 Ступень торможения (BRAKE)) Индикация среднего значения Уровень 1 — 10 Заряд аккумулятора Знак часов Напряжение аккумулятора достаточное для измерения пульса. Напряжение аккумулятора недостаточное для
Рекомендации по проведению тренировок и руководство по эксплуатации Быстрый старт (для ознакомления) без особых настроек • Нажмите кнопку Индикация • Все сегменты отобразятся на короткое время. (проверка сегментов) • Короткое время будет отображаться общий километраж. После этого происходит переход
Тренировка 1. Тренировка без настроек • Нажмите любую кнопку и / или • Нажмите педаль (согласно разделу «Быстрый старт») 2. Тренировка с настройками Индикация: «Готовность к тренировке» • Нажать «SET»: Режим настройки Настройка времени (TIME) • Введите значения с помощью кнопки «плюс» или «минус»
Рекомендации по проведению тренировок и руководство по эксплуатации пульса отсутствует). Для этого при вводе возраста следует установить значение OFF. • Отмените контроль максимального пульса с помощью кнопки «плюс» или «минус». Индикация: «AGE OFF» Подтвердите ввод нажатием кнопки «SET».
Общие указания ручной пульсометр. При подсоединении ушной клипсы или вставного приемника к разъему пульсометра ручной пульсометр автоматически деактивируется. Штекер датчиков ручного пульсометра извлекать не нужно. Системные звуки Включение При включении, во время проверки сегментов воспроизводится
Рекомендации по проведению тренировок и руководство по эксплуатации Эмпирическое правило: Частота тренировок Продолжительность тренировок ежедневно 2–3 x раза в неделю 1–2 x раза в неделю 10 мин 20–30 мин 30–60 мин Начинающим нельзя сразу приступать к тренировкам длительностью 30-60 минут.
Таблица по результатам Дата P1 P2 Пульс покоя Пульс нагрузки Пульс отдыха Уровень нагрузки Время (мин) Расстояние (км) Расход энергии Oценку состояния 81 RUS
HEINZ KETTLER GmbH & Co. KG Postfach 1020 . D-59463 Ense-Parsit www.kettler.net docu 2996/07.11
View a manual of the Kettler Giro M below. All manuals on ManualsCat.com can be viewed completely free of charge. By using the ‘Select a language’ button, you can choose the language of the manual you want to view.

MANUALSCAT | EN
Question & answers
Have a question about the Kettler Giro M but cannot find the answer in the user manual? Perhaps the users of ManualsCat.com can help you answer your question. By filling in the form below, your question will appear below the manual of the Kettler Giro M. Please make sure that you describe your difficulty with the Kettler Giro M as precisely as you can. The more precies your question is, the higher the chances of quickly receiving an answer from another user. You will automatically be sent an e-mail to inform you when someone has reacted to your question.
I have been given a kettler giro m exercise bike. Does it need a power source as I can’t see a power point?
If not how does the screen turn on ?
Julie austwick2022-03-24
What is the maximum weight
lynda mcadam2021-11-27
My recently purchased Kettler Giro exercise bike is showing ‘no pulse signal’. Can you think of reasons why that should be the case?
David Newman2021-11-20
Свети ли дисплея?
Има ли подсветка?
Атанс Поппалов2021-03-27
Ask a question about the Kettler Giro M
Page: 1
For your safety:
• Please clarify with your general practitioner before you start
with the training, whether or not your health condition allows
you to train with this device. The diagnostic findings should
be the basis for the determination of your training program-
me. Wrong or excessive training can cause damage to your
health.
Safety instructions
Please observe the following instructions for your own
safety:
• The training device must be set up on an appropriate and
firm surface.
• Inspect the connections for firm fitting before initial operation
and additionally after approximately six operation days.
• In order to prevent injuries caused by wrong stress or over-
stress, the training device may only be used in accordance
with the instructions.
• It is not recommended to permanently set up the device in
humid rooms due to the resulting corrosion development.
• Assure yourself regularly that the training device functions
properly and that it is in duly condition.
• The operator is responsible for the safety controls, which
have to be carried out on a regular and proper basis.
• Defective or damaged parts must be exchanged immediately.
Only use original KETTLER spare parts.
• The device may not be used until after repairs are comple-
ted.
• The safety level of the device can only be maintained provi-
ded that it is regularly inspected for damage and wear and
tear.
Training and Operating Instructions
12
GB
Table of contents 12
Safety instructions 12
• Service 12
• Your safety 12
Short description 13-15
• Functions and keys 13
• Display range and display 14-15
Quick start (for introduction) 16
• Ready for training 16
• Start of training 16
• End of training 16
• Sleep mode 16
Training 17-18
• without presetting 17
• with presetting 17
• Time 17
• Distance 17
• Energy (KJoule/kcal) 17
• Age input (10-99) 17
• Set alarm signal (yes/no) 17
• Target pulse selection 17
(FA 65%,/FI 75%)
• Target pulse input (40-199) 17
• Ready for training 17
• Training interruption/ 18
end of training
• Resumption of training 18
• Recovery measurement 18
General instructions 19
• System signals 19
• Recovery 19
• Calculation of average value 19
• Instructions for pulse measurement 19
with ear clip 19
with breast belt 19
with hand pulse 19
• Computer errors 19
• Brake levels 19
Training instructions 19
• Stamina training 19
• Load intensity 20
• Extent of load 20
Glossary 20
This sign in the instructions refers to the
glossary, where the respective term will
be explained.
G
GB
Page: 2
Short description
The electronics assembly is equipped with functions with
keys and a display range (display) with variable symbols
and graphics.
Quick reference guide
Functions
The four keys will be described in short below.
A detailed application description can be found in the
respective chapters. The names of the function keys in the
chapters correspond to the names used in this quick refe-
rence guide.
SET (press shortly)
Input data are accessed with this function key.
The set data are accepted.
Reset (press SET longer)
The current display is deleted for a reset.
Minus – / Plus +
With these function keys, you can change the values in
the different input data before the start of the training.
— press longer > fast run through the values
— press “Plus” and “Minus” together: value input skips to
OFF
RECOVERY
You can start the recovery pulse function with this function
key.
Pulse measurement
Pulse measurement can be achieved via three sources:
1. ear clip – connect the plug with the plug socket
2. hand pulse – the connection is situated at the back of
the display
3. breast belt (accessories) – please observe the corre-
sponding instructions
13
GB
display range
display
functions
keys
G
G
Page: 3
Quick reference guide
Display range/display
The display range (display) informs you about the different
functions.
Distance (DISTANCE)
14-130 [1/min]
1 segment = 2 [1/min]
Pedal frequency (RPM)
recovery function
Pulse (PULSE)
percentage value
comparison actual pulse/ max
pulse
Percentage pulse
target pulse limit exceeded +11
warning signal ON/OFF
display of average value
maximum pulse
warning (blinks) max. pulse +1
value 0.00 – 99.99
Speed
value 0 – 99.9
display of average values
target pulse limit undershot –11
heart symbol (blinks)
pulse display
40 – 199 [1/min]
G
14
GB
Training and Operating Instructions
Page: 4
clock symbol
value 0:00 – 99:59
level 1 — 10
Time(TIME)
battery charge
Brake level (BRAKE)
Energy consumption
value: 0 – 9999
odometer value > total k(m)
Battery charge sufficient for
pulse measurement.
Battery charge not sufficient
anymore for pulse measure-
ment, change battery.
display of average value
15
GB
Page: 5
16
BG
Training and Operating Instructions
Quick start (for introduction)
Without special settings
• press a key
Display
• All segments are shortly displayed (segment test).
• The total kilometres are shortly displayed.
Subsequently change to the display “Reading for trai-
ning”.
Ready for training
Display
All segments display “Zero”, except for pulse (if activated)
and brake level.
Start training by pedalling.
Start of training
Display
• Pedal rotation segments, distance, speed, energy and
time increase.
• Pulse (if activated).
Brake setting levels 1-10
• Turn hand wheel to the right to increase the brake
level; turn hand wheel to the left to decrease the brake
level.
Training interruption/end of training
If you interrupt or complete your training, average values
of the last training unit are displayed with the Ø symbol.
Display
• Average values Ø:
pedal rotation segments, speed, brake level and pulse
(if activated).
• Total values:
distance, energy and time.
Sleep mode
Four minutes after the end of training, the device switches
into the sleep mode. If you press a key, the display starts
again with the segment test, odometer and ready for trai-
ning.
Page: 6
17
GB
Training
1. Training without presetting
• Press a key.
and/or
• Start pedalling (as in “Quick start”).
2. Training with presetting
Display: “Ready for training”.
• Press “SET”: presetting segment
Time setting (TIME)
• Enter values using “Plus” or “Minus” (e.g. 30:00), con-
firm with “SET”.
Display: next menu “DISTANCE”.
Distance setting (DISTANCE)
• Enter values using “Plus” or “Minus” (e.g. 7.50), con-
firm with “SET”.
Display: : next menu “ENERGY”.
Energy setting (KJoule/kcal)
• Enter values using “Plus” or “Minus” (e.g. 780), con-
firm with “SET”.
• Select unit KJoule or kcal using “Plus” or “Minus”, con-
firm with “SET”.
Display : next menu “Age input”.
Age input (AGE)
The input of the age serves for the calculation and the
monitoring of the maximum pulse (symbol HI; warning
signal, if activated).
• Enter values using “Plus” or “Minus” (e.g. 50). Upon
input, the maximum pulse is calculated with the formula
(220 – age), here: maximum pulse of 170. Confirm
with “SET”.
Display : next menu “Alarm signal”.
Alarm signal, if maximum pulse is exceeded
• Select function using “Plus” or Minus”, confirm with
“SET”.
Display : next menu target pulse selection “FA 65%”.
Target pulse monitoring FA 65%/FI 75%
• Make your choice using “Plus” or “Minus”.
• Fat burning 65%, fitness 75% of maximum pulse, con-
firm with “SET” (presetting mode completed).
Display : ready for training with the presetting.
Or
Target pulse input
The input 40 – 199 serves for the determination and
monitoring of a training pulse independent of the age
(symbol HI; warning signal, if activated; no maximum
pulse monitoring). Note that that the age input has to be
set to “OFF”.
• Switch off maximum pulse monitoring using “Plus” and
“Minus”. Display: “AGE OFF”, confirm with “SET”.
Display : next presetting “Target pulse” (pulse).
• Enter values using “Plus” or “Minus” (e.g. 130), con-
firm with “SET” (presetting mode completed).
Display : ready for training with the presetting.
Page: 7
• Pedalling
Decreases with presetting.
• The presetting entries are lost with a “Reset”.
Training interruption/end of training
With less than 14 pedal rotations per minute, the electro-
nics assembly of the device identifies a training interrupti-
on. The achieved training data are displayed. Rotations,
pulse, speed and brake level are displayed as average
values with the symbol Ø.
You can switch to the current display using “Plus” or
“Minus”.
The training data are displayed for four minutes. If you do
not press any key nor train during this period of time, the
electronics assembly of the device switches to sleep mode
and displays the room temperature.
Resumption of training
If you resume training within four minutes, the last values
continue to be increased or decreased.
RECOVERY function
Recovery pulse measurement
Press “RECOVERY” at the end of training.
Display
• RECOVERY
The electronics assembly of the device measures your
pulse 60 seconds in reverse.
The current pulse value is saved under “DISTANCE”; the
pulse value after 60 seconds is saved under “KM/H”.
Next to “% Puls”, the difference between the two values is
displayed. From this difference, a fitness mark (in this
example F 1.6) is calculated. The display switches off
after 20 seconds.
“RECOVERY” interrupts the recovery pulse function or the
fitness mark display.
If no pulse is measured in the beginning or at the end of
the reverse counting, the error message “E” is displayed
Comment:
Training and Operating Instructions
18
GB
Page: 8
General instructions
System signals
Activation of the device
If you activate the device, a signal is emitted during the segment
test.
Presetting
A short signal is emitted, if you reach a presetting like time,
distance and KJoule/kcal.
Exceeding of maximum pulse
If the set maximum pulse is exceeded by one pulse beat, two
short signals are emitted for the time of exceedance.
Recovery
Calculation of the fitness mark (F):
mark (F) = 6.0 – ( 10 x (P1–P2)
)2
P1
P1 stress pulse P2 = recovery pulse
F1.0 = very good F6.0 = insufficient
Calculation of average value
The calculations of the average values refer to training units in
the past until a reset or the sleep mode.
Instructions for pulse measurement
The pulse measurement starts as soon as the heart in the display
blinks in time with your pulse beat.
With ear clip
The pulse sensor works with infrared light and measures the
variations in translucence in your skin, which are produced by
your pulse beat. Rub your ear ten times strongly to activate the
blood circulation before attaching the pulse sensor to your ear-
lobe.
Avoid disturbing pulses.
• Attach the ear clip properly to your earlobe and look for the
best point for the measurement (heart symbol blinks without
interruption).
• Do not train directly under strong incidence of light, e.g.
neon light, halogen light, spotlight, sun light.
• Completely eliminate any shocks or bounces of the ear sen-
sor and the cable. Always attach the cable with a clip at
your clothing or, even better, at your headband.
With breast clip
Please observe the corresponding instructions.
With hand pulse
An extra-low voltage caused by the contractions of your heart is
registered by the hand sensors and evaluated by the electronics
assembly of the device.
• Always grab the contact faces with both hands.
• Avoid jerky grasping.
• Hold your hands calmly and avoid contractions and rubbing
on the contact faces.
Only one way of pulse measurement is possible: either with ear
clip or with hand pulse or with breast belt. If no ear clip or plug
recipient is located in the pulse plug, hand pulse measurement
is activated. If you insert an ear clip or a plug recipient in the
pulse plug, hand pulse measurement is automatically deactivat-
ed. It is not necessary to disconnect the plug of the hand pulse
Comment:
measurement.
Failures with the training computer
Press the “SET” key for a longer period of time (reset).
Brake level display
The brake setting is divided into levels 1-10. If this division is
deranged or lost, you can reset it in the following way:
• Insert batteries and press the “SET” key until the segment test
is completed.
• Turn hand wheel back to the minimum setting and press the
“SET” key when “LO” 0%, BRAKE 0 is displayed.
• Turn hand wheel forward to the maximum setting and press
the “SET” key when “HI” 100%, BRAKE 10 is displayed.
Process completed.
Training Instructions
Sports medicine and training science use cycle ergometry,
among other things, for the examination of the functional capa-
bility of heart, circulation and respiratory system.
You can find out whether or not you have achieved the desired
effect from your training after several weeks using the following
method:
1. You manage a particular endurance performance with less
heart / circulation performance than previously
2. You sustain a particular endurance performance with the
same heart / circulation performance over a longer period.
3. You recover more quickly than previously after a particular
heart / circulation performance.
Guide values for the endurance training
Maximum pulse: maximum strain means the reaching of the
individual maximum pulse. The maximum achievable heart rate
is dependant on age.
Here, the following empirical formula applies: the maximum
heart rate per minute corresponds to 220 heart beats minus age
in years.
Example: age 50 years -> 220 – 50 = 170 pulse / min.
Load Intensity
Load pulse: the optimum intensity of load is reached at 65–75%
(see also diagram) of the maximum pulse. This value changes
depending on age.
Extent Of Load
Duration of a training unit and its frequency per week:
The optimum extent of load is attained, if 65–75% of the indivi-
dual heart / circulation performance is achieved over a longer
period.
Empirical Formula:
Beginners should not begin with training units of 30-60 minutes.
The beginner’s training can be planned as follows in the first 4
weeks:
Training frequency Duration of training
daily 10 minutes
2–3 times a week 20–30 minutes
1–2 times a week 30–60 minutes
19
GB
Page: 9
20
GB
Training and Operating Instructions
It is recommended that you perform approx. 5 minutes of exer-
cises before and after every training unit, in order to warm up
and cool down. There should be a training-free day between
each two consecutive training units, if you prefer training sessi-
ons of 20-30 minutes 3 times a week later on in your training.
Otherwise, there is no reason why you should not train daily.
Training frequency Extent of training session
3 times a week 2 minutes of training
Break of 1 minute for physical exercises
2 minutes of training
Break of 1 minute for physical exercises
2 minutes of training
3 times a week 3 minutes of training
Break of 1 minute for physical exercises
3 minutes of training
Break of 1 minute for physical exercises
2 minutes of training
3 times a week 4 minutes of training
Break of 1 minute for physical exercises
4 minutes of training
Break of 1 minute for physical exercises
3 minutes of training
3 times a week 5 minutes of training
Break of 1 minute for physical exercises
4 minutes of training
Break of 1 minute for physical exercises
4 minutes of training
4th week
3rd week
2nd week
1st week
Pulsediagramm
Fitness and Fat Burner
220
200
180
160
140
120
100
80
Pulse
Age
20 25 30 35 40 45 50 55 60 65 70 75 80
Maximalpulse
(220 minus Age)
Fitnesspulse
(75% of Max.Pulse)
Fat combustion pulse
(65% of Max.Pulse)
90
Glossary
Age
Input for the calculation of the maximum pulse.
Dimension
Units for the display of km/h or mph, KJoule or kcal.
Fat burning pulse
Calculated value of: 65% maximum pulse.
Fitness pulse
Calculated value of: 75% maximum pulse.
Glossary
An accumulation of attempts at explanation.
HI symbol
If “HI” is displayed, the target pulse is too high by 11 beats. If
“HI” blinks, the maximum pulse is exceeded. “HI” monitoring is
always activated.
LO symbol
If “LO” is displayed, the target pulse is too low by 11 beats.
“LO” monitoring is activated, if the target pulse is reached
during training.
Maximum pulse(s)
Value calculated from 220 minus age.
Menu
Display, in which values can be entered or selected.
Pulse
Registration of the heart beat per minute.
Recovery
Recovery pulse measurement at the end of training. The diffe-
rence between start pulse and end pulse of a minute is calcula-
ted. With the help of this difference, a fitness mark is determin-
ed. If you train regularly, the improvement of this mark is an
indication for your fitness progression.
Reset
Deletes the display contents and resets the display.
Target pulse
Input of a particular pulse value, which is be monitored.
Page: 10
Date Restpulse Stress pulse Recovery pulse Slope Time Distance Energy consumptionFitness Mark
(min) (km) (Kcal)
21
GB
Performance table
Page: 11
Leistungstabelle
102
P 1 P 2 Belastungs- Zeit Entfernung Energie- Fitness-
– D – Datum Ruhepuls Belastungspuls Erholungspuls stufe (min.) (km) verbrauch note
– GB – Date Restpulse Stress pulse Recovery pulse Slope Time Distance Energy consumption Fitness Mark
(min) (km) (Kcal)
– F – Date Pouls au repos Pouls en change Pouls de récupération Ange d’inclination Temps Distance Dépense d’énergie Note
(mn.) (km) (Kcal)
– NL – Datum Rustpols Belastingspols Ontspanningspols Hellingshoek Tijd Afstand Calorieenverbruik Waard. cijfer
(min.) (km) (Kcal)
– E – Fecha Pulso en reposo Pulso bajo esfuerzoPulso de recuperación Escalón Tiempo Distancia Consumo de energia
de carga (min.) (km) (Kcal) Nota
– GB – Performance table – F – Tableau de performances – NL – Prestatientabel
– E – Table de rendimiento
- Brand:
- Kettler
- Product:
- Hometrainers
- Model/name:
- Giro M
- Filetype:
- Available languages:
- Dutch, English, German, French, Spanish, Italian, Portuguese, Danish, Polish, Czech