
- Manuals
- Brands
- M-Audio Manuals
- Recording Equipment
- MobilePre USB
- User manual
-
Contents
-
Table of Contents
-
Troubleshooting
-
Bookmarks
Quick Links
MobilePre USB
User’s Guide
Related Manuals for M-Audio MobilePre USB
Summary of Contents for M-Audio MobilePre USB
-
Page 1
MobilePre USB User’s Guide… -
Page 2: Quick Start Guide
Quick Start Guide This Quick Start Guide is a very short, step-by-step guide to getting you started right away at using your new M-Audio MobilePre USB. Step 1: Run the Installer Insert the included Install CD-ROM into your CD or DVD drive and double-click the install program.
-
Page 3: Package Contents
Introduction Thank you for purchasing the MobilePre USB by M-Audio. MobilePre USB is your audio upgrade for any PC or Macintosh computer*, utilizing the convenience of your computer’s USB port—no tools, computer disassembly, or power supply is needed; In fact, the MobilePre USB is also class-compliant on Windows XP &…
-
Page 4: System Requirements
System Requirements The MobilePre USB has been designed to work with Windows 98SE, ME, 2000, or XP and Mac OS 9.2.2 or OS X 10.1.5 and Jaguar (10.2.2). Specific requirements include: Windows PC: Minimum Required— • 350 MHz Pentium II •…
-
Page 5: Software Setup
“device end” will be easily identifiable by their size and shape). Windows XP 1. Place the M-Audio Drivers Software CD in your CD-ROM Drive. 2. Launch the MobilePre USB Installer.exe installation program. 3. The MobilePre USB install screen will appear. Click “Next” to continue.
-
Page 6
5. The CD performance enhancements page will then appear. Click “Next.” 6. The installation program will now prompt you of a successful hardware installation. Click “Finish” and restart your computer. 7. After restarting your computer, Windows will tell you that your hardware has not passed Windows Logo testing. -
Page 7
Windows 2000 1. Place the M-Audio Drivers Software CD in your CD-ROM Drive. 2. Launch the MobilePre USB Installer.exe program. 3. Close all other running applications, as directed by the first screen that appears. 4. Direct X 8.1 or greater must be installed on your computer. If this software has not been previously installed, the installer program will prompt you to do so. -
Page 8
7. Click “Yes” to continue. 8. Click “Next,” twice. 9. Click “Finish” on the next screen appearing.This will cause Windows to restart your computer. -
Page 9
“Digital Signature not found.” Click “Yes” to continue. Windows ME 1. Place the M-Audio Drivers Software CD in your CD-ROM Drive. 2. Launch the MobilePre USB Installer.exe program. 3. Close all other running applications,as directed by the first screen that appears. -
Page 10
5. Your MobilePre USB must be disconnected from your computer’s USB bus, before continuing (if you just finished installing Direct X, your computer will have restarted, and a reminder to disconnect the MobilePre USB will follow). If it is currently connected, disconnect it now. 6. -
Page 11
8. The installation program will inform you of a successful hardware installation. Click “Next. 9. This next screen explains that your computer now needs to be restarted. Make sure that the box labeled,“Yes…” is checked, then click “Finish” to continue restarting. NOTE: If you un-check the box labeled, “Yes…”… -
Page 12
Windows 98 SE 1. Place the M-Audio Drivers Software CD in your CD-ROM Drive and double-click on the file named “MobilePre USB Installer.exe”. 2. Close all other running applications, as directed by the first screen that appears. 3. Direct X 8.1 or greater must be installed on your computer. If this software has not been previously installed, the installer program will do this for you. -
Page 13
6. The next screen shows that the drivers have been successfully installed. Click “Next” 7. Windows will now tell you that your computer needs to be started. Make sure that the “Yes” box is checked, and click “Finish.” 8. Once the computer has restarted and returned to the desktop, connect the MobilePre USB to your computer (refer to the Hardware Installation section of this manual for instructions). -
Page 14
9. Make sure “Search for the best driver for your device (Recommended)” is selected and click “Next to continue.” 10. None of the option-boxes in the next screen need to be selected. Click “Next,” to continue. 11. Make sure that the box for “The updated driver (Recommended) USB Composite Device”… -
Page 15
12. Windows should have found a driver. Click “Next,” to continue. 13. Windows now will inform you that driver installation has been completed. Click “Finish,” to complete the installation process. MobilePre USB and the Windows Sound System The MobilePre USB’s Windows Multimedia drivers will allow you to use the MobilePre USB as your Windows system sound device. -
Page 16
2. Double click the “M-Audio MobilePre USB Installer.” 3. Click «Continue» at the M-Powered Screen. 4. Read the «Instructions for using M-Audio MobilePre USB.» Click «Continue.» 5. Select your install location, or simply choose the OS 9 boot drive (which is the default). Click «Install» to continue. -
Page 17
MobilePre USB: 1. Go to «System Preferences» in the Apple Menu. 2. Select the «Sound» preference panel, and click the «Output» tab. 3. Select «M-Audio MobilePre USB» to choose the MobilePre USB as your default input and output device. -
Page 18: Hardware Setup
Hardware Setup Front Panel Features The front panel of the MobilePre USB houses features providing the following functions: 1. Channel 1 Inst/Line Input Jack: This 1/4” balanced connector accepts an instrument or line level signal for Channel 1 of the MobilePre USB.
-
Page 19: Power Indicator
Power Indicator: This LED indicator lights when the MobilePre USB is receiving power through its USB port. Rear Panel Features The rear panel of the MobilePre USB houses jacks providing the following functions: 1. USB Jack: This jack connects the MobilePre USB to your computer, using a USB 1.1 (or higher) connection.
-
Page 20: Control Panel Setup
USB using its control panel.To launch the control panel in your operating system, check the following instructions: Windows: You should see an M-Audio logo “M” installed on the right side of your Windows taskbar. Double click on this logo, to launch the M- Audio MobilePre USB Control Panel.
-
Page 21
Mac OS X: Follow the driver software installation for Mac OS X and restart. Launch the MobilePre USB Control Panel, which is found in the bottom row of the OS X System Preferences panel. The control panel has the following sets of controls: USB Record The USB Record section controls the level of the signal from the microphone and instrument inputs to the recording software. -
Page 22
Here is a summary of how all of these controls work together. The M-Audio MobilePre USB Control Panel controls are organized into three sets and these sets are named USB Record, Direct Monitor and Device Output. -
Page 23
Optimize for Slower Systems: Only the Mac OS 9 version of the Mobile Pre control panel has this checkbox. It should be left checked if your computer’s processor is of G3 or slower speed. Using the MobilePre USB Now that we’ve finished connecting speakers and setting levels, you’re probably interested in getting started. -
Page 24
So if you’re unsure, check the microphone’s manual or contact the manufacturer or your M-Audio dealer. Instrument/Line Inputs Channels 1 and 2 have an Instrument/Line input as well as the microphone input. -
Page 25
However, if your speakers are not self-powered then you will need to connect the MobilePre USB’s outputs to the inputs of a power amplifier or stereo receiver.You can then connect the power amp or receiver’s outputs to the speakers. Make sure that the speakers that you use near a CRT Computer Monitor are shielded speakers. -
Page 26: Troubleshooting
• If the unit stopped working when you installed a new program or a system software update, check the M-Audio website for new drivers. If there is a major new system software update that has just been released, you may need to search for beta software drivers that…
-
Page 27: Technical Specifications
Technical Specifications Hardware Features Analog Inputs: — Microphone & Instrument/Line: 2, In-to-USB & USB-to-Analog Audio Stereo Out — XLR Microphone: 2, Balanced w/ switchable Phantom Power (+48 V) — 1/8″ Microphone: Stereo — Instrument/Line: 2, 1/4″ Balanced, high-impedance (for electric guitar & bass) — Input Channel Gain Knob: +40 dB max — Input Channel LEDs: Clip (Red) and Signal-Present (Green) Analog Outputs:…
-
Page 28: Warranty Terms And Registration
— THD: -78 dB (typical) Warranty Terms and Registration Warranty Terms M-Audio warrants products to be free from defects in materials and workmanship, under normal use and provided that the product is owned by the original, registered user.Visit www.m-audio.com/warranty for terms and limitations applying to your specific product.
-
Page 29: Technical Support
M-Audio USA M-Audio Germany 5795 Martin Rd., Irwindale, CA 91706 Kuhallmand 34, D-74613 Ohringen, Germany Technical Support Technical Support web: www.m-audio.com/tech e-mail: support@m-audio.de tel (pro products): (626) 633-9055 tel: +49 (0)7941 — 9870030 tel (consumer products): (626) 633-9066 fax: +49 (0)7941 98 70070…

Quick Start Guide
This Quick Start Guide is a very short, step-by-step guide to getting you
started right away at using your new M-Audio MobilePre USB.
Step 1: Run the Installer
Insert the included Install CD-ROM into your CD or DVD drive and
double-click the install program. Follow the onscreen instructions.
Depending on your operating system, you may be prompted to restart
your computer at the end of the installation procedure. If the installer
instructs you to restart, you must restart your computer.
Step 2: Connect the Audio Cables
A typical system using the MobilePre USB has its two outputs connected
to a mixer or a pair of powered speakers. Connect a Microphone to the
Channel 1 XLR Input on the rear panel of the MobilePre USB.
Step 3: Connect the USB Cable
Connect the supplied USB cable to an open USB port on your computer.
Step 4: Test your Installation
Set your computer’s output to play out of the MobilePre USB and play and
audio file to test your connections. Launch an audio recording program,
arm one of the channels, and try recording some audio from a microphone
connected to the MobilePre USB’s inputs.
Still need more info? The following pages will walk you through the setup
and use of your MobilePre USB, in much greater detail.
2
- Manuals
- Brands
- M-Audio Manuals
- Recording Equipment
- MobilePre USB
- User manual
-
Contents
-
Table of Contents
-
Troubleshooting
-
Bookmarks
Quick Links
Related Manuals for M-Audio MobilePre
Summary of Contents for M-Audio MobilePre
-
Page 1
MobilePre User Guide… -
Page 2
Avid Technology, Inc. Avid, Pro Tools, Pro Tools M-Powered, and M-Audio are either trademarks or registered trademarks of Avid Technology, Inc. All other trademarks contained herein are the property of their respective owners. -
Page 3: Table Of Contents
Installing MobilePre Drivers ……..
-
Page 4
Check the MobilePre Drivers …….. -
Page 5: Chapter 1. Introduction To Mobilepre
1 Introduction to MobilePre Congratulations on your purchase of M-Audio® MobilePre Features MobilePre™. This audio interface is powered by a single USB connection to a computer, and • 2 inputs, 2 outputs works with your favorite music software to de- •…
-
Page 6: System Requirements
System Requirements Conventions Used in This Guide Minimum system requirements and product specifications can be found on the M-Audio The following symbols are used to highlight im- website at www.avid.com. portant information: User Tips are helpful hints for getting the most from your system.
-
Page 7: Chapter 2. Controls And Connectors
Power Indicator This blue LED indicates that ing input. The red LED indicates “clipping” or MobilePre is receiving power from the USB port distortion. on the host computer. For more information, refer to “Setting Your Recording Levels”…
-
Page 8: Top Panel
Headphone output signal when setting recording levels. Line Output Knob This knob controls the output level for both back panel Line Outputs. For more information, refer to “Setting Your Recording Levels” on page 12 MobilePre User Guide…
-
Page 9: Back Panel
Line Outputs These sockets allow you to con- 48V Phantom Power Switch When this nect MobilePre to either a pair of powered stu- switch is in the “on” position, 48V phantom dio monitors, a mixer, or stereo amplifier using a power is sent to both front panel inputs.
-
Page 10
MobilePre User Guide… -
Page 11: Chapter 3. Mobilepre Installation
Windows XP will ask if you want to search the If you do not have access to the Internet, the in- internet for a driver. Select “No, not this time” staller can also be found on the MobilePre disc. and click “Next.” When the Found New Hardware Wizard dia- Windows log appears, select “Install the software automat-…
-
Page 12: Hardware Connections
Front Panel The Line Output sockets are used to connect MobilePre to the inputs of a mixer, stereo power amplifier, or powered studio monitors using a pair of 1/4-inch TRS cables. Pressing the Front/Back Input buttons (see Chapter 2, “Controls and Connectors”) allows…
-
Page 13: Chapter 4. Mobilepre Software Control Panel
Mac OS X Smaller buffer sizes result in lower latency, but The MobilePre Control Panel can be found in may cause clicks, pops and dropouts on slower System Preferences, under “Other.” systems. If you are experiencing clicks and pops in your audio, try increasing the buffer size.
-
Page 14: Sample Rate Tab (Windows)
Adjusting the Bit Depth The default sample bit depth for MobilePre is 24-bit. If you wish to record at 16-bit, the bit depth setting can be changed in the audio pref- erences of your music software.
-
Page 15: Chapter 5. Using Mobilepre
Using MobilePre In your music software, select the appropriate Setting the Output Level MobilePre input as the source for the track you will be recording to. For further information on Once the MobilePre Line Outputs have been audio configuration and input selection, refer to…
-
Page 16: Setting Your Recording Levels
Direct Monitoring These settings can be changed in the MobilePre When recording an audio signal into your music Software Control Panel, as described in software, there is often a slight delay before it Chapter 4, “MobilePre Software Control Panel.”…
-
Page 17: Chapter 6. Troubleshooting
6 Troubleshooting MobilePre has been designed and tested under a Check Your Connections wide range of systems and operating conditions to give you high performance and professional- If you are having trouble getting audio in or out quality audio. However, there is a large number…
-
Page 18: Check The Mobilepre Drivers
Check the MobilePre Drivers Before Updating Your System If you are using MobilePre as a class compliant Visit www.avid/support for a compatible driver device (using the drivers already built into the before installing Microsoft or Apple operating computer’s operating system), download and system updates.
-
Page 19: Music Software Configuration
• Open the Sound Control Panel (Windows Vista and Windows 7) or Sounds and Audio Devices Control Panel (Windows XP), and make sure MobilePre is set as the Default Playback device. • Check the audio preferences page in your music software to see if the correct ASIO or WDM drivers are selected.
-
Page 20
MobilePre User Guide… -
Page 21: Appendix A. Compliance Information
appendix a Compliance Information Proposition 65 Warning Environmental Compliance This product contains chemicals, including lead, known to the State of California to cause cancer and Disposal of Waste Equipment by Users birth defects or other reproductive harm. Wash hands in the European Union after handling.
-
Page 22: Emc (Electromagnetic Compliance)
• Consult the dealer or an experienced radio/TV technician for help. Any modifications to the unit, unless expressly approved by Avid, could void the user’s authority to operate the equipment. MobilePre User Guide…
-
Page 23: Important Safety Instructions
Important Safety Instructions 12) For products that are not rack-mountable: Use only with a cart, stand, tripod, bracket, or table specified by the manufacturer, or sold with the equipment. When a cart is used, use caution when moving the cart/equipment combination to 1) Read these instructions.
-
Page 24
MobilePre User Guide… -
Page 26
Avid Technical Support (USA) Product Information 5795 Martin Road Visit the Online Support Center at For company and product information, Irwindale, CA 91706-6211 USA www.avid.com/support visit us on the web at www.avid.com…
 Loading…
![]()
Legal Notices
This guide is copyrighted ©2010 by Avid Technology, Inc., with all rights reserved. Under copyright laws, this guide may not be duplicated in whole or in part without the written consent of Avid Technology, Inc.
Avid, Pro Tools, Pro Tools M-Powered, and M-Audio are either trademarks or registered trademarks of Avid Technology, Inc. All other trademarks contained herein are the property of their respective owners.
Product features, specifications, system requirements, and availability are subject to change without notice.
Guide Part Number 9329-65019-00 REV A 04/10
Documentation Feedback
At Avid, we are always looking for ways to improve our documentation. If you have comments, corrections, or suggestions regarding our documentation, email us at techpubs@avid.com.

contents
Chapter 1. Introduction to MobilePre . . . . . . . . . . . . . . . . . . . . . . . . . . . . . . . . . . . . . . . . . . 1
MobilePre Features . . . . . . . . . . . . . . . . . . . . . . . . . . . . . . . . . . . . . . . . . . . . . . . . . . . . . . . 1
System Requirements . . . . . . . . . . . . . . . . . . . . . . . . . . . . . . . . . . . . . . . . . . . . . . . . . . . . . 2
Registration . . . . . . . . . . . . . . . . . . . . . . . . . . . . . . . . . . . . . . . . . . . . . . . . . . . . . . . . . . . . 2
Conventions Used in This Guide . . . . . . . . . . . . . . . . . . . . . . . . . . . . . . . . . . . . . . . . . . . . . . 2
Chapter 2. Controls and Connectors. . . . . . . . . . . . . . . . . . . . . . . . . . . . . . . . . . . . . . . . . . . 3
Front Panel. . . . . . . . . . . . . . . . . . . . . . . . . . . . . . . . . . . . . . . . . . . . . . . . . . . . . . . . . . . . . 3
Top Panel . . . . . . . . . . . . . . . . . . . . . . . . . . . . . . . . . . . . . . . . . . . . . . . . . . . . . . . . . . . . . . 4
Back Panel . . . . . . . . . . . . . . . . . . . . . . . . . . . . . . . . . . . . . . . . . . . . . . . . . . . . . . . . . . . . . 5
Chapter 3. MobilePre Installation . . . . . . . . . . . . . . . . . . . . . . . . . . . . . . . . . . . . . . . . . . . . . 7
Installing MobilePre Drivers . . . . . . . . . . . . . . . . . . . . . . . . . . . . . . . . . . . . . . . . . . . . . . . . . 7
Hardware Connections. . . . . . . . . . . . . . . . . . . . . . . . . . . . . . . . . . . . . . . . . . . . . . . . . . . . . 8
Chapter 4. MobilePre Software Control Panel . . . . . . . . . . . . . . . . . . . . . . . . . . . . . . . . . . 9
Accessing the Control Panel . . . . . . . . . . . . . . . . . . . . . . . . . . . . . . . . . . . . . . . . . . . . . . . . . 9
Latency Tab (Windows) . . . . . . . . . . . . . . . . . . . . . . . . . . . . . . . . . . . . . . . . . . . . . . . . . . . . 9
Sample Rate Tab (Windows) . . . . . . . . . . . . . . . . . . . . . . . . . . . . . . . . . . . . . . . . . . . . . . . 10
About Tab. . . . . . . . . . . . . . . . . . . . . . . . . . . . . . . . . . . . . . . . . . . . . . . . . . . . . . . . . . . . . 10
Adjusting the Bit Depth . . . . . . . . . . . . . . . . . . . . . . . . . . . . . . . . . . . . . . . . . . . . . . . . . . . 10
Chapter 5. Using MobilePre . . . . . . . . . . . . . . . . . . . . . . . . . . . . . . . . . . . . . . . . . . . . . . . . . 11
Setting the Output Level . . . . . . . . . . . . . . . . . . . . . . . . . . . . . . . . . . . . . . . . . . . . . . . . . . 11
Recording Microphones . . . . . . . . . . . . . . . . . . . . . . . . . . . . . . . . . . . . . . . . . . . . . . . . . . . 11
Recording Instruments. . . . . . . . . . . . . . . . . . . . . . . . . . . . . . . . . . . . . . . . . . . . . . . . . . . . 11
Setting Your Recording Levels . . . . . . . . . . . . . . . . . . . . . . . . . . . . . . . . . . . . . . . . . . . . . . 12
Direct Monitoring . . . . . . . . . . . . . . . . . . . . . . . . . . . . . . . . . . . . . . . . . . . . . . . . . . . . . . . 12
Sample Rate and Bit Depth . . . . . . . . . . . . . . . . . . . . . . . . . . . . . . . . . . . . . . . . . . . . . . . . 12
Contents iii
Chapter 6. Troubleshooting . . . . . . . . . . . . . . . . . . . . . . . . . . . . . . . . . . . . . . . . . . . . . . . . . 13
Check Your Connections . . . . . . . . . . . . . . . . . . . . . . . . . . . . . . . . . . . . . . . . . . . . . . . . . . 13
Check the MobilePre Drivers . . . . . . . . . . . . . . . . . . . . . . . . . . . . . . . . . . . . . . . . . . . . . . . 14
Before Updating Your System . . . . . . . . . . . . . . . . . . . . . . . . . . . . . . . . . . . . . . . . . . . . . . 14
Music Software Configuration . . . . . . . . . . . . . . . . . . . . . . . . . . . . . . . . . . . . . . . . . . . . . . 15
Appendix A. Compliance Information . . . . . . . . . . . . . . . . . . . . . . . . . . . . . . . . . . . . . . . . . 17
Environmental Compliance . . . . . . . . . . . . . . . . . . . . . . . . . . . . . . . . . . . . . . . . . . . . . . . . 17
EMC (Electromagnetic Compliance) . . . . . . . . . . . . . . . . . . . . . . . . . . . . . . . . . . . . . . . . . . 18
Safety Compliance . . . . . . . . . . . . . . . . . . . . . . . . . . . . . . . . . . . . . . . . . . . . . . . . . . . . . . 18
iv MobilePre User Guide

chapter 1
Introduction to MobilePre
Congratulations on your purchase of M-Audio® MobilePre™. This audio interface is powered by a single USB connection to a computer, and works with your favorite music software to deliver professional-quality recordings. You can use it to capture your guitar and vocal performances, voice-overs, podcasts, or anything else you need to record.
Furthermore, its lightweight compact design allows you to take MobilePre anywhere.
Please take the time to read this User Guide. It will explain how to get the best performance out of your MobilePre audio interface.
MobilePre Features
•2 inputs, 2 outputs
•24-bit, 48 kHz operation
•2 front panel “Combo” input connectors (Mic or Instrument)
•48V Phantom power for condenser microphones
•2 “Front/Back” input selector switches
•Direct Monitor button
•2 front panel Signal/Clip indicators
•1/4-inch stereo headphone output with dedicated volume control
•2 back panel 1/4-inch TRS line-level inputs
•2 back panel 1/4-inch TRS Balanced line outputs with dedicated output volume control
•USB bus powered operation
•Class compliant operation
•Pro Tools® M-Powered™ compatible
Chapter 1: Introduction to MobilePre 1

System Requirements
Minimum system requirements and product specifications can be found on the M-Audio website at www.avid.com.
Registration
Review the enclosed Registration Information Card and follow the instructions on it to quickly register your purchase online. By registering, you become eligible to receive the following:
•Technical support information
•Software update and upgrade notices
•Hardware warranty information
Conventions Used in This
Guide
The following symbols are used to highlight important information:
 User Tips are helpful hints for getting the most from your system.
 Important Notices include information that could affect your data or the performance of your system.
Cross References point to related sections in this guide.
2 MobilePre User Guide

chapter 2
Controls and Connectors
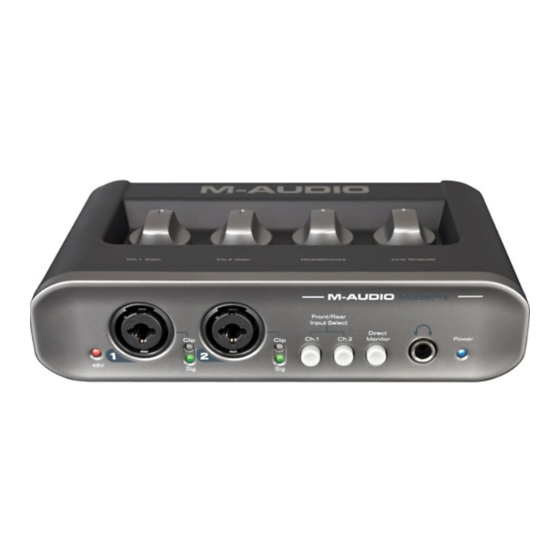
Front Panel
|
1 |
2 |
3 |
4 |
5 |
6 |
7 |
||||||||
1Phantom Power Indicator (48V) This red LED illuminates when the Phantom Power switch (back panel) is set to the “on” position.
 Although phantom power can be used safely with most microphones, it may damage some ribbon microphones. Always turn off phantom power and wait at least ten seconds before connecting a ribbon microphone.
2Microphone/Instrument Inputs These connectors accept either a standard XLR microphone cable, or high-impedance 1/4-inch TS instrument cable.
3Signal/Clip Indicators The green LED indicates the presence of a signal at the corresponding input. The red LED indicates “clipping” or distortion.
For more information, refer to “Setting Your Recording Levels” on page 12.
4Front/Back Input Buttons These buttons allow selection of the front or back panel inputs for their corresponding channels.
5Direct Monitor Button This button switches Direct Monitoring on and off, which provides a latency-free mix of the input signal and the output of your music software. When Direct Monitoring is switched off, you must use the monitoring option in your music software.
For more information, refer to “Direct Monitoring” on page 12
6Headphone Output Connect your stereo headphones to this 1/4-inch output. Set the volume using the top panel Headphone control knob.
7Power Indicator This blue LED indicates that MobilePre is receiving power from the USB port on the host computer.
Chapter 2: Controls and Connectors 3

8 Channel Gain Knobs These knobs control the input volume for their corresponding channels when setting recording levels.
For more information, refer to “Setting Your Recording Levels” on page 12
9Headphone Volume Knob This knob controls the level of the Headphone output signal
10Line Output Knob This knob controls the output level for both back panel Line Outputs.
4 MobilePre User Guide
Specifications:
|
Accompanying Data:
M-Audio MobilePre USB Recording Equipment PDF Operation & User’s Manual (Updated: Tuesday 14th of March 2023 04:20:48 AM)
Rating: 4.8 (rated by 82 users)
Compatible devices: Fast Track C400, Podcast Factory, FireWire 410, Sonica Theater, Pro Tools, UC-33e, ProFire Lightbridge, Keystation Mini 32.
Recommended Documentation:
M-Audio MobilePre USB: Text of Operation & User’s Manual
(Ocr-Read Version Summary of Contents, UPD: 14 March 2023)
-
3, Contents iii contents Chapter 1. Introduction to MobilePre . . . . . . . . . . . . . . . . . . . . . . . . . . . . . . . . . . . . . . . . . . 1 MobilePre Features . . . . . . . . . . . . . . . . . . . . . . . . . . . . . . . . . . . . . . . . . . . . . . . . . . . . . . . 1 System Requirements . . . . . . . . . . . . . . . . . . . . . . . . . . . . . . . . . . . . . . . . .…
-
17, Chapter 6: Troubleshooting 13 chapter 6 Troubleshooting MobilePre has been designed and tested under a wide range of systems and operating conditions to give you high performance and professional- quality audio. However, there is a large number of operating scenarios that could affect your sys- tem’s performance. Although this chapter can- not cover all issues you may encounter, it…
-
9, Chapter 2: Controls and Connectors 5 Back Panel 11 Line Outputs These sockets allow you to con- nect MobilePre to either a pair of powered stu- dio monitors, a mixer, or stereo amplifier using a pair of 1/4-inch TRS cables. The volume level for these outputs is controlled by the Line Output knob on the top panel. 12 Line Inputs These sockets allow you to con- nect line-level inst…
-
23, Appendix A: Compliance Information 19 Important Safety Instructions 1) Read these instructions. 2) Keep these instructions. 3) Heed all warnings. 4) Follow all instructions. 5) Do not use this equipment near water. 6) Clean only with dry cloth. 7) Do not block any ventilation openings. Install in accordance with the manufacturer’s instructions.
 Do not install n…
 -
2, Legal Notices This guide is copyrighted ©2010 by Avid Technology, Inc., with all rights reserved. Under copyright laws, this guide may not be duplicated in whole or in part without the written consent of Avid Technology, Inc. Avid, Pro Tools, Pro Tools M-Powered, and M-Audio are either trademarks or registered trademarks of Avid Technology, Inc. All other trademarks contained herein ar…
-
21, Appendix A: Compliance Information 17 appendix a Compliance Information Environmental Compliance Disposal of Waste Equipment by Users in the European Union This symbol on the product or its packaging indicates that this product must not be disposed of with other waste. Instead, it is your responsibility to dispose of your waste equipment by handing it over to a desi…
-
18, MobilePre User Guide14 Check the MobilePre Drivers If you are using MobilePre as a class compliant device (using the drivers already built into the computer’s operating system), download and install the latest drivers from the M-Audio website at www.m-audio.com/drivers. If this does not resolve the issue, check to see if the MobilePre drivers are properly installed: W…
-
19, Chapter 6: Troubleshooting 15 Music Software Configuration Make sure your music software has been con- figured for use with MobilePre. Windows • Open the Sound Control Panel (Windows Vista and Windows 7) or Sounds and Audio Devices Control Panel (Windows XP), and make sure MobilePre is set as the Default Playback device. • Check the audio prefer…
-
14, MobilePre User Guide10 Sample Rate Tab (Windows) This page allows you to select a sample rate of 44.1 kHz or 48 kHz. This is provided so that MME applications in Vista have access to both supported sample rates. ASIO and WDM appli- cations allow you to change the sample rate within the recording software, regardless of the setting on this tab. About Tab This page contai…
 Do not install n…
M-Audio MobilePre USB: Recommended Instructions
NWZ-E436FBLK Marketing Specifications (Black), Brite-Nite 5W, SP 06241, EON32000


-
Version 1.0 – Nov. 2011Have you registered your Samurai yet? Upgrade to 3 year warranty* now.Atomos SamuraiUser ManualWebsite: www.atomos.com | Sales: [email protected] | Support: [email protected] …
Samurai 30
-
USBPre 2User Guide and Technical InformationSound Devices, LLC 300 Wengel Drive • Reedsburg, WI • USA +1 (608) 524-0625 • fax: +1 (608) 524-0655 Toll-Free: (800) 505-0625 www.sounddevices.com [email protected] …
USBPre 2 27
-
BIXOLON SAMSUNG USB & LPT Device Driver Installation Manual Printer Model SRP -350/SRP-370 SRP-372/SRP-270 SRP-275/SRP-280 SRP-500/SRP-350FSRP-350plus COPYRIGHT BY BIXOLON CORP. 2005~2006 2006-07-07 …
SRP-350 16
-
201 Daktronics Drive PO Box 5128 Brookings, SD 57006-5128Tel: 1-800-DAKTRONICS (1-800-325-8766) Fax: 605697-4746www.daktronics.com/supportSportsound® RackSSR-100 Operation ManualDD2746938 Rev 2 – 13 July 2015 …
Sportsound Rack SSR-100 32
-
Twin6 Be Solo6 BeSub6SOLO6 BE — TWIN 6 BE — SUB6 BE USER MANUALProfessional Digital Monitoring SystemFrançais page 13Due to constant technological advances, Focal reserves its right to modify specifications without notice. Images may not conform exactly to specific product.Focal® is a trademark of Focal-JMlab® — BP 374 — 108, rue de l’Avenir — 42353 La Talaudière cedexFrance — Tel. 00 …
Solo6 Be 24
-
◈ Information This Installation Guide includes a brief outline of information necessary for product installation. For more detailed installation information, please refer to the user manual in the enclosed CD. The contents of the CD include the following. 1. Manual: User Manual, Code Chart, Control Commands 2. Drivers: Windows Drivers, OPOS Drivers 3. Utilities: a logo download tool and a …
SRP-275 8
-
START STOP DATEPLAYREWRECSTOPPAUSEFFTV/VCR CHC. RESETCANCELDBSDAILYWEEKLYENTERRECLINKRECSPEEDSKIPSEARCHMENUNAVISUBTITLEVCRPROGRAM PROG.CHECKTIMERA/B/C/DTVTV/VCRCABLE/DBSPOWERREMOTECODE. , ?ABC DEFGHIJKL MNOPQRS TUV WXYZAUXTVVOLA.MONITORDISPLAYOSDENTERBACKKHM-DH40000UD-VHS DIGITAL RECORDERINSTRUCTIONSLPT0698-001A For Customer Use:Enter below the Model No. and Serial No. which are loc …
HM-DH40000U 92
-
ApogeeTechNotes:Apogee Electronics • 1715 Berkeley Street Santa Monica, California 90404 • 310-584-9394 • [email protected] This DocumentThis document describes the installation procedure, new features and resolved issues for the May 2008 Ensemble Up-date. The update is comprised of two parts, the Ensemble Software Installer and the Ensemble …
ensemble 2
-
SERVICE MANUALDIGITAL SOUND PROJECTORYSP-800■ CONTENTSTO SERVICE PERSONNEL …………………………………… 2FRONT PANEL …………………………………………………….. 3REAR PANELS …………………………………………………….. 3BOTTOM PANEL ………………………………………………….. 4REMOTE CONTROL PANELS …
YSP-800 82
-
USER MANUAL GFK 2847Y Aug 2020 QuickPanel+TM OPERATOR INTERFACE USER MANUAL IC755CxS06RDx (6″ Display) IC755CxW07CDx (7″ Display) IC755CxS10CDx (10″ Display) IC755CxS12CDx (12″ Display) IC755CxS15CDx (15″ Display) …
QuickPanel+ IC755C S06RD Series 99
Additional Information:
Operating Impressions, Questions and Answers:
Still not convinced?
Already more than 1081030 people joined to us!
Join
Subscribe to Newsletter

 English
 Русский
The collection of popular instruction manuals and user guides
© All rights reserved. Made with by Manualza!