-
Contents
-
Table of Contents
-
Troubleshooting
-
Bookmarks
Quick Links
CR-N775D
NETWORK CD RECEIVER
Instruction Manual
En
Related Manuals for Onkyo CR-N775D
Summary of Contents for Onkyo CR-N775D
-
Page 1
CR-N775D NETWORK CD RECEIVER Instruction Manual… -
Page 2
> Before Start > Part Names > Install > Initial Setup > Playback Supplementary information | Advanced Setup | Others Table of Contents Before Start Before Start Other notes …………. 49 What’s in the box …………3 General Specifications ……….50 License and Trademark Information …… -
Page 3
> Before Start > Part Names > Install > Initial Setup > Playback Supplementary information | Advanced Setup | Others What’s in the box 1. Main unit (1) 2. Remote controller (RC-961S) (1), Batteries (AAA/ R03) (2) 3. DAB/FM wire antenna (1) 4. -
Page 4: Front Panel
> Before Start > Part Names > Install > Initial Setup > Playback Supplementary information | Advanced Setup | Others Front Panel Part Names 1. TIMER indicator: This lights when the alarm is set. 2. Remote control sensor: Receives signals from the remote controller. 0 The signal range of the remote controller is within about 23y/7 m, at an angle of 30°…
-
Page 5: Rear Panel
6. DAB/FM ANTENNA jack: Connect the supplied DAB/FM wire antenna. 7. NETWORK jack: Connect to the network with an ethernet cable. jack: Connect an Onkyo product with an RI jack using an RI cable to synchronize with this unit. ( P29) 9.
-
Page 6: Remote Controller
> Before Start > Part Names > Install > Initial Setup > Playback Supplementary information | Advanced Setup | Others Remote Controller 1. Í button: Turns the unit on or into standby mode. button: Switches the input to BLUETOOTH. 2. Numbered buttons: Use to directly input the CD track 11.
-
Page 7: Display
> Before Start > Part Names > Install > Initial Setup > Playback Supplementary information | Advanced Setup | Others Display DIRECT Track 1/10 1:45 / 3:23 1. Displays the play status. DIRECT: When DIRECT is enabled.
-
Page 8: Connect The Speakers
> Before Start > Part Names > Install > Initial Setup > Playback Supplementary information | Advanced Setup | Others Connect the Speakers Install Refer to the illustration to connect the speaker system. Twist the wires of the speaker cable tightly before inserting into the SPEAKERS terminals.
-
Page 9: Connecting The Antenna And Power Cord, Etc
> Before Start > Part Names > Install > Initial Setup > Playback Supplementary information | Advanced Setup | Others Connecting the antenna and power cord, etc. Antenna Hookup Move the antenna around while playing the radio to find the position with the best reception. Power Cord Hookup This model includes a removable power cord.
-
Page 10: Initial Setup
Initial Setup Starting up: When you press the Í button, the volume indicator on the main unit lights white, then after 30 seconds the ONKYO logo is displayed on the display and you can start operating the unit. Wi-Fi connection settings…
-
Page 11
> Initial Setup > Playback Supplementary information | Advanced Setup | Others button, by selecting «Push Button» you can connect 0 This unit is displayed as «Onkyo CR-N775D without entering a password. XXXXXX». Initial Setup 3. After establishing the connection, select «Done» on Would you like to start Wi-Fi setup? the screen of the iOS device. -
Page 12: Time Settings
> Before Start > Part Names > Install > Initial Setup > Playback Supplementary information | Advanced Setup | Others Time settings By setting the time, you can use the alarm to start play ( P34). 1. Press on the remote controller to display the menu. 2.
-
Page 13: Playing Cds
> Before Start > Part Names > Install > Initial Setup > Playback Supplementary information | Advanced Setup | Others Playing CDs Playback This unit can also play CD-R/CD-RW recorded with MP3 format files, along with commercially available music CDs. 0 The supported sampling rates for MP3 files are 32 kHz to 48 kHz, and supported bitrates are between 32 kbps and 320 kbps and VBR.
-
Page 14
> Before Start > Part Names > Install > Initial Setup > Playback Supplementary information | Advanced Setup | Others Repeat play 1. Repeatedly press (f) during play to display on the display. : Repeat play of the selected individual track. : Repeat play of all tracks. -
Page 15: Usb Storage Device/Hdd
> Before Start > Part Names > Install > Initial Setup > Playback Supplementary information | Advanced Setup | Others USB Storage Device/HDD You can play music files by connecting a USB storage device or HDD (hard disk drive) to the USB port on the front or rear of the unit.
-
Page 16: Repeat Play
> Before Start > Part Names > Install > Initial Setup > Playback Supplementary information | Advanced Setup | Others USB Storage / HDD Device Supported Audio Formats Folder 1 Folder 1-1 file 1-1 file 2-1 Artist name Album name Requirements file 3-1 This unit supports the following music file formats.
-
Page 17
> Before Start > Part Names > Install > Initial Setup > Playback Supplementary information | Advanced Setup | Others and VBR. FLAC (.flac/.FLAC): 0 Supported sampling rates: 44.1 kHz, 48 kHz, 88.2 kHz, 96 kHz, 176.4 kHz, 192 kHz 0 Quantization bit: 8 bit, 16 bit, 24 bit Apple Lossless (.m4a/.mp4/.M4A/.MP4): 0 Supported sampling rates: 44.1 kHz, 48 kHz, 88.2… -
Page 18: Internet Radio
> Before Start > Part Names > Install > Initial Setup > Playback Supplementary information | Advanced Setup | Others Internet Radio Basic operations You can use internet radio services such as TuneIn by connecting this unit to a network that has an internet connection.
-
Page 19: Spotify
3. Play the track in the Spotify app, then after switching to the screen for controlling play, tap «Devices Available» at the bottom of the screen. 4. Select this unit. 0 This unit is displayed as «Onkyo CR-N775D XXXXXX». 5. This unit turns on automatically and the input Device selector changes to NETWORK and streaming of Spotify starts.
-
Page 20: Listening To The Fm Radio
> Before Start > Part Names > Install > Initial Setup > Playback Supplementary information | Advanced Setup | Others Listening to the FM Radio Tuning Automatically press the button. The frequency changes continuously if the button is held down and stops Perform the following procedure when the unit is on.
-
Page 21
> Before Start > Part Names > Install > Initial Setup > Playback Supplementary information | Advanced Setup | Others Registering a station the preset number. 0 When deleted, the number on the display goes You can register up to 40 of your favorite FM/DAB radio off. -
Page 22: Using Rds
> Before Start > Part Names > Install > Initial Setup > Playback Supplementary information | Advanced Setup | Others Using RDS Cultures Science (Science and technology) RDS stands for Radio Data System and is a method of Varied speech transmitting data in FM radio signals.
-
Page 23: Listening To Dab Digital Radio
> Before Start > Part Names > Install > Initial Setup > Playback Supplementary information | Advanced Setup | Others Listening to DAB Digital Radio Tuning Perform the following procedure when the unit is on. 1. Repeatedly press INPUT 2/1 on the remote controller to switch input to DAB.
-
Page 24
> Before Start > Part Names > Install > Initial Setup > Playback Supplementary information | Advanced Setup | Others Registering a station the preset number. 0 When deleted, the number on the display goes You can register up to 40 of your favorite FM/DAB radio off. -
Page 25
> Before Start > Part Names > Install > Initial Setup > Playback Supplementary information | Advanced Setup | Others Changing the order stations are 80 — 100: Excellent reception Multiplex Name : Displays the name of the current displayed multiplex. -
Page 26
BLUETOOTH wireless technology enabled device, then select this unit from amongst the devices displayed. If a password is requested, enter «0000». 0 This unit is displayed as «Onkyo CR-N775D XXXXXX». 3. «Now Pairing…» on the display changes to the name… -
Page 27: Airplay
0 This unit is displayed as «Onkyo CR-N775D XXXXXX». Onkyo CR-N775D XXXXXX 0 If an «AirPlay Password» has been set on this unit, enter the password you set.
-
Page 28: Playing Audio From An External Device
> Before Start > Part Names > Install > Initial Setup > Playback Supplementary information | Advanced Setup | Others Playing audio from an external device Connections You can play the audio from external devices such as TVs and game consoles through this unit. If the external device has an optical digital output jack or coaxial digital jack, connect using a digital optical cable or digital coaxial cable to the DIGITAL IN OPTICAL/…
-
Page 29
Both connectors can be used. By connecting an Onkyo component with RI jack to the 0 Connection to RI connectors only does not work as unit by using an RI cable and an analog audio cable, the system. -
Page 30: Music Server
> Before Start > Part Names > Install > Initial Setup > Playback Supplementary information | Advanced Setup | Others Music Server It is possible to stream music files stored on PCs or NAS devices connected to the same network as this unit.
-
Page 31
> Before Start > Part Names > Install > Initial Setup > Playback Supplementary information | Advanced Setup | Others to list players in the network, and then go to step to display the results of the search. 5. With 3/4 on the remote controller, select the music 3. -
Page 32
> Before Start > Part Names > Install > Initial Setup > Playback Supplementary information | Advanced Setup | Others music file on another server, open the target server MP3 (.mp3/.MP3): LPCM (Linear PCM): from «Other Libraries» and select the music file to 0 Supported formats: MPEG-1/MPEG-2 Audio Layer 3 0 Supported sampling rates: 44.1 kHz, 48 kHz play. -
Page 33: Using A Computer To Save And Delete The Music On A Usb Hdd Connected To This Unit
> Before Start > Part Names > Install > Initial Setup > Playback Supplementary information | Advanced Setup | Others Using a computer to save and delete the music on a USB HDD connected to this unit Basic operations to access the HDD connected to the USB port on the rear of the main unit.
-
Page 34: Using The Alarm To Start Play
> Before Start > Part Names > Install > Initial Setup > Playback Supplementary information | Advanced Setup | Others Using the alarm to start play Settings At the set time, the unit switches on and starts play of the desired source. You can set two different timers, «Timer 1″…
-
Page 35
> Before Start > Part Names > Install > Initial Setup > Playback Supplementary information | Advanced Setup | Others amongst «Everyday», «Sunday», «Monday», 1. Press on the remote controller to display the «Tuesday», «Wednesday», «Thursday», «Friday», menu, press 3/4 (b) to select «Timer», then press «Saturday», «Mon-Fri», «Tue-Sat», and «Sat-Sun»… -
Page 36: Entering Text, Adjusting Sound Quality, Etc
> Before Start > Part Names > Install > Initial Setup > Playback Supplementary information | Advanced Setup | Others Entering text, adjusting sound quality, etc. Entering text Emphasizing the low range (PM.Bass) 1. Press TONE button (c) three times. Text entry, for passwords, etc., uses the following 2.
-
Page 37: Using Apps
You can use the Play Queue feature by downloading your smartphone, tablet connecting to the same the «Onkyo Controller» to your smartphone or tablet. network as this unit. Connect multiple Play-Fi enabled The Play Queue feature allows you to temporarily save…
-
Page 38
> Before Start > Part Names > Install > Initial Setup > Playback Supplementary information | Advanced Setup | Others Supplementary information for player functions Supplementary information Due to firmware (the software for the system) updates after you make your purchase or firmware changes during production of the product, there may be additions or changes to the features available compared to what is in the instruction manual. -
Page 39: Advanced Settings
> Before Start > Part Names > Install > Initial Setup > Playback Supplementary information | Advanced Setup | Others Advanced Settings Advanced Setup The unit allows you to configure advanced settings to provide you with an even better experience. 1.
-
Page 40
> Before Start > Part Names > Install > Initial Setup > Playback Supplementary information | Advanced Setup | Others This can be set only when «Wi-Fi» is selected in «Connection Type». ∫ AirPlay Password 0 You can make Wi-Fi connection settings using a web browser on a computer. For You can set a password of up to 31 characters so that only registered users can use details, refer to “Web Setup”… -
Page 41
> Before Start > Part Names > Install > Initial Setup > Playback Supplementary information | Advanced Setup | Others ∫ Tuner Bluetooth Wakeup / This function wakes up the unit on standby by connecting a Clock Call BLUETOOTH wireless technology enabled device. Also, if FM Search Level You can choose to have only those FM stations with strong DISPLAY on the main unit or… -
Page 42: Factory Reset
> Before Start > Part Names > Install > Initial Setup > Playback Supplementary information | Advanced Setup | Others ∫ Bluetooth Pairing Information You can initialize the pairing information saved on this unit. Press 3/4 to select «Clear», then press ENTER to initialize Bluetooth Select whether or not to use the BLUETOOTH function.
-
Page 43
> Before Start > Part Names > Install > Initial Setup > Playback Supplementary information | Advanced Setup | Others Update You will not be able to select «Update» if there is no firmware update. ∫ via Network Press ENTER to select when you want to update the firmware via network. ∫… -
Page 44: Firmware Update
> Before Start > Part Names > Install > Initial Setup > Playback Supplementary information | Advanced Setup | Others Firmware Update Firmware Update The updating function on this unit How to update Updating the Firmware via Network This unit has functionality to update the firmware (the There are two methods for updating the firmware: via 0 Check that the unit is turned on, and the connection system software) over a network or by the USB port.
-
Page 45
> Before Start > Part Names > Install > Initial Setup > Playback Supplementary information | Advanced Setup | Others to the latest version. use of the USB storage device with this unit. Thank you for your understanding. Update If an error message is displayed: When an error 1. -
Page 46: Troubleshooting
> Before Start > Part Names > Install > Initial Setup > Playback Supplementary information | Advanced Setup | Others Troubleshooting Others Before starting the procedure remote controller. 0 Make sure that the speaker cables are not shorting. 0 When you play source material that contains no When operation is unstable, problems may be solved The unit turns off unexpectedly information in the LFE channel, the subwoofer…
-
Page 47
> Before Start > Part Names > Install > Initial Setup > Playback Supplementary information | Advanced Setup | Others 0 Make sure that this unit is not subjected to direct 0 Separate the antenna from speaker cables and the 0 Shorten the distance from the access point or sunshine or inverter-type fluorescent lights. -
Page 48: Bluetooth Function
> Before Start > Part Names > Install > Initial Setup > Playback Supplementary information | Advanced Setup | Others ® 0 This unit is compatible with Windows Media Player enabled device. Restarting the BLUETOOTH selector switch. Select Send mode. 11 or 12 network servers or NAS that are compatible wireless technology enabled device may be Sound is interrupted…
-
Page 49: Other Notes
> Before Start > Part Names > Install > Initial Setup > Playback Supplementary information | Advanced Setup | Others Other notes ∫ CDs condensation. This may not only cause the unit to malfunction, but it can also damage the disc or parts of Precautions for Playback the unit.
-
Page 50: Amplifier Section
> Before Start > Part Names > Install > Initial Setup > Playback Supplementary information | Advanced Setup | Others General Specifications ∫ Amplifier Section ∫ Bluetooth Section ∫ General RMS Output Power Communication system Power Supply 0 40 W + 40 W (1 kHz, 10%, T.H.D 4 ≠) 0 BLUETOOTH Specification version 4.1+LE 0 AC 220 — 240 V, 50/60 Hz Tone Control Characteristics…
-
Page 51
> Before Start > Part Names > Install > Initial Setup > Playback Supplementary information | Advanced Setup | Others Digital Input 0 OPTICAL : 1 (Max Fs: 192 kHz) 0 COAXIAL : 1 (Max Fs: 192 kHz) ∫ Output Jacks 0 LINE OUT: 1 0 SUBWOOFER PRE OUT: 1 ∫… -
Page 52: Part Names License And Trademark Information
> Before Start > Part Names > Install > Initial Setup > Playback Supplementary information | Advanced Setup | Others License and Trademark Information For DTS patents, see http://patents.dts.com. Manufactured under license from DTS, Inc. DTS and Play-Fi are registered trademarks of DTS, Inc.
-
Page 53
6, Avenue de Marais F — 95816 Argenteuil Cedex FRANCE For Product Support only: +33 969 368 138 http://www.fr.onkyo.com/fr/ F1710-0 (C) Copyright 2017 Onkyo & Pioneer Corporation Japan. All rights reserved. http://www.onkyo.com/privacy/ * 2 9 4 0 3 2 5 2 * SN 29403252…
Посмотреть инструкция для Onkyo CR-N775D бесплатно. Руководство относится к категории Приемники, 5 человек(а) дали ему среднюю оценку 8.3. Руководство доступно на следующих языках: английский. У вас есть вопрос о Onkyo CR-N775D или вам нужна помощь? Задайте свой вопрос здесь
Не можете найти ответ на свой вопрос в руководстве? Вы можете найти ответ на свой вопрос ниже, в разделе часто задаваемых вопросов о Onkyo CR-N775D.
Когда звук считается слишком громким?
Могут ли устройства разных марок подключаться друг к другу при помощи Bluetooth?
Как лучше всего выполнять чистку Приемник?
Какой вес Onkyo CR-N775D?
Какая высота Onkyo CR-N775D?
Какая ширина Onkyo CR-N775D?
Какая толщина Onkyo CR-N775D?
Инструкция Onkyo CR-N775D доступно в русский?
Не нашли свой вопрос? Задайте свой вопрос здесь
O NKYO CR-N755
(РУКОВОДСТВО ПО ЭКСПЛУАТАЦИИ)
Вы приобрели устройство радиоприемное производства компании «ОНКИО САУНД ЭНД ВИЖН КОРПОРЕЙШЕН», Япония. Данная модель является CD ресивером (CD-плеер/усилитель/тюнер) и предназначена для воспроизведения и усиления аудио сигналов и приема радиопередач в домашних аудио системах.. Эти изделия широко известны в кругах истинных ценителей высококлассного звука. Их качество и безопасность подтверждены множеством тестов, проведенных как зарубежными, так и российскими испытательными лабораториями.
Изготовитель в течение 3 лет (срок службы) после выпуска данного изделия обеспечивает наличие комплектующих в целях возможности проведения ремонта и технического обслуживания, по истечении которого эксплуатация и техническое обслуживание продолжаются в соответствии с действующими нормативными документами. Изделие остается безопасным для жизни, здоровья человека и окружающей среды в течение всего срока эксплуатации. Гарантийный срок — 1 год.
Информация о Российской сертификации
| № сертификата
соответствия |
Орган по
сертифи-кации |
Нормативные документы | Наименование сертифицированной продукции | Срок действия сертификата |
| POCC JP.АГ23.B08701 | OC
«ТЕСТМАКС» |
ГОСТ P МЭК 60065-2009,
ГОСТ Р 51515-99 ГОСТ 22505-97, ГОСТ Р 51317.3.2-2006 (разд.6,7) ГОСТ Р 51317.3.3-2008 |
Устройства радиоприемные | 06.09.2012 – 05.09.2015 |
Основные технические характеристики
Cм. в конце инструкции
ВНИМАНИЕ: Если Вы приобрели аудиоаппаратуру надлежащего качества, то, по Российским законам, она не подлежит возврату или обмену на аналогичный товар других размера, формы и т.д.
Тоттори Онкио Корпорейшн
243 Сююки, Кураёси-си, Тоттори 682, Япония
Tottory Onkyo Corporation
243 Shuuki, Kurayoshi-shi, Tottori 682, Japan
ONKYO CR-N755,
CD-ресивер
Руководство по эксплуатации
Благодарим вас за приобретение CD-ресивера Onkyo.
Пожалуйста, прочитайте это руководство до конца перед выполнением соединений и включением питания.
Нижеследующие инструкции в данном Руководстве позволят вам получить оптимальное качество и удовольствие от прослушивания от вашего нового CD-ресивера.
Пожалуйста, сохраните данное руководство для обращения в будущем.
Содержание
| Приступая к эксплуатации | 2 |
| Соединения | 14 |
| Основные операции | 17 |
| Воспроизведение диска | 19 |
| Использование USB интерфейса/Сетевых сервисов | 23 |
| Воспроизведение c iPod/iPhone | 29 |
| Прослушивание радио | 31 |
| Более сложные режимы | 35 |
| Прочее | 41 |
Страница 2
Предупреждение:
Для предотвращения возгорания или опасности удара электрическим током, не подвергайте данное устройство воздействию дождя или влаги.
Предостережение:
Для уменьшения опасности удара электрическим током, не снимайте крышку (или заднюю панель). Внутри отсутствуют части, обслуживаемые пользователем. Обращайтесь за обслуживанием к квалифицированному ремонтному персоналу.
Символ молнии в равностороннем треугольнике призван обратить внимание пользователя на присутствие неизолированного «опасного напряжения» внутри корпуса изделия, которое может быть достаточной величины, чтобы представлять опасность удара людей электрическим током.
(рисунок)
Восклицательный знак в равнобедренном треугольнике призван обратить внимание пользователя на важные инструкции по эксплуатации и уходу (обслуживанию) в документации, сопровождающей прибор.
(рисунок)
Компактный сетевой ресивер Onkyo CR-N775D, несмотря на малые размеры, воспроизводит музыку, как утверждается в пресс-релизе, «с такой же энергией и плавностью, что и полномасштабный Hi-Fi компонент».
Небольшое устройство оснащено патентованной схемой импульсного усиления 3-state Bitstream и выдает по 40 Вт на канал. Такая схема, как считают разработчики, идеально подходит для записей в форматах Hi-Res, поскольку «обеспечивает более широкий диапазон частот и лучшую линейность, вместе с повышенным разрешением, оптимизированным для Hi-Res Audio источников».
В отличие от других систем, использующих только два состояния для представления звуковой волны, 3-уровневый битовый поток добавляет третье состояние (или «нейтральное» положение) для аппроксимации волны более гладким и естественным образом, приближаясь к аналоговым усилителям.
Ресивер поддерживает мультирумные платформы Chromecast, DTS Play-Fi и FlareConnect, а также готов работать с источниками, подключенными по Bluetooth, AirPlay и Spotify Connect. К USB-входу девайса на фронтальной панели можно подключить жесткий диск или флешку, с которой ресивер способен считать файлы в формате MQA (после обновления ПО), Direct DSD 11.2 МГц и 192 кГц/24-бит FLAC, WAV и ALAC.
Из стриминговых сервисов CR-N775D умеет работать с Tidal, Deezer и TuneIn, а любители местных радиостанций смогут воспользоваться FM/DAB-тюнером. И не стоит забывать о лотке для компакт-дисков. Выбрать источник можно с помощью ручки, а для индикации используется крупный цветной экран.
 Loading…

En
CR-N775D
NETWORK CD RECEIVER
Instruction Manual

> Before Start > Part Names > Install > Initial Setup > Playback
Supplementary information | Advanced Setup | Others
2
Table of Contents
Before Start
Before Start
What’s in the box ……………….……………………..…..…. 3
Part Names
Front Panel ……………………………………………………… 4
Rear Panel ……….………………………..……………………. 5
Remote Controller ……………………..……………….…….. 6
Display ……………………………………………….…………… 7
Install
Connect the Speakers ..……………………………….……. 8
Connecting the antenna and power cord, etc. ………. 9
Initial Setup
Power On & Initial Setup ………….…………………….… 10
Time settings ……….………………………..……………….. 12
Playback
Playing CDs ……………………………………………..……. 13
USB Storage Device/HDD …….………..…………….…. 15
Internet Radio ……………………..………………….……… 18
Spotify ……………..………………………..………………….. 19
Listening to the FM Radio ………………………………... 20
Listening to DAB Digital Radio …………..……………… 23
BLUETOOTH
®
Playback …………………………………. 26
AirPlay
®
……………………………..…………………………. 27
Playing audio from an external device ……………….. 28
Music Server ……….………………………….……………… 30
Using a computer to save and delete the music on a
USB HDD connected to this unit …………………….…. 33
Using the alarm to start play …………………………..... 34
Entering text, adjusting sound quality, etc. ………….. 36
Using Apps ………….………………………….……..………. 37
Supplementary information
Supplementary information for player functions……. 38
Advanced Setup
Advanced Settings ……………………………………….….. 39
Firmware Update ……………………….………………..….. 44
Others
Troubleshooting ……………………………………………… 46
Other notes ……………………………………………………. 49
General Specifications …………………………………..…. 50
License and Trademark Information ……………………52

En
> Before Start > Part Names > Install > Initial Setup > Playback
Supplementary information | Advanced Setup | Others
3
What’s in the box
1. Main unit (1)
2. Remote controller (RC-961S) (1), Batteries (AAA/
R03) (2)
3. DAB/FM wire antenna (1)
4. Power Cord (1)
≥ Quick Start Guide (1)
¢ This document is an online instruction manual. It is
not included as an accessory.
0 The power cord must be connected only after all
other cable connections are completed.
0 Connect speakers with 4
Ω to 16 Ω impedance.
0 We will not accept responsibility for damage arising
from the connection of equipment manufactured by
other companies.
0 Functionality may be introduced by firmware
updates and service providers may cease services,
meaning that some network services and content
may become unavailable in the future. Furthermore,
available services may vary depending on your area
of residence.
0 Details on the firmware update will be posted on our
website, etc.
0 Specifications and appearance are subject to
change without prior notice.
1
32
4

> Before Start >Part Names > Install > Initial Setup > Playback
Supplementary information | Advanced Setup | Others
4
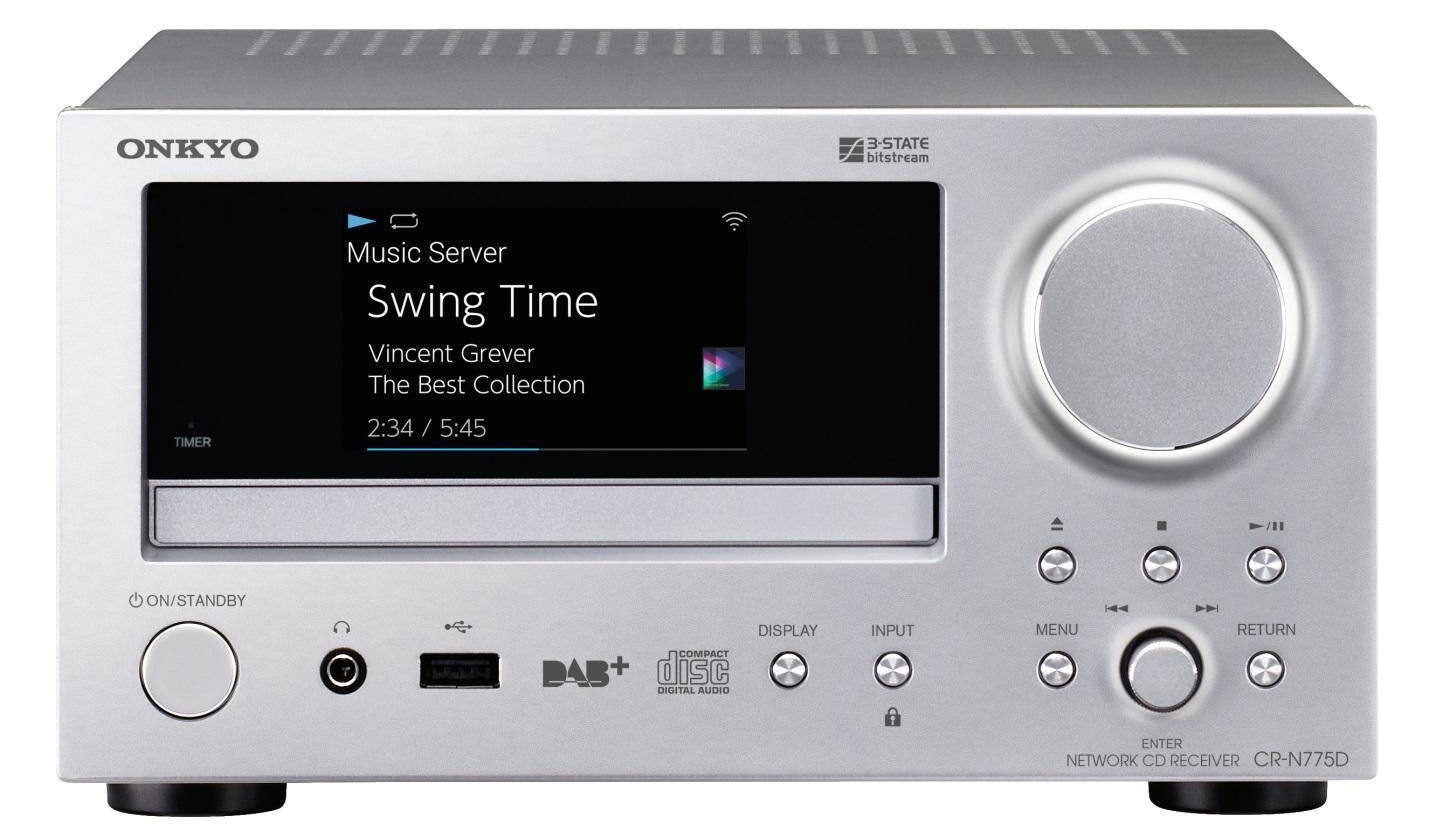
Front Panel
Part Names
1. TIMER indicator: This lights when the alarm is set.
2. Remote control sensor: Receives signals from the remote controller.
0 The signal range of the remote controller is within about 23y/7 m, at an angle of
30° to either side.
3. Display (ÄP7)
4. Disc tray: Place discs here. 8-cm discs can also be used.
5. < button: Open or close the disc tray.
6. Volume dial: Adjust the volume. Adjust between 0 and 50.
Volume indicator: This lights white when the unit is on.
7. Play buttons:
∫
: Stops playback.
1
/; : Plays or pauses playback.
0 Depending on the input, the operation may not start.
8. Í ON/STANDBY button: Turns the unit on or into standby mode.
9. jack: Stereo headphones with a mini plug (Ø1/8z/3.5 mm) are connected.
10.
USB port: Connect a USB storage device or HDD (hard disk drive) to play music
files. You can also supply power (maximum 5 V/0.5 A) to USB devices with a USB
cable.
0 When connecting a HDD that requires more than 5 V/0.5 A, connect to the USB
port (maximum 5 V/1 A) on the rear of the unit.
11.
DISPLAY button: Switches the information on the display.
0 Depending on the input, the operation may not start.
If the «Bluetooth Wakeup / Clock Call» setting is On, then the current time is
displayed when pressed while in standby mode. (ÄP41)
12.
INPUT button: Switches the input to be played. (CD / NETWORK / BLUETOOTH /
USB Front / USB Rear / COAXIAL / OPTICAL / LINE / DAB / FM)
button: When pressed for about 5 seconds, the buttons on the main unit are
locked and unable to be operated. To unlock, press and hold again.
13.
MENU button: Displays the menu. (ÄP39)
14.
ENTER button, skip (:/9) dial:
When playing, turn left or right to select the folder or file, then press to confirm.
0 Depending on the input, the operation may not start.
While the menu is displayed, turn the dial to select items and press to confirm the
settings.
15.
RETURN button: Returns the display to the previous state.

> Before Start >Part Names > Install > Initial Setup > Playback
Supplementary information | Advanced Setup | Others
5
En
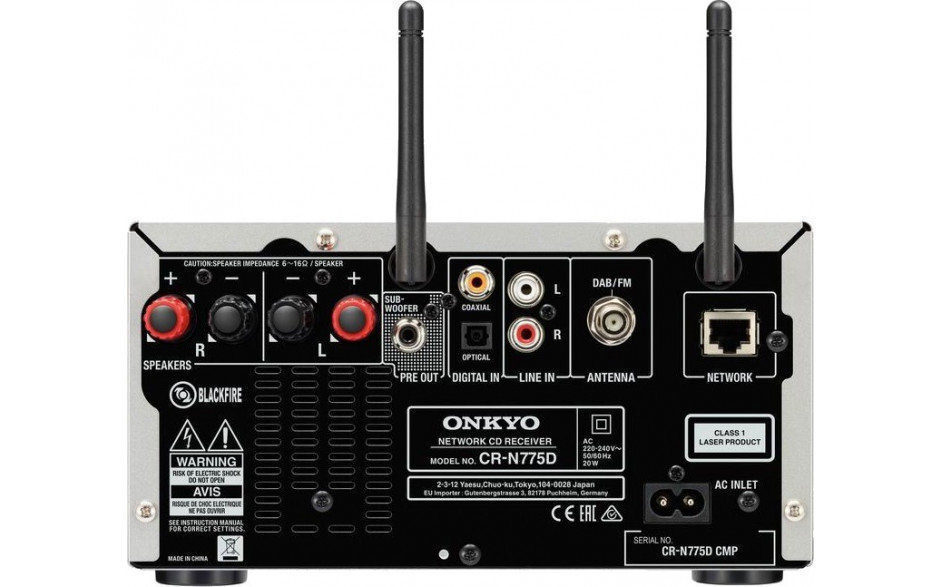
Rear Panel
1. SPEAKERS terminals: Connect speakers with the speaker cables.
2. Wireless antenna: Used for Wi-Fi connection or when using a BLUETOOTH
wireless technology enabled device. Adjust their angles according to the
connection status.
3. SUBWOOFER PRE OUT jack: Connect a subwoofer with built-in amplifier.
4. LINE OUT jacks: Connect a recording device, such as a cassette tape deck.
Connect to the LINE IN jacks on the recording device using analog audio cable.
5. LINE IN jacks: You can play the audio from an external device such as a television
connected with an analogue audio cable.
6. DAB/FM ANTENNA jack: Connect the supplied DAB/FM wire antenna.
7. NETWORK jack: Connect to the network with an ethernet cable.
8. jack: Connect an Onkyo product with an RI jack using an RI cable to
synchronize with this unit. (ÄP29)
9. AC INLET: Connect the supplied power cord.
10.
USB port: Connect a USB storage device or HDD (hard disk drive) to play music
files. You can also supply power (maximum 5 V/1 A) to USB devices with a USB
cable. It is also possible to save or delete music files on the USB HDD with a
computer over the network. (ÄP33)
11.
DIGITAL IN OPTICAL/COAXIAL jacks: You can play the digital audio from an
external device such as a television connected with a digital optical cable or a
digital coaxial cable.

> Before Start >Part Names > Install > Initial Setup > Playback
Supplementary information | Advanced Setup | Others
6
Remote Controller
1. Í button: Turns the unit on or into standby mode.
2. Numbered buttons: Use to directly input the CD track
number when selecting tracks.
3. MEMORY button: Used to register favorite radio
stations.
4. button: Switches the information on the display.
0 Depending on the input, the operation may not
start.
If the «Bluetooth Wakeup / Clock Call» setting is On,
then the current time is displayed when pressed
while in standby mode. (ÄP41)
5. button: Displays the menu. (ÄP39)
6. Cursors, ENTER button: Select the item with the
cursors and press ENTER to confirm.
TUNE 3/4: Used to select radio stations.
PRESET 2/1: Used to select stations that have
been registered.
Play buttons:
:/6: Return to the beginning of the track being
played. Press again to move to the track before.
Press and hold to rewind the track quickly.
5/9: When pressed during play, move to the
next track.
Press and hold to fast-forward through the track.
0 Depending on the input, the operation may not
start.
7. INPUT 2/1 buttons: Switches the input to be
played. (CD / NETWORK / BLUETOOTH / USB
Front / USB Rear / COAXIAL / OPTICAL / LINE /
DAB / FM)
8. Play buttons:
∫
: Stops playback.
X; : Plays or pauses playback.
0 Depending on the input, the operation may not
start.
9. button: Set repeat play.
10.
button: Switches the input to BLUETOOTH.
11.
DIMMER button: You can adjust the brightness of
the display in three steps. It cannot be turned off
completely.
12.
SLEEP button: Set the sleep timer. When the time
set (30, 60, or 90 minutes) has elapsed, the unit
switches to standby. If SLEEP button is pressed after
setting, the time remaining until sleep is displayed.
13.
button: Temporarily mutes audio. Press again to
cancel muting.
14.
CLEAR button: When FM/DAB is selected, this
clears a preset station.
15.
NOW PLAYING button: When you have changed
the display during play, for example, this button
returns the display to show information about the file
being played.
16.
button: Returns the display to the previous state.
17.
VOL i/j buttons: Adjust the volume. Adjust
between 0 and 50.
18.
button: Set random play.
19.
DIRECT button: Switch the DIRECT mode on and
off. (ÄP36)
20.
TONE button: Adjust the sound quality. (ÄP36)

> Before Start >Part Names > Install > Initial Setup > Playback
Supplementary information | Advanced Setup | Others
7
En
Display
1. Displays the play status.
2. The source is displayed.
(CD / NETWORK / Internet service / BLUETOOTH / USB Front / USB Rear /
COAXIAL / OPTICAL / LINE / DAB / FM)
3. The track number or the name of the file, artist, album, station, etc., is displayed.
: Displayed when receiving an FM broadcast.
4. The file play status is displayed. This may not be displayed depending on the input
or file.
5. Lights in the following conditions.
: When all track repeat play is on
: When one track repeat play is on
: When random play is on
STEREO: Receiving an FM stereo broadcast.
MONO: Receiving an FM broadcast in monaural
AUTO: When FM tuning mode is auto.
6. Lights in the following conditions.
Asb: When Auto Standby function is enabled. (ÄP40)
PM.Bass: When PM.Bass is enabled. (ÄP36)
DIRECT: When DIRECT is enabled. (ÄP36)
7. Lights in the following conditions.
DSD: When a DSD file is being played
8. This is displayed when muting is on.
9. Lights in the following conditions.
: When the connection setting on the unit is «Wired» and the unit is connected to
the network.
: When the connection setting on the unit is «Wired» and the unit is not
connected to the network.
: When the connection setting on the unit is «Wi-Fi» and the unit is connected to
the network.
: When the connection setting on the unit is «Wi-Fi» and the unit is not
connected to the network.
1:45 / 3:23
CD
AsbDIRECT
Track 1/10
> Before Start > Part Names >Install > Initial Setup > Playback
Supplementary information | Advanced Setup | Others
8
Connect the Speakers
Install
3
1
a
a
2
2
3
2
3
1
1/2˝
(12 mm)
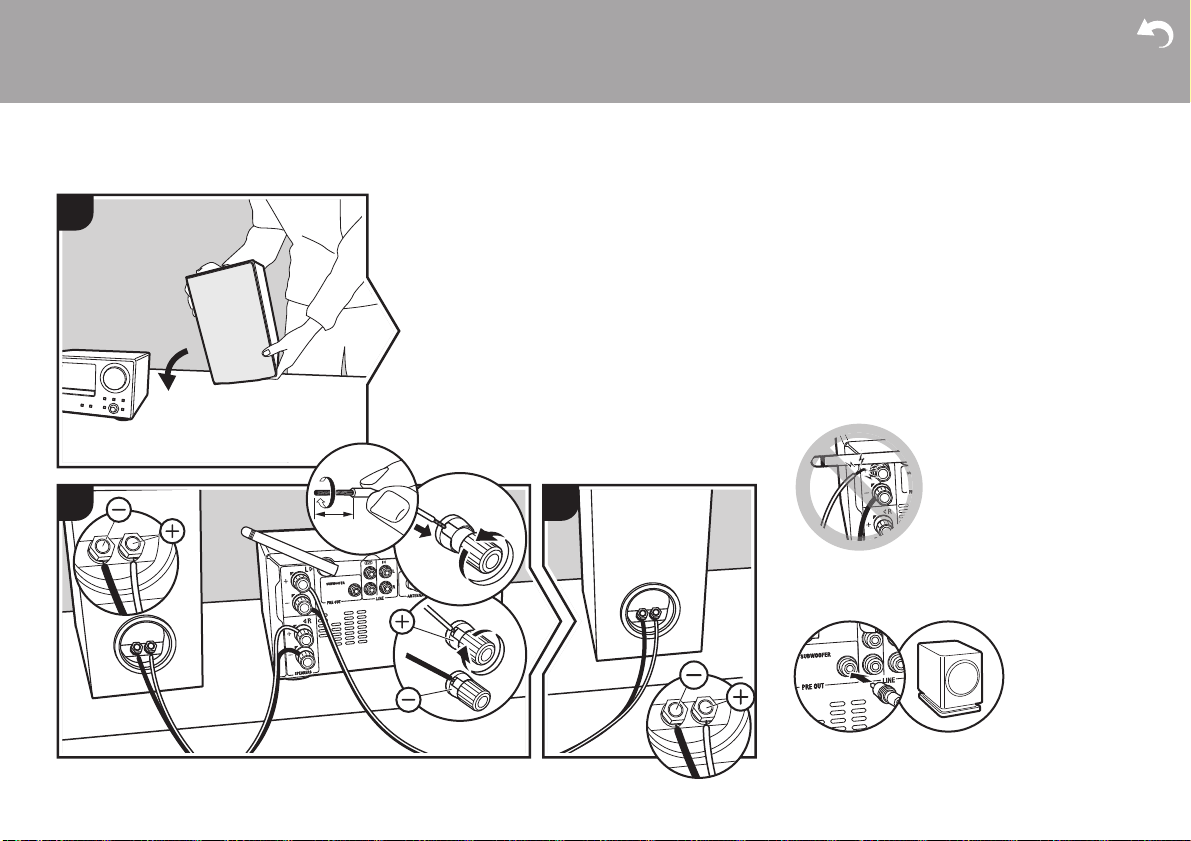
Refer to the illustration to connect the speaker system.
Twist the wires of the speaker cable tightly before
inserting into the SPEAKERS terminals. After inserting
the speaker cables, tighten the terminals firmly by
turning to the right. Make correct connection between
the unit’s jacks and speaker’s jacks (i to i and j to
j) for each channel. If connection is wrong, a bass
sound may become poor due to reverse phase. Also
make sure the exposed wires of the speaker cables do
not stick out of the speaker terminals when connecting.
If the exposed wires of the speaker cables touch the
rear panel or the i and s wires touch each other, the
protection circuit may be activated and the power may
turn off.
You can also connect a subwoofer with a built-in
amplifier to boost bass playback even more. Use a
subwoofer cable for connection.
a Speaker Cable
> Before Start > Part Names >Install > Initial Setup > Playback
Supplementary information | Advanced Setup | Others
9
En
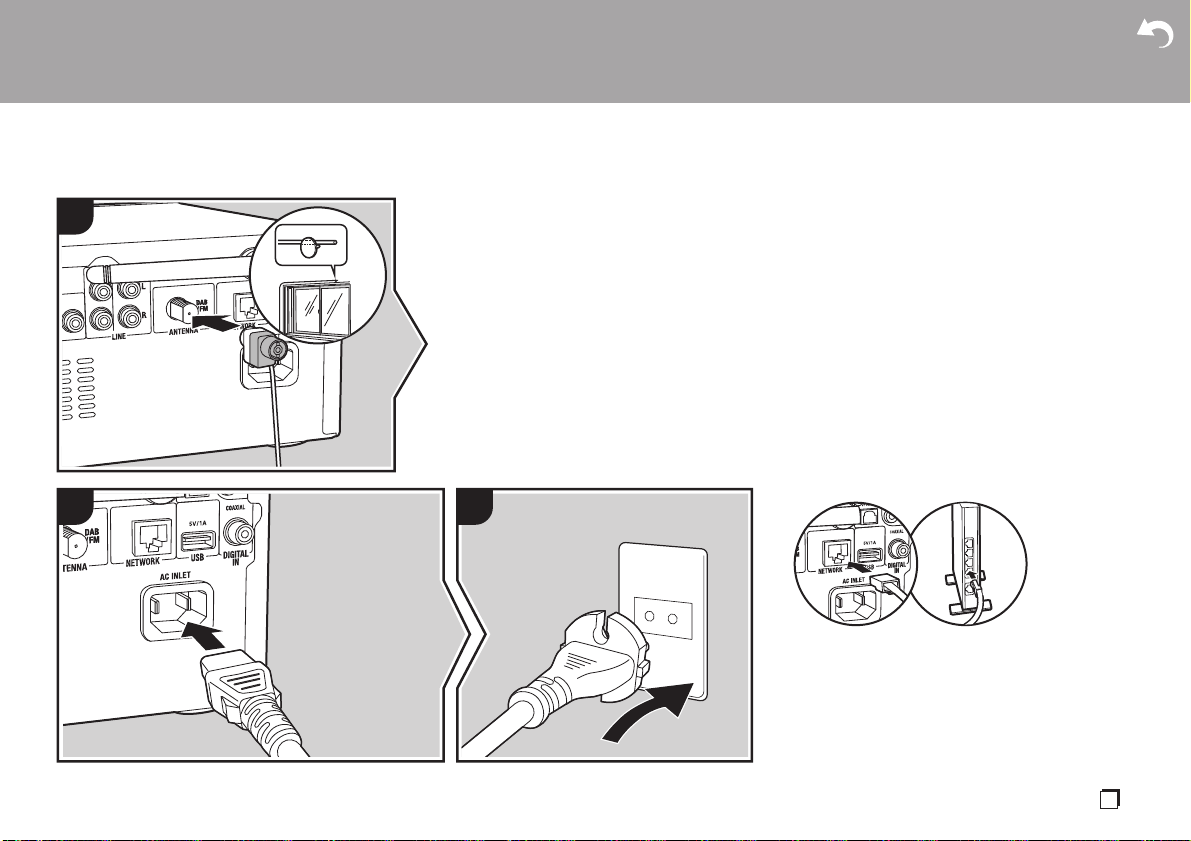
Connecting the antenna and power cord, etc.
a
1
2
b
b
3
Antenna Hookup
Move the antenna around while playing the radio to find
the position with the best reception.
Power Cord Hookup
This model includes a removable power cord.
The power cord must be connected only after all other
connections are completed. Make sure you first
connect the power cord to AC INLET terminal of the
unit and then connect to the outlet. Always disconnect
the outlet side first when disconnecting the power cord.
Ethernet cable connection
To connect to the network with an ethernet cable, use
the NETWORK jack. When using Wi-Fi connection,
make settings in initial settings (ÄP10). You can enjoy
features such as internet radio by connecting to the
network.
a DAB/FM Wire Antenna, b Power Cord
> Before Start > Part Names > Install > Initial Setup >Playback
Supplementary information | Advanced Setup | Others
10
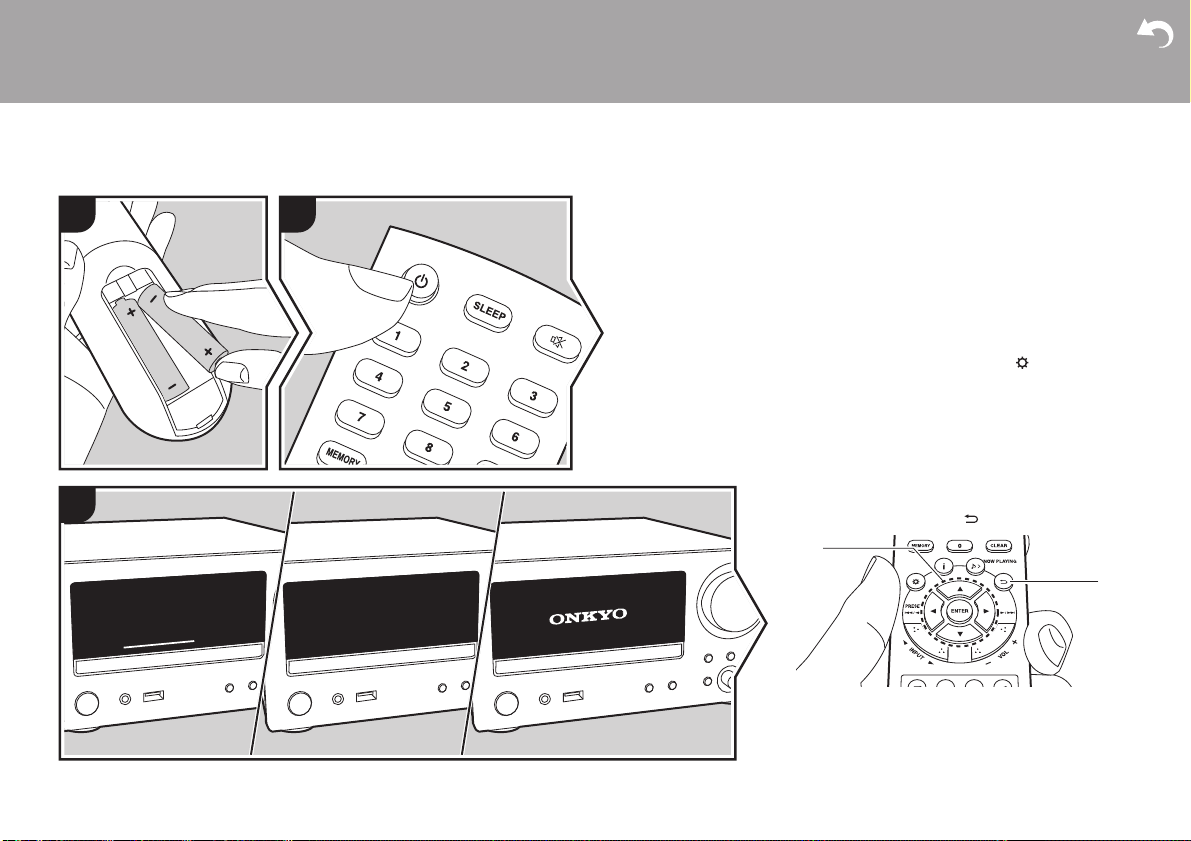
Power On & Initial Setup
Initial Setup
1
3
2
Starting up: When you press th e Í button, the volume
indicator on the main unit lights white, then after
30 seconds the ONKYO logo is displayed on the
display and you can start operating the unit.
Wi-Fi connection settings
When you first turn the power on, the initial setup
screen is displayed automatically, allowing you to
easily make Wi-Fi connection settings.
0 To redo the initial settings, press on the remote
controller, select «Wi-Fi» in «Network» — «Connection
Type», then select «Wi-Fi Setup».
0 A confirmation screen asking you to agree to the
privacy policy is displayed during network setting.
Select «Accept» and press ENTER to indicate
agreement.
To set, select the item with the cursors on the remote
controller and press ENTER to confirm (a). To return to
the previous display, press (b).
a
b
> Before Start > Part Names > Install > Initial Setup >Playback
Supplementary information | Advanced Setup | Others
11
En
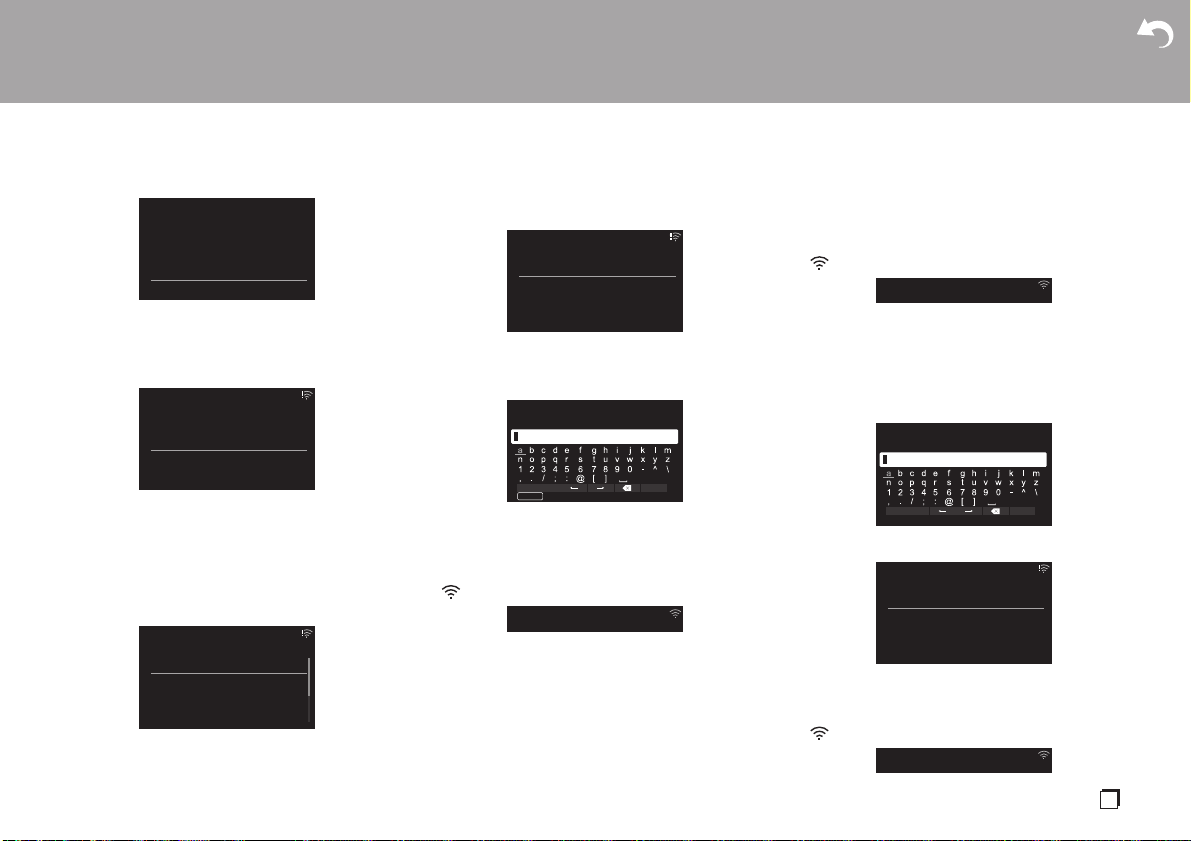
To make Wi-Fi settings, select «Yes». Select the method
for setting in the next screen (for example «Scan
Networks»).
∫ Scan Networks
From the list of SSID for access points such as wireless
LAN routers, select the required SSID and make the
settings.
1. Select the SSID of the access point you want to
connect and then confirm.
2. Select either «Enter Password» or «Push Button» and
confirm. If the access point has an automatic setting
button, by selecting «Push Button» you can connect
without entering a password.
3. If you select «Enter Password», enter the password
of the access point. For details on how to enter text,
refer to «Entering text» (ÄP36).
If you select «Push Button», then after pressing and
holding the automatic setting button on the access
point for the required amount of time, press ENTER
on the remote controller.
4. is displayed when the settings are complete.
∫ Use iOS Device
Set by sharing the iOS device’s Wi-Fi settings with this
unit.
1. Connect the iOS device by Wi-Fi.
2. Select this unit in the «SET UP NEW AIRPLAY
SPEAKER…» item in the Wi-Fi setting screen of the
iOS device, then select «Next».
0 This unit is displayed as «Onkyo CR-N775D
XXXXXX».
3. After establishing the connection, select «Done» on
the screen of the iOS device.
4. is displayed when the settings are complete.
∫ Enter SSID of the access point
Set by entering the SSID of the access point you want
to connect.
1. Enter the SSID. For details on how to enter text,
refer to «Entering text» (ÄP36).
2. Select and confirm the authentication method.
0 If you select «None», proceed to step 3. If you
select «WEP», «WPA», or «WPA2″, enter the
password and confirm.
3. is displayed when the settings are complete.
Initial Setup
Yes
No
Would you like to start Wi-Fi setup?
Wi-Fi Setup
Scan Networks
Use iOS Device
Input SSID
Asb
Wi-Fi Setup
aaaaaaaaaaaaaaa
bbbbbbbbbbbbbbb
cccccccccccccccc
ddddddddddddddd
Asb
Wi-Fi Setup
Enter Password
Push Button
Asb
Password
A/a OK
MEMORY
Hide/Show
SSID
A/a OK
Security Method
None
WEP
WPA
WPA2
Asb
> Before Start > Part Names > Install > Initial Setup >Playback
Supplementary information | Advanced Setup | Others
12
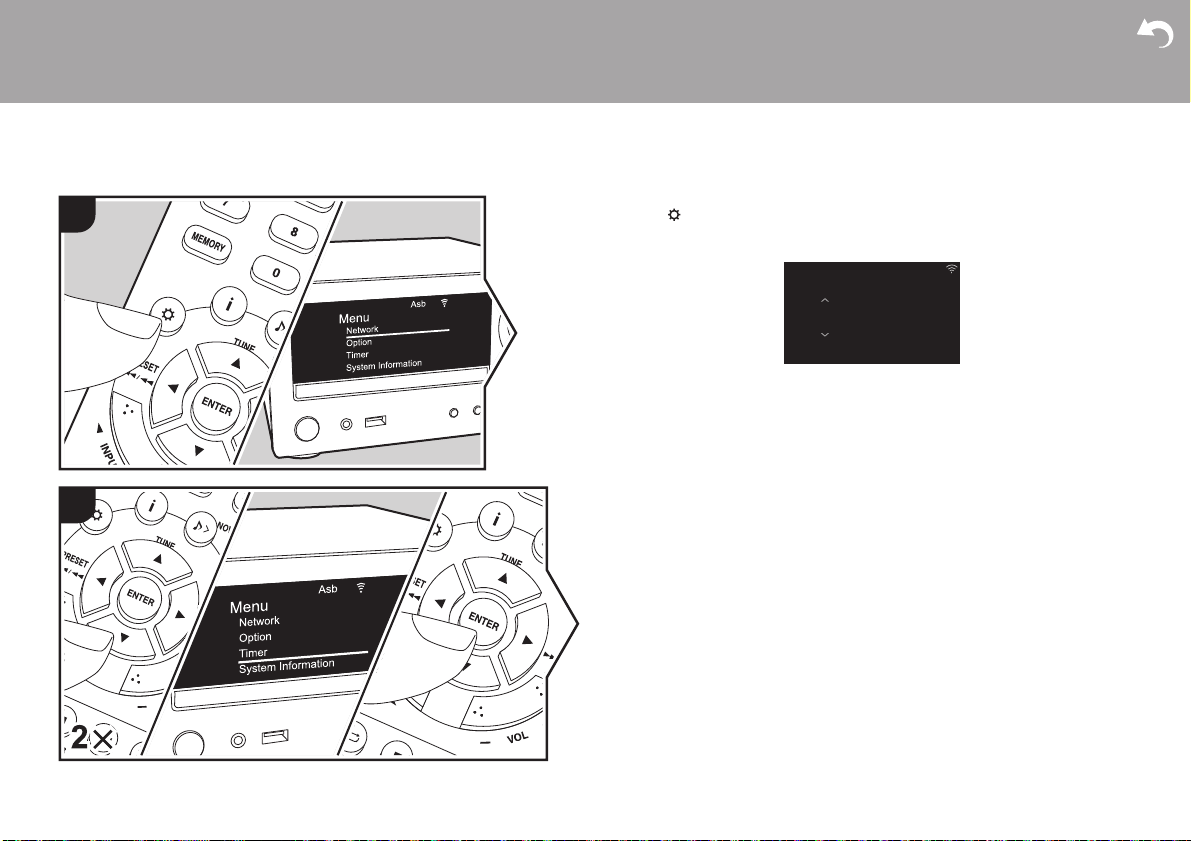
Time settings
By setting the time, you can use the alarm to start play (ÄP34).
1. Press on the remote controller to display the menu.
2. Press 3/4 to select «Timer», then press ENTER.
3. Use 3/4 to select «Clock» and press ENTER.
4. Set the day of the week with 3/4, then press ENTER.
5. In the next screen, use 3/4 to select either «24H» (24-hour display) or «12H» (12-
hour display) and press ENTER.
6. In the next screen, set the time with 3/4, then press ENTER.
7. In the next screen, set the minutes with 3/4, then press ENTER. Setting ends
automatically after a short time.
1
2
Clock
Sun 0 : 45
Asb

> Before Start > Part Names > Install > Initial Setup >Playback
Supplementary information | Advanced Setup | Others
13
En
Playing CDs
Playback
This unit can also play CD-R/CD-RW recorded with
MP3 format files, along with commercially available
music CDs.
0 The supported sampling rates for MP3 files are 32
kHz to 48 kHz, and supported bitrates are between
32 kbps and 320 kbps and VBR.
0 A maximum of 999 tracks can be read from a CD-R/
CD-RW. Depending on the folder structure of the
CD-R/CD-RW, the maximum number of tracks that
can be read may be reduced.
0 Play of CDs not conforming to the CD standards,
such as copy control CDs, is not guaranteed.
Playing Back
Perform the following procedure when the unit is on.
1. Repeatedly press INPUT 2/1 on the remote
controller to switch input to CD.
2. Press < on the main unit to open the disc tray, and
after putting the disc on the tray, press < again to
close the tray.
3. Press X; (e) on the remote controller to start play.
Use other play buttons (c) to stop play or choose
tracks to play. You can also select by entering the
track number with number buttons (a) and pressing
ENTER (d).
0 With music CDs, you can switch the display by
pressing (b) in the order Track elapsed play
time/Track remaining play time/Disc elapsed play
time/Disc remaining play time.
1
2
d
g
b
f
a
c
e
c

> Before Start > Part Names > Install > Initial Setup >Playback
Supplementary information | Advanced Setup | Others
14
Repeat play
1. Repeatedly press (f) during play to display or
on the display.
: Repeat play of the selected individual track.
: Repeat play of all tracks.
0 To cancel repeat play, press (f) several times
until the icon disappears.
0 Repeat play is canceled if random play is started
during repeat play.
Random play
Play tracks in randomly.
1. Repeatedly press (g) during play to display
on the display.
0 To cancel random play, press (g) until the icon
disappears.
0 Random play is canceled if repeat play is started
during random play.
0 Random play is only possible on MP3 discs if the
music files have been saved on the disk without
folders.
> Before Start > Part Names > Install > Initial Setup >Playback
Supplementary information | Advanced Setup | Others
15
En
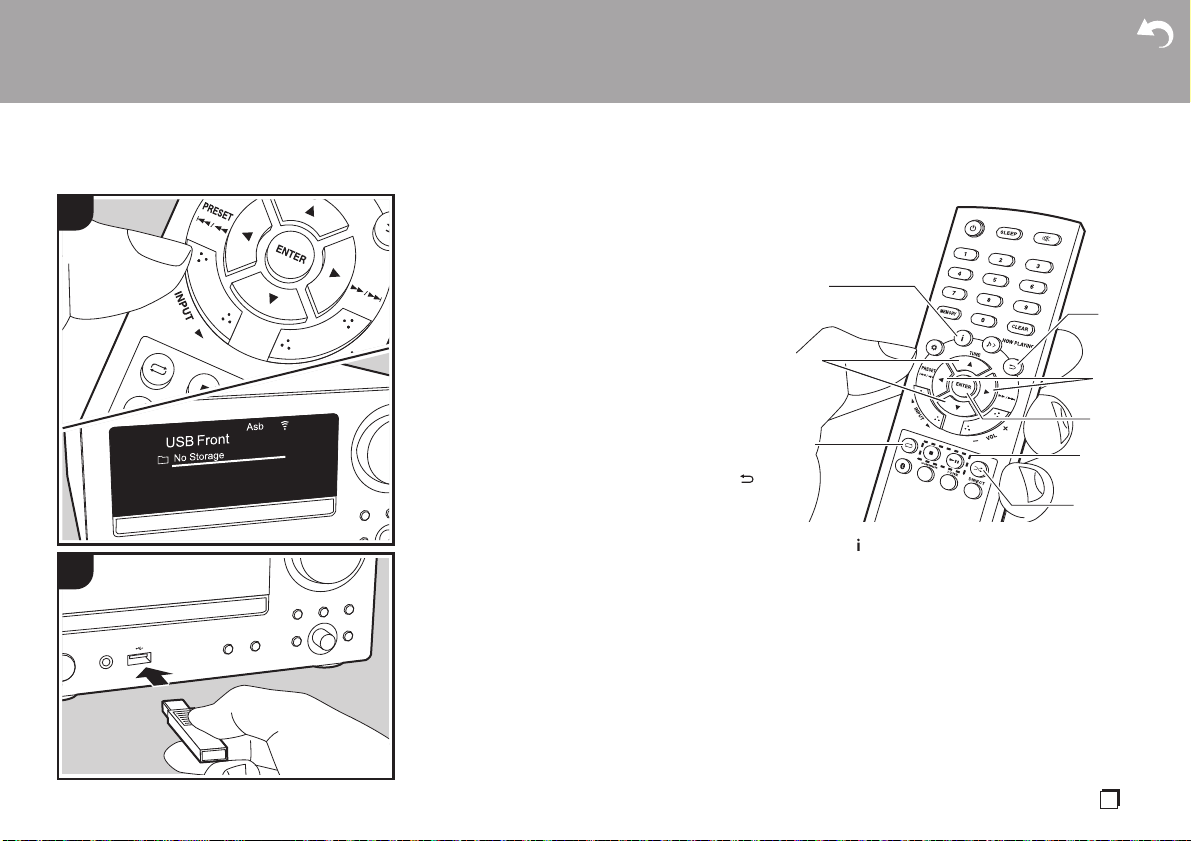
USB Storage Device/HDD
You can play music files by connecting a USB storage
device or HDD (hard disk drive) to the USB port on the
front or rear of the unit.
0 The USB port on the front supports a maximum 5 V/
0.5 A power supply. If the HDD requires more than
this, connect to the USB port (maximum 5 V/1 A) on
the rear of the unit.
Basic operations
Perform the following procedure when the unit is on.
1. Repeatedly press INPUT 2/1 on the remote
controller to switch input to USB Front or USB Rear.
2. Plug your USB storage device or HDD into the USB
port on the front or rear.
3. Press ENTER (e) after reading is complete.
4. Select the folder or music file with the cursors (c) of
the remote controller and press ENTER (e) to
confirm. To return to the previous display, press
(b).
0 Only the music files in the same level of the folder
are played.
5. Use play buttons (d) to stop play or choose tracks to
play.
0 Press (a) to display information such as album
art and file format. The display of album name, artist
name, and album art is supported with WAV/MP3/
WMA/Apple Lossless/FLAC/AAC/DSD (DSF only)
format music files. The formats for embedded
images are JPEG and PNG.
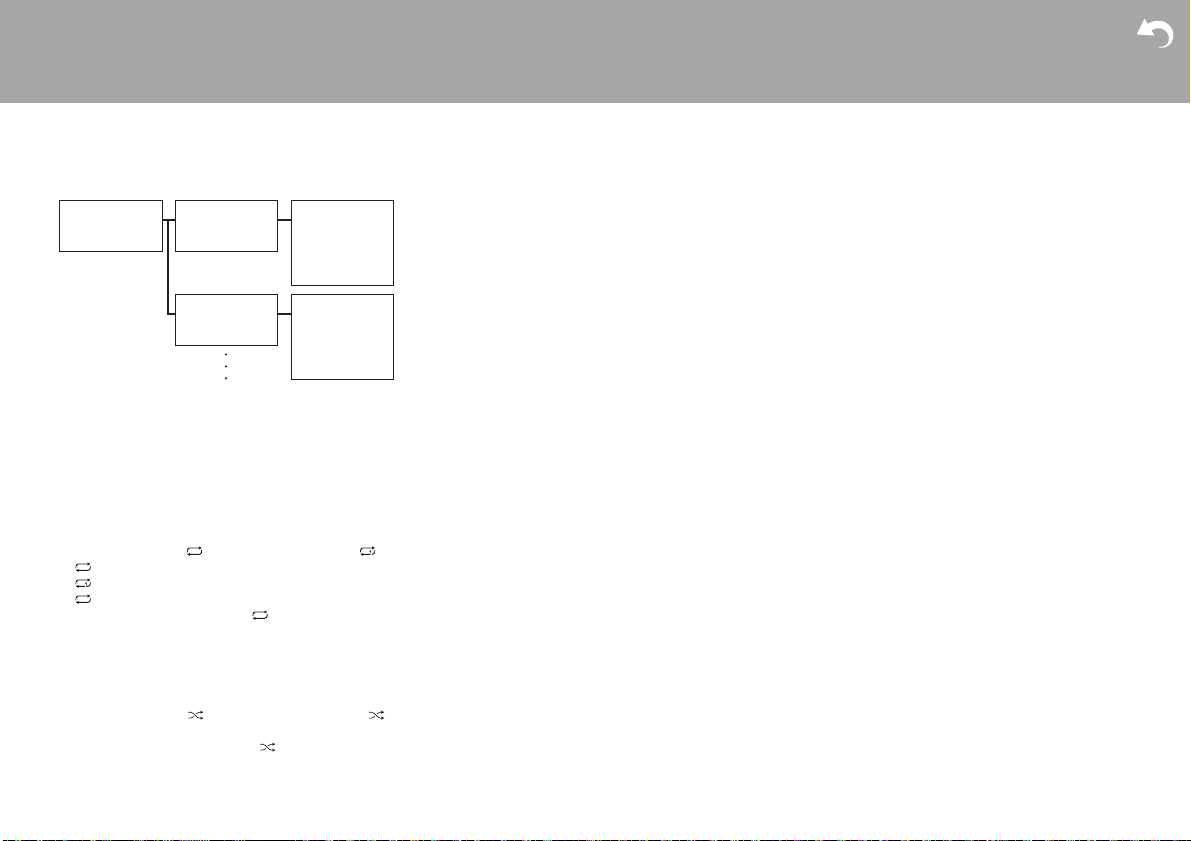
0 With WAV format, to enable display of the artist
name, album name, and album art, follow the folder
structure and file naming as shown in the following
diagram when saving music files. The album art is
displayed by saving the .jpg files to be displayed in
the lowest folder. It may take some time for the .jpg
files to be displayed or they may not be displayed at
all if the volume of the data is large.
1
2
e
g
a
c
f
b
d
d
> Before Start > Part Names > Install > Initial Setup >Playback
Supplementary information | Advanced Setup | Others
16
0 Characters that cannot be displayed by this unit
appear as «
¢
«.
0 The USB port of this unit conforms with the USB 2.0
standard. The transfer speed may be insufficient for
some content you play, which may cause some
interruption in sound.
Repeat play
1. Repeatedly press (f) during play to display or
on the display.
: Repeat play of the selected individual track.
: Repeat play of all tracks in the folder.
0 To cancel repeat play, press (f) several times
until the icon disappears.
Random play
Play tracks in a folder randomly.
1. Repeatedly press (g) during play to display
on the display.
0 To cancel random play, press (g) until the icon
disappears.
USB Storage / HDD Device
Requirements
0 Note that operation is not guaranteed with all USB
storage devices or HDD.
0 This unit can use USB storage devices that comply
with the USB mass storage device class standard.
(However, there are still devices that cannot be
played by this unit even if they comply with the USB
mass storage class standard.)
0 The unit is also compatible with USB storage
devices using the FAT16 or FAT32 file system
formats. Other formats such as exFAT, NTFS, and
HFS cannot be played by this unit.
0 If the USB storage device has been partitioned, each
section will be treated as an independent device.
0 Up to 20,000 tracks per folder can be displayed, and
folders may be nested up to 16 levels deep.
0 USB hubs and USB storage devices with hub
functions are not supported. Do not connect these
devices to the unit.
0 USB storage devices with security function are not
supported on this unit.
0 If the USB storage device or HDD comes with an AC
adapter, we recommend that you use its AC adapter
to power it.
0 Media inserted to the USB card reader may not be
available in this function. Furthermore, depending on
the USB storage device, proper reading of the
contents may not be possible.
0 We accept no responsibility whatsoever for the loss
or damage to data stored on a USB storage device
when that device is used with this unit. We
recommend that you back up your important music
files beforehand.
Supported Audio Formats
This unit supports the following music file formats. Note
that sound files that are protected by copyright cannot
be played on this unit.
MP3 (.mp3/.MP3):
0 Supported formats: MPEG-1/MPEG-2 Audio Layer 3
0 Supported sampling rates: 32 kHz, 44.1 kHz, 48 kHz
0 Supported bitrates: Between 8 kbps and 320 kbps
and VBR.
WMA (.wma/.WMA):
0 Supported sampling rates: 44.1 kHz, 48 kHz
0 Supported bitrates: Between 5 kbps and 320 kbps
and VBR.
0 WMA Pro/Voice/WMA Lossless/WMA DRM formats
are not supported
WAV (.wav/.WAV):
WAV files include uncompressed PCM digital audio.
0 Supported sampling rates: 44.1 kHz, 48 kHz, 88.2
kHz, 96 kHz, 176.4 kHz, 192 kHz
0 Quantization bit: 8 bit, 16 bit, 24 bit
AIFF (.aiff/.aif/.aifc/.afc/.AIFF/.AIF/.AIFC/.AFC):
AIFF files include uncompressed PCM digital audio.
0 Supported sampling rates: 44.1 kHz, 48 kHz, 88.2
kHz, 96 kHz, 176.4 kHz, 192 kHz
0 Quantization bit: 8 bit, 16 bit, 24 bit
AAC (.aac/.m4a/.mp4/.3gp/.3g2/.AAC/.M4A/.MP4/
.3GP/.3G2):
0 Supported formats: MPEG-2/MPEG-4 Audio
0 Supported sampling rates: 44.1 kHz, 48 kHz, 88.2
kHz, 96 kHz
0 Supported bitrates: Between 8 kbps and 320 kbps
Folder 1 Folder 1-1 file 1-1
file 2-1
file 3-1
・
・
・
Folder 1-2 file 1-2
file 2-2
file 3-2
・
・
・
Artist name
.jpg file
Album name
Album name
.jpg file