-
Contents
-
Table of Contents
-
Troubleshooting
-
Bookmarks
Quick Links
Sept 2021
QSG1_A
User Manual
Reolink PoE NVR
Related Manuals for Reolink RLN8-410
Summary of Contents for Reolink RLN8-410
-
Page 1
Sept 2021 QSG1_A User Manual Reolink PoE NVR… -
Page 2
FAQs ………………………… 44 Troubleshooting ……………………45 Note: 1.This user manual is for the Reolink PoE NVR and NVR security system that work with the monitor. 2.This user manual takes an NVR model that supports most features as an example. Your own NVR model may not support certain features mentioned here. -
Page 3
Device Overview RLN8-410/RLN16-410 Reolink has 16-channe PoE NVR RLN16-410 and 8-channel PoE NVR RLN8-410. Add cameras to the PoE NVR, you are able to customize your own security systems. Reolink PoE IP security camera systems feature plug and play, 12MP,4K Ultra HD, or 5MP/4MP, which are easy to set up and simple to use, for DIY enthusiasts and beginners. -
Page 4
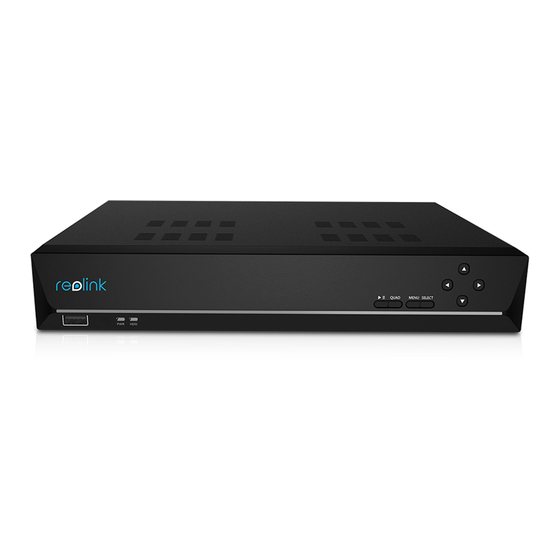
Reolink PoE NVR RLN8-410-E (8MP) HDMI Port Power Switch eSATA RJ45 Audio Out VGA Port Network USB Port Power lnput RLN16-410 eSATA Power Switch Network RJ45 Audio Out HDMI Port Power lnput VGA Port USB Port User Manual… -
Page 5
And the NVR kit is plug and play, making it super easy to set up. The NVR kit model, for example, RLK8-800B4 means it comes with one RLN8-410 and four B800 cameras. For the details, please refer to the package contents while purchasing the product. -
Page 6
Reolink PoE NVR NVR Supportability and Hardware Versions Supported Max Single Hardwar Person/Vehic Interfa NVR Model Camera e Version le Detection Resolution Capacity 4mp/5mp/8mp/ H3MB18 New UI 12mp RLN16-410 H3MB02 4mp/5mp H3MB06 4mp/5mp 4mp/5mp/8mp/ N3MB01 New UI 12mp 4mp/5mp/8mp/ Y (with latest… -
Page 7
Reolink PoE NVR 2. Connect the NVR to a monitor with HDMI or VGA cable. 3. Connect the PoE camera to PoE port of the NVR. Or if you want to use a WiFi camera, please connect the camera to the WiFi of the same router as NVR. -
Page 8
Reolink PoE NVR Set up the NVR on the Monitor Please power on the NVR and connect it to a monitor by VGA or HDMI cable. After the NVR is powered on, wait a few seconds it’ll show a setup wizard on the monitor. -
Page 9
Reolink PoE NVR 3. Login: Set up the NVR account password. If you check “Require Password Login When Unlocking Screen”, the NVR will automatically lock the screen and ask for the password when you want to operate the system. 4. Password Security: Set a password security question and answer. In the case the NVR password is forgotten, you can retrieve the password via this password security question. -
Page 10
Reolink PoE NVR 5. Device Info: Set a name for the NVR, and click Format to format the HDD. 6. Network: Suggest to keep Network access as DHCP and DNS as Auto. It’ll obtain the network connection from a router automatically, when the NVR is connected to the router with an Ethernet cable. -
Page 11
Reolink PoE NVR 7. Email Settings: Configure the email settings for sending alarm emails. You can skip this step and set it up later when you need to use this feature. Install the NVR and Camera NVR is suggested to directly placed on a table, while for the camera you are able to find installation guides and tips on the camera’s user manual. -
Page 12
Reolink PoE NVR Icon Meaning Playback: Replay the recording of the camera Record: Click to manually start/stop recording Clip: Crop to partially enlarge parts of the live image PTZ: Control the camera’s pan, tilt and zoom Audio: Turn on the audio for live viewing Image Settings: Click to change the camera’s image settings… -
Page 13
Icon Meaning Last: Click to show the previous screen of camera’s live image Next: Click to show the next screen of camera’s live image Scrollview: Click to start scrolling the live image screen automatically Display Mode: Choose to view one camera or multiple cameras Playback: Click to enter the playback page Back up: Click to enter the backup page Settings: Click to enter the NVR settings menu… -
Page 14
Reolink PoE NVR Preset Point At Preset Point, please pan and tilt the camera to wanted position then click to add a preset position. Set a name for the preset, then click Confirm to save. User Manual… -
Page 15
Reolink PoE NVR To delete a preset position, please click to edit all current saved preset positions. Click to change name of the preset position, and click to delete the selected position. Monitor Point Set the monitor point (or guard position). You can set the camera to always return back to this position if the camera is rotated away from it. -
Page 16
Reolink PoE NVR Set the Interval for Auto Return from 10-300 seconds, and then click OK. Click to return the camera to it’s monitor point immediately. User Manual… -
Page 17
Reolink PoE NVR Patrol to start or stop cruise horizontally. At Patrol, you can also customize the Click patrol routine with at least two preset points. At Patrol, click Click + to add at least two preset points to create a patrol. Click to set the preset point duration and speed, click Confirm to Save it. -
Page 18
Reolink PoE NVR Change the Live View Resolution to enter the settings menu of the camera. Click Stream, here you can Click change the Resolution for the Main Stream. Then the live view resolution will be changed accordingly. Set up Lock Screen Right click on live image screen to display the icons on the bottom. -
Page 19
Time Stamp: Set the position of the Time Stamp, you can choose from Top Left, Top Right, Bottom Left, and Bottom Right. Watermark: Turn on or off the Reolink Logo on the live view. Flip Display: Turn the camera’s image upside down when enable this option. -
Page 20
Reolink PoE NVR Screen Mirroring: Mirror the camera’s image when enable this option. Image Settings: Click Image Settings, here you can adjust the Brightness, Contrast, Saturation and Sharpness of the camera’s image. Click Advanced, you can set up image settings below. -
Page 21
Reolink PoE NVR Privacy Mask Settings You can set the privacy zone to block parts of the live image to protect your privacy. After setup, the privacy zone will be blocked in both live view and recordings. Click Privacy Mask Settings, use your mouse to drag up to 4 zones. Then click Apply to save the change. -
Page 22
Reolink PoE NVR Volume: For cameras that support adjusting volume, you can also drag the volume bard to adjust the volume of the camera’s speaker. Spotlight: For cameras with built-in spotlight, you can drag on Brightness bard to adjust the brightness of the spotlight. Click to enable Night Mode, you can choose Auto mode or On as scheduled. -
Page 23
Reolink PoE NVR More Info Go to Camera and click More Info. Here you can check the Hw No (Hardware number) of the camera and FW Version (firmware version). User Manual… -
Page 24
Reolink PoE NVR 4.Surveillance Set up Motion Detection Go to Camera > Detection, here you can set up the motion detection (MD) sensitivity and detection area. Click Add Time Period to set a time period with a sensitivity, you can set a maximum of 4 different sensitivity time periods. -
Page 25
Reolink PoE NVR For cameras with human/vehicle detection, you can also set up the sensitivity for smart detection and object size. Click Settings under Sensitivity for Smart Detection. Here you can set the sensitivity level for Person and Vehicle detection independently. -
Page 26
Reolink PoE NVR Click Object Size, here click to set a minimum object size, and click to set a maximum object size. Click Apply to save the settings. This way, only objects between the set minimum and maximum size will trigger the alarm. -
Page 27
Reolink PoE NVR Set up Motion Recording Please set up the motion detection first, then go to Surveillance > Record to enable the motion recording. Click Settings under Record option. Enable Overwrite, it’ll automatically overwrite the previous recordings when the HDD is full. -
Page 28
Reolink PoE NVR Click Daily Schedule, choose the camera you want to set up. Click Alarm, here you can set up a schedule when you’d like the camera to record on motion. If you need to set different schedules for each camera, please choose the cameras to set them up one by one. -
Page 29
Reolink PoE NVR Set up Continuous Recording Please set up the recording settings first, then go to Surveillance > Record > Daily Schedule, choose the camera you want to set up. Click Timer, here you can set up a schedule for when you’d like the continuous recording to work. -
Page 30
Reolink PoE NVR Click Settings under Email Alerts, here you can set up the email parameters as below. Server Type: Choose from Gmail, Yahoo, Outlook, or choose Other and manually the SMTP server. Port: The SMTP port of your email. -
Page 31
Reolink PoE NVR After finishing the settings, please click Apply to save the settings. Then click Test If Setup Succeeded to see if the email test is successful. Set up Email Schedule Click Daily Schedule under Email Alerts. Select a camera, and then set a schedule when you want the email alerts to work. -
Page 32
Reolink PoE NVR Set up Exception Alert Emails Click Exception under Email Alerts, you can set to send an alert email when the HDD is full or there’s an HDD error. Buzzer You can set up the NVR to make an alert beep sound when a motion is detected. -
Page 33
Reolink PoE NVR Click Daily Schedule under Buzzer. Select a camera, and then set a schedule when you want the buzzer to work. For cameras with person/vehicle detection you can also choose the Alarm type from Any Motion, Person or Vehicle. -
Page 34
Reolink PoE NVR Push Notification Push notification is a text message that pops up from the Reolink App on your mobile phone when the camera detects a motion. Go to Surveillance > Push, here you can set up the Push Notification Schedule. -
Page 35
Reolink PoE NVR Then click Exception under On-Screen Warning. Choose which exception to trigger the on-screen warnings from options Full HDD, HDD Error, Disconnected Network or IP Conflict. Set up FTP With FTP settings, you can set up the NVR to upload images or videos to the FTP server as scheduled or when motion is detected. -
Page 36
Reolink PoE NVR Server Address: Enter the domain name or IP address of your FTP server. Port: Enter the port of your FTP server. The default port is 21. Username: Enter the username of the FTP server, please make sure to use a user account with read &… -
Page 37
Reolink PoE NVR 5. Replay and Download Recordings Replay Recordings Click icon on the live image screen to enter the playback page. to select max 4 cameras, then click Apply. Click Note: If you choose a camera that is 8MP or above, it can only support one channel playback. -
Page 38
Reolink PoE NVR At Select Date, click on the date it’ll search the recordings automatically to play. Check option Alarm Only, it’ll only show the alarm recordings for playback. For cameras with person/vehicle detection you can also choose the Alarm type from Any Motion, Person or Vehicle. -
Page 39
Reolink PoE NVR Buttons on the Playback Window Icon Meaning Speed Down: Play the recording at a slow speed to view more details. Frame-by-Frame: Play the recording frame by frame, not to miss any details. Smart Playback: Replay the recording at a normal speed when there’s motion and replay at 4x speed when there’s no motion. -
Page 40
Reolink PoE NVR Download Recordings Cut and Download Connect a USB drive to the USB port of the NVR for downloading the recordings. Click icon on the live image screen to enter the playback page. Select the camera and date to search the recordings to play back. -
Page 41
Reolink PoE NVR Back up Recordings Right click on the live image screen, then click to enter the backup page. Choose the cameras you want to search recordings for. Choose Video Type from Manual, Alarm or Timer. Then select the start and end time, click Search. -
Page 42
Reolink PoE NVR Select the recordings from the searched recording list, then click Backup. Choose the storage disk to save the cut recording clip. Check the option Back Up MP4 File, it’ll convert the recording into mp4 for saving. And then Click Start. -
Page 43
Reolink PoE NVR 6. Storage Go to Storage page, here you can see the status of the HDD. Click Format, it’ll delete all the recordings on the HDD to for formatting. 7. Network and Connection View NVR Network Status Click Network > Network Status, here you can view the IP address, Default Gateway and DNS of the NVR. -
Page 44
Reolink PoE NVR Set Static IP for the NVR Click Network > General, here change Network Access from DHCP to Static. Then enter the IP address, Subnet Mask, Default Gateway, DNS Server manually, and click Apply to save the settings. -
Page 45
Reolink PoE NVR Register an No-IP or DynDNS DDNS first, then enable DDNS to enter the parameters. Click Apply to save the settings. Set up NTP Settings Click Network > Advanced, then click NTP Settings. User Manual… -
Page 46
Reolink PoE NVR Choose a Server Type to change the NTP settings. Click Synchronize to sync the NVR data and time to the NTP server immediately. Click Apply to save the settings. To customize the NTP server, under Server Type please choose Other. Then you can manually enter the parameters of your own server. -
Page 47
Reolink PoE NVR Set up IP Filter Settings Click Network > Advanced, then click IP Filter Settings. Choose Enable White List or Enable Black List, then click on Add IP. Manually enter the IP address you want to allow or block access, then click OK to save the change. -
Page 48
Reolink PoE NVR Change the Port Settings of NVR Click Network > Advanced, then click Port Settings. Here you can view the current ports of the NVR and change the port numbers. User Manual… -
Page 49
Reolink PoE NVR Enable UPNP Go to Network > Advanced, click to enable UPNP option. Enable ONVIF Go to Network > Advanced, click to enable ONVIF Protocol. User Manual… -
Page 50
Reolink PoE NVR 8. System Management General At System > General page, you can set up the settings below. Device Name: Set a name for the NVR. Screen Resolution: Set a display resolution on the NVR monitor. Scrollview Time: Set a time for the scrollview. For example, set it as 5 sec, then it’ll automatically switch to the next screen of the camera’s live image after every 5… -
Page 51
Reolink PoE NVR Time and Language Go to System > Time and Language page, enable DST you can set the daylight saving time according to your need. And click Language to choose the display language for the NVR. User Manual… -
Page 52
Reolink PoE NVR Account Center Go to System > Account Center page, here you can change the password of the NVR and add other user accounts. Click to change the password of the current account. Firstly, enter the old password, then enter the new password and confirm the new password, click OK to save the change. -
Page 53
Reolink PoE NVR Click Password Protection Settings, you can set a security question with answer to protect your password. In the case you lost the login password, you can retrieve the password via the security question. Click Add Account, enter the Username and Password. Choose account Type from General Account or Admin, then click OK to add the account. -
Page 54
Reolink PoE NVR Click to delete an account, and click to change the password of the selected account. Maintenance Go to System > Maintenance page, here you can set up auto reboot, upgrade the device or restore the system to default. -
Page 55
Reolink PoE NVR Upgrade the Firmware Before upgrade, please download the firmware file from Download Center. Unzip it and copy the file to a USB drive, then plug the USB drive to the USB port of the NVR. To upgrade the firmware for NVR, please click Upgrade. Choose the firmware file to upgrade. -
Page 56
8. Can I use the camera without directly connecting to the NVR? A: Yes, Reolink cameras can be connected to a router or PoE switch that is as the same local network as the NVR, and you can still add the cameras to NVR to use. -
Page 57
Reolink PoE NVR A: Yes, the NVR can be used locally with the monitor. Only that the functions that require internet network access won’t work anymore. Troubleshooting 1. Camera shows video loss/connection failed on the NVR monitor. The camera is connected to the NVR, but on the monitor screen the camera doesn’t display the live video but shows as video loss or connection failed. -
Page 58
(1) Please ensure the NVR’s UID is enabled. You can check it on the NVR monitor, go to System > Info page, here enable the option «Allow other Reolink software to access current device via UID». (2) Please add the NVR to Reolink App or Reolink Client software by its UID. -
Page 59
Solution: Ensure the cables and TV/monitor you used are working properly. Try to log in to the NVR via Reolink App or Reolink Client on the same network to see if it will work. Cause 5. NVR cannot be powered on. -
Page 60
For Reolink App, go to NVR Settings > Advanced page, click Restore. For Reolink Client, go to NVR Settings > System > Maintenance, click Restore. If currently no device has access to the NVR, you can reset it via the monitor with Super Password (for old UI) or security question (for new UI). -
Page 61
Reolink PoE NVR latest firmware from Download Center to upgrade it. Cause 3. The connection of the HDD is lost. Solution: Unplug the HDD then re-plug it. Cause 4. The format of the HDD is wrong. Solution: Please format/init the HDD on the NVR monitor to try again. -
Page 62
Reolink PoE NVR If the NVR doesn’t reboot, the issue may be caused by both the NVR and the cameras being grounded. Then please unground either the NVR or the cameras to fix the issue. Note: The NVR carries out the lightning protection and grounding treatment on its own and if users also ground the cameras, it will cause a certain potential difference. -
Page 63
Be aware that the ratings of the power adapter of 16-channel Reolink PoE NVRs should be DC 48V 2.5A and 8-channel Reolink PoE NVRs should be DC 48V 2A. 8. NVR cannot be accessed by Reolink software locally. -
Page 64
Reolink PoE NVR Cause 1. The power adapter issues. Solution: Check the status LED on the power adapter of the NVR. If the LED isn’t on, please plug the power adapter into another socket as well as change another working power adapter (48V) for a try. -
Page 65
Reolink PoE NVR Cause 3. Incorrect power supply for the NVR. Solution: (1) It might be the problem of the NVR’s power adapter. Please try again with a different power outlet and power adapter. Note: For the 8 channel PoE NVR the power adapter is 48V 1.87A. And for the 16 channel PoE NVR, it’s 48V 2.5A.
-
Описание
-
Файлы
Работает со всеми IP-камерами Reolink
Reolink RLN8-410 8-канальный PoE NVR может отлично работать со всеми нашими IP-камерами для круглосуточной записи, обнаружения движения, просмотра в реальном времени, воспроизведения и других функций. Поддерживаемые камеры включают B800, RLC-410, RLC-511, RLC-420, RLC-422, RLC-423 и т. Д.
* Сетевые видеорегистраторы Reolink предназначены ТОЛЬКО для камер безопасности Reolink.

Запись и мониторинг
- Одновременная запись со всех установленных камер (до 8 шт)
- Для более длительной работы системы переведите ее в автономный режим, камеры будут срабатывать только при обнаружении движения
- Есть возможность установки внешнего жесткого диска, что позволит увеличить объем памяти в два раза (до 4ТБ)

Воспроизводите любой момент времени
- Функция воспроизведения RLN8-410 позволит Вам просмотреть любой момент записи
- 4 канала одновременного воспроизведения
- Программа позволяет Вам быстро найти нужную дату и время записи
- Вы всегда сможете повторить заинтересовавший Вас момент, захваченный камерой

Совместимость со всеми IP-камерами Reolink
RLN8-410 работает со всеми IP-камерами Reolink, которые подключаются через PoE для беспрерывной записи, потокового просмотра, воспроизведения любого нужного Вам момента и т.д. Поддерживает подключение до 8 камер одновременно

RLN8-410 обеспечивает потоковую запись с разрешением 5 МП, относительно 1080p и 720p это огромный прогресс. Вы не упустите ни единой детали.

Упрощенная установка с лишь одним кабелем PoE
Система PoE позволяет использовать один кабель для подключения и к сети, и к интернету. Это в разы облегчит Вам установку и проводку.

Мгновенные оповещения при обнаружении движения
Каждый раз, когда видеокамеры обнаружат опасность Вам будет отправлено оповещение по электронной почте или push-уведомление. Программа также загружает и сохраняет захваченные изображения / видео на FTP-сервер.

Настройте удаленный просмотр, в любое время, из любого места на своем мобильном устройстве
Независимо от Вашего местоположения, вы можете удаленно получить доступ к своей камере, чтобы быть в курсе происходящего.
Настроить удаленный просмотр камеры можно через: бесплатное приложение Reolink или веб-браузеры ( Google Chrome, Safari, Firefox и т. Д.).

Прошивка для Reolink RLN8-410 видеорегистратор RUS
| Название продукта | Программное обеспечение | Инструкция |
|---|---|---|
| Все камеры Reolink | Reolink App & Client для ПК (версия 8.8.1 для Windows 7) |
Скачать |
| Все камеры Reolink | Reolink App & Client ПК (версия 8.8.1 для Mac OS 10.11) |
Скачать |
| Все камеры Reolnik | Мобильное приложение Reolink App & Client для iOS |
Скачать |
| Все камеры Reolink | Мобильное приложение Reolink App & Client для Android |
Скачать |
| Reolink Argus 2 | Руководство пользователя |
Скачать |
| Reolink E1, E1 Pro | Руководство пользователя |
Скачать |
| Reolink RLC-520A, RLC-520, RLC-820A, RLC-822A | Руководство пользователя |
Скачать |
| Reolink E1 Outdoor | Руководство пользователя |
Скачать |
| Reolink RLC-810A | Руководство пользователя |
Скачать |
| Reolink RLC-410-5-MP | Руководство пользователя |
Скачать |
| Reolink GO | Руководство пользователя |
Скачать |
| Reolink Argus 2E | Руководство пользователя |
Скачать |
If you have ordered an RLN8-410 or are interested in it, and want to get some basic information about this product before placing it in use or placing the order, you may refer to the below introductions.
This article includes the following 4 parts which will help you quickly understand the use and working principles of the NVR:
Part 1: Unboxing
Part 2: Product Overview
Part 3: Installation
Part 4: Initial Setup
Unboxing for RLN8-410

Product Overview
You may find detailed information about the structure and components of the NVR below.

- USB Port
- Power LED/HDD LED
- Control Panel

- On/Off Switch
- eSATA
- RJ45
- Power Input
- Audio Out
- USB Port
- HDMI Port
- VGA Port
- Network
Installation
You can connect either hard-wire the PoE cameras or connect WiFi cameras wirelessly (except for battery-powered cameras) to the NVR. Below is a common network topology of the connection.
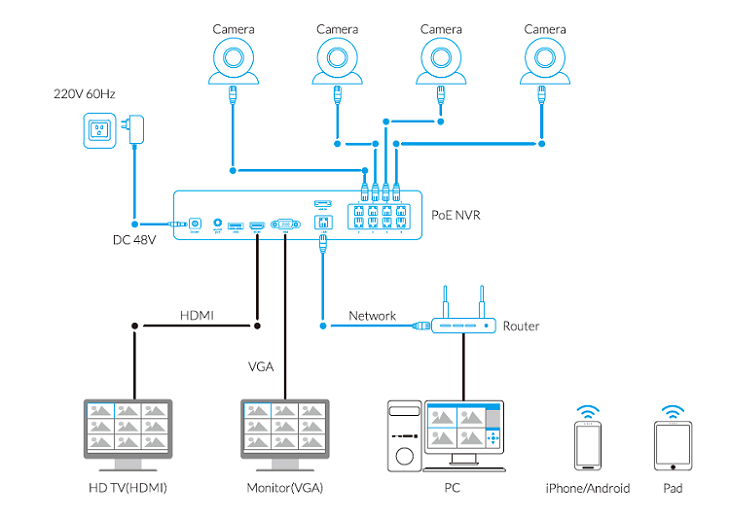
For more instructions on the configurations, you may refer to the sections Wired Connection and Wireless Connection.
Wired Connection
Applies to cameras that are hard-wired to the NVR.
Step 1. Connect your Reolink IP cameras to the Reolink PoE NVR.
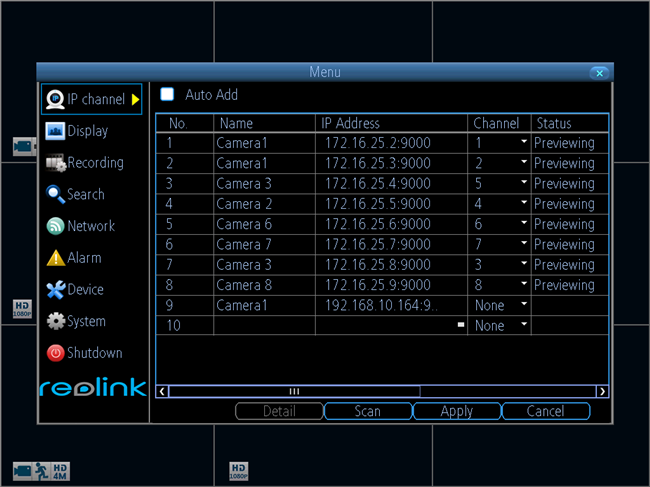
Step 2. Log into your NVR, and go to the IP channel.
Old UI:
New UI:
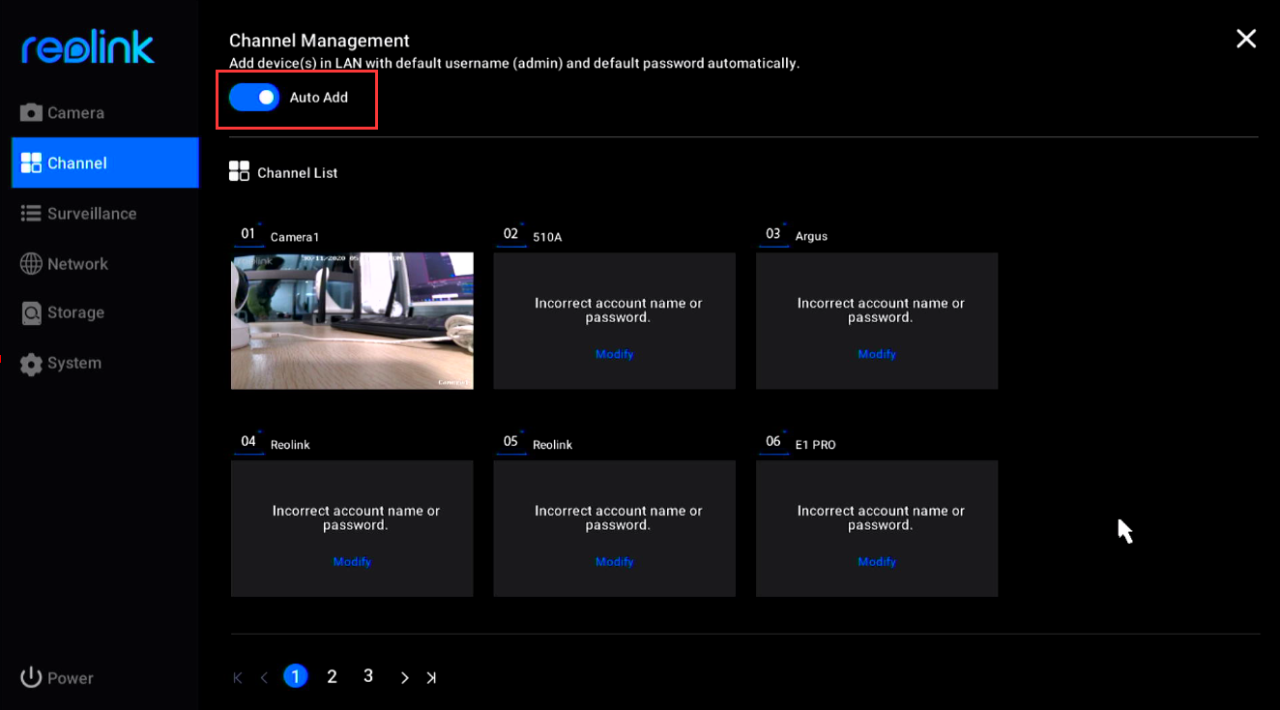
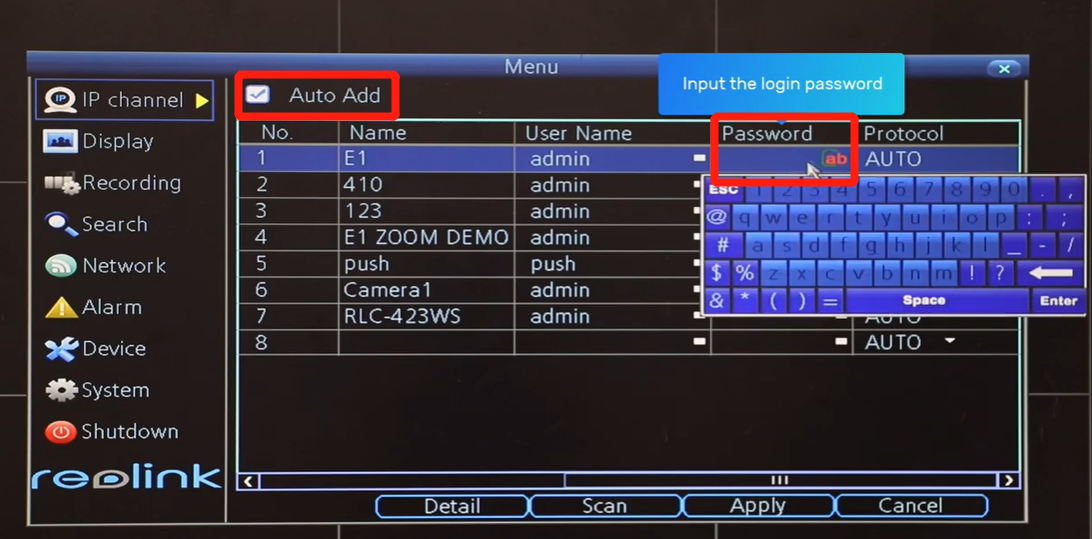
Step 3. Select Auto Add, and click Scan so that all the cameras in the same LAN can be automatically shown on the list.
Step 4. If you have never changed the password of the IP cameras (the default password of the IP camera is blank) and there are enough channels for all the cameras, you may press Apply to add all the IP cameras to the NVR.
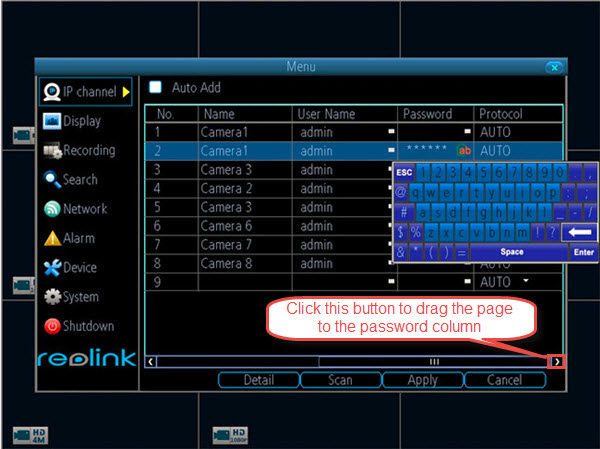
Step 5. If you have changed the User Name and the Password of your cameras, please put the password of the camera to log in.
Old UI:
Please drag the menu bar to the password column and use the soft keyboard to input the required information.
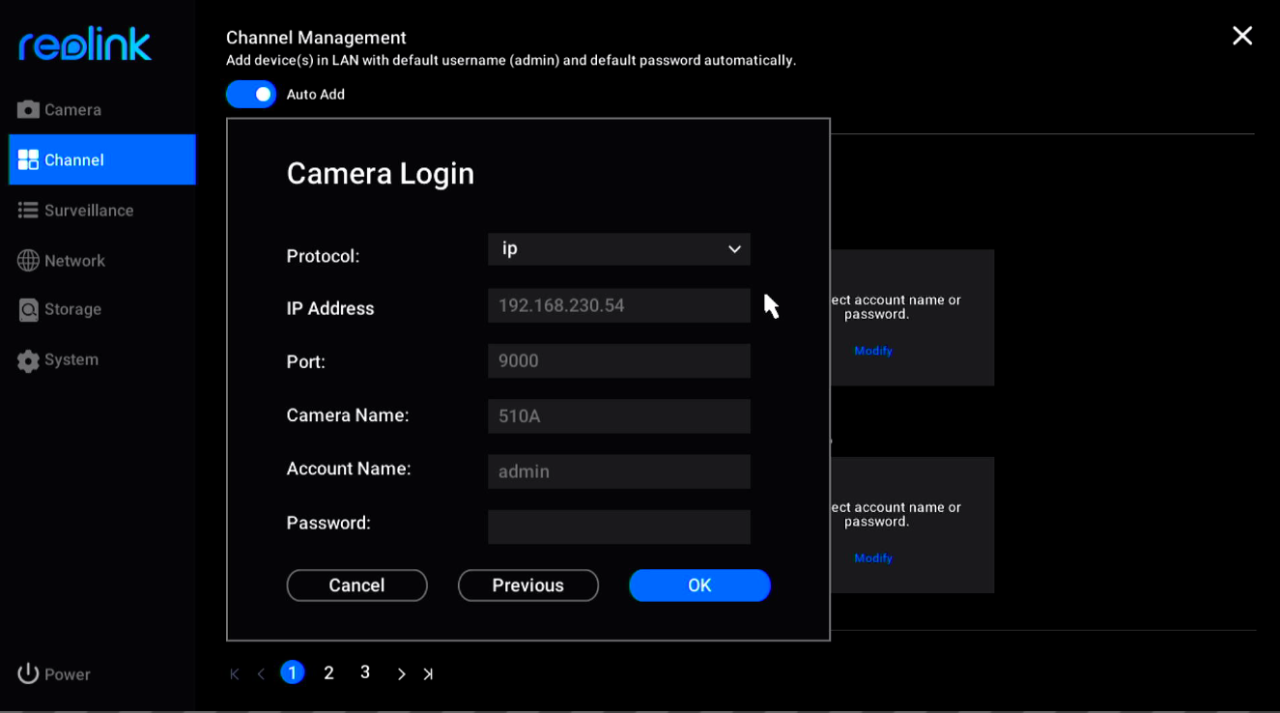
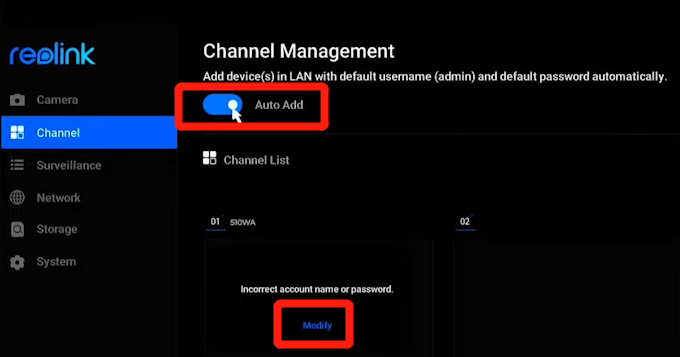
New UI:
Please click Modify to input the required information.
Step 7. Click Apply to save and apply the configuration.
For more detailed instructions, you could refer to the articles below:
- How to Add Reolink IP Cameras to Reolink PoE NVR (Old UI)
- How to Add Reolink IP Cameras to Reolink PoE NVR (New UI)
Wireless Connection
Applies to wifi cameras (except for battery-powered cameras) attempting to add to the NVR.
Step 1. Connect the WiFi camera to the same LAN as the PoE NVR.
Step 2. Connect the camera to the WiFi of the router.
Step 3. Add the camera to the PoE NVR: Toggle the «Auto add» on and hit «Modify» to input the login credentials.
Old UI:
New UI:
For more details of the configurations, please refer to the links below:
- How to Add Configured WIFI Cameras to POE NVR (Old UI)
- How to Add Configured WIFI Cameras to POE NVR (New UI)
Initial Setup
You can do the initial setup on a monitor or TV connected with an HDMI/VGA cable, or through the Reolink App or Reolink Client.
-
On Monitor
Step 1. Connect the NVR to a Monitor or TV via the VGA or HDMI cable.
Step 2. Connect the camera’s RJ45 network socket to any PoE Camera port on the NVR using the Ethernet cables provided.
Step 3. Connect an Ethernet cable from the LAN port of the NVR to the LAN port of your router.
Step 4. Connect the mouse to the USB port.
Step 5. Connect the Power Adapter. Please use the supplied power adapter. For the PoE NVR device, it is 48 volts.
Step 6. And then you will see the below splash screen. System booting up might take a few seconds.
Step 7. Follow the Setup Wizard to set your NVR, click Next to continue and at the last step, click Finish to save all the settings.
For more detailed instructions, you may refer to the articles below:
How to Do Initial Setup for PoE NVR with Monitor Connected (Old UI)
How to Initially Set up PoE NVR with Monitor Connected (New UI) -
On Reolink App
Step 1. Power the camera and the NVR, then launch the Reolink App on your phone.
Step 2. During start-up, you will find the NVR shown on the Delive List automatically on Reolink App.
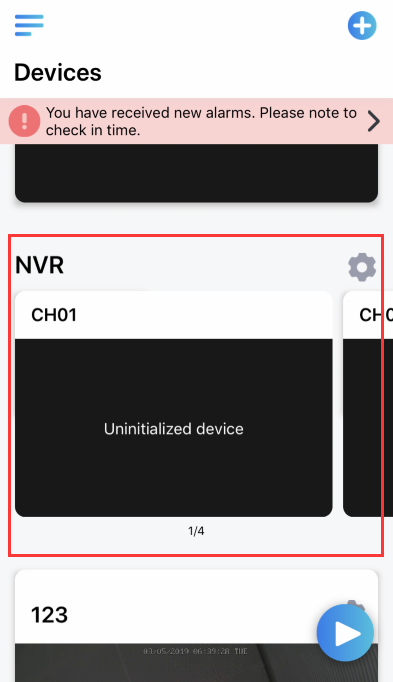
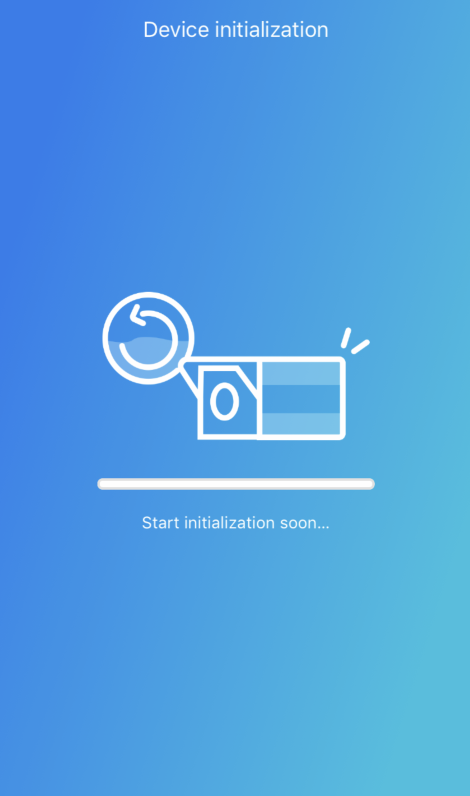
Step 3. Click the device you want to add to start initialization.
Step 4. For security considerations, you need to create a password for the first time.
Step 5. Then name your device and modify other settings on the second step page.
For more detailed instructions, you may refer to the article: How to Do Initial Setup for Reolink NVR via Reolink App. -
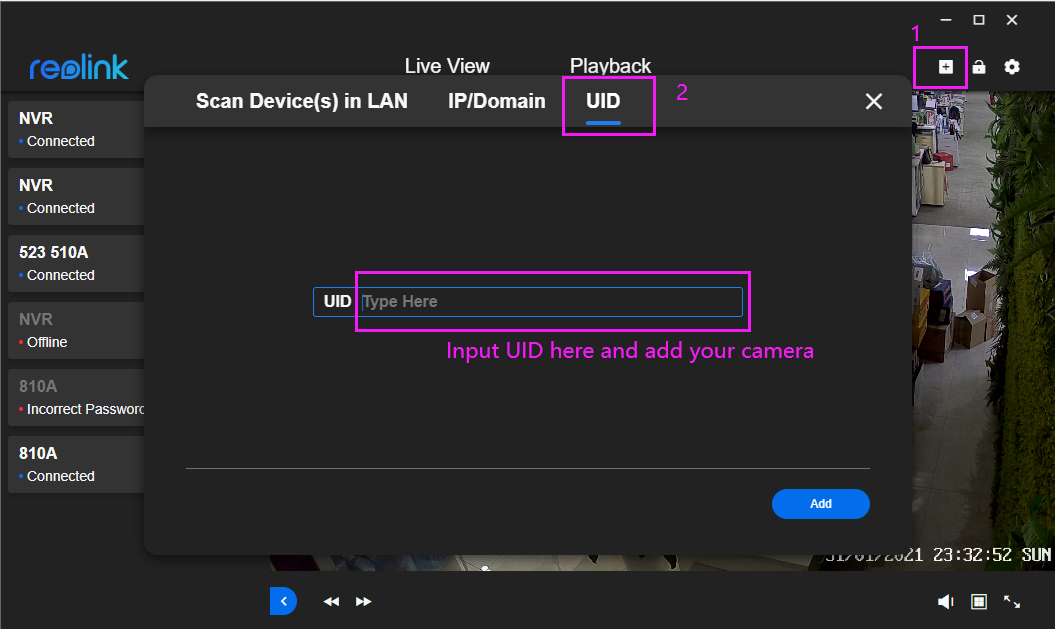
On Reolink Client
Step 1. Click the «+» icon, select UID, then fill in the blanks with the UID number of your NVR, See How to find the UID of your device.

Step 2. Create a device password, then click Next.
Step 3. Create a device name then click Finish.
For more detailed instructions, you may refer to the article: How to Initial Set up NVR via Reolink Client (New Client).
8 Menu Bar
Right click the mouse on the live view screen to open
the main Menu
1.
Opens the Main Menu.
2.
Single camera view.
3.
Four-camera view.
4.
Eight-camera view
5.
Nine-camera view
6.
Click this to view the next camera or screen when
the NVR is in single or four-camera view.
7.
Click this to enable picture-in-picture
viewing multiple cameras. When en- abled , one camera
will be displayed full screen while the other camera
will be dis- played in a small window.
8.
Click this to do a manual recording.
9.
Click this to start the Setup Wizard
when
17
Quick Start Guide
18
Шэньчжэнь Reo-link Digital Technology Co, Ltd Reolink, глобальный новатор в области умного дома, всегда стремится предоставлять удобные и надежные решения для обеспечения безопасности дома и бизнеса. Миссия Reolink состоит в том, чтобы сделать безопасность удобной для клиентов с помощью комплексных продуктов, доступных по всему миру. Их официальный webсайт reolink.com
Каталог руководств пользователя и инструкций для продуктов reolink можно найти ниже. Продукты reolink запатентованы и зарегистрированы под торговыми марками Шэньчжэнь Reo-link Digital Technology Co, Ltd
Контактная информация:
Адрес: Reolink Innovation Limited RM.4B, Kingswell Commercial Tower, 171-173 Lockhart Road, Ванчай, Ванчай, Гонконг
Найти
RLK8-800B4 Оснащенный передовой технологией интеллектуального обнаружения, RLK8-800B4 достаточно умен, чтобы отличать людей и автомобили от других объектов, и дает вам истинное спокойствие, исключая ложные тревоги. Этот превосходный комплект может отображать мельчайшие ключевые детали с максимальной яркостью, даже при цифровом увеличении, так что любая двусмысленность в видеоtagе ты…
Подробнее «Система безопасности reolink RLK8-800B4 4K Ultra HD с руководством пользователя Smart Detection»
reolink TrackMix WiFi Camera with Auto Tracking Руководство пользователя TrackMix WiFi с разрешением 4K 8MP Ultra HD захватывает изображения с высокой детализацией. Узнайте больше при увеличении. Он может отличать людей, транспортные средства и домашних животных* от других объектов, предоставляя более точные предупреждения. Кроме того, вы можете говорить через встроенный в камеру микрофон и динамик. Спецификации 1 Инфракрасный …
Подробнее «reolink TrackMix WiFi Camera with Auto Tracking Руководство пользователя»
reolink Go Plus 2K Outdoor 4G LTE Battery Security Camera Go Plus Relink Go Plus, полностью беспроводная мобильная HD-камера безопасности, работает в сетях 100G-LTE и 4G. Идеальное решение для видеонаблюдения без шнуров, без проблем с проводкой, в местах с ограниченным или отсутствующим доступом к Wi-Fi, без источника электроэнергии! 3. Характеристики 1 1 …
Подробнее «reolink Go Plus 2K Outdoor 4G LTE Battery Security Camera User Guide»
B0B7JBQW8C WiFi Floodlight Информация о продукте Reolink Floodlight WiFi — это устройство безопасности, которое оснащено динамиком, датчиком дневного света, датчиком PIR, светодиодным индикатором состояния, портом LAN, кнопкой сброса и портом питания. Он доступен в различных моделях с различными аксессуарами. Что в коробке Монтажная пластина прожектора Шаблон монтажного отверстия Кабель Ethernet 1 м Мощность 4.5 м …
Подробнее «Руководство пользователя reolink B0B7JBQW8C WiFi Floodlight»
Видеодверной звонок reolink PoE Видеодомофон WiFi Руководство пользователя Комплектация Дверной звонок Звонок на клин Монтажная пластина Шаблон монтажного отверстия Ethernet-кабель 1 м Адаптер питания* Кабель-перемычка Удлинитель питания* Набор винтов Краткое руководство ПРИМЕЧАНИЕ. Видеодомофон Reolink PoE не входит в комплект поставки с адаптером питания и удлинителем питания. Введение в дверной звонок…
Подробнее «Руководство пользователя видеодомофона reolink PoE видеодомофона WiFi»
reolink N2MB02 4K Проводная WiFi наружная камера Полезные советы Если аппаратная версия вашего сетевого видеорегистратора соответствует любой из следующих: RLN8-410: N2MB02/H3MB18/N3MBO1 RLN16-410: H3MB18, вам необходимо обновить сетевой видеорегистратор до последней версии прошивки на официальном сайте Reolink. webсайт для лучшего предварительногоview производительность. Для получения подробных инструкций перейдите по ссылке ниже или отсканируйте QR-код…
Подробнее «reolink N2MB02 4K Проводная WiFi наружная камера Руководство пользователя»
Инструкция по эксплуатации Применимо к: Reolink TrackMix WiFi / PoE Что в коробке ПРИМЕЧАНИЕ. Адаптер питания, антенны и удлинительный кабель питания 4.5 м поставляются только с камерой WiFi. Количество аксессуаров зависит от приобретаемой модели камеры. Введение в камеру Схема подключения камеры Wi-Fi камеры PoE Перед первоначальной настройкой выполните следующие действия, чтобы подключить…
Подробнее «Reolink TrackMix WiFi / PoE 4K Dual Lens Auto Tracking PTZ WiFi Camera User Manual»
reolink 5MP HD WiFi PTZ-камера на открытом воздухе с подключением Wi-Fi Шаг 1. Нажмите значок «+» в правом верхнем углу, чтобы добавить камеру. Шаг 2. Отсканируйте QR-код на камере. Шаг 3. Нажмите «Выбрать соединение Wi-Fi», чтобы настроить параметры Wi-Fi. Убедитесь, что камера включена и включена, и…
Подробнее «reolink 5MP HD WiFi PTZ Camera Outdoor Руководство пользователя»
Краткое руководство Reolink Argus серии 3 Комплект поставки ПРИМЕЧАНИЕ. * Количество аксессуаров зависит от модели приобретаемой камеры. Введение в камеру ПРИМЕЧАНИЕ. Всегда держите резиновую заглушку плотно закрытой. Различные состояния светодиодного индикатора состояния: Красный свет: сбой соединения WiFi Синий свет: соединение WiFi установлено Мигает: состояние ожидания Горит: работает…
Подробнее «Руководство пользователя беспроводной наружной камеры безопасности reolink Argus серии 3»
Уличная WiFi-камера видеонаблюдения Argus 2E 1080P Руководство пользователя Relink Argus 2E Краткое руководство по началу работы Комплект поставки Камера Введение Различные состояния светодиодного индикатора: Красный свет: подключение к WIFI отключено Синий свет: подключение к WIFI установлено Камеру Скачать и запустить…
Подробнее «reolink Argus 2E 1080P Outdoor Security WiFi Camera User Guide»
24/7 непрерывная запись
Если вы хотите записывать видео 24/7 или управлять несколькими IP-камерами, этот Reolink NVR - ваш лучший выбор.
- ● Возможность установки Жесткого Диска
- ● Поддержка записи всех камер одновременно (до 8 камер).
- ● Если вы хотите более долгую запись, попробуйте запись с обнаружением движения, которая будет запускать запись только при обнаружении движения.
- ● Позволяет установить внешний жесткий диск через e-SATA для увеличения объема памяти (до 4 ТБ).
- POE запитывание всех 8 камер
Работа со всеми IP-камерами Reolink
Reolink RLN8-410 8-канальный PoE NVR может отлично работать со всеми нашими IP-камерами для круглосуточной записи, обнаружения движения, просмотра в реальном времени, воспроизведения и других функций. Поддерживаемые камеры включают B800, RLC-410, RLC-511, RLC-420, RLC-422, RLC-423 и т. Д.
ОГРАНИЧЕННАЯ ГАРАНТИЯ 2 ГОДА
Артикул: Reolink RLN8-410
Видео наблюдение стало доступнее чем это было раньше. Не нужно переплачивать огромные суммы фирмам специализирующихся на установке видео наблюдения. Заказываем из китая и устанавливаем самостоятельно. Делюсь опытом подключения камер видео наблюдения, и регистратора Reolink RLN8 410
Ссылка на продавца : https://bit.ly/31j0evA
Ссылка на видео подключения самих камер: https://youtu.be/-7RL9YJJroA
Если вам нравится тема столярки, думаю вам будет интересно посмотреть рубрику «Столяром быть» видео собраны в одном плейлисте: https://www.youtube.com/watch?v=WfbHlygfDx4&list=PLiDyv8_HmTNxB9107FHguDrVHQ2MmEqis
По вопросам и предложениям можно писать сюда: StoDel56@yandex.ru
karmanoff.rom@yandex.ru
Инстаграмм — https://www.instagram.com/stodel_56/
#Reolink #регистратор #видеонаблюдение #StoDel_56 #Столярка