Данное руководство содержит подробные инструкции и сведения о функционировании и использовании принтера Ricoh SP 150 / SP 150w / SP 150SU / SP 150 SUw. Перед использованием устройства внимательно ознакомьтесь с данным руководством для получения информации о его возможностях и мерах безопасности.
Содержание руководства:
1. Описание компонентов;
2. Настройка принтера;
3. Материалы для печати;
4. Идет печать;
5. Драйверы;
6. Печать по Wi-Fi;
7. Кнопки и индикаторы;
8. Обслуживание устройства;
9. Устранение неисправностей;
10. Конфигурации принтера (ВЕБ-страница);
11. Приложение.
Скачать руководство
Все материалы на сайте представлены исключительно для ознакомления. Все торговые марки и права на публикуемые материалы принадлежат их владельцам.
All materials on the site are presented solely for information. All trademarks and copyrights in the published materials belong to their respective owners.
- Manuals
- Brands
- Ricoh Manuals
- Printer
- SP150 series
- User manual
-
Contents
-
Table of Contents
-
Troubleshooting
-
Bookmarks
Quick Links
User Guide
for «RICOH
Printer»
Overview
Windows version
Mac version
Android/iOS version
Troubleshooting
series
Related Manuals for Ricoh SP150 series
Summary of Contents for Ricoh SP150 series
-
Page 1: User Guide
User Guide Overview for “RICOH Windows version Printer” Mac version Android/iOS version Troubleshooting…
-
Page 3: Table Of Contents
TABLE OF CONTENTS How to Read the Manual ……………………..2 1. Overview Introduction to “RICOH Printer” ……………………4 Operating environments ……………………..4 2. Windows version Installation ………………………….. 5 Starting the program ……………………….6 Functions Page …………………………8 Print ……………………………10 Copy (Supported on SP 150SU/SP 150SUw only) ………………13 Scan (Supported on SP 150SU/SP 150SUw only) ………………18…
-
Page 4: How To Read The Manual
How to Read the Manual Symbols Used in the Manual The symbols used in this manual have the following meanings. Indicates an explanation containing points to pay attention to when operating the software, restric- tions, or other information. Be sure to read the explanation. Indicates an explanation containing information that is useful to know, a supplementary operating procedure, or other information.
-
Page 5
Disclaimer Contents of this manual are subject to change without prior notice. In no event will the company be liable for direct, indirect, special, incidental, or consequential damages as a result of handling or operating the machine. To the maximum extent permitted by applicable laws, in no event will the manufacturer be liable for any damages whatsoever arising out of failures of this machine, losses of the registered data, or the use or non-use of this product and operation manuals provided with it. -
Page 6: Overview
1. Overview Introduction to “RICOH Printer” “RICOH Printer” is a software specially designed for this series of RICOH printers. As an improve- ment over using the conventional control panel on the printer, “RICOH Printer” lets you control the printer from your computer or tablet for a seamless, integrated user experience.
-
Page 7: Windows Version
Install the software on your computer in any of the following ways: • Run the installation program in the CD ROM provided with the printer, and then select the ap- propriate installation option. • Download and install the software from the RICOH official website at: http://www.ricoh.com/printers/sp150/support/gateway/…
-
Page 8: Starting The Program
2. Windows version Starting the program 1. Click the icon on the desktop to open “RICOH Printer”. After the program starts, it displays the welcome screen below and begins searching for available printers in the background. 2. The program first searches for available printers and displays them as a list.
-
Page 9
3. If no online printers are found, the program will prompt you to check for con- nection errors before searching for available printers again. -
Page 10: Functions Page
The Model dropdown list shows all printers in the system’s “Devices and Printers” that are compatible with “RICOH Printer”. If a single-function printer (SP 150/SP 150w) is selected, the Print and Settings icons will display.
-
Page 11
The Status page shows the current status of the printer, which can be Ready, Busy, Sleep, Error or Offline. The printer’s status is described in words at the bottom of the window. When the printer en- counters an error, these words will be in red. If a question mark appears next to “Device Status”, click it and troubleshoot the error as instructed by the animation. -
Page 12: Print
2. Windows version Print Picture Print 1. Click [Picture Print] on the Print page to enter the picture selection page. 2. You can select a single or multiple images for printing from the picture selection page. The program supports the printing of images in TIFF, BMP, PNG and JPEG formats.
-
Page 13
File Print 1. Click [File Print] on the Print page to enter the file selection page. 2. From the file selection page, select the file you want to print. If the Windows sys- tem does not support the printing of the selected file, the user will be notified. 3. -
Page 14
2. Windows version Manual Duplex Printing If you wish to print more than 2 pages, you can choose to use manual duplex printing. 1. After selecting your print content, click the [More Settings] button on the Print page. 2. In the More Settings page, check the [Duplex] option and select the type of duplex printing, then click [OK]. -
Page 15: Copy (Supported On Sp 150Su/Sp 150Suw Only)
Copy (Supported on SP 150SU/SP 150SUw only) • The settings made with this application will only apply when the printer is operated using the application. For example, even if you press the Start key on the printer after setting Combine Printing using this application, Combine Printing will not be executed.
-
Page 16
2. Windows version ID Card Copy To copy both the front and back of an ID card on the same page of A4 paper, do the following: 1. On the Copy page, toggle the ID Card Copy switch to the right, then click the [ID Card Copy] button. -
Page 17
3. After the front of the ID card is copied, 2 green LED lights on the printer will start flashing. Within 1 minute, replace the ID card with its back downwards in the original position, then press the Start button on the printer. 4. -
Page 18
2. Windows version N in 1 Copy To copy multiple pages onto a single sheet of paper, do the following: 1. On the Copy page, click the [More Settings] button. On the More Setting page, check the [N in 1 copy] option, and then click the [OK] button. 2. -
Page 19
3. When the first page of the original document is copied, 2 green LED lights on the printer will start flashing. Within 1 minute, place the next page of the orig- inal document on the printer as instructed in the popup animation, and then press the Start button on the printer. -
Page 20: Scan (Supported On Sp 150Su/Sp 150Suw Only)
2. Windows version Scan (Supported on SP 150SU/SP 150SUw only) Scanning Place the document to be scanned on the scanning area of the printer, and then do the following: 1. After setting the scan parameters on the Scan page, click the [Scan] button. 2.
-
Page 21
3. After scanning, you can check the scanned images on the Scan page. 4. Double-click an image to browse, rotate or print it. -
Page 22: Settings 3
2. Windows version Settings You can set the required scan parameters before scanning. Click the [More Settings] button, select the required scan options, and then click the [OK] button. Saving Click the [Save] button to save the selected scanned image(s). If a single picture is selected, the picture may be saved in JPG, TIF or PDF format;…
-
Page 23: Settings
Settings Setting Printer Wi-Fi (Supported on SP 150w and SP 150SUw only) Select a wireless network from the list, enter the corresponding password, and then click “Connect” to configure the wireless settings for the printer. Toggle the WLAN switch to turn on or turn off Wi-Fi. The printer must be restarted for any change in Wi-Fi status to take effect.
-
Page 24
2. Windows version Setting Printer IP Address (Supported on SP 150w and SP 150SUw only) You can choose to obtain the printer’s IP address, or set a fixed IP address for the printer. To set a fixed IP ad- dress for the printer, consult your network administrator for assistance. Setting Soft AP (Supported on SP 150w and SP 150SUw only) Enter the Service Set Identifier (SSID) and password for the Soft AP network, then toggle the ON/ OFF switch to turn on or off Soft AP. -
Page 25: Power Save
Power Save Use this function to set the idle time after which the printer goes to sleep. The idle time can be be- tween 1 minute to 30 minutes.
-
Page 26
2. Windows version More Settings Use this function to set specific parameters for the printer. Unless necessary, do not change the value for any of the options. -
Page 27
Modify Password Use this function to change the administrator’s password. The administrator’s password is mainly for identity authentication purpose. If authentication fails, you will be informed that the password is wrong and be prompted for the right password. You may re-enter the password for an unlimited number of times. After successful authenti- cation, you can change the parameters on the Wi-Fi, Soft AP, TCP/IP, Power Save, and More Set- tings pages. -
Page 28: Mac Version
3. Mac version 3. Mac version Installation Install the software by running the installation program on the CD-ROM provided with the printer. Copy (Supported on SP 150SU/SP 150SUw only) • The settings made with this application will only apply when the printer is operated using the application.
-
Page 29
ID Card Copy To copy both the front and back of an ID card on the same page of A4 paper, do the following: 1. Place the ID card with its front facing downwards on the left-center region of the scanning panel. -
Page 30: Setting (Supported On Sp 150W/Sp 150Suw Only)
3. Mac version Setting (Supported on SP 150w/SP 150SUw only) Wi-Fi Settings (Supported on SP 150w and SP 150SUw only) Select a wireless network from the dropdown list, enter the corresponding password, and then click [Apply] to configure the wireless settings for the printer.
-
Page 31: Android/Ios Version
4. Android/iOS version Installation Install the software that is available on the RICOH official website at: http://www.ricoh.com/printers/sp150/support/gateway/ Starting the program 1. Tap the icon to open “RICOH Printer”. It displays the screen below and be- gins searching for available printers.
-
Page 32
4. Android/iOS version 2. If an online printer is found, the function page is displayed. 3. If no online printers are found, the program will prompt you to search for avail- able printers again. -
Page 33: Functions Page
Functions Page Select and tap a function icon (Print, Copy, Scan, Settings) at the bottom of the page to display the page corresponding to the function selected. If a single-function printer (SP 150/SP 150w) is selected, Print and Settings icons are only available. If a Multi-Function Laser Printer (SP 150SU/SP 150SUw) is selected, all the icons are available.
-
Page 34: Print
4. Android/iOS version Print Regular Print 1. Tap [Please select print files…] to enter the file selection page. 2. Select a file you want to print on the file selection page. 3. After selecting a file, set the printing parameters required. Preview the file by tapping the [Preview] button as necessary, then tap the [Print] button to start printing.
-
Page 35: Copy (Supported On Sp 150Su/Sp 150Suw Only)
Copy (Supported on SP 150SU/SP 150SUw only) • The settings made with this application will only apply when the printer is operated using the application. For example, even if you press the Start key on the printer after setting Combine Printing using this application, Combine Printing will not be executed.
-
Page 36
4. Android/iOS version N in 1 Copy To copy multiple pages onto a single sheet of paper, do the following: 1. On the Copy page, tap [N in 1]. 2. On the [N in 1] page, select an option. 3. Tap the [Copy] button on Functions Page and place the first page of the original document on the printer, and then tap the [OK] button. -
Page 37: Scan (Supported On Sp 150Su/Sp 150Suw Only)
Scan (Supported on SP 150SU/SP 150SUw only) Scanning Place the document to be scanned on the scanning area of the printer, and then do the following: 1. On the Scan page, set all the required parameters, and then tap the [Scan] button.
-
Page 38: Settings
4. Android/iOS version Settings Setting Printer Wi-Fi (Supported on SP 150w and SP 150SUw only) 1. On the Settings page, tap [Wi-Fi]. 2. Toggle the [WLAN] switch to turn on or off Wi-Fi. The printer must be restarted for any change in Wi-Fi status to take effect. 3.
-
Page 39
Setting Soft AP (Supported on SP 150w and SP 150SUw only) 1. On the Settings page, tap [Soft AP]. 2. Toggle the [Soft AP] switch to turn on or off Soft AP. The printer must be restart- ed for any change in Soft AP status to take effect. 3. -
Page 40
4. Android/iOS version Setting Printer IP Address (Supported on SP 150w and SP 150SUw only) You can choose to obtain the printer’s IP address, or set a fixed IP address for the printer. To set a fixed IP address for the printer, consult your network administrator for assistance. 1. -
Page 41
Power Save Use this function to set the idle time after which the printer goes to sleep. 1. On the Settings page, tap [Power Save]. 2. Set idle time between 1 to 30 minutes. Tap [Done] to save the setting. The printer must be restarted for the power save setting change to take effect. -
Page 42: Advanced Settings
4. Android/iOS version Advanced Settings Use this function to set specific parameters for the printer. Unless necessary, do not change the value for any of the options. 1. On the Settings page, tap [Advanced Settings]. 2. Specify the parameters as necessary. The printer must be restarted for any change in advanced settings to take effect.
-
Page 43
Modifying the Password Use this function to change the administrator’s password. The administrator’s password is mainly for identity authentication purpose. If authentication fails, you will be informed that the password is wrong and be prompted for the right password. You may re-enter the password for an unlimited number of times. After successful authen- tication, you can change the parameters on the Wi-Fi, Soft AP, IP Address, Power Save, and Ad- vanced Settings pages. -
Page 44: Troubleshooting
5. Troubleshooting Common problems encountered Unable to connect to the printer Under such circumstances, “RICOH Printer” (Windows) will display the page below. Follow the instructions on screen to troubleshoot network connection problems, and then search for available printers again. Administrator’s password is lost Restore the printer to its factory settings (refer to the user manual), and then enter the default pass- word “888888”.
-
Page 45
Right click the files in these formats, and then check if the [Print] option is available on the right-click menu. If the [Print] option is not available, the file format is not supported by “RICOH Printer”. Toner is at 0%, and the printer cannot be used Replace the empty toner cartridge with a new cartridge. -
Page 46: Error Messages On The Screen
Troubleshooting Error Messages on the Screen Message Causes Solutions Open the maintenance cover, remove the toner cartridge, then remove the jammed Jammed paper still remain- Paper Jam: Paper Remained paper. ing inside. Do not expose the toner cartridge to light. 1.
-
Page 47: Error Codes On The Screen
SC530 Fan motor error. SC541 SC542 Please try switching the power off and on to clear the error. SC543 Contact a dealer or RICOH technical Fusing unit error. support if the error continues to occur. SC544 SC545 SC559 SC560 Low voltage.
-
Page 48: Tips To Avoid Paper Jams
Troubleshooting Tips to Avoid Paper Jams • The occurrence of paper jams can be significantly reduced by using the recommended types of print media. In the event of paper jams, follow the instructions described in “Removing Paper Jams” in the User Guide. •…
-
Page 49
© 2016… -
Page 50
M290-8632A…
This manual is also suitable for:
Sp150 series
Смотреть руководство для Ricoh SP 150SU ниже. Все руководства на ManualsCat.com могут просматриваться абсолютно бесплатно. Нажав кнопку «Выбор языка» вы можете изменить язык руководства, которое хотите просмотреть.

MANUALSCAT | RU
Вопросы и ответы
У вас есть вопрос о Ricoh SP 150SU, но вы не можете найти ответ в пользовательском руководстве? Возможно, пользователи ManualsCat.com смогут помочь вам и ответят на ваш вопрос. Заполните форму ниже — и ваш вопрос будет отображаться под руководством для Ricoh SP 150SU. Пожалуйста, убедитесь, что вы опишите свои трудности с Ricoh SP 150SU как можно более детально. Чем более детальным является ваш вопрос, тем более высоки шансы, что другой пользователь быстро ответит на него. Вам будет автоматически отправлено электронное письмо, чтобы проинформировать вас, когда кто-то из пользователей ответит на ваш вопрос.
Задать вопрос о Ricoh SP 150SU
- Бренд:
- Ricoh
- Продукт:
- Принтеры
- Модель/название:
- SP 150SU
- Тип файла:
- Доступные языки:
- голландский, английский, немецкий, испанский, итальянский, португальский, греческий, китайский, Японский Язык, Хинди
Сопутствующие товары Ricoh SP 150SU
- Manuals
- Brands
- Ricoh Manuals
- All in One Printer
- SP 150
- Field service manual
-
Contents
-
Table of Contents
-
Troubleshooting
-
Bookmarks
Quick Links
Model Rev-P1/MF1
Machine Codes:
SFP: M290/M0AF
MFP: M291/M0AE
Field Service Manual
January, 2016
Related Manuals for Ricoh SP 150
Summary of Contents for Ricoh SP 150
-
Page 1
Model Rev-P1/MF1 Machine Codes: SFP: M290/M0AF MFP: M291/M0AE Field Service Manual January, 2016… -
Page 3: Important Safety Notices
Important Safety Notices Warnings, Cautions, Notes In this manual, the following important symbols and notations are used. • A Warning indicates a potentially hazardous situation. Failure to obey a Warning could result in death or serious injury. • A Caution indicates a potentially hazardous situation. Failure to obey a Caution could result in minor or moderate injury or damage to the machine or other property.
-
Page 4: Responsibilities Of The Customer Engineer
Where symbols are used on or near switches on machines for Europe and other areas, the meaning of each symbol conforms with IEC60417. Responsibilities of the Customer Engineer Customer Engineer Replacement shall be done only by trained customer engineers who have completed service training for the machine and all optional devices designed for use with the machine.
-
Page 5: Installation, Replacement, And Adjustments
• After turning the machine on with any cover removed, keep your hands away from electrical components and moving parts. Never touch the cover of the fusing unit, gears, timing belts, etc. Installation, Replacement, and Adjustments • After installation, replacement, or adjustment, always check the operation of the machine to make sure that it is operating normally.
-
Page 6: Organic Cleaners
operation of the machine to ensure that it is operating normally and safely after removal and replacement of any safety device. • For replacements use only the correct fuses or circuit breakers rated for use with the machine. Using replacement devices not designed for use with the machine could lead to a fire and personal injuries.
-
Page 7: After Maintenance
• Connect the power cord directly into the power source. Never use an extension cord. • When you disconnect the power plug from the power source, always pull on the plug, not the cable. After Maintenance Disposal of Used Items •…
-
Page 8: Special Safety Instructions For Toner
• Caution operators about removing paper fasteners around the machine. They should never allow paper clips, staples, or any other small metallic objects to fall into the machine. Special Safety Instructions for Toner Accidental Physical Exposure • Work carefully when removing paper jams or replacing toner bottles or cartridges to avoid spilling toner on clothing or the hands.
-
Page 9: Toner Disposal
• Always store fresh toner supplies or empty bottles or cartridges in a cool, dry location that is not exposed to direct sunlight. Toner Disposal • Never attempt to incinerate toner, used toner, or empty toner containers (bottles or cartridges). Burning toner can explode and scatter, causing serious burns.
-
Page 10: Observance Of Electrical Safety Standards
2. To avoid possible accumulation of ozone in the work area, locate the machine in a large well ventilated room that has an air turnover rate of more than 30m /hr/person. 3. Toner and developer are non-toxic, but if you get either of them in your eyes by accident, it may cause temporary eye discomfort.
-
Page 11: Rohs Compliance
• Use of controls, or adjustment, or performance of procedures other than those specified in this manual may result in hazardous radiation exposure. • Turn off the main switch before attempting any of the procedures in the Laser Unit section. Laser beams can seriously damage your eyes.
-
Page 12: Symbols, Abbreviations And Trademarks
Symbols, Abbreviations and Trademarks Symbols and Abbreviations Commonly Used Icons for Replacements and Adjustments This manual uses several symbols and abbreviations. The meaning of those symbols and abbreviations are as follows: Clip ring Screw Connector Clamp E-ring C-ring Spring Timing Belt Paper Feed: SEF/LEF The notations «SEF»…
-
Page 13: Key Presses
In this manual «Main Scan» means «Horizontal» and «Sub Scan» means «Vertical», both relative to the direction of paper feed. Key Presses Symbol What It Means [Key] The names of machine keys and PC keyboard keys are enclosed in square brackets. >…
-
Page 14: Table Of Contents
TABLE OF CONTENTS Important Safety Notices……………………… 1 Warnings, Cautions, Notes………………………1 General Safety Instructions……………………..1 Responsibilities of the Customer Engineer………………..2 Customer Engineer……………………..2 Reference Material for Maintenance………………..2 Before Installation, Maintenance……………………2 Shipping and Moving the Machine………………… 2 Power…………………………2 Installation, Replacement, and Adjustments………………3 Special Tools……………………….3 During Maintenance……………………….
-
Page 15
Paper Feed: SEF/LEF…………………….. 10 Key Presses……………………….11 Trademarks…………………………11 1. Product Information Specifications…………………………17 Specifications of the Machine……………………17 Software Specifications……………………..17 New Product Information……………………..18 Series Comparison……………………….18 Machine Names and Host Interface………………..18 Feature Summary……………………..18 Important Points to Remember………………….19 General Configuration……………………..19 Product Overview………………………. -
Page 16
After Replacing the Laser Unit………………….31 Paper Feed…………………………..32 Paper Feed Roller……………………….32 Friction Pad…………………………33 Registration Roller……………………….34 Image Transfer Roller………………………34 Paper Feed Clutch……………………….36 Bottom Plate Lift Clutch……………………..36 Drive……………………………. 38 Main Motor…………………………38 Fan…………………………….41 Fan…………………………..41 Fusing Unit……………………………42 Fusing Unit…………………………42 Electrical Components……………………….. -
Page 17
Adjust Registration……………………..55 Adjust Temperature……………………..56 Adjust Other Settings………………………57 Get Input Status……………………… 59 Output Check……………………….60 Data Upload……………………….61 CIS Calibration……………………….61 Firmware Update……………………….. 62 5. Troubleshooting Service Calls…………………………63 LED Indicators and Error Status……………………63 Points to Note……………………….63 Fatal SC Codes/Fusing Related Errors…………………. 64 Executing Fusing SC Reset……………………64 SC Tables…………………………65 SC Table Key……………………….65… -
Page 19: Product Information
1. Product Information Specifications Specifications of the Machine For details about machine specifications, see the user guide. Software Specifications For details about system requirements for drivers, see the user guide. For details about system requirements for the Virtual Operation Panel, see the manual for the Virtual Operation Panel.
-
Page 20: New Product Information
1. Product Information New Product Information Series Comparison Machine Names and Host Interface Abbrev. Model No. Product Name Host Interface M290-27/29 SP 150 USB2.0 USB2.0 M0AF-17/27/2 SP 150w Wi-Fi 802.11b/g/n M291-27/29 SP 150SU USB2.0 USB2.0 M0AE-17/27/2 SP 150SUw Wi-Fi 802.11b/g/n Comparison of SFP and MFP Models Abbrev.
-
Page 21: Important Points To Remember
New Product Information Feature Virtual Operation Panel Available Available Firmware update tool Available (English and Simplified Chinese) CE Tools Available Available Toner End Detection • Toner Near End A Toner Near End message is displayed on the Virtual Operation Panel. Printing can be continued.
-
Page 22: Product Overview
1. Product Information Product Overview Paper Path and Image Writing Name Name Lenses, Mirrors Registration Sensor Polygon Mirror Drum Paper Size Sensor Image Transfer Roller Paper Tray Hot Roller Bottom Plate Position Sensor Pressure Roller Paper Feed Roller Paper Exit Roller Registration Roller Exit Sensor Paper Transport Roller…
-
Page 23: Drive Layout
New Product Information Drive Layout Name Name Paper Feed Clutch Drum (inside the AIO) Main Motor Paper Transport Roller Paper Exit Roller Paper Feed Roller Pressure Roller Bottom Plate Lift Clutch Hot Roller…
-
Page 24
1. Product Information… -
Page 25: Installation And Preventive Maintenance
2. Installation and Preventive Maintenance Installation and Preventive Maintenance This product can be installed and maintained by the user. Installation For details about the installation requirements and installation procedures, see the user guide. Preventive Maintenance For details about how to maintain the machine, see the user guide.
-
Page 26
2. Installation and Preventive Maintenance… -
Page 27: Replacement And Adjustment
3. Replacement and Adjustment Before You Begin Before You Begin • Before you begin a maintenance procedure: 1) Switch the machine off, 2) Disconnect the power plug from the power source, 3) Allow the machine to cool for at least 10 minutes. •…
-
Page 28: Exterior Covers
3. Replacement and Adjustment Exterior Covers Open the top cover. Remove the AIO [A]. Bottom Cover Open the top cover. Remove the small cover [A]. (…
-
Page 29
Exterior Covers Disconnect the connector. ( Turn the machine upside down. Remove the small cover [A]. ( Remove the screws on the bottom cover. ( Remove the bottom cover. The bottom cover has hooks on the inside. Gently loosen the cover from the hooks by using the tip of a small screwdriver. -
Page 30: Top Cover
3. Replacement and Adjustment • After removing the bottom cover, place a mat underneath the machine to prevent damage to the HVP and PCB [A] when placing the machine with its bottom side down. Top Cover Open the top cover [A].
-
Page 31
Exterior Covers Remove the guide rail [B]. ( Disconnect the laser unit [A] from the top cover. ( Remove the top cover [A]. -
Page 32: Mfp
3. Replacement and Adjustment Remove the paper feed guide [A]. The MFP does not have a top cover. For details on how to remove the scanner unit, see page 48 «Scanner Unit».
-
Page 33: Laser Unit
Laser Unit Laser Unit Laser Unit For details on how to remove the laser unit, refer to page 26 «Bottom Cover», page 28 «Top Cover», and page 43 «Electrical Components». After Replacing the Laser Unit After replacing the laser unit, check the position of the image area on the page, and adjust the registration value if necessary.
-
Page 34: Paper Feed
3. Replacement and Adjustment Paper Feed Paper Feed Roller Remove the bottom cover. (page Remove the main motor. (page Remove the feed guide [A]. ( x 4) Slide the paper feed roller [A] to the right and remove it. ( x 2, bushing x 2)
-
Page 35: Friction Pad
Paper Feed Release the hook and remove the paper feed roller [A] from the shaft. Friction Pad Remove the bottom cover. (page Remove the gear [A]. ( x 1) Remove the friction pad unit [B]. ( Release the 2 hooks. Remove the friction pad [A].
-
Page 36: Registration Roller
3. Replacement and Adjustment Registration Roller Remove the AIO. (page Push down the rear end of the bushing [A] on the right end of the registration roller [B] to unlock the roller. Remove the registration roller [B]. Image Transfer Roller Remove the AIO.
-
Page 37
Paper Feed Remove the image transfer roller with the bushing [A]. Remove the gear x 1, bushing x 2, spring x 2 from the image transfer roller [A]. -
Page 38: Paper Feed Clutch
3. Replacement and Adjustment Paper Feed Clutch Remove the bottom cover. (page Remove the main motor. (page Remove the gear [A]. Remove the paper feed clutch [A] and the gear [B]. ( x1) Bottom Plate Lift Clutch Remove the bottom cover. (page…
-
Page 39
Paper Feed Disconnect the harness. Remove the friction pad unit [A]. ( x3) Remove the bottom plate lift clutch [B]. ( x1) -
Page 40: Drive
3. Replacement and Adjustment Drive Main Motor Remove the bottom cover. (page Open the top cover. Remove the gear [A]. ( Remember the position of the gear [A]. Put the gear back in the correct position after replacing the motor. Remove the gear [A].
-
Page 41
Drive Remove the T-shaped stopper [A]. Remember the position of the T-shaped stopper [A]. Put the stopper back in the correct position after replacing the motor. Remove the bracket [A]. ( ×2, ×2) -
Page 42
3. Replacement and Adjustment Remove the main motor [A] with its bracket. ( ×3) Remove the gears [A], [B], and [C]. ( ×1) Remove the bracket [A] from the main motor [B]. ( ×3) -
Page 43: Fan
Remove the bottom cover. (page Remove the Wi-Fi PCB (Wi-Fi models only). (page Remove the bracket [A] ( ×1). Remove the fan [A]. ( ×1, ×1 ). • When replacing the fan, make sure that the decal on the fan faces the outside.
-
Page 44: Fusing Unit
3. Replacement and Adjustment Fusing Unit Fusing Unit Remove the bottom cover. (page Remove the Wi-Fi PCB (Wi-Fi Models only). (page Remove the fan. (page Remove the PSU. (page Remove the main motor with its bracket. (page Disconnect the harness [A] on the PCB. Remove the fusing unit [A].
-
Page 45: Electrical Components
Electrical Components Electrical Components Main Board • Do not throw away the transparent sheet covering the main board. This sheet protects the harness from being scratched by the hooks on the inside of the bottom cover. After replacing the main board, re-attach the sheet.
-
Page 46: Main Board Of Mfp Models
3. Replacement and Adjustment Main Board of MFP Models Remove the bottom cover. (page Remove the main board [A]. ( x14,…
-
Page 47: Wi-Fi Pcb (Wi-Fi Models Only)
Electrical Components Wi-Fi PCB (Wi-Fi Models Only) Remove the bottom cover. (page Remove the Wi-Fi PCB [A]. ( x1, hook x1) Remove the bottom cover. (page Remove the bracket [A]. ( ×3)
-
Page 48: Hvp
3. Replacement and Adjustment Remove the PSU [A] with the bracket. ( ×3) • When removing the PSU, keep the harness [B] away from the heat sink [C]. Otherwise, the cover of the harness may melt because of the heat. Remove the PSU [B] from the bracket [A].
-
Page 49
Electrical Components Remove the HVP [A]. (… -
Page 50: Scanner
3. Replacement and Adjustment Scanner RTB 4 This section was revised Scanner Unit Remove the AIO. (page Remove the bottom cover. (page Remove the main board. (page Release the guides of the paper feed tray [A]. Remove the paper feed guide [A].
-
Page 51
Scanner • To remove the paper feed guide [A], release the right linkage first. Remove the rear cover from the right-hand side [A]. Open the scanner unit [A] and remove the guide rail [B]. ( Remove the scanner unit [A]. Remove the laser unit from the scanner unit [A]. -
Page 52: Scanner Open/Close Switch
3. Replacement and Adjustment Scanner Open/Close Switch Remove the bottom cover. (page Remove the sheet [A]. Remove the bracket [B]. ( Remove the scanner open/close switch [A]. (…
-
Page 53: Sensors
Sensors Sensors Registration Sensor Remove the bottom cover. (page Remove the registration sensor [A]. ( Exit Sensor Remove the fusing unit. (page Remove the exit sensor [A]. ( Thermistor Remove the AIO. (page Remove the bottom cover. (page…
-
Page 54: Bottom Plate Position Sensor
3. Replacement and Adjustment Remove the screw [A]. ( Remove the thermistor [A]. ( Bottom Plate Position Sensor Remove the friction pad unit. (page Remove the bottom plate position sensor [A]. ( Paper Size Sensor Remove the AIO. (page…
-
Page 55
Sensors Remove the top cover. (page Remove the main board. (page Remove the bracket [A] on the feed guide. ( Remove the paper size sensor. -
Page 56
3. Replacement and Adjustment… -
Page 57: System Maintenance
4. System Maintenance Utilities Using CE Tools • Before using CE Tools, make sure that the PC is connected to the machine. To start CE Tools, click on the CE Tools icon. • To return to the default values, click [Set Default] on each screen. •…
-
Page 58: Adjust Temperature
4. System Maintenance Item Details Values Adjust the leading edge registration. • Plain Paper -40 to 40 (0.1 mm steps) • Thick Paper Leading Edge • Thin Paper Adjust the leading edge registration. -2 to 2 (1 mm steps) • For User Adjust the side to side registration.
-
Page 59: Adjust Other Settings
Utilities Item Details Values Plain Paper Adjust the fusing temperature 160 to 190 (1°C steps) according to the paper type. Thick Paper 167 to 197 (1°C steps) Thin Paper 147 to 177 (1°C steps) Recycled Paper 155 to 185 (1°C steps) Adjust Other Settings Item Details…
-
Page 60
4. System Maintenance Item Details Values Specify the area where the machine is sold and used. This setting is important. It determines the following: • Default paper size. LT for NA, and A4 for all other areas. • Units of measure: inches for NA, Destination Code 0 to 255 and millimeters for all other areas. -
Page 61: Get Input Status
Utilities Item Details Values AC power unstable times are AC Power Unstable Times 0 to 99999999 displayed. The serial number of the engine is displayed. Normally, do not change the serial Serial No_Engine number. After replacing the main board, return the serial number to its original value.
-
Page 62: Output Check
4. System Maintenance Items Values • Front Cover • Main Motor Lock • Polygon Motor Lock • Fan Lock • LD XDETP Check 0: Off 1: On • LD Error • HVP Error • Fuser High Temp • Register Sens. •…
-
Page 63: Data Upload
Utilities Select the following items from the Output Check Items list, and switch them on or off. Items Values • Main Motor • Feed Clutch • Plate Clutch • Fan High Speed • Fan Low Speed • LD Heater On (LD1 & LD2) •…
-
Page 64: Firmware Update
4. System Maintenance Firmware Update For details on how to update the machine firmware, refer to the firmware update guide.
-
Page 65: Troubleshooting
5. Troubleshooting Service Calls LED Indicators and Error Status • For details about the LEDs indicators and status descriptions, refer to the user guide. To find out the SC code, see the message area on the Status screen of the Virtual Operation Panel. Status Screen 1.
-
Page 66: Fatal Sc Codes/Fusing Related Errors
5. Troubleshooting • Before deciding to replace electrical components (PCB/PSU/HVP), always check the harnesses to make sure that the problem was not caused by a loose connection. • Before deciding to replace a motor or a sensor, always check around the motor or sensor feelers to make sure that there is no physical obstruction such as paper scraps or things that have fallen into the machine (for example, paper clips or pins).
-
Page 67: Sc Tables
Service Calls From the Output Check Items list, select [FusingSCReset]. Click [On]. SC Tables SC Table Key SC codes are assigned a level of severity (A, B, C, D) based on the table below. These letters appear in the 3rd column of the SC tables below. Level Definition/ Reset Procedure This is a fatal error.
-
Page 68: Sc2Xx: Polygon Motor Errors
5. Troubleshooting Level Definition/ Reset Procedure These SC codes are not shown. They are logged internally. • Check the SC error log. The SC code is shown in the message on the Status Panel. • Cycle the power OFF/ON. • The SC code will be shown again if the error repeats. •…
-
Page 69
Service Calls Code Level Details Polygon Motor Off Timeout Error The lock signal did not go inactive within 20 sec. after the polygon motor was turned off. • The polygon motor I/F harness is loose, broken, or defective. • The motor driver board is defective. •… -
Page 70: Sc4Xx: Bias Leak
5. Troubleshooting Code Level Details Beam Synchronization Error The top cover is closed and locked, and the polygon motor is locked, but laser synchronization could not be achieved within 400 ms. • The I/F harness of the LDB is loose, broken, or defective. •…
-
Page 71: Sc5Xx: Main Motor Errors, Fusing Errors
Service Calls SC5xx: Main Motor Errors, Fusing Errors Code Level Details Plate Action Error The status of the bottom plate position sensor does not change even though 2 secs or more have lapsed after the bottom plate lift clutch is turned ON. This SC is displayed if the error is detected 3 times.
-
Page 72
5. Troubleshooting Code Level Details Main Fan Motor Error When the fan motor is ON, a lock signal is sampled every 100 ms. If an incorrect lock signal is detected 100 times (10 sec), the fan is not rotating properly. •… -
Page 73
Service Calls Code Level Details Fusing Reload Temperature Error After starting up or during operation, the reload (operating) temperature cannot be reached. • The fusing thermistor is deformed or out of position. • The fusing lamp harness is loose, broken, or defective. •… -
Page 74
5. Troubleshooting Code Level Details High Temperature Error (Hardware) The machine checks the CPU port at 50 ms intervals. This SC is displayed if the CPU port was detected to be LOW for 4 consecutive times. • The PSU is defective (triac has short-circuited). •… -
Page 75
Service Calls Code Level Details Motor Thermistor Error After starting up, the temperature inside the machine is checked every 100ms. A temperature of -30°C is detected for 4 sec., or 105°C is detected for 1 sec. • Cycle the power OFF/ON. •… -
Page 76: Sc6Xx: Communication Errors
5. Troubleshooting SC6xx: Communication Errors Code Level Details No CTL_PRREQ_N Signal Paper failed to feed after the machine has reached the reload temperature, because the main board did not issue a PRREQ signal. • The main board harness connector is loose, broken, or defective. •…
-
Page 77: Image Problems
Image Problems Image Problems Overview Image problems can occur at regular intervals [A] due to the different circumferences of rollers in the machine and inside the AIO. Diameter (mm) Interval (mm) Component Charge Roller (AIO) Development roller (AIO) 14.6 Relay roller 14.2 44.6 Exit Roller…
-
Page 78: Dark Lines In Halftone Areas
5. Troubleshooting Diameter (mm) Interval (mm) Component Paper feed roller Dark Lines in Halftone Areas Dark lines in halftone fill areas can appear at 75 mm intervals when the machine is operating in a room where the humidity is very low. (The low humidity causes variation in light sensitivity across the surface of the drum.) To prevent this problem, perform the following procedure.
-
Page 79: Energy Saving
6. Energy Saving Energy Save Energy Saving Modes…
-
Page 80
MEMO… -
Page 81
MEMO… -
Page 82
MEMO…
Уважаемые посетители нашего сайта! К сожалению, цены на наши услуги находятся в процессе пересмотра и могут отличаться от указанных на сайте. Приносим извинения за доставленные неудобства.
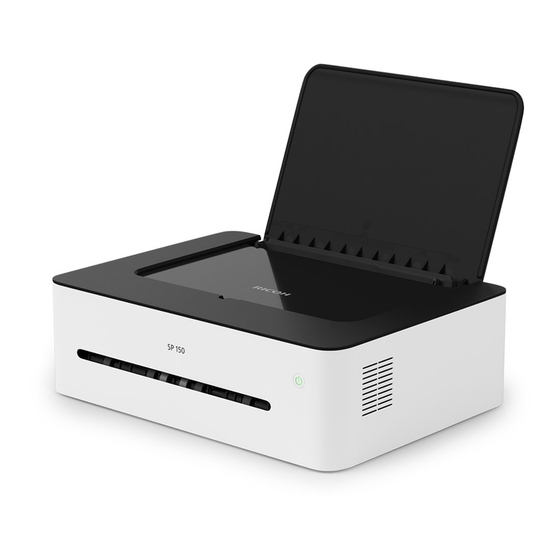
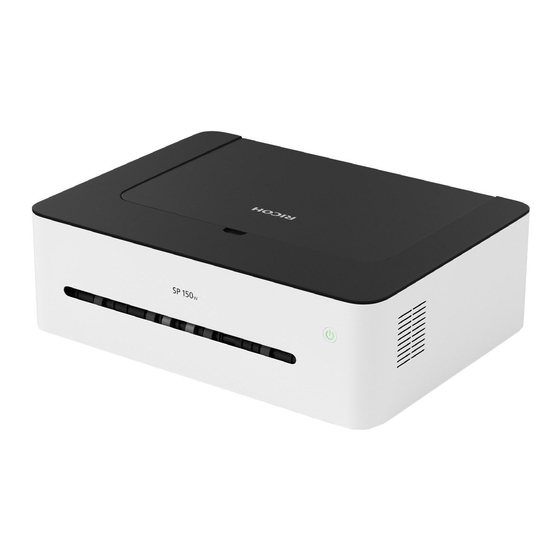
Многофункциональные устройства — принтер копир сканер — Ricoh SP 150SUw
оборудованы всего двумя кнопками
 СТАРТ
СТАРТ
и
 ВКЛ
ВКЛ
и не имеют жидкокристаллического текстового индикатора.
Кнопки клавиши выполнены с подсветкой разными цветами и способны показывать состояние МФУ
сочетанием миганий с различной частотой и цветом свечения.
Эта страничка расскажет вам, почему принтер МФУ Ricoh SP 150SUw
мигает зеленым, красным или синим огоньком, и что в этом случае делать.
При написании текста этой страницы использованы материалы руководства по эксплуатации МФУ Ricoh SP 150SUw.
Торговая марка Ricoh является зарегистрированным торговым знаком и принадлежит ….
Обозначение и наименование клавиш управления МФУ принтера Ricoh SP 150SUw

Верхняя кнопка с квадратиком называется
СТАРТ START.
Лампочка клавиши
СТАРТ
умеет быть выключенной, мигать зелёным, и постоянно гореть зелёным огоньком.
Нижняя кнопка с кружочком называется
ВКЛ POWER.
Поведение нижней кнопки включения более разнообразно.
В различных ситуациях лампочка клавиши
ВКЛ
может светиться красным, синим, оранжевым и зелёным цветами,
мигать огоньком с различной частотой, а также совсем не гореть.
Возможные варианты свечения клавиш
 POWER
POWER
и
START


Такое поведение зеленой лампочки означает, что ваше МФУ находится в СПЯЩЕМ РЕЖИМЕ.
Свечение медленно мигающего индикатора красным означает состояние МАЛО ТОНЕРА.


К сожалению, такой режим мигания лампочек указывает на обнаружение неисправности одного из важных блоков вашего МФУ.
Смотрите подробности в разделе Сервисные коды самодиагностики.

Таким свойством наделён индикатор нескольких режимов WiFi, когда кнопка ВКЛ очень часто мигает синим огоньком.
Вывод на печать страницы параметров принтера МФУ Ricoh SP 150SUw
Распечатку страницы параметров (она же страница состояний, страница настроек, демо-лист, тестовая страница, пробная печать)
МФУ принтера Ricoh SP-150SUw удобно использовать как пробный тестовый или
демонстрационный лист (demo page) для проверки качества печати без подключения к компьютеру.
Для распечатки страницы параметров достаточно подключения принтера к сети питания 220 вольт.
Подключение принтера к компьютеру или локальной сети не требуется.
- Убедитесь, что принтер подключен к электрической сети и верхняя крышка закрыта.
- Включите принтер и дождитесь перехода принтера в режим готовности.
- Быстро нажмите кнопку
ВКЛ
ТРИ РАЗА в течение полутора секунд. - Индикатор
ВКЛ
начнет мигать зелёным светом, принтер распечатает страницу конфигурации (configuration page).
Как распечатать тестовую страницу настроек принтера Ricoh SP-150SUw:
Страница конфигурации показывает имя принтера, сетевое имя и IP, сколько страниц было напечатано,
оставшийся ресурс тонер-картриджа SP150, уровень заполнения
бункера отработанного тонера (waste box), и другие данные.
Принтер МФУ Ricoh SP 150SUw выключен, питание отсутствует

Значение:
Принтер МФУ Ricoh SP 150SUw выключен, либо электрическое питание отсутствует.
Для включения Ricoh SP 150SUw нажмите и удерживайте нижнюю кнопку
ВКЛ
в течение 0.5 секунды, или чуть дольше.
Включение принтера МФУ Ricoh SP 150SUw и выход в режим готовности

Значение:
Постоянное свечение нижней кнопки
ВКЛ
зелёным цветом и отсутствие свечения верхней кнопки
СТАРТ
означает готовность принтера к работе.
Для модели с Wi-Fi Ricoh SP 150SUw зелёное свечение лампочки
ВКЛ
означает отсутствие соединения Wi-Fi. При готовности к работе через Wi-Fi индикатор должен светиться синим цветом.
Для включения Wi-Fi нажмите и удерживайте кнопку
ВКЛ
более чем одну секунду.
Прогрев, обработка задания печати, распечатывание документа

Значение:
Мигание зеленым огоньком нижней кнопки
ВКЛ
с частотой 0.5Hz (загорается на 1 секунду, и выключается на 1 секунду) в сочетании с отсутствием свечения верхней кнопки
СТАРТ
означает нормальное выполнение рабочего процесса.
Это может быть либо прогрев, либо обработка задания в памяти перед распечаткой, либо непосредственно процесс печати документов.
Для отмены выполнения текущего задания печати нажмите и удерживайте нижнюю клавишу
ВКЛ
более чем одну секунду.
Режим готовности при успешном Wi-Fi соединении

Значение:
Постоянное свечение нижней кнопки
ВКЛ
синим цветом в сочетании с отсутствием свечения верхней кнопки
СТАРТ
означает успешное подключение по Wi-Fi и готовность к работе.
В случае неполадок, вы можете распечатать страницу конфигурации и проверить сетевые настройки.
Возможно, принтер подключился к соседской сети.
Обновление микропрограммы — Firmware update

Значение:
Разноцветное мигание с переключением с синего на красный огни клавиши
ВКЛ
в сочетании с отсутствием свечения верхней кнопки
СТАРТ
означает обновление внутренней микропрограммы — прошивки — firmware update.
Не отключайте электропитание принтера и не отключайте принтер от компьютерной сети! Дождитесь завершения процесса обновления микропрограммы.
Отключение электричества либо прерывание процесса передачи данных во время обновления микропрограммы может привести к выходу устройства из строя.
Если ваш принтер МФУ подключен к компьютеру или компьютерной сети, имеющим доступ в интернет,
он может получить обновлённую прошивку самостоятельно и без вашего ведома. По закону Мерфи, процесс установки новой микропрограммы
начнется именно тогда, когда вам необходимо срочно распечатать документы или сделать копию.
Спящий режим, как вывести принтер из режима сна

Значение:
Медленное мигание зелёным цветом клавиши
ВКЛ
в сочетании с отсутствием свечения верхней кнопки
СТАРТ
означает нахождение устройства на отдыхе — в спящем режиме.
Для вывода принтера из спящего режима отправьте задание на печать, нажмите любую кнопку, либо отсоедините/подсоедините кабель USB.
Время нахождения МФУ Ricoh SP 150SUw в режиме готовности без действий,
по истечении которого МФУ перейдёт в спящий режим,
программируется от 1 минут до 30 минут через подключение к компьютеру,
страница настроек — раздел Экон.Энергии.
Чтобы изменения настроек энергосбережения вступили в силу,
МФУ Ricoh SP 150SUw необходимо перезагрузить (выключить/включить).
Полный ресет — сброс настроек к заводским — Factory reset

Значение:
Процесс восстановления заводских настроек принтера.
Для полного ресета — сброса настроек к заводским — поднимите крышку принтера, при поднятой крышке нажмите и удерживайте клавишу
ВКЛ
в течение 10 секунд и более.
Отмена выполнения текущего задания печати

Значение:
Отмена выполнения текущего задания печати.
Отменить распечатку отправленного на принтер документа возможно, когда зеленый огонек кнопки
ВКЛ
уже начал мигать.
Для отмены выполнения текущего задания нажмите и удерживайте нажатой клавишу
ВКЛ
более чем одну секунду. Зелёное мигание индикатора
ВКЛ
сменится на чередование красного и зеленого огоньков — происходит отмена задания.

Значение:
Если кнопка
ВКЛ загорелась красным и постоянно горит, это означает одну из следующих неполадок:
- Тонер закончился
- Крышка открыта
- Тонер-картридж не установлен
- Бумага застряла
- Память PDL переполнена
- Емкость отработанного тонера заполнена
Если не удается визуально определить причину неисправности (например, незакрытая крышка,
или застрявшая бумага), необходимо подключить устройство к компьютеру и посмотреть диагностику в панели инструментов принтера.
Тонер закончился — ваш картридж можно заправить.

Значение:
Если кнопка
ВКЛ моргает красным раз в секунду, это означает одну из следующих неполадок:
- Бумага закончилась
- Устройство охлаждается
- Ожидание распечатки обратной стороны листа в режиме ручной двусторонней печати
Бумага закончилась — добавьте бумагу в лоток подачи и нажмите кнопку
ВКЛ для продолжения печати.
В режиме ручной двусторонней печати, уложите лист в лоток подачи и нажмите
ВКЛ для печати второй стороны.
Если в принтере есть бумага, и вы не использовали режим ручной двусторонней печати — значит, МФУ Ricoh SP 150SUw охлаждается.

Значение:
Загорающаяся красным раз в три секунды кнопка
ВКЛ предупреждает вас о заканчивающемся тонере в картридже.
Вы можете продолжать печатать, пока тонер совсем не закончится, и кнопка загорится красным, не мигая.
Ваш принтер МФУ Ricoh SP 150 заблокируется и не будет печатать,
пока вы не заправите картридж, или не купите новый картридж.
Для заправки картриджа вы можете обратиться к нам. Мы заправим картридж с заменой чипа блокировки.

Значение:
К сожалению, такое моргание кнопки
ВКЛ означает ошибку контроллера — главной управляющей платы. Controller error. Обратитесь в сервис.
Индикация LED:
Значение:
К сожалению, такое моргание кнопки
ВКЛ означает неисправность узла термозакрепления. Fuser Unit Error. Обратитесь в сервис.
Индикация LED:
Значение:
К сожалению, такое моргание кнопки
ВКЛ означает неисправность главного двигателя. Main Motor Fault. Обратитесь в сервис.

Значение:
К сожалению, такое моргание кнопки
ВКЛ означает ошибку блока высокого напряжения. HVPS Unit Fault. Обратитесь в сервис.
Индикация LED:
Значение:
К сожалению, такое моргание кнопки
ВКЛ означает неисправность блока питания. LVPS Unit Fault. Обратитесь в сервис.
Индикация LED:
Значение:
К сожалению, такое моргание кнопки
ВКЛ означает неисправность вентилятора. Fan Fault. Обратитесь в сервис.

Индикация LED:
Значение:
Идёт процесс копирования или сканирования. Всё хорошо.

Индикация LED:
Значение:
Вы вошли в режим копирования первой стороны удостоверения личности,
водительских прав, паспорта, миграционной карты
и других документов, помещающихся на половину стандартного листа А4.
Войти в режим копирования удостоверения личности можно, нажав обе клавиши
СТАРТ
и
ВКЛ
одновременно на 1 секунду. Когда вы их отпустите, обе клавиши начнут светиться зелёным, не мигая. Для выхода из этого режима нажмите и удерживайте более чем 1 секундку клавишу
ВКЛ.
В Режиме копирования ID Card МФУ Ricoh SP 150 SUw после нажатия кнопки
СТАРТ
сканирует первую сторону документа и не печатает копию,
ожидая сканирования второй стороны документа.
Переверните документ (водительское удостоверение), или откройте другую страницу паспорта,
и уложите на стекло без сдвига, туда же, где была первая сторона.
Нажмите кнопку
СТАРТ. МФУ отсканирует вторую сторону документа и распечатает копию,
где первая и вторая стороны документа расположены на одном листе одна над другой.

Индикация LED:
Значение:
- Ожидание копирования обратной стороны документа в режиме копирования ID Card
- Ожидание копирования следующего листа в режиме N in 1 (несколько листов копируются на 1 лист, с уменьшением)
Положите лист оригинала на стекло и нажмите
СТАРТ.
Индикация LED:
Значение:
К сожалению, такое моргание кнопки
ВКЛ означает неисправность сканирующей линейки. Laser Scanning Unit Fault. Обратитесь в сервис.
Индикация LED:
Значение:
К сожалению, такое моргание кнопки
ВКЛ означает неисправность каретки сканера. Scanning Head Not Reset. Обратитесь в сервис.

Индикация LED:
Значение:
К сожалению, такое моргание кнопки
ВКЛ означает неисправность мотора привода сканера. Scanner Motor Fault. Обратитесь в сервис.
Режим готовности при успешном Wi-Fi соединении
Значение:
Постоянное свечение нижней кнопки
ВКЛ
синим цветом в сочетании с отсутствием свечения верхней кнопки
СТАРТ
означает успешное подключение по Wi-Fi и готовность к работе.
Wi-Fi можно включить из режима готовности без Wi-Fi (кнопка
(клавиша ВКЛ
постоянно горит зелёным). Для включения Wi-Fi нажмите и удерживайте кнопку
ВКЛ
более чем 1 секунду.
В случае неполадок, вы можете распечатать страницу конфигурации и проверить сетевые настройки.
Возможно, принтер подключился к соседской сети.

Значение:
- Тонер закончился
- мигает синим 2 раза — режим SoftAP разрешен
- мигает синим 3 раза — режим SoftAP запрещен
Включение-выключение режима SoftAP возможно только из режима готовности при успешном Wi-Fi соединении
(клавиша ВКЛ
постоянно горит синим).