- Manuals
- Brands
- Eclipse Manuals
- Paintball equipment
- GEO
- Operator’s manual
-
Contents
-
Table of Contents
-
Bookmarks
Quick Links
Related Manuals for Eclipse GEO
Summary of Contents for Eclipse GEO
-
Page 2
Geo. (OpErariOs) UsariOs EsTá EN iNglés. never look into the barrel or breech area of the Geo contiene importantes normas de observe all local and national laws, regulations and whilst the marker is switched on and able to fire. -
Page 3: Warranty Card
QUicK gUidE > UNdErsTaNdiNg ThE BaTTErY iNdicaTOr > dwEll -the dwell parameter names the component parts of the Geo marker. this information on the location of your nearest Geo > ThE gaME TiMEr > Fsd cOMp -the first shot drop-off…
-
Page 4
#016 nbr70 o-ring which prevents the barrel from vibrating loose from the Geo body when the marker is fired. there is also a EYE cOVEr scrEw an o-ring on the barrel front (#015 nbr70) helps with alignment between the barrel back and front. -
Page 5
BOlT sYsTEM QUicK gUidE #15 NBr 90 CONTENTS WARNING ORIENTATION ORIENTATION warNiNg: dO NOT rEMOVE ThE iNliNE pUrgE cONTrOl ValVE. QUICK SET-UP USING YOUR GEO FailUrE TO cOMplY wiTh This warNiNg MaY caUsE ThE MarKEr TO FirE a prOp shaFT shOT ThaT cOUld rEsUlT iN sEriOUs iNJUrY Or dEaTh. -
Page 6: Solenoid Assembly
OpEraTiONal OVErViEw QUicK gUidE CONTENTS below is a brief overview of what happens spOOl pacK rETaiNiNg scrEw when you fire your Geo. the location of parts ORIENTATION ORIENTATION FilTEr discussed in the text below can be found on QUICK SET-UP page 78-79.
-
Page 7
QUICK SET-UP QUICK SET-UP At the rear of the Geo grip frame you will find the away and with the barrel pointing to the right. navigation console USING YOUR GEO (FigUrE 1.5) -
Page 8
‘double-clicking’ . the Geo can also be switched on by QUICK SET-UP QUICK SET-UP a paintball is ready to fire from the Geo. if no paintball is pushing and holding the button (FigUrE 3.1). -
Page 9
MacrOliNE hOsiNg aNd QUicK gUidE ElBOws CONTENTS before you can begin to use your Geo, you will need to the Geo utilises a t-slot arrangement to mount the ORIENTATION attach an air-system and a paintball loader. oops to the bottom of the frame. the t-slot is an… -
Page 10
Geo. once you have filled your loader and air tank you will then be ready to begin using your Geo. -
Page 11: Setting The Trigger
ThE TriggEr (cONTiNUEd) QUicK gUidE CONTENTS the Geo provides the user with the option to use is used to adjust the Micro switch activation screw ORIENTATION either a micro- switch or an opto sensor as the means point in the trigger pull at which the micro-switch is for detecting trigger pulls.
-
Page 12: User Interface
Geo has a simple user interface through which ORIENTATION velocity at which your Geo is firing. this is done by all aspects of it’s electronic control system can be inserting a 1/8″ hex key into the adjuster screw at the…
-
Page 13
Geo is configured to use the micro- it must first be released and then pulled. the trigger the Geo can be fired at a maximum rate of user has selected training mode. As the switch to detect trigger pulls. the micro-… -
Page 14: Battery Level Indicator
0.5 affects the way in which the Geo shoots, without the the screen represents the number of full to another menu. branches always have an animated MENU TREE seconds.
-
Page 15
ORIENTATION QUICK SET-UP MaiN MENU sET-Up MENU USING YOUR GEO MENU TREE MENU TREE OFF? turn off the Geo lOcK ADVANCED SET-UP turn the tournament lock off displaY MAINTENANCE turn the tournament lock on timer display the game timer on the run screen… -
Page 16
CONTENTS ORIENTATION raMp sET* QUICK SET-UP FUll 1.0 — 20.0 time in milliseconds that a paintball must be in the breech for the Geo to be USING YOUR GEO TYpE step select step type ramping ready to fire MENU TREE… -
Page 17: Altering Parameters
ORIENTATION a parameter value on the right of the screen, pressing affect the way in which the Geo shoots and which this parameter is used to select the information that is QUICK SET-UP…
-
Page 18
Game timer to begin counting down. this timer counts down to a specific time set by the alarM USING YOUR GEO parameter can be set between 00:00 and 60:00 minutes parameter has the following choices: parameter. this parameter can be set between 00:00… -
Page 19: The Setup Menu
Geo operates. the Geo has a tournament lock which prevents the in order to simplify the set up of the Geo a number QUICK SET-UP to access this menu, first turn on the Geo and then user from making changes to any parameter that of preset configurations are available for selection.
-
Page 20
> Ms 08: load a set of parameters that rOF cap Max rOF MOdE or not the Geo should have a limited, or capped rate achievable rate of fire from the Geo. the value of this configures the Geo to comply with the USING YOUR GEO of fire. -
Page 21
Geo rate of fire over rate of trigger pulls. > sTEp: step ramping will cause the Geo to shoot in MENU TREE 15.0 balls per second and should always be set to the… -
Page 22
ORIENTATION the parameter sets the number of trigger pulls that are this parameter sets the minimum rate at which the once the Geo is ramping the user has to continue to parameter defines the amount of time QUICK SET-UP rEsTarT… -
Page 23
ORIENTATION the lcd backlight is illuminated whenever any of the if the Geo is inactive for a period of time then it will the parameters on the timing menu all relate to the buttons are pressed on the Geo. the parameter automatically switch off in order to save power. -
Page 24
QUICK SET-UP the Geo’s software filters which prevent the Geo from bounce that might occur in the Geo and can be set detect that the bolt is fully retracted and the breech is firing unless all of the necessary conditions are met. the between level 1 and level 9 in one level increments. -
Page 25
USING YOUR GEO paintball has to be in the breech before the Geo is can be set between 1.0 and 20.0 milliseconds in 0.5 ms is adjustable between 51% and 99% in 1% increments. -
Page 26: Basic Trigger
‘t’ to indicate that training mode is enabled. SPARES & ACCESSORIES note: the fAstest wAy to shoot A Geo is to wAlk the the training parameter choices are as follows:- triGGer with two or more finGers. feAtherinG (not…
-
Page 27
>caNcEl: TriggEr parameter unchanged. ThE TriggEr paraMETEr TONEs the Geo is fitted with a dual trigger pull detection system. A non-contact opto- ThE TONEs paraMETEr electronic trigger sensor arrangement is used to detect trigger movement this parameter sets the Geo emits a tone… -
Page 28
(sEE FigUrE 9.6). undo the retaining screw for the break beam sensor PARTS LIST Fig 9.4 cover on the right hand side of the Geo using a 5/64″ Fig 9.1 SPARES & ACCESSORIES (2mm) hex key (sEE FigUrE 9.1). -
Page 29
“superchArGe” , so this should Also be checked. NOTE: the internAls of your inline reGulAtor mAy SERVICE CENTERS vAry AccordinG to the model of Geo thAt you hAve. with the threaded section towards to the base of PARTS LIST the regulator body, re-insert the adjuster screw into SPARES &… -
Page 30
Fig 11.5 take the can and having cleaned off any old grease, PARTS LIST paint or debris, apply a small amount of eclipse Grease SPARES & ACCESSORIES once the threaded section is free from the threads in to the internal o-ring and the 2 external o-rings… -
Page 31
SERVICE CENTERS take the bolt and having cleaned off any old grease, Assembly into the marker body (sEE FigUrE 11.17). paint or debris, apply a light film of eclipse Grease to PARTS LIST Fig 11.10 Fig 11.9 cover the front end of the bolt and also the internal SPARES &… -
Page 32
(sEE FigUrE 12.1). with the Geo body and using the short arm of a 1/8” hex key, tighten the rear frame screw into place (sEE unplug the solenoid and the break beam sensor FigUrE 12.8). -
Page 33
MAINTENANCE MAINTENANCE Fig 12.10 Fig 13.1 Attach the Geo rubber Grips to the frame using a 5/64” FAULT FINDING with the frame separated from the Geo body and the hex key to replace the 6 grip screws (sEE FigUrE 12.12). -
Page 34
(sEE FigUrE 13.11) hold the solenoid Assembly onto the bottom of the Geo body, taking care to line it up correctly with the screw holes in the body and to avoid pinching the bbss NOTE: if Any of the components of the bAck- wires underneath it . -
Page 35
Geo body (see page 62), use a 5/64” hex key to remove USING YOUR GEO bearing carrier, slide the trigger pin in place and using a the two screws that hold the bearing carrier in place 1/16”… -
Page 36
MarKEr EasiEr TO wOrK ON. lubricate the narrow end of the oops pin with a drop SERVICE CENTERS of eclipse oil and push the pin, narrow end first, into the PARTS LIST oops body so that it sits in the oops insert and pokes having disconnected the macroline hose from the SPARES &… -
Page 37
SERVICE CENTERS use a low quality or rechargeable battery. PARTS LIST the Geo leaks from the solenoid Assembly. check that the solenoid gasket is intact and replace the solenoid gasket if damaged. SPARES & ACCESSORIES seated in its designated pocket in the minifold. -
Page 38
Geo has low velocity on the first shot. fsdo parameters are set too low to overcome Adjust fsd comp and fsd dly parameters. o-ring stiction. -
Page 39
QUicK gUidE plaNET EclipsE llc grOUNd zErO paiNTBall acTiON paiNTBall gaMEs CONTENTS Are you unsure of where to send your Geo to be repaired or serviced? if your local eclipse dealer can’t assist you, Australia rhode island southern states ORIENTATION… -
Page 40
QUicK gUidE parT NaME CONTENTS ORIENTATION QUICK SET-UP bolt plastic push button strip body USING YOUR GEO bolt front o-ring display window Anti double ball (Adb) finger MENU TREE bolt bumper o-ring navigation console clamping feed tube ADVANCED SET-UP clamping feed tube screw… -
Page 41
O-riNg O-riNg lOcaTiON lOcaTiON QUicK gUidE BOlT CONTENTS ORIENTATION QUICK SET-UP USING YOUR GEO middle prop shaft o-ring MENU TREE bolt rear o-ring ADVANCED SET-UP can outer o-ring #013 NBr 70 MAINTENANCE rear prop shaft o-ring FAULT FINDING SERVICE CENTERS… -
Page 42
QUICK SET-UP pcb screw (3), beArinG cArrier (2) maintain it with the eclipse tech on all maintenance and servicing the eclipse Geo. the eclipse ego9 is USING YOUR GEO ( m2.5 x5 cAp heAd socket) flex mat. procedures that require grease. -
Page 43
UK & Europe: +44 (0)161 872 5572 call Usa & canada: 401 247 9061 licensed under one or more of the following patents: us 6311682, 6615814, 5881707, 5967133, 6035843, 6474326b1, 6637421b2 uk Gb 234270, Gb 2345953 © copyright 2008-2009 planet eclipse ltd. Geo and the Geo device are registered trademarks. gM08VOl2…

- Manuals
- Brands
- Eclipse Manuals
- Paintball equipment
- GEO3.5
- User manual
-
Bookmarks
Quick Links
Related Manuals for Eclipse GEO3.5
Summary of Contents for Eclipse GEO3.5
-
Page 1
ECLIPSE USER MANUAL… -
Page 2
Never look into the barrel or from the GEO3.5 for transport and storage. breech area of the GEO3.5 whilst the marker is switched on and able to fire. • Always follow guidelines given with your first stage regulator for safe •… -
Page 3
CO2. you must seek expert advice. • Always follow instructions, warnings and guidelines given with any first stage regulator you use with the GEO3.5. Le mode d’emploi est en Anglais. Il contient des instructions et mesures de sécurité •… -
Page 4
USING THE GEO3.5 (06-26) ADVANCED SET-UP (27-41) Details on setting up the GEO3.5 and information on the user interface. In depth information on setting up the GEO3.5. This section is essential reading for everyone. Accessing the menu system Factory set-up guide… -
Page 5
TRIGGER — The trigger parameter FAULT FINDING (61-65) SOLENOID — The solenoid power parameter Information on how to resolve any problems that might arise with your GEO3.5. SOUND — The sound parameter TONES — The tones parameter SERVICE CENTRES (66) -
Page 6
Before using the GEO3.5 it is important to make sure the SL4 inline regulator, solenoid flow restrictor (SFR) and all electronically controlled parameters are set FIG 1A correctly. ANY of these can have a negative effect on the performance of the marker if set incorrectly. -
Page 7
Ensure that the GEO3.5 is switched off. Lay the marker on a flat surface in front of you with the feed tube furthest away and with the barrel pointing to the right. FIG 2A Use a 5/64” (2mm) hex key to remove the two countersunk screws that hold the… -
Page 8
SWITCHING ON THE GEO3.5 To switch on the GEO3.5 press the button twice in quick succession, referred to elsewhere in this manual as ‘double-clicking’. The GEO3.5 can also be switched on by pushing and holding the button (see figure 3A). -
Page 9
The Break Beam Sensor System, referred to elsewhere in this manual as ‘BBSS’ is used to detect when a paintball is ready to be fired from the GEO3.5. If no FIG 4A paintball is ready then the BBSS will inhibit the GEO3.5 from firing. This prevents the GEO3.5 from “chopping”… -
Page 10
PREVIOUS / RAISE At the rear of the GEO3.5 grip frame you will find the navigation console (see figure 5A) which is used for: SELECT • Turning the GEO3.5 on and off using the button. • Scrolling through menus with the buttons. -
Page 11
Always fit a barrel-blocking device to the GEO3.5 when not in use. 1 The Eclipse barrel sock that comes with the GEO3.5 may differ from that pictured in this manual. 2 Instruction on using the Eclipse barrel sock can be found on the Eclipse barrel sock warning label. -
Page 12
The GEO3.5 provides the user with the option to use either a micro-switch or an OPTO sensor (default OPTO) as the means for detecting trigger pulls. Before you FIG 7A begin to adjust and set your trigger, you must first select the method of trigger detection that you wish to use by entering the main menu and making your selection from the hardware menu (see page 37). -
Page 13
FIG 7D The magnet return strength screw is used to adjust the amount of force with which the trigger is returned to its rest position by the magnet. Turn the screw clockwise to increase the amount of force. Do not turn the screw too far or it will negate the position of the front stop screw. -
Page 14
FIG 8B You have now attached a loader to your GEO3.5. Once you have filled your loader and air tank you will then be ready to begin using your GEO3.5. WARNING! -
Page 15
There is no need to unscrew or remove the gas pipe assembly during day to day usage of the marker. FIG 9A Compressed gas is transferred from the frame to the inline regulator via gas pipe assembly (see figure 9A), comprising of a gas pipe section and pipe nut section . -
Page 16
Do not pressurise the GEO3.5 without the bolt system correctly installed, as high pressure gas will be released. • Do not install a compressed air system or load paintballs into the GEO3.5 until you feel completely confident with your ability to handle the marker safely and responsibly. -
Page 17
You have now installed a pre-set air system onto your GEO3.5. FIG 10C 1 High, mid and low pressure output pre-set air systems can be used with the GEO3.5, providing the GEO3.5 has the SL4 inline regulator originally supplied with the marker. -
Page 18
When using your GEO3.5, you may wish to change the velocity at which your GEO3.5 is firing. This is done by inserting a 1/8″ hex key into the adjuster screw FIG 11A at the bottom of your GEO3.5 inline regulator and adjusting it accordingly… -
Page 19
The following section covers direct adjustment of the solenoid valve which should The SFR has a minimum and maximum exhaust flow setting. only be used by users with a sound knowledge of the GEO3.5 firing cycle. The maximum exhaust flow setting can be achieved by turning the SFR dial Built into the left side of the fame is the solenoid flow restrictor “SFR”… -
Page 20
1 Instruction on using the Eclipse barrel sock can be found on the Eclipse barrel sock warning label. 2 0 GE O 3.5 MA N UAL… -
Page 21
GEO3.5 (or any other paintball marker) in a suitable marker case such as the one in which it was supplied. It may be a good idea to remove the battery when storing your Eclipse GEO3.5 to prevent unauthorized use. Protect your Eclipse GEO3.5 from excessive heat during transportation. -
Page 22
The marker is still able to fire when this screen is displayed. INDICATOR 1 The layout of the run screen is correct at time of printing. However newer versions of the GEO3.5 software may have a different layout of the run screen from what is printed in this manual. -
Page 23
The system is disabled. The GEO3.5 can only be fired at a maximum The GEO3.5 can be fired at a maximum rate of fire as set by the BS rate of 2 bps less than the maximum rate of fire, up to a maximum of OFF ROF parameter (see page 30). -
Page 24
OPTO sensor selected, reading 0% OPTO Sensor selected, reading mid-range The GEO3.5 is configured to use the OPTO sensor to detect trigger The GEO3.5 is configured to use the OPTO sensor to detect trigger pulls. The OPTO sensor is currently reading 0%, i.e. the trigger is fully pulls. -
Page 25
THE LOCK INDICATOR The GEO3.5 has a Tournament Lock which prevents the user from making This feature is necessary in order to make the GEO3.5 legal for tournament play. changes to any parameter that affects the way in which the GEO3.5 shoots, To enable or disable the tournament lock see Accessing the Menu System on without the need for tools. -
Page 26
THE ACTUAL RATE OF FIRE When the actual ROF is selected for display the run screen The value below it is the maximum actual rate of fire that will look something like the screen to the right. The value has been achieved. The graph below this number shows displayed in the top left of the screen represents the number the actual rates of fire achieved over time where each bar of full cycles completed in a second — the actual rate of fire… -
Page 27
ACCESSING THE MENU SYSTEM FIG 14A To access the Main menu from the run screen double-click the button and the first item on the Main menu will be displayed. Alternatively, push and hold the button for 2 seconds. Some of the parameters in the menu system can have a tournament lock applied to them. This lock can be toggled on and off by pressing the tournament lock button on the circuit board (see in figure… -
Page 28
1 The layout of the main menu is correct at time of printing. However newer versions of the GEO3.5 software may have a different layout of the main menu, sub-menus and parameters immediately turn off the GEO3.5, preventing it from firing. -
Page 29
In order to simplify the set up of the GEO3.5 a number of pre-set configurations are available for selection. Choosing one of these pre-sets will cause all of the necessary parameters to be set in such a way as to make the GEO3.5 comply with the rules governing a particular paintball league1. -
Page 30
ROF CAP PARAMETER The ROF CAP parameter is used to specify whether or not the GEO3.5 should have a limited / capped rate of fire. When the ROF CAP is enabled (and the BBSS is enabled), the maximum achievable rate of fire is set by the BS ON ROF parameter. -
Page 31
> STEP: Step ramping will cause the GEO3.5 to shoot in semi-automatic until a number of trigger pulls, set by SEMI SHOTS, have been made at a minimum pull rate, set by KICK IN. At this point the rate of fire will step up to the maximum rate of fire as set by BS ON ROF (or the maximum loader speed if the ROF CAP parameter is set to off). -
Page 32
SUSTAIN PARAMETER Once the GEO3.5 is ramping the user has to continue to pull the trigger at a minimum rate in order to maintain the ramping. This parameter sets this rate and can be between 3.3 and 10.0 pulls per second in 0.1 pulls per second increments. -
Page 33
The DWELL parameter sets the amount of time that the solenoid is energized and therefore the amount of gas that is released with each shot of the GEO3.5. Setting this parameter too low will result in low velocity shots and/or excessive shot to shot velocity fluctuations. -
Page 34
Tumbling paintballs can take time to settle in the breech before they can be successfully fired. This parameter is used to set the amount of time that a paintball has to be in the breech before the GEO3.5 is allowed to fire. This parameter can be set between 1.0 and 20 milliseconds in 0.1ms increments. -
Page 35
PULL TM PARAMETER The PULL TM parameter is used to set the minimum amount of time that the trigger must be pulled before it is recognised as a valid trigger pull. This parameter can be set between 3.0 and 20.0 milliseconds in 0.1ms increments. RELEASE TM PARAMETER The RELEASE TM parameter is used to set the minimum amount of time that the trigger must be released before it is recognised as a valid trigger release. -
Page 36
Set the magnet return strength screw and the spring return strength screw as required, making both the spring tension and the return force as strong as possible without compromising the “feel” of the trigger. HARDWARE MENU This menu comprises parameters that control low level functionality of the GEO3.5 electronic hardware. 3 6 GE O3. 5 MA N U AL… -
Page 37
TRIGGER PARAMETER The GEO3.5 is fitted with a dual trigger pull detection system. The choices available are as follows: A non-contact OPTO-Electronic trigger sensor arrangement is > OPTO: Select the OPTO sensor for trigger pull detection. used to detect trigger movement whilst a micro-switch is used to provide a more traditional tactile feedback for the trigger. -
Page 38
BACKLIGHT PARAMETER This parameter sets the time that the LCD backlight is illuminated after a push-button is pressed. The parameter can be set between 00:00 and 00:20 (20 seconds). If set to 00:00 then the backlight will not be illuminated. RED LEVEL PARAMETER This parameter sets the percentage of red light in the LCD backlight and can be set between 0% and 100% in 10% increments. -
Page 39
CANCEL: Cancel editing and leave the parameter unchanged. AUTO OFF PARAMETER This parameter sets the time that has to elapse before the GEO3.5 switches itself off if not used. The parameter can be set between 05:00 and 20:00 minutes. G E O 3 . 5 MAN UAL 3 9… -
Page 40
TRAINING PARAMETER In training mode the GEO3.5 simulates the firing cycle so that the user may practice pulling the trigger without wasting air and making lots of noise. The BBSS is overridden in order to simulate paintballs entering the breech and the beeper indicates when a shot is fired. -
Page 41
GAME TIMER MENU This menu is comprised of parameters that control the operation of the Game Timer. GAME PARAMETER This parameter is used to set the Game Time, the time from which the game timer counts down to zero. This parameter can be set between 00:00 and 60:00 minutes in 10 second increments. The factory default is 07:10 (7 minutes 10 seconds). -
Page 42
Lift the Break Beam Sensor unit free from the GEO3.5 body and using another dry cotton bud, remove any grease or debris build-up from the front of the sensor… -
Page 43
GEO3.5 body, replacing the detent if it is damaged (see figure 15D). Reinsert the detent back into the GEO3.5 body and place the BBSS back into the designated slot in the body (see figure 15E). Ensure that the sensor is face down in the body i.e. -
Page 44
(see figure 16H). Using a dry cotton bud, clean the internal 008 NBR70 o-ring that sits inside the top section of the adjuster top. Then using a small hex key gently apply Eclipse Grease to the o-ring (see figure 16I). -
Page 45
(see page 15). FIG 16M FIG 16N Basic cleaning of the SL4 inline regulator is complete. Reset the input pressure to the factory default before supplying the GEO3.5 with compressed air. WARNING! WARNING FIG 16O If you are unsure about performing a maintenance procedure please contact your nearest service centre. -
Page 46
(see figure 17E). Ensure is it re- installed correctly, failure to do so may seriously damage the GEO3.5 solenoid. With the regulator seal, purge valve and spring installed back into the adjuster screw, replace the adjuster top (see figure 17F). -
Page 47
FIG 18A Remove the inline regulator as covered on page 44. Turn the GEO3.5 upside down to reveal the body filter inside the body (see figure 18A). Using a 5/64” hex key unscrew and remove the retaining screw (see figure 18B). -
Page 48
FIG 19A FIG 19B The GEO3.5 comes with two bolts. A soft nosed ST3 Bolt and an all metal ST Bolt (see page 72). To install the ST bolt follow the maintenance procedure below, swapping over the bolts. After installation, re-chronograph the GEO3.5 and adjust the SL4 inline regulator… -
Page 49
(see figure 19J), replacing if necessary. rubber bolt tip for any signs of damage Apply a light film of Eclipse Grease to cover the front end of the bolt and also the internal rear bore of the bolt (see figure 19K &19L). -
Page 50
Check the 14×2 o-ring at the back of the prop shaft, and clean or replace then re- lubricate with Eclipse Grease as necessary. Check the rear bumper for signs of wear, replace as necessary (see figure 20B) Check the 5×1 o-ring seated on the plunger, clean or replace as necessary. -
Page 51
Disconnect any hosing and unscrew the inline regulator from the Front Regulator Mount (FRM) as detailed in the ‘Cleaning the inline regulator’ section of this Maintenance Guide. Using a 5/64” hex key, remove the four screws that attach the GEO3.5 rubber grips to the GEO3.5 frame (see figure 21A). -
Page 52
(see figure 22F). FIG 22E FIG 22F Attach the GEO3.5 rubber grips to the frame using a 5/64” hex key to replace the four grip screws (see figure 22G). Screw the inline regulator back into the Front Regulator Mount and connect any hosing… -
Page 53
FIG 23A FIG 23B The stages below on SFR maintenance do not require the frame to be removed, and can be followed for SFR removal/ blanking plug installation. Using a small hex key push the SFR body out of the left side of the frame (see figure 23A). -
Page 54
FIG 24A FIG 24B Having removed the frame completely from the GEO3.5 body (see page 51). Unscrew the two M2.5×5 retaining screws which hold the bearing carrier in the frame (see figure 24A). Gently lift the bearing carrier and trigger assembly free from the frame taking… -
Page 55
24J). DO NOT over-tighten the retaining screws. Doing so may damage the trigger FIG 24I spring and threads in the frame. You have now stripped and cleaned your GEO3.5 trigger assembly. FIG 24J WARNING! WARNING If you are unsure about performing a maintenance procedure please contact your nearest service centre. -
Page 56
GEO3.5 solenoid valve then please contact your Eclipse Service Centre. See page 66 for Eclipse Service Centre details. With the frame separated from the GEO3.5 body and the solenoid and BBSS wires unplugged from the circuit board (see page 51) use a 5/64” hex key to… -
Page 57
Replace the top and bottom gaskets into their respective grooves in the solenoid manifold as shown in figures 25K and 25L. Applying a small amount of Eclipse Grease to the surface of the solenoid manifold and gaskets. FIG 25K FIG 25L… -
Page 58
Place the solenoid valve over the solenoid manifold (see figure 25P), making sure the location holes line up with the threads in the GEO3.5 body (see figure 25Q). Replace the retaining screws which hold the solenoid onto the GEO3.5 using a 5/64”… -
Page 59
FIG 26A FIG 26B There is no need to remove the POPS from the GEO3.5 frame for general maintenance. IF the POPS is removed, ensure the o-ring is correctly seated before POPS re-attachment. Fully depress the latch button then slide the bonnet forward while continuing to… -
Page 60
26I). Lubricate this o-ring liberally using Eclipse Grease. Lubricate the narrow end of the POPS pin with a smear of Eclipse Grease and push the pin, narrow end first, into the POPS insert so that it sits in the POPS insert and pokes through to the front (see figures 26J&… -
Page 61
The fault finding guide covers common symptoms, causes and solutions that are likely to be encountered by the average user. If an issue with the GEO3.5 cannot be solved using the fault finding guide, contact your nearest Eclipse Service Centre for assistance. -
Page 62
Reduce the Dwell The Solenoid Flow Restrictor is set too low Increase the amount of flow on the SFR The GEO3.5 has low rate of fire The force setting on the loader is too low Adjust the loader force feed setting… -
Page 63
Check the inline regulator output pressure and consequent velocity. Adjust accordingly The GEO3.5 leaks from the solenoid assembly GEO3.5 solenoid assembly is over-pressurising Strip and clean the SL4 inline regulator. Replacing the seals as necessary… -
Page 64
Damaged rubber bolt tip Replace the rubber bolt tip The FSDO parameters are set too low to overcome The GEO3.5 has low velocity on the first shot Adjust FSD COMP and FSD DLY parameters o-ring stiction The FSDO parameters are set too high Adjust FSD COMP and FSD DLY parameters The GEO3.5 has high velocity on the first shot… -
Page 65
The fault finding guide covers common symptoms, causes and solutions that are likely to be encountered by the average user. If a issue with the GEO3.5 cannot be solved using the fault finding guide, contact your nearest Eclipse Service Centre for assistance. -
Page 66
Are you unsure of where to send your GEO3.5 to be repaired or serviced? If your local Eclipse dealer can’t assist you, why not contact your nearest certified Eclipse Service Centre and arrange for them to undertake any work that you require. -
Page 67
FIG 27A Below is a brief overview of what happens when you fire your GEO3.5. The location of parts discussed in the text below can be found on pages 68-69. AIR SUPPLY FROM SOLENOID Assuming the GEO3.5 is gassed up and turned on… -
Page 68
6 8 GE O 3.5 MA N UAL… -
Page 69
Clamping feed tube assembly Push-button strip Body Display window Bolt assembly PCB screw Rubber detent Navigation console BBSS unit POPS assembly Front frame screw POPS seal Rear frame screw Foregrip crown Solenoid assembly Foregrip sleeve SL4 inline regulator assembly Rubber grip Gas pipe Body plug Pipe nut… -
Page 70
Replace and lubricate these o-rings with Eclipse Grease as necessary. 1 The bore size of your Shaft4 may vary according to the model of GEO3.5 you have. 2 The GEO3.5 will only accept Cocker threaded barrels. -
Page 71
Regulator Piston 2 Only use the SL4 inline regulator with the GEO3.5. 3 Only use the SL4 GEO spring with the GEO3.5 SL4 inline regulator. Adjuster external o-ring (011 NBR70) 4 If the Purge Poppet assembly is removed for maintenance ensure is it re-installed correctly, failure to do so may seriously damage the GEO3.5 solenoid valve. -
Page 72
Bolt bonnet Prop shaft Back Cap Bolt pin 20×2 NBR70 Rear Bumper Plunger Plunger Spring 14×2 NBR70 3×1 NBR70 ST3 Bolt Prop shaft 14×2 NBR70 7×1 NBR70 14×2 NBR70 015 NBR90 Prop shaft Tip 22×1 NBR90 ST3 Bolt Tip 14×2 NBR70 020 NBR70 015 NBR90 013 NBR70… -
Page 73
NON-SERVICEABLE. Any attempt to strip, dismantle or service the M2.5×12 Mounting Screws solenoid valve will immediately void your warranty. For more information on the GEO3.5 solenoid valve please see page 56. G E O 3 . 5 MAN UAL 7 3… -
Page 74
007 NBR70 005 NBR90 004 NBR70 Pops body Insert Pops bonnet Push rod 004 NBR70 Pops screw 10-32 UNF x 1” cap head socket Latch spring Latch button 7 4 GE O 3. 5 M A NU AL… -
Page 75
Bearing carrier screw (M2.5×5 cap head socket) Micro-switch screw (6-32 UNC x1/2” socket set) Spring adjuster screw (6-32 UNC x3/16” socket set) Leaf spring Trigger pin locking screw (6-32 UNC x1/8” socket set) Sprocket Bearing carrier Short clamping feed screw (10-32 UNF x1/2”… -
Page 76
Aux socket Solenoid valve socket Trigger micro switch BBSS socket Trigger OPTO sensors Push — buttons E-portal connector Positive (+) battery terminal Negative (-) battery terminal Tournament lock button LCD display 7 6 GE O 3.5 MA N UAL… -
Page 77
SCREW TYPE DESCRIPTION PCB screw (3), bearing carrier screw (2), navigation console (1) (M2.5 X 5 cap head socket) Solenoid screw (2) (M2.5 X 12 cap head socket) Rubber grip screw (4), BBSS covers screw (2) (6-32 UNC x 5/16” countersunk socket) Short feed neck screw (10-32 UNF x 1/2”… -
Page 78
SL4 swivel Bolt bumper (middle) NBR90 18×2 POPS Seal ST bolt tip SL4 Inline regulator piston 14×2 Propshaft (x2) Bolt external SL4 inline regulator adjuster outside Propshaft retaining screw rear Bolt can external (x2) Prop shaft back cap SL4 inline regulator adjuster inside Gas transfer pipe POPS insert external Body plug… -
Page 79
See ‘accessing the menu system’ on page 27 for instruction on releasing the Tournament Lock. will only become available if the ROF CAP parameter is set to on). MAIN MENU TURN OFF Turn off the GEO3.5 PRE-SET LOAD USER 1 Load the USER 1 settings… -
Page 80
Time in milliseconds (ms) that the breech must remain empty before the BBSS looks for a paintball. (Default 4.0ms) FULL 1.0 — 20.0 ms Time in milliseconds (ms) that a paintball must be in the breech for the GEO3.5 to be ready to fire. (Default 4.0ms) PULL TM 3.0 — 25.0 ms Time in milliseconds (ms) that the trigger must be pulled for a shot to be fired. -
Page 81
AUX socket output on CANCEL Cancel AUX socket selection AUTO OFF 05:00 — 60:00 Time in minutes after which the GEO3.5 automatically powers off. (Default 20:00) DBL CLICK NONE Double click is disabled entirely POWER UP Double click for power up only… -
Page 82
BACK EXIT From time to time the software of the GEO3.5 may be updated, resulting in changes to the default values for some parameters. For the most up to date default values please consult the online version of this manual at www.planeteclipse.com… -
Page 83
And any other 1 If you already own an Eclipse E-portal kit (such as the kit included with the Eclipse SLS or CSL Eclipse E-Portal Ego and GSL GEO), this kit will be compatible with the GEO3.5. -
Page 84
Actual rate of fire..22, 26 Contrast..39, 81 Advanced trigger filter setup..36 DBL CLICK..39, 81 Air system..6, 16, 17, 18, 20 DE-BOUNCE..34, 36, 66, 80 ALARM..25, 41, 82 DWELL..33, 62, 80 AUTO OFF..39, 81 E-Portal..83 AUX OUT..22, 23, 39, 81 EMPTY..34, 80 BACKLIGHT..10, 38, 81 EXIT..82 Basic trigger filter set-up..36, 64… -
Page 85
Lock indicator..22, 25, 27, 79 ROF CAP..30, 79 Magnet return strength screw..13, 77, 79 Rubber detent..43, 69 Main menu..27, 28, 79 Rubber grip screw..77 Menu system..26, 28, 79-82 Run screen layout..22 Menu tree..79-82 SL4 inline regulator..69 Micro-switch activation screw..13, 76, 77 SAVE..29, 79 MS 10..29, 79 SEMI..30, 79… -
Page 86
13/334575; 13/165234. Additional U.S. and International Patents may be pending. © 2014 Copyright Planet Eclipse Ltd. Eclipse, Planet Eclipse, the Estar Logo Device, Ego, Geo, Etek, Etha and EMC are all either design trademarks, registered trademarks or trademarks of Planet Eclipse Ltd. All other trademarks are property of their respective owners.
Mitsubishi Eclipse Cross: Руководства по эксплуатации
Материал из MMC Manuals
Перейти к навигации
Перейти к поиску
Руководства по эксплуатации Mitsubishi Eclipse Cross. Брошюры, каталоги, спецификации, карты технического обслуживания.
↑ Mitsubishi Eclipse Cross
![]()
| Язык/Language: | Русский • English |
|---|
Брошюры, каталоги, спецификации
Руководства по эксплуатации
- Руководство по эксплуатации Mitsubishi Eclipse Cross MY 2018 (Россия), рус., pdf, 11,5 МБ
- Руководство по эксплуатации Mitsubishi Eclipse Cross MY 2019 (Россия), рус., pdf, 68,1 МБ
- Руководство по эксплуатации Mitsubishi Eclipse Cross MY 2020 (Россия), рус., pdf, 62,7 МБ
- Руководство по эксплуатации Mitsubishi Eclipse Cross MY 2021 (Россия), рус., pdf, 73,7 МБ
- Руководство по эксплуатации Mitsubishi Eclipse Cross MY 2022 (Россия), рус., pdf, 74,2 МБ
- Руководство по эксплуатации Mitsubishi Eclipse Cross MY 2018 (Europe), eng., pdf, 35,5 МБ
- Руководство по эксплуатации Mitsubishi Eclipse Cross MY 2018.5 (Europe), eng., pdf, 45,5 МБ
- Руководство по эксплуатации Mitsubishi Eclipse Cross MY 2019 (Europe), eng., pdf, 49,9 МБ
- Руководство по эксплуатации Mitsubishi Eclipse Cross MY 2020 (Europe), eng., pdf, 49,1 МБ
- Руководство по эксплуатации Mitsubishi Eclipse Cross MY 2018 (North America), eng., pdf, 74,0 МБ
- Руководство по эксплуатации Mitsubishi Eclipse Cross MY 2019 (North America), eng., pdf, 75,4 МБ
- Руководство по эксплуатации Mitsubishi Eclipse Cross MY 2020 (North America), eng., pdf, 78,0 МБ
- Руководство по эксплуатации Mitsubishi Eclipse Cross MY 2022 (North America), eng., pdf, 80,1 МБ
- Руководство по эксплуатации Mitsubishi Eclipse Cross MY 2023 (North America), eng., pdf, 80,1 МБ
Руководства по эксплуатации аудио-системы
- См. раздел Аудиооборудование: Руководства по эксплуатации
Содержание
- Как русифицировать Eclipse без головной боли 🙂
- Установка и настройка Eclipse
- Обзор платформы Eclipse — как её использовать
- Установка Java
- Через интерфейс:
- Через терминал:
- Установка Eclipse
- Из репозитория
- Через интерфейс:
- Через терминал:
- Из репозитория
- 2. Скачать с сайта
- Выбор вкладки C/C++
- Русификация
- Настройка компиляции.
- Создаем тестовый проект.
- C++ в Eclipse
- Установка CTD в Eclipse
- Начало работы с платформой Eclipse
- Подключение MinGW к Eclipse
- Приложение C++ в Eclipse
- Урок 2. Установка и настройка среды разработки Eclipse и SDK Tools
- 1. Java SDK — JDK
- 2. Android SDK
- 3. Eclipse
- 4.ADT
- 5. Платформы Android
- Среда разработки Java-приложений Eclipse
Как русифицировать Eclipse без головной боли 🙂
Eclipse — популярная среда разработки под Android. Скачав и установив её (настройка — отдельная тема), многие хотят Эклипсу ещё и русифицировать, а в инете на этот счёт много странных советов. Меж тем, давно уже есть стандартное решение — поможет Бабель 🙂 Какая такая бабель? А вот обо всём по порядку:
Переходим по ссылке, находим «Babel Language Pack Update Site» для своей версии.
Как узнать версию? Дело в том, что маркировка версий Eclipse — идиотская, там есть Juno, Indigo, Helios, Galileo, Ganymede, Europa… может, ещё чего забыл. В принципе, это разные версии, но и разные пакеты тоже. Так как установка Eclipse сводится к разворачиванию архива, их можно поставить все одновременно в разные папки. Например, для работы с гугловским плагином ADT (Android Developer Tools) нужен Eclipse не ниже 3.6. Galileo — это 3.5, далее идут Helios (3.6), Indigo (3.7) и Juno (3.8). А версия эта написана в меню Help, About ADT, кнопка Eclipse.org (где-т вторая справа, имя — org.eclipse.jdt; не путать с версией Eclipse Platform — то же самое окно, и кнопка тоже Eclipse.org, но где-то пятая слева и говорит об org.eclipse.platform :).
Узнали версию — копируем адрес ссылки, что написана под названием версии, затем делаем из неё «правильный» адрес. Например, у меня Juno, значит я ищу «Babel Language Pack Update Site for Juno» и создаю ссылку вида
http://download.eclipse.org/technology/babel/update-site/R0.10.0/juno
В Eclipse заходим в меню Help, Install new software, нажимаем кнопку Add, чтоб добавить новый репозитарий (рядом с полем Work with; так у них называется ссылка для закачки).
В поле ввода Location вставляем нашу ссылку, ждём, пока Eclipse получит содержимое по ссылке, находим в списке Babel Language Pack in Russian, отмечаем его галочкой и жмём Next, соглашаясь с лицензионным договором. Всё ставится, перезапускаем Eclipse (сама предложит) и имеем русскую версию.
Но вообще-то не торопитесь с этим — везде в мануалах, как правило, приводятся англоязычные названия команд.
Памятка с самыми полезными ссылками по Eclipse:
 Урок от Гугля (на английском)
Android — установка и настройка среды разработки
Уроки на русском по разработке в Eclipse
Ссылки на программы Android с исходниками (форум 4PDA)
Пишем крестики-нолики для Android
Вопросы по Eclipse на форуме 4PDA
Пишем приложение для вывода температуры
Создаем живые обои для Android
Конвертер и другие уроки про котов и андроид 🙂
теги: памяткасофтссылкиязыкenglishandroid
16.12.2012, 22:57; рейтинг: 63374
Если вы собираетесь освоить язык программирования java, в первую очередь надо установить правильно среду, в которой вы будете работать, так называемую IDE (мы с вами узнаем, что вообще-то можно ещё работать и просто в окне cmd, если установлена джава-машина). На сегодняшние день таких IDE около 60 видов, но наиболее востребованными являются IDEA, Eclipse, NetBeans. Поскольку Eclipse является бесплатной и наиболее распространённой для разработки средой, то научимся работать в нём, а после работа в других средах будет вам также по плечу.
Прежде чем создавать приложения на языке Java, необходимо установить интегрированную среду, JDK, JSDK, библиотеки и сделать необходимые настройки. Для демонстрации примеров работы с web-компонентами будет использоваться IDE Eclipse Indigo. Необходимо отметить, что все указанные программные средства, приложения и библиотеки устанавливаются в режиме «open source».
Для работы необходимо проделать следующие шаги:
- Скачать и проинсталлировать j2sdk1.5.0 (или другую версию по адресу:
http://www.oracle.com/technetwork/java/archive-139210.html).

- Щёлкнуть по скачанному exe-файлу, это самораспаковывающийся архив.
- Перезагрузить компьютер.
- Прописать следующие переменные среды. (Пуск->мой компьютер->правая кнопка мыши->свойства, вкладка: «Дополнительно – переменные среды (окружения)»):
JAVA_HOME (рис. 1):
Рисунок 1 – Переменная среды JAVA_HOME
CLASSPATH (рис. 2):
Рисунок 2 – Переменная среды CLASSPATH
соответственно тому файловому пути, куда были распакованы архивы.
- Скачать и проинсталлировать IDE Eclipse (http://www.eclipse.org/downloads).
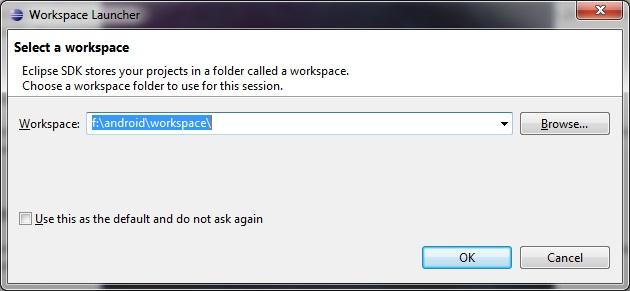
- Создать папку в том месте, где будут храниться проекты (к примеру, в корне, на диске ‘D’, под названием ‘MyWebProjects’) (рис. 3):
Рисунок 3 – Выбор Workspace
- Запустить Eclipse, кликнув по файлу с ярлычком эклипса – синим кружком. В дальнейшем вы можете, например, закрепить его в меню «пуск». В качестве Workspace в окне по запросу нужно выбрать заготовленную папку.
- Через некоторое время появится Welcome-страница Eclipse с ярлыками (рис. 4):
Рисунок 4 – Welcome-страничка Eclipse
- Нужно щелкнуть левой кнопкой мыши на ярлыке ‘Workbench’, и откроется перспектива ‘Resource’, которую Eclipse отображает по умолчанию (рис. 5):
Рисунок 5 – Перспектива ‘Resource’
- Для того чтобы создавать Java-приложения, нужно создать проект. Для этого нажмите на вкладку File->New->Java Project и дайте имя проекту, например, ‘JavaSimple’ или ‘MySimpleProject’ (рис. 6):
Рисунок 6 – Создание проекта
Теперь найдите папку src (source – исходник) и создайте свой пакет для приложений. Дайте ему название, например, ‘pack’.
Создайте теперь ваш первый класс (правая клавиша мыши по пакету – выбираем New/Class).
Нажмите Finish и получите заготовку под класс. Ничего там не удаляйте! Наберите следующий код:
Нажмите на зелёный треугольник в горизонтальной верхней панели:
Выберите Java Application:
И внизу в консоли отразится ваш текст:
Протестируйте его (например, выведите надпись или подсчитайте арифметическое выражение).
Сегодня я хотел написать статью о том как установить и настроить IDE в Linux (конкретно я работаю в Ubuntu 12.10, следовательно все примеры ориентированы для данной версии).
Установка Java
Для начала надо установить в системе Open Java SDK:
Через интерфейс:
Идем в «Центр приложений Ubuntu», вводим в поиск Java и ставим там OpenJDK Java 6 Runtime, потом ищем icedtea-6-plugin и устанавливаем его.
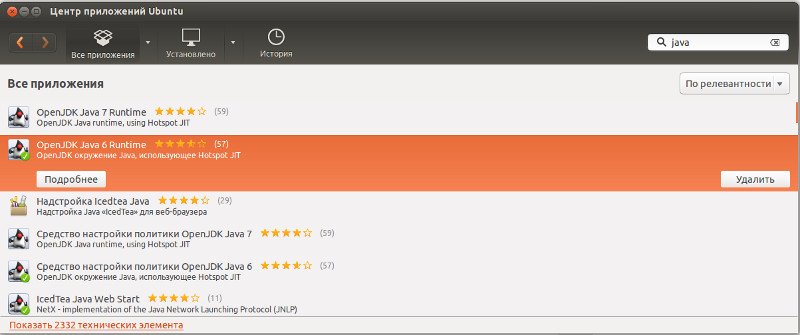
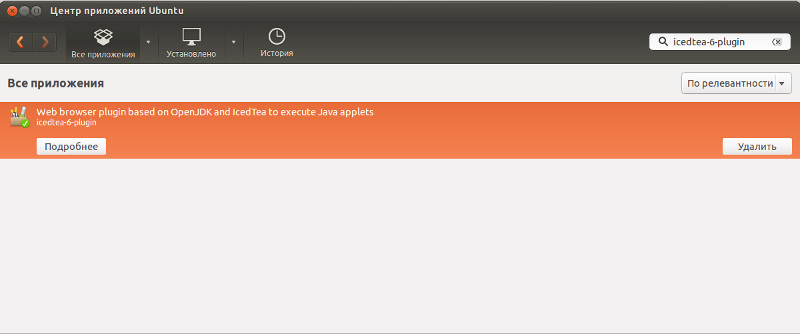
Через терминал:
sudo apt-get install openjdk-6-jre icedtea-6-plugin
Установка Eclipse
Следующий этап, это установка самого Eclipse и CDT для работы с C/C++. На данном шаге нам доступны несколько вариантов установки:
Из репозитория
Из репозитория удобно устанавливать потому что сама программа будет доступна в меню приложений.
Через интерфейс:
Через интерфейс: Идем в «Центр приложений Ubuntu», вводим в поиск Eclipse и устанавливаем его, потом вводим в поиск eclipse-cdt и так же ставим его.

Через терминал:
sudo apt-get install eclipse eclipse-cdt
2. Скачать с сайта
Беря Eclipse с сайта, вы сразу получаете самую последнюю версию продукта. Для того что бы скачать Eclipse, идем по ссылке http://www.eclipse.org/downloads/ и качаем нужную нам версию продукта ( не забываем учитывать операционную систему и архитектуру). Скаченную версию с сайта устанавливать не надо, достаточно просто разархивировать и запустить бинарный фаил. Если у вас правильно установлена Java, то программа сразу запустится.
Тут тоже есть несколько вариантов установки.
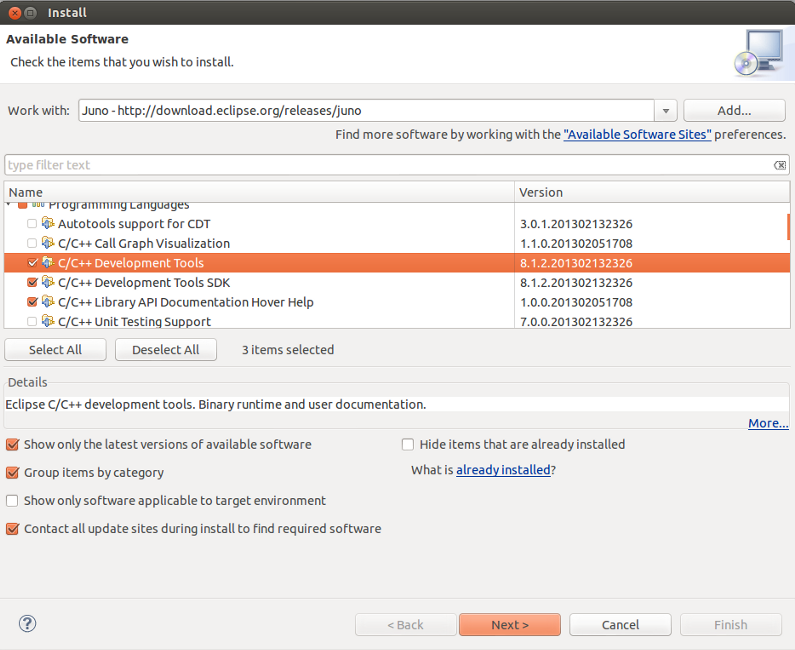
1. Классическа версия: Качаем Eclipse Classic 4.2.2 ( версия может отличаться ), распаковываем и запускаем фаил «eclipse». Потом через инструмент установки новых компонентов ( Help → Install New Software), нужно установить из раздела Programming Languages пакеты C/C++ Development tools и C/C++ Development tools SDK ( в чем разница между ними мне пока не совсем понятна, возможно вы подскажите в комментариях ).
2. Скачать готовую сборку, Eclipse IDE for C/C++ Developers, в которую уже включено все необходимое для работы.
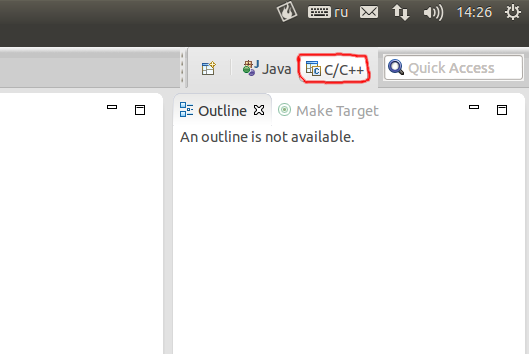
Выбор вкладки C/C++
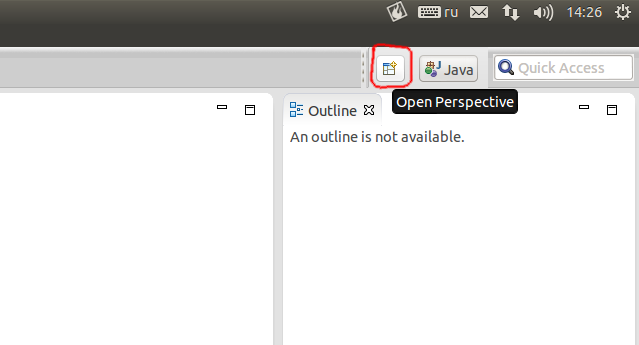
Так как Eclipse рассчитан на большое количество языков программирования, то существует система вкладок, которая переключает интерфейсы программы. Переключение закладок находиться на верхней панели, справа, возле быстрого поиска.
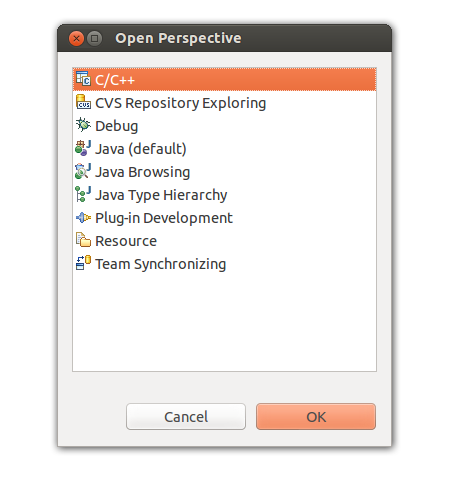
Нажмите кнопку Open Perspective, и выберите C/C++.
Русификация
Для русификации продукта используйте статью, которую я писал ранее. Как русифицировать Eclipse
Настройка компиляции.
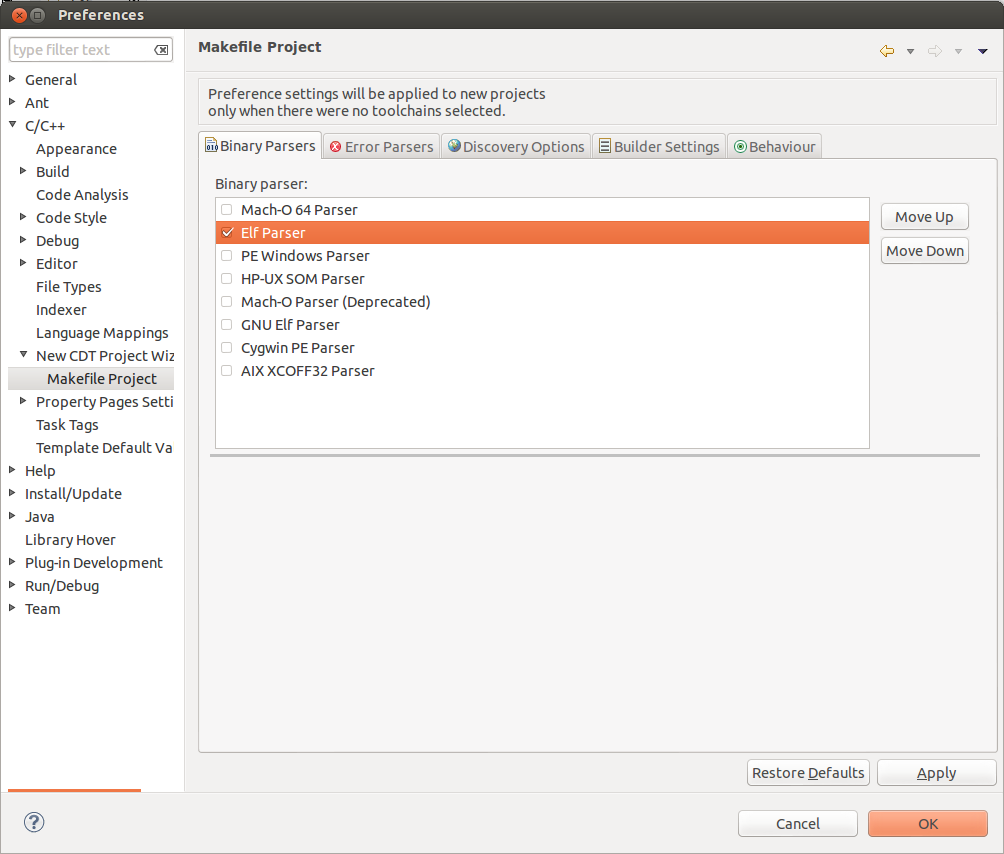
У меня был случай когда программа писала «binary not found». Для того что бы не было этой ошибки, проверьте установлен ли у вас компилятор:
sudo apt-get install gcc g++
Потом идем в настройки:
Window → Preferences → C/C++ → New CDT Project Wizard → Makefile Project, и устанавливаем там галочку на против Elf Parser (если у вас Linux), PE Windows Parser (для Windows), Cygwin PE Parser (если у вас MAC).
Создаем тестовый проект.
File → New → C++ Project → Hello World C++ Project
Компилируем Ctrl+F11, если нет ни каких ошибок, значит мы настроили IDE для работы с C++ в операционной системе Linux.
На главную
С++ на примерах
C++ в Eclipse
Для программирования на C/C++ в среде Eclipse нужно иметь:
- Eclipse IDE for C/C++ Developers (79 MB). Eclipse скачать бесплатно: http://www.eclipse.org/downloads/
- Если у вас другой пакет Eclipse IDE, без поддержки работы в cpp, то понадобится CDT (C/C++ Development Tools) (45 MB), который скачать бесплатно можно с http://www.eclipse.org/cdt/downloads.php
- MinGW (Minimalist GNU for Windows) библиотека; MinGW скачать бесплатно: http://sourceforge.net/projects/mingw/ (подробности см. ниже в «Подключение MinGW к Eclipse»).
Установка CTD в Eclipse
Если у вас пакет Eclipse IDE без CDT, т.е.
Начало работы с платформой Eclipse
не предполагалась работа с C/C++, то нужно установить CDT.
В строке меню окна Eclipse выбираем Help -> Install New Software… -> Кнопка ”Add” -> Кнопка ”Local…” -> выбираем распакованный файл с CDT -> Кнопка ”OK» -> Ставим флажки напротив CDT Main Features и CDT Optional Features -> Кнопка ”Next» -> Кнопка ”Next» -> Согласитесь с условиями лицензии -> Кнопка ”Finish».
Подключение MinGW к Eclipse
Скачиваем MinGW (http://sourceforge.net/projects/mingw/), выбирая в списке для закачки base tools и g++ compiler. Скачиваем gdb-6.6.tar.bz2 (http://downloads.sourceforge.net/mingw/gdb-6.6.tar.bz2).
Скачиваем MSYS-1.0.10.exe (http://downloads.sourceforge.net/mingw/MSYS-1.0.10.exe).
Устанавливаем MinGW, распаковываем gdb-6.6.tar.bz2 в папку, в которой установлен MinGW; устанавливаем MSYS. Теперь следует прописать путь к папке bin из каталога установки MSYS в переменной окружения PATH
Приложение C++ в Eclipse
Начинаем работать с Eclipse (Eclipse C++). Окрываем Eclipse SDK. В правом верхнем углу должна быть кнопка C/C++, как на рисунке: 
Если этого нет, тогда Window -> Open Perspective -> C/C++ (default).
Итак, делаем приложение на Cpp. File -> New -> C++ Project. В открывшемся окне указываем имя проекта «Primero», выбираем тип проекта Executable -> Hello World C++ Project, в поле Toolchains выделяем MinGW GCC, получаем: 
Два раза кликаем по Primero.cpp, изменим код этого файла так:
Далее, сохраняем проект File -> Save. Выбираем в строке меню главного окна Project -> Build Project. В окне Console видим строку
Build complete for project Primero
Правой кнопкой по названию проекта Primero в Project Explorer -> Run As -> 1Local C/C++ Application и видим в окне Console:
This is our first program in C++ Eclipse.
Вывод: наша первая программа на C++ в Eclipse работает нормально.
Урок 2. Установка и настройка среды разработки Eclipse и SDK Tools
Для того, чтобы писать программы — нужна среда разработки. Google рекомендует использовать для этих целей Eclipse с плагином Android Development Tools (ADT). В этом уроке мы подробно рассмотрим, как установить и настроить эту среду разработки.
Я буду описывать установку применимо к операционной системе Windows 7.
Использую этот мануал по установке — http://developer.android.com/sdk/installing.html
Системные требования — http://developer.android.com/sdk/requirements.html
Перед прочтением рекомендую посмотреть:
SDK — http://ru.wikipedia.org/wiki/SDK
В этой статье много скриншотов и инструкций. Учитывайте, что версии ПО постоянно меняются и у вас все может выглядеть по-другому и версии могут быть другими.
О том, как обновить компоненты, есть отдельная статья.
1. Java SDK — JDK
Т.к. разработка приложений ведется на Java, нам нужно скачать и установить соответствующее SDK, называемое еще JDK (если, конечно, оно уже не установлено).
Скачать можно здесь. Недавно появилась седьмая версия. Ничего не могу сказать о ней, но есть мнение, что сырая, потому рекомендую скачать проверенную шестую версию В разделе Java Platform, Standard Edition жмете JDK Download, ставите галку, что принимаете лицензионное соглашение и скачиваете файл соответственно Вашей операционной системе.
С установкой проблем возникнуть не должно. После этого желательно перезагрузиться.
2. Android SDK
Android SDK включает в себя инструменты, необходимые для разработки Android-приложений. Содержимое можно посмотреть здесь, а скачать здесь. Рекомендуется скачивать EXE-шник, но я предлагаю скачать ZIP-версию и самим распаковать в какой-нить удобный для вас каталог (если нет ссылки на ZIP, нажмите ссылку Other Platforms).
Учтите, что это должен быть каталог «на векА». И лучше его не перемещать никуда, иначе придется перенастраивать среду разработки. Предлагаю где-нибудь создать каталог Android. Крайне желательно, чтобы путь к нему был коротким. Идеально — <имя диска>:android (у меня это будет f:android). Для себя запомним этот каталог под псевдонимом . И в него распакуем наш архив SDK, получим .
3. Eclipse
Симпатичная и удобная среда разработки, где мы и будем творить и созидать ). Ее мы будем брать здесь. Гугл рекомендует нам версию Eclipse Classic. Согласимся с ним и скачаем именно эту версию. Распаковываем архив в
4.ADT
По умолчанию Eclipse не особо годится для разработки Android-приложений. ADT — плагин, который настраивает среду разработки для использования Android SDK и добавляет возможность удобной разработки.
Запускаем Eclipse (
Итак Eclipse запущен. Скачаем ADT плагин.
В меню запускаем Help > Install New Software… 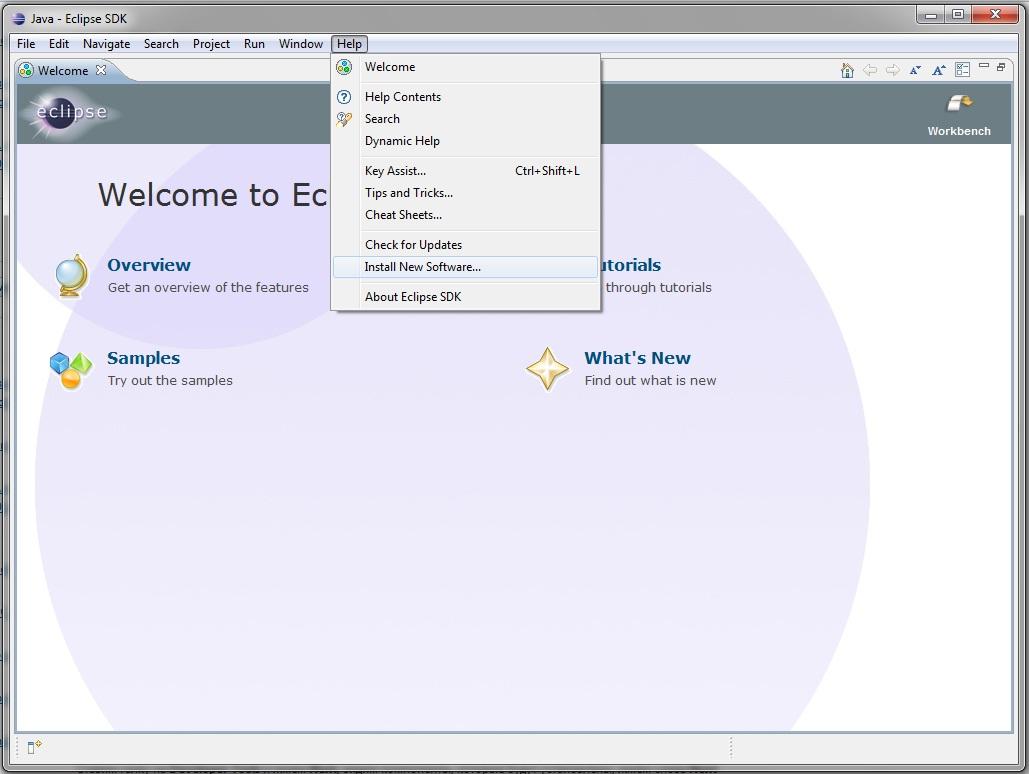
Жмем кнопку Add в правом верхнем углу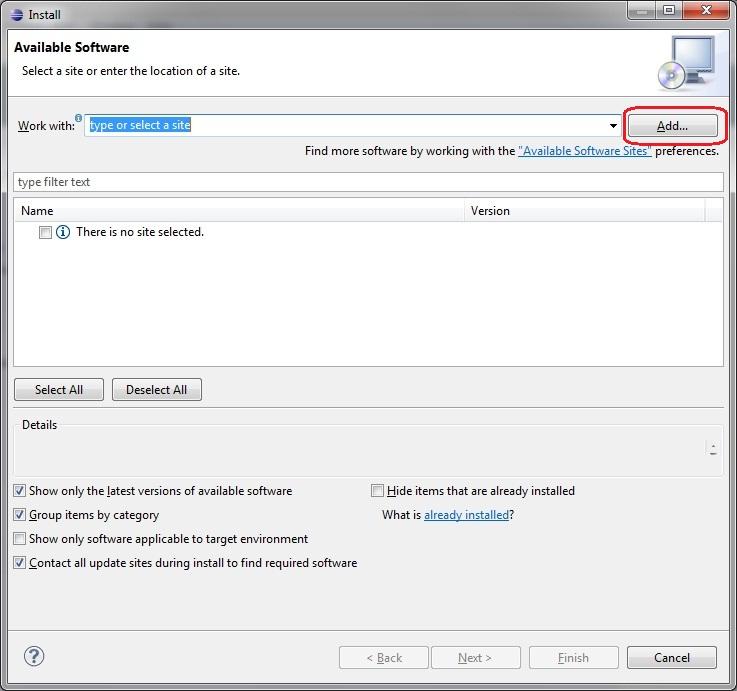
Вводим «ADT Plugin» в поле Name
URL адрес: https://dl-ssl.google.com/android/eclipse/ — в поле Location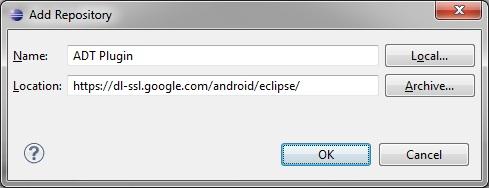
Жмем OK и ждем, пока появится Developer Tools(Если возникают проблемы, используйте http вместо https)
Ставим галку на Developer Tools и жмем Next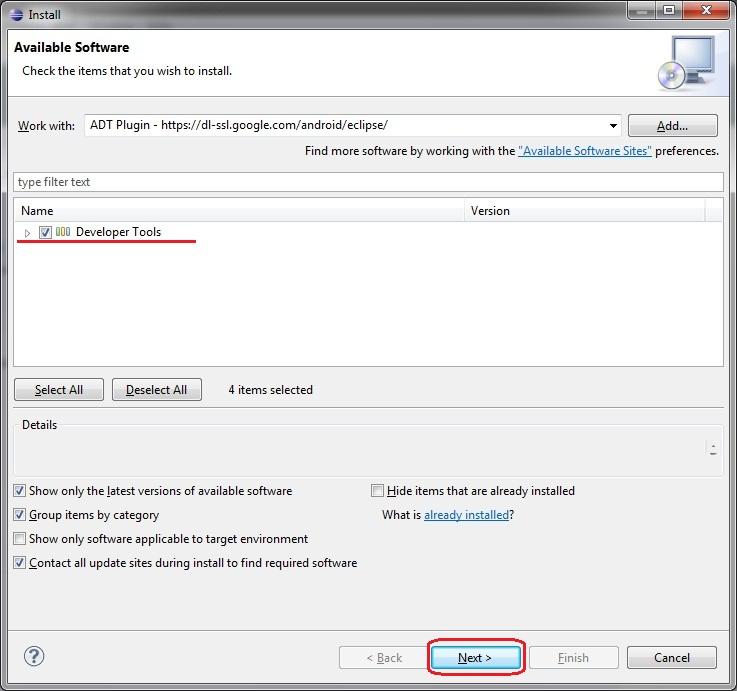
Видим компоненты, которые будут установлены, жмем снова Next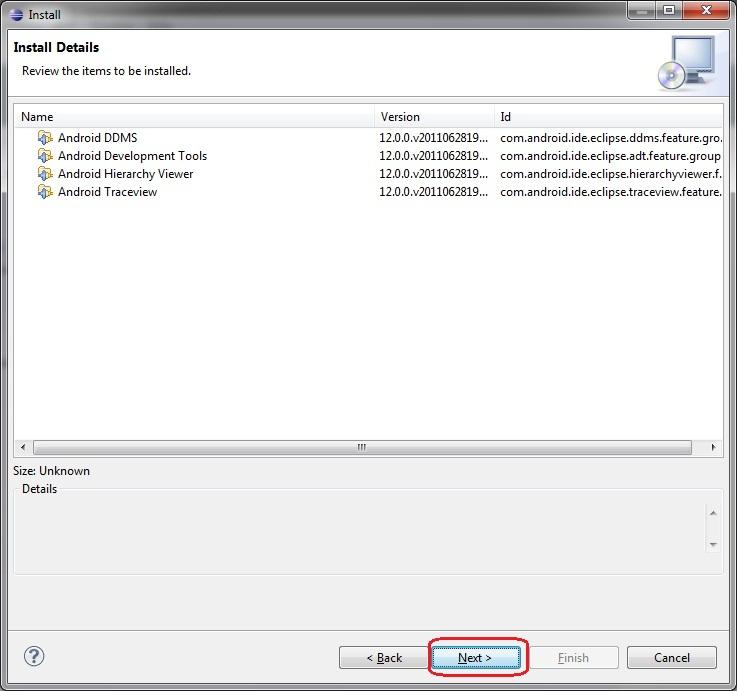
Читаем и принимаем лицензионное соглашение и жмем Finish
Начинается закачка компонентов.
Если выскочит Security warning о том, что the authenticity or validity of the software can’t be established, жмите OK.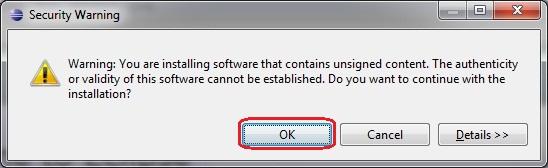
У меня процесс занял около минуты.
После завершения надо перезапустить Eclipse — Restart Now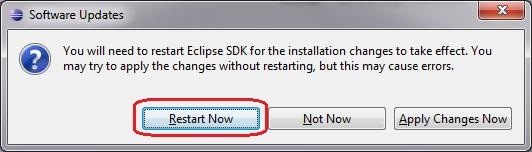
После перезапуска Eclipse выдаст такой диалог:
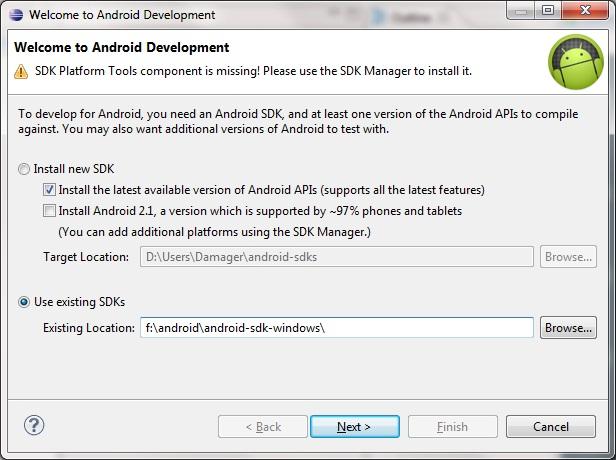
Первый пункт нужен для тех, кто по каким то причинам не скачал и не распаковал SDK на втором шаге данной инструкции. Eclipse сможет сделать это сам. И дополнительно сразу же скачает последнюю Android-платформу. Также он предлагает скачать платформу версии 2.1, как наиболее поддерживаемую кучей устройств.
Нам интересен второй пункт — он позволяет указать, куда мы распаковали SDK в шаге 2. У нас это — . Жмем Next.
И в появившемся окне выбираете, отправлять статистику в гугл или не отправлять. На работу это никак не повлияет.
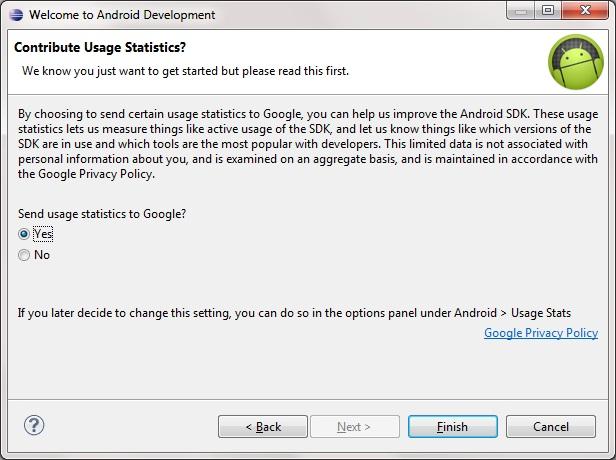
Выбираете, жмете Finish.
Далее нам сообщают, что наше скачанное SDK не содержит компонент и предлагают пройти в SDK Manager и срочно закачать. Жмем OK.
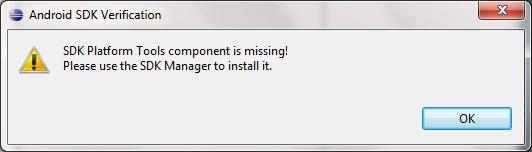
5. Платформы Android
И проваливаемся в SDK Manager.
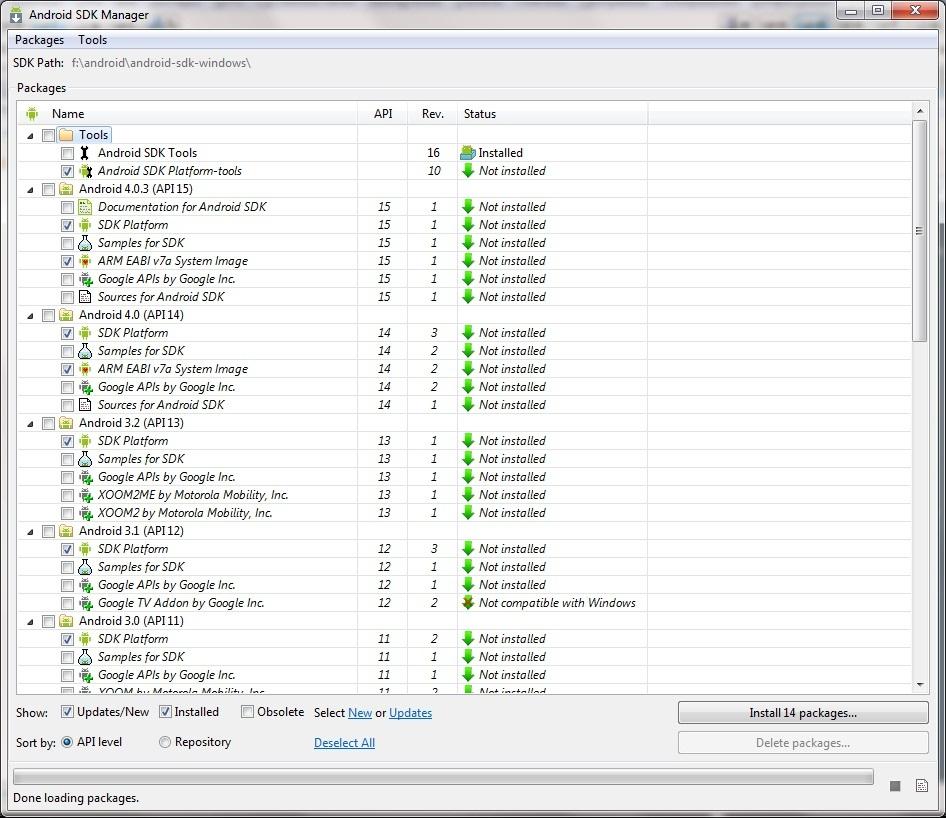
Тут предлагается выбрать компоненты для закачки через интернет.
В правой части для каждого компонента указано, установлен он уже или нет. Итак, что будем качать?
Обязательно нужно докачать неустановленное еще содержимое папки Tools. Также в папке Extras (в конце списка) найдите пункт Android Support Library и отметьте его, если он есть.
Для остальных, необходимых вам версий Android выбираете только SDK Platform. Учитывайте, что каждая платформа может весить до 150 метров!!! На работе особо не покачаешь, админы потом придут за вами 🙂 Для первых уроков потребуется только платформы 2.2 (API  и 2.3.3 (API 10).
Среда разработки Java-приложений Eclipse
Можете скачать пока только их.
Для платформ версии 4.Х выбираем SDK Platform (сама платформа) и ARM EABI v7a System Image (для работы эмулятора).
Если же трафика не жалко, то добавляйте для каждой плафтормы пункты:
Samples for SDK — исходники примеров приложений
Google APIs by Google Inc. — нужно если собираетесь работать с гугл-приложениями (Map, Navigation и пр.)
Если трафика не жалко вообще — ставьте все галки. Но ждать придется долго. И займет все это дело не один гиг.
Когда все выбрали — жмем кнопку Install X packages справа снизу.
В новом окне подтверждаем, что согласны все это скачать — Accept All. Заодно здесь можно и размер посмотреть и отказаться от чего-либо.
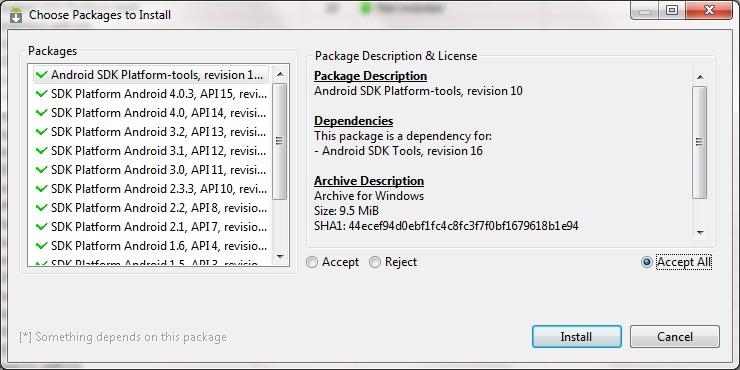
Жмете Install — побежал индикатор и открылся лог — началась закачка. При моем выборе компонентов, я ждал минут 20. После этого в окошках появилась фраза: Done loading packages.
Установка завершена. Закрываем лог и SDK Manager.
Для информации — у меня новые компоненты заняли 1,5 гига.
Далее перезапускаете Eclipse и все. После выполнения этих шагов мы получили среду разработки, с помощью которой можно кодить Android-приложения. Возможно эти действия покажутся мутными и скучными, но без них, к сожалению, никак. Дальше дело пойдет веселей. Если что-то не получается или выдает ошибку — попробуйте погуглить, наверняка вы не первый сталкиваетесь с такой проблемой и в сети уже есть описание решения. Ну или пишите в форум.
На следующем уроке мы в Eclipse настроим Android Virtual Device (AVD), создадим наше первое приложение и запустим его. AVD – это эмулятор смартфона с операционной системой Android, на котором можно запускать и тестировать приложения. Не подключать же свой смартфон каждый раз ) Также мы рассмотрим структуру проекта приложения.
P.S. Если у вас не появилось это окно
или вы его нечаянно закрыли — ничего страшного. Путь к SDK из шага 2 можно указать вручную.
В Eclipse меню Windows > Preferences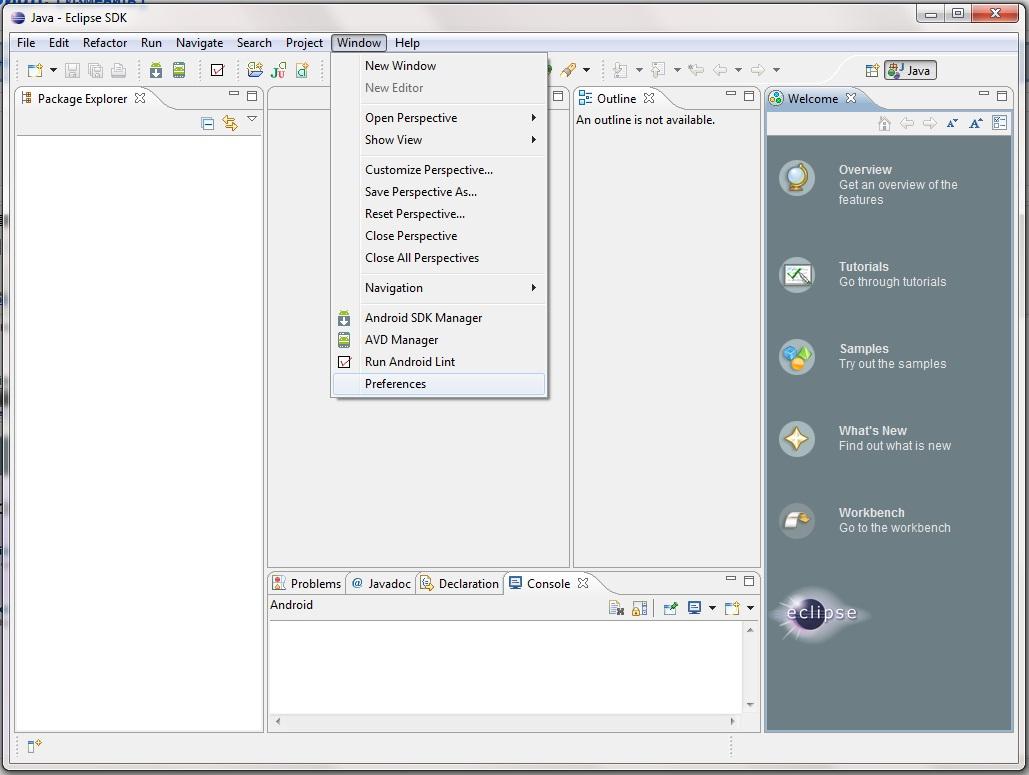
Слева выбираем Android, жмем Browse 
Указываем каталог, куда распаковали SDK — . Жмем Apply. 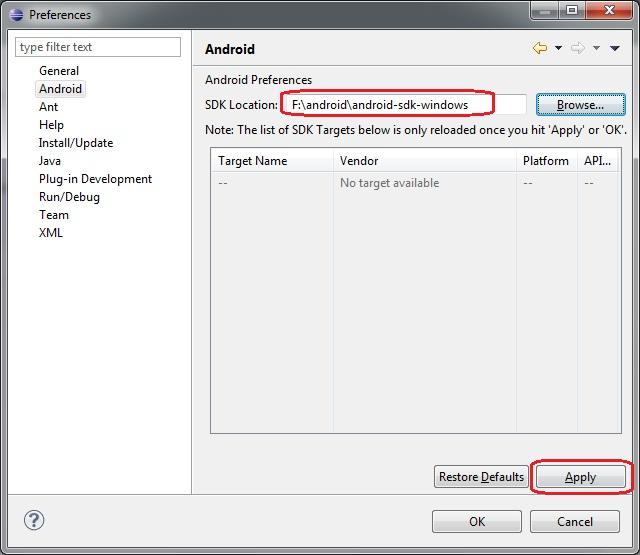
Нам говорят, что отсутствует компонент — закрываем это сообщение и жмем OK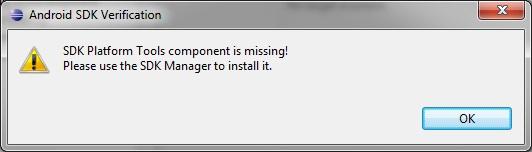
У меня еще выскочило такое окошко: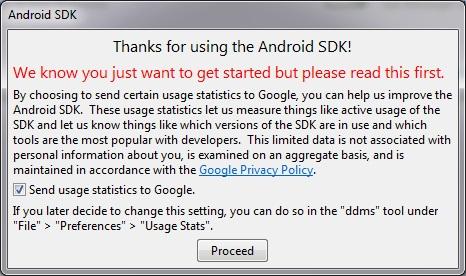
В нем сообщается, что если мы хотим улучшить продукт, то можем отправлять статистику использования. Выбор за вами, позже это всегда можно поменять в настройках. Я галку оставил, мне не жалко )
После этого можно идти в SDK Manager (в Eclipse меню Window > Android SDK Manager) и скачивать платформы.
Представляем вашему вниманию Видео: Обучение разработке на Android Урок 2.
Установка и настройка среды разработки Eclipse и SDK Tools с канала Start Android. Приятного просмотра!
Этот видеоурок устарел. Смотрите его обновленную версию
Инструкция по установке и ссылки:
Для того, чтобы писать программы — нужна среда разработки. Google рекомендует использовать для этих целей Eclipse с плагином Android Development Tools (ADT). В этом уроке мы подробно рассмотрим, как установить и настроить эту среду разработки.
Я буду описывать установку применимо к операционной системе Windows 7.
Использую этот мануал по установке —
Системные требования —
Перед прочтением рекомендую посмотреть:
SDK —
Скачать Java SDK — JDK можно здесь:
Скачать Eclipse + Android SDK + ADT по ссылкам на этой странице:
In order to write programs — need a development environment. Google recommends that you use for this purpose with the Eclipse plug-in Android Development Tools (ADT). In this lesson we will examine in detail how to install and configure this development environment.
I will describe the setting applies to Windows 7.
Use this manual to install —
System requirements —
Before reading I recommend to look:
SDK —
Download the Java SDK — JDK here:
Download Eclipse + Android SDK + ADT:
Отдельное спасибо за помощь в переводе субтитров:
Igor Gaiduk