- Manuals
- Brands
- SUZUKI Manuals
- Motorcycle
- GSX-R600
Manuals and User Guides for SUZUKI GSX-R600. We have 3 SUZUKI GSX-R600 manuals available for free PDF download: Manual, Service Manual

suzuki GSX-R600 Manual (653 pages)
Brand: suzuki
|
Category: Motorcycle
|
Size: 21.59 MB
Table of Contents
-
Section 1 Engine
63
-
General Information
13
-
Cylinder Identification
17
-
Maintenance and Lubrication
28
-
Scheduled Maintenance
28
-
Lubrication Points
29
-
Front Fork Inspection
47
-
Table of Contents
63
-
Precautions
68
-
Precautions for Engine
68
-
-
Engine General Information and Diagnosis
69
-
General Description
69
-
Injection Timing Description
69
-
Self-Diagnosis Function
71
-
-
Schematic and Routing Diagram
72
-
FI System Wiring Diagram
72
-
Terminal Alignment of ECM Coupler
74
-
-
Component Location
75
-
FI System Parts Location
75
-
-
Diagnostic Information and Procedures
77
-
Engine Symptom Diagnosis
77
-
Self-Diagnostic Procedures
81
-
Use of SDS Diagnosis Reset Procedures
83
-
Show Data When Trouble (Displaying Data at the Time of DTC)
84
-
SDS Check
85
-
DTC Table
89
-
Fail-Safe Function Table
91
-
FI System Troubleshooting
92
-
Malfunction Code and Defective Condition Table
94
-
DTC «C11» (P0340): CMP Sensor Circuit Malfunction
98
-
DTC «C12» (P0335): CKP Sensor Circuit Malfunction
101
-
DTC «C13» (P0105-H/L): IAP Sensor Circuit Malfunction
104
-
DTC «C14» (P0120-H/L): TP Sensor Circuit Malfunction
113
-
DTC «C15» (P0115-H/L): ECT Sensor Circuit Malfunction
120
-
DTC «C21» (P0110-H/L): IAT Sensor Circuit Malfunction
125
-
DTC «C22» (P1450-H/L): AP Sensor Circuit Malfunction
130
-
DTC «C23» (P1651-H/L): to Sensor Circuit Malfunction
139
-
-
DTC «C24» (P0351), «C25» (P0352), «C26» (P0353) or «C27» (P0354): Ignition System Malfunction
146
-
DTC «C28» (P1655): Secondary Throttle Valve Actuator (STVA) Malfunction
146
-
DTC «C29» (P1654-H/L): Secondary Throttle Position Sensor (STPS) Circuit Malfunction
150
-
DTC «C31» (P0705): GP Switch Circuit Malfunction
157
-
DTC «C32» (P0201), «C33» (P0202), «C34» (P0203) or «C35» (P0204): Primary Fuel Injector Circuit Malfunction
159
-
DTC «C36» (P1764), «C37» (P1765), «C38» (P1766) or «C39» (P1767): Secondary Fuel Injector Circuit Malfunction
162
-
DTC «C40» (P0505 / P0506 / P0507): ISC Valve Circuit Malfunction
165
-
DTC «C41» (P0230-H/L): FP Relay Circuit Malfunction
169
-
DTC «C41» (P2505): ECM Power Input Signal Malfunction
172
-
DTC «C42» (P1650): IG Switch Circuit Malfunction
174
-
DTC «C44» (P0130/P0135): HO2 Sensor (HO2S) Circuit Malfunction
174
-
DTC «C46» (P1657-H/L or P1658): EXCV Actuator Circuit Malfunction
180
-
DTC «C49» (P1656): PAIR Control Solenoid Valve Circuit Malfunction
194
-
DTC «C60» (P0480): Cooling Fan Relay Circuit Malfunction
197
-
DTC «C62» (P0443): EVAP System Purge Control Solenoid Valve Circuit Malfunction (E-33 Only)
200
-
DTC «C91» (P0500): Vehicle Speed Sensor Circuit Malfunction
203
-
DTC «C93» (P1769): Steering Damper Solenoid Valve Circuit Malfunction
206
-
-
Specifications
210
-
Service Data
210
-
-
Special Tools and Equipment
211
-
Special Tool
211
-
-
Emission Control Devices
213
-
Precautions
213
-
Precautions for Emission Control Devices
213
-
-
General Description
213
-
Fuel Injection System Description
213
-
Crankcase Emission Control System Description
214
-
Exhaust Emission Control System Description
215
-
Noise Emission Control System Description
216
-
Evaporative Emission Control System Diagram (Only for
216
-
-
Schematic and Routing Diagram
217
-
PAIR System Hose Routing Diagram
217
-
EVAP Canister Hose Routing Diagram
218
-
-
Repair Instructions
219
-
Heated Oxygen Sensor (HO2S) Removal and Installation
219
-
Heated Oxygen Sensor (HO2S) Inspection
219
-
PAIR Reed Valve Removal and Installation
219
-
PAIR Control Solenoid Valve Removal and Installation
221
-
PAIR System Inspection
221
-
Crankcase Breather (PCV) Hose Inspection
222
-
Crankcase Breather (PCV) Hose / Reed Valve / Cover Removal and Installation
223
-
Crankcase Breather (PCV) Cover Inspection
224
-
Crankcase Breather (PCV) Reed Valve Inspection
224
-
Evaporative Emission Control System Removal and Installation (Only for
224
-
Evaporative Emission Control System
224
-
Inspection (Only for
224
-
-
Specifications
229
-
Service Data
229
-
Tightening Torque Specifications
229
-
-
Special Tools and Equipment
229
-
Special Tool
229
-
-
Engine Electrical Devices
230
-
Precautions
230
-
Precautions for Engine Electrical Device
230
-
-
Component Location
230
-
Engine Electrical Components Location
230
-
-
Diagnostic Information and Procedures
230
-
Engine Symptom Diagnosis
230
-
-
Repair Instructions
230
-
ECM Removal and Installation
230
-
CMP Sensor Inspection
231
-
CMP Sensor Removal and Installation
231
-
CKP Sensor Inspection
232
-
CKP Sensor Removal and Installation
232
-
IAP Sensor Inspection
232
-
IAP Sensor Removal and Installation
232
-
TP Sensor Inspection
232
-
TP Sensor Removal and Installation
232
-
TP Sensor Adjustment
233
-
ECT Sensor Removal and Installation
233
-
ECT Sensor Inspection
234
-
IAT Sensor Removal and Installation
234
-
IAT Sensor Inspection
235
-
AP Sensor Inspection
235
-
AP Sensor Removal and Installation
235
-
TO Sensor Inspection
235
-
TO Sensor Removal and Installation
235
-
STP Sensor Inspection
236
-
STP Sensor Adjustment
236
-
STP Sensor Removal and Installation
237
-
STV Actuator Inspection
237
-
STV Actuator Removal and Installation
237
-
ISC Valve Inspection
237
-
ISC Valve Removal and Installation
237
-
ISC Valve Preset and Opening Initialization
238
-
HO2 Sensor Inspection
238
-
HO2 Sensor Removal and Installation
238
-
GP Switch Inspection
238
-
GP Switch Removal and Installation
238
-
-
Specifications
239
-
Service Data
239
-
Tightening Torque Specifications
239
-
-
Special Tools and Equipment
240
-
Special Tool
240
-
-
Engine Mechanical
241
-
Schematic and Routing Diagram
241
-
Camshaft and Sprocket Assembly Diagram
241
-
Throttle Cable Routing Diagram
242
-
-
Diagnostic Information and Procedures
243
-
Engine Mechanical Symptom Diagnosis
243
-
Compression Pressure Check
243
-
-
Repair Instructions
244
-
Engine Components Removable with the Engine in Place
244
-
Air Cleaner Element Removal and Installation
246
-
Air Cleaner Box Removal and Installation
247
-
Air Cleaner Element Inspection and Cleaning
247
-
Throttle Cable Removal and Installation
247
-
Throttle Cable Inspection
247
-
Throttle Cable Play Inspection and Adjustment
247
-
Throttle Body Components
248
-
Throttle Body Construction
249
-
Throttle Body Removal and Installation
250
-
Throttle Body Disassembly and Assembly
251
-
Throttle Body Inspection and Cleaning
255
-
ISC Valve Visual Inspection
256
-
Throttle Valve Synchronization
256
-
ISC Valve Reset
258
-
TP Reset
258
-
Engine Assembly Removal
259
-
Engine Assembly Installation
263
-
Engine Top Side Disassembly
265
-
Engine Top Side Assembly
267
-
Camshaft Inspection
274
-
Camshaft Sprocket
276
-
Cam Chain Tension Adjuster Inspection
276
-
Cam Chain Guide / Cam Chain Tensioner Removal and Installation
277
-
Cam Chain Guide Inspection
277
-
Cam Chain Tensioner Inspection
277
-
Cylinder Head Disassembly and Assembly
278
-
Cylinder Head Related Parts Inspection
282
-
Valve Guide Replacement
285
-
Valve Seat Repair
287
-
Engine Bottom Side Disassembly
287
-
Engine Bottom Side Assembly
294
-
Cylinder Inspection
309
-
Piston Ring Removal and Installation
309
-
Piston and Piston Ring Inspection
311
-
Conrod Crank Pin Bearing Removal and Installation
313
-
Conrod and Crankshaft Inspection
313
-
Conrod Crank Pin Bearing Inspection and Selection
314
-
Crankshaft Journal Bearing Inspection and Selection
316
-
Crankshaft Thrust Clearance Inspection and Selection
319
-
-
Specifications
321
-
Service Data
321
-
Tightening Torque Specifications
323
-
-
Special Tools and Equipment
324
-
Recommended Service Material
324
-
Special Tool
324
-
-
Engine Lubrication System
327
-
Precautions
327
-
Precautions for Engine Oil
327
-
-
Schematic and Routing Diagram
328
-
Engine Lubrication System Chart Diagram
328
-
Oil Pan
328
-
Engine Lubrication Circuit Diagram
329
-
-
Diagnostic Information and Procedures
331
-
Engine Lubrication Symptom Diagnosis
331
-
Oil Pressure Check
331
-
-
Repair Instructions
332
-
Engine Oil and Filter Replacement
332
-
Engine Oil Level Inspection
332
-
Oil Pan / Oil Strainer / Oil Pressure Regulator
332
-
Removal and Installation
332
-
-
Oil Pressure Regulator / Oil Strainer Inspection
333
-
Oil Cooler / Oil Cooler Hose Inspection
334
-
Oil Cooler Removal and Installation
334
-
Oil Pressure Switch Removal and Installation
335
-
Oil Pressure Switch Inspection
335
-
Oil Jet / Oil Gallery Jet Removal and Installation
335
-
Oil Jet / Oil Gallery Jet Inspection
337
-
Oil Pump Removal and Installation
338
-
Oil Pump Inspection
339
-
Oil Pump Drive Gear Removal and Installation
339
-
-
Specifications
340
-
Service Data
340
-
Tightening Torque Specifications
341
-
-
Special Tools and Equipment
341
-
Recommended Service Material
341
-
Special Tool
341
-
-
Engine Cooling System
342
-
Precautions
342
-
Precautions for Engine Cooling System
342
-
Precautions for Engine Coolant
342
-
-
General Description
342
-
Engine Coolant Description
342
-
-
Schematic and Routing Diagram
343
-
Cooling Circuit Diagram
343
-
Water Hose Routing Diagram
344
-
-
Diagnostic Information and Procedures
345
-
Engine Cooling Symptom Diagnosis
345
-
-
Repair Instructions
345
-
Cooling Circuit Inspection
345
-
Radiator Cap Inspection
346
-
Radiator Inspection and Cleaning
346
-
Radiator / Cooling Fan Motor Removal and Installation
346
-
Water Hose Inspection
347
-
Water Hose Removal and Installation
348
-
Radiator Reservoir Tank Inspection
348
-
Radiator Reservoir Tank Removal and Installation
349
-
Cooling Fan Inspection
349
-
Cooling Fan Relay Inspection
349
-
ECT Sensor Removal and Installation
350
-
ECT Sensor Inspection
350
-
Thermostat Removal and Installation
350
-
Thermostat Inspection
351
-
Water Pump Components
352
-
Water Pump Construction
353
-
Water Pump Removal and Installation
353
-
Water Pump Disassembly and Assembly
354
-
Water Pump Related Parts Inspection
357
-
-
Specifications
359
-
Service Data
359
-
Tightening Torque Specifications
359
-
-
Special Tools and Equipment
360
-
Recommended Service Material
360
-
Special Tool
360
-
-
Fuel System
361
-
Precautions
361
-
Precautions for Fuel System
361
-
-
General Description
362
-
Fuel Injection System Description
362
-
-
Schematic and Routing Diagram
363
-
Fuel Tank Drain Hose and Breather Hose Routing Diagram
363
-
-
Diagnostic Information and Procedures
364
-
Fuel System Diagnosis
364
-
-
Repair Instructions
365
-
Fuel Pressure Inspection
365
-
Fuel Pump Inspection
365
-
Fuel Discharge Amount Inspection
366
-
Fuel Pump Relay Inspection
367
-
Fuel Hose Inspection
367
-
Fuel Level Gauge Inspection
367
-
Fuel Tank Construction
368
-
Fuel Tank Removal and Installation
369
-
Fuel Pump Components
370
-
Fuel Pump Disassembly and Assembly
371
-
Fuel Mesh Filter Inspection and Cleaning
373
-
Fuel Injector / Fuel Delivery Pipe / T-Joint Removal and Installation
373
-
Fuel Injector Inspection and Cleaning
373
-
-
Specifications
374
-
Special Tools and Equipment
375
-
Recommended Service Material
375
-
Special Tool
375
-
-
Ignition System
376
-
General Description
376
-
Immobilizer Description (for
376
-
Drive Mode Selector Description
377
-
-
Schematic and Routing Diagram
378
-
Ignition System Diagram
378
-
Ignition System Components Location
378
-
-
Diagnostic Information and Procedures
379
-
Ignition System Symptom Diagnosis
379
-
No Spark or Poor Spark
380
-
-
Repair Instructions
381
-
Ignition Coil / Plug Cap and Spark Plug Removal and Installation
381
-
Spark Plug Inspection and Cleaning
382
-
Ignition Coil / Plug Cap Inspection
382
-
CKP Sensor Inspection
384
-
CKP Sensor Removal and Installation
385
-
Engine Stop Switch Inspection
385
-
Ignition Switch Inspection
385
-
Ignition Switch Removal and Installation
386
-
Drive Mode Selector Inspection
387
-
-
Specifications
388
-
Service Data
388
-
Tightening Torque Specifications
388
-
-
Special Tools and Equipment
389
-
Recommended Service Material
389
-
Special Tool
389
-
-
Starting System
390
-
Schematic and Routing Diagram
390
-
Starting System Diagram
390
-
-
Component Location
390
-
Starting System Components Location
390
-
-
Diagnostic Information and Procedures
390
-
Starting System Symptom Diagnosis
390
-
Starter Motor will Not Run
391
-
Starter Motor Runs but Does Not Crank the Engine
391
-
-
Repair Instructions
392
-
Starter Motor Components
392
-
Starter Motor Removal and Installation
393
-
Starter Motor Disassembly and Assembly
393
-
Starter Motor Inspection
394
-
Starter Relay Removal and Installation
395
-
Starter Relay Inspection
396
-
Turn Signal / Side-Stand Relay Removal and Installation
396
-
Side-Stand / Ignition Interlock System Parts Inspection
397
-
Starter Clutch Removal and Installation
399
-
Starter Clutch Inspection
401
-
Starter Button Inspection
402
-
-
Specifications
403
-
Service Data
403
-
Tightening Torque Specifications
403
-
-
Special Tools and Equipment
404
-
Recommended Service Material
404
-
Special Tool
404
-
-
Charging System
405
-
Schematic and Routing Diagram
405
-
Charging System Diagram
405
-
-
Component Location
405
-
Charging System Components Location
405
-
-
Diagnostic Information and Procedures
405
-
Charging System Symptom Diagnosis
405
-
Battery Runs down Quickly
406
-
-
Repair Instructions
407
-
Battery Current Leakage Inspection
407
-
Regulated Voltage Inspection
407
-
Generator Inspection
407
-
Generator Removal and Installation
408
-
Regulator / Rectifier Construction
412
-
Regulator / Rectifier Removal and Installation
413
-
Regulator / Rectifier Inspection
414
-
Battery Components
415
-
Battery Charging
415
-
Battery Removal and Installation
417
-
Battery Visual Inspection
418
-
-
Specifications
418
-
Service Data
418
-
Tightening Torque Specifications
418
-
-
Special Tools and Equipment
419
-
Recommended Service Material
419
-
Special Tool
419
-
-
Exhaust System
420
-
Precautions
420
-
Precautions for Exhaust System
420
-
-
General Description
420
-
Exhaust Control System Description
420
-
Exhaust Control System Operation
421
-
-
Repair Instructions
423
-
Exhaust Control System Construction
423
-
Exhaust System Components
424
-
EXCV Cable Removal and Installation
425
-
EXCVA Removal and Installation
426
-
EXCVA Inspection
428
-
EXCVA Pulley Inspection
428
-
EXCVA Adjustment
428
-
-
-
Section 2 Suspension
435
-
Precautions
436
-
Precautions for Suspension
436
-
-
Suspension General Diagnosis
437
-
Diagnostic Information and Procedures
437
-
Suspension and Wheel Symptom Diagnosis
437
-
-
Repair Instructions
438
-
Front Fork Components
438
-
Front Fork Removal and Installation
439
-
Front Suspension Adjustment
441
-
Front Fork Disassembly and Assembly
441
-
Front Fork Parts Inspection
448
-
-
Front Suspension
438
-
Specifications
449
-
Service Data
449
-
Tightening Torque Specifications
449
-
-
Special Tools and Equipment
450
-
Recommended Service Material
450
-
Special Tool
450
-
-
Rear Suspension
451
-
Repair Instructions
451
-
Rear Suspension Components
451
-
Rear Suspension Assembly Construction
452
-
Rear Shock Absorber Removal and Installation
453
-
Rear Suspension Inspection
454
-
Rear Shock Absorber Inspection
454
-
Rear Suspension Adjustment
454
-
Rear Shock Absorber Disposal
455
-
Cushion Lever Removal and Installation
456
-
Cushion Lever Inspection
456
-
Cushion Lever Bearing Removal and Installation
457
-
Cushion Rod Removal and Installation
458
-
Cushion Rod Inspection
458
-
Cushion Rod Bearing Removal and Installation
459
-
Swingarm Removal and Installation
460
-
Swingarm Related Parts Inspection
462
-
Swingarm Bearing Removal and Installation
463
-
-
Specifications
465
-
Service Data
465
-
Tightening Torque Specifications
465
-
-
Special Tools and Equipment
466
-
Recommended Service Material
466
-
Special Tool
466
-
-
Wheels and Tires
467
-
Precautions
467
-
Precautions for Wheel and Tire
467
-
-
Repair Instructions
468
-
Front Wheel Components
468
-
Front Wheel Assembly Construction
469
-
Front Wheel Assembly Removal and Installation
470
-
Front Wheel Related Parts Inspection
472
-
Front Wheel Dust Seal / Bearing Removal and Installation
473
-
Rear Wheel Components
475
-
Rear Wheel Assembly Construction
476
-
Rear Wheel Assembly Removal and Installation
477
-
Rear Wheel Related Parts Inspection
477
-
Rear Wheel Dust Seal / Bearing Removal and Installation
479
-
Tire Removal and Installation
481
-
Wheel / Tire / Air Valve Inspection and Cleaning
482
-
Air Valve Removal and Installation
483
-
Wheel Balance Check and Adjustment
484
-
-
Specifications
485
-
Service Data
485
-
Tightening Torque Specifications
485
-
-
Special Tools and Equipment
486
-
Recommended Service Material
486
-
Special Tool
486
-
-
-
Section 3 Driveline / Axle
487
-
Precautions
488
-
Precautions for Driveline / Axle
488
-
-
Diagnostic Information and Procedures
489
-
Drive Chain and Sprocket Symptom Diagnosis
489
-
-
Repair Instructions
489
-
Drive Chain Related Components
489
-
Engine Sprocket Removal and Installation
490
-
Rear Sprocket / Rear Sprocket Mounting Drum Removal and Installation
491
-
Drive Chain Related Parts Inspection
492
-
Sprocket Mounting Drum Dust Seal / Bearing Removal and Installation
493
-
Drive Chain Replacement
495
-
-
Drive Chain / Drive Train / Drive Shaft
489
-
Specifications
498
-
Service Data
498
-
Tightening Torque Specifications
498
-
-
Special Tools and Equipment
499
-
Recommended Service Material
499
-
Special Tool
499
-
-
Advertisement

Suzuki GSX-R600 Service Manual (466 pages)
Brand: Suzuki
|
Category: Motorcycle
|
Size: 52.53 MB
Table of Contents
-
Foreword
2
-
Group Index
2
-
How to Use this Manual
3
-
Component Parts and Work to be Done
3
-
Symbol
4
-
Abbreviations Used in this Manual
5
-
Wire Color
7
-
General Information
8
-
Contents
8
-
Warning/Caution/Note
9
-
Suzuki GSX-R600K4 (’04-Model) View
11
-
Serial Number Location
11
-
Fuel, Oil and Engine Coolant Recommendation Fuel (for USA and Canada)
12
-
Fuel (for Other Countries)
12
-
Engine Oil (for USA)
12
-
Engine Oil (for Other Countries)
12
-
Engine Coolant
13
-
Water for Mixing
13
-
Anti-Freeze/Engine Coolant
13
-
Liquid Amount of Water/Engine Coolant
13
-
Break-In Procedures
14
-
Cylinder Identification
14
-
Information Labels
15
-
Specifications
16
-
Dimensions and Dry Mass
16
-
Drive Train
16
-
Electrical
17
-
Capacities
17
-
Periodic Maintenance
18
-
Periodic Maintenance Schedule
19
-
Periodic Maintenance Chart
19
-
Lubrication Points
20
-
Maintenance and Tune-Up Procedures
21
-
Air Cleaner
21
-
Spark Plug and Ignition Coil/Plug Cap Removal
22
-
Heat Range
22
-
Carbon Deposits
22
-
Spark Plug Gap
23
-
Electrode’s Condition
23
-
Spark Plug and Ignition Coil/Plug Cap Installation
23
-
Valve Clearance
24
-
Valve Clearance Adjustment
26
-
Intake Side
27
-
Tappet Shim Selection Table
27
-
Exhaust Side
28
-
Engine Oil and Oil Filter
29
-
Engine Oil Replacement
29
-
Oil Filter Replacement
30
-
Fuel Line
31
-
Engine Idle Speed
31
-
Throttle Valve Synchronization
32
-
Evaporative Emission Control System (E-33 Only)
32
-
Pair (Air Supply) System
32
-
Throttle Cable Play
33
-
Clutch
33
-
Cooling System
34
-
Engine Coolant Level Check
34
-
Engine Coolant Change
34
-
Air Bleeding the Cooling Circuit
35
-
Radiator Hoses
36
-
Drive Chain
37
-
Checking
37
-
Adjusting
38
-
Cleaning and Lubricating
39
-
Brake Fluid Level Check
40
-
Brake Pads
41
-
Front Brake
41
-
Rear Brake
41
-
Brake Pedal Height
41
-
Brake Light Switch
42
-
Air Bleeding from Brake Fluid Circuit
42
-
Front Brake (Caliper Side)
42
-
Front Brake (Master Cylinder Side)
43
-
Tire Tread Condition
44
-
Tire Pressure
44
-
Steering
45
-
Front Fork
45
-
Rear Suspension
45
-
Exhaust Pipe Bolt and Muffler Bolt and Nut
46
-
Chassis Bolts and Nuts
47
-
Compression Pressure Check
49
-
Compression Pressure Specification
49
-
Compression Test Procedure
49
-
Oil Pressure Check
50
-
Oil Pressure Specification
50
-
Oil Pressure Test Procedure
50
-
Engine
52
-
Engine Components Removable with Engine in Place
53
-
Engine Center
53
-
Engine Right Side
53
-
Engine Left Side
53
-
Engine Removal
54
-
Radiator
55
-
Exhaust Pipe and Muffler
56
-
Electric Parts and Pair Hose
57
-
Engine Sprocket and Gear Shift Lever
58
-
Engine Mounting
59
-
Engine Installation
61
-
Engine Disassembly
67
-
Starter Motor
67
-
Cylinder Head Cover and Pair Reed Valve
67
-
Camshafts
68
-
Cylinder Head
69
-
Oil Pump
72
-
Gearshift System
72
-
Starter Idle Gear
73
-
Starter Clutch
74
-
Cam Chain, Cam Chain Tensioner and Cam Chain Guide
74
-
CKP Sensor
74
-
Generator Cover
75
-
Generator Rotor
75
-
Water Pump
75
-
Gear Position Switch
76
-
Crankcase Breather (PCV) Cover
76
-
Oil Filter
76
-
Lower Crank Case
77
-
Middle Crankcase
78
-
Crankshaft
78
-
Piston and Conrod
78
-
Engine Components Inspection and Service
80
-
Cylinder Head Cover
80
-
CMP Sensor
80
-
Pair Reed Valve
80
-
PCV Hose
81
-
Camshaft Identification
81
-
Cam Wear
81
-
Camshaft Journal Wear
82
-
Сamshaft Runout
83
-
Сam Sprocket
83
-
Сam Chain Tension Adjuster
83
-
Сam Chain Tensioner
84
-
Сam Chain Guide
84
-
Сylinder Head and Valve
84
-
Valve and Valve Spring Disassembly
84
-
Cylinder Head Distortion
86
-
Valve Stem Runout
86
-
Valve Head Radial Runout
86
-
Valve Stem and Valve Face Wear Condition
87
-
Valve Stem Deflection
87
-
Valve Stem Wear
87
-
Valve Guide Servicing
88
-
Valve Seat Width Inspection
89
-
Valve Seat Servicing
90
-
Initial Seat Cut
90
-
Top Narrowing Cut
91
-
Bottom Narrowing Cut
91
-
Final Seat Cut
92
-
Valve Spring
93
-
Valve and Valve Spring Reassembly
94
-
Intake Pipe
95
-
Water Bypass Union
96
-
Clutch Drive Plates Inspection
96
-
Clutch Spring Inspection
97
-
Clutch Bearing Inspection
97
-
Clutch Sleeve Hub/Primary Driven Gear Assembly
97
-
Generator
98
-
Gearshift Shaft/Gearshift Arm Disassembly
99
-
Gearshift Shaft/Gearshift Arm Inspection
99
-
Gearshift Shaft/Gearshift Arm Reassembly
99
-
Oil Pressure Regulator
100
-
Transmission
101
-
Disassembly
101
-
Reassembly
102
-
Transmission Parts Location
103
-
Cylinder Distortion
104
-
Cylinder Bore
104
-
Piston and Piston Ring
105
-
Piston Diameter
105
-
Piston-To-Cylinder Clearance
105
-
Piston Pin and Pin Bore
105
-
Piston Ring-To-Groove Clearance
106
-
Piston Ring Free End Gap and Piston Ring End Gap
106
-
Crankcase
107
-
Gearshift Fork and Gearshift Cam
107
-
Gearshift Fork-To-Groove Clearance
107
-
Gearshift Fork Groove Width
107
-
Gearshift Fork Thickness
108
-
Gearshift Cam Bearing and Gearshift Shaft Bearing
108
-
Bearing Inspection
108
-
Bearing Removal
108
-
Installation
109
-
Oil Jet
111
-
Inspection and Cleaning
111
-
Plug
112
-
Conrod Big End Side Clearance
113
-
Conrod-Big End Bearing Inspection
113
-
Conrod-Big End Bearing Selection
113
-
Crankshaft and Conrod
114
-
Crankshaft Runout
114
-
Conrod Small End I.D.
114
-
Crank Pin O.D.
115
-
Bearing Thickness
115
-
Bearing Selection Table
116
-
Conrod I.D.
116
-
Crankshaft Journal Bearing
118
-
Selection
118
-
Crankcase I.D. Specification
119
-
Crankshaft Journal O.D. Specification
120
-
Bearing Thickness Specification
120
-
Crankshaft Thrust Bearing
121
-
Crankshaft Thrust Clearance Adjustment
121
-
Thrust Bearing Selection Table
122
-
Engine Reassembly
123
-
Piston Ring
123
-
Oil Strainer
133
-
Oil Pan
133
-
Oil Pressure Switch
134
-
Crankcase Breather Cover
135
-
Cam Chain Drive Sprocket
138
-
Cam Chain Tensioner and Cam Chain Guide
138
-
Clutch Cover
146
-
Camshaft
149
-
Cam Chain Tension Adjuster
152
-
FI System Diagnosis
157
-
Precautions in Servicing
159
-
Electrical Parts
159
-
Connector/Coupler
159
-
Fuse
160
-
Ecm/Various Sensors
160
-
Electrical Circuit Inspection Procedure
162
-
Open Circuit Check
162
-
Continuity Check
163
-
Voltage Check
163
-
Short Circuit Check (Wire Harness to Ground)
164
-
Using the Multi-Circuit Tester
165
-
Using the Tester
165
-
FI System Technical Features
166
-
Injection Time (Injection Volume)
166
-
Compensation of Injection Time (Volume)
167
-
Injection Stop Control
167
-
Injection Timing
168
-
FI System Parts Location
169
-
FI System Wiring Diagram
171
-
Self-Diagnosis Function
172
-
User Mode
172
-
Dealer Mode
173
-
TPS Adjustment
175
-
Fail-Safe Function
176
-
FI System Troubleshooting
178
-
Self-Diagnostic Procedures
180
-
Self-Diagnosis Reset Procedure
180
-
Malfunction Code and Defective Condition
181
-
«C11» CMP Sensor Circuit Malfunction
183
-
«C12» CKP Sensor Circuit Malfunction
185
-
«C13» IAP Sensor Circuit Malfunction
187
-
«C14» TP Sensor Circuit Malfunction
190
-
«C15» ECT Sensor Circuit Malfunction
191
-
Output Voltage
193
-
«C21» IAT Sensor Circuit Malfunction
195
-
«C22» AP Sensor Circuit Malfunction
197
-
«C23» to Sensor Circuit Malfunction
200
-
«C28» STV Actuator Circuit Malfunction
202
-
«C29» STP Sensor Circuit Malfunction
204
-
«C31» GP Switch Circuit Malfunction
207
-
«C32», «C33», «C34» or «C35» Fuel Injector Circuit Malfunction
208
-
«C41» FP Relay Circuit Malfunction
210
-
«C42» IG Switch Circuit Malfunction
210
-
«C49» Pair Control Solenoid Valve Circuit Malfunction
211
-
Sensors
213
-
Fuel System and Throttle Body
216
-
Fuel Delivery System
217
-
Fuel System
218
-
Fuel Tank Lift-Up
218
-
Fuel Tank Removal
218
-
Fuel Pressure Inspection
219
-
Fuel Pump Inspection
220
-
Fuel Discharge Amount Inspection
220
-
Fuel Pump Relay Inspection
221
-
Fuel Pump and Fuel Filter Removal
222
-
Construction
222
-
Fuel Mesh Filter Inspection and Cleaning
224
-
Fuel Pump and Fuel Mesh Filter Installation
224
-
Throttle Body Construction
228
-
Air Cleaner Box Removal
229
-
Throttle Body Removal
230
-
Throttle Body Disassembly
231
-
Throttle Body Cleaning
233
-
Throttle Body Reassembly
234
-
Throttle Body Installation
236
-
Air Cleaner Box Installation
237
-
STP Sensor Adjustment
237
-
Fuel Injector Removal
238
-
Fuel Injector Inspection
238
-
Fuel Injector Installation
238
-
Fast Idle Adjustment
239
-
Use for Digital Vacuum Tester
241
-
Use for Vacuum Balancer Gauge
242
-
Calibrating each Vacuum Gauge
242
-
Throttle Position Sensor (TPS) Setting
244
-
Exhaust System
246
-
Precautions for Exhaust System
247
-
Exhaust System Components
247
-
Cooling and Lubrication System
250
-
Cooling Circuit Inspection
252
-
Radiator and Water Hoses
253
-
Radiator Removal
253
-
Radiator Cap Inspection
253
-
Radiator Inspection and Cleaning
253
-
Water Hose Inspection
254
-
Cooling Fan
255
-
Cooling Fan Thermo-Switch
256
-
ECT Sensor
257
-
Temperature Sensor Specification
257
-
Thermostat
258
-
Mechanical Seal
263
-
Oil Seal
263
-
Impeller Shaft Journal
263
-
Seal Washer
263
-
Lubrication System
267
-
Oil Cooler
267
-
Engine Lubrication System Chart
269
-
Engine Lubrication System
270
-
Chassis
273
-
Exterior Parts
275
-
Fastener Removal and Reinstallation
275
-
Screen
276
-
Body Cowling Cover and Lower Bracket Cover
276
-
Right and Left under Cowlings
276
-
Body Cowling
278
-
Right and Left Air Intake Pipes
279
-
Cowling Brace
279
-
Front Seat
279
-
Rear Seat and Seat Tail Cover
280
-
Frame Cover
280
-
Front Wheel Construction
281
-
Axle Shaft
283
-
Wheel Bearing
283
-
Reassembly and Installation
284
-
Brake Disc
285
-
Spacer Nut
286
-
Brake Caliper
286
-
Front Axle
286
-
Front Fork Construction
287
-
Inner and Outer Tubes
291
-
Damper Rod
292
-
Compression Damping Force Adjuster
292
-
Oil Seal and Dust Seal
292
-
Damper Rod Bolt
293
-
Fork Oil
293
-
Fork Spring
294
-
Front Fork Cap Bolt
295
-
Suspension Setting
298
-
Spring Pre-Load Adjustment
298
-
Damping Force Adjustment
298
-
Standard Front Suspension Setting
298
-
Steering Damper Construction
299
-
Steering Construction
301
-
Inner Race
303
-
Stem Nut
304
-
Front Fork and Steering Stem Upper Bracket
305
-
Steering Tension Adjustment
306
-
Handlebars Construction
307
-
Rear Wheel Construction
311
-
Rear Axle
313
-
Wheel Damper
313
-
Sprocket
314
-
Dust Seals
317
-
Rear Sprocket and Sprocket Mounting Drum
317
-
Rear Shock Absorber Construction
319
-
Rear Shock Absorber Scrapping Procedure
321
-
Rear Shock Absorber Gas Release
321
-
Rear Suspension Construction
323
-
Spacer
326
-
Swingarm Bearing
326
-
Cushion Lever Bearing
327
-
Cushion Lever and Cushion Lever Rods
327
-
Swingarm Pivot Shaft
327

Suzuki GSX-R600 Manual (165 pages)
Brand: Suzuki
|
Category: Motorcycle
|
Size: 2.75 MB
Table of Contents
-
Table of Contents
4
-
The Sport of Motorcycling
6
-
Most Accidents Can be Avoided
7
-
If You Don’t Have a Helmet, Buy a Helmet and Wear It Every Time You Ride
7
-
If a Collision Is Imminent, Do Something
8
-
Special Situations Require Special Care
9
-
Know Your Limits
9
-
Be Extra Safety-Conscious on Bad Weather Days
10
-
Practice Away from Traffic
10
-
Inspection before Riding
10
-
Accessories and Loading
10
-
Carrying a Passenger
11
-
Motorcycle Safety Foundation’s «Riding Tips and Practice Guide» Handbook (for Owners in Usa)
11
-
Be Street Smart
11
-
Labels
11
-
Conclusion
12
-
-
Fuel, Engine Oil and Coolant Recommendations
14
-
-
Controls, Equipment and Adjustments
22
-
Location of Parts
23
-
Ignition Switch
26
-
Key
26
-
Instrument Panel
29
-
Left Handlebar
43
-
Right Handlebar
46
-
Fuel Tank Cap
49
-
Gearshift Lever
50
-
Rear Brake Pedal
51
-
Seat Lock and Helmet Holders
51
-
Side Stand
53
-
Suspension Adjustment
54
-
Footrests and Gearshift Lever Position Change
59
-
Break-In and Inspection before Riding
62
-
-
Riding Tips
66
-
Starting the Engine
67
-
Starting off
69
-
Using the Transmission
70
-
Riding on Hills
71
-
Stopping and Parking
72
-
Carrying a Passenger
73
-
-
Accessory Use and Motorcycle Loading
74
-
Accessory Installation Guidelines
75
-
Accessory Use
75
-
Loading Limit
76
-
Loading Guidelines
77
-
Modification
77
-
-
Inspection and Maintenance
80
-
Maintenance Schedule
81
-
Steering Damper Maintenance
85
-
Tools
85
-
Lubrication Points
86
-
Battery
87
-
Air Cleaner
89
-
Spark Plugs
93
-
Engine Oil
99
-
Engine Idle Speed Inspection
105
-
Throttle Cable Play
105
-
Fuel Hose
106
-
Clutch Adjustment
107
-
Engine Coolant
107
-
Drive Chain
109
-
Brakes
113
-
Tires
118
-
Side Stand/Ignition Interlock System
121
-
Front Wheel Removal
122
-
Rear Wheel Removal
125
-
Light Bulb Replacement
128
-
Fuses
134
-
Catalytic Converter
136
-
Troubleshooting
138
-
Advertisement
Advertisement
Related Products
-
Suzuki GSX-R600 2006
-
Suzuki GSX-R600 2007
-
Suzuki GSX R600 2003
-
Suzuki GSX-R1000K5
-
Suzuki GSX-R750W 1993
-
Suzuki GSX-R250
-
Suzuki GSX-R1000/A
-
Suzuki GSX-R1000 2007
-
Suzuki GSX-R750UD
-
Suzuki GSX-R750UF
SUZUKI Categories
Motorcycle
Automobile
Musical Instrument
Offroad Vehicle
Outboard Motor
More SUZUKI Manuals
Руководство на английском языке по эксплуатации и техническому обслуживанию мотоциклов Suzuki GSX-R250.
- Издательство: Suzuki Motor Corporation
- Год издания: —
- Страниц: 22
- Формат: PNG
- Размер: 6,2 Mb
Руководство на английском языке по ремонту мотоциклов Suzuki GSX-R400.
- Издательство: Suzuki Motor Corporation
- Год издания: —
- Страниц: 246
- Формат: PDF
- Размер: 22,3 Mb
Руководство на английском языке по ремонту мотоциклов Suzuki GSX-R600 1997-2000 годов выпуска.
- Издательство: Suzuki Motor Corporation
- Год издания: —
- Страниц: 429
- Формат: PDF
- Размер: 48,5 Mb
Руководство на английском языке по ремонту мотоциклов Suzuki GSX-R600 2001-2002 годов выпуска.
- Издательство: Suzuki Motor Corporation
- Год издания: —
- Страниц: 399
- Формат: PDF
- Размер: 41,8 Mb
Руководство на английском языке по ремонту мотоциклов Suzuki GSX-R600.
- Издательство: Suzuki Motor Corporation
- Год издания: 2003
- Страниц: 466
- Формат: PDF
- Размер: 48,9 Mb
Руководство на английском языке по ремонту мотоциклов Suzuki GSX-R600.
- Издательство: Suzuki Motor Corporation
- Год издания: 2006
- Страниц: 517
- Формат: PDF
- Размер: 45,9 Mb
Руководство на английском языке по ремонту мотоциклов Suzuki GSX-R750.
- Издательство: Suzuki Motor Corporation
- Год издания: 1995
- Страниц: 558
- Формат: PDF
- Размер: 188,3 Mb

Руководство на английском языке по ремонту мотоциклов Suzuki GSX-R750 2000-2002 годов выпуска.
- Издательство: Suzuki Motor Corporation
- Год издания: —
- Страниц: 498
- Формат: PDF
- Размер: 142,6 Mb
Руководство на английском языке по ремонту мотоциклов Suzuki GSX-R750.
- Издательство: Suzuki Motor Corporation
- Год издания: 2004
- Страниц: 471
- Формат: PDF
- Размер: 40,8 Mb
Руководство на английском языке по ремонту мотоциклов Suzuki GSX-R750.
- Издательство: Suzuki Motor Corporation
- Год издания: 2006
- Страниц: 522
- Формат: PDF
- Размер: 46,0 Mb
Руководство на английском языке по техническому обслуживанию и ремонту мотоциклов Suzuki GSX600F Katana, GSX750F Katana, GSX1100F Katana 1988-1996 годов выпуска и GSX-R750, GSX-R1100 1985-1992 годов выпуска.
- Издательство: Haynes Publishing
- Год издания: —
- Страниц: 256
- Формат: PDF
- Размер: 37,5 Mb
Руководство на французском языке по техническому обслуживанию и ремонту мотоциклов Suzuki GSX-R750T 1996 года выпуска.
- Издательство: —
- Год издания: —
- Страниц: 86
- Формат: PDF
- Размер: 43,1 Mb
Руководство на английском языке по ремонту мотоциклов Suzuki GSX-R750W.
- Издательство: Suzuki Motor Corporation
- Год издания: 1992
- Страниц: 352
- Формат: PDF
- Размер: 50,6 Mb

Руководство на английском языке по ремонту мотоциклов Suzuki GSX-R1000.
- Издательство: Suzuki Motor Corporation
- Год издания: 2000
- Страниц: 424
- Формат: PDF
- Размер: 211,4 Mb
Руководство на английском языке по ремонту мотоциклов Suzuki GSX-R1000.
- Издательство: Suzuki Motor Corporation
- Год издания: 2003
- Страниц: 460
- Формат: PDF
- Размер: 18,8 Mb
Руководство на английском языке по ремонту мотоциклов Suzuki GSX-R1000.
- Издательство: Suzuki Motor Corporation
- Год издания: 2007
- Страниц: 549
- Формат: PDF
- Размер: 48,8 Mb
Руководство на английском языке по эксплуатации и техническому обслуживанию мотоциклов Suzuki GSX-R1100.
- Издательство: Suzuki Motor Corporation
- Год издания: 1988
- Страниц: 90
- Формат: PDF
- Размер: 38,1 Mb
Руководство на английском языке по ремонту мотоциклов Suzuki GSX-R1100.
- Издательство: Suzuki Motor Corporation
- Год издания: 1986
- Страниц: 295
- Формат: PDF
- Размер: 105,4 Mb
Руководство на английском языке по ремонту мотоциклов Suzuki GSX-R1100.
- Издательство: Suzuki Motor Corporation
- Год издания: 1990
- Страниц: 358
- Формат: PDF
- Размер: 50,7 Mb
Руководство на английском языке по ремонту мотоциклов Suzuki GSX-R1100W.
- Издательство: Suzuki Motor Corporation
- Год издания: 1992
- Страниц: 380
- Формат: PDF
- Размер: 52,8 Mb
Руководство на английском языке по ремонту мотоциклов Suzuki GSX-R1300R.
- Издательство: Suzuki Motor Corporation
- Год издания: 2007
- Страниц: 663
- Формат: PDF
- Размер: 26,9 Mb

Материал из BikesWiki — энциклопедия японских мотоциклов
Перейти к: навигация, поиск

Suzuki GSX-R600
Ниже представлены прямые ссылки на скачку сервисной документации.
Для Suzuki GSX-R 600
- Сервисный мануал (Service Manual) на Suzuki GSX-R 600 (1997-2000)
- Сервисный мануал (Service Manual) на Suzuki GSX-R 600 (2001-2003)
- Сервисный мануал (Service Manual) на Suzuki GSX-R 600 (2004-2005)
- Сервисный мануал (Service Manual) на Suzuki GSX-R 600 (2006-2007)
- Сервисный мануал (Service Manual) на Suzuki GSX-R 600 (2008-2009)
- Сервисный мануал (Service Manual) на Suzuki GSX-R 600 (2010-2012)
Обзор модели
- Suzuki GSX-R 600
Источник — «https://bikeswiki.ru/index.php?title=Suzuki_GSX-R600:_мануалы&oldid=9844»
Категория:
- Сервисная документация
-
Page 2
GSX-R1000 9 9 5 0 0 — 3 9 2 7 0 — 0 1 E… -
Page 3: Table Of Contents
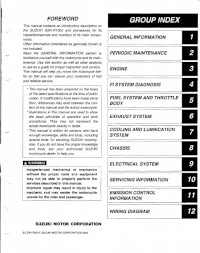
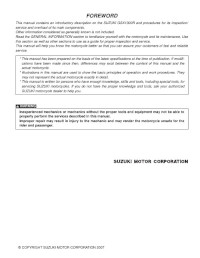
FOREWORD GROUP INDEX This manual contains an introductory description on the SUZUKI GSX-R1000 and procedures for its inspection/service and overhaul of its main compo- GENERAL INFORMATION nents. Other information considered as generally known is not included. PERIODIC MAINTENANCE Read the GENERAL INFORMATION section to familiarize yourself with the motorcycle and its main- tenance.
-
Page 4: How To Use This Manual
HOW TO USE THIS MANUAL TO LOCATE WHAT YOU ARE LOOKING FOR: 1. The text of this manual is divided into sections. 2. The section titles are listed in the GROUP INDEX. 3. Holding the manual as shown at the right will allow you to find the first page of the section easily.
-
Page 5
Use engine coolant. wise specified. 99000-99032-11X (Except USA) Apply molybdenum oil solution. Use fork oil. (Mixture of engine oil and SUZUKI 99000-99044-L01 MOLY PASTE in a ratio of 1:1) Apply SUZUKI SUPER GREASE “A”. 99000-25010 (Others) Apply or use brake fluid. -
Page 6: Abbreviations Used In This Manual
ABBREVIATIONS USED IN THIS MANUAL ABDC : After Bottom Dead Center : Engine Control Module : Alternating Current Engine Control Unit (ECU) : Air Cleaner, Air Cleaner Box (FI Control Unit) : American Petroleum Institute ECT Sensor : Engine Coolant Temperature ATDC : After Top Dead Center Sensor (ECTS), Water Temp.
-
Page 7
: Oil Pressure Switch : Positive Crankcase Ventilation (Crankcase Breather) : Right Hand : Read Only Memory : Society of Automotive Engineers : Suzuki Diagnosis System STC System : Secondary Throttle Control System (STCS) STP Sensor : Secondary Throttle Position Sensor… -
Page 8
WIRE COLOR : Black : Green :Pink : Blue : Gray : Red : Brown : Light blue : White : Dark green : Light green : Yellow : Dark gray : Orange B/Bl : Black with Blue tracer B/Br : Black with Brown tracer : Black with Green tracer B/Lg… -
Page 9: General Information
GENERAL INFORMATION CONTENTS WARNING/CAUTION/NOTE…………….. 1- 2 GENERAL PRECAUTIONS …………….1- 2 SUZUKI GSX-R1000K5 (’05-MODEL)…………1- 4 SERIAL NUMBER LOCATION …………..1- 4 FUEL, OIL AND ENGINE COOLANT RECOMMENDATION……. 1- 5 FUEL (FOR USA AND CANADA)…………1- 5 FUEL (FOR OTHER COUNTRIES) …………1- 5 ENGINE OIL (FOR USA)…………….
-
Page 10: Warning/Caution/Note
1-2 GENERAL INFORMATION WARNING/CAUTION/NOTE Please read this manual and follow its instructions carefully. To emphasize special information, the symbol and the words WARNING, CAUTION and NOTE have special meanings. Pay special attention to the mes- sages highlighted by these signal words. …
-
Page 11
GENERAL INFORMATION 1-3 * If parts replacement is necessary, replace the parts with Suzuki Genuine Parts or their equiva- lent. * When removing parts that are to be reused, keep them arranged in an orderly manner so that they may be reinstalled in the proper order and orientation. -
Page 12: Suzuki Gsx-R1000K5 (’05-Model)
1-4 GENERAL INFORMATION SUZUKI GSX-R1000K5 (’05-MODEL) RIGHT SIDE LEFT SIDE • Difference between photograph and actual motorcycle may exist depending on the markets. SERIAL NUMBER LOCATION The frame serial number or V.I.N. (Vehicle Identification Number) 1 is stamped on the right side of the steering head pipe.
-
Page 13: Fuel, Oil And Engine Coolant Recommendation
Suzuki recommends the use of SUZUKI PERFORMANCE 4 MOTOR OIL or equivalent engine oil. Use of API SF/SG or SH/SJ with JASO MA. Suzuki recommends the use of SAE 10W-40 engine oil. If SAE 10W-40 engine oil is not available, select an alternative according to the following chart.
-
Page 14: Front Fork Oil
Suzuki recommends the use of SUZUKI COOLANT anti-freeze/engine coolant. If this is not available, use an equivalent which is compatible with an aluminum radiator.
-
Page 15: Break-In Procedures
GENERAL INFORMATION 1-7 BREAK-IN PROCEDURES During manufacture only the best possible materials are used and all machined parts are finished to a very high standard but it is still necessary to allow the moving parts to “BREAK-IN” before subjecting the engine to maximum stresses.
-
Page 16: Information Labels
1-8 GENERAL INFORMATION INFORMATION LABELS GSX-R1000 GSX-R1000UF 1 Noise label A (For E-03, 24, 33) 2 Information label A (For E-03, 28, 33) 3 Vacuum hose routing label A (For E-33) 4 Fuel caution label A (For E-02, 24) 5 Fuel information label 6 Manual notice label A (For E-03, 33) 7 Frame caution plate…
-
Page 17: Specifications
GENERAL INFORMATION 1-9 SPECIFICATIONS DIMENSIONS AND DRY MASS Overall length …………….2 030 mm (79.9 in) Overall width …………….710 mm (28.0 in) Overall height …………….1 130 mm (44.5 in) Wheelbase …………….1 405 mm (55.3 in) Ground clearance…………..130 mm (5.1 in) Seat height …………….
-
Page 18: Chassis
1-10 GENERAL INFORMATION CHASSIS Front suspension …………..Inverted telescopic, coil spring, oil damped Rear suspension …………..Link type, coil spring, oil damped Front fork stroke…………..120 mm (4.7 in) Rear wheel travel …………..130 mm (5.1 in) Steering angle…………….. 27° Caster ………………
-
Page 19: Periodic Maintenance
PERIODIC MAINTENANCE 2-1 PERIODIC MAINTENANCE CONTENTS PERIODIC MAINTENANCE SCHEDULE …………. 2- 2 PERIODIC MAINTENANCE CHART…………2- 2 LUBRICATION POINTS …………….. 2- 3 MAINTENANCE AND TUNE-UP PROCEDURES ……..2- 4 AIR CLEANER………………2- 4 SPARK PLUG………………2- 5 VALVE CLEARANCE…………….2- 7 ENGINE OIL AND OIL FILTER …………..
-
Page 20: Periodic Maintenance Schedule
2-2 PERIODIC MAINTENANCE PERIODIC MAINTENANCE SCHEDULE The chart below lists the recommended intervals for all the required periodic service work necessary to keep the motorcycle operating at peak performance and economy. Mileages are expressed in terms of kilome- ters, miles and time for your convenience. NOTE: More frequent servicing may be required on motorcycles that are used under severe conditions.
-
Page 21: Lubrication Points
PERIODIC MAINTENANCE 2-3 LUBRICATION POINTS Proper lubrication is important for smooth operation and long life of each working part of the motorcycle. Major lubrication points are indicated below. Brake lever holder Brake pedal pivot and footrest pivot Clutch lever holder Side-stand pivot Footrest pivot and and spring hook…
-
Page 22: Maintenance And Tune-Up Procedures
2-4 PERIODIC MAINTENANCE MAINTENANCE AND TUNE-UP PROCEDURES This section describes the servicing procedures for each item of the Periodic Maintenance requirements. AIR CLEANER Inspect every 6 000 km (4 000 miles, 12 months). Replace every 18 000 km (11 000 miles, 36 months). •…
-
Page 23: Spark Plug
PERIODIC MAINTENANCE 2-5 SPARK PLUG Inspect every 6 000 km (4 000 miles, 12 months). replace every 12 000 km (7 500 miles, 24 months). SPARK PLUG AND IGNITION COIL/PLUG CAP REMOVAL • Remove the front seat. (8-7) • Lift and support the fuel tank. (5-3) •…
-
Page 24
2-6 PERIODIC MAINTENANCE SPARK PLUG GAP • Measure the spark plug gap with a thickness gauge. • Adjust the spark plug gap if necessary. Spark plug gap: Standard: 0.7 – 0.8 mm (0.028 – 0.031 in) 09900-20803: Thickness gauge ELECTRODE’S CONDITION •… -
Page 25: Valve Clearance
PERIODIC MAINTENANCE 2-7 VALVE CLEARANCE Inspect every 24 000 km (14 500 miles, 48 months). • Remove the right under cowling. (8-5) • Lift and support the fuel tank. (5-3) • Remove the air cleaner box. (5-13) • Disconnect the CMP sensor coupler 1. •…
-
Page 26
2-8 PERIODIC MAINTENANCE • Turn the crankshaft to bring the “Top” line on the starter clutch to the index mark and also to bring the notches A on the left ends of both camshafts (Ex. and In.) to the positions as shown. -
Page 27
PERIODIC MAINTENANCE 2-9 VALVE CLEARANCE ADJUSTMENT The clearance is adjusted by replacing the existing tappet shim by a thicker or thinner shim. • Remove the intake or exhaust camshafts. (3-15) • Remove the tappet and shim by fingers or magnetic hand. •… -
Page 28
2-10 PERIODIC MAINTENANCE (INTAKE SIDE) -
Page 29
PERIODIC MAINTENANCE 2-11 (EXHAUST SIDE) -
Page 30: Engine Oil And Oil Filter
2-12 PERIODIC MAINTENANCE ENGINE OIL AND OIL FILTER (ENGINE OIL) Replace initially at 1 000 km (600 miles, 2 months) and every 6 000 km (4 000 miles, 12 months) thereafter. (OIL FILTER) Replace initially at 1 000 km (600 miles, 2 months) and every 18 000 km (11 000 miles, 36 months) thereafter.
-
Page 31: Exhaust Control Valve
Oil and filter change : 3.3 L (3.5/2.9 US/Imp qt) Engine overhaul : 3.6 L (3.8/3.2 US/Imp qt) ONLY USE A GENUINE SUZUKI MOTORCYCLE OIL FILTER. Other manufacturer’s oil filters may differ in thread specifications (thread diameter and pitch), fil- tering performance and durability which may lead to engine damage or oil leaks.
-
Page 32: Fuel Line
2-14 PERIODIC MAINTENANCE • Remove the two bolts and cover. • Check the lock-nuts tightness. If the lock-nuts are loose, adjust the cable play and tighten the lock-nuts. FUEL LINE Inspect initially 6 000 km (4 000 miles, 12 months). •…
-
Page 33: Throttle Valve Synchronization
PERIODIC MAINTENANCE 2-15 THROTTLE VALVE SYNCHRONIZATION Inspect initially at 1 000 km (600 miles, 2 months) (E-33 only) and every 12 000 km (7 500 miles, 24 moths). Inspect the throttle valve synchronization periodically. (5-26) EVAPORATIVE EMISSION CONTROL SYSTEM (E-33 ONLY) Inspect every 12 000 km (7 500 miles, 24 months).
-
Page 34: Clutch
2-16 PERIODIC MAINTENANCE CLUTCH Inspect every 6 000 km (4 000 miles, 12 months). • Lift and support the fuel tank with its prop stay. (5-3) • Turn in the adjuster 1 all the way into the clutch lever assem- bly.
-
Page 35: Cooling System
PERIODIC MAINTENANCE 2-17 COOLING SYSTEM Inspect every 6 000 km (4 000 miles, 12 months). Replace engine coolant every 2 years. ENGINE COOLANT LEVEL CHECK • Keep the motorcycle upright. • Check the engine coolant level by observing the full and lower lines on the engine coolant reservoir.
-
Page 36
2-18 PERIODIC MAINTENANCE AIR BLEEDING THE COOLING CIRCUIT • Add engine coolant up to the radiator inlet. • Support the motorcycle upright. • Slowly swing the motorcycle, right and left, to bleed the air trapped in the cooling circuit. • Add engine coolant up to the radiator inlet. •… -
Page 37
PERIODIC MAINTENANCE 2-19 RADIATOR HOSES • Remove the under cowlings. (8-5) • Lift and support the fuel tank. (5-3) • Check the radiator hoses for crack, damage or engine coolant leakage. • If any defect is found, replace the radiator hose with new one. -
Page 38: Drive Chain
2-20 PERIODIC MAINTENANCE DRIVE CHAIN Inspect initially at 1 000 km (600 miles, 2 months) and every 6 000 km (4 000 miles, 12 months) thereafter. Clean and lubricate every 1 000 km (600 miles). Visually check the drive chain for the possible defects listed below.
-
Page 39
PERIODIC MAINTENANCE 2-21 • Count out 21 pins (20 pitches) on the chain and measure the distance between the two points. If the distance exceeds the 1 2 3 19 20 21 service limit, the chain must be replaced. Drive chain 20-pitch length: Service limit: 319.4 mm (12.57 in) ADJUSTING •… -
Page 40
* Do not use any oil sold commercially as “drive chain oil”. Such oil can damage the O-rings. * The standard drive chain is DID530 V9. Suzuki rec- ommends to use this standard drive chain as a replacement. -
Page 41: Brake
PERIODIC MAINTENANCE 2-23 BRAKE (BRAKE) Inspect initially at 1 000 km (600 miles, 2 months) and every 6 000 km (4 000 miles, 12 months) thereafter. (BRAKE HOSE AND BRAKE FLUID) Inspect every 6 000 km (4 000 miles, 12 months). Replace hoses every 4 years.
-
Page 42
2-24 PERIODIC MAINTENANCE BRAKE PADS Front brake The extent of brake pad wear can be checked by observing the grooved limit line A on the pad. When the wear exceeds the grooved limit line, replace the pads with the new ones. (8-63) … -
Page 43
PERIODIC MAINTENANCE 2-25 BRAKE PEDAL HEIGHT • Loosen the lock-nut 1. • Turn the push rod 2 until the brake pedal height becomes 55 – 65 mm (2.2 – 2.6 in) A below the top of the footrest. • Tighten the lock-nut 1 securely. … -
Page 44
2-26 PERIODIC MAINTENANCE FRONT BRAKE (Caliper side) • Fill the master cylinder reservoir to the top of the inspection window. Replace the reservoir cap to prevent dirt from enter- ing. • Attach a hose to the air bleeder valve and insert the free end of the hose into a receptacle. -
Page 45: Tires
PERIODIC MAINTENANCE 2-27 TIRES Inspect every 6 000 km (4 000 miles, 12 months). TIRE TREAD CONDITION Operating the motorcycle with excessively worn tires will decrease riding stability and consequently invite a dangerous situation. It is highly recommended to replace a tire when the remaining depth of tire tread reaches the following specification.
-
Page 46: Front Fork
2-28 PERIODIC MAINTENANCE FRONT FORK Inspect every 12 000 km (7 500 miles, 24 months). Inspect the front forks for oil leakage, scoring or scratches on the outer surface of the inner tubes. Replace any defective parts, if necessary. (8-18) REAR SUSPENSION Inspect every 12 000 km (7 500 miles, 24 months).
-
Page 47: Exhaust Pipe Bolt And Nut
PERIODIC MAINTENANCE 2-29 EXHAUST PIPE BOLT AND NUT Tighten initially at 1 000 km (600 miles, 2 months) and every 12 000 km (7 500 miles, 24 months) thereafter. • Tighten the exhaust pipe bolts, muffler mounting bolt and nut to the specified torque.
-
Page 48: Chassis Bolts And Nuts
2-30 PERIODIC MAINTENANCE CHASSIS BOLTS AND NUTS Tighten initially at 1 000 km (600 miles, 2 months) and every 6 000 km (4 000 miles, 12 months) thereafter. Check that all chassis bolts and nuts are tightened to their specified torque. (Refer to page 2-31 for the loca- tions of the following nuts and bolts on the motorcycle.) Item N·m…
-
Page 49
PERIODIC MAINTENANCE 2-31… -
Page 50: Compression Pressure Check
2-32 PERIODIC MAINTENANCE COMPRESSION PRESSURE CHECK The compression pressure reading of a cylinder is a good indicator of its internal condition. The decision to overhaul the cylinder is often based on the results of a compression test. Periodic mainte- nance records kept at your dealership should include compression readings for each maintenance service. COMPRESSION PRESSURE SPECIFICATION Standard Limit…
-
Page 51: Oil Pressure Check
PERIODIC MAINTENANCE 2-33 OIL PRESSURE CHECK Check the engine oil pressure periodically. This will give a good indication of the condition of the moving parts. OIL PRESSURE SPECIFICATION 100 – 400 kPa (1.0 – 4.0 kgf/cm , 14 – 57 psi) at 3 000 r/min, Oil temp. at 60 °C (140 °F) If the oil pressure is lower or higher than the specification, the following causes may be considered.
-
Page 52: Sds Check
2-34 PERIODIC MAINTENANCE SDS CHECK Using SDS, take the sample of data from the new motorcycle and at the time of periodic maintenance at your dealership. Save the data in the computer or by printing and filing the hard copies. The saved or filed data are useful for troubleshooting as they can be compared periodically with changes over time or failure conditions of the motorcycle.
-
Page 53: Data At The Time Of Racing
PERIODIC MAINTENANCE 2-35 Data at 3 000 r/min under no load 3 000 r/min Check the manifold absolute pressure. XXX mmHg Secondary valve moves approx. XX degree. Data at the time of racing Throttle: Slowly open Throttle: Quick wide open Secondary throttle valve opens closes in according with the engine r/min.
-
Page 54
2-36 PERIODIC MAINTENANCE Data of intake negative pressure during idling (100 °C) Check the manifold absolute pressure. Approx. XXX mmHg Data of secondary throttle valve operation at the time of starting Closes fully in approx. XX sec. -
Page 55
ENGINE 3-1 ENGINE CONTENTS ENGINE COMPONENTS REMOVABLE WITH ENGINE IN PLACE … 3- 2 ENGINE REMOVAL AND INSTALLATION……….3- 3 ENGINE REMOVAL …………….3- 3 ENGINE INSTALLATION …………… 3-10 ENGINE DISASSEMBLY …………….3-15 ENGINE COMPONENTS INSPECTION AND SERVICE ………………..3-27 CYLINDER HEAD COVER………….. -
Page 56: Engine Components Removable With Engine In Place
3-2 ENGINE ENGINE COMPONENTS REMOVABLE WITH ENGINE IN PLACE The parts listed below can be removed and reinstalled without removing the engine from the frame. Refer to page listed in each section for removal and reinstallation instructions. ENGINE CENTER ITEM REMOVAL INSPECTION INSTALLATION…
-
Page 57: Engine Removal And Installation
ENGINE 3-3 ENGINE REMOVAL AND INSTALLATION ENGINE REMOVAL Before taking the engine out of the frame, wash the engine using a steam cleaner. Engine removal is sequentially explained in the following steps. Reinstall the engine by reversing the removal procedure. •…
-
Page 58
3-4 ENGINE • Remove the throttle body assembly 2. (5-14) OIL COOLER • Remove the oil cooler pipes. • Remove the oil cooler 1. Be careful not to bent the oil cooler fin. RADIATOR • Disconnect the reservoir inlet hose 1 and radiator inlet hose •… -
Page 59
ENGINE 3-5 • Remove the radiator mounting bolts. • Remove the radiator 4. Be careful not to bent the radiator fin. • Remove the front engine cover 5. EXHAUST PIPE • Remove the exhaust pipe bolts. • With the muffler connecting bolt loosened, remove the exhaust pipe 1. -
Page 60
3-6 ENGINE • Remove the radiator mounting bracket 2. ELECTRIC PARTS AND PAIR HOSE • Disconnect the oil pressure switch lead wire 1. • Disconnect the starter motor lead wire 2. • Disconnect the ground lead wire 3. • Disconnect the CKP sensor coupler 4. •… -
Page 61
ENGINE 3-7 • Disconnect the ignition coil/plug cap lead wire couplers and CMP sensor lead wire coupler. Do not remove the ignition coil/plug cap before dis- connecting its coupler. • Remove the ignition coils/plug caps. * Do not pry up the ignition coil/plug cap with a screw driver or a bar to avoid its damage. -
Page 62
3-8 ENGINE • Remove the speed sensor rotor 4. • Remove the engine sprocket nut 5 and the washer 6. • Remove the cotter pin. (For E-03, 28, 33) • Loosen the rear axle nut 7. • Loosen the chain adjuster lock-nuts. •… -
Page 63
ENGINE 3-9 ENGINE MOUNTING • Support the engine using an engine jack. • Remove the engine mounting bolts A and C. • Loosen the engine mounting pinch bolts 1 and 2. • Remove the engine mounting bolts B and D. •… -
Page 64: Engine Installation
3-10 ENGINE • Remove the engine mounting nut 6. • Loosen the engine mounting thrust adjuster lock-nut 7 with the special tool. • Loosen the engine mounting thrust adjuster 8. 09940-14990: Engine mounting thrust adjuster socket wrench NOTE: Do not remove the engine mounting bolts at this stage. •…
-
Page 65
ENGINE 3-11 • Gradually raise the rear side of the engine assembly, and then put the drive chain on the driveshaft. • Install all engine mounting bolts, spacers and tighten them temporarily. (3-12) Be careful not to catch the wiring harness between the frame and the engine. -
Page 66
3-12 ENGINE LENGTH ITEM N·m kgf-m lb-ft ITEM ABCD 40.0 1.77 54.0 Bolt 2.17 16.5 8.46 16.5 Spacer 30.5 1.20 32.5 Adjuster 1.57 a Left b Right… -
Page 67
• Tighten the speed sensor rotor bolt 3 to the specified torque. Speed sensor rotor bolt: 25 N·m (2.5 kgf-m, 18.0 lb-ft) • Apply SUZUKI SUPER GREASE “A” to the clutch push rod end. 99000-25030: SUZUKI SUPER GREASE “A” (USA) 99000-25010: SUZUKI SUPER GREASE “A”… -
Page 68
3-14 ENGINE • Install the radiator mounting bracket 1. • Install the exhaust pipe 2. Replace the gaskets with new ones. Muffler connecting bolt: 23 N·m (2.3 kgf-m, 16.5 lb-ft) Exhaust pipe bolt: 23 N·m (2.3 kgf-m, 16.5 lb-ft) •… -
Page 69: Engine Disassembly
ENGINE 3-15 ENGINE DISASSEMBLY Identify the position of each removed part. Organize the parts in their respective groups (e.g., intake, exhaust) so that they can be reinstalled in their origi- nal positions. • Remove the spark plugs. (2-5) STARTER MOTOR •…
-
Page 70
3-16 ENGINE • Turn the crankshaft to bring the line A on the starter clutch to the index mark B of the valve timing inspection hole and also to bring the cams to the position as shown. • Remove the cam chain tension adjuster cap bolt 2 and spring. -
Page 71
ENGINE 3-17 CYLINDER HEAD • Remove the water hose 1. • Remove the thermostat cover 2 and thermostat. THERMOSTAT INSPECTION (7-9) • Remove the ECT sensor 3. ECT SENSOR INSPECTION (7-7) • Remove the cylinder head bolts (M6) 4. • Remove the cylinder head bolts and washers. NOTE: When loosening the cylinder head bolts, loosen each bolt little by little diagonally. -
Page 72
3-18 ENGINE • Remove the pressure plate. • Remove the clutch drive plates 1 and driven plates 2. • Remove the clutch push piece 3, bearing 4 and the thrust washer 5. • Remove the spring washer 6 and its seat 7. •… -
Page 73
ENGINE 3-19 • Hold the clutch sleeve hub with the special tool. 09920-53740: Clutch sleeve hub holder • Remove the clutch sleeve hub nut. • Remove the conical spring washer 9, washer 0 and clutch sleeve hub A. • Remove the wave spring washers B and clutch lifter driven cam C. -
Page 74
3-20 ENGINE • Remove the thrust washer I. • Remove the oil pump drive gear J from the primary driven gear assembly K. OIL PUMP • Remove the snap ring 1. • Remove the oil pump driven gear 2. NOTE: Do not drop the snap ring 1 into the crankcase. -
Page 75
ENGINE 3-21 STARTER IDLE GEAR • Remove the starter idle gear cover. • Remove the dowel pins and gasket. • Remove the spring washer 1, washer 2 and starter idle gear No. 1 3. • Remove the shaft 4, bearing 5 and thrust washer 6. •… -
Page 76
3-22 ENGINE STARTER CLUTCH • Hold the starter clutch with the special tool. 09920-34830: Starter clutch holder • Remove the starter clutch bolt and washer. • Remove the starter clutch assembly and washer. CAM CHAIN/CAM CHAIN TENSIONER/CAM CHAIN GUIDE •… -
Page 77
ENGINE 3-23 • Install a bolt A of suitable size to the left end of crankshaft. SUITABLE BOLT A [M12, length: 28 – 38 mm (1.1 – 1.5 in)] • Remove the generator rotor with the special tool. 09930-34980: Rotor remover 28 –… -
Page 78
3-24 ENGINE OIL FILTER • Remove the oil filter with the special tool. (2-13) 09915-40610: Oil filter wrench OIL PAN • Remove the oil pan 1. OIL PRESSURE REGULATOR • Remove the oil pressure regulator 1. OIL PRESSURE SWITCH •… -
Page 79
ENGINE 3-25 TRANSMISSION • Remove the transmission 1 and O-rings. • Remove the dowel pins 2. MIDDLE CRANKCASE • Remove the crankcase bolts. • Remove the crankcase bolts (M6). • Remove the crankcase bolts (M8). • Remove the crankshaft journal bolts (M9). NOTE: Loosen the crankcase bolts diagonally with the smaller sizes first. -
Page 80
3-26 ENGINE PISTON AND CONROD • Push the conrod to cylinder head side and remove the piston and conrod from the upper crankcase. Be careful not to damage the cylinder wall by the con- rod. • Remove the piston pin circlip 1. •… -
Page 81: Engine Components Inspection And Service
ENGINE 3-27 ENGINE COMPONENTS INSPECTION AND SERVICE Identify the position of each removed part. Organize the parts in their respective groups (i.e., intake, exhaust, No.1 or No.2) so that they can be installed in their original locations. CYLINDER HEAD COVER •…
-
Page 82: Camshaft
3-28 ENGINE INSPECTION • Inspect the reed valve for the carbon deposit. • If the carbon deposit is found in the reed valve, replace the PAIR reed valve with a new one. INSTALLATION • Install the PAIR reed valves and PAIR reed valve covers. •…
-
Page 83
ENGINE 3-29 CAMSHAFT JOURNAL WEAR • Determine whether or not each journal is worn down to the limit by measuring the oil clearance with the camshaft installed in place. • Use the plastigauge 1 to read the clearance at the widest portion, which is specified as follows: … -
Page 84: Camshaft Runout
3-30 ENGINE • If the camshaft journal oil clearance measured exceeds the limit, measure the inside diameter of the camshaft journal holder and outside diameter of the camshaft journal. • Replace the camshaft or the cylinder head depending upon which one exceeds the specification. …
-
Page 85: Cam Chain Tensioner
ENGINE 3-31 CAM CHAIN TENSIONER INSPECTION • Check the contacting surface of the cam chain tensioner. • If it is worn or damaged, replace it with a new one. CAM CHAIN GUIDE INSPECTION • Check the contacting surfaces of the cam chain guides. •…
-
Page 86
3-32 ENGINE • When compressing the valve spring, use a protector that is handcrafted from a 35-mm film cartridge as shown in the right illustration. For intake side For exhaust side A 7 mm (0.28 in) A 7 mm (0.28 in) B 46 mm (1.81 in) B 46 mm (1.81 in) C 24 mm (0.95 in) -
Page 87
ENGINE 3-33 • Remove the oil seal 8 and spring seat 9. Do not reuse the removed oil seal. • Remove the other valves in the same manner as described previously. CYLINDER HEAD DISTORTION • Decarbonize the combustion chambers. •… -
Page 88
3-34 ENGINE VALVE STEM AND VALVE FACE WEAR CONDITION • Visually inspect each valve stem and valve face for wear and pitting. If it is worn or damaged, replace the valve with a new one. VALVE STEM DEFLECTION • Lift the valve about 10 mm (0.39 in) from the valve seat. •… -
Page 89
ENGINE 3-35 VALVE GUIDE SERVICING • Using the valve guide remover, drive the valve guide out toward the intake or exhaust camshaft side. 09916-53310: Valve guide remover/installer NOTE: * Discard the removed valve guide subassemblies. * Only oversized valve guides are available as replacement parts. -
Page 90
3-36 ENGINE • After installing the valve guides, re-finish their guiding bores using the reamer. • Clean and oil the guides after reaming. 09916-33210: Valve guide reamer 09916-34542: Reamer handle NOTE: * Be sure to cool down the cylinder head to ambient air temper- ature. -
Page 91
ENGINE 3-37 VALVE SEAT SERVICING • The valve seats 1 for both the intake valve 2 and exhaust valve 3 are machined to four different angles. The seat con- ˚ tact surface is cut at 45°. ˚ ˚ ˚ ˚ ˚… -
Page 92
3-38 ENGINE • If the valve seat is pitted or burned, use the 45° cutter to con- dition the seat some more. NOTE: Cut only the minimum amount necessary from the seat to pre- vent the possibility of the valve stem becoming too close to the camshaft. -
Page 93
ENGINE 3-39 FINAL SEAT CUT • If the contact area W is too low or too narrow, use the 45° cut- ter to raise and widen the contact area. NOTE: After cutting the 15°, 30° and 60° angles, it is possible that the valve seat (45°) is too narrow. -
Page 94
3-40 ENGINE • Clean and assemble the head and valve components. Fill the intake and exhaust ports with gasoline to check for leaks. • If any leaks occur, inspect the valve seat and face for burrs or other things that could prevent the valve from sealing. … -
Page 95
ENGINE 3-41 VALVE AND VALVE SPRING REASSEMBLY • Install the valve spring seat. • Apply MOLYBDENUM OIL SOLUTION to the oil seal 1, and press-fit it into position. MOLYBDENUM OIL SOLUTION Do not reuse the removed oil seal. •… -
Page 96
* When seating the tappet shim, be sure the figure printed sur- face faces the tappet. INTAKE PIPE • Remove the intake pipes. • Apply SUZUKI SUPER GREASE to the O-rings. 99000-25030: SUZUKI SUPER GREASE “A” (USA) 99000-25010: SUZUKI SUPER GREASE “A” (Others) • Install the intake pipes. -
Page 97: Clutch
ENGINE 3-43 WATER BYPASS UNION • Remove the water bypass union 1. • Apply SUZUKI BOND to the thread part of water bypass union and tighten it to the specified torque. 99104-31140: SUZUKI BOND “1207B” (USA) 99000-31140: SUZUKI BOND “1207B” (Others) …
-
Page 98
3-44 ENGINE CLUTCH DRIVEN PLATE INSPECTION NOTE: Wipe off engine oil from the clutch driven plates with a clean rag. • Measure each driven plate for distortion with a thickness gauge and surface plate. • Replace driven plates which exceed the limit. … -
Page 99: Clutch Lifter
ENGINE 3-45 CLUTCH LIFTER CLUTCH LIFTER DRIVE CAM AND DRIVEN CAM INSPEC- TION • Inspect the clutch lifter drive cam and driven cam for wear or damage. If any defects are found, replace the clutch lifter drive cam and driven cam as a set. CLUTCH LIFTER PIN ADJUSTMENT NOTE: When adjusting the clutch lifter, it is not necessary to install the…
-
Page 100: Oil Pump
3-46 ENGINE • Check the height H of clutch lifter adjusting pin screws at three positions using the thickness gauge. • If the measurement is out of the specification, adjust the height H as shown in the following specification. Clutch lifter adjusting pin screw height H Standard: 0.2 –…
-
Page 101: Starter Clutch
ENGINE 3-47 STARTER CLUTCH INSPECTION • Install the starter driven gear 1 onto the starter clutch 2. • Turn the starter driven gear by hand. • Inspect the starter clutch for a smooth movement. • Check that the gear turns only in one direction. •…
-
Page 102: Water Pump
3-48 ENGINE WATER PUMP 7-13 GEARSHIFT SYSTEM GEARSHIFT SHAFT/GEARSHIFT ARM DISASSEMBLY • Remove the following parts from the gearshift shaft/gearshift arm. 1 Washer 4 Gearshift cam drive plate 2 Snap ring 5 Plate return spring 3 Gearshift shaft return spring GEARSHIFT SHAFT/GEARSHIFT ARM INSPECTION •…
-
Page 103: Oil Pressure Regulator
ENGINE 3-49 OIL PRESSURE REGULATOR • Inspect the operation of the oil pressure regulator by pushing on the piston with a proper bar. • If the piston does not operate, replace the oil pressure regula- tor with a new one. OIL STRAINER •…
-
Page 104: Transmission
3-50 ENGINE TRANSMISSION DISASSEMBLY Disassemble the countershaft and driveshaft. Pay attention to the following points: • Remove the 6th drive gear snap ring 1 from its groove and slide it towards the 3rd/4th drive gears 2. • Slide the 6th 3 and 2nd 4 drive gears toward the 3rd/4th drive gears 2, then remove the 2nd drive gear circlip 5.
-
Page 105
Replace the bearings if there is anything unusual. * Before installing the gears, apply engine oil to the driveshaft and countershaft. * When installing the oil seal, apply SUZUKI SUPER GREASE “A” to it. 99000-25030: SUZUKI SUPER GREASE “A” (USA) 99000-25010: SUZUKI SUPER GREASE “A”… -
Page 106
3-52 ENGINE TRANSMISSION PARTS LOCATION 1 Countershaft 2 Driveshaft… -
Page 107: Cylinder
ENGINE 3-53 CYLINDER CRANKCASE SERVICING (3-56) CYLINDER DISTORTION • Check the gasketed surface of the cylinder for distortion with a straightedge and thickness gauge, taking a clearance read- ing at several places as indicated. • If the largest reading at any position of the straightedge exceeds the limit, replace the crankcase set.
-
Page 108: Piston And Piston Ring
3-54 ENGINE PISTON AND PISTON RING PISTON DIAMETER • Using a micrometer, measure the piston outside diameter at 15 mm (0.6 in) A from the piston skirt end. • If the measurement is less than the limit, replace the piston. …
-
Page 109: Piston Ring Groove Width
ENGINE 3-55 PISTON RING-TO-GROOVE CLEARANCE • Measure the side clearances of the 1st and 2nd piston rings using the thickness gauge. • If any of the clearances exceeds the limit, replace both the piston and piston rings. 09900-20803: Thickness gauge 09900-20205: Micrometer (0 –…
-
Page 110: Crankcase
3-56 ENGINE CRANKCASE GEARSHIFT FORK AND GEARSHIFT CAM Removal • Remove the gearshift cam bearing retainer screws 1 and gearshift fork shaft retainer 2 from the lower crankcase. • Remove the gearshift fork shafts 3 and gearshift forks 4 from the lower crankcase. •…
-
Page 111
ENGINE 3-57 GEARSHIFT FORK THICKNESS • Measure the gearshift fork thickness using the vernier cali- pers. Shift fork thickness: Standard: 4.8 – 4.9 mm (0.189 – 0.193 in) 09900-20102: Vernier calipers GEARSHIFT CAM BEARING AND GEARSHIFT SHAFT BEARING Bearing inspection •… -
Page 112
• Install the oil seal with the special tool. 09913-70210: Bearing installer set (22) • Apply SUZUKI SUPER GREASE “A” to the oil seal lip. 99000-25030: SUZUKI SUPER GREASE “A” (USA) 99000-25010: SUZUKI SUPER GREASE “A” (Others) •… -
Page 113
ENGINE 3-59 • Install the gearshift forks and their shafts as shown. 6 For 3rd/4th drive gears 7 For 6th driven gear 8 For 5th driven gear • Apply a small quantity of THREAD LOCK to the bearing retainer screws 9. •… -
Page 114
3-60 ENGINE OIL JET Removal • Remove the piston cooling oil jets 1 from the upper crank- case. • Remove the oil jet 2 (for transmission) from the lower crank- case. • Remove the oil jet 3 (for cam chain tension adjuster) from the cylinder head. -
Page 115
ENGINE 3-61 Installation • Fit the new O-ring 1 to each piston cooling oil jet as shown and apply engine oil to them. Use the new O-rings to prevent oil pressure leak. • Install each piston cooling oil jet with the bolt. NOTE: Apply a small quantity of THREAD LOCK to the bolts and tighten them to the specified torque. -
Page 116
• Remove the oil gallery plugs 4 (for lower crankcase side). Installation • Apply engine coolant to the O-ring of the water jacket plug 1. 99000-99032-11X: SUZUKI COOLANT (Except USA) • Apply THREAD LOCK to the oil gallery plug 2. 99000-32050: THREAD LOCK “1342”… -
Page 117: Balancer Shaft
ENGINE 3-63 BALANCER SHAFT DISASSEMBLY • Remove the balancer gear along with the dampers from the balancer shaft. INSPECTION • Inspect the damper for wear and damage, replace it if any defects are found. REASSEMBLY • Apply MOLYBDENUM OIL SOLUTION to each part. …
-
Page 118
3-64 ENGINE • Remove the middle crankcase and measure the width of the compressed plastigauge using the envelope scale. This mea- surement should be taken at the widest part of the com- pressed plastigauge. Balancer shaft journal oil clearance: Standard: 0.028 –… -
Page 119: Crankshaft And Conrod
ENGINE 3-65 INSTALLATION • When fitting the balancer shaft journal bearings to the upper and middle crankcases, be sure to fix the stopper part A first and press the other end. Do not touch the bearing surfaces with your hands. Grasp by the edge of the bearing shell.
-
Page 120
3-66 ENGINE CONROD BIG END SIDE CLEARANCE • Inspect the conrod side clearance by using a thickness gauge. • If the clearance exceeds the limit, remove the conrod and inspect the conrod big end width and the crank pin width. •… -
Page 121
ENGINE 3-67 *1: The number faces the intake side. • Remove the bearing caps and measure the width of the com- pressed plastigauge using the envelope scale. This measure- ment should be taken at the widest part of the compressed plastigauge. -
Page 122
3-68 ENGINE Crank pin O.D. Code O.D. specification 34.992 – 35.000 mm (1.3776 – 1.3780 in) 34.984 – 34.992 mm (1.3773 – 1.3776 in) 34.976 – 34.984 mm (1.3770 – 1.3773 in) 09900-20202: Micrometer (25 – 50 mm) … -
Page 123: Crankshaft Journal Bearing
ENGINE 3-69 CRANKSHAFT JOURNAL BEARING INSPECTION • Inspect each bearing of upper and middle crankcases for any damage. SELECTION • Place the plastigauge axially along the crankshaft journal, avoiding the oil hole, as shown. 09900-22301: Plastigauge Never rotate the crankshaft when a piece of plasti- gauge is installed.
-
Page 124
3-70 ENGINE • Check the corresponding crankcase journal I.D. code number A, “A”, “B” or “C” which is stamped on the rear of upper crankcase. • Check the corresponding crankshaft journal O.D. code num- ber B, “A”, “B” or “C” which is stamped on the crankshaft. … -
Page 125
ENGINE 3-71 Crankshaft journal O.D. specification Code O.D. specification 34.994 – 35.000 mm (1.3777 – 1.3780 in) 34.988 – 34.994 mm (1.3775 – 1.3777 in) 34.982 – 34.988 mm (1.3772 – 1.3775 in) 09900-20202: Micrometer (25 – 50 mm) … -
Page 126: Crankshaft Thrust Bearing
3-72 ENGINE CRANKSHAFT THRUST BEARING • With the crankshaft, right-side thrust bearing and left-side thrust bearing inserted in the upper crankcase, measure the thrust clearance on the left side by using the thickness gauge. L: Left-side thrust bearing R: Right-side thrust bearing NOTE: Pull the crankshaft to the generator side, so that there is no clearance on the right-side thrust bearing.
-
Page 127
ENGINE 3-73 Thrust bearing selection table Clearance before Color Thrust bearing inserting left-side Thrust clearance (Part No.) thickness thrust bearing 2.570 – 2.590 mm Brown 2.480 – 2.500 mm 0.070 – 0.110 mm (0.1012 – 0.1020 in) (12228-48B00-0B0) (0.0976 – 0.0984 in) (0.0028 –… -
Page 128: Engine Reassembly
3-74 ENGINE ENGINE REASSEMBLY • Reassemble the engine in the reverse order of disassembly. • The following steps require special attention or precautionary measures should be taken. NOTE: Apply engine oil to each running and sliding part before reas- sembling. •…
-
Page 129
ENGINE 3-75 • Be sure to bring the concave side of 1st ring to the top when fitting it to the piston. • 2nd ring has letters “T” marked on the side. Be sure to bring the marked side ring to the top when fitting it to the piston. •… -
Page 130
3-76 ENGINE • Install the pistons and conrods into the cylinders from upside. NOTE: When installing the pistons, the indent C of each piston head must be brought to the exhaust side. Be careful not to damage the cylinder wall and piston jet by the conrod. -
Page 131
ENGINE 3-77 • Set the crankshaft to the conrods and upper crankcase. • Apply a MOLYBDENUM OIL SOLUTION to the crank pin and bearing surface. MOLYBDENUM OIL SOLUTION Be sure to clean the conrod big end. • When fitting the conrod cap, make sure that I.D. code A on each conrod faces intake side. -
Page 132
3-78 ENGINE • Insert the right and left-thrust bearings with oil groove B fac- ing the crank web. NOTE: Right-thrust bearing has green painting. BALANCER SHAFT • Install the thrust washers 1, 2 and oil seal 3. • Apply a MOLYBDENUM OIL SOLUTION to each balancer shaft journal and bearing lightly. -
Page 133
ENGINE 3-79 • Apply SUZUKI BOND to the mating surface of the middle crankcase. 99104-31140: SUZUKI BOND “1207B” (USA) 99000-31110: SUZUKI BOND “1215” (Others) NOTE: Use of SUZUKI BOND is as follows: * Make surfaces free from moisture, oil, dust and other foreign materials. -
Page 134
3-80 ENGINE • Tighten the other crankcase bolts a little at a time to equalize the pressure. Crankcase bolt: (M6) Initial: 6 N·m (0.6 kgf-m, 4.5 lb-ft) Final : 11 N·m (1.1 kgf-m, 8.0 lb-ft) (M8) Initial : 15 N·m (1.5 kgf-m, 11.0 lb-ft) Final : 26 N·m (2.6 kgf-m, 19.0 lb-ft) NOTE: Fit a new gasket washer to the crankcase bolt A. -
Page 135
ENGINE 3-81 TRANSMISSION • Install the bearing pins 1 and the C-rings 2 on the middle crankcase. • Install the countershaft assembly on the middle crankcase. NOTE: Align the C-ring with the groove of bearing and the bearing pin with the indent on the bearing. •… -
Page 136
3-82 ENGINE • Apply SUZUKI BOND to the mating surface of the lower crankcase. 99104-31140: SUZUKI BOND “1207B” (USA) 99000-31110: SUZUKI BOND “1215” (Others) NOTE: Use of SUZUKI BOND is as follows: * Make surfaces free from moisture, oil, dust and other foreign materials. -
Page 137
• Check that the driveshaft and countershaft rotate smoothly. OIL STRAINER • Install the O-ring. • Apply SUZUKI SUPER GREASE “A” to the O-ring. 99000-25030: SUZUKI SUPER GREASE “A” (USA) 99000-25010: SUZUKI SUPER GREASE “A” (Others) … -
Page 138
99104-31140: SUZUKI BOND “1207B” (USA) 99000-31140: SUZUKI BOND “1207B” (Others) Oil pressure switch: 14 N·m (1.4 kgf-m, 10.0 lb-ft) NOTE: Be careful not to apply SUZUKI BOND to the hole of thread end. -
Page 139
• Install the breather cover 2. Breather cover bolt: 10 N·m (1.0 kgf-m, 7.0 lb-ft) GEAR POSITION SWITCH • Apply SUZUKI SUPER GREASE “A” to the O-ring. NOTE: Align the gear position switch pin A with the gearshift cam hole … -
Page 140
3-86 ENGINE WATER PUMP • Apply SUZUKI SUPER GREASE “A” to the O-ring. Use a new O-ring to prevent oil leakage. 99000-25030: SUZUKI SUPER GREASE “A” (USA) 99000-25010: SUZUKI SUPER GREASE “A” (Others) • Tighten the water pump mounting bolts 1 to the specified torque. -
Page 141
09930-44520: Rotor holder Generator rotor bolt: 120 N·m (12.0 kgf-m, 87.0 lb-ft) GENERATOR COVER • Apply SUZUKI BOND lightly to the mating surfaces at the parting line between the upper and middle crankcases as shown. 99104-31140: SUZUKI BOND “1207B” (USA) 99000-31140: SUZUKI BOND “1207B”… -
Page 142
3-88 ENGINE • Apply SUZUKI BOND lightly to the groove of signal generator lead wire grommet. 99104-31140: SUZUKI BOND “1207B” (USA) 99000-31140: SUZUKI BOND “1207B” (Others) CAM CHAIN DRIVE SPROCKET • Install the cam chain drive sprocket onto the crankshaft. -
Page 143
• Install the starter idle gear No. 2 1, shaft 2 and spring washer 3. • Apply SUZUKI BOND lightly to the mating surfaces A at the parting line between the upper and middle crankcases and surface B as shown. -
Page 144
3-90 ENGINE • Install the starter idle gear No. 1 shaft 6, thrust washer 7, bearing 8, starter idle gear No. 1 9, washer 0, and spring washer A. • Install the dowel pins B and new gasket C. Use a new gasket to prevent oil leakage. -
Page 145
ENGINE 3-91 • Install the gearshift cam stopper plate 6. NOTE: Align the gearshift cam pin B with the gearshift cam stopper plate hole C. • Apply a small quantity of THREAD LOCK to the gearshift cam stopper plate bolt and tighten it to the specified torque. … -
Page 146
3-92 ENGINE OIL PUMP • Install the O-ring to the oil pump and apply SUZUKI SUPER GREASE “A” to it. Use a new O-ring to prevent oil leakage. NOTE: Set the oil pump shaft end A to the water pump shaft. -
Page 147
ENGINE 3-93 • Install the oil pump drive gear 1 to the primary driven gear assembly 2. • Install the primary driven gear assembly 2. NOTE: * If it is difficult to install the primary driven gear, rotate the crankshaft. * Be sure to engage the oil pump driven gear with the drive gear and the primary driven gear with the drive gear. -
Page 148
3-94 ENGINE • Install the clutch sleeve hub assembly 9 onto the counter- shaft. • Install the washer 0 and spring washer A. NOTE: * Before installing the washer 0, visually inspect the washer surface for wear and damage. If necessary, replace it with a new one. -
Page 149
ENGINE 3-95 • Install the clutch push rod D into the countershaft. • Install the clutch push piece E, bearing F and thrust washer G to the countershaft. NOTE: Thrust washer G is located between the pressure plate and bearing F. •… -
Page 150
3-96 ENGINE *1: Direction of outside *2: Paint DRIVE PLATE: a No. 2 Drive plate..1 pc. [Black paint/I.D. 111 mm (4.4 in)] b No. 1 Drive plate..8 pcs. [Purple paint/I.D. 111 mm (4.4 in)] c No. 3 Drive plate..1 pc. [NIL/I.D. 118 mm (4.6 in)] NOTE: No.3 drive plate can be distinguished by the inside diameter (I.D.). -
Page 151
* Tighten the clutch spring set bolts diagonally. * After mounting the engine, adjust the push rod. (2-16) CLUTCH COVER • Apply SUZUKI BOND lightly to the mating surfaces at the parting line between the upper, middle and lower crankcases as shown. -
Page 152
3-98 ENGINE CYLINDER HEAD • Fit the dowel pins 1 and new cylinder head gasket 2 to the cylinder. Use a new gasket to prevent gas leakage. • Place the cylinder head on the cylinder. NOTE: When installing the cylinder head, keep the cam chain taut. •… -
Page 153
ENGINE 3-99 • Fit the gasket 3 and tighten the ECT sensor. ECT sensor: 18 N·m (1.8 kgf-m, 13.0 lb-ft) • Install the thermostat 4. NOTE: The jiggle valve A of thermostat faces upside. • Install the thermostat cover 5. … -
Page 154
3-100 ENGINE CAMSHAFT • Turn the crankshaft clockwise with the box wrench and align the line A on the starter clutch with the index mark B of valve timing inspection hole while keeping the cam chain pulled upward. Pull the cam chain upward, or the chain will be caught between crankcase and cam drive sprocket. -
Page 155
ENGINE 3-101 • Pull the cam chain lightly. • The exhaust camshaft sprocket has an arrow marked “1” C. Turn the exhaust camshaft so that the arrow is aligned with the gasket surface of the cylinder head. • Engage the cam chain with the exhaust camshaft sprocket. •… -
Page 156
3-102 ENGINE • Install the dowel pins 3. • Install the camshaft journal holders, intake and exhaust, and cam chain guide. • Have the camshaft journal holders seated evenly by tighten- ing the camshaft journal holder bolts lightly, in the ascending order of numbers. -
Page 157
ENGINE 3-103 CAM CHAIN TENSION ADJUSTER • Retract the push rod by pushing the stopper 1. • Install a new gasket 2. Use a new gasket to prevent oil leakage. • Install the cam chain tension adjuster 3 and tighten its mounting bolts. -
Page 158
3-104 ENGINE 23 N·m (2.3 kgf-m, 16.5 lb-ft) 10 N·m (1.0 kgf-m, 7.0 lb-ft) -
Page 159
• Install the dowel pins. • Install the O-rings. • Install the new gaskets to the cylinder head cover. • Apply SUZUKI BOND to the cam end caps of the gaskets as shown. 99104-31140: SUZUKI BOND “1207B” (USA) 99000-31140: SUZUKI BOND “1207B” (Others) … -
Page 160
3-106 ENGINE STARTER MOTOR • Apply SUZUKI SUPER GREASE to the O-ring. 99000-25030: SUZUKI SUPER GREASE “A” (USA) 99000-25010: SUZUKI SUPER GREASE “A” (Others) • Install the starter motor 1. Starter motor mounting bolt: 10 N·m (1.0 kgf-m, 7.0 lb-ft) -
Page 161: Fi System Diagnosis
FI SYSTEM DIAGNOSIS 4-1 FI SYSTEM DIAGNOSIS CONTENTS PRECAUTIONS IN SERVICING …………..4- 3 ELECTRICAL PARTS …………….4- 3 FUSE………………….. 4- 4 ECM/VARIOUS SENSORS …………..4- 4 ELECTRICAL CIRCUIT INSPECTION PROCEDURE……4- 6 USING THE MULTI-CIRCUIT TESTER……….4- 9 FI SYSTEM TECHNICAL FEATURES…………4-10 INJECTION TIME (INJECTION VOLUME) ……….
-
Page 162
4-2 FI SYSTEM DIAGNOSIS FI SYSTEM DIAGNOSIS CONTENTS “C31” (P0705) GP SWITCH CIRCUIT MALFUNCTION……4-73 “C32” (P0201), “C33” (P0202), “C34” (P0203) or “C35” (P0204) PRIMARY FUEL INJECTOR CIRCUIT MALFUNCTION ……. 4-75 “C36” (P1764), “C37” (P1765), “C38” (P1766) or “C39” (P1767) SECONDARY FUEL INJECTOR CIRCUIT MALFUNCTION…. -
Page 163: Precautions In Servicing
FI SYSTEM DIAGNOSIS 4-3 PRECAUTIONS IN SERVICING When handling the component parts or servicing the FI system, observe the following points for the safety of the system. ELECTRICAL PARTS CONNECTOR/COUPLER • When connecting a connector, be sure to push it in until a Click click is felt.
-
Page 164: Fuse
4-4 FI SYSTEM DIAGNOSIS • When connecting meter probe from the terminal side of the coupler (where connection from harness side not being possi- ble), use extra care not to force and cause the male terminal to bend or the female terminal to open. Connect the probe as shown to avoid opening of female ter- minal.
-
Page 165
FI SYSTEM DIAGNOSIS 4-5 • When disconnecting and connecting the ECM, make sure to turn OFF the ignition switch 1, or electronic parts may get damaged. INCORRECT • Battery connection in reverse polarity is strictly prohibited. Such a wrong connection will damage the components of the FI system instantly when reverse power is applied. -
Page 166: Electrical Circuit Inspection Procedure
4-6 FI SYSTEM DIAGNOSIS ELECTRICAL CIRCUIT INSPECTION PROCEDURE While there are various methods for electrical circuit inspection, described here is a general method to check for open and short circuit using an ohmmeter and a voltmeter. OPEN CIRCUIT CHECK Possible causes for the open circuits are as follows. As the cause can exist in the connector/coupler or terminal, they need to be checked carefully.
-
Page 167
FI SYSTEM DIAGNOSIS 4-7 Continuity check • Measure resistance across coupler B (between A and C in the figure). If no continuity is indicated (infinity or over limit), the circuit is open between terminals A and C. 1 ECM • Disconnect the coupler B and measure resistance between couplers A and B. -
Page 168
4-8 FI SYSTEM DIAGNOSIS SHORT CIRCUIT CHECK (WIRE HARNESS TO GROUND) • Disconnect the negative cable from the battery. • Disconnect the connectors/couplers at both ends of the circuit to be checked. NOTE: If the circuit to be checked branches to other parts as shown, disconnect all connectors/couplers of those parts. -
Page 169: Using The Multi-Circuit Tester
FI SYSTEM DIAGNOSIS 4-9 USING THE MULTI-CIRCUIT TESTER • Use the Suzuki multi-circuit tester set (09900-25008). • Use well-charged batteries in the tester. • Be sure to set the tester to the correct testing range. USING THE TESTER • Incorrectly connecting the + and — probes may cause the inside of the tester to burnout.
-
Page 170: Fi System Technical Features
4-10 FI SYSTEM DIAGNOSIS FI SYSTEM TECHNICAL FEATURES INJECTION TIME (INJECTION VOLUME) The factors to determine the injection time include the basic fuel injection time, which is calculated on the basis of intake air pressure, engine speed and throttle opening angle, and various compensations. These compensations are determined according to the signals from various sensors that detect the engine and driving conditions.
-
Page 171: Compensation Of Injection Time (Volume)
FI SYSTEM DIAGNOSIS 4-11 COMPENSATION OF INJECTION TIME (VOLUME) The following different signals are output from the respective sensors for compensation of the fuel injection time (volume). SIGNAL DESCRIPTION ATMOSPHERIC PRESSURE SENSOR When atmospheric pressure is low, the sensor sends the SIGNAL signal to the ECM and reduce the injection time (volume).
-
Page 172: Fi System Parts Location
4-12 FI SYSTEM DIAGNOSIS FI SYSTEM PARTS LOCATION A Intake air temperature sensor (IATS) B Throttle position sensor (TPS) C Secondary throttle position sensor (STPS) D Secondary throttle valve actuator (STVA) E Exhaust control valve actuator (EXCVA) F Fuel pump relay (FP RELAY) G Fuel pump (FP) H Crankshaft position sensor (CKPS)
-
Page 173
FI SYSTEM DIAGNOSIS 4-13 I Tip-over sensor (TOS) J Atmospheric pressure sensor (APS) K Intake air pressure sensor (IAPS) L Engine coolant temperature sensor (ECTS) M Speed sensor N Camshaft position sensor (CMPS) O Ignition coil (IG COIL) P PAIR control solenoid valve Q Secondary fuel injector R Primary fuel injector S Speedometer… -
Page 174: Fi System Wiring Diagram
4-14 FI SYSTEM DIAGNOSIS FI SYSTEM WIRING DIAGRAM…
-
Page 175: Ecm Terminal
FI SYSTEM DIAGNOSIS 4-15 ECM TERMINAL TERMINAL TERMINAL CIRCUIT CIRCUIT STVA signal (STVA. 2A) STVA signal (STVA. 2B) STVA signal (STVA. 1A) STVA signal (STVA. 1B) EXCVA power (MO–) STP sensor signal (STP) EXCVA power (MO+) Ignition switch signal [For E-03, 28, 33] EXCVA position sensor (MPS) TO sensor signal (TOS) Serial data for speedometer…
-
Page 176
4-16 FI SYSTEM DIAGNOSIS TERMINAL TERMINAL CIRCUIT CIRCUIT — — — — Tachometer — Immobilizer communication Immobilizer communication [For E-02, 19, 24] [For E-02, 19, 24] Fuel pump relay (FP Relay) — Starter relay Mode select switch Blank Neutral switch —… -
Page 177: Self-Diagnosis Function
FI SYSTEM DIAGNOSIS 4-17 SELF-DIAGNOSIS FUNCTION The self-diagnosis function is incorporated in the ECM. The function has two modes, “User mode” and “Dealer mode”. The user can only be notified by the LCD (DISPLAY) panel and LED (FI light). To check the function of the individual FI system devices, the dealer mode is provided.
-
Page 178: Dealer Mode
4-18 FI SYSTEM DIAGNOSIS DEALER MODE The defective function is memorized in the computer. Use the special tool’s coupler to connect to the dealer mode coupler. The memorized malfunction code is displayed on LCD (DISPLAY) panel. Malfunction means that the ECM does not receive signal from the devices. These affected devices are indicated in the code form.
-
Page 179
FI SYSTEM DIAGNOSIS 4-19 CODE MALFUNCTION PART REMARKS None No defective part Camshaft position sensor (CMPS) Crankshaft position sensor (CKPS) Pick-up coil signal, signal generator Intake air pressure sensor (IAPS) Throttle position sensor (TPS) Engine coolant temperature sensor (ECTS) Intake air temperature sensor (IATS) Atmospheric pressure sensor (APS) Tip-over sensor (TOS) Ignition signal #1 (IG coil #1) -
Page 180: Tps Adjustment
4-20 FI SYSTEM DIAGNOSIS TPS ADJUSTMENT 1. Adjust the engine rpm to 1 150 r/min. (2-14) 2. Connect the special tool (Mode select switch) to the dealer mode coupler at the wiring harness. 3. If the throttle position sensor adjustment is necessary, loosen the screw and turn the throttle position sensor 1 and bring the line to the middle.
-
Page 181: Fail-Safe Function
FI SYSTEM DIAGNOSIS 4-21 FAIL-SAFE FUNCTION FI system is provided with fail-safe function to allow the engine to start and the motorcycle to run in a mini- mum performance necessary even under malfunction condition. STARTING RUNNING ITEM FAIL-SAFE MODE ABILITY ABILITY CMP sensor When camshaft position signal has…
-
Page 182
4-22 FI SYSTEM DIAGNOSIS STARTING RUNNING ITEM FAIL-SAFE MODE ABILITY ABILITY Secondary injection signal #1 Fuel-cut (secondary side) — “YES” #2, #3 & #4 cylinders can run. #2 Fuel-cut (secondary side) — “YES” #1, #3 & #4 cylinders can run. #3 Fuel-cut (secondary side) —… -
Page 183: Fi System Troubleshooting
FI SYSTEM DIAGNOSIS 4-23 FI SYSTEM TROUBLESHOOTING CUSTOMER COMPLAINT ANALYSIS Record details of the problem (failure, complaint) and how it occurred as described by the customer. For this purpose, use of such an inspection form such as below will facilitate collecting information required for proper analysis and diagnosis.
-
Page 184: Visual Inspection
4-24 FI SYSTEM DIAGNOSIS MOTORCYCLE/ENVIRONMENTAL CONDITION WHEN PROBLEM OCCURS Environmental condition Weather Fair Cloudy Rain Snow Always Other Temperature Warm Cool Cold ( °C/ °F) Always Frequency Always Sometimes ( times/ day, month) Only once Under certain condition Road Urban Suburb Highway Mountainous (…
-
Page 185: Self-Diagnostic Procedures
FI SYSTEM DIAGNOSIS 4-25 SELF-DIAGNOSTIC PROCEDURES NOTE: * Don’t disconnect couplers from the ECM, the battery cable from the battery, ECM ground wire harness from the engine or main fuse before confirming the malfunction code (self-diag- nostic trouble code) stored in memory. Such disconnection will erase the memorized information in ECM memory.
-
Page 186: Use Of Sds Diagnostic Procedures
4-26 FI SYSTEM DIAGNOSIS USE OF SDS DIAGNOSTIC PROCEDURES * Don’t disconnect couplers from ECM, the battery cable from the battery, ECM ground wire harness from the engine or main fuse before confirming the malfunction code (self-diagnostic trouble code) stored in memory. Such disconnection will erase the memorized information in ECM memory.
-
Page 187: Use Of Sds Diagnosis Reset Procedure
FI SYSTEM DIAGNOSIS 4-27 USE OF SDS DIAGNOSIS RESET PROCE- DURE • After repairing the trouble, turn OFF the ignition switch and turn ON again. • Click the DTC inspection button 1. • Check the DTC. • The previous malfunction history code (Past DTC) still remains stored in the ECM.
-
Page 188: Show Data When Trouble (Displaing Data At The Time Of Dtc)
4-28 FI SYSTEM DIAGNOSIS SHOW DATA WHEN TROUBLE (DISPLAING DATA AT THE TIME OF DTC) ECM stores the engine and driving conditions (in the form of data as shown in the figure) at the moment of the detection of a malfunction in its memory. This data is called “Show data when trouble”. Therefore, it is possible to know engine and driving conditions (e.g., whether the engine was warm or not, where the motorcycle was running or stopped) when a malfunction was detected by checking the show data when trouble.
-
Page 189: Malfunction Code And Defective Condition
FI SYSTEM DIAGNOSIS 4-29 MALFUNCTION CODE AND DEFECTIVE CONDITION DETECTED DTC No. DETECTED FAILURE CONDITION CHECK FOR ITEM NO FAULT ––––––––––– ––––––––––– CMP sensor The signal does not reach ECM for 3 CMP sensor wiring and mechan- sec. or more, after receiving the starter ical parts signal.
-
Page 190
4-30 FI SYSTEM DIAGNOSIS DETECTED DTC No. DETECTED FAILURE CONDITION CHECK FOR ITEM IAT sensor The sensor voltage should be the fol- IAT sensor, lead wire/coupler lowing. connection 0.15 V sensor voltage < 4.85 V In other than the above range, C21 (P0110) is indicated. -
Page 191
FI SYSTEM DIAGNOSIS 4-31 DETECTED DTC No. DETECTED FAILURE CONDITION CHECK FOR ITEM STP sensor The sensor should produce following STP sensor, lead wire/coupler voltage. connection 0.15 V sensor voltage < 4.85 V In other than the above range, C29 (P1654) is indicated. -
Page 192
4-32 FI SYSTEM DIAGNOSIS DETECTED DTC No. DETECTED FAILURE CONDITION CHECK FOR ITEM Exhaust con- EXCVA position sensor produces fol- EXCVA, EXCVA lead wire/cou- trol valve lowing voltage. pler actuator 0.1 V sensor voltage < 4.9 V In other than the above range, C46 (P1675) is indicated. -
Page 193: C11″ (P0340) Cmp Sensor Circuit Malfunction
FI SYSTEM DIAGNOSIS 4-33 “C11” (P0340) CMP SENSOR CIRCUIT MALFUNCTION DETECTED CONDITION POSSIBLE CAUSE The signal does not reach ECM for 3 sec. or more, • Metal particles or foreign material being stuck on after receiving the starter signal. the CMP sensor and rotor tip •…
-
Page 194
4-34 FI SYSTEM DIAGNOSIS Step 2 1) Crank the engine a few seconds with the starter motor, and measure the CMP sensor peak voltage at the coupler. 2) Repeat the above test procedure a few times and measure the highest peak voltage. … -
Page 195: C12″ (P0335) Ckp Sensor Circuit Malfunction
FI SYSTEM DIAGNOSIS 4-35 “C12” (P0335) CKP SENSOR CIRCUIT MALFUNCTION DETECTED CONDITION POSSIBLE CAUSE The signal does not reach ECM for 3 sec. or more, • Metal particles or foreign material being stuck on after receiving the starter signal. the CKP sensor and rotor tip •…
-
Page 196
4-36 FI SYSTEM DIAGNOSIS 5) If OK, then check the continuity between each terminal and ground. CKP sensor continuity: ∞ Ω (Infinity) (Black – Ground) (Green – Ground) 09900-25008: Multi-circuit tester set Tester knob indication: Resistance (Ω) Are the resistance and continuity OK? Go to step 2. -
Page 197: C13″ (P0105-H/L) Iap Sensor Circuit Malfunction
FI SYSTEM DIAGNOSIS 4-37 “C13” (P0105-H/L) IAP SENSOR CIRCUIT MALFUNCTION DETECTED CONDITION POSSIBLE CAUSE IAP sensor voltage is not within the fol- • Clogged vacuum passage between throttle body lowing range. and IAP sensor. 0.5 V Sensor voltage < 4.85 V •…
-
Page 198
4-38 FI SYSTEM DIAGNOSIS 4) Disconnect the IAP sensor coupler. 5) Turn the ignition switch ON. 6) Insert the needle pointed probes to the lead wire coupler. 7) Measure the voltage at the Red wire and ground.If OK, then measure the voltage at the Red wire and B/Br wire.
-
Page 199
FI SYSTEM DIAGNOSIS 4-39 6) Disconnect the ECM coupler. 7) Check the continuity between G/B wire B and terminal 9.If OK, then check the continuity between B/Br wire C and ter- minal S. IAPS lead wire continuity: Continuity () …
-
Page 200
4-40 FI SYSTEM DIAGNOSIS 7) Disconnect the ECM coupler.Check the continuity between Red wire A and terminal A. 9) Also, check the continuity between G/B wire B and terminal IAPS lead wire continuity: Continuity () 09900-25008: Multi-circuit tester set 09900-25009: Needle pointed probe set (Gray) (Black)
-
Page 201
FI SYSTEM DIAGNOSIS 4-41 Step 3 1) Turn the ignition switch OFF. 2) Remove the IAP sensor. 3) Connect the vacuum pump gauge to the vacuum port of the IAP sensor. Arrange 3 new 1.5 V batteries in series 1 (check that total — voltage is 4.5 –… -
Page 202
4-42 FI SYSTEM DIAGNOSIS Output voltage (VCC voltage 4.5 – 5.0 V, ambient temp. 20 – 30 °C, 68 – 86 °F) ALTITUDE ATMOSPHERIC OUTPUT (Reference) PRESSURE VOLTAGE (ft) (mmHg) 3.1 – 3.6 2 000 2 001 2.8 – 3.4 5 000 1 524 5 001… -
Page 203: C14″ (P0120-H/L) Tp Sensor Circuit Malfunction
FI SYSTEM DIAGNOSIS 4-43 “C14” (P0120-H/L) TP SENSOR CIRCUIT MALFUNCTION DETECTED CONDITION POSSIBLE CAUSE Output voltage is not within the following • TP sensor maladjusted range. • TP sensor circuit open or short Difference between actual throttle open- • TP sensor malfunction ing and opening calculated by ECM is •…
-
Page 204
4-44 FI SYSTEM DIAGNOSIS Step 1 (When indicating P0120-H:) 1) Turn the ignition switch OFF. 2) Lift and support the fuel tank. (5-3) 3) Check the TP sensor coupler for loose or poor contacts. If OK, then check the TP sensor lead wire continuity. 4) Disconnect the TP sensor coupler. -
Page 205
FI SYSTEM DIAGNOSIS 4-45 Step 1 (When indicating P0120-L:) 1) Turn the ignition switch OFF. 2) Lift and support the fuel tank. (5-3) 3) Check the TP sensor coupler for loose or poor contacts. If OK, then check the TP sensor lead wire continuity. 4) Disconnect the TP sensor coupler. -
Page 206
4-46 FI SYSTEM DIAGNOSIS Step 2 1) Turn the ignition switch OFF. 2) Disconnect the TP sensor coupler and ECM coupler. 3) Install the test harness to the TP sensor. 4) Check the continuity between terminal A and ground. TP sensor continuity: ∞ Ω (Infinity) (Terminal A –… -
Page 207
FI SYSTEM DIAGNOSIS 4-47 Step 3 1) Connect the TP sensor coupler 1 to the test harness. 2) Turn the ignition switch ON. 3) Measure the TP sensor output voltage at the coupler (between + P/B and — B/Br) by turning the throttle grip. … -
Page 208: C15″ (P0115-H/L) Ect Sensor Circuit Malfunction
4-48 FI SYSTEM DIAGNOSIS “C15” (P0115-H/L) ECT SENSOR CIRCUIT MALFUNCTION DETECTED CONDITION POSSIBLE CAUSE Output voltage is not within the following • ECT sensor circuit open or short range. • ECT sensor malfunction 0.15 V Sensor voltage < 4.85 V •…
-
Page 209
FI SYSTEM DIAGNOSIS 4-49 Step 1 (When indicating P0115-H:) 1) Turn the ignition switch OFF. 2) Lift and support the fuel tank. (5-3) 3) Check the ECT sensor coupler for loose or poor contacts. If OK, then check the ECT sensor lead wire continuity. 4) Disconnect the ECT sensor coupler and ECM coupler. -
Page 210
4-50 FI SYSTEM DIAGNOSIS Step 1 (When indicating P0115-L:) 1) Turn the ignition switch OFF. 2) Lift and support the fuel tank. (5-3) 3) Check the ECT sensor coupler for loose or poor contacts. If OK, then measure the output voltage. 4) Disconnect the ECT sensor coupler. -
Page 211
FI SYSTEM DIAGNOSIS 4-51 Step 2 1) Turn the ignition switch OFF. 2) Disconnect the ECT sensor coupler. 3) Measure the ECT sensor resistance. ECT sensor resistance: Approx. 2.45 kΩ at 20 °C (68 °F) (Terminal – Terminal) 09900-25008: Multi-circuit tester set … -
Page 212: C21″ (P0110-H/L) Iat Sensor Circuit Malfunction
4-52 FI SYSTEM DIAGNOSIS “C21” (P0110-H/L) IAT SENSOR CIRCUIT MALFUNCTION DETECTED CONDITION POSSIBLE CAUSE Output voltage is not within the following • IAT sensor circuit open or short range. • IAT sensor malfunction 0.15 V Sensor voltage < 4.85 V •…
-
Page 213
FI SYSTEM DIAGNOSIS 4-53 Step 1 (When indicating P0110-H:) 1) Turn the ignition switch OFF. 2) Lift and support the fuel tank. (5-3) 3) Check the IAT sensor coupler for loose or poor contacts. If OK, then check the IAT sensor lead wire continuity. 4) Disconnect the IAT sensor coupler and ECM coupler. -
Page 214
4-54 FI SYSTEM DIAGNOSIS Step 1 (When indicating P0110-L:) 1) Turn the ignition switch OFF. 2) Lift and support the fuel tank. (5-3) 3) Check the IAT sensor coupler for loose or poor contacts. If OK, then check the IAT sensor lead wire continuity. 4) Disconnect the IAT sensor coupler. -
Page 215
FI SYSTEM DIAGNOSIS 4-55 Step 2 1) Turn the ignition switch OFF. 2) Measure the IAT sensor resistance. IAT sensor resistance: Approx. 2.45 kΩ at 20 °C (68 °F) (Terminal – Terminal) 09900-25008: Multi-circuit tester set Tester knob indication: Resistance (Ω) Is the resistance OK? ECM coupler (Harness side) •… -
Page 216: C22″ (P1450-H/L) Ap Sensor Circuit Malfunction
4-56 FI SYSTEM DIAGNOSIS “C22” (P1450-H/L) AP SENSOR CIRCUIT MALFUNCTION DETECTED CONDITION POSSIBLE CAUSE AP sensor voltage is not within the fol- • Clogged air passage with dust lowing range. • AP sensor circuit open or shorted to ground 0.5 V Sensor voltage <…
-
Page 217
FI SYSTEM DIAGNOSIS 4-57 4) Disconnect the AP sensor coupler. 5) Turn the ignition switch ON. 6) Measure the voltage at the Red wire and ground. 7) If OK, then measure the voltage at the Red wire A and B/Br wire B. -
Page 218
4-58 FI SYSTEM DIAGNOSIS 6) Disconnect the ECM coupler. 7) Check the continuity between G/Y wire C and terminal P.If OK, then check the continuity between B/Br wire B and ter- minal S. APS lead wire continuity: Continuity () …
-
Page 219
FI SYSTEM DIAGNOSIS 4-59 7) Disconnect the ECM coupler.Check the continuity between Red wire A and terminal A. 9) If OK, then check the continuity between G/Y wire C and ter- minal P. APS lead wire continuity: Continuity () …
-
Page 220
4-60 FI SYSTEM DIAGNOSIS Step 3 1) Remove the AP sensor. 2) Connect the vacuum pump gauge to the vacuum port of the AP sensor. Arrange 3 new 1.5 V batteries in series 1 (check that total voltage is 4.5 – 5.0 V) and connect — terminal to the ground terminal 2 and + terminal to the VCC terminal 3. -
Page 221: C23″ (P1651-H/L) To Sensor Circuit Malfunction
FI SYSTEM DIAGNOSIS 4-61 “C23” (P1651-H/L) TO SENSOR CIRCUIT MALFUNCTION DETECTED CONDITION POSSIBLE CAUSE The sensor voltage should be the follow- • TO sensor circuit open or short ing for 2 sec. and more, after ignition • TO sensor malfunction switch is turned ON.
-
Page 222
4-62 FI SYSTEM DIAGNOSIS Step 1 (When indicating P1651-H:) 1) Turn the ignition switch OFF. 2) Lift and support the fuel tank. (5-3) 3) Check the TO sensor coupler for loose or poor contacts. If OK, then check the TO sensor lead wire continuity. 4) Disconnect the TO sensor coupler. -
Page 223
FI SYSTEM DIAGNOSIS 4-63 Step 1 (When indicating P1651-L:) 1) Turn the ignition switch OFF. 2) Lift and support the fuel tank. (5-3) 3) Check the TO sensor coupler for loose or poor contacts. If OK, then check the TO sensor lead wire continuity. 4) Disconnect the TO sensor coupler. -
Page 224: C24″ (P0351), «C25» (P0352), «C26» (P0353) Or «C27» (P0354) Ignition System Malfunction
4-64 FI SYSTEM DIAGNOSIS Step 2 1) Connect the TO sensor coupler and ECM coupler. 2) Insert the needle pointed probes to the lead wire coupler. 3) Turn the ignition switch ON. 4) Measure the voltage at the wire side coupler between Black and B/Br wires.
-
Page 225: C28″ (P1655) Stv Actuator Circuit Malfunction
FI SYSTEM DIAGNOSIS 4-65 “C28” (P1655) STV ACTUATOR CIRCUIT MALFUNCTION DETECTED CONDITION POSSIBLE CAUSE The operation voltage does not reach the STVA. • STVA malfunction ECM does not receive communication signal from • STVA circuit open or short the STVA. •…
-
Page 226
4-66 FI SYSTEM DIAGNOSIS Step 2 1) Turn the ignition switch OFF. 2) Disconnect the STVA lead wire coupler. 3) Check the continuity between each terminal and ground. STVA continuity: ∞ Ω (Infinity) (Terminal – Ground) 4) If OK, then measure the STVA resistance (between Black wire A and Pink wire B) and (between Green wire C and W/BI wire D). -
Page 227
FI SYSTEM DIAGNOSIS 4-67 ACTIVE CONTROL INSPECTION 1) Set up the SDS tool. (Refer to the SDS operation manual for further details.) 2) Turn the ignition switch ON. 3) Click “Secondary throttle operating control” 1. 4) Click each button 2. At this time, if an operation sound is heard from the STVA, the function is normal. -
Page 228: C29″ (P1654-H/L) Stp Sensor Circuit Malfunction
4-68 FI SYSTEM DIAGNOSIS “C29” (P1654-H/L) STP SENSOR CIRCUIT MALFUNCTION DETECTED CONDITION POSSIBLE CAUSE Signal voltage is not within the following • STP sensor maladjusted range. • STP sensor circuit open or short Difference between actual throttle open- • STP sensor malfunction ing and opening calculated by ECM is •…
-
Page 229
FI SYSTEM DIAGNOSIS 4-69 Step 1 (When indicating P1654-H:) 1) Turn the ignition switch OFF. 2) Lift and support the fuel tank. (5-3) 3) Check the STP sensor coupler for loose or poor contacts. If OK, then check the STP sensor lead wire continuity. 4) Disconnect the STP sensor coupler. -
Page 230
4-70 FI SYSTEM DIAGNOSIS Step 1 (When indicating P1654-L:) 1) Turn the ignition switch OFF. 2) Lift and support the fuel tank. (5-3) 3) Check the STP sensor coupler for loose or poor contacts. If OK, then check the STP sensor lead wire continuity. 4) Disconnect the STP sensor coupler. -
Page 231
FI SYSTEM DIAGNOSIS 4-71 Step 2 1) Turn the ignition switch OFF. 2) Lift and support the fuel tank. (5-3) 3) Disconnect the STP sensor coupler. 4) Check the continuity between each terminal and ground. STP sensor continuity: ∞ Ω (Infinity) (Terminal –… -
Page 232
4-72 FI SYSTEM DIAGNOSIS Step 3 1) Turn the ignition switch OFF. 2) Connect the STP sensor coupler. 3) Insert the needle pointed probes to the STP sensor coupler. 4) Disconnect the STVA lead wire coupler. 5) Turn the ignition switch ON. 6) Measure the STP sensor output voltage at the coupler (between + Yellow wire and — Black wire) by turning the secondary throttle valve (close and open) with a finger. -
Page 233: C31″ (P0705) Gp Switch Circuit Malfunction
FI SYSTEM DIAGNOSIS 4-73 “C31” (P0705) GP SWITCH CIRCUIT MALFUNCTION DETECTED CONDITION POSSIBLE CAUSE No Gear Position switch voltage • Gear Position switch circuit open or short Switch voltage is not within the following range. • Gear Position switch malfunction Switch voltage >…
-
Page 234
4-74 FI SYSTEM DIAGNOSIS Is the voltage OK? ECM coupler (Harness side) • Pink wire open or shorted to ground (Black) (Gray) • If wire and connection are OK, intermittent trou- ble or faulty ECM. • Recheck each terminal and wire harness for open circuit and poor connection. -
Page 235: C32″ (P0201), «C33» (P0202), «C34» (P0203) Or «C35» (P0204) Primary Fuel Injector Circuit Malfunction
FI SYSTEM DIAGNOSIS 4-75 “C32” (P0201), “C33” (P0202), “C34” (P0203) or “C35” (P0204) PRIMARY FUEL INJECTOR CIRCUIT MALFUNCTION DETECTED CONDITION POSSIBLE CAUSE CKP signal is produced but fuel injector signal is • Injector circuit open or short interrupted by 4 times or more continuously. •…
-
Page 236
4-76 FI SYSTEM DIAGNOSIS 5) If OK, then check the continuity between each terminal and ground. STP sensor continuity: ∞ Ω (Infinity) 09900-25008: Multi-circuit tester set Tester knob indication: Resistance (Ω) Are the resistance and continuity OK? Go to Step 2. -
Page 237: C36″ (P1764), «C37» (P1765), «C38» (P1766) Or «C39» (P1767) Secondary Fuel Injector Circuit Malfunction
FI SYSTEM DIAGNOSIS 4-77 “C36” (P1764), “C37” (P1765), “C38” (P1766) or “C39” (P1767) SECOND- ARY FUEL INJECTOR CIRCUIT MALFUNCTION DETECTED CONDITION POSSIBLE CAUSE Some failure exists in the fuel injector signal in a • Injector circuit open or short high load, high revolution condition. •…
-
Page 238
4-78 FI SYSTEM DIAGNOSIS 5) If OK, then check the continuity between each terminal and ground. STP sensor continuity: ∞ Ω (Infinity) 09900-25008: Multi-circuit tester set Tester knob indication: Resistance (Ω) Are the resistance and continuity OK? Go to Step 2. -
Page 239: C41″ (P0230-H/L) Fp Relay Circuit Malfunction
FI SYSTEM DIAGNOSIS 4-79 “C41” (P0230-H/L) FP RELAY CIRCUIT MALFUNCTION DETECTED CONDITION POSSIBLE CAUSE No voltage is applied to fuel pump • Fuel pump relay circuit open or short although fuel pump relay is turned ON, • Fuel pump relay malfunction or voltage is applied to fuel pump, •…
-
Page 240
4-80 FI SYSTEM DIAGNOSIS Step 1 (When indicating P0230-H:) 1) Turn the ignition switch OFF. 2) Remove the front seat. (8-7) 3) Check the FP relay coupler for loose or poor contacts. If OK, then check the FP relay. (5-6) Is the FP relay OK? ECM coupler (Harness side) •… -
Page 241: C42″ (P01650) Ig Switch Circuit Malfunction
FI SYSTEM DIAGNOSIS 4-81 “C42” (P01650) IG SWITCH CIRCUIT MALFUNCTION DETECTED CONDITION POSSIBLE CAUSE Ignition switch signal is not input to the ECM. • Ignition system circuit open or short • ECM malfunction When the ID agreement is not verified. •…
-
Page 242: C46″ (P1657-H/L Or P1658) Excv Actuator Circuit Malfunction
4-82 FI SYSTEM DIAGNOSIS “C46” (P1657-H/L or P1658) EXCV ACTUATOR CIRCUIT MALFUNCTION DETECTED CONDITION POSSIBLE CAUSE The operation signal does not reach the • EXCVA maladjusted EXCV actuator. • EXCVA circuit open or short EXCVA position sensor voltage low or •…
-
Page 243
FI SYSTEM DIAGNOSIS 4-83 Step 1 (When indicating P1657-H:) 1) Turn the ignition switch OFF. 2) Lift and support the fuel tank. (5-3) 3) Check the EXCVA position sensor coupler for loose or poor contacts. If OK, then check the EXCVA position sensor lead wire conti- nuity. -
Page 244
4-84 FI SYSTEM DIAGNOSIS Step 1 (When indicating P1657-L:) 1) Turn the ignition switch OFF. 2) Lift and support the fuel tank. (5-3) 3) Check the EXCVA position sensor coupler for loose or poor contacts. If OK, then check the EXCVA position sensor lead wire conti- nuity. -
Page 245
FI SYSTEM DIAGNOSIS 4-85 Step 1 (When indicating P1658:) 1) Turn the ignition switch OFF. 2) Lift and support the fuel tank. (5-3) 3) Check the EXCVA motor coupler for loose or poor contacts. Is the contacting OK? Go to Step 6. Loose or poor contacts on the EXCV motor cou- pler 4) After repairing the trouble, clear the DTC using SDS tool. -
Page 246
4-86 FI SYSTEM DIAGNOSIS Step 3 1) Turn the ignition switch OFF. 2) Check the continuity between Yellow wire and ground. Position sensor continuity: ∞ Ω (Infinity) 3) If OK, then measure the position sensor resistance. 4) Connect the position sensor coupler. 5) Set the EXCVA to adjustment position. -
Page 247
FI SYSTEM DIAGNOSIS 4-87 Step 4 1) Turn the ignition switch OFF. 2) Connect the position sensor coupler. 3) Measure the position sensor output voltage at fully close posi- tion and fully open position. 4) Insert the needle pointed probes to the back side of the posi- tion sensor lead wire coupler. -
Page 248
4-88 FI SYSTEM DIAGNOSIS Step 5 1) If the position sensor output voltage is 0.5 V and less at fully close position, adjust the output voltage to specified by turn- ing out the No. 1 cable adjuster 1. 2) Repeat the above procedure (Step 4) until the out put voltage becomes specified value. -
Page 249
FI SYSTEM DIAGNOSIS 4-89 Step 6 1) Turn the ignition switch OFF. 2) Disconnect the motor lead wire coupler of the EXCVA. 3) Apply 12 volts to the terminal and check the operation of EXCVA. 12 V 4) Then, swap the wires supplied 12 volts and check the opera- tion of EXCVA. -
Page 250
4-90 FI SYSTEM DIAGNOSIS ACTIVE CONTROL INSPECTION 1) Set up the SDS tool. (Refer to the SDS operation manual for further details.) 2) Turn the ignition switch ON. 3) Click “Exhaust valve operating control” 1. 4) Click each button 2. At this time, if an operation sound is heard from the EXCVA, the function is normal. -
Page 251: C49″ (P1656) Pair Control Solenoid Valve Circuit Malfunction
FI SYSTEM DIAGNOSIS 4-91 “C49” (P1656) PAIR CONTROL SOLENOID VALVE CIRCUIT MALFUNCTION DETECTED CONDITION POSSIBLE CAUSE PAIR control solenoid valve voltage is not input to • PAIR control solenoid valve circuit open or short ECM. • PAIR control solenoid valve malfunction •…
-
Page 252
4-92 FI SYSTEM DIAGNOSIS Step 2 1) Turn the ignition switch ON. 2) Measure the voltage between O/W wire and ground. PAIR valve voltage: Battery voltage (+ O/W – — Ground) 09900-25008: Multi-circuit tester set Tester knob indication: Voltage () Is the voltage OK? ECM coupler (Harness side) •… -
Page 253: C60″ (P0480) Cooling Fan Relay Circuit Malfunction
FI SYSTEM DIAGNOSIS 4-93 “C60” (P0480) COOLING FAN RELAY CIRCUIT MALFUNCTION DETECTED CONDITION POSSIBLE CAUSE Cooling fan relay signal is not input to ECM. • Cooling fan relay circuit open or short • ECM malfunction Engine stop Side-stand Ignition Cooling fan switch relay switch…
-
Page 254
4-94 FI SYSTEM DIAGNOSIS ACTIVE CONTROL INSPECTION 1) Set up the SDS tool. (Refer to the SDS operation manual for further details.) 2) Start the engine and run it idling condition. 3) Click “Cooling fan relay control” 1. 4) Click the operate button 2. At this time, if an operation sound is heard from the cooling fan relay and cooling fan motor is operated, the function is normal. -
Page 255: Sensors
FI SYSTEM DIAGNOSIS 4-95 SENSORS CMP SENSOR INSPECTION The camshaft position sensor is installed on the cylinder head cover. (4-33) CMP SENSOR REMOVAL AND INSTALLATION • Remove the CMP sensor. (3-27) • Install the CMP sensor in the reverse order of removal. CKP SENSOR INSPECTION The crankshaft position sensor is installed on the right side of middle crankcase cover.
-
Page 256: Ect Sensor Inspection
4-96 FI SYSTEM DIAGNOSIS ECT SENSOR INSPECTION The engine coolant temperature sensor is installed at the cylin- der head. (4-48) ECT SENSOR REMOVAL AND INSTALLATION • Remove the ECT sensor. (7-7) • Install the ECT sensor in the reverse order of removal. …
-
Page 257: Stp Sensor Inspection
FI SYSTEM DIAGNOSIS 4-97 STP SENSOR INSPECTION STP SENSOR REMOVAL AND INSTALLATION The secondary throttle position sensor is installed at the right side of the No. 4 throttle body. • Remove the STP sensor. (5-16) • Install the STP sensor in the reverse order of removal. STP SENSOR ADJUSTMENT •…
-
Page 258: Fuel System And Throttle
FUEL SYSTEM AND THROTTLE BODY 5-1 FUEL SYSTEM AND THROTTLE BODY CONTENTS FUEL DELIVERY SYSTEM…………….5- 2 FUEL SYSTEM………………..5- 3 FUEL TANK LIFT-UP …………….5- 3 FUEL TANK REMOVAL…………….. 5- 3 FUEL TANK INSTALLATION …………..5- 4 FUEL PRESSURE INSPECTION …………5- 4 FUEL PUMP INSPECTION …………..
-
Page 259: Fuel Delivery System
5-2 FUEL SYSTEM AND THROTTLE BODY FUEL DELIVERY SYSTEM The fuel delivery system consists of the fuel tank, fuel pump, fuel filters, fuel feed hose, fuel delivery pipe (including fuel injectors) and fuel pressure regulator. There is no fuel return hose. The fuel in the fuel tank is pumped up by the fuel pump and pressurized fuel flows into the injector installed in the fuel delivery pipe.
-
Page 260: Fuel System
FUEL SYSTEM AND THROTTLE BODY 5-3 FUEL SYSTEM FUEL TANK LIFT-UP • Remove the right and left fuel tank lower side covers. (8-7) • Remove the fuel tank mounting bolts. • Lift and support the fuel tank with the fuel tank prop stay 2. FUEL TANK REMOVAL •…
-
Page 261: Fuel Tank Installation
5-4 FUEL SYSTEM AND THROTTLE BODY FUEL TANK INSTALLATION • Installation is in the reverse order of removal. FUEL PRESSURE INSPECTION • Lift and support the fuel tank. (5-3) • Place a rag under the fuel feed hose and remove the fuel feed hose 1.
-
Page 262: Fuel Pump Inspection
FUEL SYSTEM AND THROTTLE BODY 5-5 FUEL PUMP INSPECTION Turn the ignition switch ON and check that the fuel pump oper- ates for few seconds. If the fuel pump motor does not make operating sound, inspect the fuel pump circuit connections or inspect the fuel pump relay and tip-over sensor.
-
Page 263: Fuel Pump Relay Inspection
5-6 FUEL SYSTEM AND THROTTLE BODY • Connect a proper lead wire into the fuel pump lead wire cou- pler (fuel pump side) and apply 12 volts to the fuel pump (between Y/R wire and B/W wire) for 10 seconds and mea- sure the amount of fuel discharged.
-
Page 264: Fuel Pump And Fuel Filter Removal
FUEL SYSTEM AND THROTTLE BODY 5-7 FUEL PUMP AND FUEL FILTER REMOVAL CONSTRUCTION 1 Fuel level gauge 5 Holder 2 Fuel pump case/Fuel filter cartridge 6 Fuel mesh filter ITEM N·m kgf-m lb-ft 3 Fuel pump 7 O-ring 4 Rubber cushion A Fuel pump mounting bolt…
-
Page 265
5-8 FUEL SYSTEM AND THROTTLE BODY REMOVAL • Remove the fuel tank. (5-3) • Remove the fuel pump assembly 1 by removing its mounting bolts diagonally. Gasoline is highly flammable and explosive. Keep heat, spark and flame away. • Remove the nuts. •… -
Page 266: Fuel Mesh Filter Inspection And Cleaning
FUEL SYSTEM AND THROTTLE BODY 5-9 • Remove the fuel mesh filter 7. • Remove the fuel pump 8 from the fuel pump case/fuel filter cartridge 9. FUEL MESH FILTER INSPECTION AND CLEANING If the fuel mesh filter is clogged with sediment or rust, fuel will not flow smoothly and loss in engine power may result.
-
Page 267
• Be sure to connect the wires to the proper terminals. A ….+ terminal for fuel pump B ….+ terminal for fuel level gauge • Install a new O-ring and apply SUZUKI SUPER GREASE “A” to it. 99000-25030: SUZUKI SUPER GREASE “A” (USA) 99000-25010: SUZUKI SUPER GREASE “A”… -
Page 268
FUEL SYSTEM AND THROTTLE BODY 5-11 • When installing the fuel pump assembly, first tighten all the fuel pump mounting bolts lightly and then to the specified torque, in the ascending order of numbers. Fuel pump mounting bolt: 10 N·m (1.0 kgf-m, 7.0 lb-ft) NOTE: Apply a small quantity of the THREAD LOCK to the thread por- tion of fuel pump mounting bolts. -
Page 269: Throttle Body
5-12 FUEL SYSTEM AND THROTTLE BODY THROTTLE BODY CONSTRUCTION Only for E-33 1 TP sensor 8 Cushion seal 2 STP sensor 9 Fast idle adjusting screw 3 STVA 0 Throttle stop screw 4 Fuel delivery pipe A Vacuum hose ITEM N·m kgf-m lb-ft 5 Fuel delivery pipe joint…
-
Page 270: Air Cleaner Box Removal
FUEL SYSTEM AND THROTTLE BODY 5-13 AIR CLEANER BOX REMOVAL • Lift and support the fuel tank. (5-3) • Disconnect the IAT sensor lead wire coupler 1, PAIR hose 2 and PCV hose 3. • Disconnect the IAP sensor lead wire coupler 4 and vacuum hose 5.
-
Page 271: Throttle Body Removal
5-14 FUEL SYSTEM AND THROTTLE BODY THROTTLE BODY REMOVAL • Remove the air cleaner box. (5-13) • Disconnect the throttle cables from their drum. After disconnecting the throttle cables, do not snap the throttle valve from full open to full close. It may cause damage to the throttle valve and throttle body.
-
Page 272: Throttle Body Disassembly
FUEL SYSTEM AND THROTTLE BODY 5-15 • Remove the throttle body assembly. THROTTLE BODY DISASSEMBLY Identify the position of each removed part. Organize the parts in their respective groups so that they can be reinstalled in their original positions. •…
-
Page 273
5-16 FUEL SYSTEM AND THROTTLE BODY • Remove the fuel injectors 7, secondary fuel delivery pipes 8 and primary fuel delivery pipes 9. • Remove the fuel delivery pipe 0 and fuel delivery pipe joints • Remove the TP sensor and STP sensor with the special tool. … -
Page 274: Throttle Body Cleaning
FUEL SYSTEM AND THROTTLE BODY 5-17 The fast idle screw E is factory-adjusted at the time of delivery and therefore avoid removing or turning it unless otherwise necessary. THROTTLE BODY CLEANING Some carburetor cleaning chemicals, especially dip-type soaking solutions, are very corrosive and must be handled carefully.
-
Page 275: Throttle Body Reassembly
* Apply thin coat of the engine oil to the O-ring. * Align the throttle shaft end C with the groove D of TP sensor. * Apply SUZUKI SUPER GREASE “A” to the throttle shaft end C if necessary. 99000-25030: SUZUKI SUPER GREASE “A” (USA) 99000-25010: SUZUKI SUPER GREASE “A”…
-
Page 276
FUEL SYSTEM AND THROTTLE BODY 5-19 • Apply thin coat of the engine oil to the new O-ring 3 and cusion seal 4. Replace the cushion seal and O-ring with the new ones. • Apply thin coat of the engine oil to the new O-rings 5. … -
Page 277
5-20 FUEL SYSTEM AND THROTTLE BODY • Assemble the fuel delivery pipes as shown. Never turn the fuel delivery pipes while pushing it. • Install the primary fuel delivery pipe assembly 8 and second- ary fuel delivery pipe assembly 9 to the throttle body assem- bly. -
Page 278: Throttle Body Installation
FUEL SYSTEM AND THROTTLE BODY 5-21 THROTTLE BODY INSTALLATION Installation is in the reverse order of removal. Pay attention to the following points: • Connect the fuel injector couplers to the fuel injectors. Make sure that each coupler is installed in the correct position. The color on each lead wire refers to the appropriate fuel injector.
-
Page 279: Air Cleaner Box Installation
5-22 FUEL SYSTEM AND THROTTLE BODY AIR CLEANER BOX INSTALLATION Installation is in the reverse order of removal. Pay attention to the following points: • Install the air cleaner box and tighten the throttle body clamp screws as shown in the illustration. LEFT RIGHT SIDE…
-
Page 280: Fuel Injector Removal
FUEL SYSTEM AND THROTTLE BODY 5-23 FUEL INJECTOR REMOVAL • Remove the air cleaner box. (5-13) • With battery negative cable disconnected, disconnect the injector couplers. • Remove the fuel delivery pipe assembly. (5-15) • Remove the primary and secondary fuel injectors #1, #2, #3 and #4.
-
Page 281: Fast Idle
5-24 FUEL SYSTEM AND THROTTLE BODY FAST IDLE The fast idle system is automatic type. When the fast idle cam is turned by the secondary throttle valve actuator, the cam pushes the lever on the throttle valve shaft causing the throttle valve to open and raise the engine speed. When the engine has warmed up, depending on the water tem- perature, ambient temperature and lapsed time, the fast idle is cancelled allowing the engine to resume idle speed.
-
Page 282
FUEL SYSTEM AND THROTTLE BODY 5-25 • Calculate the voltage difference between TP sensor output voltage at idle and TP sensor output voltage with the STV full opened. Example: TP sensor output voltage with the STV fully open Minus TP sensor output voltage at idle is 0.027 V STV fully open 1.152 V Idle… -
Page 283: Throttle Valve Synchronization
5-26 FUEL SYSTEM AND THROTTLE BODY THROTTLE VALVE SYNCHRONIZATION Check and adjust the throttle valve synchronization among four cylinders. USE OF DIGITAL VACUUM TESTER Step 1 • Lift and support the fuel tank. (5-3) • Start up the engine and run it in idling condition for warming up. •…
-
Page 284
FUEL SYSTEM AND THROTTLE BODY 5-27 Step 3 • Turn in all the idle air screws to the complete close position. • Check for difference of vacuum between #1 and #2. • Equalize these two by gradually turning back the air screw on the higher vacuum side until the vacuum comes down to the lower. -
Page 285
5-28 FUEL SYSTEM AND THROTTLE BODY • Connect a tachometer. • Start up the engine and keep it running at 1 150 r/min by turn- ing throttle stop screw 3. Avoid dirt drown into the throttle body while running the engine without air cleaner box. -
Page 286: Throttle Position Sensor (Tps) Setting
FUEL SYSTEM AND THROTTLE BODY 5-29 THROTTLE POSITION SENSOR (TPS) SETTING After all adjustments are completed, check or adjust the TPS setting condition. (Refer to page 4-20 for TPS setting procedure.)
-
Page 287
EXHAUST SYSTEM 6-1 EXHAUST SYSTEM CONTENTS EXHAUST SYSTEM………………6- 2 EXHAUST CONTROL SYSTEM …………6- 2 OPERATION………………. 6- 3 EXCVA (EXHAUST CONTROL VALVE ACTUATOR) AND EXCV (EXHAUST CONTROL VALVE)…………6- 4 EXCVA REMOVAL…………….. 6- 4 EXCVA INSTALLATION ……………. 6- 6 EXCVA INSPECTION……………. -
Page 288: Exhaust System
6-2 EXHAUST SYSTEM EXHAUST SYSTEM EXHAUST CONTROL SYSTEM The exhaust control system (EXCS) consists of the exhaust control valve (EXCV), exhaust control valve actuator (EXCVA) and exhaust control valve cables (EXCV cables). EXCV is installed between the exhaust pipes and muffler. EXCVA is mounted on the right side of the seat rail.
-
Page 289: Operation
EXHAUST SYSTEM 6-3 OPERATION The EXCS is operated by the signal supplied from the ECM. The open/close operation of the EXCV is performed by the EXCVA which is controlled by the ECM by changing the current direction of the actuator motor. The position sensor (incorporated in the EXCVA) detects the EXCVA movement by measuring the voltage and then the ECM determines the EXCV opening angle based on the engine rpm and gear positions.
-
Page 290: Excva (Exhaust Control Valve Actuator) And Excv (Exhaust Control Valve)
6-4 EXHAUST SYSTEM EXCVA (EXHAUST CONTROL VALVE ACTUATOR) AND EXCV (EXHAUST CONTROL VALVE) EXCVA REMOVAL • Turn the ignition switch OFF. • Remove the front seat. • Lift and support the fuel tank. (5-3) • Connect the special tool (Mode select switch) to the dealer mode coupler.
-
Page 291
EXHAUST SYSTEM 6-5 • Remove the brake fluid reservoir tank mounting bolt 2 and front footrest bracket mounting bolts 3. • Move the front footrest assembly. • Hold the EXCVA pulley with an adjustable wrench, and loosen the pulley mounting bolt. … -
Page 292: Excva Installation
6-6 EXHAUST SYSTEM EXCVA INSTALLATION • Make the No. 1 cable straight and turn the No. 1 cable adjuster 1 in or out until the inner cable length A becomes 40 – 41 mm (1.57 – 1.61 in). • After adjusting the inner cable length A, tighten the lock-nut No.
-
Page 293
EXHAUST SYSTEM 6-7 • Hold the pulley with an adjustable wrench, and then tighten the pulley mounting bolt to the specified torque. EXCVA pulley mounting bolt: 5 N·m (0.5 kgf-m, 3.5 lb-ft) When loosening or tightening the pulley bolt, be sure to fix the pulley with an adjustable wrench, or EXCVA may get damaged. -
Page 294: Excva Inspection
6-8 EXHAUST SYSTEM EXCVA INSPECTION 4-82 EXCV CABLE REPLACEMENT • Disconnect the EXCV cables from the EXCVA pulley. (6-4 to -5) • Remove the cable guide. • Disconnect the EXCV cables from the EXCV pulley. (6-14) NOTE: 41G0OP The EXCV cables are identified by the plated chrome color and shape.
-
Page 295
EXHAUST SYSTEM 6-9 • Make the No. 2 cable straight and turn in the cable adjuster 5 fully. • Loosen the lock-nuts 6 and turn the No.2 cable adjuster 7 in or out until the inner cable length C becomes 62 – 63 mm (2.44 – 2.48 in). •… -
Page 296: Excva Adjustment
6-10 EXHAUST SYSTEM • After connecting the No. 2 cable 0, loosen the lock-nut A and turn the adjuster B in or out until 16 – 17 mm (0.63 – 0.67 in) of the thread length F on the cable adjuster cam be pro- vided and tighten the lock-nut A.
-
Page 297
EXHAUST SYSTEM 6-11 2nd step: • Turn the mode select switch OFF. • Turn the ignition switch ON to check the EXCVA operation. • Turn the mode select switch ON. • If C46 is not indicated on the LCD (DISPLAY), the adjustment is correctly completed. -
Page 298
6-12 EXHAUST SYSTEM • Turn the ignition switch ON. • Measure the position sensor output voltage at fully close posi- tion. Position sensor output voltage EXCV is fully close: 0.5 output voltage 1.3 V (+ Yellow – — B/Br) … -
Page 299: Excv/Muffler Removal
EXHAUST SYSTEM 6-13 If the measured voltage is more than specification, adjust the No.2 cable adjuster as follows: • Set the EXCVA to adjustment position. (6-4) Adjusting the No. 2 cable with the EXCV fully opened can damage the EXCVA. Be sure to adjust the No. 2 cable with the EXCV set in adjustment position.
-
Page 300: Excv Inspection
6-14 EXHAUST SYSTEM • Remove the EXCV cover 3 and disconnect the two cables from the EXCV pulley. EXCV INSPECTION • Turn the EXCV by hand and check that it moves smoothly. • If it does not move smoothly, replace the EXCV together with the muffler body.
-
Page 301: Exhaust Pipe Removal
EXHAUST SYSTEM 6-15 • Install the cable guide. • Install the front footrest assembly. (6-7) • Install the EXCVA. (Refer to the EXCVA INSTALLATION pro- cedures.) (6-6 to -7) EXHAUST PIPE REMOVAL 3-5 EXHAUST PIPE INSTALLATION 3-14…
-
Page 302
6-16 EXHAUST SYSTEM * When adjusting the No. 1 and No. 2 cables, the cable slots of EXCVA pulley must be located to adjustment position. * Do not use the adjustable wrench to turn EXCVA pul- ley so as not to cause damage to the internal gear of EXCVA. -
Page 303: Cooling And Lubrication System
COOLING AND LUBRICATION SYSTEM 7-1 COOLING AND LUBRICATION SYSTEM CONTENTS ENGINE COOLANT ………………7- 2 COOLING CIRCUIT ………………7- 3 COOLING CIRCUIT INSPECTION…………7- 3 RADIATOR AND WATER HOSES …………… 7- 4 RADIATOR REMOVAL …………….7- 4 RADIATOR CAP INSPECTION………….. 7- 4 RADIATOR INSPECTION AND CLEANING……….
-
Page 304: Engine Coolant
7-2 COOLING AND LUBRICATION SYSTEM ENGINE COOLANT At the time of manufacture, the cooling system is filled with a 50:50 mixture of distilled water and ethylene glycol anti-freeze. This 50:50 mixture will provide the optimum corrosion protection and excellent heat pro- tection, and will protect the cooling system from freezing at temperatures above –31 °C (–24 °F).
-
Page 305: Cooling Circuit
COOLING AND LUBRICATION SYSTEM 7-3 COOLING CIRCUIT RESERVOIR ENGINE COOLANT THERMOSTAT TEMPERATURE CYLINDER HEAD TANK SENSOR CYLINDER RADIATOR WATER PUMP COOLING CIRCUIT INSPECTION Before removing the radiator and draining the engine coolant, inspect the cooling circuit for tightness. • Remove the under cowlings. (8-5) •…
-
Page 306: Radiator And Water Hoses
7-4 COOLING AND LUBRICATION SYSTEM RADIATOR AND WATER HOSES RADIATOR REMOVAL • Remove the under cowlings. (8-5) • Drain the engine coolant. (2-17) • Remove the radiator assembly. (3-5) • Remove the reservoir tank 1, cooling fan 2 and bracket 3 from the radiator.
-
Page 307: Radiator Installation
COOLING AND LUBRICATION SYSTEM 7-5 • Fins bent down or dented can be repaired by straightening them with the blade of a small screwdriver. RADIATOR INSTALLATION • Install the radiator. • Route the radiator hoses. (10-24) • Pour engine coolant. (2-17) •…
-
Page 308: Cooling Fan
7-6 COOLING AND LUBRICATION SYSTEM COOLING FAN REMOVAL • Remove the under cowlings. (8-5) • Drain the engine coolant. (2-17) • Remove the radiator assembly. (3-5) • Remove the cooling fan 1. INSPECTION • Remove the under cowlings. (8-5) • Disconnect the cooling fan coupler 1. •…
-
Page 309: Cooling Fan Relay Inspection
COOLING AND LUBRICATION SYSTEM 7-7 COOLING FAN RELAY INSPECTION Cooling fan relay is located in rear of the battery. • Remove the front seat. (8-7) • Remove the cooling fan relay 1. First check the insulation between A and B terminals with tester.
-
Page 310: Installation
7-8 COOLING AND LUBRICATION SYSTEM • If the ECT sensor ohmic value does not change in the propor- tion indicated, replace it with a new one. Temperature sensor specification Temperature Standard resistance 20 °C (68 °F) Approx. 2.45 kΩ 50 °C (122 °F) Approx.
-
Page 311: Thermostat
COOLING AND LUBRICATION SYSTEM 7-9 THERMOSTAT REMOVAL • Remove the front seat. (8-7) • Lift and support the fuel tank. (5-3) • Place a rag under the thermostat cover. • Remove the thermostat cover 1. • Remove the thermostat 2. INSPECTION Inspect the thermostat pellet for signs of cracking.
-
Page 312: Installation
7-10 COOLING AND LUBRICATION SYSTEM • Keep on heating the water to raise its temperature. • Just when the water temperature reaches specified value, the thermostat valve should have lifted by at least 8 mm (0.31 in). Thermostat valve lift A Standard: 8.0 mm and over at 95 °C (0.31 in and over at 203 °F) •…
-
Page 313: Water Pump
COOLING AND LUBRICATION SYSTEM 7-11 WATER PUMP REMOVAL AND DISASSEMBLY NOTE: Before draining engine oil and engine coolant, inspect engine oil and coolant leakage between the water pump and crankcase. If engine oil is leaking, visually inspect the oil seal and O-ring. If engine coolant is leaking, visually inspect the mechanical seal and seal washer.
-
Page 314
7-12 COOLING AND LUBRICATION SYSTEM • Remove the water pump cover 5 and clamp 6. • Remove the impeller securing bolt by holding the impeller with a water pump pliers. • Remove the mechanical seal ring 7 and rubber seal 8 from the impeller. -
Page 315: Inspection
COOLING AND LUBRICATION SYSTEM 7-13 • Remove the oil seal using a suitable bar. NOTE: If there is no abnormal condition, the oil seal removal is not nec- essary. The removed oil seal must be replaced with a new one. INSPECTION MECHANICAL SEAL •…
-
Page 316: Reassembly And Installation
09913-70210: Bearing installer set (22) NOTE: The stamped mark on the oil seal faces mechanical seal side. • Apply a small quantity of the SUZUKI SUPER GREASE “A” to the oil seal lip. 99000-25030: SUZUKI SUPER GREASE “A” (USA) 99000-25010: SUZUKI SUPER GREASE “A”…
-
Page 317
NOTE: * Apply engine coolant to the O-ring 6. * Apply SUZUKI SUPER GREASE “A” to the O-ring 7. 99000-25030: SUZUKI SUPER GREASE “A” (USA) 99000-25010: SUZUKI SUPER GREASE “A” (Others) • Tighten the water pump cover screws to the specified torque. -
Page 318
7-16 COOLING AND LUBRICATION SYSTEM • Install the water pump. NOTE: Set the water pump shaft end F to the oil pump shaft G as shown. 8 N·m (0.8 kgf-m, 6.0 lb-ft) • Tighten the water pump mounting bolts to the specified torque. -
Page 319: Lubrication System
COOLING AND LUBRICATION SYSTEM 7-17 LUBRICATION SYSTEM OIL PRESSURE 2-33 OIL FILTER 2-13 OIL PRESSURE REGULATOR 3-49 OIL STRAINER 3-49 OIL JET 3-60 OIL PUMP 3-46 OIL PRESSURE SWITCH 9-34 OIL COOLER REMOVAL • Remove the under cowlings. (8-5) • Drain the engine oil. (2-12) •…
-
Page 320
7-18 COOLING AND LUBRICATION SYSTEM INSPECTION AND CLEANING • Road dirt or trash stuck to the fins must be removed. • Use of compressed air is recommended for this cleaning. • Fins bent down or dented can be repaired by straightening them with the blade of a small screwdriver. -
Page 321: Engine Lubrication System Chart
COOLING AND LUBRICATION SYSTEM 7-19 ENGINE LUBRICATION SYSTEM CHART INTAKE CAMSHAFT INTAKE CAMSHAFT JOURNAL HOLDER CAM CHAIN OIL JET CAMSHAFT JOURNALS, TENSION ADJUSTER CAMFACES AND TAPPETS EXHAUST CAMSHAFT EXHAUST CAMSHAFT JOURNAL HOLDER CAMSHAFT JOURNALS, CAM DRIVE CHAIN CAMFACES AND TAPPETS STARTER CLUTCH BALANCER SHAFT BEARING…
-
Page 322: Engine Lubrication System
7-20 COOLING AND LUBRICATION SYSTEM ENGINE LUBRICATION SYSTEM To sub- To sub- o sub- galler gallery gallery MAIN GALLERY…
-
Page 323
COOLING AND LUBRICATION SYSTEM 7-21 SUB-GALLERY VIEW OF A MAIN GALLERY To transmission… -
Page 324
CHASSIS 8-1 CHASSIS CONTENTS EXTERIOR PARTS ………………8- 3 FASTENER REMOVAL AND INSTALLATION……..8- 3 SCREEN ………………..8- 5 BODY COWLING COVER AND LOWER BRACKET COVER ….8- 5 UNDER COWLING …………….. 8- 5 BODY COWLING ………………. 8- 6 AIR INTAKE PIPE ……………… 8- 7 COWLING BRACE …………….. -
Page 325
8-2 CHASSIS CHASSIS CONTENTS INSPECTION ………………8-49 REAR SHOCK ABSORBER DISPOSAL ……….8-50 INSTALLATION………………8-51 SUSPENSION SETTING ……………. 8-51 REAR SUSPENSION ………………8-52 CONSTRUCTION ………………. 8-52 REMOVAL ………………..8-53 INSPECTION AND DISASSEMBLY …………8-55 REASSEMBLY ………………8-58 INSTALLATION………………8-60 FINAL INSPECTION AND ADJUSTMENT ……….8-61 FRONT BRAKE………………… -
Page 326: Exterior Parts
CHASSIS 8-3 EXTERIOR PARTS FASTENER REMOVAL AND INSTALLATION FASTENER (Type A) Removal • Depress the head of fastener center piece 1. • Pull out the fastener a. Installation • Let the center piece stick out toward the head so that the pawls 2 close.
-
Page 327
8-4 CHASSIS Installation • Insert the fastener into the installation hole. NOTE: To prevent the pawl 2 from damage, insert the fastener all the way into the installation hole. • Push in the head of center piece. -
Page 328: Screen
CHASSIS 8-5 SCREEN REMOVAL • Remove the screws. • Remove the combination meter 1. (9-29) • Disconnect the turnsignal lead wire couplers. • Remove the rear view mirrors/turn signals 2. • Remove the screen 3. INSTALLATION • Install the screen in the reverse order of removal. •…
-
Page 329: Body Cowling
8-6 CHASSIS • Remove the right under cowling. NOTE: “” indicates hook location. • Remove the left under cowling. NOTE: “” indicates hook location. INSTALLATION • Install the right and left under cowlings in the reverse order of removal. BODY COWLING REMOVAL •…
-
Page 330: Air Intake Pipe
CHASSIS 8-7 AIR INTAKE PIPE REMOVAL • Remove the body cowling. (8-6) • Remove the fasteners. • Remove the air intake pipes 1. INSTALLATION • Install the right and left air intake pipes in the reverse order of removal. COWLING BRACE REMOVAL •…
-
Page 331: Rear Seat And Seat Tail Cover
8-8 CHASSIS REAR SEAT AND SEAT TAIL COVER REMOVAL • Remove the rear seat (seat tail cover) with the ignition key. INSTALLATION • Hook the seat hook to the frame and push down the seat (seat tail cover) firmly until the seat (seat tail cover) snaps into the locked position.
-
Page 332: Front Wheel
CHASSIS 8-9 FRONT WHEEL CONSTRUCTION 1 Brake disc 6 Front axle 2 Collar 7 Front wheel ITEM N·m kgf-m lb-ft 3 Dust seal A Front axle bolt 10.0 72.5 4 Bearing B Brake disc bolt 23.0 16.5 5 Spacer…
-
Page 333: Removal
8-10 CHASSIS REMOVAL • Remove the brake calipers. Do not operate the brake lever while removing the cal- ipers. • Loosen two axle pinch bolts 1 on the right front fork leg. • Remove the front axle bolt 2. •…
-
Page 334: Inspection And Disassembly
CHASSIS 8-11 INSPECTION AND DISASSEMBLY TIRE INSPECTION (8-82) • Remove the brake disc. BRAKE DISC INSPECTION (8-68) • Remove the dust seals on both sides with the special tool. 09913-50121: Oil seal remover The removed dust seals must be replaced with new ones.
-
Page 335
8-12 CHASSIS • Remove the wheel bearings with the special tool. 09921-20240: Bearing remover set The removed bearings should be replaced with new ones. -
Page 336: Reassembly And Installation
(2.3 kgf-m, 16.5 lb-ft) 23 N·m (2.3 kgf-m, 16.5 lb-ft) 100 N·m (10.0 kgf-m, 72.5 lb-ft) WHEEL BEARING • Apply SUZUKI SUPER GREASE “A” to the wheel bearings. 99000-25030: SUZUKI SUPER GREASE “A” (USA) 99000-25010: SUZUKI SUPER GREASE “A” (Others)
-
Page 337
• Install the dust seal with the special tool. 09913-70210: Bearing installer set (52 mm) • Apply SUZUKI SUPER GREASE “A” to the dust seal lip. 99000-25030: SUZUKI SUPER GREASE “A” (USA) 99000-25010: SUZUKI SUPER GREASE “A” (Others) BRAKE DISC •… -
Page 338
CHASSIS 8-15 • Install the collar 1 in the right side. WHEEL • Install the front wheel with the front axle and hand-tighten the front axle bolt temporarily. The directional arrow on the tire should point to the wheel rotation, when remounting the wheel. BRAKE CALIPER •… -
Page 339
8-16 CHASSIS • Tighten two axle pinch bolts on the left front fork leg to the specified torque. Front axle pinch bolt: 23 N·m (2.3 kgf-m, 16.5 lb-ft) -
Page 340: Front Fork
CHASSIS 8-17 FRONT FORK CONSTRUCTION (USA) (Others) 1 O-ring 0 Oil seal 2 Spring retainer A Oil seal stopper ring 3 Spacer B Dust seal 4 Washer C Inner tube 5 Spring A Front fork cap bolt ITEM N·m kgf-m lb-ft 6 Adjuster rod…
-
Page 341: Removal And Disassembly
8-18 CHASSIS REMOVAL AND DISASSEMBLY • Remove the front wheel. (8-10) • Disconnect the brake hose from the brake hose guides on the front fender. • Remove the front fender. • Loosen the front fork upper clamp bolts 1, left and right. •…
-
Page 342
CHASSIS 8-19 • Remove the front fork cap bolt from the inner rod by loosening the lock nut. • Compress the fork spring with the special tool and remove the special tool. • Remove the front fork cap bolt 5, adjuster rod 6, spring retainer 7, spacer 8, washer 9 and spring 0. -
Page 343
8-20 CHASSIS • Remove the inner rod/damper rod (cartridge) B. Do not disassemble the inner rod/damper rod (car- tridge). • Slide the outer tube to remove it from the inner tube. NOTE: Be careful not to damage the “ANTI-FRICTION” metals. •… -
Page 344: Inspection
CHASSIS 8-21 INSPECTION INNER AND OUTER TUBES • Inspect the inner tube outer surface and outer tube inner sur- face for scratches. • Inspect the “ANTI-FRICTION” metal surfaces for scratches. • If any defects are found, replace them with the new ones. …
-
Page 345: Reassembly
8-22 CHASSIS REASSEMBLY Reassemble the front fork in the reverse order of disassembly. Pay attention to the following points: OIL SEAL AND DUST SEAL • Install the dust seal, oil seal stopper ring, oil seal and oil seal retainer onto the inner tube. 1 Dust seal 2 Oil seal stopper ring 3 Oil seal…
-
Page 346
• Pour specified front fork oil up to the top level of the outer tube. Capacity (each leg): 510 ml (17.2/17.9 US/lmp oz) 99000-99044-L01: SUZUKI FORK OIL L01 or an equivalent fork oil • Move the inner rod slowly with the special tool ten times and more until no more bubbles come out from the oil. -
Page 347
8-24 CHASSIS FRONT FORK INNER ROD LOCK NUT • Adjust the height H of the inner rod threads by turning the lock-nut 1 as shown in illustration. H: 11 mm (0.43 in) FORK SPRING • Install the fork spring as shown in the illustration. Upper side Lower side •… -
Page 348
CHASSIS 8-25 • Make sure that the height H of the inner rod threads is as fol- lows. H: 11 mm (0.43 in) • Slowly turn the cap bolt completely by hand until the end of the cap bolt seats on the lock nut. •… -
Page 349: Installation
8-26 CHASSIS INSTALLATION Install the front fork in the reverse order of removal. Pay atten- tion to the following points: • Set the upper surface of the outer tube height A at 4.0 mm (0.157 in) from the upper surface of the steering stem upper bracket and tighten the front fork lower clamp bolts 1 to the specified torque.
-
Page 350
CHASSIS 8-27 Rebound damping force Fully turn the damping force adjuster 1 clockwise. It is at stiffest position and turn it out to standard setting position. (For E-02, 19): 11 clicks out from stiffest position (For E-03, 24, 28, 33): 9 clicks out from stiffest position NOTE: Make sure to check the 1st click position by the last click sound when turning in the adjuster. -
Page 351: Steering Damper
8-28 CHASSIS STEERING DAMPER CONSTRUCTION 1 Steering damper Convex curve side of the washer 2 Dust seal faces down side. ITEM N·m kgf-m lb-ft 3 Steering stem head nut A Damper rod bolt 16.5 B Damper rod nut 65.0…
-
Page 352: Removal
INSTALLATION Install the steering damper in the reverse order of removal. Pay attention to the following points: • Apply SUZUKI SUPER GREASE “A” to the bearings and dust seals. 99000-25030: SUZUKI SUPER GREASE “A” (USA) 99000-25010: SUZUKI SUPER GREASE “A” (Others) •…
-
Page 353: Steering
8-30 CHASSIS STEERING CONSTRUCTION 1 Steering stem upper bracket 8 Steering stem lower bracket 2 Handlebars A Steering stem head nut ITEM N·m kgf-m lb-ft 3 Handlebar balancer B Steering stem lock-nut 65.0 4 Steering stem nut C Front fork upper clamp bolt 65.0 5 Dust seal cover D Handlebar clamp bolt…
-
Page 354: Removal
CHASSIS 8-31 REMOVAL • Remove the under cowling. (8-5 to -6) • Support the motorcycle with a jack or a wooden block. Do not work by using side stand. Do not support the motorcycle with exhaust pipe. Make sure that the motorcycle is supported securely.
-
Page 355: Inspection And Disassembly
8-32 CHASSIS • Remove the dust seal cover 1, dust seal 2, steering stem upper bearing inner race 3 and bearing 4. INSPECTION AND DISASSEMBLY Inspect the removed parts for the following abnormalities. * Handlebars distortion * Race wear and brinelling * Bearing wear or damage * Abnormal noise of bearing If any abnormal points are found, replace defective parts with…
-
Page 356: Reassembly
Install the steering stem in the reverse order of removal. Pay attention to the following points: BEARING • Apply SUZUKI SUPER GREASE “A” to the bearings and bearing races. 99000-25030: SUZUKI SUPER GREASE “A” (USA) 99000-25010: SUZUKI SUPER GREASE “A” (Others) •…
-
Page 357
8-34 CHASSIS • Turn the steering stem lower bracket about five or six times to the left and right so that the angular ball bearings will be 1/4 – 1/2 turn seated properly. • Loosen the stem nut by 1/4 – 1/2 turn. NOTE: This adjustment will vary from motorcycle to motorcycle. -
Page 358: Steering Tension Adjustment
CHASSIS 8-35 STEERING TENSION ADJUSTMENT Check the steering movement in the following procedure. • By supporting the motorcycle with a jack, lift the front wheel until it is off the floor by 20 – 30 mm (0.8 – 1.2 in). •…
-
Page 359: Handlebars
8-36 CHASSIS HANDLEBARS CONSTRUCTION 1 Left handle grip 5 Handlebar (RH) 2 Right handle throttle grip 6 Handlebar (LH) 3 Right handle switch 7 Handle balancer ITEM N·m kgf-m lb-ft 4 Left handle switch A Handlebar clamp bolt 16.5 REMOVAL •…
-
Page 360: Installation
CHASSIS 8-37 • Remove the left handle switch 5 and disconnect the clutch lever switch lead wire. • Remove the handle balancer 6. • Remove the left handle grip 7. • Disconnect the clutch cable 8. • Remove the clutch lever holder 9. •…
-
Page 361
8-38 CHASSIS • Insert the protrusion A of the handlebars into the hole B of the steering stem upper bracket. • Tighten the front fork upper clamp bolts 1 and handlebar clamp bolts 2 to the specified torque. Front fork upper clamp bolt: 23 N·m (2.3 kgf-m, 16.5 lb-ft) Handlebar clamp bolt: 23 N·m (2.3 kgf-m, 16.5 lb-ft) •… -
Page 362
CHASSIS 8-39 • Apply the SUZUKI SUPER GREASE “A” to the throttle cables and cable drum. 99000-25030: SUZUKI SUPER GREASE “A” (USA) 99000-25010: SUZUKI SUPER GREASE “A” (Others) • When remounting the right and left handle switches, engage the stopper with the handlebar hole. -
Page 363: Rear Wheel
8-40 CHASSIS REAR WHEEL CONSTRUCTION 1 Rear axle 0 Spacer *1 Except for E-03, 28, 33 2 Caliper bracket A Sprocket mounting drum 3 Brake disc B Sprocket 4 Collar C Bearing 5 Dust seal D Dust seal 6 Rear wheel E Collar ITEM N·m…
-
Page 364: Removal
CHASSIS 8-41 REMOVAL • Remove the cotter pin. (For E-03, 28, 33) • Loosen the axle nut 1. • Remove the under cowling. (8-5 to -6) • Raise the rear wheel off the ground and support the motorcy- cle with a jack or wooden block. •…
-
Page 365: Inspection And Disassembly
8-42 CHASSIS • Remove the dust seal with the special tool. 09913-50121: Oil seal remover The removed dust seal must be replaced with a new one. • Remove the dust seal with the special tool. 09913-50121: Oil seal remover …
-
Page 366
CHASSIS 8-43 SPROCKET • Inspect the sprocket teeth for wear. • If they are worn as shown, replace the two sprockets and drive chain as a set. A Normal wear B Excessive wear BEARINGS • Inspect the play of the wheel bearing and sprocket mounting drum bearing by hand while they are installed in place. -
Page 367: Reassembly And Installation
8-44 CHASSIS REASSEMBLY AND INSTALLATION Reassemble and install the rear wheel in the reverse order of removal and disassembly. Pay attention to the following points: Left Right 100 N·m (10.0 kgf-m, 72.5 lb-ft) 35 N·m 93 N·m (3.5 kgf-m, 25.5 lb-ft) (9.3 kgf-m, 67.5 lb-ft) E-02, 19, 24 25 N·m…
-
Page 368
CHASSIS 8-45 BEARINGS • Apply SUZUKI SUPER GREASE “A” to the bearings before installing. 99000-25030: SUZUKI SUPER GREASE “A” (USA) 99000-25010: SUZUKI SUPER GREASE “A” (Others) • Install the new bearing to the sprocket mounting drum with the special tool. -
Page 369
• Install the new dust seal with the special tool. 09913-70210: Bearing installer set (1 68) (2 52) • Apply SUZUKI SUPER GREASE “A” to the dust seal lip before assembling rear wheel. 99000-25030: SUZUKI SUPER GREASE “A” (USA) 99000-25010: SUZUKI SUPER GREASE “A”… -
Page 370
CHASSIS 8-47 • Tighten the sprocket mounting nuts to the specified torque. Rear sprocket nut: 93 N·m (9.3 kgf-m, 67.5 lb-ft) NOTE: Stamped mark A on the sprocket should face outside. • Install the collar 2. BRAKE DISC • Apply THREAD LOCK to the disc bolts and tighten them to the specified torque. -
Page 371: Rear Shock Absorber
8-48 CHASSIS REAR SHOCK ABSORBER CONSTRUCTION Left Right Rear shock absorber mount- 1 Rear shock absorber ing bolt/nut ITEM N·m kgf-m lb-ft Rear shock absorber bracket 36.0 2 Rear shock absorber bracket 11.5 83.0…
-
Page 372: Removal
CHASSIS 8-49 REMOVAL • Lift and support the fuel tank with the fuel tank prop stay. (5-3) • Remove the regulator/rectifier 1. (10-40) • Remove the under cowling. (8-5 to -6) • Support the motorcycle with a jack relieve no load on the rear shock absorber.
-
Page 373: Rear Shock Absorber Disposal
8-50 CHASSIS REAR SHOCK ABSORBER DISPOSAL * The rear shock absorber unit contains high-pressure nitrogen gas. * Mishandling can cause explosion. * Keep away from fire and heat. High gas pressure caused by heat can cause an explosion. * Release gas pressure before disposing. GAS PRESSURE RELEASE The rear cushion damper unit contains high-pressure nitrogen gas.
-
Page 374: Installation
CHASSIS 8-51 INSTALLATION Remount the rear shock absorber in the reverse order of removal. Pay attention to the following points: • Install the rear shock absorber and tighten the rear shock absorber upper/lower mounting bolts and nuts. Rear shock absorber mounting nut: 50 N·m (5.0 kgf-m, 36.0 lb-ft) SUSPENSION SETTING After installing the rear suspension, adjust the spring pre-load…
-
Page 375: Rear Suspension
8-52 CHASSIS REAR SUSPENSION CONSTRUCTION 1 Rear shock absorber A Swingarm pivot boss (LH) 2 Rear cushion rod Rear shock absorber mounting 3 Rear cushion lever bolt/nut ITEM N·m kgf-m lb-ft 4 Spacer B Rear cushion lever bolt/nut 36.0 5 Bearing C Rear cushion rod bolt/nut 56.5…
-
Page 376: Removal
CHASSIS 8-53 REMOVAL • Cut the drive chain. (8-86) NOTE: It is not necessary to cut the drive chain, unless replacing drive chain or swingarm. • Remove the rear wheel. (8-41) • Remove the side-stand 1. NOTE: It is not necessary to remove the side-stand, unless when replacing the cushion lever.
-
Page 377
8-54 CHASSIS • Hold the swingarm pivot shaft 5 and remove the swingarm pivot nut 6. 09944-28320: Hexagon socket (19 mm) • Draw out the swingarm pivot shaft. • Remove the rear suspension assembly. • Remove the cushion rods 7. •… -
Page 378: Inspection And Disassembly
CHASSIS 8-55 • Set the swingarm pivot boss by its set screws. • Tighten the swingarm boss nut to the specified torque. Swingarm pivot boss nut: 65 N·m (6.5 kgf-m, 47.0 lb-ft) INSPECTION AND DISASSEMBLY SPACER • Remove the spacers from swingarm. •…
-
Page 379
8-56 CHASSIS • Draw out the swingarm pivot bearings 1 and the swingarm cushion rod upper bearings 2 with the special tool. 09921-20240: Bearing remover set (1 28 mm) (2 17 mm) The removed bearings must be replaced with new ones. -
Page 380
CHASSIS 8-57 SWINGARM PIVOT SHAFT • Using a dial gauge, check the pivot shaft runout and replace it if the runout exceeds the limit. Swingarm pivot shaft runout: Service limit: 0.3 mm (0.01 in) 09900-20607: Dial gauge (1/100 mm, 10 mm) 09900-20701: Magnetic stand 09900-21304: V-block set (100 mm) CHAIN BUFFER… -
Page 381: Reassembly
Left Right 115 N·m 11.5 kgf-m 83.0 lb-ft 50 N·m 5.0 kgf-m 36.0 lb-ft Apply SUZUKI SUPER GREASE “A” to the bearings, washers and dust seals. 1 mm (0.04 in) 1 mm (0.04 in) 78 N·m 7.8 kgf-m 56.5 lb-ft 78 N·m…
-
Page 382
09924-84521: Bearing installer set NOTE: When installing the bearing, stamped mark on the bearing must face outside. • Apply SUZUKI SUPER GREASE “A” to the bearings, spacers. 99000-25030: SUZUKI SUPER GREASE “A” (USA) 99000-25010: SUZUKI SUPER GREASE “A” (Others) -
Page 383: Installation
8-60 CHASSIS • Assemble the cushion rod onto the swingarm temporarily. NOTE: The stamped marks A on the cushion rod should be face out- side. • Remount the chain cases 1 chain buffer 2 and rear fender INSTALLATION Install the swingarm in the reverse order of disassembly and removal, and pay attention to the following points.
-
Page 384: Final Inspection And Adjustment
CHASSIS 8-61 SHOCK ABSORBER AND CUSHION LEVER MOUNTING NUT • Install the washers A and cushion lever. (8-58) • Tighten the cushion lever mounting nut 1 to the specified torque. Cushion lever mounting nut: 78 N·m (7.8 kgf-m, 56.5 lb-ft) •…
-
Page 385: Front Brake
8-62 CHASSIS FRONT BRAKE CONSTRUCTION 1 Brake lever 9 Brake hose 2 Dust boot A Master cylinder mounting bolt ITEM N·m kgf-m lb-ft 3 Piston set B Brake hose union bolt 4 Piston seal C Caliper mounting bolt 16.5 5 Dust seal D Caliper air bleeder valve 28.0…
-
Page 386: Brake Pad Replacement
CHASSIS 8-63 * This brake system is filled with an ethylene glycol-based DOT 4 brake fluid. Do not use mix different types of fluid such as silicone-based or petroleum-based. * Do not use any brake fluid taken from old, used or unsealed containers. Never reuse brake fluid left over from the last servicing or stored for long periods.
-
Page 387: Brake Fluid Replacement
8-64 CHASSIS • Install the spring to the caliper, bring its wider side of pawl A facing top. • Install the new brake pads. • Install the brake caliper. • Tighten each bolt to the specified torque. Pad mounting pin 1: 15 N·m (1.5 kgf-m, 11.0 lb-ft) Front brake caliper mounting bolt 2: 39 N·m (3.9 kgf-m, 28.0 lb-ft) NOTE:…
-
Page 388: Caliper Removal
CHASSIS 8-65 CALIPER REMOVAL • Remove the brake hose from the caliper by removing the union bolt 1 and catch the brake fluid in a suitable recepta- cle. NOTE: Place a rag underneath the union bolt on the brake caliper to catch any split brake fluid.
-
Page 389: Caliper Inspection
8-66 CHASSIS • Remove the dust seals 4 and piston seals 5. Avoid reusing the dust seals and piston seals to pre- vent fluid leakage. CALIPER INSPECTION BRAKE CALIPER • Inspect the brake caliper cylinder wall for nicks, scratches or other damage.
-
Page 390: Caliper Installation
CHASSIS 8-67 PISTON SEAL • Install the piston seals as shown in the illustration. Dust seal Caliper body Piston seal O-RING • Install the new O-ring 1 and reassemble caliper halves. Replace the O-ring with a new one. • Temporarily tighten the air bleeder valve 2. •…
-
Page 391: Brake Disc Inspection
8-68 CHASSIS BRAKE DISC INSPECTION • Visually check the brake disc for damage or cracks. • Measure the thickness with a micrometer. • Replace the disc if the thickness is less than the service limit or if damage is found. …
-
Page 392: Master Cylinder Removal And Disassembly
CHASSIS 8-69 MASTER CYLINDER REMOVAL AND DISAS- SEMBLY • Drain the brake fluid. (8-64) • Disconnect the front brake light switch lead wires 1. • Place a rag underneath the union bolt 2 on the master cylin- der to catch any split brake fluid. Remove the union bolt and disconnect the brake hose.
-
Page 393: Master Cylinder Inspection
8-70 CHASSIS • Remove the dust boot 9 push rod 0 and snap ring A. • Remove the following parts. B Secondary cup C Piston D Primary cup E Return spring F Return spring guide G Air bleeder valve • Remove the dust rubber H and snap ring I. •…
-
Page 394: Master Cylinder Reassembly
• Install the O-ring to the brake hose connector. Use a new O-ring to prevent the fluid leakage. • Apply SUZUKI SUPER GREASE “A” to the push rod. 99000-25030: SUZUKI SUPER GREASE “A” (USA) 99500-25010: SUZUKI SUPER GREASE “A” (others)
-
Page 395: Master Cylinder Installation
8-72 CHASSIS • Apply SUZUKI SILICONE GREASE to the brake lever mount- ing bolt. 99000-25100: SUZUKI SILICONE GREASE • Align the convex part A of brake light switch with the hole B of master cylinder when installing the brake light switch.
-
Page 396: Rear Brake
CHASSIS 8-73 REAR BRAKE CONSTRUCTION 1 Brake pedal A Caliper air bleeder valve 2 Piston/Cup set B Brake hose union bolt ITEM N·m kgf-m lb-ft 3 Reservoir hose C Brake caliper mounting bolt 4 Brake hose D Brake master cylinder mounting bolt 16.5 5 Brake pad E Brake master cylinder rod lock-nut…
-
Page 397: Brake Pad Replacement
8-74 CHASSIS * This brake system is filled with an ethylene glycol-based DOT 4 brake fluid. Do not use mix different types of fluid such as silicone-based or petroleum-based. * Do not use any brake fluid taken from old, used or unsealed containers. Never reuse brake fluid left over from the last servicing or stored for long periods.
-
Page 398: Brake Fluid Replacement
CHASSIS 8-75 BRAKE FLUID REPLACEMENT • Remove the brake fluid reservoir cap 1. • Replace the brake fluid in the same manner as the front brake. (8-64) Specification and classification: DOT 4 Bleed air from the brake system. (2-26) CALIPER REMOVAL •…
-
Page 399: Caliper Disassembly
8-76 CHASSIS CALIPER DISASSEMBLY • Remove the caliper air bleeder valve 1. • Remove the caliper housing bolts 2. • Separate the caliper halves. • Remove the O-ring 3. Replace the O-ring with a new one. • Place a rag over the piston to prevent it from popping out and then force out the pistons using compressed air.
-
Page 400: Caliper Reassembly
CHASSIS 8-77 CALIPER REASSEMBLY Reassemble the caliper in the reverse order of disassembly. Pay attention to the following points: • Clean the caliper bores and pistons with specified brake fluid, especially the dust seal grooves and piston seal grooves. Specification and classification: DOT 4 …
-
Page 401: Caliper Installation
8-78 CHASSIS • Completely clean the thread of caliper housing and bolts. • Apply THREAD LOCK to the caliper housing bolts. 99000-32130: THREAD LOCK SUPER “1360” CALIPER INSTALLATION Install the caliper in the reverse order of removal. Pay attention to the following points: •…
-
Page 402: Master Cylinder Removal
CHASSIS 8-79 MASTER CYLINDER REMOVAL • Drain the brake fluid. (8-64) • Remove the brake fluid reservoir mounting bolt 1. • Place a rag underneath the union bolt on the master cylinder to catch spilled drops of brake fluid. Remove the union bolt 2 and disconnect the brake hose.
-
Page 403: Master Cylinder Inspection
8-80 CHASSIS • Pull out the dust boot 5, then remove the snap ring 6. 09900-06108: Snap ring pliers • Remove the push rod 7, piston/primary cup 8 and spring 9. MASTER CYLINDER INSPECTION CYLINDER, PISTON AND CUP SET •…
-
Page 404: Master Cylinder Installation
CHASSIS 8-81 • Apply SUZUKI SILICONE GREASE to the push rod end. 99000-25100: SUZUKI SILICONE GREASE MASTER CYLINDER INSTALLATION Install the master cylinder in the reverse order of removal. Pay attention to the following points: • Apply THREAD LOCK to the master cylinder mounting bolts.
-
Page 405: Tire And Wheel
8-82 CHASSIS TIRE AND WHEEL TIRE REMOVAL The most critical factor of tubeless tire is the seal between the wheel rim and the tire bead. For this reason, it is recommended to use a tire changer that can satisfy this sealing requirement and can make the operation efficient as well as functional.
-
Page 406: Valve Inspection
CHASSIS 8-83 VALVE INSPECTION • Inspect the valve after the tire is removed from the rim. • Replace the valve with a new one if the seal A rubber is peel- ing or has damage. NOTE: If the external appearance of the valve shows no abnormal con- dition, removing of the valve is not necessary.
-
Page 407: Tire Installation
8-84 CHASSIS TIRE INSTALLATION • Apply tire lubricant to the tire bead. • When installing the tire onto the wheel, observe the following points. * Do not reuse the valve which has been once removed. * Never use oil, grease or gasoline on the tire bead in place of tire lubricant.
-
Page 408: Balancer Weight Installation
CHASSIS 8-85 • In this condition, check the “rim line” B cast on the tire side walls. The line must be equidistant from the wheel rim all around. If the distance between the rim line and wheel rim varies, this indicates that the bead is not properly seated. If this is the case, deflate the tire completely and unseat the bead for both sides.
-
Page 409: Drive Chain
8-86 CHASSIS DRIVE CHAIN Use the special tool in the following procedures, to cut and rejoin the drive chain. 09922-22711: Drive chain cutting and joining tool set NOTE: When using the special tool, apply a small quantity of grease to the threaded parts of the special tool.
-
Page 410: Drive Chain Connecting
CHASSIS 8-87 • Place the drive chain link being disjointed on the holder part 8 of the tool. • Turn in both the adjuster bolt 6 and pressure bolt “A” 3 so that each of their end hole fits over the chain joint pin properly. •…
-
Page 411
8-88 CHASSIS • Apply grease on the recessed portion of the joint plate holder 3 and set the joint plate 0. NOTE: When positioning the joint plate 0 on the tool, its stamp mark must face the joint plate holder 3 side. •… -
Page 412
CHASSIS 8-89 • Stake the joint pin by turning (approximately 7/8 turn) the pressure bolt “A” 3 with the bar until the pin end diameter becomes the specified dimension. Pin end diameter specification D 5.50 – 5.80 mm (0.217 – 0.228 in) … -
Page 413: Electrical System
ELECTRICAL SYSTEM 9-1 ELECTRICAL SYSTEM CONTENTS CAUTIONS IN SERVICING …………….9- 3 CONNECTOR ………………9- 3 COUPLER………………..9- 3 CLAMP ………………..9- 3 FUSE………………….. 9- 3 SEMI-CONDUCTOR EQUIPPED PART ……….9- 4 BATTERY ………………..9- 4 CONNECTING THE BATTERY………….. 9- 4 WIRING PROCEDURE…………….
-
Page 414
9-2 ELECTRICAL SYSTEM ELECTRICAL SYSTEM CONTENTS RELAYS ………………….. 9-37 TURN SIGNAL/SIDE-STAND RELAY ……….. 9-37 STARTER RELAY ……………… 9-37 FUEL PUMP RELAY …………….9-37 COOLING FAN RELAY…………….9-37 IGNITION SWITCH REMOVAL ………….. 9-38 IGNITION SWITCH INSTALLATION…………9-38 SWITCHES INSPECTION …………..9-39 BATTERY ………………… -
Page 415: Cautions In Servicing
ELECTRICAL SYSTEM 9-3 CAUTIONS IN SERVICING CONNECTOR • When connecting a connector, be sure to push it in until a click is felt. Click • Inspect the connector for corrosion, contamination and break- age in its cover. COUPLER Click • With a lock type coupler, be sure to release the lock when dis- connecting, and push in fully to engage the lock when con- necting.
-
Page 416: Semi-Conductor Equipped Part
9-4 ELECTRICAL SYSTEM SEMI-CONDUCTOR EQUIPPED PART • Be careful not to drop the part with a semi-conductor built in INCORRECT such as a ECM. • When inspecting this part, follow inspection instruction strictly. Neglecting proper procedure may cause damage to this part. BATTERY •…
-
Page 417: Using The Multi-Circuit Tester
ELECTRICAL SYSTEM 9-5 USING THE MULTI-CIRCUIT TESTER • Properly use the multi-circuit tester + and — probes. Improper use can cause damage to the motorcycle and tester. • If the voltage and current values are not known, begin mea- suring in the highest range. •…
-
Page 418: Location Of Electrical Components
9-6 ELECTRICAL SYSTEM LOCATION OF ELECTRICAL COMPONENTS 1 Battery 0 Ignition coil (No.1, 2, 3, 4) 2 Cooling fan relay (7-7) A STV actuator (4-65) 3 Fuel pump relay (5-6) B STP sensor (4-68) 4 AP sensor (4-56) C TP sensor (4-43) 5 ECM (Engine Control Module) D IAT sensor (4-52) 6 Mode selection switch coupler (4-25)
-
Page 419
ELECTRICAL SYSTEM 9-7 1 IAP sensor (4-37) 9 Regulator/Rectifier 2 Secondary fuel injector (4-77) 0 Horn 3 Primary fuel injector (4-75) A Generator 4 ECT sensor (4-48) B Fuse box 5 Fuel level gauge (5-8) C Turn signal/Side-stand relay 6 Fuel pump (5-8) D Speed sensor 7 TO sensor (4-61) E GP switch… -
Page 420: Charging System
9-8 ELECTRICAL SYSTEM CHARGING SYSTEM Regulator/Rectifier IG. switch Generator TROUBLESHOOTING Battery runs down quickly Step 1 1) Check accessories which use excessive amounts of electricity. Are accessories being installed? Remove accessories. Go to Step 2. Step 2 1) Check the battery for current leaks. (9-9) Is the battery for current leaks OK? Go to Step 3.
-
Page 421: Inspection
ELECTRICAL SYSTEM 9-9 Step 5 1) Measure the generator no-load performance. (9-11) Is the generator no-load performance OK? Go to Step 6. Faulty generator Step 6 1) Inspect the regulator/rectifier. (9-11) Is the regulator/rectifier OK? Go to Step 7. Faulty regulator/rectifier Step 7 1) Inspect wirings.
-
Page 422
9-10 ELECTRICAL SYSTEM REGULATED VOLTAGE • Remove the front seat. (8-7) • Start the engine and keep it running at 5 000 r/min with the dimmer switch turned HI position. • Measure the DC voltage between the + and — battery termi- nals using the multi-circuit tester. -
Page 423
ELECTRICAL SYSTEM 9-11 GENERATOR NO-LOAD PERFORMANCE • Lift and support the fuel tank. (5-3) • Disconnect the generator coupler. • Start the engine and keep it running at 5 000 r/min. • Using the multi-circuit tester, measure the voltage between three lead wires. -
Page 424: Starter System And Side-Stand/Ignition Interlock System
9-12 ELECTRICAL SYSTEM STARTER SYSTEM AND SIDE-STAND/IGNITION INTERLOCK SYSTEM Engine stop Ignition switch switch Fuse (30 A) To Ignition coil Starter motor Fuse GP switch (10 A) (Neutral) Battery Starter relay Starter Turn signal/ button side-stand relay Clutch switch side-stand switch TROUBLESHOOTING Make sure that the fuses are not blown and the battery is fully-charged before diagnosing.
-
Page 425: Starter Motor Removal
ELECTRICAL SYSTEM 9-13 Step 3 1) Measure the starter relay voltage at the starter relay connectors (between Y/G + and B/Y -) when the starter button is pushed. Is a voltage OK? Go to Step 4. • Faulty engine stop switch •…
-
Page 426: Starter Motor Disassembly
9-14 ELECTRICAL SYSTEM STARTER MOTOR DISASSEMBLY • Disassemble the starter motor as shown in the illustration. 1 O-ring 4 Armature 2 Housing end (inside) 5 Housing end (outside) ITEM N·m kgf-m lb-ft 3 Starter motor case A Lead wire mounting bolt STARTER MOTOR INSPECTION CARBON BRUSH Inspect the brushes for abnormal wear, cracks, or smoothness…
-
Page 427: Starter Motor Reassembly
Reassemble the starter motor in the reverse order of disassem- bly. Pay attention to the following points: • Apply SUZUKI SUPER GREASE “A” to the lip of the oil seal. 99000-25030: SUZUKI SUPER GREASE “A” (USA) 99000-25010: SUZUKI SUPER GREASE “A” (Others) •…
-
Page 428: Starter Relay Inspection
9-16 ELECTRICAL SYSTEM • Tighten the starter motor lead wire mounting bolt to the speci- fied torque. Lead wire mounting bolt: 3 N·m (0.3 kgf-m, 2.0 lb-ft) STARTER RELAY INSPECTION • Remove the front seat. (8-7) • Disconnect the battery — lead wire from the battery. •…
-
Page 429: Side Stand/Ignition Interlock System Parts Inspection
ELECTRICAL SYSTEM 9-17 SIDE STAND/IGNITION INTERLOCK SYSTEM PARTS INSPECTION Check the interlock system for proper operation. If the interlock system does not operate properly, check each component for damage or abnormalities. If any abnormality is found, replace the component with a new one. SIDE-STAND SWITCH The side-stand switch coupler is located above the crankcase.
-
Page 430
9-18 ELECTRICAL SYSTEM GEAR POSITION SWITCH • Lift and support the fuel tank. (5-3) • Disconnect the gear position switch coupler and check the continuity between Blue and Black/White with the transmis- sion in “NEUTRAL”. 09900-25008: Multi-circuit tester set … -
Page 431
ELECTRICAL SYSTEM 9-19 TURN SIGNAL/SIDE-STAND RELAY The turn signal/side-stand relay is composed of the turn signal relay, side-stand relay and diode. • Remove the turn signal/side-stand relay. SIDE-STAND RELAY INSPECTION First check the insulation between D and E terminals with the tester. -
Page 432: Ignition System
9-20 ELECTRICAL SYSTEM IGNITION SYSTEM Engine stop switch Side- stand Power source relay circuit Fuse sensor Waveform arrangement Ignition circuit switch Fuse Waveform arrangement circuit Battery sensor sensor sensor switch NOTE: The fuel cut-off circuit is incorporated in this ECM in order to prevent over-running of engine. When engine speed reaches 13 300 r/min, this circuit cuts off fuel at the fuel injector.
-
Page 433: Immobilizer (Except For E-03, 28, 33)
ELECTRICAL SYSTEM 9-21 IMMOBILIZER (Except for E-03, 28, 33) DESCRIPTION The immobilizer, an anti-theft system, is installed as a standard equipment. The immobilizer verifies that the key ID agrees with ECM ID by means of radio communication through the immobilizer antenna. When the ID agreement is verified, the system makes the engine ready to start. Immobi-antenna Indicator light Indicator light…
-
Page 434
9-22 ELECTRICAL SYSTEM Operation When the ignition switch is turned ON with the engine stop switch in ON, the immobi-antenna and ECM are powered ON. The ECM transmits a signal to the transponder through the immobi-antenna in order to make comparison between the key ID and ECM ID. -
Page 435: Troubleshooting
ELECTRICAL SYSTEM 9-23 TROUBLESHOOTING No spark or poor spark NOTE: Check that the transmission is in neutral and the engine stop switch is in the “RUN” position. Grasp the clutch lever. Check that the fuse is not blown and the battery is fully-charged before diagnosing. Step 1 1) Check the ignition system couplers for poor connections.
-
Page 436
9-24 ELECTRICAL SYSTEM Step 5 1) Inspect the ignition coil/plug caps. (9-26) Is the ignition coil/plug cap OK? Go to Step 6. • Poor connection of the ignition coil/plug cap(-s). • Faulty ignition coil/plug cap(-s). Step 6 1) Measure the crankshaft position sensor peak voltage and its resistance. (9-27 to -28) NOTE: The crankshaft position sensor peak voltage inspection is applicable only with the multi circuit tester and peak volt adaptor. -
Page 437: Inspection
ELECTRICAL SYSTEM 9-25 INSPECTION IGNITION COIL PRIMARY PEAK VOLTAGE • Remove the air cleaner box. (5-13) • Disconnect all the ignition coil/plug cap lead wire couplers before removing the ignition coil/plug caps. • Remove all of the ignition coil/plug caps. …
-
Page 438
9-26 ELECTRICAL SYSTEM NOTE: Use the special tool, to prevent the rubber of the water proof coupler from damage. • Shift the transmission into neutral and turn ignition switch “ON”. • Crank the engine a few seconds with the starter motor by depressing starter button and check the ignition coil primary peak voltage. -
Page 439
ELECTRICAL SYSTEM 9-27 CKP SENSOR PEAK VOLTAGE • Remove the front seat. (8-7) NOTE: Be sure that all couplers are connected properly and the battery used is in fully-charged condition. • Disconnect the both couplers 1. • Connect the multi-circuit tester with peak volt adaptor as fol- lows. -
Page 440
9-28 ELECTRICAL SYSTEM If the peak voltage is lower than the standard range, check the peak voltage at the CKP sensor lead wire coupler. Green • Lift and support the fuel tank. (5-3) • Disconnect the CKP sensor lead wire coupler and connect the multi-circuit tester with the peak volt adaptor. -
Page 441: Combination Meter
ELECTRICAL SYSTEM 9-29 COMBINATION METER DESCRIPTION This combination meter mainly consists of the stepping motor, LCD (Liquid Crystal Display) and LED (Light Emitting Diode). This combination meter is light, thin and of high response compared to those currently in use because of this composition. The rpm pointer is driven by the stepping motor.
-
Page 442: Removal And Disassembly
9-30 ELECTRICAL SYSTEM REMOVAL AND DISASSEMBLY • Remove the screws 1. • With the hooked parts 2 of the combination meter pulled from the headlight housing, disconnect the combination meter lead wire coupler. • Remove the combination meter. When disconnecting and reconnecting the combina- tion meter coupler, make sure to turn OFF the ignition switch, or electronic parts may get damaged.
-
Page 443: Inspection
ELECTRICAL SYSTEM 9-31 INSPECTION LED (LIGHT EMITTING DIODE) Check that the LED lights [FI light, Fuel level indicator light, Engine revolution indicator lamp and immobilizer indicator light (For E-02, 19, 24)] immediately after turning the ignition switch on. Also, other LED lights (Neutral indicator light, High-beam indicator light and Turn signal indicator light) can be checked by depend- ing on each switch position.
-
Page 444
9-32 ELECTRICAL SYSTEM ENGINE COOLANT TEMPERATURE METER AND INDICATOR ECT sensor inspection (7-7 to -8) • Lift and support the fuel tank. (5-3) • Disconnect the ECT sensor coupler 1. When connecting and disconnecting the engine cool- ant temperature sensor lead wire coupler, make sure to turn OFF the ignition switch, or electronic parts may get damaged. -
Page 445
ELECTRICAL SYSTEM 9-33 FUEL LEVEL GAUGE INSPECTION • Remove and disassemble the fuel pump assembly. (5-8) • Measure the resistance at each fuel level gauge float position. If the resistance is incorrect, replace the fuel level gauge with a new one. Float position Resistance 196.4 mm… -
Page 446
9-34 ELECTRICAL SYSTEM SPEEDOMETER If the speedometer, odometer or trip meter does not function properly, inspect the speedometer sensor and connection of couplers. If the speed sensor and connection are functioning properly, replace the meter with a new one. SPEED SENSOR •… -
Page 447: Lamps
ELECTRICAL SYSTEM 9-35 LAMPS HEADLIGHT, BRAKE LIGHT/TAILLIGHT, LICENSE PLATE LIGHT AND TURN SIGNAL LIGHT HEADLIGHT 12 V 55 W H7 1 12 V 60 W HB3 2 POSITION LIGHT 3 12 V 5 W × 2 BRAKE LIGHT/TAILLIGHT: LED LICENCE PLATE LIGHT 4 12 V 5 W TURN SIGNAL LIGHT 5 12 V 21 W ×…
-
Page 448
9-36 ELECTRICAL SYSTEM HEADLIGHT BEAM ADJUSTMENT • Adjust the headlight beam. NOTE: * Use a screw driver + for adjuster A, B and C. * To adjust the headlight beam, adjust the beam horizontally first, then adjust vertically. A: Horizontal adjuster (Low beam) B: Vertical adjuster (Low beam) C: Horizontal adjuster (Hi beam) D: Vertical adjuster (Low beam) -
Page 449: Relays
ELECTRICAL SYSTEM 9-37 RELAYS TURN SIGNAL/SIDE-STAND RELAY The turn signal/side-stand relay is composed of the turn signal relay, side-stand relay and diode. INSPECTION Before removing the turn signal/side-stand relay, check the operation of the turn signal light. If the turn signal light does not illuminate, inspect the bulb, turn signal switch and circuit connection.
-
Page 450: Ignition Switch Removal
9-38 ELECTRICAL SYSTEM IGNITION SWITCH REMOVAL • Remove the air cleaner box. (5-13) • Disconnect the ignition switch lead wire coupler (Green) 1. • Disconnect the immobilizer lead wire coupler (Black) 2. (For E-02, 19, 24) • Remove the cable guide 3. •…
-
Page 451: Switches Inspection
ELECTRICAL SYSTEM 9-39 SWITCHES INSPECTION Inspect each switch for continuity with a tester. If any STARTER BUTTON abnormality is found, replace the respective switch Color Position assemblies with new ones. PUSH HAZARD SWITCH HORN BUTTON Color Position Color B/Bl (OFF) Position (ON) PUSH…
-
Page 452: Battery
9-40 ELECTRICAL SYSTEM BATTERY SPECIFICATIONS Type designation FT12A-BS Capacity 12 V, 36 kC (10 Ah)/10 HR 1 Upper cover breather 5 Terminal 2 Cathode plates 6 Safety valve 3 Stopper 7 Anode plates 4 Filter 8 Separator (Fiberglass plate) INITIAL CHARGING Filling electrolyte •…
-
Page 453
ELECTRICAL SYSTEM 9-41 NOTE: If no air bubbles are coming up from a filler port, tap the bottom of the electrolyte container two or three times. Never remove the container from the battery. • After confirming that the electrolyte has entered the battery completely, remove the electrolyte containers from the bat- tery. -
Page 454: Servicing
9-42 ELECTRICAL SYSTEM SERVICING Visually inspect the surface of the battery container. If any signs of cracking or electrolyte leakage from the sides of the battery have occurred, replace the battery with a new one. If the battery terminals are found to be coated with rust or an acidic white powdery substance, clean the battery terminals with sandpaper.
-
Page 455: Servicing Information
SERVICING INFORMATION 10-1 SERVICING INFORMATION CONTENTS TROUBLESHOOTING …………….10- 3 FI SYSTEM MALFUNCTION CODE AND DEFECTIVE CONDITION ………………10- 3 ENGINE ………………..10- 7 RADIATOR (COOLING SYSTEM) …………10-13 CHASSIS ………………..10-14 BRAKES ………………..10-15 ELECTRICAL ………………10-16 BATTERY ………………… 10-17 WIRING HARNESS, CABLE AND HOSE ROUTING………
-
Page 456
10-2 SERVICING INFORMATION SERVICING INFORMATION CONTENTS TIGHTENING TORQUE …………….10-45 ENGINE ………………..10-45 FI SYSTEM AND INTAKE AIR SYSTEM ……….10-46 COOLING SYSTEM…………….10-46 CHASSIS ………………..10-47 TIGHTENING TORQUE CHART …………10-48 SERVICE DATA ………………10-49… -
Page 457: Troubleshooting
SERVICING INFORMATION 10-3 TROUBLESHOOTING FI SYSTEM MALFUNCTION CODE AND DEFECTIVE CONDITION DETECTED DTC No. DETECTED FAILURE CONDITION CHECK FOR ITEM NO FAULT ––––––––––– ––––––––––– CMP sensor The signal does not reach ECM for 3 CMP sensor wiring and mechan- sec. or more, after receiving the starter ical parts signal.
-
Page 458
10-4 SERVICING INFORMATION DETECTED DTC No. DETECTED FAILURE CONDITION CHECK FOR ITEM IAT sensor The sensor voltage should be the fol- IAT sensor, lead wire/coupler lowing. connection 0.15 V sensor voltage < 4.85 V In other than the above range, C21 (P0110) is indicated. -
Page 459
SERVICING INFORMATION 10-5 DETECTED DTC No. DETECTED FAILURE CONDITION CHECK FOR ITEM STP sensor The sensor should produce following STP sensor, lead wire/coupler voltage. connection 0.15 V sensor voltage < 4.85 V In other than the above range, C29 (P1654) is indicated. Sensor voltage is higher than specified STP sensor circuit shorted to value. -
Page 460
10-6 SERVICING INFORMATION DETECTED DTC No. DETECTED FAILURE CONDITION CHECK FOR ITEM Exhaust con- EXCVA position sensor produces fol- EXCVA, EXCVA lead wire/cou- trol valve lowing voltage. pler actuator 0.1 V sensor voltage < 4.9 V In other than the above range, C46 (P1675) is indicated. -
Page 461: Engine
SERVICING INFORMATION 10-7 ENGINE Complaint Symptom and possible causes Remedy Engine will not start Compression too low or is hard to start. 1. Valve clearance out of adjustment Adjust. 2. Worn valve guides or poor seating of valves Repair or replace. 3.
-
Page 462
10-8 SERVICING INFORMATION Complaint Symptom and possible causes Remedy Engine idles poorly. 1. Valve clearance out of adjustment Adjust. 2. Poor seating of valves Replace or repair. 3. Defective valve guides Replace. 4. Worn down camshafts Replace. 5. Too wide spark plug gaps Adjust or replace. -
Page 463
SERVICING INFORMATION 10-9 Complaint Symptom and possible causes Remedy Noisy engine Excessive valve chatter Adjust. 1. Too large tappet clearance 2. Weakened or broken valve springs Replace. 3. Worn tappet or cam surface Replace. 4. Worn and burnt camshaft journal Replace. -
Page 464
10-10 SERVICING INFORMATION Complaint Symptom and possible causes Remedy Engine runs poorly Defective engine internal/electrical parts Replace. in high speed range. 1. Weakened valve springs 2. Worn camshafts Replace. 3. Valve timing out of adjustment Adjust. 4. Too narrow spark plug gaps Adjust. -
Page 465
SERVICING INFORMATION 10-11 Complaint Symptom and possible causes Remedy Engine lacks power. Defective engine internal/electrical parts Adjust. 1. Loss of tappet clearance 2. Weakened valve springs Replace. 3. Valve timing out of adjustment Adjust. 4. Worn piston rings or cylinders Replace. -
Page 466
10-12 SERVICING INFORMATION Complaint Symptom and possible causes Remedy Engine overheats Defective engine internal parts 1. Heavy carbon deposit on piston crowns Clean. 2. Not enough oil in the engine Add oil. 3. Defective oil pump or clogged oil circuit Replace or clean. -
Page 467: Radiator (Cooling System)
SERVICING INFORMATION 10-13 RADIATOR (COOLING SYSTEM) Complaint Symptom and possible causes Remedy Engine overheats 1. Not enough engine coolant Add coolant. 2. Radiator core clogged with dirt or scale Clean. 3. Faulty cooling fan Repair or replace. 4. Defective cooling fan relay, or open- or short- Repair or replace.
-
Page 468: Chassis
10-14 SERVICING INFORMATION CHASSIS Complaint Symptom and possible causes Remedy Heavy steering 1. Overtightened steering stem nut Adjust. 2. Broken bearing in steering stem Replace. 3. Distorted steering stem Replace. 4. Not enough pressure in tires Adjust. Wobbly handlebars 1. Loss of balance between right and left front forks Adjust.
-
Page 469: Brakes
SERVICING INFORMATION 10-15 BRAKES Complaint Symptom and possible causes Remedy Insufficient brake 1. Leakage of brake fluid from hydraulic system Repair or replace. power 2. Worn pads Replace. 3. Oil adhesion of engaging surface of pads/shoe Clean disc and pads. 4.
-
Page 470: Electrical
10-16 SERVICING INFORMATION ELECTRICAL Complaint Symptom and possible causes Remedy No sparking or poor 1. Defective ignition coils Replace. sparking 2. Defective spark plugs Replace. 3. Defective CKP sensor Replace. 4. Defective ECM Replace. 5. Defective TO sensor Replace. 6. Open-circuited wiring connections Check and repair.
-
Page 471: Battery
SERVICING INFORMATION 10-17 BATTERY Complaint Symptom and possible causes Remedy “Sulfation”, acidic 1. Cracked battery case Replace the battery. white powdery sub- 2. Battery has been left in a run-down condition for Replace the battery. stance or spots on a long time. surface of cell plates Battery runs down…
-
Page 472: Wiring Harness, Cable And Hose Routing
10-18 SERVICING INFORMATION WIRING HARNESS, CABLE AND HOSE ROUTING WIRING HARNESS ROUTING Engine ground lead wire TO sensor Engine ground lead wire Fuel shut-off valve TO sensor Regulator/Rectifier Clamp Fixed To brake light clamp Clutch cable switch Clamp E-33 only Regulator/Rectifier To brake light Clamp…
-
Page 473
SERVICING INFORMATION 10-19 Clamp (After binding the lead wires, cut the clamp end.) Clamp Locate the junction of the wire harness to the center of the headlight. Clamp (After binding the lead wires, cut the clamp end.) Backside of the headlight 10 mm (0.4 in) Immobilizer label Backside of the fuel tank… -
Page 474
10-20 SERVICING INFORMATION Clamp Clamp Grommet CKP sensor GP switch lead wire GP switch lead wire is made to slacken. Oil pressure switch 14 N·m GP switch 1.4 kgf-m 10.0 lb-ft 5 N·m (0.5 kgf-m, 3.5 lb-ft) 1.5 N·m (0.15 kgf-m, 1.0 lb-ft) 10 N·m (1.0 kgf-m, 7.0 lb-ft) Engine ground lead wire… -
Page 475: Cable Routing
SERVICING INFORMATION 10-21 CABLE ROUTING Clutch cable, Part No. Clutch cable, Lot No. Clutch cable guide Wiring harness Clutch cable Throttle cable guide Water bypass hose Clutch cable guide Clutch cable Throttle cable Throttle cable guide Throttle cable No. 1 0 mm (0 in) Clutch cable Throttle cable No.
-
Page 476: Throttle Body Hose Routing
10-22 SERVICING INFORMATION THROTTLE BODY HOSE ROUTING 1 Fuel feed hose 4 Purge hose (E-33 only) 2 PCV (breather) hose 5 Surge hose (E-33 only) 3 IAP sensor vacuum hose 6 EVAP canister (E-33 only)
-
Page 477: Fuel Tank Drain Hose Routing
SERVICING INFORMATION 10-23 FUEL TANK DRAIN HOSE ROUTING 45˚ 45˚ 1 Fuel feed hose 5 Hose clamp Pass the breather hose 2 and drain hose 3 2 Breather hose through under the wiring harness. Pass the breather hose 2 and drain hose 3 3 Drain hose through ahead of the fuse box.
-
Page 478: Cooling System Hose Routing
10-24 SERVICING INFORMATION COOLING SYSTEM HOSE ROUTING : The ends of the clamp should face..: The clamp screw head should face..Hose clamp bolt tightening torque: 2 N·m (0.2 kgf-m, 1.5 lb-ft) Backward. Backward. Marking (White) Backward. Backward. Air bleeder 6 N·m 0.6 kgf-m 4.5 lb-ft…
-
Page 479: Front Brake Hose Routing
SERVICING INFORMATION 10-25 FRONT BRAKE HOSE ROUTING 1 – 2 mm (0.04 – 0.08 in) 49˚ 42˚ 14˚ 42˚ 42˚ After positioning the clamp with stopper, tighten *1 Clamp ends should face downward. the clamp bolt. Insert the clamp to the hole of the front fender *2 Clamp ends should face backward.
-
Page 480: Rear Brake Hose Routing
10-26 SERVICING INFORMATION REAR BRAKE HOSE ROUTING 28˚ 5˚ *1 Clamp ends should face backward. *3 White paint faces topside. After the brake hose union has contacted the stopper, tighten the union bolt.
-
Page 481: Pair (Air Supply) System Hose Routing
SERVICING INFORMATION 10-27 PAIR (AIR SUPPLY) SYSTEM HOSE ROUTING Approx. Approx. Approx. 0˚ 0˚ 45˚ 1 PAIR control solenoid valve 3 Air cleaner box 2 PAIR reed valve *1 To air cleaner box…
-
Page 482: Fuel Tank Installation
10-28 SERVICING INFORMATION FUEL TANK INSTALLATION 2 mm (0.08 in) 5 mm (0.20 in) 4 mm (0.16 in) A Apply an adhesive agent. 3 Fuel tank cover 1 Velcro fastening 4 Fuel tank side cushion 2 Frame cover cushion…
-
Page 483: Fuel Tank Lower Side Cover Cushion Rubber
SERVICING INFORMATION 10-29 FUEL TANK LOWER SIDE COVER CUSHION RUBBER/ FASTENER INSTALLATION 33 – 39 mm (1.30 – 1.54 in) 41 – 47 mm (1.61 – 1.85 in) 1 Cushion tape 2 Velcro fastening 3 Cushion rubber AIR INTAKE PIPE CUSHION RUBBER INSTALLATION Align the cushion rubber to the aligned mark.
-
Page 484: Cowling Installation
10-30 SERVICING INFORMATION COWLING INSTALLATION Windscreen Cowling brace Frame Right under cowling cover Body cowling Cushion rubber Left under cowling cover Clamp connector Right under cowling “A” Oil pan Left air intake pipe Left air intake cover “J” Right air intake Right air intake pipe “D”…
-
Page 485: Frame Cover Installation
SERVICING INFORMATION 10-31 FRAME COVER INSTALLATION SEAT LOCK CABLE ROUTING…
-
Page 486: Rear Fender Installation
10-32 SERVICING INFORMATION REAR FENDER INSTALLATION 35 mm (1.38 in) 1 Seat rail 5 Rear fender (lower) 2 Rear fender (front) 6 Chain cover No.1 3 Rear fender cover (front) 7 Swingarm 4 Rear fender (rear) *1 Cushion rubber…
-
Page 487: Under Cowling Heat Shield Installation
SERVICING INFORMATION 10-33 UNDER COWLING HEAT SHIELD INSTALLATION Forward side 1 mm (0.04 in) 1 mm (0.04 in) 1 mm (0.04 in) 15 mm (0.59 in) 15 mm (0.59 in) 2 mm (0.08 in) 10 mm (0.4 in) 2 mm (0.08 in) 1 Left under cowling 3 Heat shield (L)
-
Page 488: Body Cowling Cover Cushion Installation
10-34 SERVICING INFORMATION BODY COWLING COVER CUSHION INSTALLATION 15 mm 15 mm (0.59 in) (0.59 in) 25 mm (0.98 in) WINDSCREEN TAPE CUSHION INSTALLATION 4 mm (0.16 in) 10 mm (0.40 in) 10 mm (0.40 in) 5 mm (0.20 in) 4 mm (0.16 in) 7 mm (0.28 in)
-
Page 489: Headlight Tape Cushion Installation
SERVICING INFORMATION 10-35 HEADLIGHT TAPE CUSHION INSTALLATION 3 – 7 mm (0.12 – 0.28 in) AIR INTAKE COVER TAPE CUSHION INSTALLATION NOTE: Align the tape cushion to the aligned mark. Clean an adhesive surface before adhering the tape cushion.
-
Page 490: Side-Stand Installation
10-36 SERVICING INFORMATION SIDE-STAND INSTALLATION (USA) (Others) 50 N·m (5.0 kgf-m, 36.0 lb-ft) 40 N·m (4.0 kgf-m, 29.0 lb-ft) 50 N·m (5.0 kgf-m, 36.0 lb-ft) GEARSHIFT PEDAL INSTALLATION Footrest 50 – 60 mm (1.97 – 2.36 in)
-
Page 491: Handlebar Balancer
SERVICING INFORMATION 10-37 HANDLEBAR BALANCER 1 Handlebar 4 Handle balancer expander 2 Throttle grip 5 Handlebar balancer ITEM N·m kgf-m lb-ft 3 Nut 6 Screw FRONT FOOTREST INSTALLATION 18 N . m (1.8 kgf-m, 13.0 lb-ft) 1 Footrest 5 Spring 2 Bank sensor 6 E-ring 3 Holder…
-
Page 492: Rear View Mirror Installation
10-38 SERVICING INFORMATION REAR VIEW MIRROR INSTALLATION 1 Body cowling 5 Turn signal lead wire coupler 2 Cowling brace 6 Mirror cover 3 Cushion 7 Mirror body Locate the turn signal lead wire coupler 5 4 Turn signal lead wire between the mirror cover 6 and mirror body 7.
-
Page 493: Rear Combination Light Installation
SERVICING INFORMATION 10-39 REAR COMBINATION LIGHT INSTALLATION (2 pcs.) (2 pcs.) (2 pcs.) (2 pcs.) (2 pcs.) 2.0 N . m (0.2 kgf-m, 1.5 lb-ft) 1 Frame cover 5 License plate light 2 Brake light/Taillight cushion 6 Rear fender 3 Brake light/Taillight *A Align the brake light/Taillight cushion to the parting line.
-
Page 494: Regulator/Rectifier Installation
10-40 SERVICING INFORMATION REGULATOR/RECTIFIER INSTALLATION 20 mm (0.8 in) 1 Regulator/Rectifier 2 Battery holder rubber cushion NOTE: To remove or install the regulator/rectifier easily, hold its bolt head with an open-end wrench.
-
Page 495: Special Tools
SERVICING INFORMATION 10-41 SPECIAL TOOLS 09900-18740 09900-20101 09900-20202 09900-20203 09900-06108 Hexagon socket 09900-20102 Micrometer Micrometer Snap ring pliers (24 mm) Vernier calipers (25 – 50 mm) (50 – 75 mm) 09900-20205 09900-20602 09900-20605 09900-20607 Micrometer 09900-20508 Dial gauge Dial calipers Dial gauge (0 –…
-
Page 496
10-42 SERVICING INFORMATION 09913-13121 09913-10750 Vacuum balancer 09913-50121 09913-70210 09915-40610 Adapter gauge Oil seal remover Bearing installer set Oil filter wrench 09915-64512 09915-74521 09915-74540 09915-77331 Compression gauge Oil pressure gauge Oil pressure gauge Meter 09916-10911 hose attachment (for high pressure) Valve lapper set 09916-14530 09916-21111… -
Page 497
SERVICING INFORMATION 10-43 09917-47011 09920-34830 09920-53740 09916-53330 09916-84511 Vacuum pump Starter clutch Clutch sleeve hub Attachment Tweezers gauge holder holder 09922-22711 09921-20210 09921-20240 Drive chain cutting 09923-74511 09924-84510 Bearing remover Bearing remover set and joining tool Bearing remover Bearing installer set 09925-18011 09924-84521 Steering bearing… -
Page 498
10-44 SERVICING INFORMATION 09940-14940 09940-14990 09940-14960 09940-30221 09940-40211 Swingarm pivot Engine mounting Steering nut Front fork assem- Fuel pressure thrust adjuster thrust adjuster wrench socket bling tool gauge adaptor socket wrench socket wrench 09940-40220 09940-50120 09940-52861 09940-94922 Fuel pressure gauge Front fork inner Front fork oil seal 09940-92720… -
Page 499: Tightening Torque
SERVICING INFORMATION 10-45 TIGHTENING TORQUE ENGINE ITEM N·m kgf-m lb-ft Exhaust pipe bolt 16.5 Muffler connecting bolt 16.5 Muffler mounting bolt 16.5 Speed sensor rotor bolt 18.0 Speed sensor bolt 0.45 Engine sprocket nut 11.5 83.0 Engine mounting bolt and nut (M: 12) 54.0 (M: 10)
-
Page 500: Fi System And Intake Air System
10-46 SERVICING INFORMATION ITEM N·m kgf-m lb-ft Crankcase bolt (Initial) (M: 6) (Final) (Initial) 11.0 (M:
(Final) 19.0 Crankshaft journal bolt (Initial) 13.0 (M: 9) (Final) 50° Oil gallery plug (M: 6) (M:
13.0 (M: 10) 13.0 (M: 16) 25.5 Oil drain plug 16.5…
-
Page 501: Chassis
SERVICING INFORMATION 10-47 CHASSIS N·m kgf-m lb-ft ITEM Steering stem head nut 65.0 Steering stem lock-nut 65.0 Steering damper bolt and nut 16.5 Front fork upper clamp bolt 16.5 Front fork lower clamp bolt 16.5 Front fork cap bolt 16.5 Front fork inner rod lock-nut 21.0 Front fork damper rod bolt…
-
Page 502: Tightening Torque Chart
10-48 SERVICING INFORMATION TIGHTENING TORQUE CHART For other nuts and bolts not listed in the preceding page, refer to this chart: Bolt Diameter Conventional or “4” marked bolt “7” marked bolt A (mm) N·m kgf-m lb-ft N·m kgf-m lb-ft 0.15 0.23 0.45 0.55…
-
Page 503: Service Data
SERVICING INFORMATION 10-49 SERVICE DATA VALVE + VALVE GUIDE Unit: mm (in) ITEM STANDARD LIMIT Valve diam. — (1.18) — (0.94) Valve clearance (when cold) 0.10 – 0.20 — (0.004 – 0.008) 0.20 – 0.30 — (0.008 – 0.012) Valve guide to valve stem 0.010 –…
-
Page 504
10-50 SERVICING INFORMATION CYLINDER + PISTON + PISTON RING Unit: mm (in) ITEM STANDARD LIMIT Compression pressure 1 300 – 1 700 kPa 1 000 kPa (13 – 17 kgf/cm², 185 – 242 psi) (10 kgf/cm , 142 psi) Compression pressure difference 200 kPa —… -
Page 505
SERVICING INFORMATION 10-51 CONROD + CRANKSHAFT Unit: mm (in) ITEM STANDARD LIMIT Conrod small end I.D. 15.010 – 15.018 15.040 (0.5909 – 0.5913) (0.5921) Conrod big end side clearance 0.10 – 0.20 0.30 (0.004 – 0.008) (0.012) Conrod big end width 19.95 –… -
Page 506
10-52 SERVICING INFORMATION CLUTCH Unit: mm (in) ITEM STANDARD LIMIT Clutch lever play 10 – 15 — (0.4 – 0.6) Clutch release screw 1/2 turn back — Drive plate thickness 2.72 – 2.88 2.42 No. 1, 2 and 3 (0.107 – 0.113) (0.095) Drive plate claw width 13.85 –… -
Page 507
SERVICING INFORMATION 10-53 THERMOSTAT + RADIATOR + FAN + COOLANT ITEM STANDARD/SPECIFICATION NOTE Thermostat valve opening temper- Approx. 82 °C (180 °F) — ature Thermostat valve lift 8 mm (0.31 in) and over at 95 °C (203 °F) — ECT sensor resistance 20 °C Approx. -
Page 508
10-54 SERVICING INFORMATION FI SENSORS ITEM SPECIFICATION NOTE CMP sensor resistance 0.9 – 1.7 kΩ CMP sensor peak voltage 0.5 V and more When cranking 142 – 194 Ω CKP sensor resistance CKP sensor peak voltage 0.5 V and more When cranking IAP sensor input voltage 4.5 –… -
Page 509
SERVICING INFORMATION 10-55 THROTTLE BODY ITEM SPECIFICATION Bore size 44 mm I.D. No. 41G1 (For E-33), 41G0 (For the others) Idle r/min 1 150 ± 100 r/min Fast idle r/min 1 400 – 2 000 r/min (When cold engine) Throttle cable play 2.0 –… -
Page 510
10-56 SERVICING INFORMATION WATTAGE Unit: W STANDARD/SPECIFICATION ITEM E-03, 28, 33 Others ← Headlight ← ← Position/Parking light 5 × 2 ← Brake light/Taillight ← Turn signal light 21 × 4 ← License plate light ← Combination meter light ← Turn signal indicator light ←… -
Page 511
SERVICING INFORMATION 10-57 ITEM STANDARD LIMIT Wheel rim runout Axial — (0.08) Radial — (0.08) Wheel rim size Front 17 M/C × MT 3.50 — Rear 17 M/C × MT 6.00 — Wheel axle runout 0.25 Front — (0.010) 0.25 Rear —… -
Page 512
(8.86) Front fork oil level (without spring, — outer tube fully compressed) (3.98) Front fork oil type SUZUKI FORK OIL L01 or an equivalent fork oil — Front fork oil capacity (each leg) 510 ml — (17.2/17.9 US/Imp oz) Front fork spring adjuster 4 th groove from top —… -
Page 513: Emission Control Information
EMISSION CONTROL INFORMATION 11-1 EMISSION CONTROL INFORMATION CONTENTS EMISSION CONTROL SYSTEMS ……………11- 2 FUEL INJECTION SYSTEM…………..11- 2 CRANKCASE EMISSION CONTROL SYSTEM……..11- 3 EXHAUST EMISSION CONTROL SYSTEM (PAIR SYSTEM)…..11- 4 NOISE EMISSION CONTROL SYSTEM……….11- 5 PAIR (AIR SUPPLY) SYSTEM AND EMISSION CONTROL SYSTEM INSPECTION ………………..11- 6 PAIR HOSES………………11- 6 PAIR REED VALVE …………….11- 6…
-
Page 514: Emission Control Systems
11-2 EMISSION CONTROL INFORMATION EMISSION CONTROL SYSTEMS FUEL INJECTION SYSTEM GSX-R1000 motorcycles are equipped with a fuel injection system for emission level control. This fuel injection system is precision designed, manufactured and adjusted to comply with the applicable emission limits. 1 Fuel tank 7 Fuel feed hose 2 Fuel filter (For high pressure)
-
Page 515: Crankcase Emission Control System
EMISSION CONTROL INFORMATION 11-3 CRANKCASE EMISSION CONTROL SYSTEM The engine is equipped with a PCV system. Blow-by gas in the engine is constantly drawn into the crank- case, which is returned to the combustion chamber through the PCV (breather) hose, air cleaner and throttle body.
-
Page 516: Exhaust Emission Control System (Pair System)
11-4 EMISSION CONTROL INFORMATION EXHAUST EMISSION CONTROL SYSTEM (PAIR SYSTEM) The exhaust emission control system is composed of the PAIR system, exhaust control system and three-way catalyst system. The fresh air is drawn into the exhaust port through the PAIR control solenoid valve and PAIR reed valve.
-
Page 517: Noise Emission Control System
EMISSION CONTROL INFORMATION 11-5 NOISE EMISSION CONTROL SYSTEM TAMPERING WITH THE NOISE CONTROL SYSTEM PROHIBITED: Local law prohibits the following acts or the causing thereof: 1. The removal or rendering inoperative by any person, other than for purposes of maintenance, repair or replacement, of any device or element of design incorporated into any new vehicle for the purpose of noise control prior to its sale or delivery to the ultimate purchaser or while it is in use, or 2.
-
Page 518: Pair (Air Supply) System And Emission Control System
11-6 EMISSION CONTROL INFORMATION PAIR (AIR SUPPLY) SYSTEM AND EMISSION CONTROL SYSTEM INSPECTION PAIR HOSES • Inspect the PAIR hoses for wear or damage. • Inspect the PAIR hoses for secure connection. PAIR REED VALVE • Lift and support the fuel tank. (5-3) •…
-
Page 519
EMISSION CONTROL INFORMATION 11-7 • Connect the 12 V battery to the PAIR control solenoid valve terminals and check the air flow. • If air does not flow out, the solenoid valve is in normal condi- tion. • Check the resistance between the terminals of the PAIR con- trol solenoid valve. -
Page 520: Pair (Air Supply) System Diagram
11-8 EMISSION CONTROL INFORMATION PAIR (AIR SUPPLY) SYSTEM DIAGRAM 1 PAIR control solenoid valve *1 From air cleaner 2 PAIR reed valve *2 To #1 and #2 cylinders A FRESH AIR *3 To #3 and #4 cylinders B EXHAUST GAS…
-
Page 521: Pair (Air Supply) System Hose Routing
EMISSION CONTROL INFORMATION 11-9 PAIR (AIR SUPPLY) SYSTEM HOSE ROUTING Approx. Approx. Approx. 0˚ 0˚ 45˚ 1 PAIR control solenoid valve 3 Air cleaner box 2 PAIR reed valve *1 To air cleaner box…
-
Page 522: Wiring Diagram
WIRING DIAGRAM E-02, 19, 24 Wiring diagrams wire color, refer to section “WIRE COLOR”. IGNITION IGNITION IGNITION IGNITION PAIR COIL #1 COIL #2 COIL #3 COIL #4 SOLENOID HANDLEBAR SWITCH (R) : TURN SIGNAL INDICATOR LIGHT : HI BEAM INDICATOR LIGHT ENGINE STOP FRONT BRAKE STARTER…
-
Page 523
E-03, 28, 33 IGNITION IGNITION IGNITION IGNITION PAIR COIL #1 COIL #2 COIL #3 COIL #4 SOLENOID HANDLEBAR SWITCH (R) : TURN SIGNAL INDICATOR LIGHT : HI BEAM INDICATOR LIGHT ENGINESTOP STARTER FRONT BRAKE SIDE STAND SWITCH SWITCH : NEUTRAL INDICATOR LIGHT BUTTON SWITCH : FUEL INDICATOR LIGHT… -
Page 524
Prepared by January, 2005 Part No. 99500-39270-01E Printed in Japan… -
Page 525
Printed in Japan…
2001-2002
SUZUKI
GSX-R600
ИНСТРУКЦИЯ
ПО ЭКСПЛУАТАЦИИ
«шшитм
09500-35080-01E

ИНДЕКС ГРУППЫ
ПРЕДИСЛОВИЕ
Эта
инструкция содержит вводное описание
на SUZUKI GSX-R600 и процедуры по его mspection
servtce и капитальному ремонту его mam
компонентов
Другая
информация, которую рассматривают как
общеизвестную, не включена
Прочитайте
секцию ОБЩЕЙ ИНФОРМАЦИИ, чтобы ознакомить
себя с мотоциклом и его Использованием
техобслуживания эта секция так же как
другие секции, чтобы использовать в
качестве направляющей для надлежащего
осмотра и sendee, Эта инструкция поможет
Вам знать заключающего пари мотоцикла
так, чтобы можно было уверить заказчиков
быстрого и надежного сервиса.
Эта
инструкция была подготовлена на основе
последних технических требований во
время публикации, Если модификации
были сделаны, так как различия мужчин
могут существовать между содержанием
этой инструкции и фактическим мотоциклом.
’Иллюстрации
в этой инструкции используются, чтобы
показать bas*c pnnciples работы и ivork процедур.
Они могут не представить фактический
мотоцикл точно подробно.
‘Эта
инструкция написана для людей ivho, имеют
достаточно знания, навыков и инструментов,
включая специальные инструменты, для
того, чтобы обслужить мотоциклы SUZUKI.
Если у Вас нет надлежащего знания и
инструментов, попросите, чтобы Ваш
уполномоченный дилер мотоцикла SUZUKI
помог Вам.
ПРЕДУПРЕЖДЕНИЕ
|
ОБЩАЯ ИНФОРМАЦИЯ |
1 |
|
ПЕРИОДИЧЕСКИЙ РЕМОНТ |
2 |
|
ДВИГАТЕЛЬ |
3 |
|
СИСТЕМА FI И ПНЕВМАТИЧЕСКАЯ СИСТЕМА |
4 |
|
ОХЛАЖДЕНИЕ И СИСТЕМА ПОДАЧИ СОЖ |
5 |
|
ШАССИ |
6 |
|
ЭЛЕКТРИЧЕСКАЯ СИСТЕМА |
7 |
|
ОБСЛУЖИВАНИЕ ИНФОРМАЦИИ |
8 |
|
СХЕМА СОЕДИНЕНИЙ |
9 |
Неопытная
механика или механика без надлежащих
инструментов и оборудования могут не
быть в состоянии должным образом
выполнить услуги, описанные в этой
инструкции. Неподходящий ремонт может
привести к ране механику, и может ronder
мотоцикл, опасный для ползуна и пассажира.
МОТОРНАЯ
КОРПОРАЦИЯ SUZUKI
Отдел
технического обслуживания мотоцикла
ИСПОЛЬЗОВАНИЕ С ПРАКТИЧЕСКИМИ
РЕКОМЕНДАЦИЯМИ ЭТА ИНСТРУКЦИЯ, ЧТОБЫ
ОПРЕДЕЛИТЬ МЕСТОНАХОЖДЕНИЕ ТОГО, ЧТО
ВЫ ИЩЕТЕ:
текст этой
инструкции разделен на секции
названия
секции перечислены в ИНДЕКСЕ ГРУППЫ.
НоЮтд инструкция
как показано в праве позволит Вам
находить первый радо секции легко.
Содержание
перечислено на первой странице каждой
секции, чтобы помочь находить пункт и
страницу, в которой Вы нуждаетесь
КОМПОНЕНТЫ И РАБОТА, КОТОРАЯ БУДЕТ
СДЕЛАНА
Под именем
каждой системы или устройства, его
взорванный v »ew инструкции по Работе и
другая информация о сервисе, такие как
крутящий момент сжимания, смазывая
пункты и пункты скрепляющего вещества,
обеспечены
Пример:
Переднее колесо

СИМВОЛ
Перечисленный
во мне tatfe ниже — символы, указывающие
на сборник изречений инструкций другая
информация, необходимая для того, чтобы
обслужить. Значение каждого символа —
ateo, включенный в таблицу
|
СИМВОЛ |
ОПРЕДЕЛЕНИЕ |
СИМВОЛ |
ОПРЕДЕЛЕНИЕ |
|
H |
Управление крутящего Данные около него крутящий момент |
T@ |
Нанесите ЗАМОК 99000-32130 |
|
номер |
Нанесите масло. Используйте машинное |
Используйте машинный охладитель. |
|
|
Ур |
Нанесите молибденовое нефтяное |
£ |
Используйте масло вилки. 99000-99001-SS8 |
|
Нанесите SUZUKI SUPER GREASE “A*. |
Нанесите или используйте тормоз |
||
|
я§» |
Aoply SUZUKI MOLY PASTE. 99000-25140 |
Щ) |
Размер В vollage диапазоне. |
|
<1207^ |
Нанесите SUZUKI BOND “1207B». 99000-31140 |
Размер в текущем диапазоне. |
|
|
чпш |
Нанесите SUZUKI BOND *1215″ 99000-31110 |
Размер в диоде тестирует диапазон |
|
|
Нанесите ЗАМОК “1303″. 99000-32030 |
Размер в непрерывности тестирует |
||
|
тШЭ |
Нанесите ЗАМОК 99000-32110 |
Используйте специальный инструмент. |
|
|
т*Э |
Нанесите ЗАМОК РЕЗЬБЫ 4342″ |
EffiS |
lndicat> на эксплуатационных данных |
ECM
Испаритель
датчика электрошока
Канистра
испарителя
ABDC
ПЕРЕМЕННЫЙ
ТОК
ACL
API
ATDC
В? / Давление
СОКРАЩЕНИЯ МОГУТ ИСПОЛЬЗОВАТЬСЯ В ЭТОЙ
ИНСТРУКЦИИ
A
После
мертвой точки пода
Переменный
ток
Воздухоочиститель.
Стержневой ящик воздухоочистителя
Американский
нефтяной институт
: Измените
главную мертвую точку
Атмосферное
давление
Атмосферный
датчик давления (APS, датчик AP)
A’F : Воздух Топливо Смесь
Модуль
управления двигателем
Блок
управления двигателем (ECU) (блок управления
FI»
Engine
Coolant Temperature Sensor (ECTS). Water Temp Sensor (WTS)
Выделение
паров топлива
Канистра
выделения паров топлива (канистра)
B8DC
BTDC
B*
В
Перед
мертвой точкой пода: перед лучшим
аккумулятором мертвой точки положительное
напряжение
FI Топливо Инъекция,
топливный инжектор
FP : Топливо Насос
FPR : Топливо Регулятор
давления
Реле
FP . Топливо Реле насоса
ПОСТОЯННЫЙ
ТОК
DMC
DOHC
БЛИЖНИЙ
СВЕТ
H
Датчик
угла поворота коленчатого вала датчика
CKP (CKPS)
CKT : Схема
Выключатель
CLP: путевой выключатель рычага сцепления
(выключатель муфты)
Датчик
CMP: позиционный датчик кулачкового вала
(CMPS)
CO :
Углерод Моноксид
ЦЕНТРАЛЬНЫЙ
ПРОЦЕССОР : Центральный Обрабатывание Устройство
: Постоянный
ток: сцепной прибор способа дилера:
отогните головку Camshatl: фара с системой
DRL
ГЕНЕРАЛ :
Генератор
GND Основание
Выключатель
GP : Механизм выключатель Positton
HC :
Углеводороды
Датчик
IAP : Воздух впуска Давление
Sensof (IAPS)
Датчик
IAT : Воздух впуска Температура
Датчик
(IATS)
IG : Зажигание
ЖК-МОНИТОР .
Жидкокристаллический дисплей
СВЕТОДИОД Свет Испускание Диод
(Лампа
индикатора неисправности)
: Левая
рука
ЛЮФТГАНЗА
м
MAL-код
Мах
МИЛ
Мм
N
NO*
О
онс
OPS
р
PCV
R
RH
ROM
S
САМОМУ
СЕБЕ АДРЕСОВАННЫЙ КОНВЕРТ
STC Syslem STC
Unll датчик НТП
СВ. Valve
привод STV
T
К датчику
датчик TP
: Код
неисправности (диагностический код)
: Максимум
Неисправность
лампа Indcator (светодиод)
Минимум
. Азот
Oxidos
: По
выключателю давления масла кулачкового
вала головки
Положительная
вентиляция картера (сапун картера)
Правая
рука, прочитанная только память
Общество
автомобильных инженеров
Secondary
Throttle Control System (STCS)
Secondary
Throttle Control Unit (STCU)
Secondary
Throttle Position Sensor (STPS)
Secondary
Throttle Valve (STV)
:
Secondary Throttle Valvo Actuator (STVA)
Tip
Over Sensor (TOS)
:
Throttle Position Sensor (TPS)
ОБЩАЯ ИНФОРМАЦИЯ
СОДЕРЖАНИЕ
Пожалуйста,
fead эта инструкция и следуют ее инструкциям
тщательно. К emohas »2e специальная информация
у символа и ПРЕДУПРЕЖДЕНИЯ слов,
ПРЕДОСТЕРЕЖЕНИЯ и ПРИМЕЧАНИЯ есть
специальные значения, Обращают особое
внимание на сообщения, выдвинутые на
первый план этими словами сигнала
ПРЕДУПРЕЖДЕНИЕ
Указывает
на потенциальную опасность, которая
могла привести К смерти или Ране.
ПРЕДОСТЕРЕЖЕНИЕ
Указывает
на потенциальную опасность, которая
могла привести к повреждению мотоцикла.
ПРИМЕЧАНИЕ:
Указывает
на специальную информацию, чтобы сделать
техобслуживание легче или инструкции
более дорогой.
Пожалуйста,
отметьте, как бы то ни было. то, что
предупреждения и предостережения,
содержавшиеся в этой инструкции, не
могут возможно обмотать все потенциальные
опасности, касающиеся servcing. 1или
нехватки сенатора/обледенения мотоцикла.
В дополнение к ПРЕДУПРЕЖДЕНИЯМ и
заявленным ПРЕДОСТЕРЕЖЕНИЯМ, необходимо
использовать хорошее суждение и основную
механическую безопасность prmciples. Если
Вы неуверены о том, как выполнить особую
сервисную работу, попросить у более
опытного механика совет
ОБЩИЕ ПРЕДОСТОРОЖНОСТИ
ПРЕДУПРЕЖДЕНИЕ
Надлежащий
sorvlce и ремонтные операции Важны для
безопасности servlco механика и safoty и
надежности мотоцикла.
Когда 2 или
больше человека v/ork вместе, обратите
внимание на безопасность друг друга.
‘Когда
необходимо управлять машинными закрытыми
помещениями, сделайте suro, что выхлопной
газ вызван на открытом воздухе.
Работая с
ядовитыми или огнеопасными материалами,
удостоверьтесь, что область, в которой
Вы работаете, хорошо — проветрена и что
Вы следуете всем инструкциям материального
завода — изготовителя.
Никогда не
используйте бензин в качестве чистящегося
растворителя.
Чтобы
избежать быть сожженными, не касайтесь
engino. onglno масло. радиатор и система
вытяжной вентиляции, пока они не
охладились.
После
обслуживания топлива, масла, машинный
охладитель, системы вытяжной вентиляции
или тормозные системы, проверяет все
линии и детали, связанные с системой
для утечек.
ПРЕДОСТЕРЕЖЕНИЕ
Если замена
детали — necessnry, замените деталь Suzuki
Genuine Parts или их эквивалентом.
Удаляя
деталь, которая должна быть снова
использована, сохраняйте их устроенными
в аккуратной манере так, чтобы они могли
быть снова установлены в надлежащем
заказе.
Убедитесь,
что использовали специальные инструменты
когда проинструктировано.
Удостоверьтесь,
что вся деталь usod В переборке чиста.
Смажьте их когда определено.
‘Используйте
указанный смазочный материал, связь
или герметизирующий состав.
Удаляя
аккумулятор, разъедините отрицательный
кабель сначала и затем положительный
кабель.
Переключая
аккумулятор, присоедините положительный
кабель сначала и затем отрицательный
кабель, и обмотайте положительный зажим
с предельной крышкой.
Выполняя
сервис к olectrlcal детали, разъедините
аккумулятор отрицательный кабель, если
сервисная процедура не требует battory
мощности.
Закрепляя
cyllndor головку и болты картера и гайки,
закрепите большие размеры сначала.
Всегда закрепляйте болты и гайки по
диагонали от Внутреннего решения и к
указанному крутящему моменту сжимания.
Всякий раз,
когда Вы удаляете сальники, gaskots.
уплотнение. О-кольца, захватывая шайбы,
самостопорящиеся гайки, шпильки клина,
стопорные кольца. и определенная othor
деталь как определено, убедиться, что
заменили их новыми. Кроме того, прежде,
чем установить ту новую деталь, убедиться,
что удалили любой перенесенный материал
из сопрягаемых поверхностей.
Novor снова
используют стопорное кольцо. Когда
Монтаж нового clrcllp. заботится, чтобы не
расширить зазор разреза, больше чем
необходимый, чтобы обмануть стопорным
кольцом вал. После Монтажа стопорного
кольца. всегда гарантируйте, что это
полностью помещено в Его углублении и
надежно приспособлено.
Используйте
ключ с ограничением по крутящему моменту,
чтобы закрепить соединительные детали
к усилию затяжки, регламентированному
спецификацией. Вытрите смазочный
материал и масло, если резьбу мажут ими.
После
повторной сборки проверьте деталь lor
плотность и правильное функционирование.
SUZUKI (2001-MQDEL) GSX-R600K1

ПРАВАЯ
СТОРОНА

ЛЕВАЯ
СТОРОНА
• Различие
b*IM «n photoyapn anrl фактический iretoftyae OepenOs на
trie markete
РАЗМЕЩЕНИЕ ЗАВОДСКОГО НОМЕРА
Порядковый
номер рамы или V.I.N. (Идентификационный
номер транспортного средства) л отпечатан
на r ght сторона steoring блока головки.
Машинный порядковый номер § расположен
на тыльной стороне картера, Эти числа
требуются специально для регистрации
машины и заказывания запчастей.
ТОПЛИВО, НЕФТЯНОЕ И МАШИННОЕ ТОПЛИВО
РЕКОМЕНДАЦИИ ОХЛАДИТЕЛЯ (ДЛЯ США И
КАНАДЫ)
Используйте
только unleadea бензин по крайней мере 87
насосов ociane (B*M) или 91 октан или выше
номинальный исследованием meihod. Бензин,
содержащий MTBE (Метил Третичный Эфир
Бутила), меньше чем 10%-ый этанол или
меньше чем 5°n метанол с соответствующим
cosolvents и ингибитором коррозии, допустим.
ТОПЛИВО (ДЛЯ ДРУГИХ СТРАН)
Используемый
бензин должен градуироваться 91 октан
(Метод Исследования) или выше.
Неэтилированный бензин рекомендуется.
МАШИННОЕ МАСЛО (Для американской модели)
SUZUKI
рекомендует использование SUZUKI PERFORMANCE
4 MOTOR OIL ет масло, которое оценено SF SG под
API (американский Нефтяной Институт)
сервисная классификация. Рекомендуемая
вязкость — САМОМУ СЕБЕ АДРЕСОВАННЫЙ
КОНВЕРТ 10W/40. Если САМОМУ СЕБЕ АДРЕСОВАННЫЙ
КОНВЕРТ 10W/40 масло не доступен, выберите
и альтернатива согласно правильной
карте
|
MUlTt (ScAC€ |
|
|
• c | Tpwp -‘ |
У9 — 20 — 10 О Ю 20 К 10 |
|
*71 |
22 * М. 12 М. II 16 104 |
МАШИННОЕ МАСЛО (Для других моделей)
Используйте
премиальное качество, которое molor масло
с 4 ходами lo гарантирует более длинному
серу — вице-жизнь Вашего Использования
мотоцикла только масла, которые оценены
SF или SG под сервисной классификацией
API.
Рекомендуемая
вязкость — САМОМУ СЕБЕ АДРЕСОВАННЫЙ
КОНВЕРТ 10W-40. Если САМОМУ СЕБЕ АДРЕСОВАННЫЙ
КОНВЕРТ 10W-40 моторное масло ts nof доступный,
выберите альтернативу согласно следующей
карте
ТОРМОЗНАЯ ЖИДКОСТЬ
Используйте
тормозную жидкость DOT4
▲
ПРЕДУПРЕЖДЕНИЕ
Так как
тормозная система этого мотоцикла
заполнена основанной на гликоле тормозной
жидкостью заводом — изготовителем, не
сделайте uso или смешайте различные типы
жидкости, такие как основанная на
силиконе и основанная на нефти жидкость
для rofllllng система, иначе серьезное
повреждение закончится.
Не делайте
uso никакая тормозная жидкость, взятая
от старых или используемых или
распечатанных контейнеров.
Никогда не
снова используйте тормозную жидкость,
перенесенную от предыдущего sorvicing.,
который хранился в течение длительного
периода.
ПЕРЕДНЕЕ МАСЛО ВИЛКИ
Используйте
масло вилки SS-8 («10) или эквивалентное
масло вилки
МАШИННЫЙ ОХЛАДИТЕЛЬ
Используйте
охладитель двигателя антифриза,
совместимый с алюминиевым радиатором,
смешанным с дистиллированной водой
только ВОДА ДЛЯ ТОГО, ЧТОБЫ СМЕШАТЬСЯ
Используйте
дистиллированную воду, только Вода
кроме дистиллированной воды может
подвергнуться действию коррозии и
защелка алюминиевый радиатор. ОХЛАДИТЕЛЬ
АНТИЗАМОРАЖИВАНИЯ/ДВИГАТЕЛЯ
Машинный
охладитель выступает, поскольку коррозия
и ржавчина обитают так же как антифриз
Поэтому, машинный охладитель должен
использоваться всегда печь, хотя
атмосферная температура в Вашей области
doos не снижается до замораживания poinL
Suzuki
рекомендует использование охладителя
антизамораживания/двигателя ОХЛАДИТЕЛЯ
SU2UKI, Если это не доступно, используйте
эквивалент, который совместим с
алюминиевым радиатором
ЖИДКОЕ КОЛИЧЕСТВО ВОДНОГО/МАШИННОГО
ОХЛАДИТЕЛЯ
Производительность
решения (общее количество): 2 400 мл (2.5/2.1
спокойные США/Импорт)
Для машинной
информации о смеси охладителя обратитесь
к секции системы охлаждения, (cr 5-2)
ПРЕДОСТЕРЕЖЕНИЕ
Смешивание
охладителя антизамораживания/двигателя
должно быть ограничено 60 В, Смешивающимися
вне его, уменьшил бы его КПД. Если
anti-freeze/engino передаточное число смешивания
охладителя ниже рабочих характеристик
обитания ржавчины на 50 В, очень уменьшен.
Будьте suro, чтобы смешать Его выше 50 °»
даже при том, что атмосферная температура
не снижается до tho температуры
кристаллизации.
ПРОЦЕДУРЫ ВЗЛОМА
Во время
изготовления только используются самые
лучшие материалы, и вся обработанная
на станке деталь закончена к очень
высокому стандарту, но все еще необходимо
позволить движущуюся деталь «ВЗЛОМУ’
прежде, чем подвергнуть двигатель
максимальным усилиям. Будущие рабочие
характеристики и надежность двигателя
зависят от заботы и сдержанности,
осуществленной во время ее молодости,
которая правила Tho gonoral следующие
Придерживайтесь
этих процедур взлома:
Начальная
буква 800 км (500 миль): Ниже 7 000 обмин
До 1 600 км (1
000 mllos): Ниже 10 500 обмин
К 1 600 км (1
000 milos): Ниже 14 000 обмин
После
достижения чтения одометра 1 600 км (l 000
миль) можно подвергнуть мотоцикл работе
полного газа Однако, не превышайте 14
000 обмин никогда
ЦИЛИНДРИЧЕСКАЯ ИДЕНТИФИКАЦИЯ
Четыре
цилиндра этого двигателя идентифицированы
как № 1. Цилиндр № 2. № 3 и № 4, как посчитано
слева направо (как рассматривающийся
ползуном на сидении)
ИНФОРМАЦИОННЫЕ ТАБЛИЧКИ
|
— |
GSX-R600 |
GSX-R600UD |
GSX-R600UF |
|
1 Шумовая табличка |
г Для электронный 03. 24 33 |
||
|
2 информационных таблички |
О Для электронный 03. 28. 33 |
||
|
3 таблички направления Вакуумного |
О Для электронный 33 |
||
|
— Fuef предостерегают iaoel |
О Для электронный 02. 24 |
||
|
5 Ручных табличек замечания |
_ Для электронный 03. 33 |
||
|
6 табличек предостережения Рамы |
o |
О |
|
|
7 Экранов, предупреждающих labol |
О |
О |
О |
|
табличка предупреждения нанограмма |
О |
О |
|
|
й Табличка давления в шине |
О |
О |
|
|
• u Предупреждение таблички |
О |
о |
|
|
• ЛЬДЫ Канадская табличка |
О Для электронный 28 |
||
|
‘2 платы удостоверения личности |
О Для электронный 02 19. 24 |
/-ч |
о |
|
• 3 электронная 19 табличек |
о |
||
|
‘4 платы Безопасности |
0 Для электронный 03. 28. 33 |

Электронные
28 iF’er^h)


Для
электронных 33 Далеких другие
• •
<••••<••< <<<••<•<<■
Четырехтактный
двигатель. Охлажденный жидкостью, DOHC
4
0.10 — 0.20 мм
(0.004 — 0 008 m) 0.20 — 0 30 мм (0.008 — 0 012 в) 67.0 мм (2
638 в)
42.5 мм
(1.673 в)
599 см’
(36.5 cu. в)
12.2: 1
Топливная
инъекция
Нетканый
элемент ткани
Электрический
Влажный
поддон
ТЕХНИЧЕСКИЕ ТРЕБОВАНИЯ
ИЗМЕРЕНИЯ
И СУХАЯ МАССА
Полная
Габаритная ширина длины..
Полная
высота
Колёсная
база ….
Основание
dearnce
Высота
сидения
Сухая
масса.
ДВИГАТЕЛЬ
ТУР« —
Число в
цилиндрическом Клапанном зазоре В
ИСКЛЮЧАЯ
Отверстие
Ход.
Степень
сжатия объема, проходимого поршнем за
один ход
Топливная
система
Воздухоочиститель
Система
стартера
Система
Lubncatfon…
2 040 мм (80 3
в) 715 мм (28.1 в)
135 мм (44.7
в)
410 мм (55.5
в) 130 мм (5.1 в) 830 мм (32.7 в)
кг (359
фунтов)…
кг (361 фунт)
ПЕРЕДАЧА
Муфта
Передача.
Образец
переключения передач
Основное
передаточное отношение
Крыса
механизма> рот. Низко
2-ой
3-ий…
4-ый 5-ый..
Вершина…..
Заключительная
Система приводов передаточного
отношения
Влажный
многодисковый тип постоянная сетка с
6 скоростями 1 — вниз, 5 — 1.926 (79/41)
2.785 (39.14)
000 (32/16)
600 (32/20)
363 (30/20)
208 (29/24)
1.086 (25’23)
812 (45/16)
RK 525SMOZ6. 110
связей
ШАССИ
Передняя
подвеска
Задняя
подвеска
Литейная
машина
ТГа!!· ■
• ■■ • ■
«• ■ •• fiaaa —
Управление
угла
Радиус
поворота
Передний
тормоз
Задний
тормоз
Передний
размерный фактор шины
Размер
задней покрышки
Телескопический,
цилиндрическая пружина. o <l заглушенный,
пружините предварительный натяг
полностью adjustatxo. rebouna сжатие сборника
изречений oomp сила мг полностью ad|us1able.
Свяжите
заглушенный type.oll, цилиндрическая
пружина, пружините полностью регулируемую
предварительную дорогу, демпфирующая
сила восстановления и сжатие, заглушающее
lorce полностью регулируемые 24*
96 мм (3 8 в)
29 = (право
& lelt)
3.2 м. (10.5
футов)
Дисковый
тормоз, парный Дисковый тормоз
120/70 ZR17 (58
W). бескамерный 180/55 2R17 (73 W). бескамерный
…
ЭЛЕКТРИЧЕСКИЙ
Тип
зажигания
Выбор
времени зажигания….
Свеча
зажигания
Battory
Генератор
Предохранитель
Mam
Предохранитель
Передняя
фара
Свет
положения
Свет сигнала
поворота..
Тормоз
lightTailhght —
Нейтральная
индикаторная лампа —
Индикаторная
лампа дальнего света
Поверните
s*gnal индикаторную лампу
Топливная
инъекция wamnlng свет
Давление
FI/Oil временный секретарь охладителя
Engino, индикаторная лампа
Электронное
зажигание (Transistorized)
4 В T.DС в 1
300 обмин NGK CR9E. DENSO U27ESR-N 12 В 36 0 kC (8 Ах)/10HR
С тремя фазами C. Генератор 30A
15’15/15’15’,
10. ’10A 12 В 55*55’55W (H7)
12 В 5W За
исключением электронный 03. 24. 28. 33 модели
12 В 21W
12 В 21/5W x 2
СВЕТОДИОД
СВЕТОДИОД
СВЕТОДИОД
СВЕТОДИОД
СВЕТОДИОД
• Мл….
ПРОИЗВОДИТЕЛЬНОСТЬ
Топливный
бак, включая запасное Машинное масло,
замену масла.
18 L (4 8/4.0
US/lmp девочка)
800 мл
(3.0’2.5 спокойных US’Imp)
с изменением
фильтра 3 100 мл (3.3’2.7 спокойных US/lmp)
3 400 мл
(3.6/3.0 US/lmp спокойный)
2 400 мл
(3.2/2 6 спокойных US/lmp)
Coo’ant
…………
капитальный
ремонт.