- Manuals
- Brands
- Stanley Manuals
ManualsLib has more than 3342 Stanley manuals
Popular Categories:
![]()
Indoor Furnishing
![]()
Lawn Mower
![]()
Power Supply
![]()
Vacuum Cleaner
Featured manuals
BM1S — Automatic 12V Battery Charger/Maintainer Manual
FATMAX SL10LEDS — Lithium LED Spotlight Manual
Accessories
Models
Document Type
3253560774073
User Manual
77-075
Operating Instructions
77-152
Manual
• Manual
FATMAX PPS200S
Instruction Manual
FORESITE Mobile Depth Sensor
Smart Manual
S150
User Manual
• User Manual
• Manual
S300
Instructions Manual
• User Manual
• Operating Instructions
• User Manual
Show all Stanley Accessories manuals
Adapter
Models
Document Type
204063
Quick Reference Manual
Fatmax SFMCB100
Original Instructions Manual
• Manual
POWERMAX 31308
Quick Start Manual
WY-06
Instruction Manual
Air Compressor
Models
Document Type
79-004
Instruction Manual And Safety Instructions
8216035SCR011
Instruction Manual
• Instruction Manual
A6BB304SCR512
Instruction Manual
AC6168
Manual
AC6359
Instruction Manual
• Manual
AC6511
User Manual
AIR KIT
Instruction Manual For Owner’s Use
AIRPRO 120
Instruction Manual
AIRPRO 120 CDC120SCA
Instruction Manual
Show all Stanley Air Compressor manuals
Air compressors
Models
Document Type
AC6359
Instruction Manual
• Manual
Analytical Instruments
Models
Document Type
Fatmax FMHT0-77421
User Manual
Fatmax TLM165S
User Manual
• User Manual
IntelliMeasure 77-018
Instruction Manual
STHT1-77366
User Manual
• User Manual
• Safety, Maintenance And Warranty
STHT77363
User Manual
TLM30
User Manual
• User Manual
TLM40
User Manual
TLM99
User Manual
• Instructions Manual
• User Manual
• Instructions Manual
• User Manual
TLM99s
User Manual
• Instructions Manual
• User Manual
• Instructions Manual
• User Manual
Show all Stanley Analytical Instruments manuals
Automobile Accessories
Models
Document Type
SIMPLE START BBC2CS
Instruction Manual
Automobile Battery Charger
Models
Document Type
TGC11
Instruction Manual
Automobile Electronics
Models
Document Type
GLPS
Instruction Manual
Battery Charger
Models
Document Type
BC15
Instruction Manual
BC1509
Instruction Manual
• Instruction Manual
BC15BS
Instruction Manual
BC209
Instruction Manual
• Instruction Manual
BC209h284504
Instruction Manual
BC2509
Instruction Manual
• Instruction Manual
BC25BS
Instruction Manual
Show all Stanley Battery Charger manuals
Blower
Models
Document Type
FATMAX SFMCBL01B
Original Instructions Manual
FATMAX SFMCBL01B (H1)
Original Instructions Manual
FATMAX SFMCBL01B-XJ
Original Instructions Manual
Fatmax SFMCBL7M1
Manual
FATMAX SFMCBLB76
Original Instructions Manual
FATMAX V20 LITHIUM ION SFMCBL730
Original Instructions Manual
SLB- 3IN1
Original Instructions Manual
SPT500
Original Instructions Manual
• Quick Start Manual
• Original Instructions Manual
Show all Stanley Blower manuals
Boiler
Models
Document Type
Tara
Installation And Operation Instructions Manual
• Installation & Operating Instructions Manual
• Installation And Operating Instructions Manual
Brush Cutter
Models
Document Type
SPS-1400
Original Instructions Manual
SPS-900
Original Instructions Manual
Cables and connectors
Models
Document Type
SXAE00013
Manual
SXAE00014
Manual
Camera Accessories
Models
Document Type
77-255
Instruction Manual
IntelliSensor Pro
User Manual
• Instruction Manual
Card Reader
Models
Document Type
909020113
Installation Manual
909028117
Installation Manual
GS3-MT
Installation Manual
• Installation Manual
• Installation Manual
• Installation Manual
• Installation Manual
GS3LFM
Installation Manual
• Installation Manual
Oneprox GS3-LF
Installation Manual
• Installation Manual
• Installation Manual
• Installation Manual
• Installation Manual
• Installation Manual
Show all Stanley Card Reader manuals
Cell Phone
Models
Document Type
MyCall Communicator 806A5601
User Manual
S241
Quick Start Manual
Cell Phone Accessories
Models
Document Type
S231
Quick Start User Manual
Chainsaw
Models
Document Type
CS05
User Manual
• User Manual
• Safety, Operation And Maintenance Manual
• User Manual
CS06
User Manual
• User Manual
• Safety, Operation And Maintenance Manual
• User Manual
CS06920
User Manual
CS06930
User Manual
Show all Stanley Chainsaw manuals
Chipper
Models
Document Type
2-Way Feed Chipper / Shredder
Owner’s Manual
• Owner’s Manual
Chippers/Shredders
Models
Document Type
CH2
Owner’s Manual
CH7
Owner’s Manual
Circuit breakers
Models
Document Type
MB256
User Manual
MB25616
User Manual
MB556
User Manual
Cleaning Equipment
Models
Document Type
FATMAX SFMCPC93
Original Instructions Manual
Fatmax SFMCPC93M1
Manual
SXPWSF001
Owner’s Operating Manual
Clock Radio
Models
Document Type
TIMERMAX TM251
Quick Start Manual
Construction Equipment
Models
Document Type
SRA 68
User Manual
SRA60
Parts Manual
• User Manual
Control Systems
Models
Document Type
GUARD STST1-71238
Manual
GUARD STST1-79226
Manual
GUARD STST320000
Manual
GUARD STST321000
Manual
Control Unit
Models
Document Type
70500
Instruction And Service Manual
• Instruction And Service Manual
• Instruction And Service Manual
• Instruction And Service Manual
70501
Instruction And Service Manual
• Instruction And Service Manual
71502
Instruction And Service Manual
• Instruction And Service Manual
71504
Instruction And Service Manual
MC521
Quick Reference Manual
MC521 Pro
Installation And Operation Manual
• Installation And Operation Manual
• Quick Reference Manual
• Installation And Operation Manual
• Installation And Operation Manual
Pellet Stove Wi-Fi Kit
Manual
Show all Stanley Control Unit manuals
Controller
Models
Document Type
204143
Installation And Operation Manual
DE-MC521
Quick Reference Manual
• Quick Reference Manual
EX5500
Installation & Configuration Manual
JUMP iT J5C09D
Instruction Manual
JUMPiT J309E
Instruction Manual
JUMPiT J309GB
Instruction Manual
Magic-Force HDFE
Quick Reference Manual
Magic-Force HDLE
Quick Reference Manual
Magic-Swing HDFE
Quick Reference Manual
Magic-Swing HDLE
Quick Reference Manual
Show all Stanley Controller manuals
Cookers
Models
Document Type
Alpha 120
Servicing Instructions
Alpha 120K
Commissioning Instructions
Alpha 150K
Servicing Instructions
• Commissioning Instructions
BRANDON 100K
Installation And Commissioning Instructions
• User Manual
• Operation Instructions Manual
• Installation And Commissioning Instructions
• Operation Instructions Manual
• Installation And Commissioning Instructions
BRANDON 60K
Installation And Commissioning Instructions
• User Manual
• Operation Instructions Manual
Show all Stanley Cookers manuals
Cordless Saw
Models
Document Type
FATMAX SCC500
Manual
STCT1850
Manual
STCT1860
Manual
Crimp tool
Models
Document Type
CT04
Safety, Operation And Maintenance User’s Manual
CT06
Safety And Operation Manual
• User Manual
DUBUIS BPL036
Instruction Manual
DUBUIS BPP060F
User Manual
IBC600
User Manual
• User Manual
• User Manual
PBCC40
User Manual
• User Manual
PBCC65
User Manual
• User Manual
• User Manual
PBCC85
User Manual
• User Manual
• User Manual
PBD1200
User Manual
• User Manual
PBD1201
User Manual
• User Manual
• User Manual
Show all Stanley Crimp tool manuals
Cutter
Models
Document Type
78-411
Instruction Manual
Dubuis BCP065C
Instruction Manual
DUBUS BCE025G
Instruction Manual
IBC600
User Manual
• User Manual
• User Manual
PBCC40
User Manual
• User Manual
PBCC65
User Manual
• User Manual
• User Manual
PBCC85
User Manual
• User Manual
• User Manual
PBD1200
User Manual
• User Manual
PBD1201
User Manual
• User Manual
• User Manual
Show all Stanley Cutter manuals
Cutting tool
Models
Document Type
PBCC65
User Manual
• User Manual
• User Manual
DC Drives
Models
Document Type
PD45
User Manual
• User Manual
SCH20
User Manual
• Original Instructions Manual
• Manual
SCH201
User Manual
• Original Instructions Manual
Dehumidifier
Models
Document Type
ST-12L-DH-E
Quick Start Manual
• Manual
ST-12L-DH-ME
Instruction Manual
ST-16L-DH-E
Quick Start Manual
• Manual
ST-16L-DH-ME
Instruction Manual
ST-20L-DH-E
Quick Start Manual
• Manual
ST-20L-DH-ME
Instruction Manual
ST-30L-DH-E
Manual
Show all Stanley Dehumidifier manuals
Desktop
Models
Document Type
07535
Instruction Manual
• Instruction Manual
STST98182-1
User Manual
Door
Models
Document Type
7400-Series
Quick Reference Manual
Door locks
Models
Document Type
48369 / 01 CP/BP
Quick Installation Manual
EL
Manual
ES4
Installation Instructions
ES5
Installation Instructions
Omnilock 45HOM
Installation Instructions Manual
• Installation Addendum
• Installation Template
QEL 200
User Manual
• User Manual
• Quick Start Manual
• Installation Instructions
• Quick Start Manual
• Installation Instructions
QEL 200 EL Series
User Manual
QET100 Series
Installation Instructions
Show all Stanley Door locks manuals
Door Opening System
Models
Document Type
28064
Quick Start Manual
Dura-Glide 2000AG Series
Installation Instructions, Quick Reference Manual
Dura-Glide Series
Owner’s Operation And Maintenance Manual
• Operation And Maintenance Manual
Dura-Guard Series
Owner’s Operation And Maintenance Manual
• Operation And Maintenance Manual
Dura-Max Series
Owner’s Operation And Maintenance Manual
Dura-Storm Series
Owner’s Operation And Maintenance Manual
• Operation And Maintenance Manual
Show all Stanley Door Opening System manuals
Drill
Models
Document Type
5035048724255
Original Instructions Manual
78-339
Quick Start Manual
78-407
Instruction Manual
CD10
User Manual
• User Manual
CD12
User Manual
DL07
User Manual
• Operation And Service Manual
• Service Manual
• User Manual
Show all Stanley Drill manuals
Electric Heater
Models
Document Type
EH6883
User Manual
ST-02-230-E
Operating Instructions Manual
• Operating Instructions Manual
• Instruction Manual
• Manual
• Manual
• Instruction Manual
• Manual
• Manual
ST-02-240-E
Operating Instructions Manual
• Operating Instructions Manual
• Instruction Manual
• Manual
• Manual
• Instruction Manual
• Manual
• Manual
ST-03-230-E
Operating Instructions Manual
• Operating Instructions Manual
• Instruction Manual
• Manual
• Manual
• Instruction Manual
• Manual
• Manual
ST-033-230-E
Operating Instructions Manual
• Operating Instructions Manual
• Instruction Manual
• Manual
• Manual
• Instruction Manual
• Manual
• Manual
ST-05-400-E
Operating Instructions Manual
• Operating Instructions Manual
• Instruction Manual
• Manual
• Manual
• Instruction Manual
• Manual
• Manual
ST-09-400-E
Operating Instructions Manual
• Operating Instructions Manual
• Instruction Manual
• Manual
• Manual
• Instruction Manual
• Manual
• Manual
ST-302-231-E
Instruction Manual
ST-303-231-E
Instruction Manual
ST-305-401-E
Instruction Manual
Show all Stanley Electric Heater manuals
Engine
Models
Document Type
HV18
User Manual
• Safety, Operation & Maintenance
OHV Series
Manual
Extender
Models
Document Type
Simple Start
Quick Start Manual
Simple Start P2G7S
Quick Start Manual
SSLION
Instruction Manual
Fan
Models
Document Type
146796099
Instruction Manual
146796199
Instruction Manual
655302
Operation And Maintenance Manual
655702
Operation And Maintenance Manual
FATMAX SFMCE001
Original Instructions Manual
FT10
Installation & Commissioning Instructions
ST-12F
Instruction Manual
ST-12F-DDF-E
User’s Manual And Operating Instructions
• User’s Manual And Operating Instructions
• User’s Manual And Operating Instructions
Show all Stanley Fan manuals
Fire Alarms
Models
Document Type
SCSS-700
Installation & Operation Manual
Fitness Equipment
Models
Document Type
Sprinter 190
Manual
Flashlight
Models
Document Type
95-112
Manual
95-148
Manual
95-155
Manual
• Manual
BARFLEX BF0109
Instruction Manual
• Instruction Manual
• Instruction Manual
BARFLEX BF0109CA
Instruction Manual
FatMax 95-154
Quick Start Manual
FatMax FMHT72397
Instructions
Show all Stanley Flashlight manuals
Flood Light
Models
Document Type
LAMPMAX DELUXE
Quick Start Manual
Garage Door Opener
Models
Document Type
U-INSTALL
Owner’s Manual
• Owner’s Manual
Garbage Disposal
Models
Document Type
HS3000
Service Manual
Gas Heater
Models
Document Type
ST-11P-CPH-EC
User’s Manual And Operating Instructions
ST-11P-CPH-EU
User’s Manual And Operating Instructions
ST-11T-CPH-E
User’s Manual And Operating Instructions
• User’s Manual And Operating Instructions
ST-14A-CH-E
Instruction Manual
• Manual
• Instructions Manual
ST-14S-CH-E
Instruction Manual
• Manual
• Instructions Manual
Gate Opener
Models
Document Type
Dura-Glide 2000
Installation And Operation Manual
Dura-Glide 3000
Installation And Operation Manual
Dura-Glide 5200
Installation And Operation Manual
Dura-Glide 5300
Installation And Operation Manual
Dura-Guard
Installation And Operation Manual
Dura-Max 5400 Series
Installation And Operation Manual
Dura-Storm
Installation And Operation Manual
DuraCare 7500A TL-FBO
Installation And Operation Manual
ProCare 8300A
Installation And Operation Manual
Gateway
Models
Document Type
GW1200
Installation & Configuration Manual
SHX-GTW
Installation Instructions
Generators
Models
Document Type
SIG 3200
Original Instructions Manual
Glue Gun
Models
Document Type
6-GR25
Original Instructions Manual
FATMAX STHT6-70416
Original Instructions Manual
GPS
Models
Document Type
Hugs
User Manual
Kisses
User Manual
Grinder
Models
Document Type
FATMAX FMC761
Original Instructions Manual
• Original Instructions Manual
FATMAX FMC761M2
Original Instructions Manual
FatMax FME820
Instruction Manual
FatMax FME841
Original Instructions Manual
FATMAX FMEG125V
Manual
FATMAX FMEG210
Manual
• Original Instructions Manual
FATMAX FMEG220
Manual
• Original Instructions Manual
Show all Stanley Grinder manuals
Hand Mixer
Models
Document Type
SDR1400
Original Instructions Manual
• Manual
• Original Instructions Manual
• Instruction Manual
• Original Instructions Manual
Handsets
Models
Document Type
AudioHS-QSG
Installation And Programming
Headlamp
Models
Document Type
HL1S
Instruction Manual
HL2PKS
Instruction Manual
HL2S
Instruction Manual
HLWAKS
Instruction Manual
HLWAKSL
Manual
Heat Pump
Models
Document Type
Solis ECO
Operation And Installation Manual
Heat Pump Accessories
Models
Document Type
WSL141
Manual For Installation, Operation And Maintenance
WSL142
Manual For Installation, Operation And Maintenance
Heater
Models
Document Type
5900
User Manual
657888110095
Manual
675900
Manual
957071
Instruction Manual
Show all Stanley Heater manuals
Impact Driver
Models
Document Type
78-342
Quick Start Manual
78-343
Instruction Manual
AUTOMATIVE STMT70116-8
Quick Start Manual
Fat Max FMC041
Original Instructions Manual
Fatmax FMC040
User Manual
• Instruction Manual
FatMax FMC645
User Manual
• Original Instructions Manual
• Original Instructions Manual
• Original Instructions Manual
Show all Stanley Impact Driver manuals
Indoor Fireplace
Models
Document Type
Argon Built 3 Sided
Manual
Argon Built In ARBI100
Installation And Operating Instructions Manual
Argon Built In ARBI130
Installation And Operating Instructions Manual
Argon Cube
Manual
Argon NMARWH110
Manual
Argon NMARWH140
Manual
Argon NMARWH90
Manual
Argon Wall Mounted ARWH110
Installation And Operating Instructions Manual
Argon Wall Mounted ARWH140
Installation And Operating Instructions Manual
Argon Wall Mounted ARWH200
Installation And Operating Instructions Manual
Show all Stanley Indoor Fireplace manuals
Indoor Furnishing
Models
Document Type
DELUXE CLOSET SYSTEM
Assembly Instructions Manual
H5CHSBK
Use And Care Manual
Show all Stanley Indoor Furnishing manuals
Industrial Equipment
Models
Document Type
71502
Instruction And Service Manual
• Instruction And Service Manual
AV 10
Instruction And Service Manual
• Assembly Instructions Manual
AV 5
Instruction And Service Manual
• Assembly Instructions Manual
AVDEL Avseal II 73200
Assembly Instructions Manual
AVDEL Avseal II PB2500
Assembly Instructions Manual
AVDEL Avseal II PB3400
Assembly Instructions Manual
AVDEL Avseal II ProSet XT
Assembly Instructions Manual
EP30200
User Manual
PP10
User Manual
QED100
Quick Start Manual
Show all Stanley Industrial Equipment manuals
Inverter
Models
Document Type
E-SG 2200
Original Instructions Manual
• Original Instructions Manual
• Original Instructions Manual
• Original Instructions Manual
E-SG 4000
Original Instructions Manual
• Original Instructions Manual
• Original Instructions Manual
• Original Instructions Manual
FATMAX PCI140CA
Instruction Manual
HP1
Safety, Operation And Maintenance Manual
Show all Stanley Inverter manuals
IP Access Controllers
Models
Document Type
PAC iPAC
Quick Start Manual
Keypad
Models
Document Type
40HZ
Manual
9KZ
Manual
EXZ
Manual
KEYPAD EZ LOCKS
Brochure & Specs
Kitchen Appliances
Models
Document Type
BRANDON
Operation Instructions Manual
• Operation Instructions Manual
BRANDON 100K
Installation And Commissioning Instructions
• User Manual
• Operation Instructions Manual
• Installation And Commissioning Instructions
• Operation Instructions Manual
• Installation And Commissioning Instructions
BRANDON 80K
Installation And Commissioning Instructions
• User Manual
• Operation Instructions Manual
• Installation And Commissioning Instructions
• Operation Instructions Manual
• Installation And Commissioning Instructions
BRANDON DHW
Installation And Commissioning Instructions
• Operation Instructions Manual
• Installation And Commissioning Manual
BRANDON DHW OIL
Operation Instructions Manual
BRANDON DRY
Installation And Commissioning Instructions
• Operation Instructions Manual
• Installation And Commissioning Manual
BRANDON DRY OIL
Operation Instructions Manual
Brandon OCD
User Instructions
COMERAGH — 50
Operating Instructions Manual
• Instruction Manual
• Installation And Operation Instructions Manual
DHW
Operating Instructions Manual
Show all Stanley Kitchen Appliances manuals
Label Maker
Models
Document Type
HeavyDuty Labeler 1150DX
Manual
HeavyDuty Labeler ST-1150
Manual
ST-1150
User Manual
Laminate Trimmer
Models
Document Type
ST55
Manual
• Manual
• Original Instructions Manual
• Instruction Manual
Laser Level
Models
Document Type
77-121
Manual
77-189
Instruction Manual
CL2XTi
Manual
CLLi
Instructions For Use Manual
CROSS 90
User Manual
• Instructions Manual
Cubix STHT77340
User Manual
Fat Max S2
Instruction Manual
Fat Max S2XL
Instruction Manual
• Instruction Manual
FatMax AL32
Manual
Show all Stanley Laser Level manuals
Lawn and Garden Equipment
Models
Document Type
1303W
Quick Start Manual
BDS6520
Instruction Manual
EA08
User Manual
• Safety, Operation & Maintenance
• User Manual
FATMAX SFMSTB930
Original Instructions Manual
STR-4 IN 1
Original Instructions Manual
Lawn Mower
Models
Document Type
100″ Tow BEHIND MOWER
Owner’s Manual
100TS
Owner’s Manual
• Owner’s Manual
309311x692A
Instruction Book
36BDS
Owner’s Manual
36BS
Owner’s Manual
36FDS
Owner’s Manual
• Owner’s Manual
36FS
Owner’s Manual
• Owner’s Manual
Show all Stanley Lawn Mower manuals
Light Fixture
Models
Document Type
Fatmax FMHT81507-1
Instruction Manual
Fatmax FMHT81508-1
Instruction Manual
Lighting Equipment
Models
Document Type
FT448
Instruction Manual
LIGHTTIMER SELECT TWIN TM501
Instructions Manual
PSL1000S
Instruction Manual
SB01AL
Instruction Manual
SCT12
Manual
Locks
Models
Document Type
203820
Installation Instructions Manual
3 Series
Service Manual
83KM-93KM
Installation Instructions Manual
85KM-95KM
Installation Instructions Manual
9K Series
Manual
BEST ACCESS SYSTEMS 45HM IDH Max
Manual
BEST ACCESS SYSTEMS 45HM Series
Quick Start Manual
GS3-MT PIN
Installation Manual
GS3PIN
Installation Manual
OmniLock
Illustrated Parts Catalog
Show all Stanley Locks manuals
Measuring Instruments
Models
Document Type
0-77-030
User Manual
• Manual
4V360H
Manual
77-030
Manual
BRANDON OIL MK3
Installation Manual
CL2i
User Manual
Compulevel
User Manual
CROSS 90
User Manual
• Instructions Manual
Fatmax FMHT77356
Manual
Fatmax FMHT77357
Manual
Show all Stanley Measuring Instruments manuals
Media Converter
Models
Document Type
PC1A09
Instruction Manual
PC509
Instruction Manual
PC809
Instruction Manual
Medical Equipment
Models
Document Type
AeroScout EX5210R
Installation & Configuration Manual
Bed-Check Vr
Quick Programming Manual
M200
Setup & User Manual
T14
User Manual
Mixer
Models
Document Type
Fatmax FME190
Original Instructions Manual
• Original Instructions Manual
SDR1400
Original Instructions Manual
• Manual
• Original Instructions Manual
• Instruction Manual
• Original Instructions Manual
Monitor
Models
Document Type
UMP 91621
User Manual
Multimeter
Models
Document Type
Fatmax FMHT77419
User Manual
STHT0-77364
User Manual
Nail Gun
Models
Document Type
76001
Service Manual
• Original Instruction
• Instruction Manual
• Original Instruction
• Instruction Manual
• Instruction Manual
• Instruction Manual
76003
Service Manual
• Instruction Manual
• Instruction Manual
• Instruction Manual
APC-2IN1
Technical Data Manual
APC-BN
Technical Data Manual
APC-FN
Technical Data Manual
Bostitch BT1855
Original Instructions Manual
BOSTITCH F21PL
Original Instructions Manual
BOSTITCH F28WW
Original Instructions Manual
BOSTITCH F33PT
Original Instructions Manual
BOSTITCH F33PTSM
Original Instructions Manual
Show all Stanley Nail Gun manuals
Other
Models
Document Type
ProSet XT3
Service Manual
• Instruction Manual
• Instruction Manual
• Instruction Manual
• Instruction Manual
• Instruction Manual
ProSet XT4
Instruction Manual
• Instruction Manual
• Instruction Manual
• Instruction Manual
• Instruction Manual
• Service Manual
TA54
User Manual
• Safety, Operation & Maintenance
Oven
Models
Document Type
BRANDON DHW
Installation And Commissioning Instructions
• Operation Instructions Manual
• Installation And Commissioning Manual
BRANDON DRY
Installation And Commissioning Instructions
• Operation Instructions Manual
• Installation And Commissioning Manual
Paint Sprayer
Models
Document Type
160123XSTN
Instruction Manual For Owner’s Use
161132XSTN
Instruction Manual For Owner’s Use
Pellet stove
Models
Document Type
FUSION PELLET STOVE
Operating & Installation Manual
Pipe cleaners
Models
Document Type
FATMAX V20 LITHIUM ION SFMCGA75
Original Instructions Manual
FATMAX V20 LITHIUM ION SFMCGA75M1
Original Instructions Manual
Planer
Models
Document Type
FatMax FME630
Original Instructions Manual
• Manual
Fatmax KFFMEW630
Original Instructions Manual
STEL360
User Manual
STPP7502
Instruction Manual
• Original Instructions Manual
• Original Instructions Manual
• Original Instructions Manual
• Original Instructions Manual
• Original Instructions Manual
Show all Stanley Planer manuals
Pole Saw
Models
Document Type
CS25
User Manual
• User Manual
• User Manual
CS25112P
User Manual
CS2581106
User Manual
CS25812
User Manual
CS258812
User Manual
CS28
User Manual
• User Manual
• User Manual
Show all Stanley Pole Saw manuals
Portable Generator
Models
Document Type
AL35
Safety, Operation And Maintenance User’s Manual
FATMAX EVO160 TIG LIFT
Manual
G2250S
Owner’s Manual
• Owner’s Manual
G3250S
Owner’s Manual
• Owner’s Manual
G5000S
Owner’s Manual
• Owner’s Manual
• Owner’s Manual
G8000S
Owner’s Manual
• Owner’s Manual
• Owner’s Manual
Show all Stanley Portable Generator manuals
Power distribution unit
Models
Document Type
Fatmax PPRH5DS
Instruction Manual
Power Hammer
Models
Document Type
FATMAX SFMEH230
Original Instructions Manual
• Original Instructions Manual
FATMAX SFMEH230K-QS
Original Instructions Manual
LaBounty MRP
Safety, Operation & Maintenance Instructions
STHM10
Original Instructions Manual
• Original Instructions Manual
• Instruction Manual
STHM10K
Original Instructions Manual
STHM5
Original Instructions Manual
• Original Instructions Manual
• Original Instructions Manual
• Original Instructions Manual
• Original Instruction
• Manual
Power Screwdriver
Models
Document Type
Fatmax FMC011S
Manual
Fatmax FMC021
Manual
FATMAX FMC626C2K
Original Instructions Manual
FATMAX FMC627
Original Instructions Manual
• Manual
FATMAX FMHT66719
Original Instructions Manual
FATMAX KFMCD011
Original Instructions Manual
• Original Instructions Manual
• Original Instructions Manual
FATMAX KFMCD011S2
Original Instructions Manual
• Original Instructions Manual
Fatmax SCD718
Original Instructions Manual
• Original Instructions Manual
Show all Stanley Power Screwdriver manuals
Power Strips
Models
Document Type
POWERMAX 6
Instructions
Power Supply
Models
Document Type
FATMAX PP1DCS
Instruction Manual
FatMax PPRH5KL
Quick Start Manual
FATMAX PPRH7DS
Instruction Manual
GT09
Safety, Operation And Maintenance User’s Manual
GT13
Safety, Operation And Maintenance User’s Manual
J5C09D
Instruction Manual
J7C09D
Instruction Manual
PLUGBANK 6
Manual
PPRH5
Instruction Manual
• Instruction Manual
Show all Stanley Power Supply manuals
Power Tool
Models
Document Type
00496014
Instruction And Service Manual
031312004
Safety, Operation & Maintenance
07287
Instruction And Service Manual
07530
Instruction And Service Manual
• Instruction And Service Manual
07531
Instruction And Service Manual
• Instruction And Service Manual
07532
Instruction And Service Manual
• Instruction And Service Manual
07536
Instruction And Service Manual
• Instruction And Service Manual
07537-00200
Instruction And Service Manual
150703XSTN
Instruction Manual For Owner’s Use
150704XSTN
Instruction Manual For Owner’s Use
Show all Stanley Power Tool manuals
Power Tool Accessories
Models
Document Type
S3007
Operating Instructions
Power Tools
Models
Document Type
0753 MKII
Instruction And Service Manual
07530
Instruction And Service Manual
• Instruction And Service Manual
07531
Instruction And Service Manual
• Instruction And Service Manual
07532
Instruction And Service Manual
• Instruction And Service Manual
73200
Instruction And Service Manual
• Instruction And Service Manual
• Instruction And Service Manual
76001
Service Manual
• Original Instruction
• Instruction Manual
• Original Instruction
• Instruction Manual
• Instruction Manual
• Instruction Manual
76002
Original Instruction
• Instruction Manual
• Original Instruction
• Instruction Manual
• Instruction Manual
• Instruction Manual
EZM1000
Instruction And Service Manual
• Instruction And Service Manual
Show all Stanley Power Tools manuals
Pressure Washer
Models
Document Type
BXPW1300E
Original Instructions Manual
BXPW1300PE
Original Instructions Manual
BXPW1400E
Original Instructions Manual
BXPW1400PE
Original Instructions Manual
BXPW1500E
Original Instructions Manual
BXPW1500PE
Original Instructions Manual
BXPW1600E
Original Instructions Manual
BXPW1600PE
Original Instructions Manual
BXPW1700E
Original Instructions Manual
BXPW1700PE
Original Instructions Manual
Show all Stanley Pressure Washer manuals
Printer
Models
Document Type
MODEL 1
User Manual
STDG5006
Original Instructions Manual
Projector Accessories
Models
Document Type
PJMM-2465C
Installation Manual
Radio
Models
Document Type
FatMax FMC770
Original Instructions Manual
• Manual
FATMAX FMCR001
Manual
Ranges
Models
Document Type
BRANDON 100K
Installation And Commissioning Instructions
• User Manual
• Operation Instructions Manual
• Installation And Commissioning Instructions
• Operation Instructions Manual
• Installation And Commissioning Instructions
BRANDON 60K
Installation And Commissioning Instructions
• User Manual
• Operation Instructions Manual
BRANDON 80K
Installation And Commissioning Instructions
• User Manual
• Operation Instructions Manual
• Installation And Commissioning Instructions
• Operation Instructions Manual
• Installation And Commissioning Instructions
DONARD 60K
Installation And Operating Instructions Manual
Errigal and
Installation And Operating Instructions Manual
• Instruction Manual
• Installation And Operating Instructions Manual
• Assembly, Installation And Operating Instructions
• Training Manual
Woodburning Range and
Installation And Operating Instructions Manual
• Assembly, Installation And Operating Instructions
Receiver
Models
Document Type
FATMAX FMHT1-77359
User Manual
FatMax FMHT1-77360
Manual
Remote Control
Models
Document Type
31166
Quick Start Manual
31184
Quick Start Manual
51180
Instructions
• Quick Start Manual
51186
Quick Start Manual
51192
Installation & Pairing
56316
Quick Start Manual
56322
Quick Start Manual
56325
Manual
56326
Quick Start Manual
58325-AHR
Manual
Show all Stanley Remote Control manuals
Remote Starter
Models
Document Type
350 AMP
Instruction Manual
FatMax
Instruction Manual
• Instruction Manual
• Instruction Manual
fatmax 700
Instruction Manual
Fatmax J7C5
Instruction Manual
J309
Instruction Manual
• Instruction Manual
• Instruction Manual
• Instruction Manual
J45C09
Instruction Manual
J45TK
Manual
Show all Stanley Remote Starter manuals
Rfid Systems
Models
Document Type
EX5200
Deployment Manual
PAC iEVO Series
Quick Start Manual
Rivet Tools
Models
Document Type
07535
Instruction Manual
• Instruction Manual
73200
Instruction And Service Manual
• Instruction And Service Manual
• Instruction And Service Manual
73482
Instruction And Service Manual
• Instruction And Service Manual
73483
Instruction And Service Manual
74202
Service Manual
• Service Manual
• Instruction Manual
76005
Instruction Manual
AV 20
Instruction And Service Manual
• Instruction And Service Manual
AV 25
Instruction And Service Manual
Show all Stanley Rivet Tools manuals
Rotary Hammer
Models
Document Type
Fatmax FMCD900
Original Instructions Manual
Fatmax FMER524
Manual
Fatmax SFMCH900 Series
Original Instructions Manual
• Manual
• Original Instructions Manual
Fatmax SFMCH900B
Original Instructions Manual
Show all Stanley Rotary Hammer manuals
Safety Equipment
Models
Document Type
DE-MC521
Quick Reference Manual
• Quick Reference Manual
Sander
Models
Document Type
78-409
Quick Start Manual
FAT MAX FMEW214
Manual
FAT MAX KFFMEW210
Manual
FAT MAX SFMEE500
Original Instructions Manual
FATMAX FMCW210
Original Instructions Manual
• Original Instructions Manual
FATMAX FMCW220
Original Instructions Manual
• Original Instructions Manual
Fatmax FMEW204
Original Instructions Manual
• Original Instructions Manual
Show all Stanley Sander manuals
Saw
Models
Document Type
CO23
User Manual
CO23341
User Manual
CO25
Service Manual
• User Manual
• User Manual
CO25141
User Manual
CO2514101
Service Manual
CO25541
User Manual
CO2554101
Service Manual
COV10 V SERIES
User Manual
Show all Stanley Saw manuals
Scanner
Models
Document Type
GS3-MT
Installation Manual
• Installation Manual
• Installation Manual
• Installation Manual
• Installation Manual
Oneprox GS3-LF
Installation Manual
• Installation Manual
• Installation Manual
• Installation Manual
• Installation Manual
• Installation Manual
Security Sensors
Models
Document Type
FATMAX FMHT77652
User Manual
FATMAX FMHT77653
User Manual
IntelliLaser Pro
Instruction Manual
• Instruction Manual
• User Manual
INTELLILASER PRO 0-77-260
User Manual
IntelliSensor Pro
User Manual
• Instruction Manual
K2
Manual
LD100
User Manual
QED300
Installation Instructions Manual
• Installation Instructions
• Manual
S100
User Manual
• User Manual
S50
User Manual
Show all Stanley Security Sensors manuals
Security System
Models
Document Type
BEST SSS-SEDA
Manual
Easikey 250
User And Installation Manual
SCSS-700VS
Installation & Operation Manual
Shelter FOB 9KX
Operating Instructions
VIP Series
Installation & Operation Manual
Server
Models
Document Type
ACS
Quick Start Manual
Snow Blower
Models
Document Type
30SS
Owner’s Manual
• Owner’s Manual
36SS
Owner’s Manual
• Owner’s Manual
• Owner’s Manual
45SS
Owner’s Manual
• Owner’s Manual
• Owner’s Manual
SPT-163-560
Original Instructions Manual
SPT-182-570
Original Instructions Manual
• Original Instructions Manual
Show all Stanley Snow Blower manuals
Speakers
Models
Document Type
FatMax FMC772B
Original Instructions Manual
• Original Instructions Manual
MOBILE
Quick Start User Manual
Spotlight
Models
Document Type
FatMax
Instruction Manual
• Instruction Manual
• Instruction Manual
FATMAX SL10LEDS
Instruction Manual
• User Manual
FL5W10
Instruction Manual
• Instruction Manual
FL5W15S
Instruction Manual
HID0109
Instruction Manual
HIDC10
Instruction Manual
HIDLIS
Manual
Show all Stanley Spotlight manuals
Staple Gun
Models
Document Type
TR35
Quick Start Manual
Stove
Models
Document Type
0063AU5289
Assembly, Installation And Operation Instructions
Aoife
Installation And Operating Instructions Manual
• Installation And Operating Instructions Manual
• User Instructions
Ardmore
Installation And Operating Instructions Manual
• Installation And Operating Instructions Manual
• Installation And Operating Instructions Manual
• Installation And Operating Instructions Manual
ARDMORE HPB
Manual
Argon Arranmore
Installation And Operating Instructions Manual
Argon Bailey
Installation And Operating Instructions Manual
Show all Stanley Stove manuals
Stud Sensor
Models
Document Type
3253560775889
User Manual
IntelliSensor 77-110
Instruction Manual
S100
User Manual
• User Manual
S150
User Manual
• User Manual
• Manual
S200
User Manual
S300
Instructions Manual
• User Manual
• Operating Instructions
• User Manual
STHT77587
User Manual
• Manual
Show all Stanley Stud Sensor manuals
Swimming Pool Vacuum
Models
Document Type
PoolTec
Owner’s Manual
• Owner’s Manual
PoolTec 28817
Owner’s Manual
Switch
Models
Document Type
51180
Instructions
• Quick Start Manual
ECO Pro
Quick Reference Manual
Thermometer
Models
Document Type
Fatmax FMHT0-77422
User Manual
• Original Instructions Manual
STHT0-77365
User Manual
• User Manual
Tiller
Models
Document Type
SGT-25-450-H
Original Instructions Manual
SGT-25-450-V
Original Instructions Manual
SGT-51-820-H
Original Instructions Manual
Timer
Models
Document Type
31250
Quick Start Manual
31251
Quick Start Manual
38424
Quick Start Manual
51215
Quick Start Manual
56470
Quick Start Manual
56471
Quick Start Manual
DR-1589
Manual
GS-302
Operating Instructions Manual
LIGHTTIMER SELECT TWIN
Manual
PLUGBANK 3 SELECT
Operating Instructions Manual
Show all Stanley Timer manuals
Tool Storage
Models
Document Type
FatMax XTREME
User Manual
Garage Workshop T3
Assembly Instructions Manual
Show all Stanley Tool Storage manuals
Tools
Models
Document Type
07536
Instruction And Service Manual
• Instruction And Service Manual
07536-02100
Instruction And Service Manual
150
Quick Start Manual
160173XSTN
Instruction Manual For Owner’s Use
204018
Quick Reference Manual
55
Quick Manual
• How To Use Manual
65AT
Manual
70500
Instruction And Service Manual
• Instruction And Service Manual
• Instruction And Service Manual
• Instruction And Service Manual
Show all Stanley Tools manuals
Tractor
Models
Document Type
MHP3
User Manual
• User Manual
Trimmer
Models
Document Type
Fatmax SFMCHTB866
Original Instructions Manual
FATMAX SFMCPH845
Original Instructions Manual
Fatmax SFMCST933
Instructions Manual
• Original Instructions Manual
FATMAX SFMCSTB933
Original Instructions Manual
• Original Instructions Manual
FATMAX V20
Original Instructions Manual
FATMAX V20 SFMCST933
Instructions Manual
FATMAX V60
Original Instructions Manual
SFMCSTB963
Original Instructions Manual
Show all Stanley Trimmer manuals
TV Accessories
Models
Document Type
TTL-6644TS
Installation Manual
TV Mount
Models
Document Type
TLR-EC3215T
Installation Manual
TLS-120T
Installation Manual
TLS-210S
Installation Manual
TLX-105FM
Installation Manual
TMS-DS1113T
Installation Manual
Ultrasonic Jewelry Cleaner
Models
Document Type
SXPW0101
Owner’s Operating Manual
Vacuum Cleaner
Models
Document Type
199-4375-2
Owner’s Manual
8111007W
Owner’s Manual
8210413B
Owner’s Manual
BXVC15PE
Manual
BXVC20PE
Manual
BXVC20PTE
Manual
BXVC20XE
Manual
BXVC20XTE
Manual
BXVC25PDE
Manual
BXVC30PDE
Manual
Show all Stanley Vacuum Cleaner manuals
Vibratory rammers & tampers
Models
Document Type
TA54
User Manual
• Safety, Operation & Maintenance
TA54103
Safety, Operation & Maintenance
TA54603
Safety, Operation & Maintenance
TA54603A
Safety, Operation & Maintenance
Water Pump
Models
Document Type
76501-02000
Manual
76501-02500
Manual
76502-02000
Manual
76502-02500
Manual
76503-02000
Manual
76503-02500
Manual
76504-02000
Manual
76504-02500
Manual
76505-02000
Manual
76505-02500
Manual
Show all Stanley Water Pump manuals
Welding Accessories
Models
Document Type
E-Protection 2000 E
User Manual
E-Protection 2000 E 11
User Manual
PC1T09
Instruction Manual
Welding System
Models
Document Type
460081
User Manual
EPX10
User Manual
• Safety, Operation And Maintenance User’s Manual
FATMAX TIG LIFT
User Manual
GOLDEN ARC MINI
User Manual
IPER E181
User Manual
MIKROMIG
User Manual
RW30110
User Manual
RW30112
User Manual
RW30120
User Manual
Show all Stanley Welding System manuals
Wood Router
Models
Document Type
SRR1200
Original Instructions Manual
• Original Instructions Manual
• Instruction Manual
• Original Instructions Manual
SRR1200-RU
Original Instructions Manual
Wood stove
Models
Document Type
Aoife
Installation And Operating Instructions Manual
• Installation And Operating Instructions Manual
• User Instructions
Errigal and
Installation And Operating Instructions Manual
• Instruction Manual
• Installation And Operating Instructions Manual
• Assembly, Installation And Operating Instructions
• Training Manual
K1200
Installation And Operating Instructions Manual
• Instruction Manual
K1700
Installation And Operating Instructions Manual
• Installation And Operating Instructions Manual
• Instruction Manual
K2300
Installation And Operating Instructions Manual
• Installation And Operating Instructions Manual
• Instruction Manual
Lismore
Installation And Operating Instructions Manual
• Installation And Operating Instructions Manual
• Installation And Operating Instructions Manual
• Installation And Operating Instructions Manual
Solis F1100 Panoramic
Installation And Operating Instructions Manual
Work Light
Models
Document Type
7629101430
Instruction Manual
7629104430
Instruction Manual
7634802430
Instruction Manual
BARFLEX BF0109
Instruction Manual
• Instruction Manual
• Instruction Manual
BF01AL
Instruction Manual
DR-1577
Operator’s Manual
FATMAX FMCL001B
Original Instructions
FATMAX SFMCL020
Original Instructions Manual
Show all Stanley Work Light manuals
- Home
- Stanley
Количество руководств по эксплуатации : 202
Инструкции по эксплуатации
Укажите здесь торговую марку и тип
Количество руководств по эксплуатации : 202
В настоящее время вы находитесь на странице с руководствами . Выберите одну из категорий продуктов, чтобы быстро найти нужное руководство . Не удалось найти нужный продукт ? Тогда попробуйте вбить в строку поиска и модель, чтобы найти нужное руководство . На ManualsPDF.ru в настоящее время имеется 202 руководств , разделенных на 28. Самые популярные категории продуктов :
- Компрессоры
- Зарядные устройства
- Лазерные указки
Самые популярные продукты из на сегодня:
- Stanley BC15BS
- Stanley SXVC30XTDE
- Stanley TLM30
Стэнли Логистикс, Инк., работает как глобальная компания, предоставляющая финансовые услуги. Фирма предоставляет инвестиционно-банковские продукты и услуги своим клиентам и заказчикам, включая корпорации, правительства, финансовые учреждения и частных лиц. Их официальный webсайт Стэнли.com.
Каталог руководств пользователя и инструкций для продуктов Stanley можно найти ниже. Продукция Stanley запатентована и зарегистрирована под торговыми марками Стэнли Логистикс, Инк.
Контактная информация:
Адрес: Morgan Stanley & Co. 1 International Place, 13th Floor Boston, MA 02110
Найти
3Gal (11.5Liter) WET/DRY VACUUM) OWNER’S MANUALIMPORTANT: READ THIS OPERATOR’S MANUAL BEFORE USING! Manufactured in China Toll-free helpline for replacement parts: 1-888-899-0146 © 2015 Alton Industry Ltd. Group – All Rights Reserved PRODUCT SPECIFICATIONS Power 220V/50/60Hz/ 900W Motor By-Pass, Single Stage Tank Capacity 3 Gallon Hose 1-1/4 in. x 5 ft. Power cord 10 ft. Length …
Подробнее “STANLEY SL18136 Wet-Dry Vacuum Owner’s Manual”
STANLEY SL18115 Пылесос на 5 галлонов Руководство пользователя ХАРАКТЕРИСТИКИ ИЗДЕЛИЯ Питание: 120 В / 60 Гц / 7 А Двигатель: байпас, одинарный Stage Емкость резервуара: 5 галлонов. Шланг: 1-1/4 дюйма x 5 футов. Шнур питания: SJTW18AWG / 10 футов. Длина ПРЕДУПРЕЖДЕНИЕ. Используйте только удлинители, предназначенные для использования вне помещений. Удлинители в плохом…
Подробнее «Руководство по эксплуатации пылесоса STANLEY SL18115 на 5 галлонов»
STANLEY SL18402-8B Пылесос для сухой и влажной уборки объемом 8 галлонов Руководство пользователя ТЕХНИЧЕСКИЕ ХАРАКТЕРИСТИКИ ИЗДЕЛИЯ Мощность: 120 В / 60 Гц / 10 А Двигатель: Single Stage Емкость резервуара: 8 галлонов. Шланг: 1-7/8 дюйма x 6 футов. Шнур питания: SJTW18AWG / 10 футов. Длина ПРЕДУПРЕЖДЕНИЕ. Используйте только удлинители, предназначенные для использования вне помещений. Удлинители в…
Подробнее «Руководство пользователя пылесоса для сухой и влажной уборки STANLEY SL18402-8B на 8 галлонов»
РУКОВОДСТВО ПО ЭКСПЛУАТАЦИИ И ОБСЛУЖИВАНИЮ ОРИГИНАЛЬНАЯ ИНСТРУКЦИЯ Гидропневматический электроинструмент Инструмент для заклепочных гаек — 74200 ОРИГИНАЛЬНАЯ ИНСТРУКЦИЯ 74200 Инструмент с резьбовой вставкой © 2021 Stanley Black & Decker inc. Все права защищены. Предоставленная информация не может быть воспроизведена и/или обнародована каким-либо образом и с помощью любых средств (электронных или механических) без предварительного явного и письменного разрешения от…
Подробнее «Руководство по эксплуатации инструмента с резьбовой вставкой STANLEY 74200»
Инструкция по эксплуатации ударной отвертки STANLEY SBI810 Overview Рисунок Инструкции Использование по назначению Ваш бесщеточный ударный шуруповерт STANLEY SBI810 предназначен для завинчивания и завинчивания гаек. Этот прибор предназначен для профессиональных и частных непрофессиональных пользователей. Инструкции по технике безопасности Общие предупреждения по безопасности при работе с электроинструментом Внимание! Прочтите все предупреждения о безопасности, инструкции, иллюстрации и технические характеристики, прилагаемые к этому …
Подробнее «Руководство по эксплуатации ударной отвертки STANLEY SBI810»
STANLEY 74200 Инструмент для установки заклепок-гаек Информация о продукте Инструмент для заклепок-гаек – 74200 представляет собой гидропневматический инструмент, предназначенный для установки заклепок-гаек. Инструмент имеет следующие характеристики: Спецификация установочного инструмента Вес: 2 кг (4.4 фунта) Ход: 7 мм (0.28 дюйма) Давление воздуха: 6–8 бар (87–116 фунтов на кв. дюйм) Гидравлическое давление: 30–80 бар …
Подробнее «Инструкция по эксплуатации инструмента для изготовления заклепочных гаек STANLEY 74200»
STANLEY ESAFOR MK II 74290 Гидропневматический электроинструмент © 2021 Stanley Black & Decker inc. Все права защищены. Предоставленная информация не может быть воспроизведена и/или обнародована каким-либо образом и с помощью любых средств (электронных или механических) без предварительного письменного разрешения от STANLEY Engineered Fastening. Предоставленная информация основана на…
Подробнее «Руководство пользователя гидропневматического электроинструмента STANLEY ESAFOR MK II 74290»
Гидравлические/пневматические заклепочные инструменты STANLEY EZM1000 ВВЕДЕНИЕ Предоставленная информация не может быть воспроизведена и/или обнародована каким-либо образом и с помощью любых средств (электронных или механических) без предварительного явного и письменного разрешения от STANLEY Engineered Fastening. Предоставленная информация основана на данных, известных на момент внедрения этого продукта. …
Подробнее «Руководство пользователя гидравлических/пневматических заклепочных инструментов STANLEY EZM1000»
Гидропневматический электроинструмент 74200. Руководство пользователя. РУКОВОДСТВО ПО ЭКСПЛУАТАЦИИ И ОБСЛУЖИВАНИЮ. ОРИГИНАЛЬНАЯ ИНСТРУКЦИЯ. Гидропневматический электроинструмент 74200. Все права защищены. Предоставленная информация не может быть воспроизведена и/или обнародована каким-либо образом и с помощью любых средств (электронных или механических)…
Подробнее «Руководство пользователя гидропневматического электроинструмента STANLEY 74200»
Гидропневматический силовой модуль 71501 Руководство пользователя Гидропневматический силовой модуль 71501 © STANLEY Black & Decker, 2021 г. Все права защищены. Предоставленная информация не может быть воспроизведена и/или обнародована каким-либо образом и с помощью любых средств (электронных или механических) без предварительного письменного разрешения от STANLEY Engineered Fastening. Представленная информация основана на…
Подробнее «Руководство пользователя гидропневматического силового модуля STANLEY 71501»

ENGLISH (Original Instructions)
SM18
English
French
Russian
Ukrainian
Turkish
ةيبرعلا
14
27
42
61
77
107
ENGLISH (Original Instructions)
2
0000 00-00
a
l
w
ggg
q
mm
cc
aa
p
c
j
ee
dt
e
f
v
u
b
x
o
n
aaa
m
ddd
r
g
k
s
i
ii
bbb
ccc
1
2
3
ENGLISH (Original Instructions)
ii
ff
ee
3
4
ENGLISH (Original Instructions)
4
i
mm
o
j
7
5
6
5
ENGLISH (Original Instructions)
i
nn
pp
v
s
t
e
oo
oo
rr
uu
x
ll
nn
kk
bb
8
9 10
11
ENGLISH (Original Instructions)
6
tt
i
tt
oo
s
v
cc
p
xx
q
yy
ww
cc
12
13 14
15 16
7
ENGLISH (Original Instructions)
v
k
zz
aa
ww
>30mm
ggg
q
yy
xx
17
19
18
20
21 22
ss
hhh
ENGLISH (Original Instructions)
8
dd
bb
c
v
y
I
23
25
26
24
9
ENGLISH (Original Instructions)
ee
ii
ii
h
h
p
fff
27
28
ENGLISH (Original Instructions)
10
gg
29
11
ENGLISH (Original Instructions)
30
ENGLISH (Original Instructions)
12
31
32
34
35
33
13
ENGLISH (Original Instructions)
36
37

ENGLISH (Original Instructions)
14
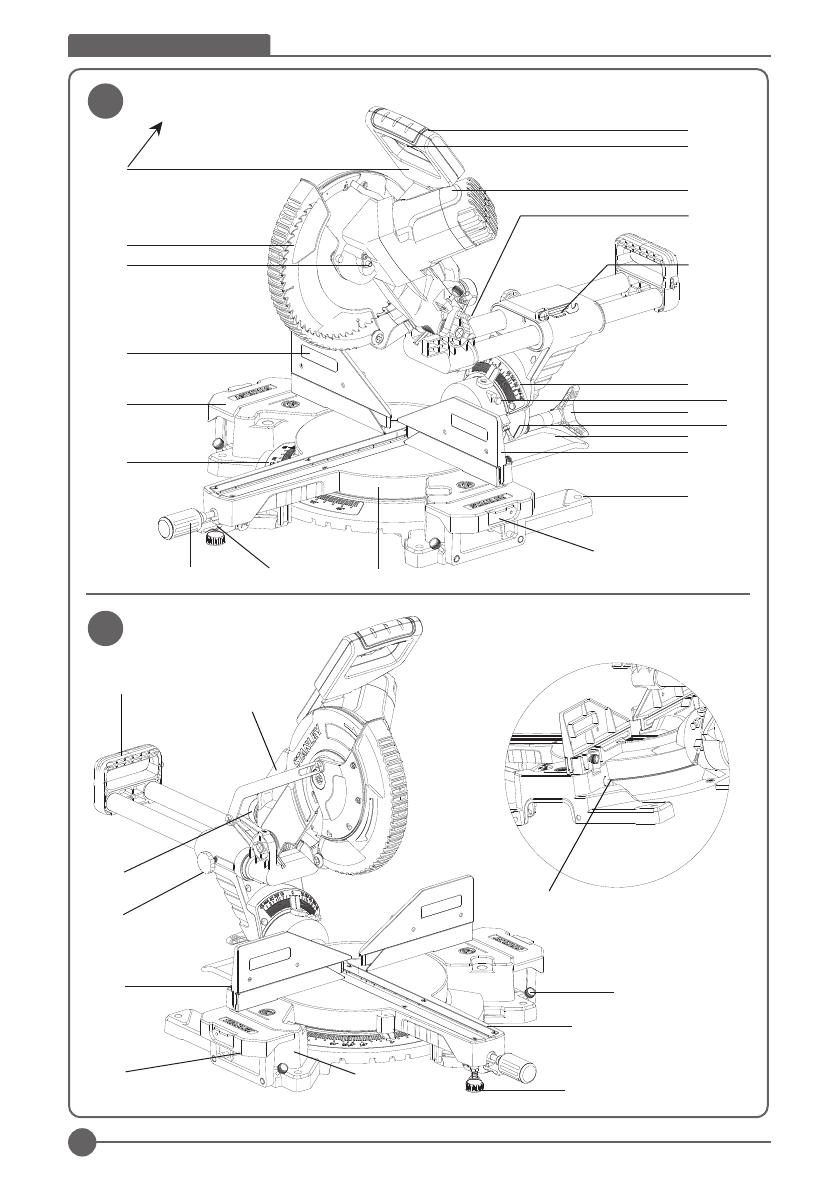
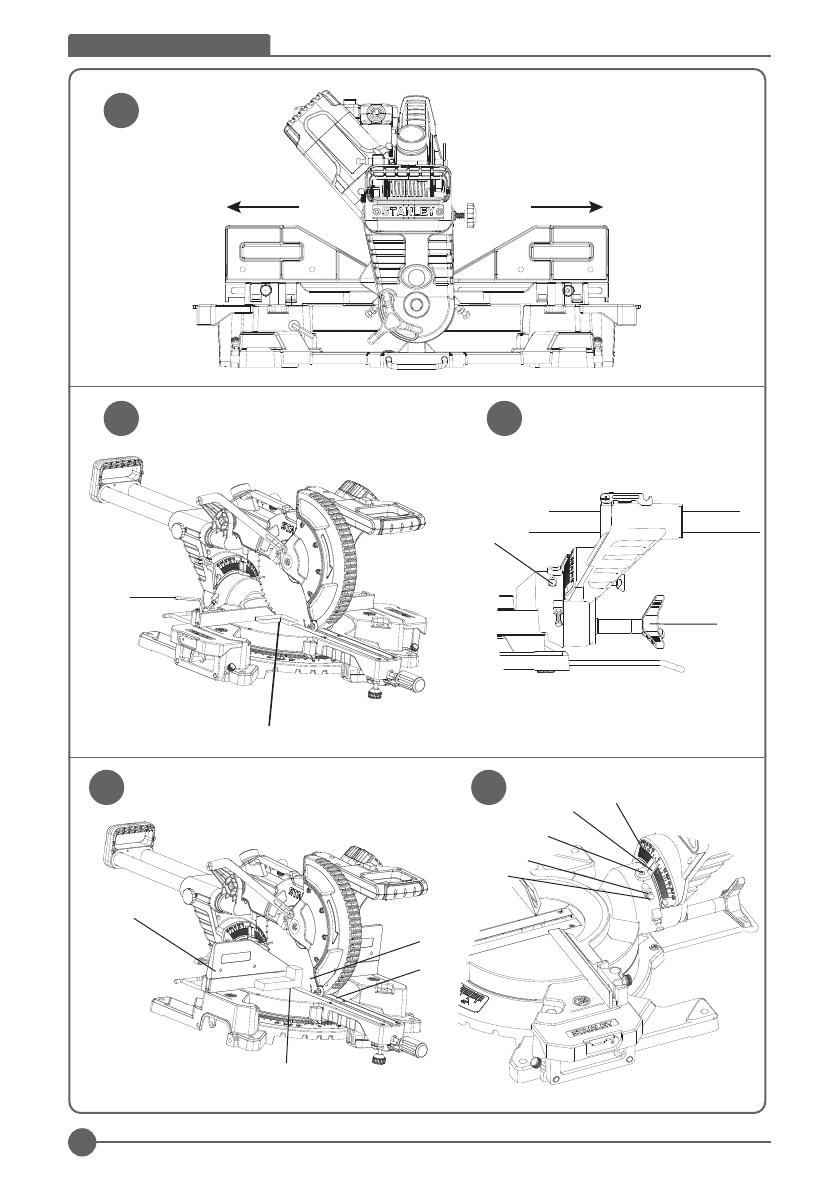
INTENDED USE
Your STANLEY Mitre Saw SM18 has been designed for
cutting wood and aluminum, wood products, aluminum
products and plastics. It performs the sawing operations of
cross-cutting, bevelling and mitring easily, accurately and
safely. This tool is intended for professional use.
SAFETY INSTRUCTIONS
The definitions below describe the level of severity for each
signal word. Please read the manual and pay attention to
these symbols.
DANGER: Indicates an imminently hazardous
situation which, if not avoided, will result in
death or serious injury.
WARNING: Indicates a potentially hazardous
situation which, if not avoided, could result in
death or serious injury.
CAUTION: Indicates a potentially hazardous
situation which, if not avoided, may result in
minor or moderate injury.
NOTICE: Indicates a practice not related to personal injury
which, if not avoided, may result in property damage.
Denotes risk of electric shock.
Denotes risk of fire.
Warning: To reduce the risk of injury, read the
instruction manual.
General Power Tool Safety Warnings
WARNING! Read all safety warnings, instruc—
tions, illustrations and specifications pro—
vided with this power tool. Failure to follow all
instructions listed below may result in electric
shock, fire and/or serious injury.
Save all warnings and instructions for future
reference
The term “power tool” in the warnings refers to your
mains-operated (corded) power tool or battery operated
(cordless) power tool.
1. Work area safety
a. Keep work area clean and well lit. Cluttered or dark
areas invite accidents.
b. Do not operate power tools in explosive
atmospheres, such as in the presence of
flammable liquids, gases or dust. Power tools
create sparks which may ignite the dust or fumes.
c. Keep children and bystanders away while
operating a power tool. Distractions can cause you
to lose control.
2. Electrical Safety
a. Power tool plugs must match the outlet. Never
modify the plug in any way. Do not use any adapter
plugs with earthed (grounded) power tools.
Unmodified plugs and matching outlets will reduce risk
of electric shock.
b. Avoid body contact with earthed or grounded
surfaces such as pipes, radiators, ranges and
refrigerators. There is an increased risk of electric
shock if your body is earthed or grounded.
c. Do not expose power tools to rain or wet
conditions. Water entering a power tool will increase
the risk of electric shock.
d. Do not abuse the cord. Never use the cord for
carrying, pulling or unplugging the power tool.
Keep cord away from heat, oil, sharp edges or
moving parts. Damaged or entangled cords increase
the risk of electric shock.
e. When operating a power tool outdoors, use an
extension cord suitable for outdoor use. Use of
a cord suitable for outdoor use reduces the risk of
electric shock.
f. If operating a power tool in a damp location is
unavoidable, use a residual current device (RCD)
protected supply. Use of an RCD reduces the risk of
electric shock.
3. Personal Safety
a. Stay alert, watch what you are doing and use
common sense when operating a power tool. Do
not use a power tool while you are tired or under
the influence of drugs, alcohol or medication. A
moment of inattention while operating power tools may
result in serious personal injury.
b. Use personal protective equipment. Always wear
eye protection. Protective equipment such as a dust
mask, non-skid safety shoes, hard hat, or hearing
protection used for appropriate conditions will reduce
personal injuries.
c. Prevent unintentional starting. Ensure the switch
is in the off position before connecting to power
source and/or battery pack, picking up or carrying
the tool. Carrying power tools with your finger on the
switch or energising power tools that have the switch
on invites accidents.
d. Remove any adjusting key or wrench before
turning the power tool on. A wrench or a key left
attached to a rotating part of the power tool may result
in personal injury.
e. Do not overreach. Keep proper footing and
balance at all times. This enables better control of
the power tool in unexpected situations.
f. Dress properly. Do not wear loose clothing or
jewellery. Keep your hair and clothing away from
moving parts. Loose clothes, jewellery or long hair
can be caught in moving parts.
g. If devices are provided for the connection of dust
extraction and collection facilities, ensure these
are connected and properly used. Use of dust
collection can reduce dust-related hazards.
h. Do not let familiarity gained from frequent use of
tools allow you to become complacent and ignore
tool safety principles. A careless action can cause
severe injury within a fraction of a second.

15
ENGLISH (Original Instructions)
4. Power Tool Use And Care
a. Do not force the power tool. Use the correct power
tool for your application. The correct power tool will
do the job better and safer at the rate for which it was
designed.
b. Do not use the power tool if the switch does not
turn it on and off. Any power tool that cannot be
controlled with the switch is dangerous and must be
repaired.
c. Disconnect the plug from the power source and/
or remove the battery pack, if detachable from
the power tool before making any adjustments,
changing accessories, or storing power tools.
Such preventive safety measures reduce the risk of
starting the power tool accidentally.
d. Store idle power tools out of the reach of children
and do not allow persons unfamiliar with the
power tool or these instructions to operate the
power tool. Power tools are dangerous in the hands
of untrained users.
e. Maintain power tools and accessories. Check
for misalignment or binding of moving parts,
breakage of parts and any other condition that
may affect the power tool’s operation. If damaged,
have the power tool repaired before use. Many
accidents are caused by poorly maintained power
tools.
f. Keep cutting tools sharp and clean. Properly
maintained cutting tools with sharp cutting edges are
less likely to bind and are easier to control.
g. Use the power tool, accessories and tool bits etc.
in accordance with these instructions, taking into
account the working conditions and the work to
be performed. Use of the power tool for operations
different from those intended could result in a
hazardous situation.
h. Keep handles and grasping surfaces dry, clean
and free from oil and grease. Slippery handles and
grasping surfaces do not allow for safe handling and
control of the tool in unexpected situations.
5. Service
a. Have your power tool serviced by a qualified
repair person using only identical replacement
parts. This will ensure that the safety of the power tool
is maintained.
SAFETY INSTRUCTIONS FOR MITRE SAWS
♦ Mitre saws are intended to cut wood or wood—like
products, they cannot be used with abrasive cut-
off wheels for cutting ferrous material such as
bars, rods, studs, etc. Abrasive dust causes moving
parts such as the lower guard to jam. Sparks from
abrasive cutting will burn the lower guard, the kerf
insert and other plastic parts.
♦ Use clamps to support the workpiece
wheneverpossible. If supporting the workpiece
by hand, you must always keep your hand at least
100 mm from either side of the saw blade. Do not
use this saw to cut pieces that are too small to be
securely clamped or held by hand. If your hand is
placed too close to the saw blade,there is an increased
risk of injury from blade contact.
♦ The workpiece must be stationary and clamped or
held against both the fence and the table. Do not
feed the workpiece into the blade or cut “freehand”
in any way. Unrestrained or moving workpieces could
be thrown at high speeds,causing injury.
♦ Push the saw through the workpiece. Do not
pull the saw through the workpiece. To make a
cut, raise the saw head and pull it out over the
workpiece without cutting, start the motor, press
the saw head down and push the saw through
the workpiece. Cutting on the pull stroke is likely to
cause the saw blade to climb on top of the workpiece
and violently throw the blade assembly towards the
operator.
♦ Never cross your hand over the intended line of
cutting either in front or behind the saw blade.
Supporting the workpiece “cross handed” i.e. holding
the workpiece to the right of the saw blade with your
left hand or vice versa is very dangerous.
♦ Do not reach behind the fence with either hand
closer than 100 mm from either side of the saw
blade, to remove wood scraps, or for any other
reason while the blade is spinning. The proximity
of the spinning saw blade to your hand may not be
obvious and you may be seriously injured.
♦ Inspect your workpiece before cutting. If the
workpiece is bowed or warped, clamp it with the
outside bowed face toward the fence. Always
make certain that there is no gap between the
workpiece, fence and table along the line of the
cut. Bent or warped workpieces can twist or shift and
may cause binding on the spinning saw blade while
cutting. There should be no nails or foreign objects in
the workpiece.
♦ Do not use the saw until the table is clear of all
tools, wood scraps, etc., except for the workpiece.
Small debris or loose pieces of wood or other objects
that contact the revolving blade can be thrown with
high speed.
♦ Cut only one workpiece at a time. Stacked multiple
workpieces cannot be adequately clamped or braced
and may bind on the blade or shift during cutting.
♦ Ensure the mitre saw is mounted or placed on
a level, firm work surface before use.A level and
firm work surface reduces the risk of the mitre saw
becoming unstable.
♦ Plan your work. Every time you change the bevel
or mitre angle setting, make sure the adjustable
fence is set correctly to support the workpiece
and will not interfere with the blade or the
guarding system. Without turning the tool “ON” and
with no workpiece on the table, move the saw blade
through a complete simulated cut to assure there will
be no interference or danger of cutting the fence.
♦ Provide adequate support such as table
extensions, saw horses, etc. for a workpiece that
is wider or longer than the table top. Workpieces
longer or wider than the mitre saw table can tip if not
securely supported. If the cut-off piece or workpiece

ENGLISH (Original Instructions)
16
tips, it can lift the lower guard or be thrown by the
spinning blade.
♦ Do not use another person as a substitute for a
table extension or as additional support. Unstable
support for the workpiece can cause the blade to bind
or the workpiece to shift during the cutting operation
pulling you and the helper into the spinning blade.
♦ Thecut-offpiecemustnotbejammedorpressed
byanymeansagainstthe spinning saw blade. If
confined, i.e. using length stops, the cut-off piece could
get wedged against the blade and thrown violentiy.
♦ Always use aclamp or a fixture designed to
properly support round material such as rods or
tubing. Rods have a tendency to roll while being cut,
causing the blade to “bite” and pull the work with your
hand into the blade.
♦ Let the blade reach full speed before contacting
the workpiece. This will reduce the risk of the
workpiece being thrown.
♦ If the workpiece or blade becomes jammed, turn
the mitre saw off.Wait for all moving parts to stop
and disconnect the plug from the power source
and/ or remove the battery pack. Then work to
free the jammed material. Continued sawing with
a jammed workpiece could cause loss of control or
damage to the mitre saw.
♦ After finishing the cut, release the switch, hold
the saw head down and wait for the blade to stop
before removing the cut-off piece. Reaching with
your hand near the coasting blade is dangerous.
♦ Hold the handle firmly when making an incomplete
cut or when releasing the switch before the saw
head is completely in the down position. The
braking action of the saw may cause the saw head to
be suddenly pulled downward, causing a risk of injury.
ADDITIONAL SAFETY RULES FOR MITRE
SAWS
♦ The machine is provided with a special configured
power supply cord which can only be replaced by the
manufacturer or its authorised service agent.
♦ Do not use the saw to cut other materials than those
recommended by the manufacturer.
♦ Cutting plastics, sap coated wood, and other materials
may cause melted material to accumulate on the blade
tips and the body of the saw blade, increasing the risk
of blade overheating and binding while cutting.
♦ Do not operate the machine without guards in posi—
tion, or if guards do not function or are not maintained
properly.
♦ Ensure that the arm is securely fixed when performing
bevel cuts.
♦ Keep the floor area around the machine level,
well-maintained and free of loose materials, e.g., chips
and cut-offs.
♦ Use correctly sharpened saw blades. Observe the
maximum speed mark on the saw blade.
♦ Make sure all locking knobs and clamp handles are
tight before starting any operation.
♦ Never place either hand in the blade area when the
saw is connected to the electrical power source.
♦ Never attempt to stop a machine in motion rapidly by
jamming a tool or other means against the blade; seri—
ous accidents can occur.
♦ Before using any accessory consult the instruction
manual. The improper use of an accessory can cause
damage.
♦ Use a holder or wear gloves when handling a saw
blade.
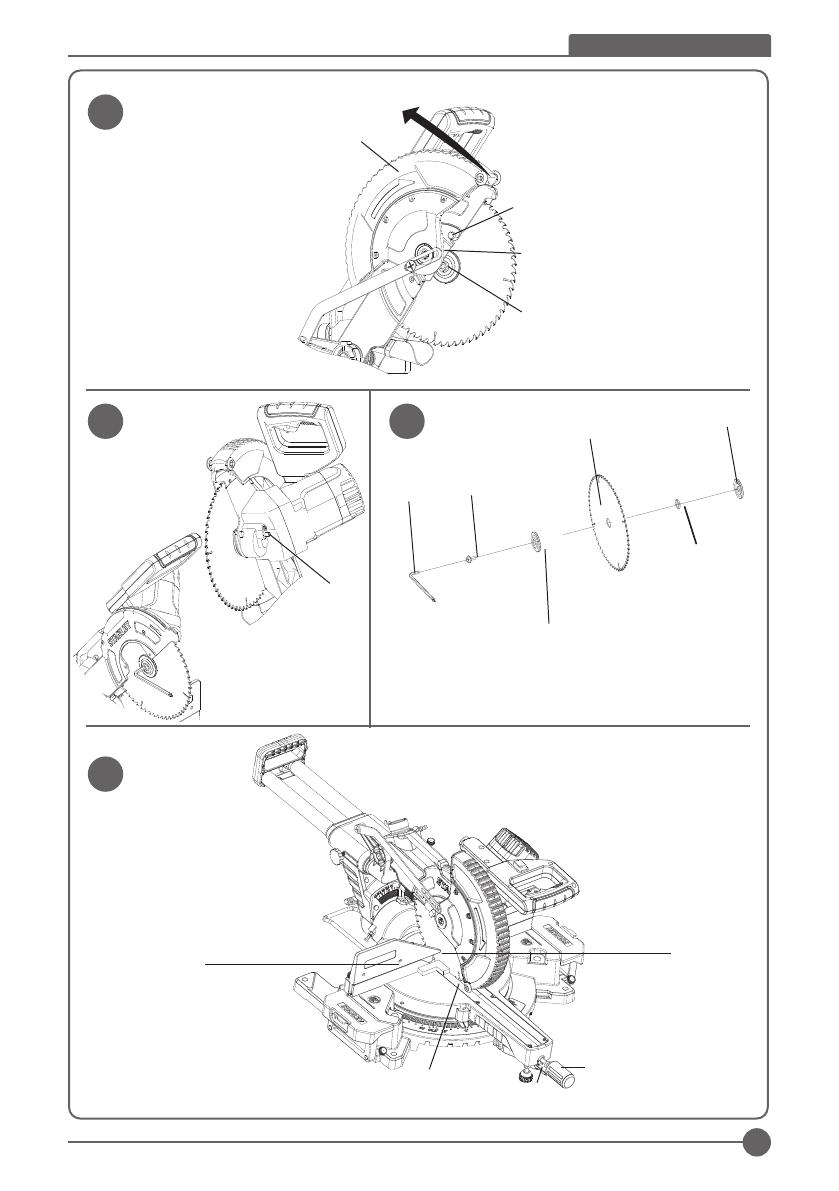
♦ Ensure that the saw blade is mounted correctly before
use.
♦ Make sure that the blade rotates in the correct
direction.
♦ Take care when slotting.
♦ Do not use blades of larger or smaller diameter than
recommended. For the proper blade rating refer to the
technical data. Use only the blades specified in this
manual, complying with EN 847-1.
♦ Consider applying specially designed noise-reduction
blades.
♦ Do not use HSS blades.
♦ Do not use cracked or damaged saw blades.
♦ Do not use any abrasive or diamond discs.
♦ Never use your saw without the kerf plate.
♦ Raise the blade from the kerf in the workpiece prior to
releasing the switch.
♦ Do not wedge anything against the fan to hold the
motor shaft.
♦ The blade guard on your saw will automatically raise
when the arm is brought down; it will lower over the
blade when head lock up release lever (cc) is pushed.
♦ Never raise the blade guard manually unless the saw
is switched off. The guard can be raised by hand when
installing or removing saw blades or for inspection of
the saw.
♦ Check periodically that the motor air slots are clean
and free of chips.
♦ Replace the kerf plate when worn. Refer to service
parts list included.
♦ Disconnect the machine from the mains before
carrying out any maintenance work or when changing
the blade.
♦ Never perform any cleaning or maintenance work
when the machine is still running and the head is not
in the rest position.
♦ When possible, always mount the machine to a bench.
♦ The front section of the guard is louvered for visibility
while cutting. Although the louvers dramatically
reduce flying debris, they are openings in the guard
and safety glasses should be worn at all times when
viewing through the louvers.
♦ Connect the saw to a dust collection device when
sawing wood. Always consider factors which influence
exposure of dust such as:
– type of material to be machined (chip board
produces more dust than wood);

17
ENGLISH (Original Instructions)
– sharpness of the saw blade;
– correct adjustment of the saw blade,
– dust extractor with air velocity not less than 20 m/s.
Ensure that the local extraction as well as hoods, baffles
and chutes are properly adjusted.
♦ Please be aware of the following factors influencing
exposure to noise:
– use saw blades designed to reduce the emitted
noise;
– use only well sharpened saw blades;
♦ Machine maintenance shall be conducted periodically;
♦ Machine faults, including guards or saw blade, shall be
reported as soon as they are discovered;
♦ Provide adequate general or localized lighting;
♦ Ensure the operator is adequately trained in the use,
adjustment and operation of the machine;
♦ Ensure that any spacers and spindle rings are suitable
for the purpose as stated in this manual.
♦ Refrain from removing any cut-offs or other parts of
the workpiece from the cutting area while the machine
is running and the saw head is not in the rest position
♦ Never cut workpieces shorter than 30 mm(Figure 34).
♦ Without additional support the machine is designed to
accept the maximum workpiece size of:
– Height 75 mm by width 140 mm by length 460 mm
– Longer workpieces need to be supported by suit—
able additional table(work support). Always clamp
the workpiece safely.
♦ In case of an accident or machine failure, immediately
turn the machine off and disconnect machine from the
power source.
♦ Report the failure and mark the machine in suitable
form to prevent other people from using the defective
machine.
♦ When the saw blade is blocked due to abnormal feed
force during cutting, turn the machine off and discon—
nect it from power supply. Remove the workpiece and
ensure that the saw blade runs free. Turn the machine
on and start new cutting operation with reduced feed
force.
♦ Never cut light alloy, especially magnesium.
♦ Whenever the situation allows, mount the machine to
a bench using bolts.
RESIDUAL RISKS
The following risks are inherent to the use of saws:
– injuries caused by touching the rotating parts
In spite of the application of the relevant safety reg—
ulations and the implementation of safety devices,
certain residual risks cannot be avoided. These are:
– Impairment of hearing.
– Risk of accidents caused by the uncovered parts of the
rotating saw blade.
– Risk of injury when changing the blade.
– Risk of squeezing fingers when opening the guards.
– Health hazards caused by breathing dust developed
when sawing wood, especially oak, beech and MDF.
The following factors increase the risk of breathing
problems:
– No dust extractor connected when sawing wood.
– Insufficient dust extraction caused by uncleaned exhaust
filters.
ELECTRICAL SAFETY
Only one voltage is applicable to this tool. Be sure to check
that the power supply corresponds to the voltage on the
rating plate.
Your Stanley tool is equipped with double insula—
tion, hence, it does not require to be earthed
When the power cord is damaged, have it sent
to a STANLEY service center for replacement to specially
prepared cables.
USING AN EXTENSION CABLE
If an extension cable is required, use an approved 3–core
extension cable suitable for the power input of this tool
(see Technical Data).The minimum conductor size is 1.5
mm
2
; the maximum length is 30 m. When using a cable
reel, always unwind the cable completely.
Cable cross-sectional
area (mm
2
)
Cable rated current
(Ampere)
0.75 6
1.00 10
1.50 15
2.50 20
4.00 25
Cable length (m)
7.5 15 25 30 45 60
Voltage Amperes Cable rated current (Ampere)
110~127 0 — 2.0 6 6 6 6 6 10
2.1 — 3.4 6 6 6 6 15 15
3.5 — 5.0 6 6 10 15 20 20
5.1 — 7.0 10 10 15 20 20 25
7.1 — 12.0 15 15 20 25 25 —
12.1 — 20.0 20 20 25 — — —
230 0 — 2.0 6 6 6 6 6 6
2.1 — 3.4 6 6 6 6 6 6
3.5 — 5.0 6 6 6 6 10 15
5.1 — 7.0 10 10 10 10 15 15
7.1 — 12.0 15 15 15 15 20 20
12.1 — 20.0 20 20 20 20 25 —

ENGLISH (Original Instructions)
18
LABELS ON TOOL
In addition to the pictographs used in this manual, the
labels on the tool show the following pictographs:
WARNING! To reduce the risk of injury, the user
must read the instruction manual before use.
Wear a dust mask.
Wear ear protection.
Wear safety glasses or goggles.
Keep your hands away from this area
V Volts
Direct Current
A Amperes n
0
No-Load Speed
Hz Hertz
Class II Construction
WWatts
Earthing Terminal
min minutes
Safety Alert Symbol
Alternating
Current
/min.
Revolutions or
Reciprocation per
minute
Date Code Position (Fig. 1)
The Date Code, which also includes the year of
manufacture, is printed into the housing.
Example: 2019 XX XX
Year of Manufacture
THE PACKAGE CONTAINS
1 Mitre Saw
1 Blade wrench stored in wrench pocket
1 Saw blade
1 Dust bag
1 Vertical clamp
1 Rear support
1 Instruction manual
♦ Check for damage to the tool, parts or accessories
which may have occurred during transport.
♦ Take the time to thoroughly read and understand this
manual prior to operation.
Description (Fig. 1, 2, 3, 5, 6, 12, 23, 27, 28)
WARNING: Never modify the power tool or any
part of it. Damage or personal injury could result.
a. Operating handle
b. Lower guard
c. Right side, fence
d. Table
e. Mitre lock knob
f. Mitre scale
g. Base
h. Extension knob
i. Wrench
j. Bench mounting holes
k. Fence clamping knob
l. Trigger switch
m. Carrying handle
n. Dust spout
o. Lock down pin
p. Bevel clamp knob
q. Bevel scale
r. Hand indentation
s. Kerf plate
t. Mitre detent
u. Date code
v. Left side, fence
w. End cap
x. Spindle lock
y. Hole for padlock
z. Angle position stop
aa. Bevel position adjustment stop
bb. LED switch
cc. Vertical position adjustment stop
dd. Lock-off lever
ee. Length stop
ff. Dust bag
gg. Vertical clamp
ii. Work support
jj. Fence stop screw
mm. Rear support
aaa. Rear handle
bbb. Mitre arm support
ccc. Work support clamping knob
ddd. Rail lock knob
fff. Bevel lock knob
ggg. Slide stop control
ASSEMBLY AND ADJUSTMENT
WARNING: To reduce the risk of injury, turn unit
off and disconnect machine from power source
before installing and removing accessories,
before adjusting or changing set-ups or when
making repairs. Be sure the trigger switch is in the OFF
position. An accidental start-up can cause injury.

19
ENGLISH (Original Instructions)
3. Remove the blade locking screw (nn) and the outside
arbor collar (pp).
4. Install the saw blade (oo) onto the blade adaptor (uu)
seated directly against the inside arbor collar (rr), mak—
ing sure that the teeth at the bottom edge of the blade
are pointing toward the back of the saw (away from the
operator).
5. Replace the outer arbor collar (pp).
6. Tighten the blade locking screw (nn) carefully by turn—
ing counter-clockwise while holding the spindle lock
engaged with your other hand.
7. Return the guard bracket (ll) to its original position and
firmly tighten the guard bracket screw (kk) to hold brack—
et in place.
WARNING! Be aware the saw blade shall be
replaced in the described way only. Only use
saw blades as specified under Technical Data.
WARNING! The guard bracket(ll) must be
returned to its original position and the guard
bracket screw(kk) tightened before activating the
saw.
WARNING! Failure to do so may allow the guard
to contact the spinning saw blade resulting in
damage to the saw and severe personal injury.
Your mitre saw was accurately adjusted at the factory. If
readjustment due to shipping and handling or any other
reason is required, follow the steps below to adjust your
saw. Once made, these adjustments should remain
accurate.
Checking and Adjusting the Mitre Scale
(Fig. 11, 12, 13)
1. Loosen the mitre lock knob (e), depress the mitre detent
(t) to release the mitre arm. Swing the mitre arm until the
latch locates it at the 0° mitre position. Do not lock mitre
lock knob (e).
2. Pull down the head until the blade just enters the saw
kerf (s).
3. Place a square (tt) against the left side fence (v) and
blade (oo) (Fig. 11).
WARNING: Do not touch the tips of the blade
teeth with the square.
If adjustment is required, proceed as follows:
4. Tighten the mitre lock knob (e). Loose the fence clamp—
ing knob (k), remove the left side fence (v) and right side
fence (c).
5. Loose 4 hex bolts behind the fence, adjust the base
fence as the necessary to against the square (tt).
6. Tighten the hex bolts, and install the side fence.the
wrench (i) to tighten the hex bolts on the fence in the
order from the right side.
Unpacking (Fig. 2, 4, 5, 6)
♦ Remove the saw from the packing material carefully
using the carrying handle (m) and rear handle(aaa).
♦ Use the supplied blade wrench(i) to mount the rear
support (mm) to the back of base(g).
♦ Press down the operating handle (a) and pull out the
lock down pin (o), as shown.
♦ Gently release the downward pressure and allow the
arm to rise to its full height.
Bench Mounting (Fig. 7)
♦ Holes (j) are provided in all four feet to facilitate bench
mounting. Always mount your saw firmly to prevent
movement. To enhance the portability, the tool can be
mounted to a piece of 15 mm or thinner plywood which
can then be clamped to your work support or moved to
other job sites and reclamped.
♦ When mounting your saw to a piece of ply—
wood, make sure that the mounting screws
do not protrude from the bottom of the wood.
The plywood must sit flush on the work support. When
clamping the saw to any work surface, clamp only on
the clamping bosses where the mounting screw holes
are located. Clamping at any other point will interfere
with the proper operation of the saw.
♦ To prevent binding and inaccuracy, be sure the moun—
ting surface is not warped or otherwise uneven. If the
saw rocks on the surface, place a thin piece of material
under one saw foot until the saw is firm on the moun—
ting surface.
Mounting the Saw Blade (Fig. 8, 9, 10)
WARNING: To reduce the risk of injury, turn unit
off and disconnect machine from power source
before installing and removing accessories,
before adjusting or changing set-ups or when
making repairs. Be sure the trigger switch is in the OFF
position. An accidental start-up can cause injury.
♦ Never depress the spindle lock button while the blade
is under power or coasting.
♦ Do not cut light alloy and ferrous metal (containing iron
or steel) or masonry or fibre cement product with this mitre
saw.
♦ Should use the corresponding blade cutting different
materials.
1. With the lower guard held in the raised position loosen
the guard bracket screw (kk) until the guard bracket (ll)
raises far enough to access the blade locking screw
(nn).
2. Depress the spindle lock button (x) with one hand and
with the other hand use the wrench (i) provided to
loosen the left-hand threaded blade locking screw (nn)
by turning clockwise.
WARNING: To use the spindle lock, press the
button as shown and rotate the spindle by hand
until you feel the lock engage.
Continue to hold the lock button in to keep the spindle from
turning.

ENGLISH (Original Instructions)
20
5. To achieve a 0° or a 45° right/left bevel, the three adjust—
ment stop screws must be adjusted to allow the saw arm
to move as necessary.
Adjusting the Depth Stop (Sawing Grooves)
(Fig.20)
This operation is necessary if you want to saw a groove.
– Move the depth stop plate (hhh) to the place as shown
Fig 20.
– Tilt the tool head by the handle to the position at which the
requested groove depth is reached.
– Turn the adjusting screw(ss) clockwise until the end of the
screw touches the housing stop.
– Guide the tool arm slowly upward.
Return the depth stop plate (hhh) to its original position
once sawing grooves done.
Ensure that saw blades do not touch any part of the base
or kerf plate.
Guard Actuation and Visibility
The blade guard on your saw has been designed to automat—
ically raise when the arm is brought down and to lower over
the blade when the arm is raised.
The guard can be raised by hand when installing or removing
saw blades or for inspection of the saw. NEVER RAISE
THE BLADE GUARD MANUALLY UNLESS THE SAW IS
TURNED OFF.
NOTE: Certain special cuts will require that you manually
raise the guard. The front section of the guard is louvered
for visibility while cutting. Although the louvers dramatically
reduce flying debris, they are openings in the guard and
safety glasses should be worn at all times when viewing
through the louvers.
Automatic Electric Brake
Your saw is equipped with an automatic electric blade brake
which stops the saw blade within 10 seconds of trigger
release. This is not adjustable.
On occasion, there may be a delay after trigger release to
brake engagement. On rare occasions, the brake may not
engage at all and the blade will coast to a stop.
If a delay or “skipping” occurs, turn the saw on and off 4 or 5
times. If the condition persists, have the tool serviced by an
authorized STANLEY service center.
Always be sure the blade has stopped before removing it from
the kerf. The brake is not a substitute for guards or for ensur—
ing your own safety by giving the saw your complete attention.
Kerf Plate Adjustment
To adjust the kerf plates, loosen the screws holding the
kerf plates in place. Adjust the kerf plates are as close
as possible without interfering with the blade’s movement.
Brushes (Fig. 1)
WARNING: To reduce the risk of serious person—
al injury, turn off the tool and disconnect it from
the power source before attempting to move it,
change accessories or make any adjustments.
Inspect carbon brushes regularly by unplugging the
tool, removing the Brush holder cap (W) that holds the
Checking and Adjusting the Blade to the Table
(Fig. 14, 15, 16)
1. Loosen the bevel clamp knob (p).
2. Press the mitre arm to the right to ensure it is fully
vertical with the angle position stop located against the
vertical position adjustment stop (cc) and tighten the
bevel clamp knob.
3. Pull down the head until the blade just enters the saw
kerf (s).
4. Place a set square (tt) on the table and up against
the blade (oo) (Fig. 15).
WARNING: Do not touch the tips of the blade
teeth with the square.
If adjustment is required, proceed as follows:
5. Loosen the lock nut (ww) a few turns and turn the bevel
position adjustment stop screw (cc) in or out until the
pointer (xx) indicates 45°-0° with the angle position stop
resting on the bevel position adjustment stop.
6. Firmly tighten the lock nut (ww) while holding the stop
screw(cc) stationary.
7. If the bevel pointer (xx) does not indicate zero on the
bevel scale (q), loosen the screw (yy) that secures the
pointer and move the pointer as necessary
Adjusting the Fence (Fig. 17)
The upper part of the fence can be adjusted to provide
clearance, allowing the saw to bevel to 45° left and 0° right.
To adjust the left fence (v) and right side fence(c):
1. Loosen the plastic knob (k) and slide the fence to the left.
2. Make a no load running with the saw switched off and
check for clearance. Adjust the fence to be as close to
the blade as practical to provide maximum workpiece
support, without interfering with the up and down move—
ment of the arm.
3. Tighten the knob securely.
WARNING: The guide grooves (zz) can become
clogged with sawdust. Use a stick or some low
pressure air to clear the guide grooves.
Checking and Adjusting the Bevel Angle
(Fig. 17, 18, 19)
1. Loosen the left side fence clamping knob (k) and slide
the upper part of the left side fence to the left as far as it
will go.
2. Loosen the bevel clamp knob (p) and move the saw arm
to the left 45° bevel position
If adjustment is required, proceed as follows:
3. Loosen the locknut (ww) a few turns and turn the bevel
position adjustment stop screw (aa) in or out until the
pointer (xx) indicates 45° with the angle position stop (z)
resting on the bevel position adjustment stop.
4. Firmly tighten the lock nut (ww) while holding the stop
screw (aa) stationary.