Время на прочтение
5 мин
Количество просмотров 88K
QQ Хабр! В этом гайде мы пройдемся по каждому шагу создания ботов в Telegram — от регистрации бота до публикации репозитория на GitHub. Некоторым может показаться, что все разжевано и слишком много элементарной информации, но этот гайд создан для новичков, хотя будет интересен и для тех, кто уже занимался разработкой в Telegram. Сегодня мы будем делать бота, который отвечает на заданные вопросы.
I. Регистрация бота
Прежде всего нужно зарегать бота. Для этого пишем боту @BotFather команду /newbot, после этого даем боту имя и тэг. После этих действий бот отправит нам токен, который никому давать нельзя.
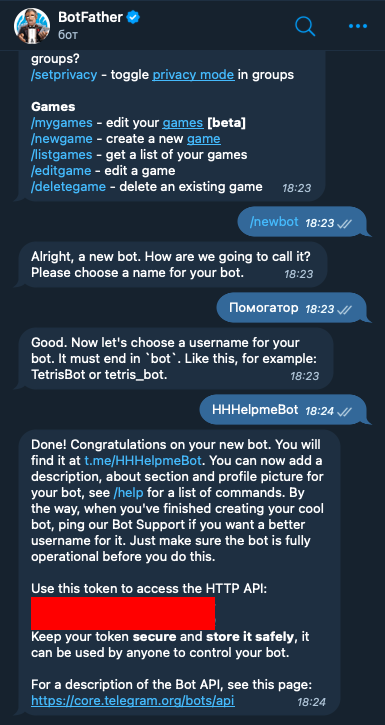
На этом процесс регистрации бота завершен, можно приступать к самому интересному — кодингу
II. Кодинг
Итак, бота мы будем писать на python. Для начала установим библиотеку pytelegrambotapi. Для этого в командной строке (или в терминале, если у вас MacOS) пишем:
pip3 install pytelegrambotapiПосле этого можно приступать, импортируем библиотеки и вводим токен:
import telebot

bot = telebot.TeleBot('BOT-TOKEN')
Вместо BOT-TOKEN пишем токен, который получили от BotFather
Сейчас можно уже и поговорить о кнопках
Кнопки
Для того, чтобы кнопки заработали нужно импортировать типы, для этого после импорта библиотек пишем:
from telebot import typesБывает два вида кнопок, это:
-
Inline-кнопки
-
Keyboard-кнопки
Inline-кнопки
Для создания таких кнопок используется метод InlineKeyboardMarkup, например, сделаем кнопку, которая ведет на сайт Хабра
@bot.message_handler(commands = ['start'])
def url(message):
    markup = types.InlineKeyboardMarkup()
    btn1 = types.InlineKeyboardButton(text='Наш сайт', url='https://habr.com/ru/all/')
    markup.add(btn1)
    bot.send_message(message.from_user.id, "По кнопке ниже можно перейти на сайт хабра", reply_markup = markup)
Выглядит это так

Более подробно про такие кнопки можно почитать в этой статье
Keyboard-кнопки
Такие кнопки можно увидеть в большом количестве ботов, таких как Дайвинчик и тому подобные. Пишутся они довольно просто, с помощью метода ReplyKeyboardMarkup. Для примера сделаем кнопку выбора языка
@bot.message_handler(commands=['start'])
def start(message):

    markup = types.ReplyKeyboardMarkup(resize_keyboard=True)
    btn1 = types.KeyboardButton("🇷🇺 Русский")
    btn2 = types.KeyboardButton('🇬🇧 English')
    markup.add(btn1, btn2)
    bot.send_message(message.from_user.id, "🇷🇺 Выберите язык / 🇬🇧 Choose your language", reply_markup=markup)
Вот как это выглядит

Обратно к коду
Теперь уже точно можно вернуться к кодингу, давайте добавим стартовую команду и кнопку
@bot.message_handler(commands=['start'])
def start(message):

    markup = types.ReplyKeyboardMarkup(resize_keyboard=True)
    btn1 = types.KeyboardButton("👋 Поздороваться")
    markup.add(btn1)
    bot.send_message(message.from_user.id, "👋 Привет! Я твой бот-помошник!", reply_markup=markup)
Далее делаем реакцию бота на кнопки (здесь то уже есть комментарии)
@bot.message_handler(content_types=['text'])
def get_text_messages(message):

    if message.text == '👋 Поздороваться':
        markup = types.ReplyKeyboardMarkup(resize_keyboard=True) #создание новых кнопок
        btn1 = types.KeyboardButton('Как стать автором на Хабре?')
        btn2 = types.KeyboardButton('Правила сайта')
        btn3 = types.KeyboardButton('Советы по оформлению публикации')
        markup.add(btn1, btn2, btn3)
        bot.send_message(message.from_user.id, '❓ Задайте интересующий вопрос', reply_markup=markup) #ответ бота
Теперь по этому примеру продолжаем плодить бота
elif message.text == 'Как стать автором на Хабре?':
    bot.send_message(message.from_user.id, 'Вы пишете первый пост, его проверяют модераторы, и, если всё хорошо, отправляют в основную ленту Хабра, где он набирает просмотры, комментарии и рейтинг. В дальнейшем премодерация уже не понадобится. Если с постом что-то не так, вас попросят его доработать.n nПолный текст можно прочитать по ' + '[ссылке](https://habr.com/ru/sandbox/start/)', parse_mode='Markdown')

elif message.text == 'Правила сайта':
    bot.send_message(message.from_user.id, 'Прочитать правила сайта вы можете по ' + '[ссылке](https://habr.com/ru/docs/help/rules/)', parse_mode='Markdown')

elif message.text == 'Советы по оформлению публикации':
    bot.send_message(message.from_user.id, 'Подробно про советы по оформлению публикаций прочитать по ' + '[ссылке](https://habr.com/ru/docs/companies/design/)', parse_mode='Markdown')
Так, стоп, сейчас нужно обсудить, как делать гиперссылки. Это делается просто, вот пример:
bot.send_message(message.from_user.id, 'Подробно про советы по оформлению публикаций прочитать по ' + '[ссылке](https://habr.com/ru/docs/companies/design/)', parse_mode='Markdown')Как мы видим, чтобы сделать гиперссылку мы берем в квадратные скобки слово, которое будет ссылкой, а саму ссылку берем в круглые. В конце строки добавляем parse_mode='Markdown'
Когда мы дописали основной код нужно вставить важную строку
bot.polling(none_stop=True, interval=0) #обязательная для работы бота частьКак сказано в комментарии, это строка обязательна для работы бота, чтобы он не отключался и работал постоянно.
Полностью наш код выглядит так:
import telebot
from telebot import types

bot = telebot.TeleBot('BOT-TOKEN')

@bot.message_handler(commands=['start'])
def start(message):

    markup = types.ReplyKeyboardMarkup(resize_keyboard=True)
    btn1 = types.KeyboardButton("👋 Поздороваться")
    markup.add(btn1)
    bot.send_message(message.from_user.id, "👋 Привет! Я твой бот-помошник!", reply_markup=markup)

@bot.message_handler(content_types=['text'])
def get_text_messages(message):

    if message.text == '👋 Поздороваться':
        markup = types.ReplyKeyboardMarkup(resize_keyboard=True) #создание новых кнопок
        btn1 = types.KeyboardButton('Как стать автором на Хабре?')
        btn2 = types.KeyboardButton('Правила сайта')
        btn3 = types.KeyboardButton('Советы по оформлению публикации')
        markup.add(btn1, btn2, btn3)
        bot.send_message(message.from_user.id, '❓ Задайте интересующий вас вопрос', reply_markup=markup) #ответ бота


    elif message.text == 'Как стать автором на Хабре?':
        bot.send_message(message.from_user.id, 'Вы пишете первый пост, его проверяют модераторы, и, если всё хорошо, отправляют в основную ленту Хабра, где он набирает просмотры, комментарии и рейтинг. В дальнейшем премодерация уже не понадобится. Если с постом что-то не так, вас попросят его доработать.n nПолный текст можно прочитать по ' + '[ссылке](https://habr.com/ru/sandbox/start/)', parse_mode='Markdown')

    elif message.text == 'Правила сайта':
        bot.send_message(message.from_user.id, 'Прочитать правила сайта вы можете по ' + '[ссылке](https://habr.com/ru/docs/help/rules/)', parse_mode='Markdown')

    elif message.text == 'Советы по оформлению публикации':
        bot.send_message(message.from_user.id, 'Подробно про советы по оформлению публикаций прочитать по ' + '[ссылке](https://habr.com/ru/docs/companies/design/)', parse_mode='Markdown')


bot.polling(none_stop=True, interval=0) #обязательная для работы бота часть
Этот код я написал за 10 минут, при желании код можно сделать намного больше. Полноценный бот выглядит так. Этого бота я делал для конкурса и написал его за 3,5 часа.
Важно: если вы делаете полноценного бота, которого будете куда-то публиковать, очень стоит добавить в него эмодзи: кнопки, сообщения — все должно включать в себя эмодзи, это важно для красоты
III. Публикация репозитория на GitHub
Для этого на потребуется приложение GitHub Desktop
Создаем новый репозиторий, после этого в папке по умолчанию появится папка с названием вашего проекта. В нее закидываем файлы проекта и в приложении нажимаем кнопку Commit to main. После этого нажимаем на кнопку Publish Repository. Готово! При желании, можно создать Readme.md
IV. Заключение
Здесь я расписал все, что я вспомнил о разработке ботов для telegram, если есть, что предложить — комментарии открыты для вас. Надеюсь, вам это было полезно.
Источники:
Документация Telegram Bot API
Встроенные кнопки в Telegram Bot API — pyTelgramBotApi
This guide will walk you through everything you need to know to build your first Telegram Bot.
If you already know your way around some of the basic steps, you can jump directly to the part you’re missing. Equivalent examples are available in C#, Python, Go and TypeScript .
- Introduction
- Basic Tutorial
- Environment
- First Run
- Echo Bot
- Advanced Tutorial
- Commands
- Navigation
- Database
- Hosting
- Further Reading
Introduction
At its core, you can think of the Telegram Bot API as software that provides JSON-encoded responses to your queries.
A bot, on the other hand, is essentially a routine, software or script that queries the API by means of an HTTPS request and waits for a response. There are several types of requests you can make, as well as many different objects that you can use and receive as responses.
Since your browser is capable of sending HTTPS requests, you can use it to quickly try out the API. After obtaining your token, try pasting this string into your browser:
https://api.telegram.org/bot<YOUR_BOT_TOKEN>/getMeIn theory, you could interact with the API with basic requests like this, either via your browser or other tailor-made tools like cURL. While this can work for simple requests like the example above, it’s not practical for larger applications and doesn’t scale well.
For that reason, this guide will show you how to use libraries and frameworks, along with some basic programming skills, to build a more robust and scalable project.
If you know how to code, you’ll fly right through each step in no time – and if you’re just starting out, this guide will show you everything you need to learn.
We will use Java throughout this guide as it’s one of the most popular programming languages, however, you can follow along with any language as all the steps are fundamentally the same.
Since Java is fully cross-platform, each code example will work with any operating system.
If you pick another language, equivalent examples are available in C#, Python, Go and TypeScript .
Getting Ready
First, we will briefly cover how to create your first project, obtain your API token and download all necessary dependencies and libraries.
For the purposes of this guide, a copy of the bot you will be creating is also live at @TutorialBot – feel free to check it out along the way to see how your own implementation should look after each step.
Obtain Your Bot Token
In this context, a token is a string that authenticates your bot (not your account) on the bot API. Each bot has a unique token which can also be revoked at any time via @BotFather.
Obtaining a token is as simple as contacting @BotFather, issuing the /newbot command and following the steps until you’re given a new token. You can find a step-by-step guide here.
Your token will look something like this:
4839574812:AAFD39kkdpWt3ywyRZergyOLMaJhac60qcMake sure to save your token in a secure place, treat it like a password and don’t share it with anyone.
Download an IDE
To program in Java you’ll need an IDE – a special text editor that will let you write, compile and run your code.
In this tutorial, we’ll use IntelliJ – there are several free, open source alternatives like Eclipse or NetBeans which work in the exact same way.
You will also need a JDK, a software kit that allows your Java code to run.
Most IDEs don’t include a JDK, so you should download a version compatible with your operating system separately. You can find a free, open source version here.
If you use another language, the steps are identical. You will just have to download a different IDE and software development kit.
Pick a Framework or Library
You can think of a framework as software that handles all the low-level logic for you, including the API calls, and lets you focus on your bot-specific logic.
In this tutorial, we’ll use TelegramBots, but you can follow along with any equivalent implementation, since all the underlying methods are either similar or exactly the same.
You can find many frameworks, along with code examples, in our dedicated list.
Create Your Project
In IntelliJ, go to File > New > Project.
Fill in the fields accordingly:
- Name — The name of your project. For example, BotTutorial.
- Location — Where to store your project. You can use the default value.
- Language — Java
- Build System — The framework that will handle your dependencies. Pick Maven.
- JDK — Pick whichever version you downloaded. We’ll be using version 17.
- Add Sample Code — Leave this selected, it will generate some needed files for you.
- Advanced Settings > GroupId — We suggest tutorial.
- Advanced Settings > ArtifactId — You can use the default value.
After hitting Create, if you did everything correctly, your Project view in the top left should show a project structure along these lines:
BotTutorial
├─ .idea
├─ src
│  └─ main
│     └─ java
│        └─ tutorial
│           └─ Main
└─ pom.xml
Other IDEs will follow a similar pattern. Your dependency management system will have a different name (or no name at all if it’s built-in) depending on the language you chose.
If this looks scary, don’t worry. We will only be using the Main file and the pom.xml file.
In fact, to check that everything is working so far, double click on Main and click on the small green arrow on the left of public class Main, then select the first option.
If you followed the steps correctly, Hello world! should appear in the console below.
Add Framework Dependency
We will now instruct the IDE to download and configure everything needed to work with the API.
This is very easy and happens automatically behind the scenes.
First, locate your pom.xml file on the left side of the screen.
Open it by double-clicking and simply add:
<dependencies>
    <dependency>
        <groupId>org.telegram</groupId>
        <artifactId>telegrambots</artifactId>
        <version>6.0.1</version>
    </dependency>
</dependencies>
right after the </properties> tag.
When you’re done, your pom.xml should look something like this.
Start Coding
We are ready to start coding. If you’re a beginner, consider that being familiar with your language of choice will greatly help. With this tutorial, you’ll be able to teach your bot basic behaviors, though more advanced features will require some coding experience.
Creating a Bot Class
If you’re familiar with object-oriented programming, you’ll know what a class is.
If you’ve never heard of it before, consider a class as a file where you write some logic.
To create the class that will contain the bot logic, right click on tutorial from the project tree on the left and select New > Java Class. Name it Bot and hit enter.
Now we have to connect this class to the bot framework. In other words, we must make sure it extends TelegramLongPollingBot. To do that, just add extends TelegramLongPollingBot right after Bot.
A red line will appear – it simply means we’re missing some important methods.
To fix this, hover over the red line, click on implement methods, then hit OK.
Depending on the IDE, this option may be called implement missing methods or something similar.
You should end up with this – if something went wrong, feel free to copy it from here and paste it in your class:
package tutorial;
import org.telegram.telegrambots.bots.TelegramLongPollingBot;
import org.telegram.telegrambots.meta.api.objects.Update;

public class Bot extends TelegramLongPollingBot {

  @Override
  public String getBotUsername() {
      return null;
  }

  @Override
  public String getBotToken() {
      return null;
  }

  @Override
  public void onUpdateReceived(Update update) {}

}
If you get a red line under TelegramLongPollingBot, it means you didn’t set up your pom.xml correctly. If this is the case, restart from here.
Available Methods
Let’s look into these 3 methods one by one.
- getBotUsername — This method must be edited to always return your bot’s username. You should replace the null return value with it.
- getBotToken — This method will be used by the framework to retrieve your bot token. You should replace the null return value with the token.
- onUpdateReceived — This is the most important method. It will be called automatically whenever a new Update is available. Let’s add a
System.out.println(update);call in there to quickly show what we are getting.
After you’ve replaced all the strings, you should end up with this:
@Override
public String getBotUsername() {
    return "TutorialBot";
}

@Override
public String getBotToken() {
    return "4839574812:AAFD39kkdpWt3ywyRZergyOLMaJhac60qc";
}

@Override
public void onUpdateReceived(Update update) {
    System.out.println(update);
}
At this point, the bot is configured and ready to go – time to register it on the API and start processing updates.
In the future, you should consider storing your token in a dedicated settings file or in environment variables. Keeping it in the code is fine for the scope of this tutorial, however, it’s not very versatile and is generally considered bad practice.
Registering the Bot
To register the bot on the API, simply add a couple of lines in the main method that will launch the application. If you named your class Bot, this is what your main method should look like:
public static void main(String[] args) throws TelegramApiException {
  TelegramBotsApi botsApi = new TelegramBotsApi(DefaultBotSession.class);
  botsApi.registerBot(new Bot());
}
You can place this method in any class. Since we have an auto-generated
mainmethod in the Main class, we’ll be using that one for this tutorial.
First Run
It’s time to run your bot for the first time.
Hit the green arrow to the left of public static void main and select the first option.
And then there was nothing. Yes, a bit anticlimactic.
This is because your bot has nothing to print – there are no new updates because nobody messaged it yet.
If you try messaging the bot on Telegram, you’ll then see new updates pop up in the console. At this point, you have your very own Telegram Bot – quite the achievement. Now, on to making it a bit more intelligent.
If nothing pops up, make sure you messaged the right bot and that the token you pasted in the code is correct.
Receiving Messages
Every time someone sends a private message to your bot, your onUpdateReceived method will be called automatically and you’ll be able to handle the update parameter, which contains the message, along with a great deal of other info which you can see detailed here.
Let’s focus on two values for now:
- The user — Who sent the message. Access it via
update.getMessage().getFrom(). - The message — What was sent. Access it via
update.getMessage().
Knowing this, we can make it a bit more clear in the console output.
@Override
public void onUpdateReceived(Update update) {
    var msg = update.getMessage();
    var user = msg.getFrom();

    System.out.println(user.getFirstName() + " wrote " + msg.getText());
}
This is just a basic example – you can now play around with all the methods to see everything you can pull out of these objects. You can try getUsername, getLanguageCode, and dozens more.
Knowing how to receive, process and print incoming messages, now it’s time to learn how to answer them.
Remember to stop and re-launch your bot after each change to the code.
Sending Messages
To send a private text message, you generally need three things:
- The user must have contacted your bot first. (Unless the user sent a join request to a group where your bot is an admin, but that’s a more advanced scenario).
- You must have previously saved the User ID (
user.getId()) - A
Stringobject containing the message text, 1-4096 characters.
With that out of the way, let’s create a new method to send the first message:
public void sendText(Long who, String what){
   SendMessage sm = SendMessage.builder()
                    .chatId(who.toString()) //Who are we sending a message to
                    .text(what).build();    //Message content
   try {
        execute(sm);                        //Actually sending the message
   } catch (TelegramApiException e) {
        throw new RuntimeException(e);      //Any error will be printed here
   }
}
And proceed to run this in the main method, right after registering the bot.
For this example, we’ll assume your User ID is 1234.
public static void main(String[] args) throws TelegramApiException {
   TelegramBotsApi botsApi = new TelegramBotsApi(DefaultBotSession.class);
   Bot bot = new Bot();                  //We moved this line out of the register method, to access it later
   botsApi.registerBot(bot);
   bot.sendText(1234L, "Hello World!");  //The L just turns the Integer into a Long
}
If you did everything correctly, your bot should text you Hello World! every time you launch your code. Sending messages to groups or channels – assuming you have the relevant permissions – is as simple as replacing 1234 with the ID of the respective chat.
Try experimenting with other types of messages, like SendPhoto, SendSticker, SendDice…
A full list is available starting here.
Echo Bot
Let’s practice everything we tried so far by coding an Echo Bot.
Its functionality will be rather simple: every text message it receives will be sent right back to the user.
Copying Text
The most intuitive way of coding this is saving the User ID and calling sendText right after each update.
In other words:
@Override
public void onUpdateReceived(Update update) {
    var msg = update.getMessage();
    var user = msg.getFrom();
    var id = user.getId();

    sendText(id, msg.getText());
}
This works for text but can be extended to stickers, media and files.
Copying Everything
There are more specific functions that can be used to copy messages and send them back.
Let’s build a method to do just that:
public void copyMessage(Long who, Integer msgId){
   CopyMessage cm = CopyMessage.builder()
              .fromChatId(who.toString())  //We copy from the user
           .chatId(who.toString())      //And send it back to him
           .messageId(msgId)            //Specifying what message
           .build();
    try {
        execute(cm);
    } catch (TelegramApiException e) {
        throw new RuntimeException(e);
    }
}
After replacing the method call inonUpdateReceived, running the code will result in a fully functional Echo Bot.
This tutorial assumes that updates always contain messages for the sake of simplicity. This may not always be true – be sure to implement all the proper checks in your code to handle every type of update with the appropriate methods.
Executing Commands
To learn what a command is and how it works, we recommend reading this dedicated summary.
In this guide, we’ll focus on the technical side of things.
Creating Your Command
Begin by opening @BotFather.
Type /mybots > Your_Bot_Name > Edit Bot > Edit Commands.
Now send a new command, followed by a brief description.
For the purpose of this tutorial, we’ll implement two simple commands:
scream - Speak, I'll scream right back
whisper - Shhhhhhh
Command Logic
We want the Echo Bot to reply in uppercase when it’s in scream mode and normally otherwise.
First, let’s create a variable to store the current mode.
public class Bot extends TelegramLongPollingBot {

   private boolean screaming = false;

   [...]
}
Then, let’s change some logic to account for this mode.
public void onUpdateReceived(Update update) {
    [...]                                   //Same variables as the previous versions
   if(screaming)                            //If we are screaming
       scream(id, update.getMessage());     //Call a custom method
   else
       copyMessage(id, msg.getMessageId()); //Else proceed normally
}

private void scream(Long id, Message msg) {
   if(msg.hasText())
       sendText(id, msg.getText().toUpperCase());
   else
       copyMessage(id, msg.getMessageId());  //We can't really scream a sticker
}
Finally, let’s add a couple more lines to the onUpdateReceived method to process each command before replying.
if(msg.isCommand()){
   if(msg.getText().equals("/scream"))         //If the command was /scream, we switch gears
      screaming = true;
   else if (msg.getText().equals("/whisper"))  //Otherwise, we return to normal
      screaming = false;

   return;                                     //We don't want to echo commands, so we exit
}
As you can see, it checks if the message is a command. If it is, the bot enters scream mode.
In the update method, we check which mode we are in and either copy the message or convert it to upper case before sending it back.
And that’s it. Now the bot can execute commands and change its behavior accordingly.
Naturally, this simplified logic will change the bot’s behavior for everyone – not just the person who sent the command. This can be fun for this tutorial but won’t work in a production environment – consider using a Map, dictionary or equivalent data structure to assign settings for individual users.
Remember to always implement a few basic global commands.
You can practice by implementing a simple feedback to the/startcommand, which we intentionally left out.
Buttons and Keyboards
To streamline and simplify user interaction with your bot, you can replace many text-based exchanges with handy buttons. These buttons can perform a wide variety of actions and can be customized for each user.
Button Types
There are two main types of buttons:
- Reply Buttons — used to provide a list of predefined text reply options.
- Inline Buttons — used to offer quick navigation, shortcuts, URLs, games and so much more.
Using these buttons is as easy as attaching a ReplyKeyboardMarkup or an InlineKeyboardMarkup to your SendMessage object.
This guide will focus on inline buttons since they only require a few extra lines of code.
Creating Buttons
First of all, let’s create some buttons.
 var next = InlineKeyboardButton.builder()
            .text("Next").callbackData("next")
            .build();

 var back = InlineKeyboardButton.builder()
            .text("Back").callbackData("back")
            .build();

 var url = InlineKeyboardButton.builder()
            .text("Tutorial")
            .url("https://core.telegram.org/bots/api")
            .build();
Let’s go back through the fields we specified:
- Text — This is what the user will see, the text that appears on the button
- Callback Data — This will be sent back to the code instance as part of a new
Update, so we can quickly identify what button was clicked. - Url — A button that specifies a URL doesn’t specify callbackdata since its behavior is predefined – it will open the given link when tapped.
Creating Keyboards
The buttons we created can be assembled into two keyboards, which will then be used to navigate back and forth between two sample menus.
First, add two fields to store the necessary keyboards.
private boolean screaming = false;

private InlineKeyboardMarkup keyboardM1;
private InlineKeyboardMarkup keyboardM2;
Then, build and assign them.
keyboardM1 = InlineKeyboardMarkup.builder()
          .keyboardRow(List.of(next)).build();

//Buttons are wrapped in lists since each keyboard is a set of button rows
keyboardM2 = InlineKeyboardMarkup.builder()
          .keyboardRow(List.of(back))
          .keyboardRow(List.of(url))
          .build();
You can place this code wherever you prefer, the important thing is making sure that keyboard variables are accessible from the method call that will send the new menu. If you’re confused by this concept and don’t know where to put them, just paste them above the command processing flow.
Sending Keyboards
Sending a keyboard only requires specifying a reply markup for the message.
public void sendMenu(Long who, String txt, InlineKeyboardMarkup kb){
    SendMessage sm = SendMessage.builder().chatId(who.toString())
            .parseMode("HTML").text(txt)
            .replyMarkup(kb).build();

    try {
        execute(sm);
    } catch (TelegramApiException e) {
        throw new RuntimeException(e);
    }
}
You may have noticed that we also added a new parameter,
HTML.
This is called a formatting option and will allow us to use HTML tags and add formatting to the text later on.
Menu Trigger
We could send a new menu for each new user, but for simplicity let’s add a new command that will spawn a menu. We can achieve this by adding a new else clause to the previous command flow.
 var txt = msg.getText();
 if(msg.isCommand()) {
        if (txt.equals("/scream"))
            screaming = true;
        else if (txt.equals("/whisper"))
            screaming = false;
        else if (txt.equals("/menu"))
            sendMenu(id, "<b>Menu 1</b>", keyboard1);
        return;
 }
Try sending /menu to your bot now. If you did everything correctly, you should see a brand new menu pop up.
In a production environment, commands should be handled with an appropriate design pattern that isolates them into different executor classes – modular and separated from the main logic.
Navigation
When building complex bots, navigation is essential. Your users must be able to move seamlessly from one menu to the next.
In this example, we want the Next button to lead the user to the second menu.
The Back button will send us back.
To do that, we will start processing incoming CallbackQueries, which are the results we get after the user taps on a button.
A CallbackQuery is essentially composed of three main parameters:
- queryId — Needed to close the query. You must always close new queries after processing them – if you don’t, a loading symbol will keep showing on the user’s side on top of each button.
- data — This identifies which button was pressed.
- from — The user who pressed the button.
Processing in this context just means executing the action uniquely identified by the button, then closing the query.
A very basic button handler could look something like:
private void buttonTap(Long id, String queryId, String data, int msgId) {

    EditMessageText newTxt = EditMessageText.builder()
            .chatId(id.toString())
            .messageId(msgId).text("").build();

    EditMessageReplyMarkup newKb = EditMessageReplyMarkup.builder()
            .chatId(id.toString()).messageId(msgId).build();

    if(data.equals("next")) {
        newTxt.setText("MENU 2");
        newKb.setReplyMarkup(keyboardM2);
    } else if(data.equals("back")) {
        newTxt.setText("MENU 1");
        newKb.setReplyMarkup(keyboardM1);
    }

    AnswerCallbackQuery close = AnswerCallbackQuery.builder()
            .callbackQueryId(queryId).build();

    execute(close);
    execute(newTxt);
    execute(newKb);
}
With this handler, whenever a button is tapped, your bot will automatically navigate between inline menus.
Expanding on this concept allows for endless combinations of navigable submenus, settings and dynamic pages.
Database
Telegram does not host an update database for you – once you process and consume an update, it will no longer be available. This means that features like user lists, message lists, current user inline menu, settings, etc. have to be implemented and maintained by bot developers.
If your bot needs one of these features and you want to get started on data persistence, we recommend that you look into serialization practices and libraries for your language of choice, as well as available databases.
Implementing a database is out of scope for this guide, however, several guides are available online for simple embedded open source software solutions like SQLite, HyperSQL, Derby and many more.
Your language of choice will also influence which databases are available and supported – the list above assumes you followed this Java tutorial.
Hosting
So far, your bot has been running on your local machine – your PC. While this may be good for developing, testing and debugging, it is not ideal for a production environment.
You’ll want your bot to be available and responsive at all times, but your computer might not always be online.
This can be done in four steps:
-
Package your code
Making your bot easy to move and runnable outside of an IDE is essential to host it elsewhere.
If you followed this tutorial, this standard guide will work for you. If you didn’t, look into export or packaging guides for your IDE and language of choice – procedures may vary but the end result is the same. -
Purchase a VPS or equivalent service
A server is essentially a machine that is always online and running, without you having to worry about anything. To host your bot, you can opt for a VPS which serves this purpose and can be rented from several different providers.
Another option would be to purchase a network-capable microcontroller, which come in all different specs and sizes depending on your needs.
You should ensure that all user data remains heavily encrypted at all times in your database to guarantee the privacy of your users. The same concept applies to your local instance, however, this becomes especially important once you transfer your database to a remote server.
- Upload your executable/package
Once you have a working ssh connection between your machine and your new server, you should upload your executable and all associated files.
We will assume the runnable jar TutorialBot.jar and its database dbase.db are currently in the /TBot folder.
$ scp -r /TBot/ username@server_ip:/bots/TBotRemote/- Run your application
Depending on which language you chose, you might have to configure your server environment differently. If you chose Java, you just need to install a compatible JDK.
$ apt install openjdk-17-jre
$ java -version
If you did everything correctly, you should see a Java version as the output, along with a few other values. This means you’re ready to run your application.
Now, to run the executable:
$ cd /bots/TBotRemote/
$ java -jar TutorialBot.jar
Your bot is now online and users can interact with it at any time.
To streamline and modularize this process, you could employ a specialized docker container or equivalent service.
If you followed along in one of the equivalent examples (C#, Python, Go and TypeScript) you can find a detailed set of instructions to export and run your code here.
Further Reading
If you got this far, you might be interested in these additional guides and docs:
- General Bot Platform Overview
- Detailed List of Bot Features
- Full API Reference
If you encounter any issues while following this guide, you can contact us on Telegram at @BotSupport.
Напишем простой диалоговый Telegram-бот на Python, который в дальнейшем можно дополнить различными функциями, и задеплоим его.
Примечание Вы читаете улучшенную версию некогда выпущенной нами статьи.
- Настройка
- Hello, bot!
- Docker
- Деплой на AWS
- Заключение
Настройка
Откройте Telegram, найдите @BotFather и начните беседу. Отправьте команду /newbot и следуйте инструкциям. Вы получите:
- свой токен;
- адрес Telegram API (https://api.telegram.org/bot);
- ссылку на документацию.
Обязательно сохраните токен, так как это ключ для взаимодействия с ботом.
Примечание Хранение токена должно быть локальным: ни в коем случае не выгружайте его в общий доступ, например в GitHub-репозиторий .
Далее начните беседу. Введите в поисковой строке имя бота и нажмите /start. Отправьте любое сообщение: оно станет первым обновлением, которое получит Телеграм бот.
Установка Python
Для написания Telegram-бота на Python, нужно установить сам язык. Если вы пользуетесь Windows, скачать Python можно с официального сайта. Версия важна. Нам подойдет Python не ниже версии 3.7. Если же у вас Linux или macOS, то, скорее всего, у вас стоит Python 3.6. Как обновиться, можете почитать здесь.
Тем, кто только начал изучение этого языка, будет также полезна дорожная карта Python-разработчика.
Установка pip
Это менеджер пакетов. В версиях выше Python 2.7.9 и Python 3.4, а также на macOS/Linux он уже есть. Проверить это можно командой pip --version в терминале. Если же по каким-то причинам он отсутствует, установить его можно при помощи команды:
$ sudo apt-get install python-pipУстановка aiogram
Установить данный фреймворк для Telegram Bot API с помощью pip:
pip install aiogramHello, bot!
Давайте напишем простенькую программу приветствия. Для начала следует импортировать библиотеки и создать экземпляры Телеграм бота и диспетчера:
from aiogram import Bot, types
from aiogram.dispatcher import Dispatcher
from aiogram.utils import executor
TOKEN = "ваш токен от бота здесь"
bot = Bot(token=TOKEN)
dp = Dispatcher(bot)
Теперь напишем обработчик текстовых сообщений, который будет обрабатывать входящие команды /start и /help:
@dp.message_handler(commands=['start', 'help'])
async def send_welcome(msg: types.Message):
    await msg.reply_to_message(f‘Я бот. Приятно познакомиться,
                               {msg.from_user.first_name}’)
Добавим ещё один обработчик для получения текстовых сообщений. Если бот получит «Привет», он также поздоровается. Все остальные сообщения будут определены, как нераспознанные:
@dp.message_handler(content_types=['text'])
async def get_text_messages(msg: types.Message):
   if msg.text.lower() == 'привет':
       await msg.answer('Привет!')
   else:
       await msg.answer('Не понимаю, что это значит.')
Запускаем Telegram бота, написанного на Python, следующим образом:
if __name__ == '__main__':
   executor.start_polling(dp)
Примечание Так мы задаём боту непрерывное отслеживание новых сообщений. Если бот упадёт, а сообщения продолжат поступать, они будут накапливаться в течение 24 часов на серверах Telegram, и в случае восстановления бота прилетят ему все сразу.
Ну вот и всё, простенький бот в Телеграмме на языке Python готов.
Docker
Сейчас мало кто не слышал про Docker, но если вдруг не слышали — вот хорошая статья. Для нашего проекта потребуется самый простой Dockerfile:
FROM python:3.8
# set work directory
WORKDIR /usr/src/app/
# copy project
COPY . /usr/src/app/
# install dependencies
RUN pip install --user aiogram
# run app
CMD ["python", "bot.py"]
Каталог проекта должны при этом содержать следующие файлы:
- bot.py;
- Dockerfile.
Для локальных тестов достаточно установить Docker (linux, mac, windows), после чего в папке проекта собрать и запустить контейнер с помощью команд:
docker build -t my_app
docker run -d my_app
my_app — это просто название нашего контейнера, вместо которого можно использовать другое имя.
-d — специальный флаг, который запускает контейнер в фоне и позволяет дальше работать в терминале. Это называется detached mode.
Деплой на AWS
Прежде всего нам понадобится аккаунт на Docker Hub. Это аналог GitHub, только не с исходниками кода, а с уже созданными контейнерами. Работа с Docker Hub выглядит достаточно просто:
- Локально или с помощью пайплайнов собрали контейнер.
- Загрузили его на докер хаб.
- В любом удобном месте скачали его. Это может быть локальная машина, VPS сервер или облачный провайдер по типу AWS.
- Запустили.
Пройдёмся по этим шагам. Везде, где указано <docker_hub_username>, надо вставлять свой юзернейм, использованный при регистрации на докерхабе. Если это ваша первая публикация на докерхаб, для начала потребуется залогиниться с помощью docker login.
Билдим контейнер:
docker build -t <docker_hub_username>/my_appЗагружаем его на докерхаб:
docker push <docker_hub_username>/my_appДля проверки успешности загрузки можете запустить контейнер из Docker Hub с помощью команды:
docker run -d <docker_hub_username>/my_appДалее загрузим наш контейнер в AWS Elastic Beanstalk. Для этого потребуется аккаунт на AWS. Если его нет, необходимо зарегистрироваться. Вас попросят ввести данные карты для верификации, но переживать не стоит, ведь мы воспользуемся бесплатным годовым триалом. Чтобы поиграться, этого более чем достаточно, а вот если вы захотите вывести проект в продакшен, следует перейти на VPS — это даст больше контроля и гибкости.
- Переходим в Elastic Beanstalk, на вкладку Applications, и создаём новое приложение:

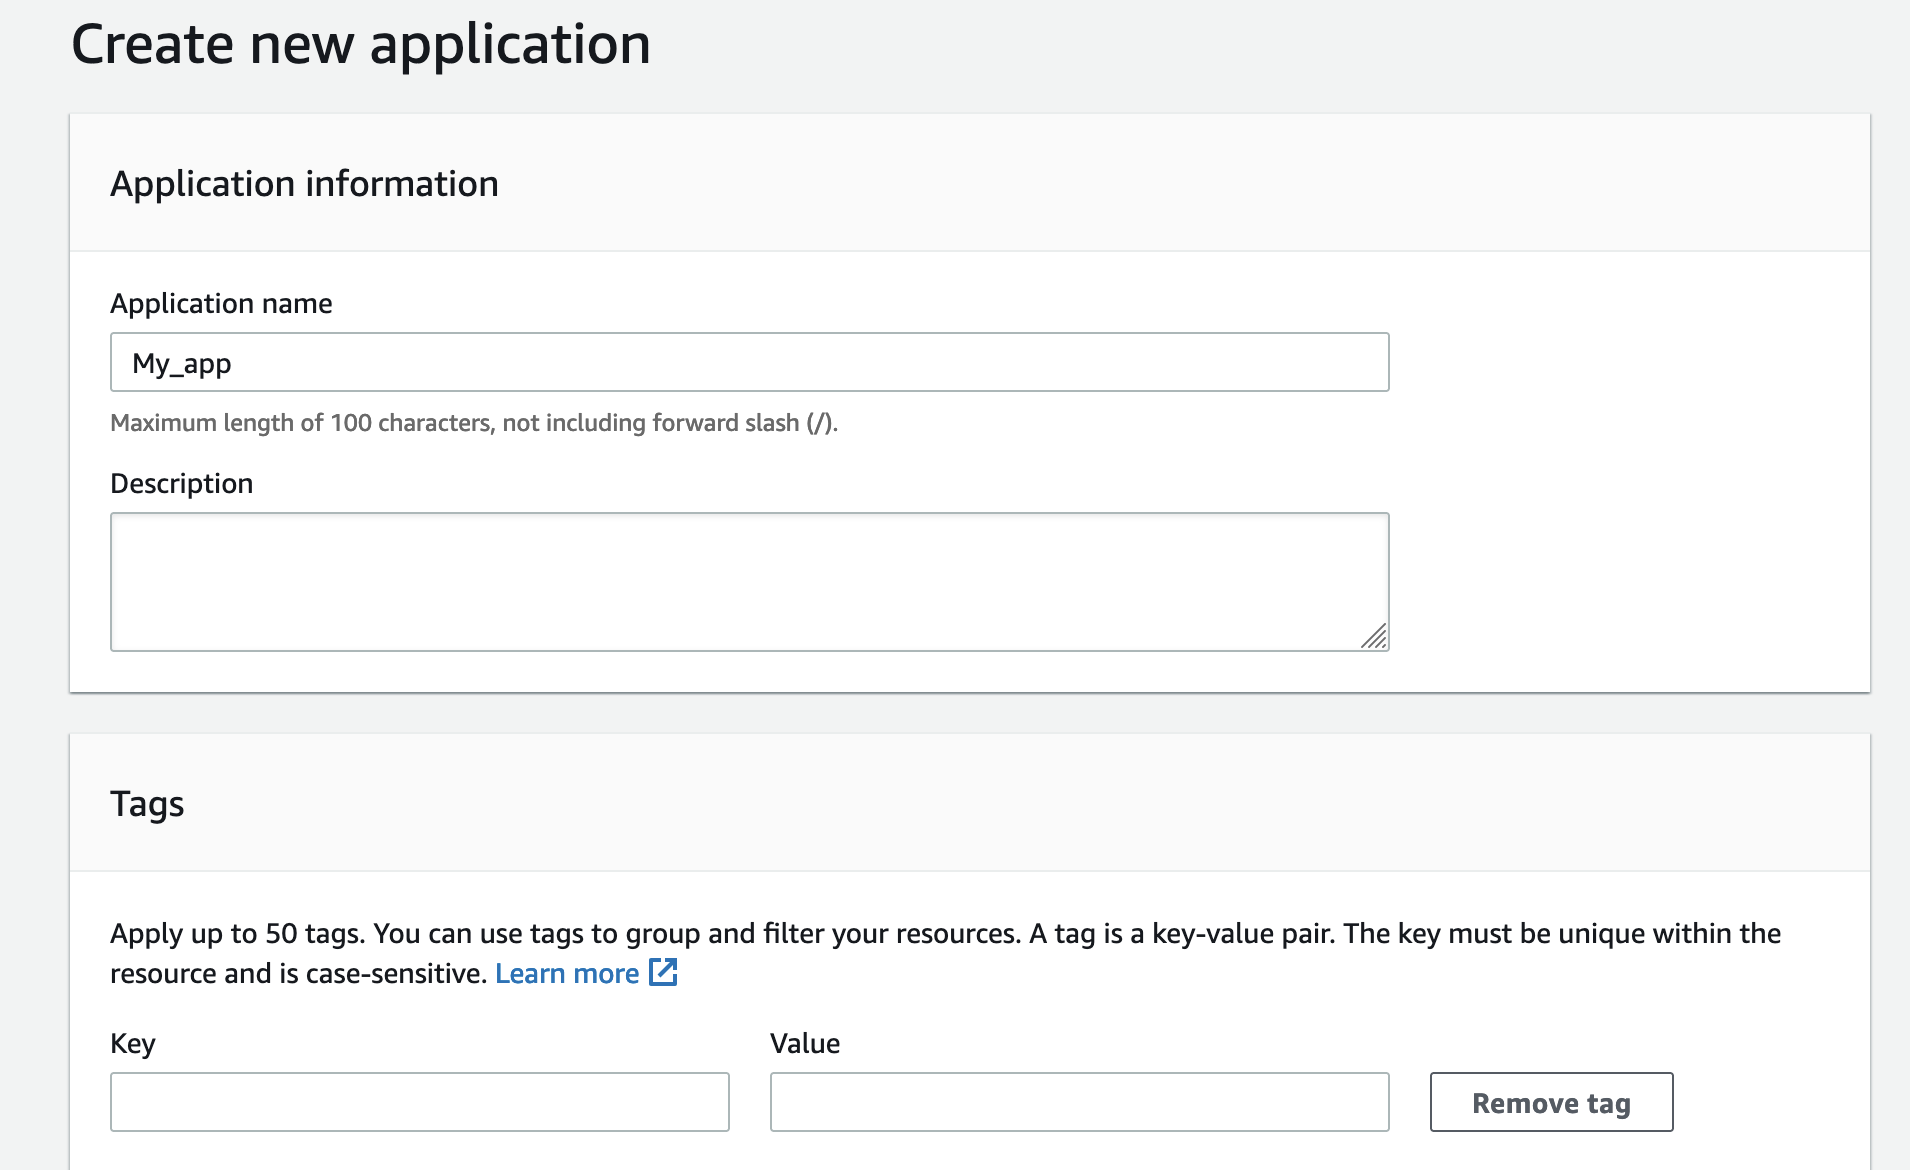
- Называем приложение, теги оставляем пустыми:
- Создаём для приложения environment:

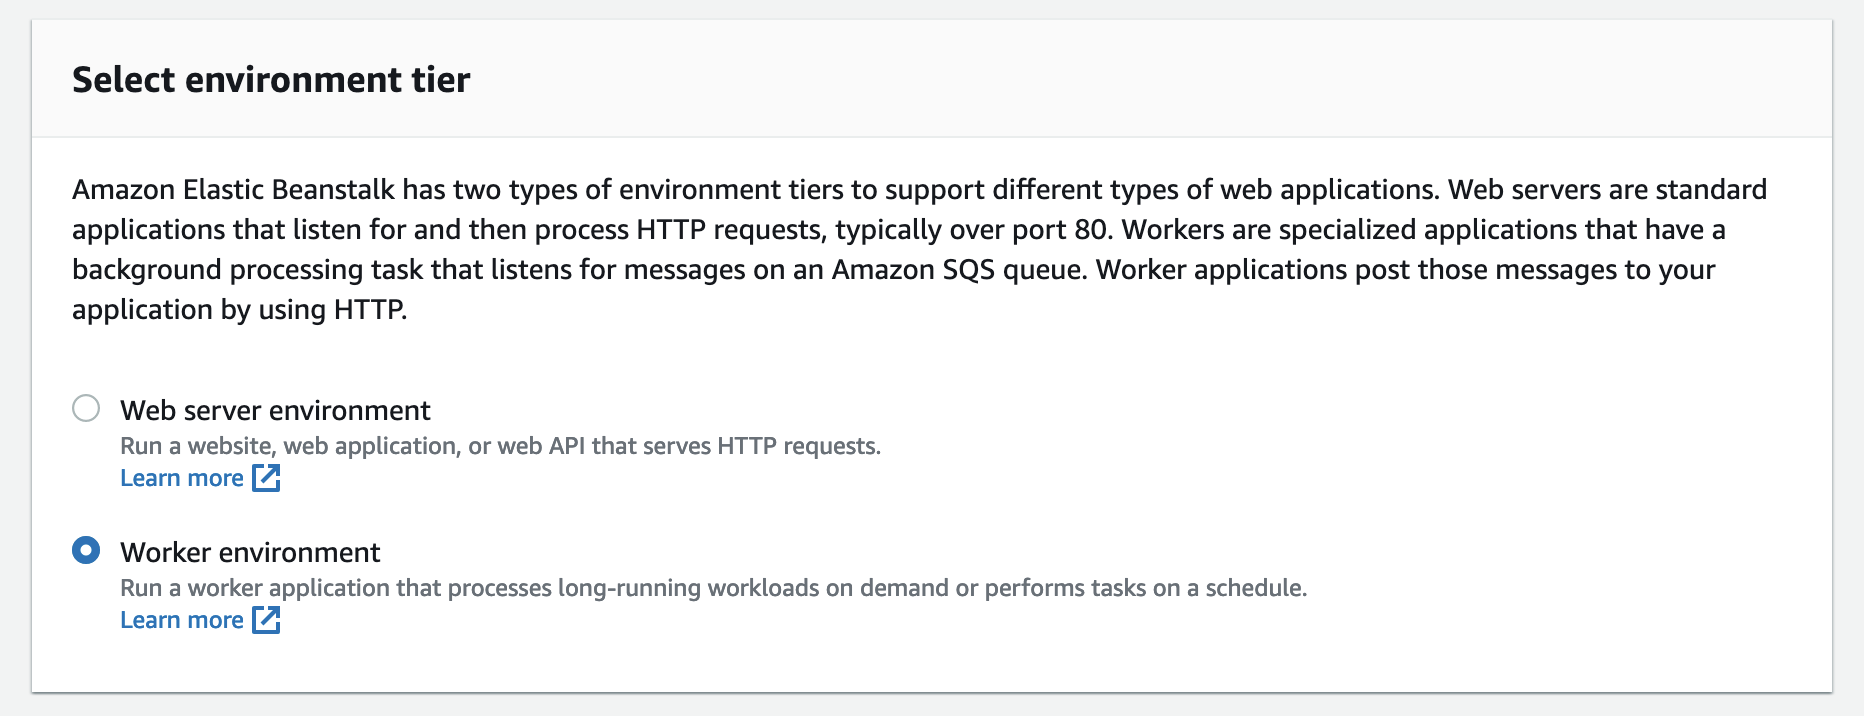
- Выбираем Worker environment:
- В качестве платформы выбираем Docker:

- В пункте Application code нужно загрузить JSON-файл с конфигурацией Docker-образа. Сам файл:
Dockerrun.aws.json
{
 "AWSEBDockerrunVersion": "1",
 "Image": {
   "Name": "<docker_hub_username>/my_app",
   "Update": "true"
 },
"Ports": [
 {
   "ContainerPort": 5000,
   "HostPort": 8000
 }
]
}

- Создаём окружение:

- AWS начинает создавать окружение, просто ждём завершения процесса:

- Если всё прошло успешно, вы увидите индикатор успешного запуска приложения:

Проверяем работу нашего Telegram bot:
Успех!
Заключение
Поздравляем! Теперь вы знаете, как писать роботов для Telegram на Python.
Бота можно дополнять другими функциями, например, добавить отправку файлов, опрос или клавиатуру.
Кстати, в телеграмме есть аж целых два типа клавиатур:
- Классическая RelpyKeyboardMarkup, у которой кнопки располагаются под полем ввода сообщения:

- Более современная InlineKeyboardMarkup, которая привязывается к конкретному сообщению:


Но и это полностью рабочий Телеграм-бот на Python: дополните словарём, и получите полноценную беседу. Также можете опробовать функциональность нашего Telegram-бота.
В «настоящих проектах» не обойтись без базы данных. Тут на помощь приходит docker-compose, который позволяет объединить несколько контейнеров в один сервис. Таким образом, например, можно создать приложение и положить его в контейнер, а базу данных, как отдельный сервис, поместить в другой контейнер, и с помощью docker-compose наладить между ними связь.
Также для более серьёзной разработки лучше использовать выделенный виртуальный сервер (VPS): он даёт гораздо больше гибкости и свободы, чем тот же AWS. А самое главное, он более приближён к «боевой» разработке. Схема работы тут будет даже проще, чем с AWS: вам просто нужно установить Docker, спуллить образ с Docker Hub и запустить его.
#Руководства
- 14 сен 2022
-

0
Разбираемся, как написать чат-бота с помощью библиотеки aiogram. Весь код — внутри статьи.
Иллюстрация: Polina Vari для Skillbox Media

Изучает Python, его библиотеки и занимается анализом данных. Любит путешествовать в горах.
Компании используют чат-ботов в Telegram для разных задач: рассылают новости о новых акциях, принимают платежи или даже организуют службу технической поддержки. Обычные пользователи тоже используют их для своих бытовых нужд — ведут учёт личных финансов или оформляют посты в социальных сетях.
В этой статье мы научимся с нуля создавать чат-ботов с помощью Python: выберем лучшую библиотеку и напишем на ней эхо-бота, который отвечает на сообщения пользователя точно такими же сообщениями. Это первая часть урока по чат-ботам в Telegram — во второй части мы добавим новые фичи.
Для создания Telegram-ботов на Python существует несколько десятков библиотек. Они различаются популярностью, размером комьюнити и функциональностью. Рассмотрим самые популярные.
aiogram
Современная библиотека, набирающая популярность. Работает с асинхронным подходом к выполнению кода. Это позволяет не останавливать работу бота в ожидании ответа пользователя. У aiogram подробная документация и большое русскоязычное комьюнити. В этой и последующих статьях цикла мы будем работать как раз с этой библиотекой.
python-telegram-bot
Одна из первых библиотек для создания ботов. Отличается от aiogram синхронным подходом к работе, то есть при ожидании ответа от пользователя выполнение кода останавливается.
TeleBot
Библиотека для создания простых ботов, позволяющая работать с асинхронным и синхронным подходом на выбор. Подходит для небольших проектов. Подробнее можно узнать в документации.
Переходим к созданию Telegram-бота. Потренируемся на простом примере — создадим эхо-бота, который отвечает на сообщения пользователя его же словами.
Для этого нам необходимо:
- установить Python и настроить виртуальное окружение;
- зарегистрировать бота в специальном Telegram-канале @BotFather;
- установить библиотеку aiogram;
- написать код эхо-бота, связав его по API с Telegram.
На macOS или Linux. Python установлен в эти операционные системы изначально. Чтобы проверить его наличие, откройте терминал и введите команду:
python --version
Если Python установлен, то терминал покажет его версию:

На Windows требуется установка Python. Сделать это проще всего по нашей инструкции.
После установки и проверки Python требуется установить виртуальное окружение с помощью virtualenv. Это специальный инструмент, который позволяет изолировать друг от друга проекты в разработке, независимо устанавливая для них библиотеки и пакеты. Удобно, когда вы работаете над разными приложениями одновременно.
virtualenv устанавливается через терминал:
sudo pip3 install virtualenv
После этого необходимо создать директорию для проекта, внутри которой будет работать виртуальное окружение:
mkdir telegram_bot
cd telegram_bot
Команда mkdir создаст папку telegram_bot, а команда cd переведёт нас в неё. Теперь в этой директории будут храниться файлы проекта, связанные с нашим ботом.
Развернём виртуальное окружение внутри папки telegram_bot:
virtualenv venv -p python3
Теперь его активируем. Если этого не сделать, то оно не будет работать.
source venv/bin/activate
Виртуальное окружение запущено, и мы готовы перейти к следующему шагу.
Для создания бота необходимо воспользоваться Telegram и ботом @BotFather. Откройте мессенджер и введите название бота в поисковой строке:
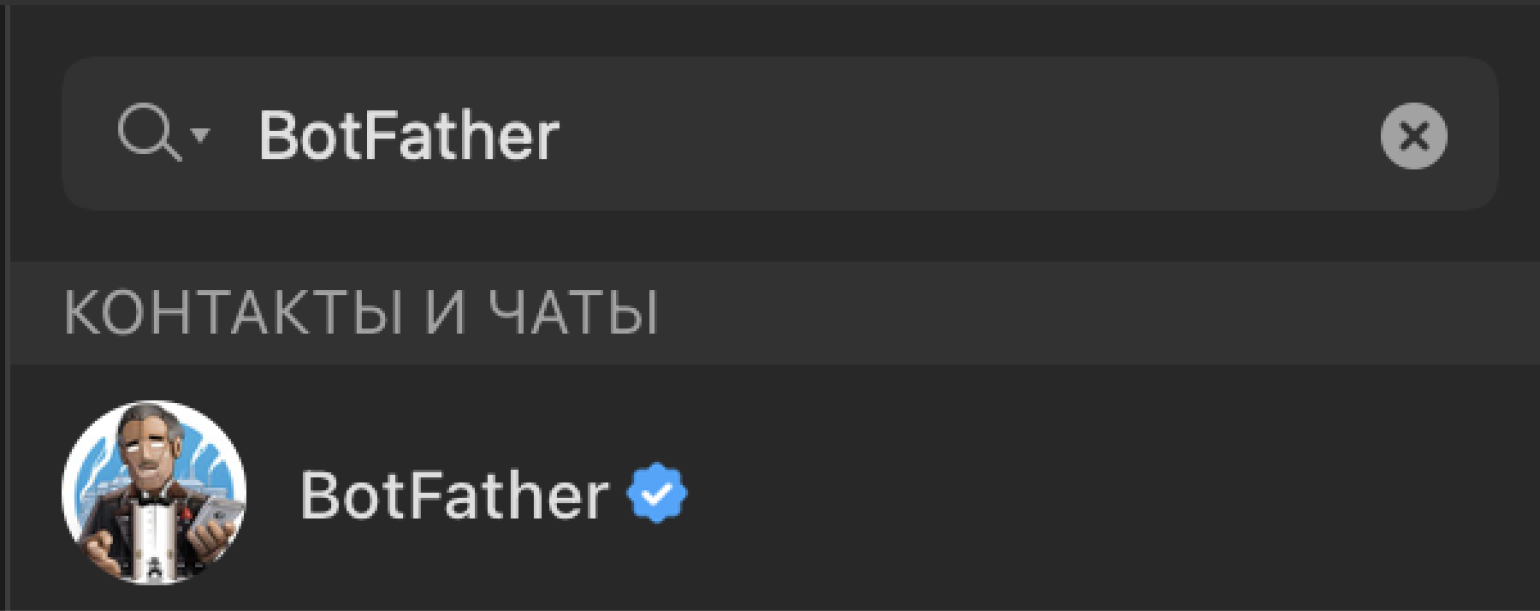
Открываем его, жмём кнопку «Запустить» и вводим команду /newbot:
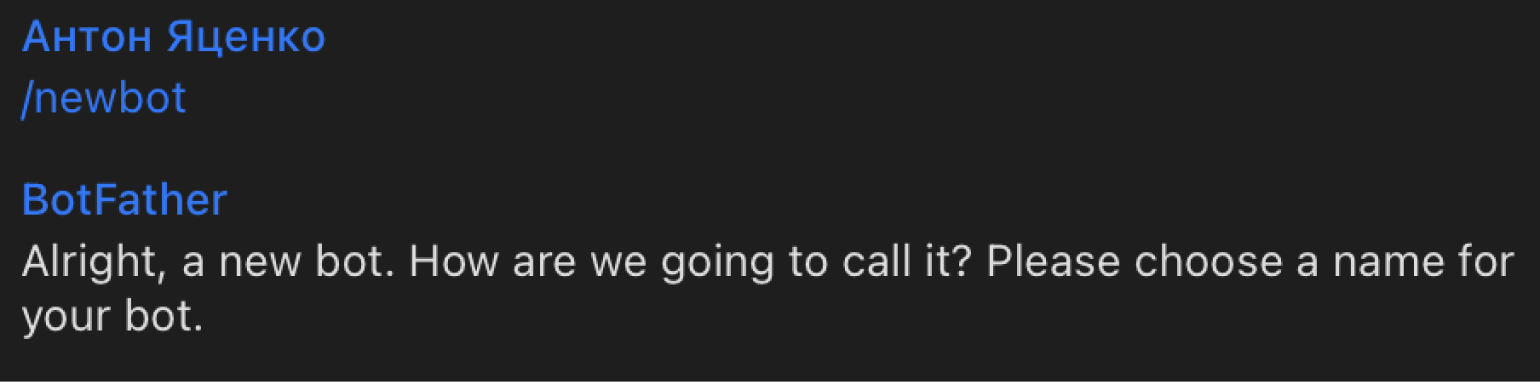
Теперь напишем название и юзернейм для нашего бота. Назовём его echo_skillbox_bot (теперь это имя занято, так что вам надо будет придумать своё). В ответ придёт наш токен, который мы будем использовать для подключения к API Telegram.
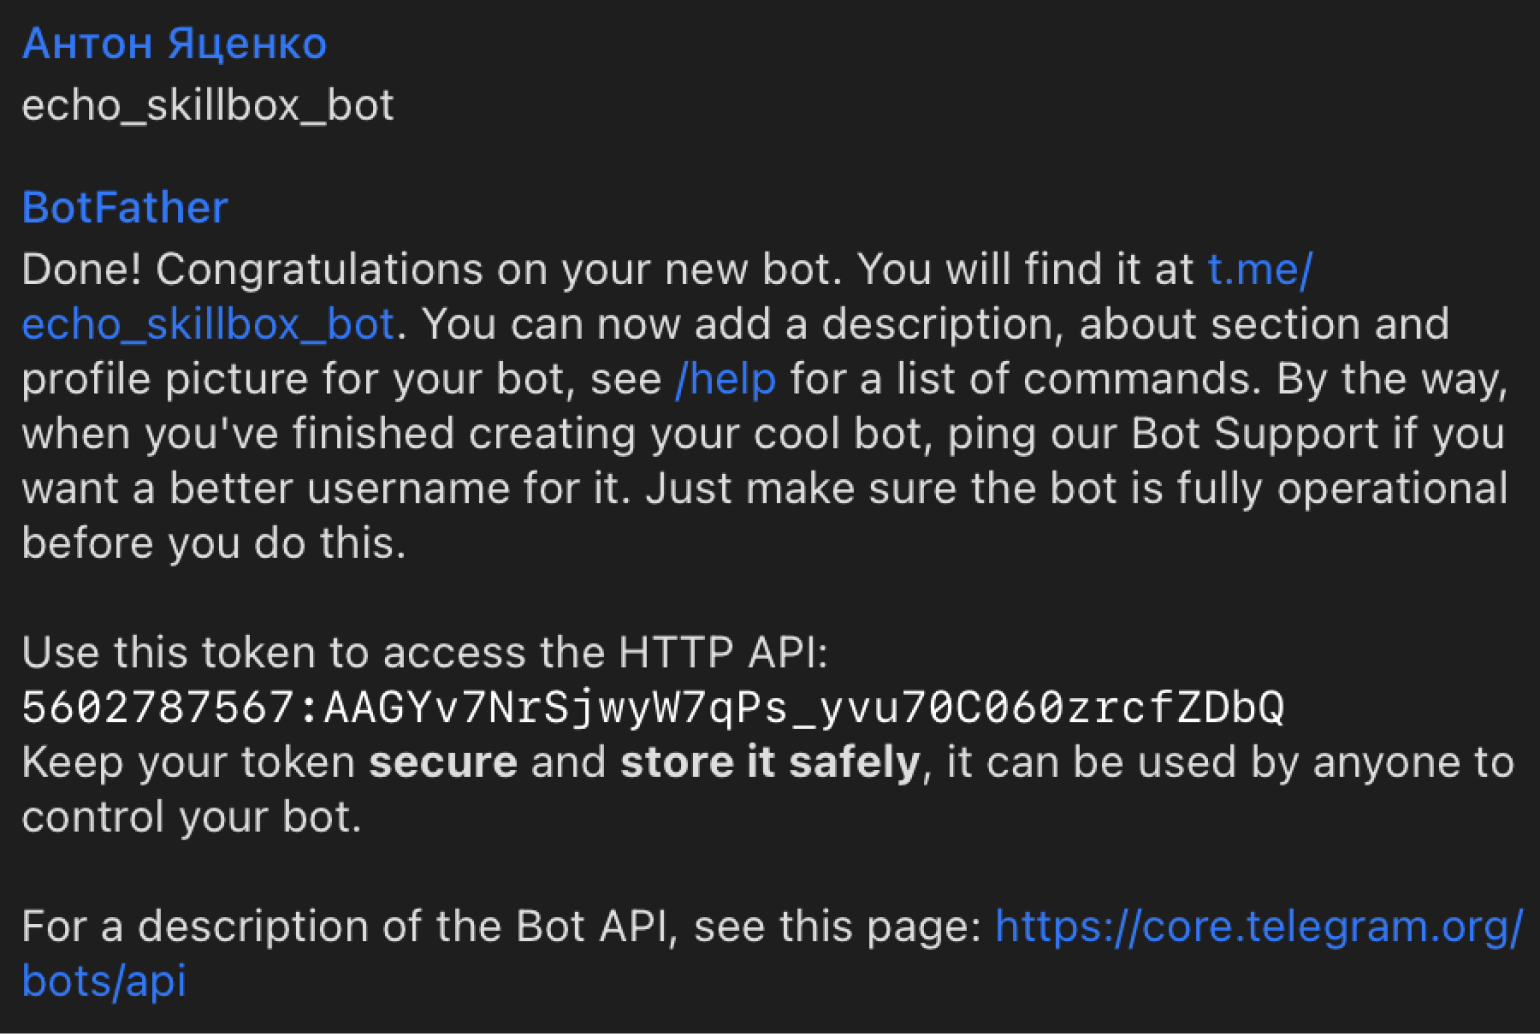
Этот токен мы сохраняем — он потребуется нам в будущем.
Для установки aiogram воспользуемся менеджером пакетов pip. Вводим в терминал:
pip install aiogram
Важно! Библиотека устанавливается в созданное ранее виртуальное окружение, связанное с папкой telegram_bot. Если вы решите создать нового бота в другой директории на компьютере, то установку будет необходимо провести заново, иначе aiogram не будет работать.
Писать код на Python лучше всего в IDE, а не в окне терминала. В проекте ниже мы будем использовать бесплатный редактор Visual Studio Code, но вы можете воспользоваться любым удобным для вас инструментом.
Откроем IDE и создадим файл main.py. Для этого проекта нам потребуется только он. Импортируем из aiogram нужные классы и модуль:
from aiogram import Bot, Dispatcher, executor, types
Разберёмся, что каждый из них делает. Начнём с классов:
- Bot определяет, на какие команды от пользователя и каким способом отвечать;
- Dispatcher позволяет отслеживать обновления;
- Executor запускает бота и выполняет функции, которые следует выполнить.
Модуль types позволит нам использовать базовые классы для аннотирования, то есть восприятия сообщений. Например, мы будем использовать types.Message, позволяющий работать с приёмом текстовых сообщений пользователя. Подробно об этом можно прочесть в документации.
Импортируем наш токен, который поможет коммуницировать с API Telegram:
API_TOKEN = '5602787567:AAGYv7NrSjwyW7qPs_yvu70C060zrcfZDbQ' #В одинарных кавычках размещаем токен, полученный от @BotFather.
Теперь необходимо инициализировать объекты bot и Dispatcher, передав первому наш токен. Если их не инициализировать, то код не будет работать.
bot = Bot(token=API_TOKEN)
dp = Dispatcher(bot)
Настроим приветственное окно для нового пользователя, которое будет появляться при нажатии команды /start. Для этого создаём message_handler и прописываем функцию ответа:
@dp.message_handler(commands=['start']) #Явно указываем в декораторе, на какую команду реагируем.
async def send_welcome(message: types.Message):
   await message.reply("Привет!nЯ Эхо-бот от Skillbox!nОтправь мне любое сообщение, а я тебе обязательно отвечу.") #Так как код работает асинхронно, то обязательно пишем await.
Теперь при нажатии на кнопку Начать или при вводе команды /start пользователь будет получать от бота приветственное сообщение.
Разберёмся в коде:
- message_handler — это декоратор, который реагирует на входящие сообщения и содержит в себе функцию ответа. Декоратор — это «обёртка» вокруг функций, позволяющая влиять на их работу без изменения кода самих функций. В нашем случае мы управляем функцией, считая команды пользователя;
- commands=[‘start’] — это команда, которая связана с декоратором и запускает вложенную в него функцию;
- async def send_welcome — создаёт асинхронную функцию, которая принимает в себя сообщение пользователя message, определяемое через тип Message. Саму функцию можно назвать любым образом. Мы выбрали send_welcome, чтобы название было понятным и осмысленным;
- await message.reply — определяет ответ пользователя, используя await из-за асинхронности работы библиотеки.
Теперь создадим событие, которое будет обрабатывать введённое пользователем сообщение:
@dp.message_handler() #Создаём новое событие, которое запускается в ответ на любой текст, введённый пользователем.
async def echo(message: types.Message): #Создаём функцию с простой задачей — отправить обратно тот же текст, что ввёл пользователь.
   await message.answer(message.text)
Так как бот должен реагировать на любое текстовое сообщение от пользователя, то скобки в @dp.message_handler мы оставляем пустыми. Параметр message не отличается от использованного в предыдущих шагах.
Для ответа мы также используем метод message, указывая, что возвращаем исходный текст, принятый в message.
Остаётся последний этап — настроить получение сообщений от сервера в Telegram. Если этого не сделать, то мы не получим ответы бота. Реализовать получение новых сообщений можно с помощью поллинга. Он работает очень просто — метод start_polling опрашивает сервер, проверяя на нём обновления. Если они есть, то они приходят в Telegram. Для включения поллинга необходимо добавить две строчки:
if __name__ == '__main__':
   executor.start_polling(dp, skip_updates=True)
Всё, теперь код нашего бота полностью готов:
from aiogram import Bot, Dispatcher, executor, types

API_TOKEN = '5602787567:AAGYv7NrSjwyW7qPs_yvu70C060zrcfZDbQ'

bot = Bot(token=API_TOKEN)
dp = Dispatcher(bot)

@dp.message_handler(commands=['start'])
async def send_welcome(message: types.Message):
   await message.reply("Привет!nЯ Эхо-бот от Skillbox!nОтправь мне любое сообщение, а я тебе обязательно отвечу.")

@dp.message_handler()
async def echo(message: types.Message):
   await message.answer(message.text)

if __name__ == '__main__':
   executor.start_polling(dp, skip_updates=True)
Сохраняем его в нашей папке telegram_bot под именем main.py.
Для запуска бота нам необходим терминал. Открываем его и переходим в нашу папку telegram_bot. После этого вводим команду:
python3 main.py
В ответ терминал пришлёт сообщение, что обновления успешно пропущены:

Находим нашего бота в Telegram по имени @echo_skillbox_bot и запускаем его, нажав на кнопку Начать. В ответ на это или на команду /start нам придёт приветственное сообщение:

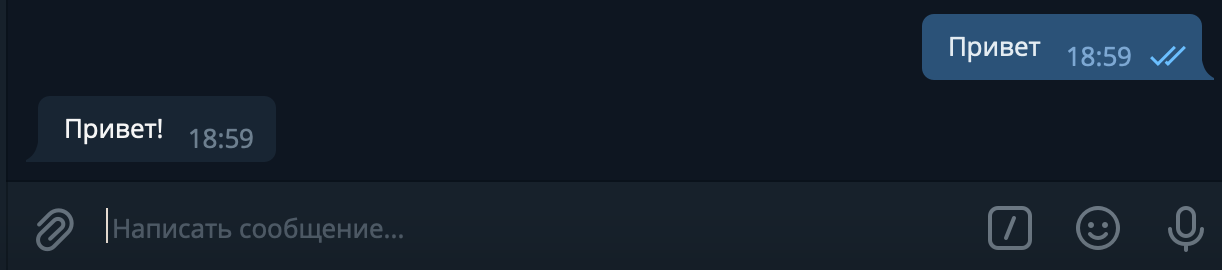
Попробуем написать что-то:
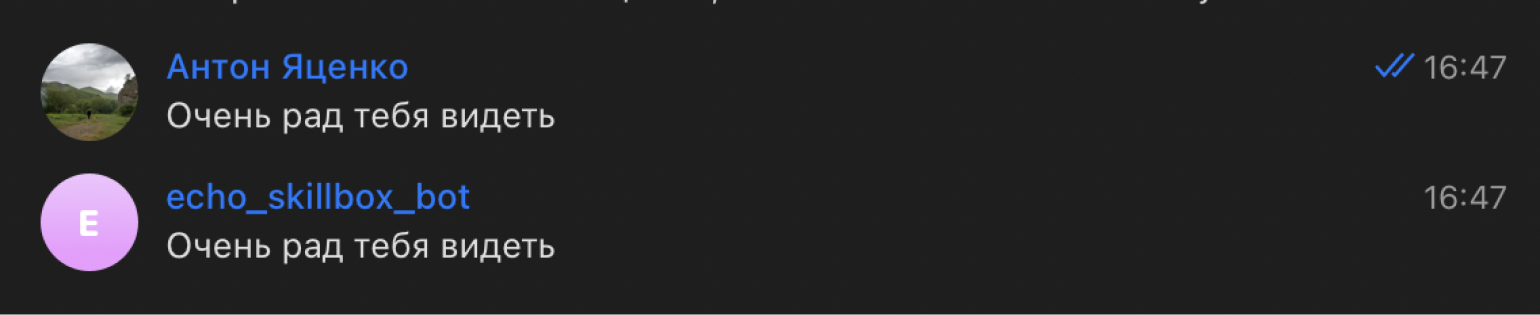
Как мы видим — всё работает. Бот возвращает нам наши сообщения.
Расширять функциональность бота, указывая для разных команд пользователя разные ответы. Например, добавить раздел помощи, который будет появляться по команде /help. Или настроить запуск кода на виртуальном сервере, чтобы бот работал независимо от вашего компьютера.
В следующей части статьи мы добавим к нашему боту кнопки и новые возможности.

Научитесь: Профессия Python-разработчик
Узнать больше
Рассказываем, как с помощью бессерверных вычислений сделать своего чат-бота в Telegram с нуля. Он сможет отвечать на запросы простыми сообщениями и отправлять картинки. Подойдет для организации процессов разработки, поддержки и продаж.
Мы напишем простого бота-заготовку, которого можно использовать для написания полноценного приложения, добавив нужную вам функциональность.
Такого бота можно написать с использованием serverless-подхода в крупных облаках, например, с помощью AWS Lambda или Google Cloud Functions. Мы напишем функцию на Yandex Cloud Function, сделаем Object Storage, чтобы хранить файлы, и спрячем нашу serverless-архитектуру от пользователя с помощью сервиса Yandex API Gateway, который позволяет выступить фронтом для пользователя.
Шаг 1. Создайте бота с помощью BotFather
Прежде всего нужно зарегистрировать наше приложение в Telegram. Найдите в мессенджере главного бота BotFather и наберите команду /newbot. Для этого достаточно написать его имя user name и account name. В нашем случае account name — Serverless Hello Telegram Bot, username — ServerlessHelloTelegramBot. В результате вы получите token, запомните его, он потребуется на следующих этапах.
С помощью команды /setuserpic установите иконку для вашего бота. В нашем случае это картинка с именем sayhello.png.
На этом этапе у нас уже есть заготовка для бота. Дальше переходим в Yandex.Cloud и начинаем создавать инфраструктуру для бота.
Шаг 2. Создайте сервисный аккаунт
Войдите в ваш рабочий каталог.
Создайте новый сервисный аккаунт для работы telegram-бота. Например, serverless-telegram. Задайте роли для него: serverless.functions.invoker и editor. Роль serverless.functions.invoker необходима для запуска функций.
Обратите внимание: editor перекрывает роль serverless.function.invoker.
Запомните идентификатор созданного сервисного аккаунта.
Шаг 3. Создайте Object Storage
Нам нужно где-то хранить файлы для бота. Перейдите в каталог и выберете сервис Object Storage. Нажмите кнопку Создать бакет.
Введите имя бакета: for-serverless-hello-telegram-bot. Затем задайте максимальный размер в 1 ГБ и установите параметр Доступ на чтение объектов — Публичный.
Когда мы размещаем объект, есть возможность поместить его в два разных хранилища: стандартное с быстрым доступом или холодное. Холодное — это долговременное хранилище, оно отдельно тарифицируется и чаще всего используется для бэкапов. В нашем случае выбираем стандартное.
Загрузите картинку в созданный бакет. В нашем случае это тот же самый файл, который мы установили аватаром для бота: sayhello.png. Получите ссылку на загруженную картинку и проверьте её доступность по ссылке в браузере.
Шаг 4. Опубликуйте картинку через API Gateway
Давайте опубликуем нашу картинку через сервис API Gateway. Таким образом мы создадим заготовку, чтобы пользователь мог работать с нашим telegram-ботом, но не видел, что находится внутри. Перейдите в каталог и выберете сервис API Gateway. Нажмите кнопку Создать API-шлюз:
Введите имя for-serverless-hello-telegram-bot и вставьте спецификацию:
openapi: 3.0.0
info:
title: for-serverless-hello-telegram-bot
version: 1.0.0
paths:
/sayhello.png:
get:
x-yc-apigateway-integration:
type: object-storage
bucket: for-serverless-hello-telegram-bot
object: sayhello.png
presigned_redirect: false
service_account: IDYOURACCOUNT
operationId: static
Обязательно замените:
· sayhello.png — на имя вашей картинки (два раза).
· for-serverless-hello-telegram-bot — на имя вашего бакета.
· IDYOURACCOUNT— на id вашего сервисного аккаунта, созданного ранее.
После опубликования API-шлюза в спецификации появится секция servers с адресом url. Через этот адресом вы сможете обратиться к ранее опубликованной картинке. В нашем случае к sayhello.png.
Проверяем, все работает. Отлично! Мы соединили два сервиса. У нас, с одной стороны, есть Object Storage, в котором что-то хранится. И есть API Gateway, который публично предоставляет доступ к каким-то ресурсам.
Шаг 5. Создадим Cloud Function
Идем дальше. Теперь нам нужно сделать функцию. Перейдите в каталог и выберете сервис Cloud Functions. Нажмите кнопку Создать функцию. Задайте имя. В нашем случае: fshtb-function.
Мы создали объект, но сама функция еще не создана. Нам необходимо выбрать среду выполнения. Внутри Yandex.Cloud несколько разных сред. Мы выберем nodejs, у нас есть там python.
Выберете среду выполнения node12js-preview.
Создайте два файла: index.js и package.json. Здесь мы используем известный в JavaScript-комьюнити фреймфорк Telegraf.
Для файла index.js скопируйте следующий код:
const { Telegraf } = require(‘telegraf’);
const bot = new Telegraf(process.env.BOT_TOKEN);
bot.start((ctx) => ctx.reply(`Hello. nMy name Serverless Hello Teleram Bot nI’m working on Cloud Function in the Yandex.Cloud.`))
bot.help((ctx) => ctx.reply(`Hello, ${ctx.message.from.username}.nI can say Hello and nothing more`))
bot.on(‘text’, (ctx) => {
ctx.reply(`Hello, ${ctx.message.from.username}`);
});
module.exports.handler = async function (event, context) {
const message = JSON.parse(event.body);
await bot.handleUpdate(message);
return {
statusCode: 200,
body: »,
};
};
Этим мы научили нашего бота отвечать на команды /start, /help, а также на любой написанный текст. Но давайте сразу изменим функцию так, чтобы она на любой текст отправляла картинку. Для этого внесите изменение в файл index.js.
bot.on(‘text’, (ctx) => {
ctx.replyWithPhoto(‘YOURAPIGWURL/sayhello.png’);
ctx.reply(`Hello, ${ctx.message.from.username}`);
Важно: не забудьте заменить YOURAPIGWURL на url из секции servers вашего API-шлюза. После создания версии функции, ваш telegram-бот будет отправлять вам картинку из Object Storage, опубликованную через API-шлюз.
Для файла package.json введите следующий код:
{
«name»: «ycf-telegram-example»,
«version»: «1.0.0»,
«description»: «»,
«main»: «index.js»,
«scripts»: {
«test»: «echo «Error: no test specified» && exit 1″
},
«author»: «»,
«license»: «MIT»,
«dependencies»: {
«telegraf»: «^3.38.0»
}
}
Укажите точку входа index.handler. Увеличьте таймаут до 5 секунд. В переменные окружения добавьте переменную BOT_TOKEN со значением токена вашего telegram-бота, полученного ранее.
Обязательно нажмите кнопку — Создать версию. После создания функции сделайте ее публичной. Запомните идентификатор вашей функции.
Шаг 6. Свяжем функцию и бота в Telegram
Теперь нам нужно соединить нашу функцию с ботом в Telegram. Для этого вернитесь в сервис API Gateway и выберете ранее созданный API-шлюз с именем for-serverless-hello-telegram-bot. Измените его спецификацию — в конце добавьте в нее секцию fshtb-function:
/fshtb-function:
post:
x-yc-apigateway-integration:
type: cloud-functions
function_id: IDYOURFUNCTION
operationId: fshtb-function
ЗаменитеIDYOURFUNCTION на id вашей функции, созданной ранее. Сохраните изменения.
Теперь для создания связи между ранее созданным телеграм-ботом и вашей функцией нужно запустить команду в терминале (командной строке).
curl —request POST —url https://api.telegram.org/botYOURTOKEN/setWebhook —header ‘content-type: application/json’ —data ‘{«url»: «YOURAPIGWURL/fshtb-function»}’
Замените YOURTOKEN на токен вашего telegram-бота и YOURAPIGWURL на url из секции servers вашего API-шлюза. Нажмите Enter. После положительного ответа связь создана, и вы сможете поговорить со своим ботом. Если не вылезать из лимитов Free tier, ваш бот обойдется вам в 0 рублей.
Оставляем полезные ссылки на каналы и сообщества Serverless в мире и в России, где вы сможете найти еще больше полезных примеров использования функций:
- Serverless Architectures for Mobile and Web Apps
- Yandex Serverless Ecosystem
- goserverless
- Serverless Moscow
Подписывайтесь на блог Yandex.Cloud, чтобы узнавать еще больше новостей и историй об IT и бизнесе.
Другие истории, которые активно читают наши подписчики:
- Перфокарты, лунная программа «Аполлон» и эпоха big data: рассказываем о важном из истории хранения данных
- Как мы сделали мобильное приложение для управления серверами по клику
- Бессерверные вычисления: почему некоторые разработчики упускают главное?