
лчиттничюнльтцию.
глтчн.Бзвыдны
www.sotmarket.ru
дбняинфмциятв,
тзывы,бзыиы
Инструкция
Brother LS-2125
Перейти в карточку товара
8 800 775 98 98

ИНСТРУКЦИИ ПО ТЕХНИКЕ БЕЗОПАСНОСТИ
При эксплуатации швейной машины следует всегда соблюдать перечисленные ниже основные меры безопасности.
Прочтите все инструкции перед использованием
ВНИМАНИЕ! Для предотвращения возможности поражения электрическим током:
1. Никогда не оставляйте швейную машину без присмотра при вставленной в розетку вилке сетевого шнура. Сразу же
после использования швейной машины или перед ее чисткой всегда вынимайте вилку сетевого шнура из розетки.
2.
Всегда отключайте сетевой шнур перед заменой лампы подсветки. Заменяйте лампы на однотипные, мощностью 15 Вт
ПРЕДУПРЕЖДЕНИЕ! Для снижения возможности получения ожогов, возгорания, поражения
электрическим током или травм:
1. Не допускайте использования машины в качестве игрушки. Необходимо быть особенно внимательным, когда машина
используется детьми или когда во время работы на машине рядом находятся дети.
2. Используйте машину только по ее прямому назначению, как описано в настоящем руководстве. Используйте только те
принадлежности, которые рекомендованы изготовителем и указаны в данном руководстве.
3. Никогда не используйте швейную машину, если у нее поврежден сетевой шнур или вилка, если машина плохо
работает, если ее уронили или повредили, если в машину попала вода. В этих случаях машину следует отправить
официальному дилеру компании BROTHER вашего региона или в уполномоченный сервисный центр для проверки,
ремонта и наладки ее электрической или механической части.
4. Никогда не работайте на машине при закрытых вентиляционных отверстиях. Содержите вентиляционные отверстия
машины и педаль в чистоте, своевременно очищайте их от пыли, грязи, обрывков ткани и ворса.
5. Не роняйте в отверстия машины и не вставляйте в них никаких посторонних предметов.
6. Не используйте машину для работы вне помещения.
7. Не используйте машину в помещениях, в которых распыляют те или иные аэрозоли или применяют чистый кислород.
8. Для отключения машины от электрической сети установите сетевой выключатель в положение, обозначенное
символом «О», соответствующее выключению, а затем выньте вилку сетевого шнура из розетки.
9. При отключении машины от сети не вытягивайте вилку за шнур. Возьмитесь за вилку и выньте ее из электрической
розетки.
10. Держите пальцы вдали от движущихся частей машины. Особенная осторожность требуется в непосредственной
близости к игле машины.
11. Применяйте только соответствующую игольную пластину. Использование неподходящей игольной пластины может
привести к поломке иглы.
12. Не пользуйтесь погнутыми иглами.
13. Не тяните и не подталкивайте ткань во время шитья. Это может привести к отклонению иглы и ее поломке.
14. При выполнении любых операций в районе иглы, например при заправке нити в иглу, замене иглы или шпульки или
смене прижимной лапки и т. п., выключите машину, установив сетевой выключатель в положение, обозначенное
символом «О».
15. При снятии крышек, смазке или выполнении любых других регулировок, разрешенных пользователю и описанных в
данном руководстве, всегда отключайте машину от электрической сети.
16. Малолетним детям, а также физически или умственно неполноценным людям пользоваться швейной машиной без
присмотра не разрешается.
17. Следите за детьми. Не допускайте, чтобы они играли со швейной машиной.
СОХРАНИТЕ ЭТО РУКОВОДСТВО
Эта машина предназначена только для бытового
применения

Подключение соединителей и выключатель питания/
лампочки подсветки
1. Вставьте трехконтактный разъем сетевого шнура в
гнездо на машине.
2. Вставьте вилку сетевого шнура в настенную розетку.
— Перед тем как оставить машину без присмотра,
выключите ее сетевым выключателем или выньте
вилку сетевого шнура из настенной розетки.
Переключатель для включения или выключения сетевого
питания и лампочки подсветки.
1 Включение
2 Выключение
— При выполнении технического обслуживания
швейной машины, снятии крышек и замене лампочки,
машина должна быть обесточена отключением
сетевого шнура от розетки.
1
2

INDICE
Página
ELEMENTOS PRINCIPALES……………………………………..…………. 1
ELEMENTOS PRINCIPALES……………………………………..…………. 2
ACCESORIOS……….…………..………………………………………..………….3
FUNCIONAMIENTO DE LA MÁQUINA DE COSER ……………… 4
Conexión de los enchufes .…………..…………………………………… 4
Interruptor principal y de luz ……………………..…………………… 5
Pedal………..…………..……………….…………..……………………….... 5
Inserción de la aguja ……..…………………………..…………………… 6
Comprobación de la aguja ……………………………..……………….. 6
Cambio del prensatelas ………..……………………………………….... 7
Conversión en modalidad de brazo libre……….…………………… 8
Para estabilizar la máquina ………..…………………………………… 8
DISTINTOS MANDOS ………………………………………………..………….9
Selector de puntadas ….………………………..……………………….... 9
DIBUJO Y NOMBRE DE LOS PUNTOS ………….……………………. 11
Palanca de retroceso ….………………………..………………………..12
ENHEBRADO DE LA MÁQUINA………………………………………….13
Bobinado de la canilla …………………………………………………..13
Enhebrado inferior (de la canilla) …………………………………..14
Enhebrado superior (de la aguja)………………..…………………. 15
Para sacar el hilo de la canilla ……………………………..………..17
Costura con aguja doble ………………………………..……………… 19
Tensión de los hilos ..……………………………………………………..20
TABLA DE RELACIÓN ENTRE TEJIDOS, HILOS Y AGUJAS 23
Puntada recta ………..……………………………………..……………… 24
Puntadas zigzag……..……………………………………………………..26
Puntadas invisibles………..…………………………..…………………. 27
Puntada elástica………..………………………..………………………..28
Puntada ondas…………..………………………..………………………..29
Para coser ojales ……….………………………..………………………..30
Ajuste fino de los ojales…….………………………..…………………. 34
Coser botones….………………………..………………………..……….. 35
Poner de cremalleras………..………………………..…………………. 36
Fruncido …………………………………..………………………..………..37
Zurcido ………………………………………………………..……………… 38
Aplicaciones ……………..………………………..………………………..39
Monogramas y bordados …..…………………………………………… 40
Cambio de la bombilla …..…………..…………………………………. 42
Engrasado ………………..………………………..………………………..43
Limpieza …………………………………..………………………..………..44
Listado de posibles incidencias……….…………..…………………. 45
LISTADO DE POSIBLES INCIDENCIAS…..……………………. 50
Embalaje de la máquina……….………………………..……………… 54
INDICE …………………..………………………………………..…………………. 57
СОДЕРЖАНИЕ
Стр.
ОСНОВНЫЕ ЧАСТИ……………….…………………………………. 1
ОСНОВНЫЕ ЧАСТИ……………….…………………………………. 2
ПРИНАДЛЕЖНОСТИ………………………………………………… 3
РАБОТА НА ШВЕЙНОЙ МАШИНЕ ……………………..……… 4
Подключение электропитания …………..……..………..….. 4
Выключатель питания и лампочки подсветки …….……. 5
Педаль ………..……..……………..………..……..……..………….. 5
Установка иглы ………………..………..……..……..……………. 6
Проверка иглы ………..……..……..……………….……………... 6
Замена прижимной лапки ………..……………..………..……. 7
Переоборудование машины для работы с функцией
«свободный рукав»…….……..……..……………….……………. 8
Обеспечение устойчивости машины ..….……….…..….…. 8
ОРГАНЫ УПРАВЛЕНИЯ……………………….……………………. 9
Ручка выбора вида строчки ………………..……….………….. 9
НАИМЕНОВАНИЯ СТРОЧЕК И СООТВЕТСТВУЮЩИЕ
ИМ ПОЗИЦИИ ПЕРЕКЛЮЧАТЕЛЯ …………………….……. 10
Клавиша шитья в обратном направлении …….………... 12
ЗАПРАВКА НИТИ В МАШИНУ……….………………………… 12
Намотка шпульки ……..……….……………..……..………..… 14
Заправка нижней нити (шпульки) …..……..……..………. 14
Заправка верхней нити (в иглу)……..……….……..………. 15
Вытягивание нижней (шпульной) нити …………………. 17
Шитье двойной иглой ………….……………..……..………… 18
Натяжение нитей …….……..……..………..……..……………. 20
ТАБЛИЦА РЕКОМЕНДУЕМЫХ КОМБИНАЦИЙ
ТКАНЕЙ, ИГЛ И НИТЕЙ ………………………………………….. 22
Прямая строчка……..……..……..………..……..……..………. 24
Строчка «зигзаг» …….……..……….……………..………..….. 26
Подрубка …….……..……………….……………..……..………... 27
Эластичная строчка ………..……..……………..………..……. 28
Строчкаракушка…….……….……..……………….………….. 29
Выметывание петель……..……..……………….……..………. 30
Точная настройка при выметывании петель …………… 34
Пришивание пуговиц ….……..………..……..……..………… 35
Вшивание застежки «молния» ……………..……..………… 36
Выполнение сборок…….……..………..……..……..………… 37
Штопка……..……..……………..………..……..……..………….. 38
Аппликация ……..………..……..……………..……..………….. 39
Выстрачивание монограмм и вышивание …..………..… 40
Замена лампочки подсветки…………………..……..………. 42
Смазка ……………..……………..………..……..……..………….. 43
Чистка …….……..……………..……..………..……..……………. 43
Порядок проверки машины при возникновении
проблем ………..………..……..……..……………..………..……. 45
ПОРЯДОК ПРОВЕРКИ МАШИНЫ ПРИ
ВОЗНИКНОВЕНИИ ПРОБЛЕМ …..……..……..………. 46
Повторная упаковка машины …..……………..……………. 54
УАЗАТЕЛЬ……………………………………………………………….. 55
1
1
3
4
5
6
2
L
O
H
I
J
K
M
N
P
7
8
9
0
A
B
C
E
F
D
G
1
3
4
5
6
2
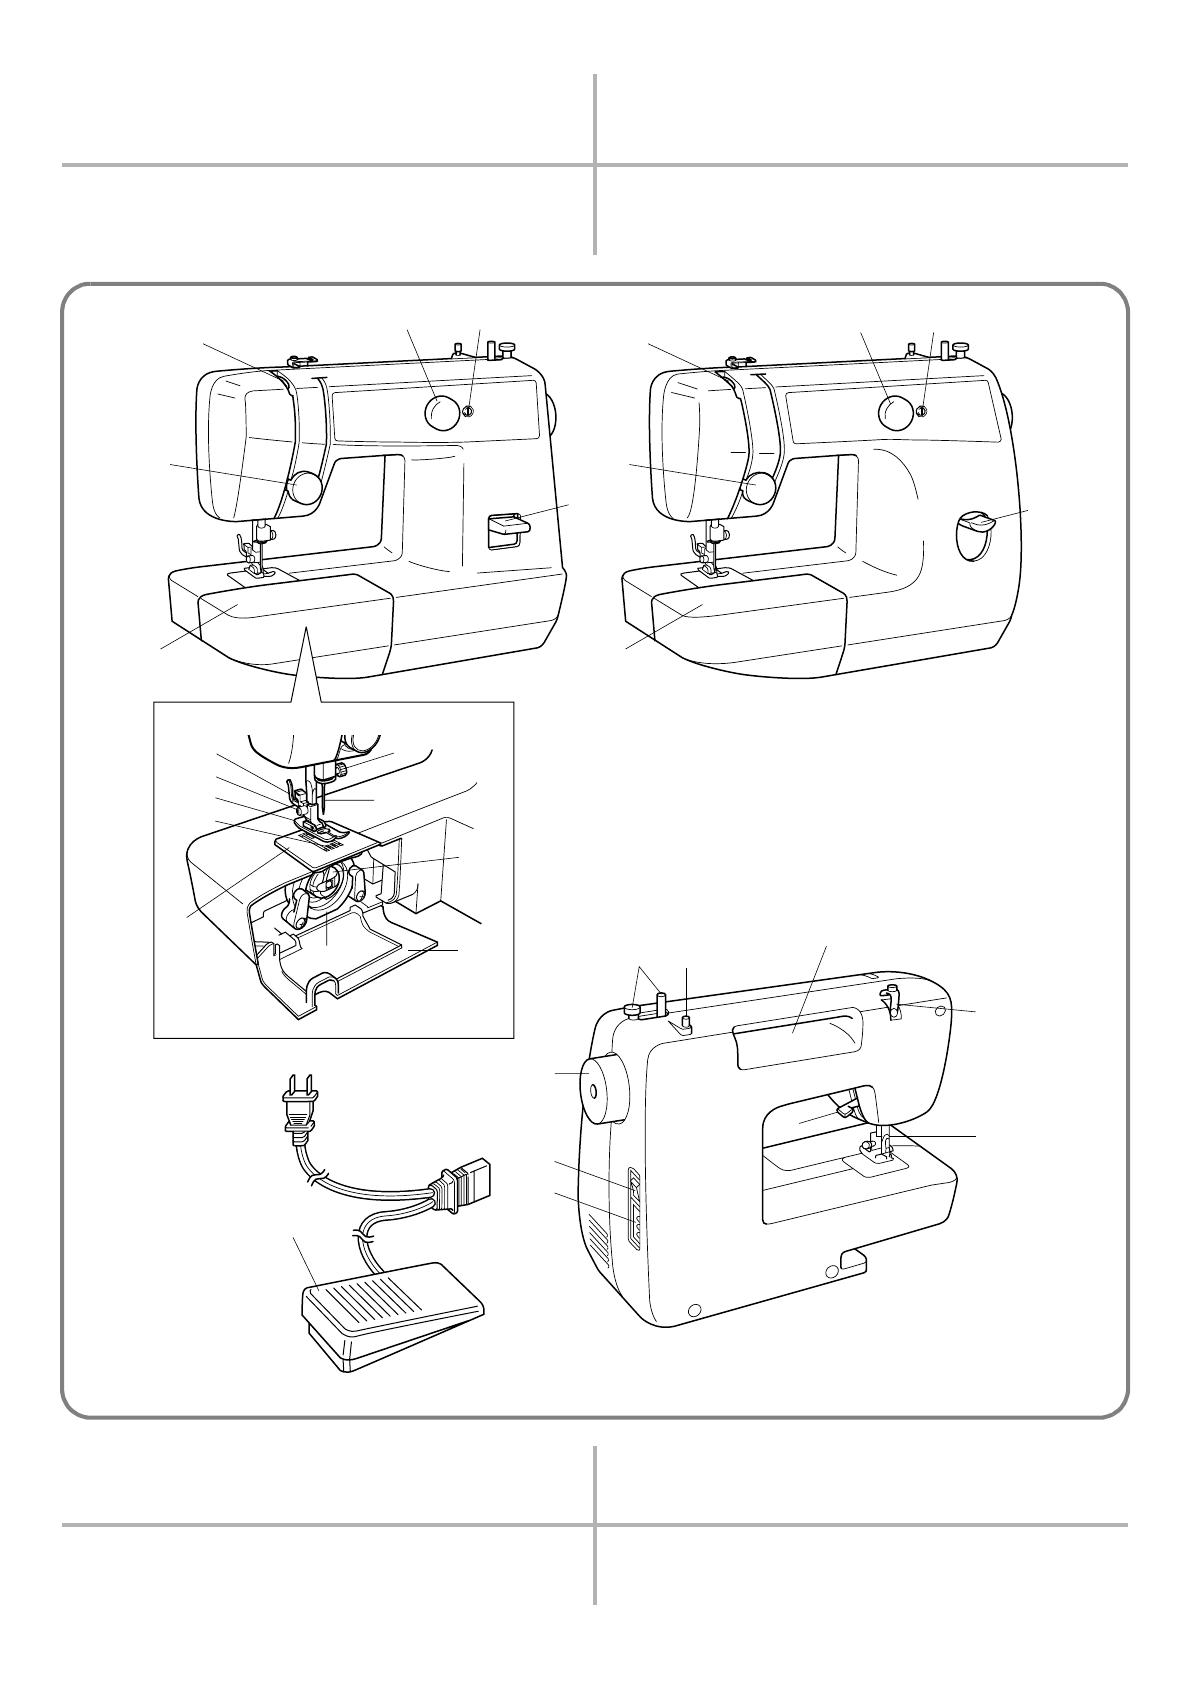
PRINCIPAL PARTS
* The illustrations of the sewing machine on the following pages may
differ slightly from your machine.
PIECES PRINCIPALES
* Les illustrations représentées aux pages suivantes peuvent différer
légèrement de votre machine à coudre.
ELEMENTOS PRINCIPALES
* Las ilustraciones de la máquina de coser, representadas en las siguientes
páginas, pueden variar un poco con respecto del modelo adquirido.
ОСНОВНЫЕ ЧАСТИ
* Изображения швейной машины на последующих страницах могут
незначительно отличаться от Вашей машины.
2
PRINCIPAL PARTS
a Pattern selection dial
b Buttonhole fine-adjusting screw
c Thread take-up lever
d Extension table with accessory storage
e Upper tension control dial
f Reverse sewing lever
g Thread cutter
h Presser foot holder assembly
i Presser foot screw
j Presser foot (Zigzag)
k Needle plate (Zigzag)
l Shuttle hook
m Bobbin case
n Feed dogs
o Needle
p Needle clamp screw
q Shuttle cover
r Spool pin
s Bobbin winder
t Balance wheel
u Foot controller jack
v Presser foot lever
w Main power/sewing light switch
x Built-in handle
y Thread guide/bobbin winding tension disc
z Foot controller
PIÉCES PRINCIPALES
a Sélecteur de modèle de point
b Vis d’équilibrage des boutonnières
c Levier releveur de fil
d Table d’extension avec tiroir à accessoires
e Sélecteur de tension supérieure
f Levier de couture en marche arrière
g Coupe-fils
h Support du pied-de-biche
i Vis du pied-de-biche
j Pied-de-biche (zigzag)
k Plaque à aiguille (zigzag)
l Crochet de la navette
m Boîtier de la canette
n Griffes d’entraînement
o Aiguille
p Vis de fixation de l’aiguille
q Shytttle cuver
r Porte-bobine
s Dévidoir
t Volant à main
u Prise de la pédale
v Levier du pied-de-biche
w Interrupteur principal/de la lampe
x Poignée intégrée
y Guide-fils/Disque de tension du dévidoir
z Pédale
ELEMENTOS PRINCIPALES
a Selector de puntadas
b Tornillo de ajuste fino de los ojales
c Palanca tirahilos
d Soporte de accesorios
e Disco de control de la tensión superior
f Pulsador de retroceso
g Cortador de hilo
h Conjunto del soporte del prensatelas
i Tornillo del prensatelas
j Prensatelas (zigzag)
k Placa de agujas (zigzag)
l Garfio de la lanzadera
m Portacanillas
n Alimentadores
o Aguja
p Tornillo de sujeción de la aguja
q Cubierta exterior del garfio
r Portacarretes
s Conjunto de bobinado de la canilla
t Ruedecilla
u Enchufe del pedal
v Palanca del prensatelas
w Interruptor principal y de luz
x Asa incorporada
y Guía hilos/Disco de tensión para bobinado
z Pedal
ОСНОВНЫЕ ЧАСТИ
a Ручка выбора вида строчки
b Винт точной настройки выметывания петель
c Рычаг нитепритягивателя
d
Съемный столик с отделением для хранения принадлежностей
e Дисковый регулятор натяжения верхней нити
f Клавиша шитья в обратном направлении
g Приспособление для обрезки нити
h Узел адаптера прижимной лапки
i Винт крепления адаптера прижимной лапки
j Прижимная лапка (для строчки «зигзаг»)
k Игольная пластина (для строчки «зигзаг»)
l Челночный узел
m Шпульный колпачок
n Гребенки транспортера ткани
o Игла
p Винт иглодержателя
q Крышка челночного устройства
r Стержень для установки катушки
s Устройс тво намотк и шп ул ек
t Маховик
u Гнездо подключения педали
v Рычаг прижимной лапки
w Выключатель питания и лампочки подсветки
x Встроенная ручка для переноски
y Направляющая нити/регулятор натяжения нити при намотке
на шпульку
z Педаль

3
1 X59369-251 2 X59370-051
7 XA3442-151
9 130920-051
3 X59375-051
4 129583-001 5 X57521-001
6 X52800-150 8 X55467-051
ACCESSORIES
a Buttonhole foot (1 pc.)
b Zipper foot (1 pc.)
c Button sewing Foot (1 pc.)
d Needle set (regular single needle No. 14) (3 pcs.)
e Twin needle (1 pc.)
f Bobbins (3 pcs.)
g Darning plate (1 pc.)
h Screwdriver (1 pc.)
i Extra spool pin (1 pc.)
Parts code for zigzag presser foot: 138135-051
Foot controller: X57319-051 (110/120V Area)
XA6422-021 (220/240V Area)
XA6412-021 (U.K.)
XA6414-021 (Australia, New Zealand)
The above accessories are stored in the accessory bag inside the
extension table. These accessories have been designed to help
complete most sewing tasks.
ACCESSOIRES
a Pied pour boutonnières (1 pc.)
b Pied pour fermetures à glissière (1 pc.)
c Pied pour boutons (1 pc.)
d Jeu d’aiguilles (aiguille normale No. 14) (3 pcs.)
e Aiguille jumelée (1 pc.)
f Canettes (3 pcs.)
g Plaque à repriser (1 pc.)
h Tournevi (1 pc.)
i Porte-bobine supplémentaire (1 pc.)
Code des éléments pour le pied Zigzag: 138135-051
Pédale du rhéostat:X57319-051 (Zones 110/120V)
XA6422-021 (Zones 220/240V)
XA6412-021 (R.U.)
XA6414-021 (Australie, Nouvelle Zélande)
Les accessoires mentionnés ci-dessus se trouvent dans un sac, à
l’intérieur de la table d’extension. Ils ont été conçus pour vous
permettre de réaliser la plupart des tâches de couture. Pour de
plus amples renseignements les concernant, veuillez vous
reporter aux pages indiquées.
ACCESORIOS
a Prensatelas para ojales (1 pza)
b Pata de cremalleras (1 pza)
c Prensatelas para la costura de botones (1 pza)
d Paquete de agujas (agujas simples normales No 14) (3 pzas)
e Aguja doble (1 pza)
f Canillas (3 pzas)
g Placa de zurcir (1 pza)
h Destornilladore (1 pza)
i Portacarretes extra (1 pza)
Código del prensatelas para la puntada zigzag: 138135-051
Pedal: X57319-051 (zona con 110/120V)
XA6422-021 (zona con 220/240V)
XA6412-021 (Reino Unido)
XA6414-021 (Australia, Nueva zelanda)
Los accesorios mencionados arriba se encuentran en la bolsa de
accesorios, dentro del soporte de accesorios. Han sido concebidos
para poder realizar la mayoría de las operaciones de costura.
ПРИНАДЛЕЖНОСТИ
a Лапка для выметывания петель (1 шт.)
b Лапка для вшивания застежки «молния» (1 шт.)
c Лапка для пришивания пуговиц (1 шт.)
d Набор игл (обычная одиночная игла № 14) (3 шт.)
e Двойная игла (1 шт.)
f Шпульки (3 шт.)
g Штопальная пластина (1 шт.)
h Отвертка (1 шт.)
i Дополнительный стержень для катушки (1 шт.)
Код изделия для прижимной лапки для строчки «зигзаг»:
138135-051
Педаль: XA6422-021
Перечисленные выше принадлежности хранятся в
специально предназначенном для них футляре внутри
столика-приставки. Эти принадлежности предназначены для
облегчения выполнения большинства швейных задач.
5
1
2
1
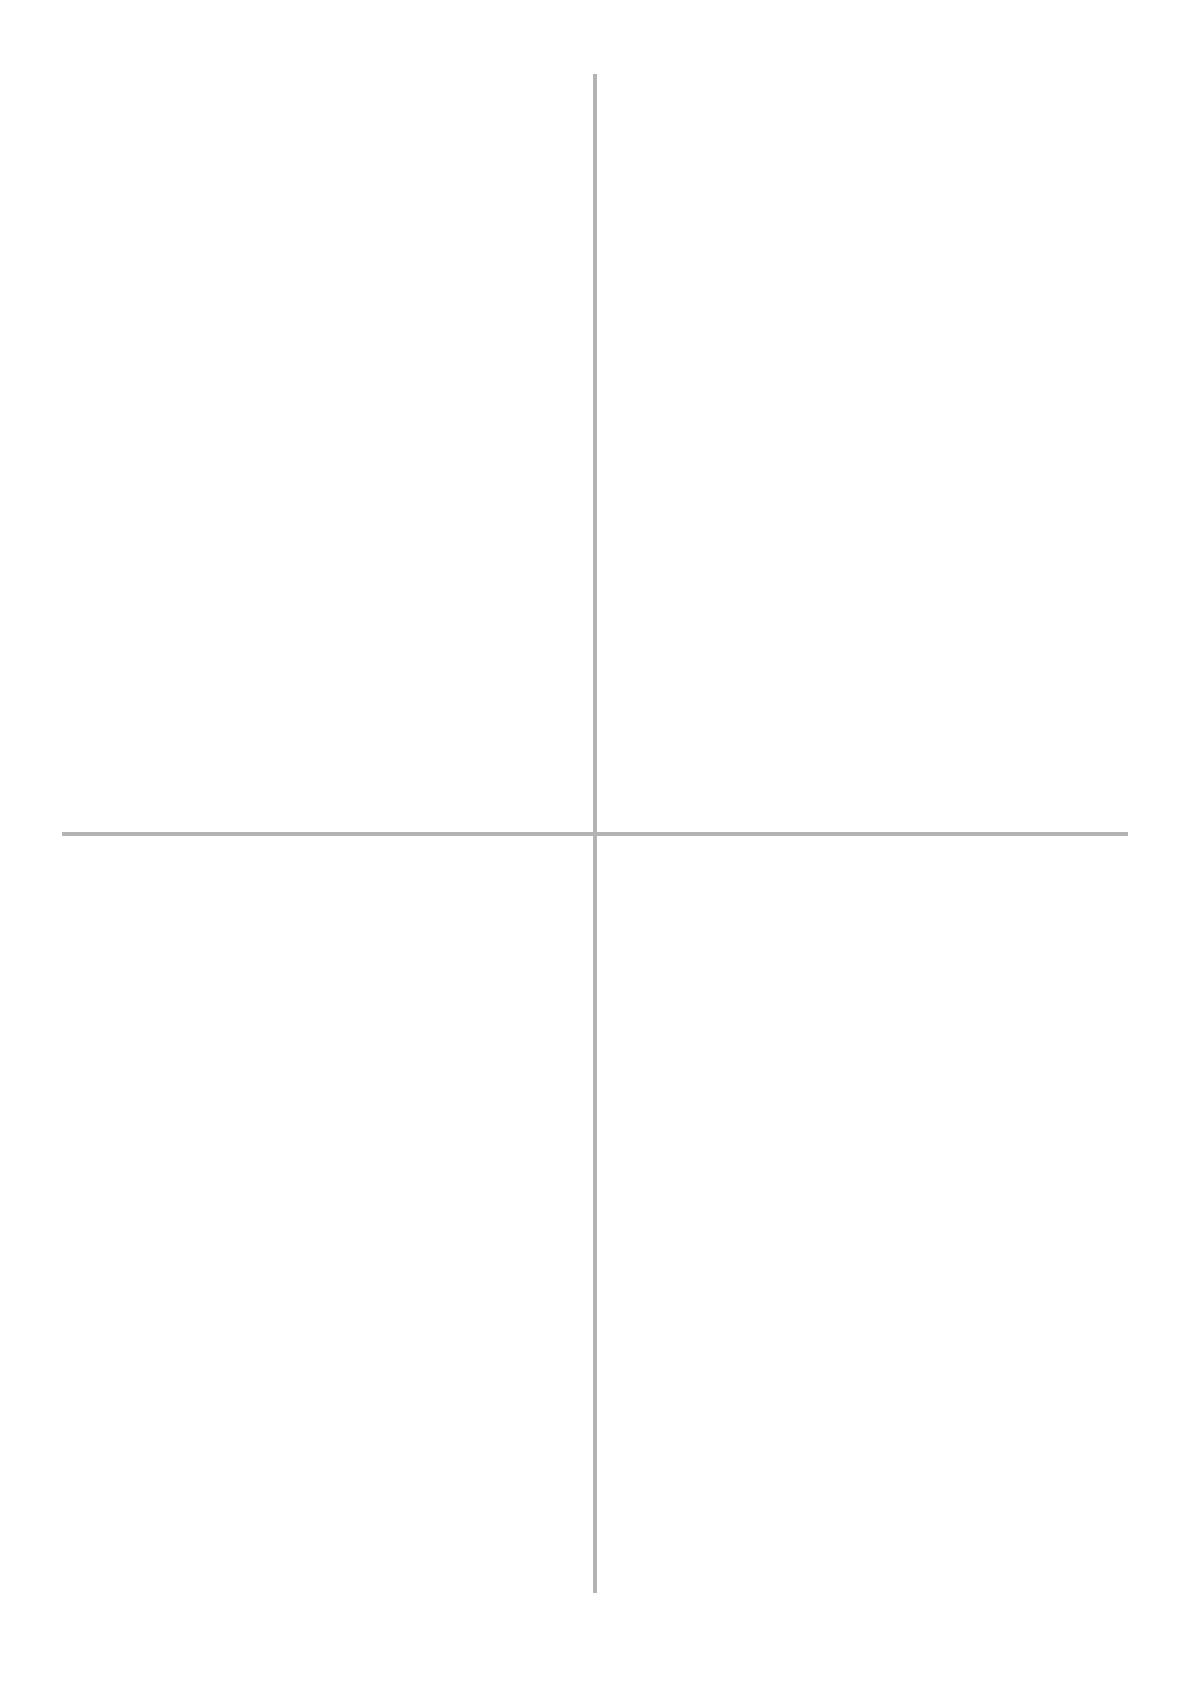
Main Power and Sewing Light Switches
This switch turns the main power and sewing light on or off. (See
fig. A.)
a Turn on (toward the “I” mark)
b Turn off (toward the “O” mark)
Foot Controller
When the foot controller is depressed lightly, the machine will
run at a low speed. When the pressure on the foot controller is
increased, the machine’s speed will increase. When pressure on
the foot controller is released, the machine will stop. (See fig. B.)
NOTE:
1. Be sure that nothing is placed on the foot controller when the
machine is not being used.
2. A new sewing machine or one that has not been in use for a
long period of time should be oiled as described on page 43.
After oiling, be sure to wipe off any excess oil.
Note (For U.S.A. only):
This foot controller can be used for sewing machine model
LS-2220/2720.
a Foot controller: Model N
Interrupteur principal et de la lampe
Cet interrupteur permet d’allumer et d’éteindre la machine ainsi
que la lampe de couture. (Voir fig. A.)
a Allumer (pousser vers la marque “I”)
b Eteindre (pousser vers la marque “O”)
Pédale
Lorsque l’on appuie légèrement sur la pédale, la machine va
fonctionner à faible vitesse. Si l’on augmente la pression, la
vitesse de couture de la machine va augmenter également. La
machine s’arrête lorsque la pression sur la pédale est relâchée.
(Voir fig. B.)
REMARQUE:
1. S’assurer de ne rien placer sur la pédale lorsque la machine
n’est pas utilisée.
2. Il est nécessaire d’huiler une nouvelle machine ou une
machine n’ayant pas été utilisée pendant une longue période
de temps selon les instructions page 43. Après l’avoir huilée,
essuyer tout excédent d’huile.
a Pédale du rhéostat
Interruptor principal y de luz
Este interruptor permite apagar y encender la máquina y la luz.
(Véase fig. A.)
a Encender (hacia la marca “I”)
b Apagar (hacia la marca “O”)
Pedal
Al presionar ligeramente el pedal, la máquina funcionará a baja
velocidad. Al aumentar la presión, se incrementa también la velocidad
de la máquina. Al soltar el pedal, la máquina se para. (Véase fig. B.)
NOTA:
1. Asegúrese siempre de no dejar ningún objeto sobre el pedal
cuando la máquina no está utilizada.
2. Una nueva máquina de coser o que no haya sido utilizada por
mucho tiempo debe ser lubricada tal como se indica en la página
43. Después de la lubricación, asegúrese siempre de limpiar todo
el excedente de aceite.
a Pedal
Выключатель питания и лампочки
подсветки
Этот выключатель служит для включения и выключения
машины и лампочки подсветки. (См. рис. A.)
a Включен (нажата сторона с символом «I»)
b Выключен (нажата сторона с символом «O»)
Педаль
При слабом нажатии на педаль машина будет работать на
низкой скорости. При усилении нажима на педаль скорость
машины возрастёт. Если нажим на педаль прекратить,
машина остановится. (См. рис. B.)
ПРИМЕЧАНИЕ:
1. Следите за тем, чтобы на педали не находились никакие
предметы, когда машина не используется.
2. Новую швейную машину или машину, которая не
использовалась в течение длительного времени,
необходимо смазать в соответствии с инструкциями на
стр.43. После смазки протрите машину для удаления
излишков масла.
a Педаль
A
B
6
1
1
Inserting the Needle
Turn power switch to “O”.
1. Remove the power supply plug from the electrical outlet.
2. Raise the needle bar to its highest position.
3. Lower the presser foot.
4. If a needle is already installed, remove the needle by
loosening the needle clamp with a coin and pulling the
needle down.
5. With the flat side toward the back, insert the new needle as far
as possible up against the needle stopper.
6. Tighten the needle clamp.
a Coin
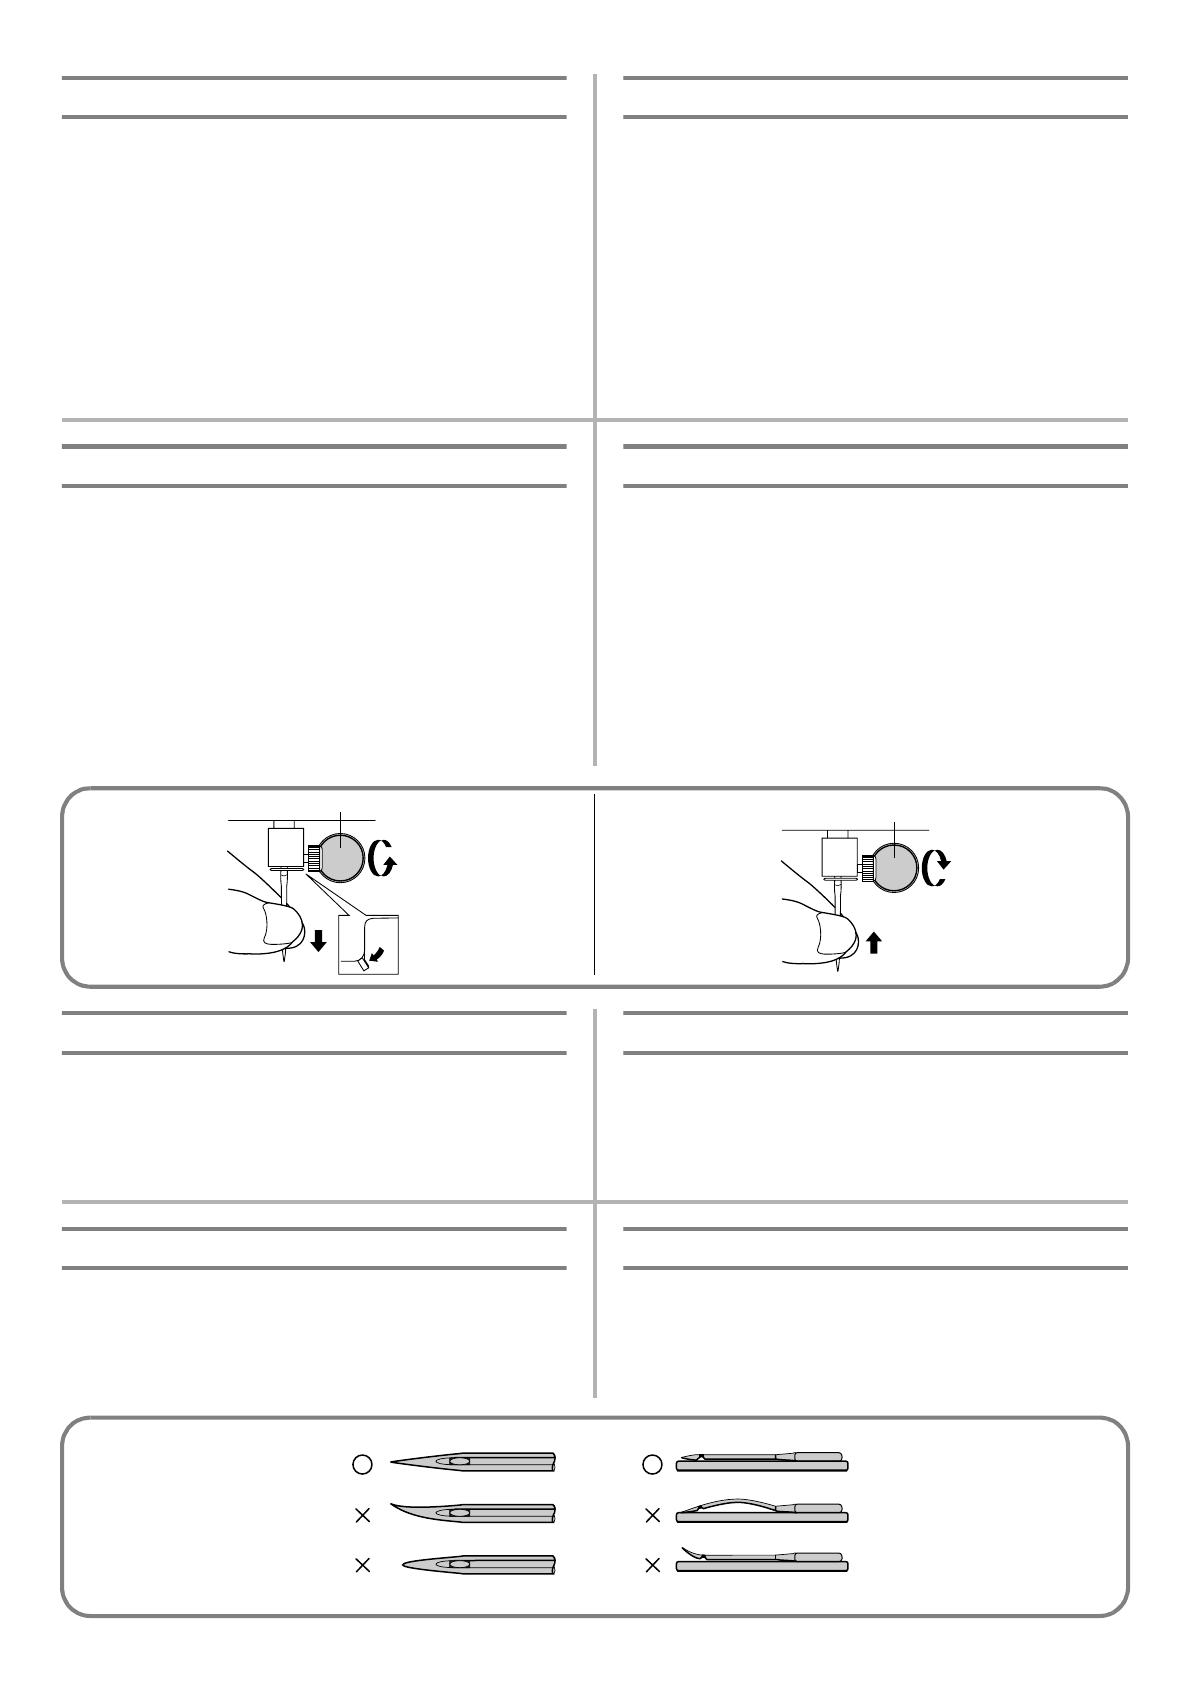
Checking the Needle
1. The sewing needle must always be straight and sharp for
smooth sewing.
2. To check if the needle is bent, place the flat side of the needle
down as shown in the illustration.
3. Replace the needle if it is bent or dull.
Pour mettre l’aiguille en place
Mettre l’interrupteur d’alimentation sur “O”.
1. Retirer la fiche de la prise de courant.
2. Remonter complètement l’aiguille.
3. Abaisser le pied-de-biche.
4. Retirer l’aiguille éventuellement présente en dévissant la fixation
avec une pièce de monnaie et en tirant l’aiguille vers le bas.
5. Introduire une autre aiguille côté plat vers l’arrière, en
l’enfonçant au maximum jusqu’à ce qu’elle vienne heurter le
butoir.
6. Resserrer la fixation.
a Pièce de monnaie
Vérification de l’aiguille
1. L’aiguille doit toujours être droite et pointue pour piquer
correctement.
2. Pour vérifier si l’aiguille n’est pas tordue, placer le côté plat de
l’aiguille vers le bas, comme le montre l’illustration.
3. Remplacer l’aiguille si elle est tordue ou usée.
Inserción de la aguja
Coloque el interruptor principal en “O”.
1. Retire el enchufe de alimentación de la toma de corriente.
2. Levante la barra de la aguja a su posición más alta.
3. Baje el prensatelas.
4. En caso de que ya esté una aguja instalada, retírela aflojando el
tornillo con una moneda y tirándola hacia abajo.
5. Introduzca otra aguja, con la parte redonda cara a usted. Hay que
meterla lo más adentro posible hasta que toque arriba con el
pasador.
6. Vuelva a apretar el tornillo de la aguja.
a Moneda
Comprobación de la aguja
1. La aguja siempre ha de estar bien recta y afilada para un perfecto
cosido.
2. Para comprobar que la aguja no está doblada, coloque la parte
plana de la aguja hacia abajo como se muestra en el dibujo.
3. Cambie la aguja si está doblada o gastada.
Установка иглы
Переведите сетевой выключатель в положение «О»
1. Выньте вилку сетевого шнура из электрической розетки.
2. Поднимите игловодитель в крайнее верхнее положение.
3. Опустите прижимную лапку.
4. Если игла уже установлена, выньте ее, ослабив винт
иглодержателя монетой и потянув иглу вниз.
5. Вставьте новую иглу, плоской стороной обращённую к
задней части машины, задвигая её как можно выше до
упора в стопор.
6. Затяните винт иглодержателя.
a Монета
Проверка иглы
1. Для ровного шитья швейная игла обязательно должна быть
прямой и острой.
2. Для проверки прямизны иглы расположите её плоской стороной
вниз на ровной поверхности, как показано на рисунке.
3. Если игла погнута или затупилась, замените ее.
7
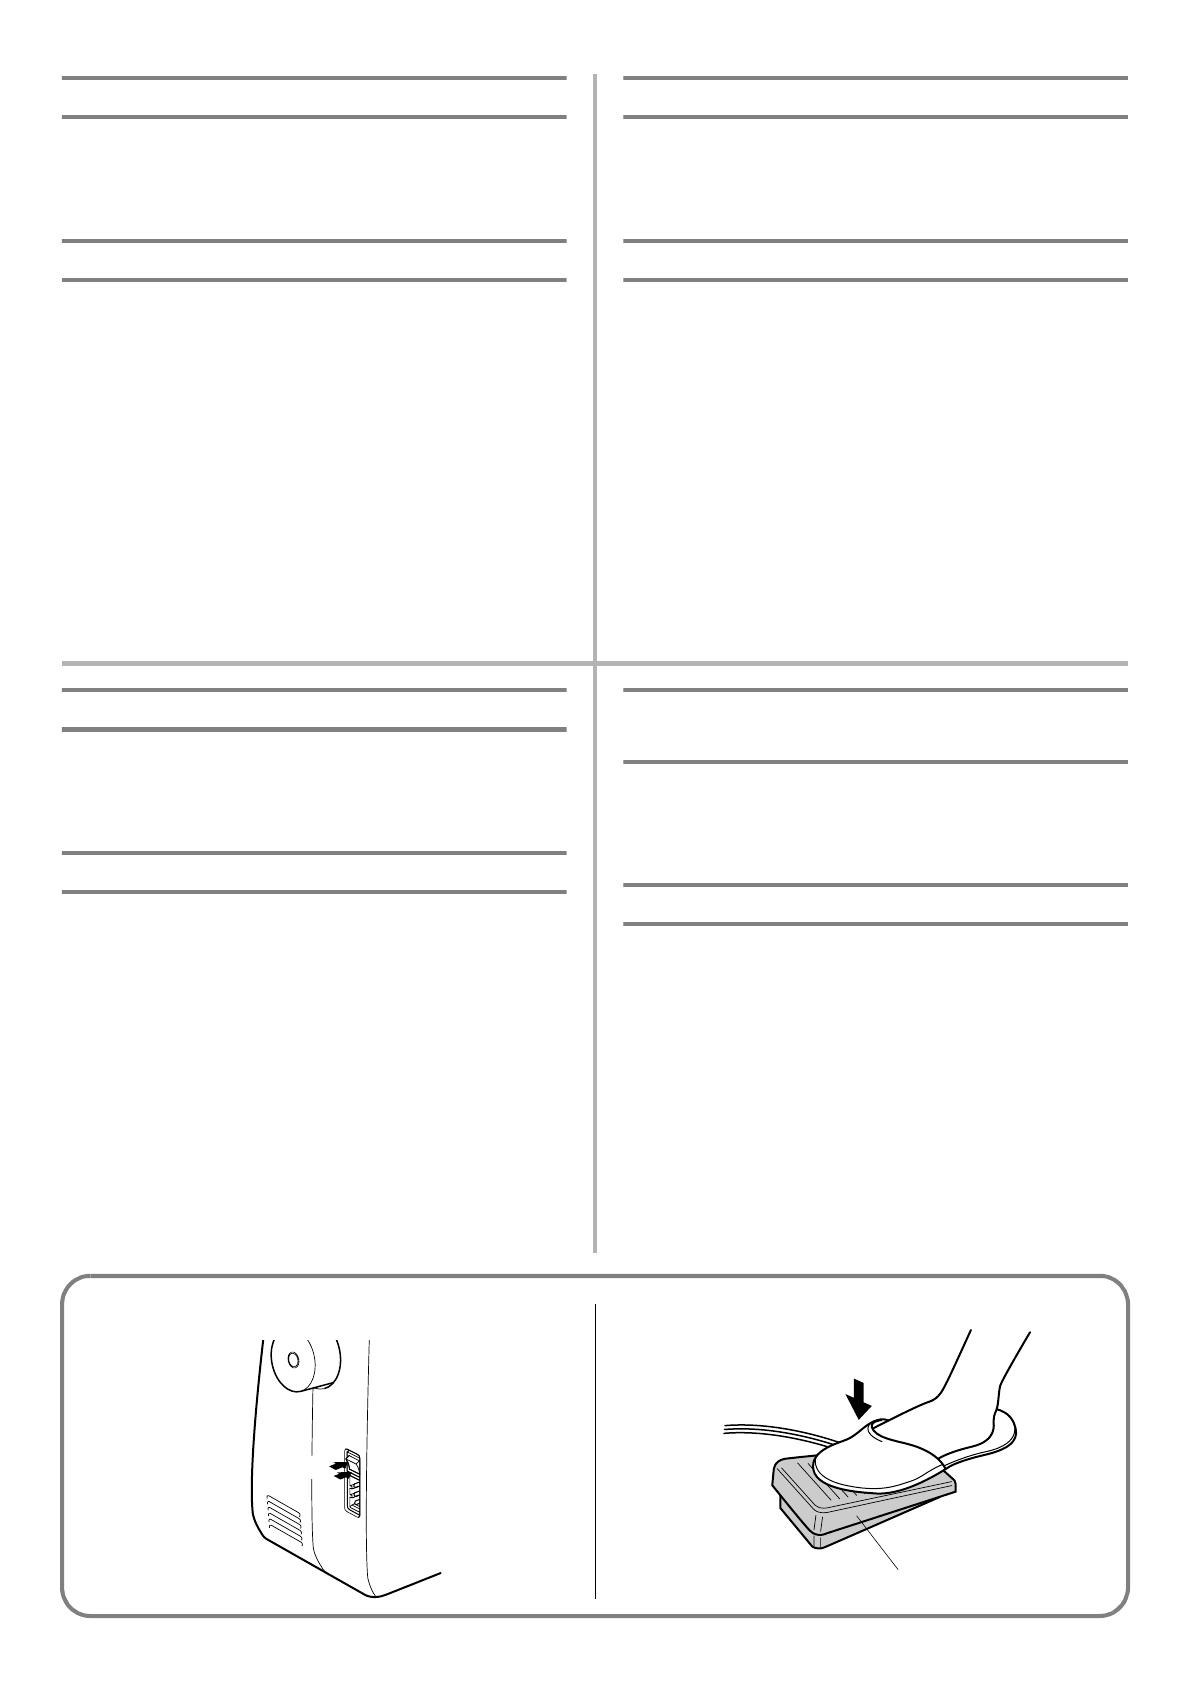
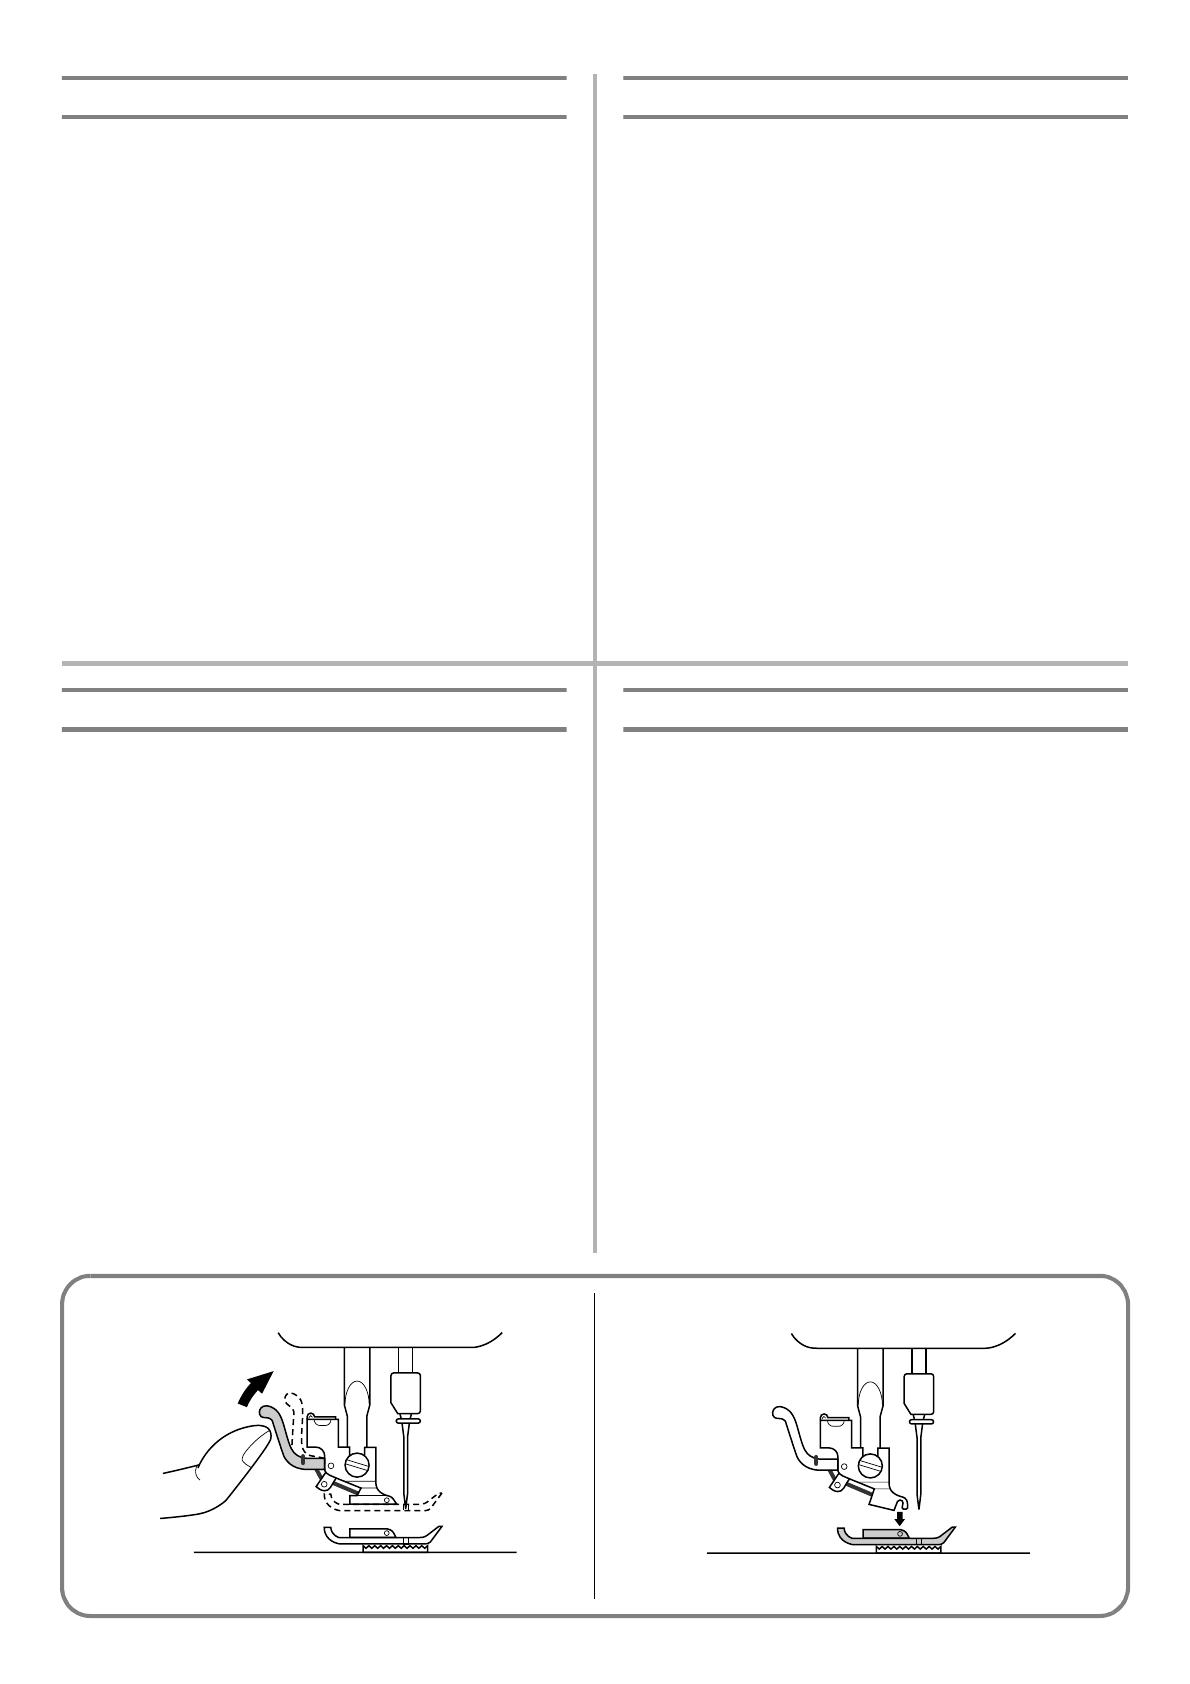
Changing the Presser Foot
It may be necessary to change the presser foot according to your
sewing needs.
SNAP-ON TYPE
Turn power switch to “O”.
1. Raise the needle to its highest position by turning the balance
wheel toward you (counterclockwise), and raise the presser
foot lever.
2. Release the foot by raising the lever located at the back of the
presser foot holder assembly.
3. Place a different presser foot on the needle plate so that the
bar on the presser foot is in line with the slot on the shank.
4. Lower the presser foot lever and fix the presser foot onto the
shank. If the presser foot is in the correct location, the bar
should snap in.
Changement de pied-de-biche
En fonction des besoins, il peut s’avérer nécessaire de changer le
pied-de-biche.
MODELE A CLIQUET
Mettre l’interrupteur principal sur “O”.
1. Remonter complètement l’aiguille en tournant le volant vers
soi (dans le sens opposé aux aiguilles d’une montre) et
remonter le levier du pied-de-biche.
2. Libérer le pied en levant le levier situé à l’arrière du support.
3. Placer un pied différent sur la plaque à aiguille de telle
manière que la tige du pied-de-biche s’aligne avec la fente de
la fixation.
4. Abaisser le levier du pied-de-biche et fixer le pied sur l’axe. Si
le pied-de-biche est mis correctement, la tige devrait se mettre
en place d’elle même avec un déclic.
Cambio del prensatelas
Según sus necesidades de costura, puede ser necesario cambiar el
prensatelas.
MODELO A PRESIÓN
Coloque el interruptor principal en “O”.
1. Levante la aguja a su posición más alta, girando la ruedecilla
hacia usted (en el sentido contrario al de las manecillas de un
reloj) y levante la palanca del prensatelas.
2. Suelte el prensatelas levantando la palanca que hay en la parte
trasera del soporte.
3. Coloque otro prensatelas en la placa de agujas de tal forma que la
barra del prensatelas quede alineada con la ranura del soporte.
4. Baje la palanca del prensatelas y fije el prensatelas en el soporte.
Si el prensatelas está bien colocado, la barra se entra a presión.
Замена прижимной лапки
В зависимости от вида вашей работы, бывает нужно заменить
прижимную лапку.
ФИКСАЦИЯ ЛАПКИ ОСУЩЕСТВЛЯЕТСЯ ПУТЕМ
ЗАЩЕЛКИВАНИЯ НА СТЕРЖНЕ
Переведите сетевой выключатель в положение «О»
1. Поднимите иглу в крайнее верхнее положение, повернув
маховик на себя (против часовой стрелки), затем
поднимите рычаг прижимной лапки.
2. Отсоедините прижимную лапку, подняв рычажок на
задней стороне узла адаптера лапки.
3. Разместите другую прижимную лапку на игольной
пластине таким образом, чтобы поперечный стерженёк
прижимной лапки находился прямо под пазом в нижней
части адаптера лапки.
4. Опустите рычаг прижимной лапки и зафиксируйте лапку в
адаптере. Если прижимная лапка находиться в правильном
положении, ее стерженек защелкнется в адаптере.

8
1
Converting to Free-Arm Style
Free-Arm sewing is convenient for sewing tubular and hard-to-
reach areas on garments. To change your machine to the free-arm
style, lift up on the extension table and pull it out.
a Lift the bottom of the extension table up toward you.
b Pull the extension table out to remove it.
a Extension table
Steadying the Machine
When the sewing machine is placed on an uneven surface, turn
the rubber cushion on the front right-hand side of the base plate
to adjust its height until the sewing machine is stable.
Modèle bras libre
La couture à bras libre s’impose pour des coutures tubulaires ou
pour des endroits difficiles à atteindre sur des vêtements. Pour
obtenir la configuration à bras libre, il suffit de soulever et de
retirer la table d’extension.
a Soulever le bas de la table d’extension vers soi.
b Tirer la table d’extension vers l’extérieur pour l’enlever.
a Table d’extension
Pour stabiliser la machine
Lorsque la machine à coudre est installée sur une surface inégale,
tourner le coussin en caoutchouc sur le côté avant droit de la
plaque de base pour régler sa hauteur jusqu’à ce que la machine
soit stable.
Conversión en modalidad de brazo libre
La costura con brazo libre es práctica para coser en redondo y en
partes del tejido de dificil acceso. Para transformar su máquina en
esa modalidad, sólo hace falta levantar el soporte de los accesorios y
sacarlo tirando de él.
a Levante la parte inferior del soporte de accesorios hacia usted.
b Tíre hacia afuera para sacarlo.
a Soporte de accesorios
Para estabilizar la máquina
Si se instala la máquina de coser en una superficie desigual, puede
ajustar su altura girando el cojinete de goma que se encuentra en la
parte anterior derecha de la placa de base hasta que la máquina
quede estable.
Переоборудование машины для работы с
функцией «свободный рукав»
Функция «свободный рукав» удобна для обработки
цилиндрических деталей одежды и шитья в труднодоступных
частях изделия. ля переоборудования машины для работы с
функцией «свободный рукав» поднимите столик-приставку и
снимите его с машины
a Приподнимите нижнюю часть столика-приставки по
направлению вверх и к себе.
b Потяните столик-приставку и снимите его с машины.
a Столик-приставка
Обеспечение устойчивости машины
Если машина установлена на неровной поверхности, то
добейтесь ее устойчивого положения путем вращения
резиновой ножки в правой передней части основания
машины.
9
bac
1
d 2
c
a
3 4
5
12 141311
1
678910
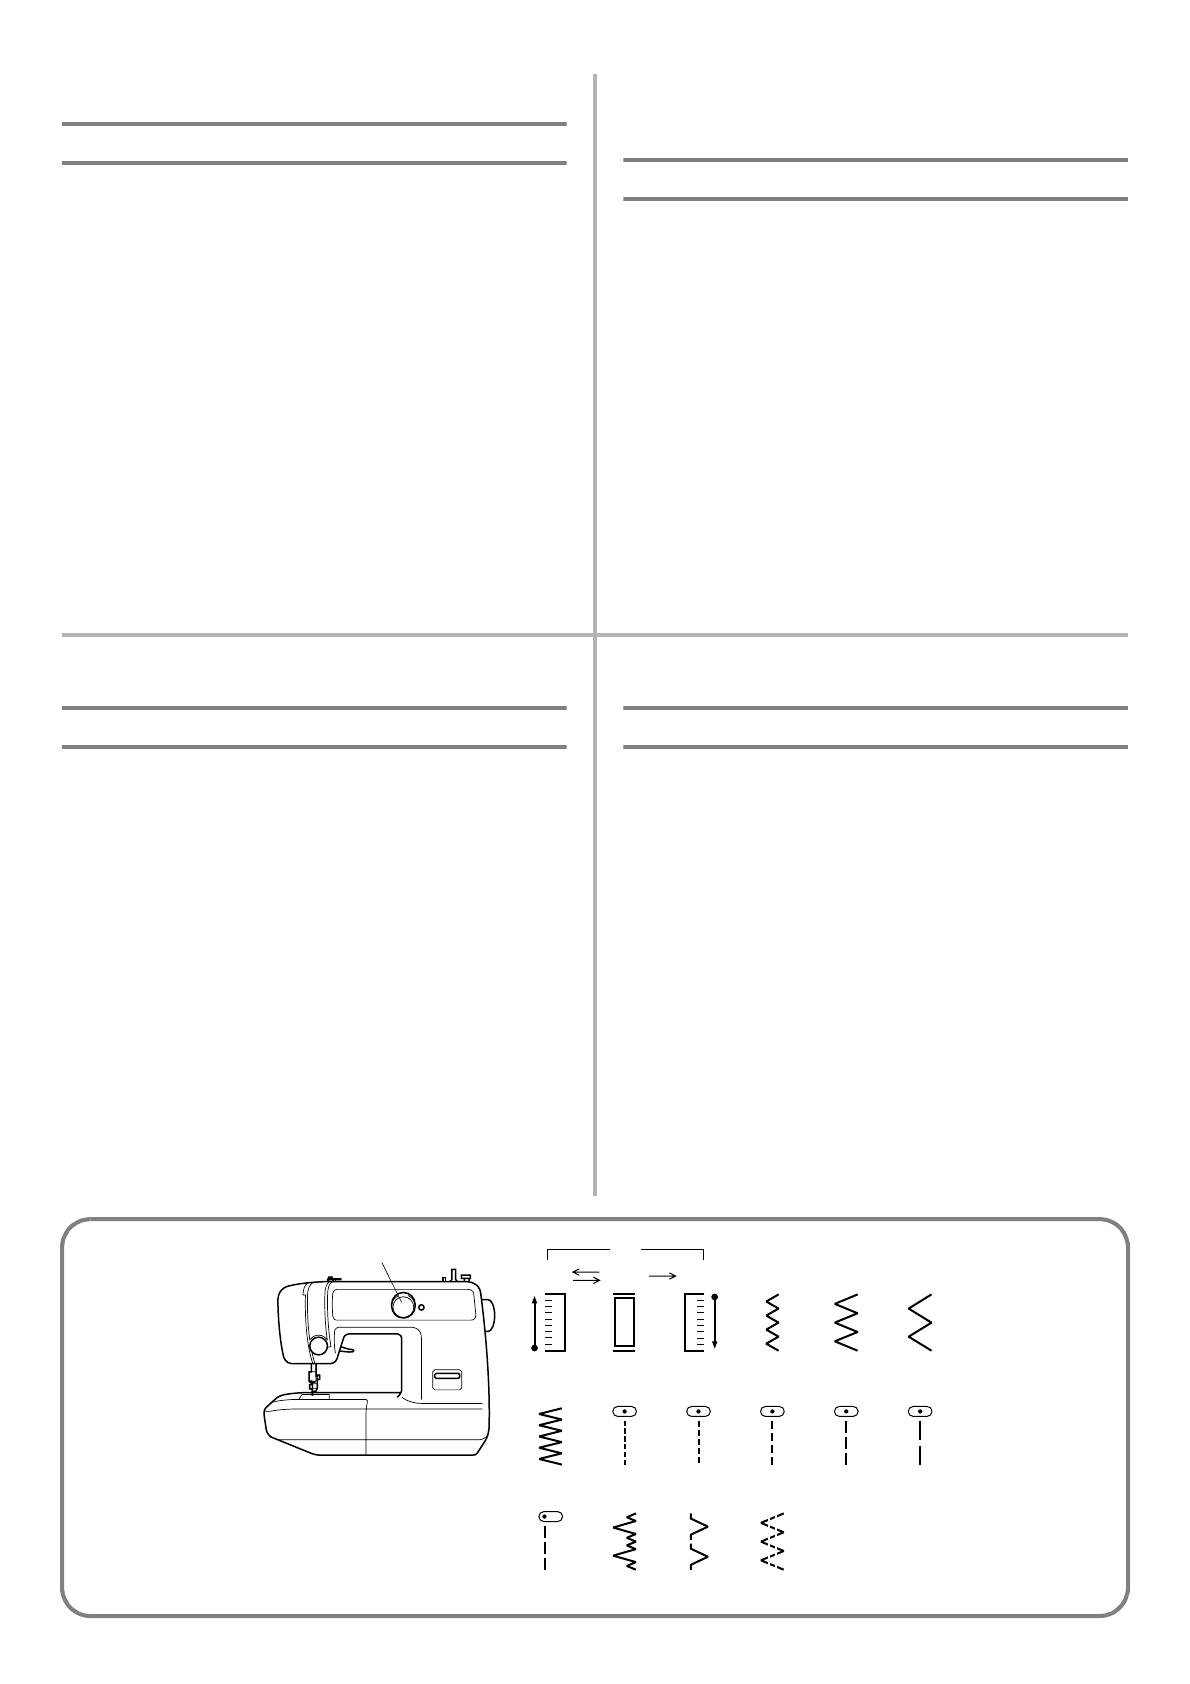
VARIOUS CONTROLS
Pattern Selection Dial
To select a stitch, simply turn the pattern selection dial in either
direction. Stitch widths and lengths are shown on the following
page.
a Pattern selection dial
DESCRIPTIF DES DIFFERENTES
COMMANDES
Sélecteur de modèle de point
Pour sélectionner un modèle de point, tourner le sélecteur de
modèle dans l’un ou l’autre sens. Sur la page suivante, vous
trouverez une liste avec les longueurs et les largeurs de points en
fonction du modèle choisi.
a Sélecteur de modèle de point
DISTINTOS MANDOS
Selector de puntadas
Para seleccionar una puntada, sólo hace falta girar el disco en
cualquier dirección. En la siguiente página, encontrará los largos y
anchos de puntadas.
a Selector de puntadas.
ОРГАНЫ УПРАВЛЕНИЯ
Ручка выбора вида строчки
Для выбора желаемой строчки просто поворачивайте ручку
выбора вида строчки в том или ином направлении. Значения
ширины строчки и длины стежка приведены на следующей
странице.
a Ручка выбора вида строчки
11
НАИМЕНОВАНИЯ СТРОЧЕК И СООТВЕТСТВУЮЩИЕ ИМ ПОЗИЦИИ
ПЕРЕКЛЮЧАТЕЛЯ
ПОЗИЦИЯ НАИМЕНОВАНИЕ СТРОЧКИ
СТРАНИЦЫ С
ИНСТРУКЦИ-
ЯМИ
1(a-b-c-d) Автоматическое выметывание петель за четыре приема 30
2 Строчка «ЗИГЗАГ» 26
3 Строчка «ЗИГЗАГ» 26
4 Строчка «ЗИГЗАГ» 26
5 Строчка «ЗИГЗАГ» (атласная) 26
6-10 Прямая строчка 24
11 Прямая строчка (левое положение иглы) 24
12 Эластичная потайная строчка 27
13 Строчка-ракушка 29
14 Эластичная строчка 28
DIBUJO Y NOMBRE DE LOS PUNTOS
PUNTADA NOMBRE
PÁGINA DEL
manual
1(a-b-c-d) OJAL AUTOMÁTICO DE 4 PASOS 30
2 PUNTADA ZIGZAG 26
3 PUNTADA ZIGZAG 26
4 PUNTADA ZIGZAG 26
5 PUNTADA ZIGZAG (DE REALCE) 26
6-10 PUNTADA RECTA 24
11 PUNTADA RECTA (aguja a la izquierda) 24
12 PUNTADA INVISIBLE ELÁSTICA 27
13 PUNTADA ONDAS 29
14 PUNTADA ELÁSTICA 28
13
2
3
4
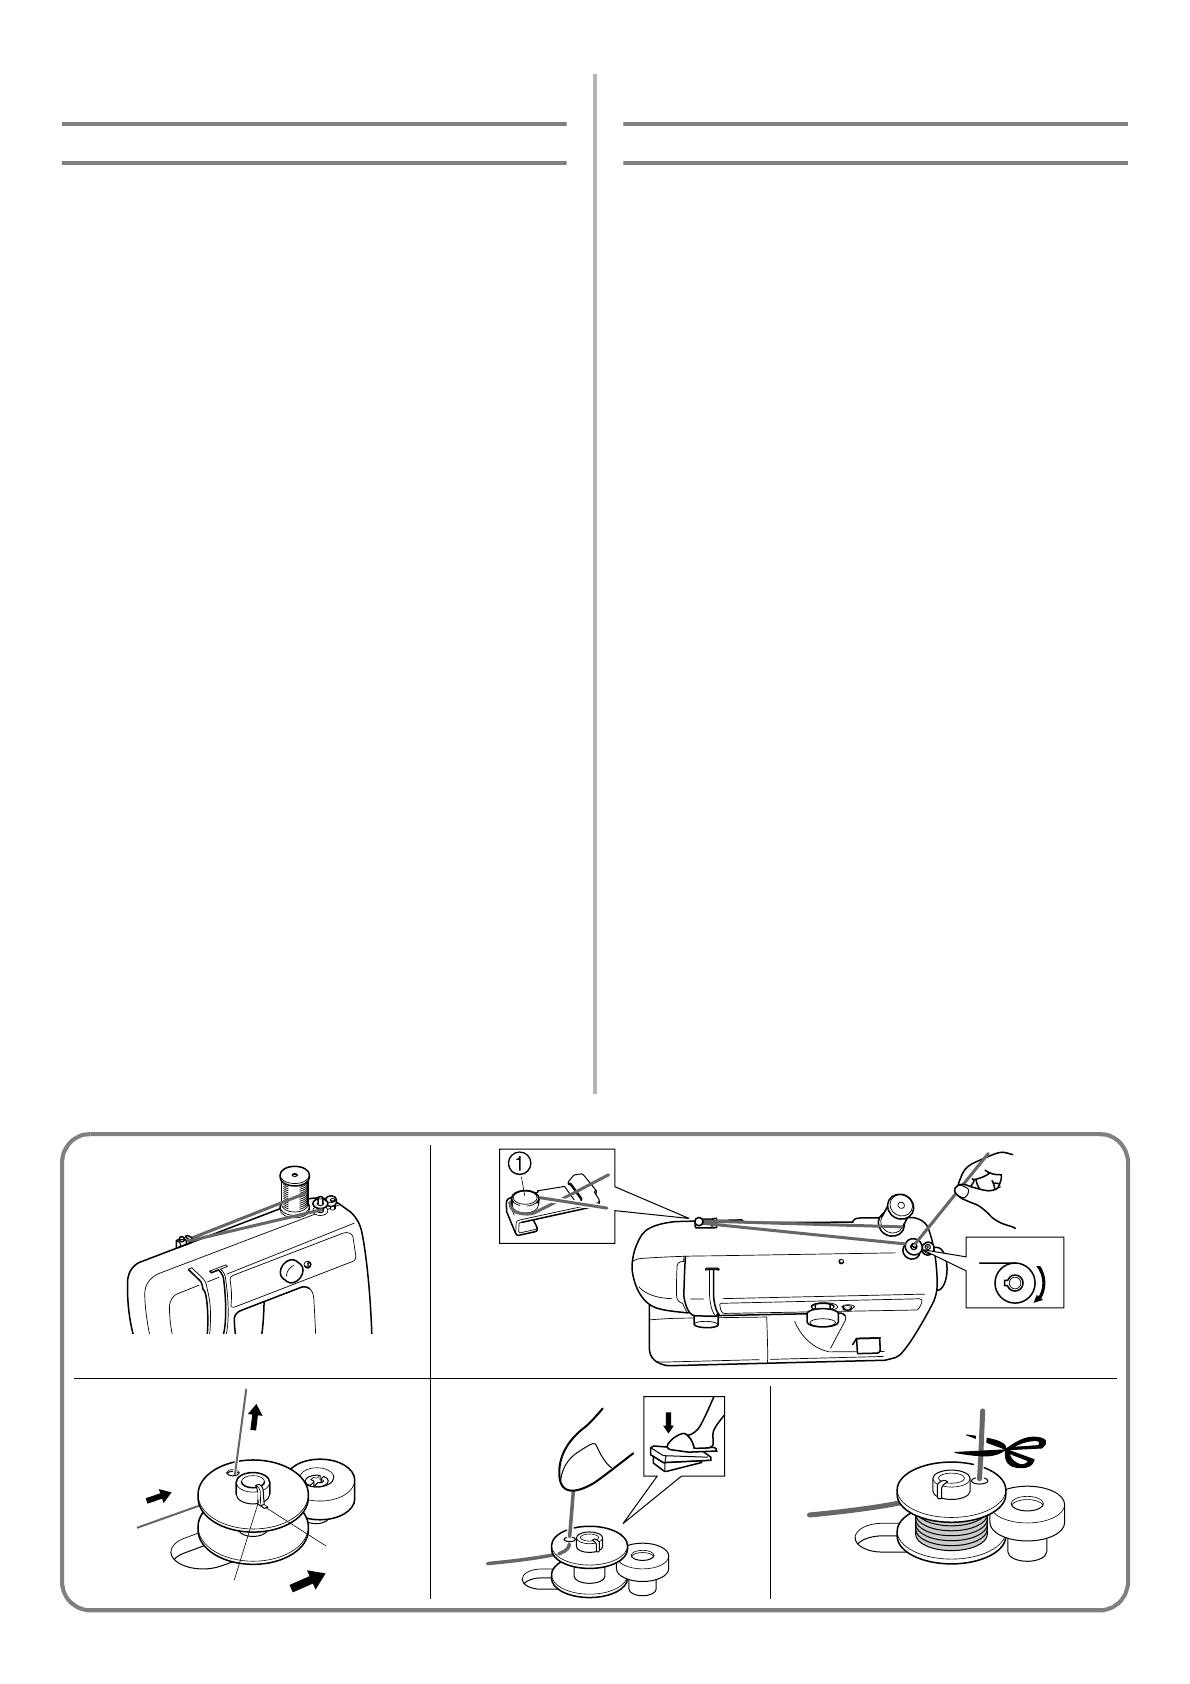
ENHEBRADO DE LA MÁQUINA
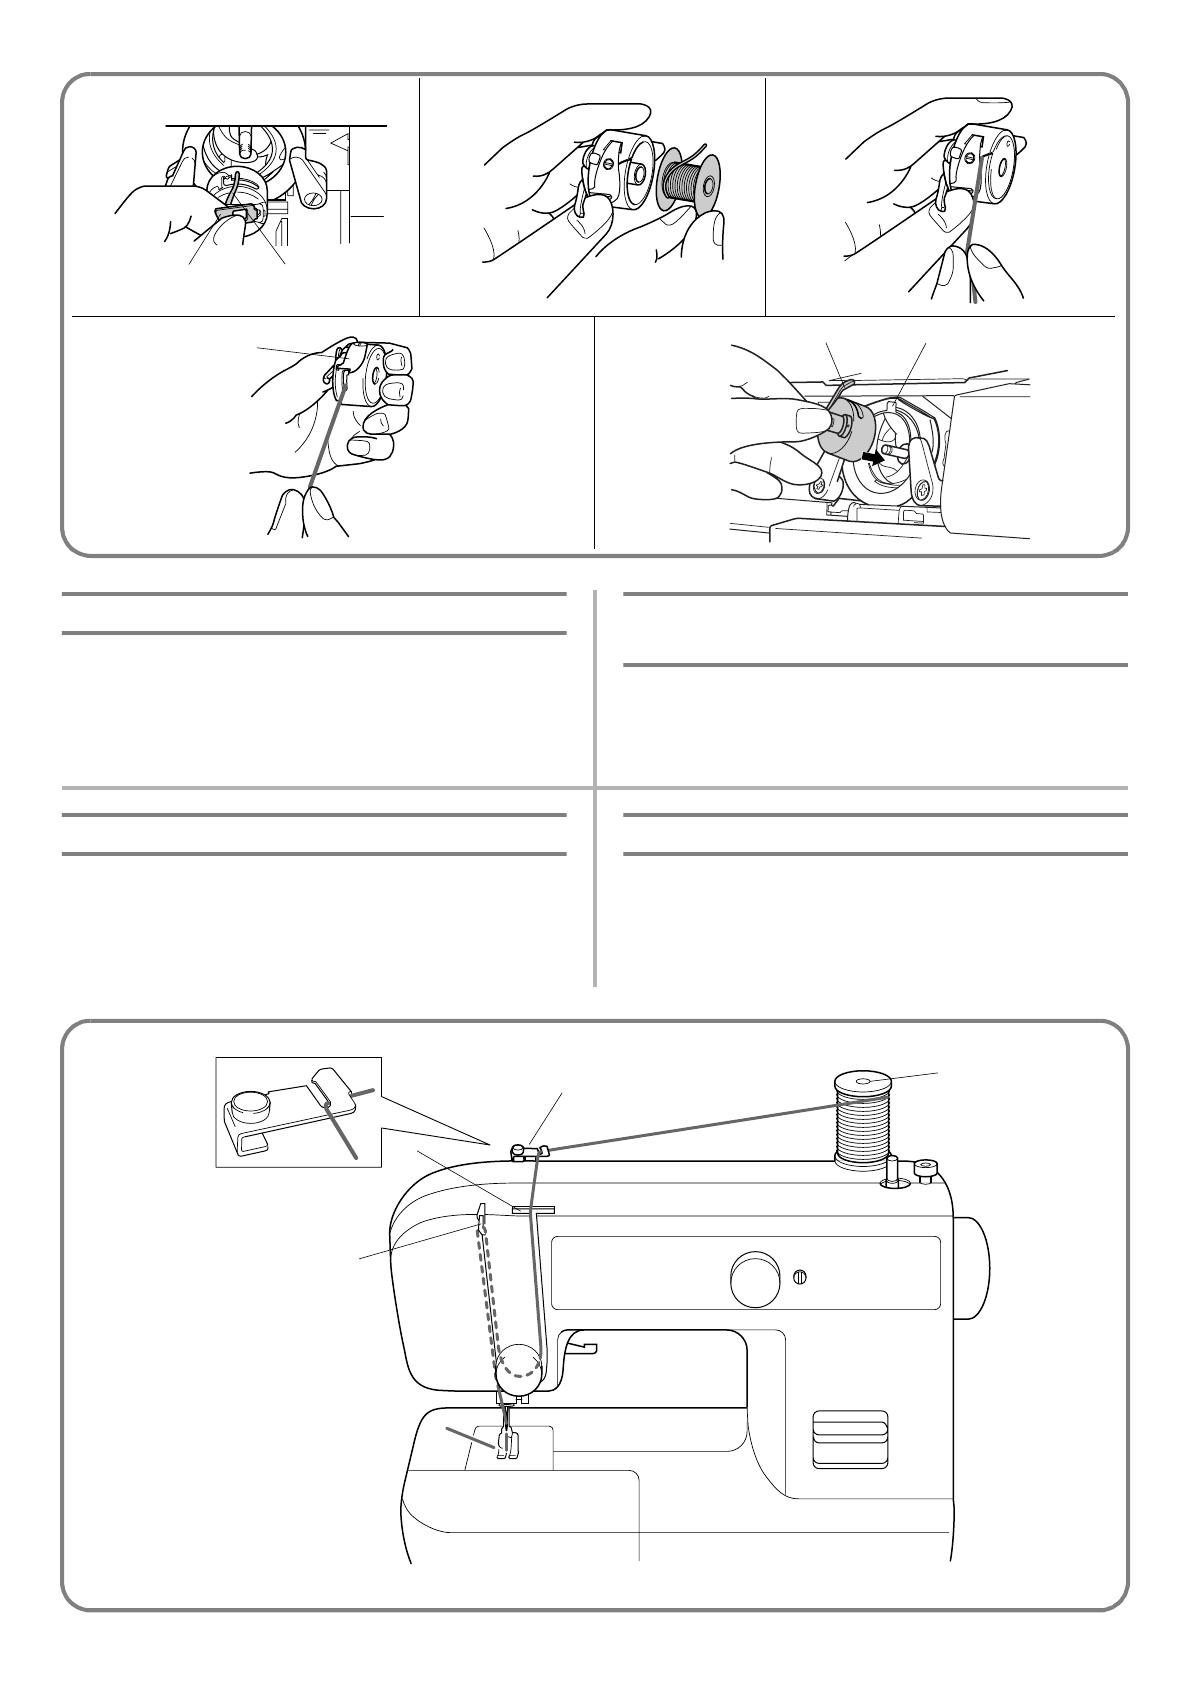
Bobinado de la canilla
1. Coloque un carrete de hilo en el porta carretes y pase el hilo por el
disco de tensión de bobinado de la canilla
a Disco de tensión de bobinado de la canilla
b Bobinado de la canilla
2. Pase el extremo del hilo por el orificio de la canilla a partir del
interior.
3. Coloque la canilla en el eje de bobinado y deslice dicho eje hacia
la derecha. Gire la canilla con la mano en el sentido de las
manillas de un reloj, hasta que el muelle impulsor del eje se
deslice dentro de la ranura de la canilla.
c Muelle
d Ranura
4. Sujetando el extremo del hilo, presione suavemente el pedal para
que el hilo dé un par de vueltas alrededor de la canilla y pare la
máquina.
5. Deshaga el exceso de hilo arriba de la canilla. Siga bobinando el
hilo en la canilla presionando el pedal.
NOTA:
La máquina se para automáticamente cuando la canilla está llena.
6. Cuando la máquina se pare, corte el hilo entre la canilla y el
carrete, empuje el eje hacia la izquierda y retire la canilla llena
del eje.
ATENCIÓN:
Aunque la barra de la aguja no se desplaza cuando el eje de bobinado
de la canilla está empujado hacia el apretador de canilla, la
ruedecilla va a seguir girando. Por lo tanto, no se puede tocarla
mientras la canilla está bobinando.
ЗАПРАВКА НИТИ В МАШИНУ
Намотка шпульки
1. Установите катушку с нитью на предназначенный для нее
стержень и проведите нить вокруг регулятора натяжения
нити при намотке на шпульку.
a Регулятор натяжения нити при намотке на шпульку
b Намотка шпулек
2. Пропустите конец нити сквозь отверстие в шпульке с
внутренней ее стороны.
3. Установите шпульку на вал устройства намотки и сдвиньте
вал вправо. Вручную вращайте шпульку по часовой
стрелке до тех пор, пока пружина на валу не попадет в
предназначенный для нее паз на шпульке.
c Пружина
d Паз
4. Удерживая конец нити, плавно нажмите на педаль, чтобы
несколько оборотов нити намотались на шпульку. Затем
остановите машину.
5. Обрежьте излишек нити над шпулькой и, нажимая на
педаль, продолжите намотку нити на шпульку.
ПРИМЕЧАНИЕ:
Когда шпулька заполняется нитью, машина автоматически
останавливается.
1. После остановки машины разрежьте нить между шпулькой
и катушкой, сдвиньте вал влево и снимите намотанную
шпульку с вала.
ВНИМАНИЕ:
Когда вал устройства намотки шпульки сдвинут в сторону
прижимного ролика, игловодитель неподвижен, но маховик
продолжает вращаться. Поэтому не прикасайтесь к маховику
во время намотки шпульки.

14
Lower (bobbin) Threading
Turn power switch to “O”.
1. Raise the needle to its highest position by turning the balance
wheel toward you (counterclockwise) and raise the presser
foot lifter.
2. Open the shuttle cover behind the extension table on the front
of the machine and remove the bobbin case by pulling its
latch toward you and pulling it out from the shuttle race (fig.
A).
3. Unwind about 10 cm (4″) of thread from a full bobbin and
insert the bobbin into the bobbin case. (See fig. B-1.) Pull the
trailing thread into the slot, down and to the left, as shown in
fig. B-2, until it enters the delivery eye under the tension
spring (fig. B-3).
4. Holding the bobbin case by the latch, fully insert the bobbin
case into the shuttle race and release the latch. Make sure the
bobbin case finger fits into the notch at the top of the race as
shown in fig. C.
NOTE:
If the bobbin case is not properly placed back into the machine, it
will fall out from the shuttle immediately after starting to sew.
a Bobbin case latch
b Bobbin case finger
c Tension spring
d Notch
Mise en place du fil inférieur (canette)
Mettre l’interrupteur principal sur “O”.
1. Remonter complètement l’aiguille en tournant le volant vers
soi (dans le sens opposé aux aiguilles d’une montre) et relever
le levier du pied-de-biche.
2. Ouvrir le couvercle de la navette, derrière la table
d’extension, à l’avant de la machine, et retirer le boîtier de la
canette en tirant la languette métallique vers soi pour le sortir
de la coursière. (fig. A)
3. Dévider environ 10 cm de fil de la canette pleine et insérer la
canette dans le boîtier (voir fig. B-1). Faire passer le fil qui
dépasse dans la fente, en bas et vers la gauche, comme illustré
sur la fig. B-2, jusqu’à ce qu’il s’insère dans l’orifice de sortie
sous le ressort de tension (fig.B-3).
4. Tout en tenant le boîtier par le loquet métallique, l’enfoncer à
fond dans la navette et relâcher la languette métallique. Bien
veiller à ce que la languette métallique du boîtier s’introduise
dans l’encoche en haut de la glissière, comme le montre la
fig. C ci-dessous.
REMARQUE:
Si le boîtier n’est pas placé correctement, il va s’échapper de la
navette dès qu’on commence à coudre.
a Loquet du boîtier
b Languette du boîtier
c Ressort tenseur
d Encoche
Enhebrado inferior (de la canilla)
Coloque el interruptor principal en “O”.
1. Levante la aguja a su posición más alta, girando la ruedecilla
hacia usted (en el sentido contrario al de las manecillas de un
reloj) y levante la palanca del prensatelas.
2. Abra la tapa del soporte para accesorios, en la parte delantera de
la máquina, y retire el portacanillas de la máquina, tirando la uña
metálica (pestillo) hacia usted y sacándola de la lanzadera (fig.
A).
3. Tire unos 10 cm (4″) de hilo de una canilla llena e inserte la
canilla en el portacanillas. (Véase fig. B-1.) Tire del hilo suelto y
páselo por la hendidura, abajo y hacia la izquierda, tal como se
indica en la fig. B-2, hasta que quepa dentro del fleja de presión.
(fig. B-3).
4. Sujetando el portacanillas por la uña metálica, introdúzcalo en la
lanzadera y suelte el pestillo. Asegúrese de que la uñeta metálica
del portacanillas se encaje en la ranura arriba tal como se indica
en la fig. C a continuación.
NOTA:
Si el portacanillas no se encuentra bien colocado en la máquina, se
saldrá de su alojamiento inmediatamente después de empezar a coser.
a Pestillo del portacanillas
b Uñeta del portacanillas
c Resorte tensor
d Hendidura
Заправка нижней нити (шпульки)
Переведите сетевой выключатель в положение «О»
1. Поднимите иглу в крайнее верхнее положение, повернув
маховик на себя (против часовой стрелки), затем
поднимите рычаг прижимной лапки.
2. Откройте крышку челночного устройства за столиком-
приставкой с передней стороны машины, извлеките
шпульный колпачок, потянув его защелку на себя и
извлекая его из челнока (рис. A).
3. Отмотайте приблизительно 10 см нити с полностью
намотанной шпульки и вставьте шпульку в шпульный
колпачок. (См. рис. B-1.) Проденьте отмотанный конец
нити в щель, затем вниз и влево, как показано на рис. B-2,
до тех пор, пока нить не попадет в отверстие под пружиной
регулировки натяжения (рис. B-3).
4. Держа шпульный колпачок за защелку, вставьте его до
упора в челнок, после чего отпустите защелку. Следите за
тем, чтобы палец шпульного колпачка вошел в
предназначенный для него паз в верхней части челнока,
как показано на рис. C.
ПРИМЕЧАНИЕ:
Если неправильно вставить шпульный колпачок в машину, то
сразу после начала шитья он выпадет из челнока.
a Защелка шпульного колпачка
b Палец шпульного колпачка
c Пружина регулировки натяжения нити
d Паз
15
1
2
3
24
2
3
4
1
Upper (Needle) Threading Mise en place du fil supérieur
(fil de l’aiguille)
Enhebrado superior (de la aguja) Заправка верхней нити (в иглу)
AB—1B—2
C
B-3

16
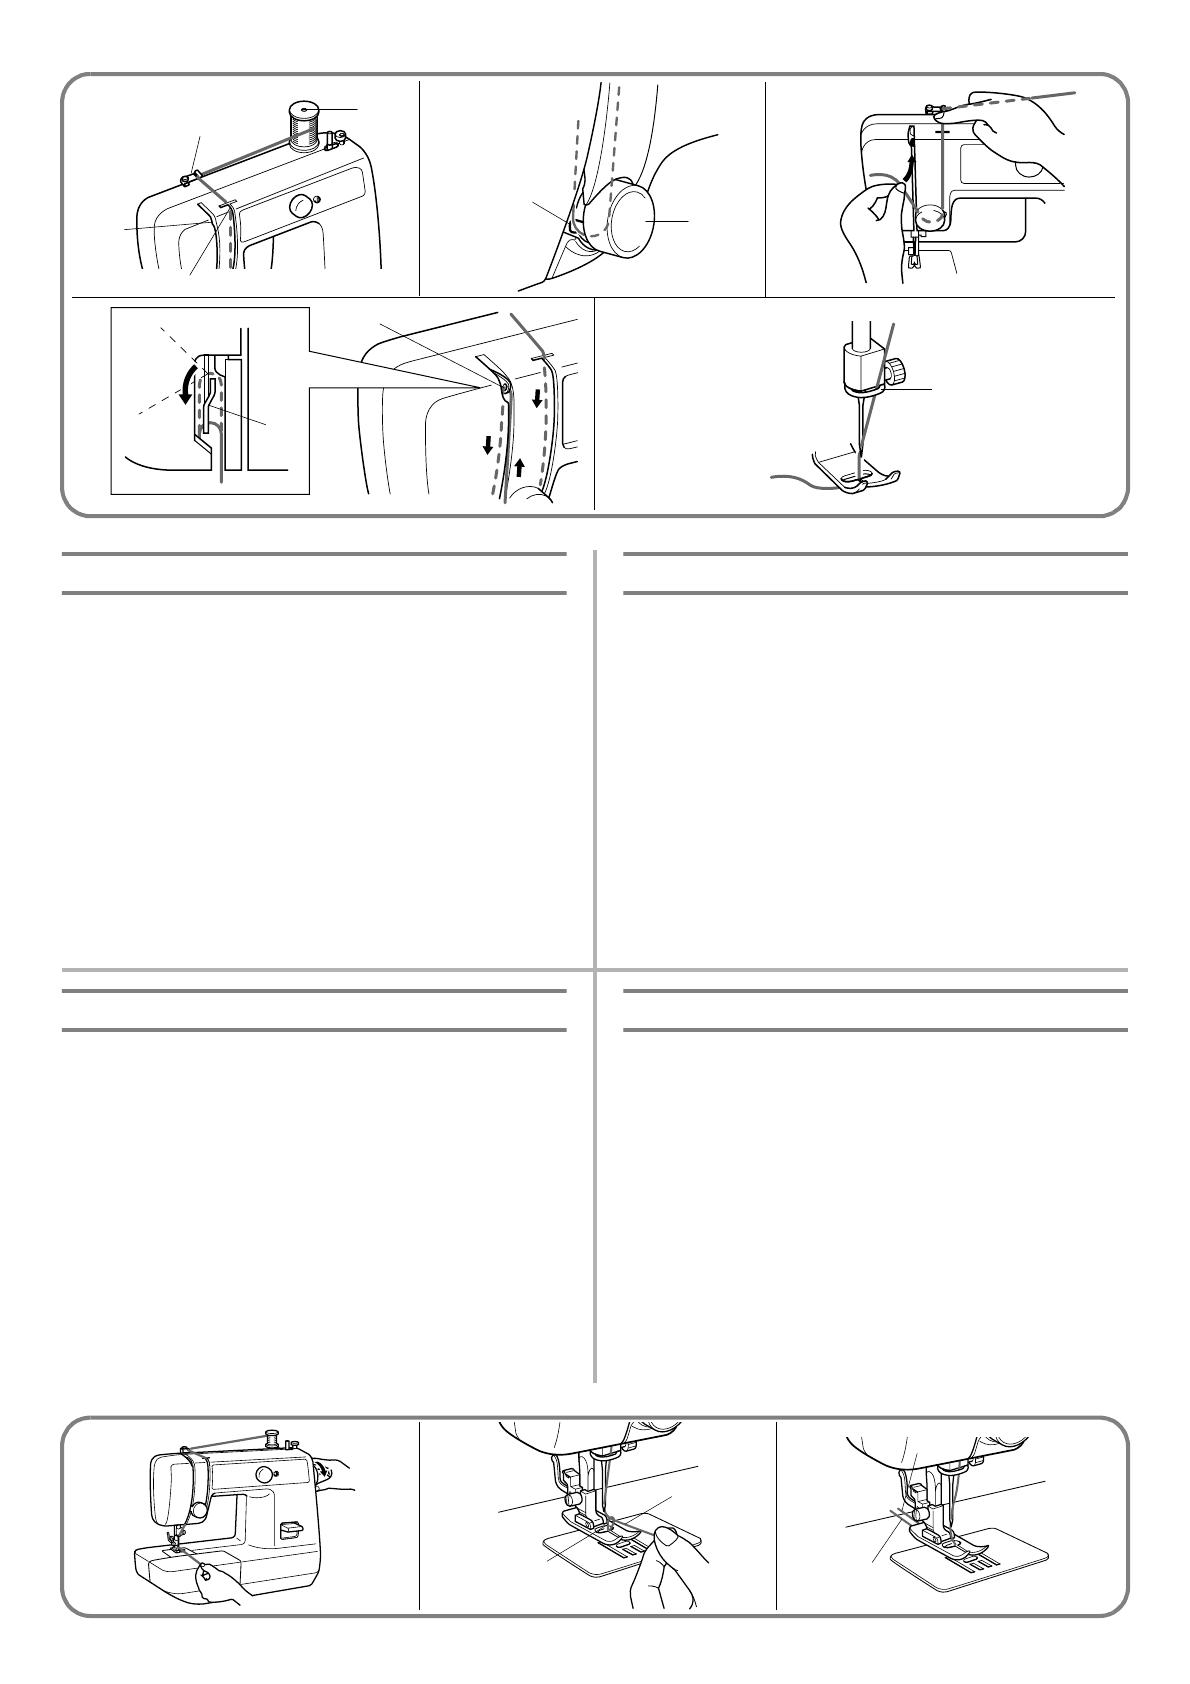
1. Raise the presser foot using the presser foot lifter and turn the
balance wheel toward you (counterclockwise) to raise the
thread take-up lever to its highest position.
2. Pull up the spool pin and place a spool of thread on this pin.
3. Pass the thread through both thread guides: the rear one first,
then the front one. (fig. A)
a Spool pin
b Thread guide (rear)
c Thread guide (front)
d Thread take-up lever
4. Pull the thread down and around the upper tension control
dial from the right to the left so the thread picks up the thread
check spring. (See fig. B.) While holding the thread as shown
in fig. C, pull it between the tension discs.
e Upper tension control dial
f Thread check spring
5. Guide the thread to the back of the thread take-up lever and
around to the left (fig. D). Bring the thread through the slit by
pulling it toward you and into the eyelet.
g Thread take-up lever
6. Bring the thread down and pass it behind the thread guide.
h Thread guide
7. Thread the needle from front to back and pull out about 5 cm
(2″) of thread as shown in fig. E.
NOTE:
If the thread is incorrectly fed, the thread may break, cause
stitches to be skipped or cause the fabric to wrinkle.
1. Lever le pied-de-biche à l’aide du levier correspondant et
tourner le volant à main vers soi (dans le sens contraire aux
aiguilles d’une montre) pour remonter complètement le levier
releveur.
2. Lever le porte-bobine et y placer une bobine de fil.
3. Faire passer le fil par les deux guide-fils: d’abord l’arrière puis
l’avant. (fig. A)
a Porte-bobine
b Guide-fils (arrière)
c Guide-fils (avant)
d Levier releveur de fil
4. Tirer le fil vers le bas et le faire passer par le disque de
contrôle de tension supérieure de droite à gauche afin que le
fil attrape le ressort de vérification (voir fig. B). Tirer le fil entre
les disques de tension, tout en le tenant comme le montre la
fig. C.
e Disque de tension du fil
f Ressort de vérification du fil
5. Guider le fil vers l’arrière du levier releveur puis autour vers la
gauche (fig. D). Amener le fil vers la fente en le tirant vers soi
et le faire passer par le chas.
g Levier releveur
6. Tirer le fil vers le bas et le faire passer derrière le guide-fils.
h Guide-fils
7. Enfiler l’aiguille de l’avant vers l’arrière et tirer environ 5 cm
(2″) de fil comme le montre la fig. E.
REMARQUE:
Si le fil n’est pas installé correctement, il peut se rompre, causer
des sauts de points ou des fronces dans le tissu.
1. Levante el prensatelas con la palanca y gire la ruedecilla hacia
usted (en el sentido contrario al de las manecillas de un reloj)
para subir la palanca tirahilos a su posición más alta.
2. Levante el porta carretes y coloque un carrete en el eje.
3. Pase el hilo a través de ambas guías: la de atrás primero y luego la
de delante. (fig. A)
a Porta carretes
b Guía hilo (trasera)
c Guía hilo (delantera)
d Palanca tirahilos
4. Tire del hilo hacia abajo, pasando por el disco de control de la
tensión superior de derecha a izquierda de tal forma que el hilo
enganche el resorte de comprobación del hilo. (Véase fig. B).
Mientras sujeta el hilo tal como indica la fig. C, páselo por los
discos de tensión.
e Disco de tensión del hilo
f Resorte de comprobación del hilo.
5. Guíe el hilo por detrás de la palanca tirahilos y por la izquierda
(fig. D). Lleve el hilo por la ranura, tirándolo hacia usted y
pasándolo por el agujero.
g Palanca tirahilos
6. Baje el hilo y páselo por detrás de la guía.
h Guía
7. Enhebre la aguja de delante hacia atrás y saque unos 5 cm (2″) de
hilo tal como indica la fig. E.
NOTA:
Si el hilo está mal enhebrado, puede romperse, saltar puntadas o
fruncir el tejido.
1. Поднимите рычаг прижимной лапки, пользуясь
соответствующим рычагом, и поверните маховик на себя
(против часовой стрелки), чтобы поднять рычаг
нитепритягивателя в крайнее верхнее положение.
2. Выяните вверх стержень для катушки и наденьте на него
катушку с нитью.
3. Пропустите нить через оба нитенаправителя: сначала через
задний, а потом через передний. (рис. A.)
a Стержень для установки катушки
b Нитенаправитель (задний)
c Нитенаправитель (передний)
d Рычаг нитепритягивателя
4. Протяните нить вниз и вокруг регулятора натяжения
верхней нити справа налево так, чтобы нить зацепила
ограничительную пружину. (См. рис. B.) Придерживая
нить, как показано на рис. C, протяните ее между
натяжными дисками.
e Дисковый регулятор натяжения верхней нити
f Ограничительная пружина
5. Направьте нить к задней части рычага нитепритягивателя
и далее вокруг него справа налево. Проведите нить через
прорезь, вытянув ее на себя, до попадания ее в ушко
нитепритягивателя (cм. рис. D.).
g Рычаг нитепритягивателя
6. Опустите нить вниз и проведите ее за нитенаправителем.
h Нитенаправитель
7. Заправьте нить в ушко иголки спереди назад и вытяните
около 5 см нити, как показано на рис. E.
ПРИМЕЧАНИЕ:
Если нить заправлена неправильно, она может оборваться, а
также могут пропускаться стежки или морщиться ткань.
17
1
2
1
2
3
4
5
6
7
7
8
3
1
Drawing Up Lower (bobbin) Thread
1. Raise the presser foot and the needle to their highest positions.
2. With your left hand, hold the end of the upper thread. With
your right hand, turn the balance wheel toward you
(counterclockwise) until the needle moves down and back up
again to its highest position.
3. The upper thread should have caught the lower thread in a
loop. Pull the upper thread toward you and the lower thread
will come up from the bobbin in a large loop.
4. Pull out about 15 cm (6″) of both threads and place them
toward the back of the machine straight behind the presser
foot. The upper thread should pass between the toes of the
presser foot.
a Upper thread
b Lower thread loop
c Lower thread
Remontée du fil inférieur (canette)
1. Lever au maximum le pied-de-biche et l’aiguille.
2. Avec la main gauche, tenir l’extrémité du fil supérieur. Avec
la main droite, tourner le volant vers soi (dans le sens
contraire aux aiguilles d’une montre) jusqu’à ce que l’aiguille
descende puis remonte à nouveau complètement.
3. Le fil supérieur doit alors former une boucle avec le fil
inférieur. Tirer vers soi le fil supérieur: le fil inférieur va se
dérouler de la canette et former une boucle de plus en plus
large.
4. Tirer environ 15 cm de chacun des deux fils et les placer vers
l’arrière de la machine, juste derrière le pied-de-biche. Le fil
supérieur doit passer entre les branches du pied-de-biche.
a Fil supérieur
b Boucle du fil inférieur
c Fil inférieur
Para sacar el hilo de la canilla
1. Levante el prensatelas y la aguja a sus posiciones más elevadas.
2. Con la mano izquierda, sujete el extremo del hilo superior. Con la
mano derecha, gire la ruedecilla hacia usted (en el sentido
contrario al de las manecillas de un reloj) hasta que la aguja vaya
hacia abajo y suba a su posición más alta.
3. El hilo superior debe haber enganchado el hilo inferior y hacer
una lazada. Tire del hilo superior hacia usted y el hilo inferior
saldrá de la canilla en una baga larga.
4. Tire unos 15 cm (6″) de ambos hilos y colóquelos hacia la parte
atrás de la máquina, justo detrás del prensatelas. El hilo superior
debe pasar entre los salientes del prensatelas.
a Hilo superior
b Bagas en el hilo inferior
c Hilo inferior
Вытягивание нижней (шпульной) нити
1. Поднимите прижимную лапку и иглу в крайнее верхнее
положение.
2. Левой рукой удерживайте конец верхней нити. Правой
рукой вращайте маховик по направлению к себе (против
часовой стрелки), пока игла не опустится вниз и вновь не
займет крайнее верхнее положение.
3. Верхняя нить должна захватить нижнюю нить в петлю.
Потяните верхнюю нить на себя, и нижняя нить вытянется
из шпульки в виде большой петли.
4. Вытяните порядка 15 см обеих нитей и разместите их
прямолинейно по направлению к задней части машины за
прижимной лапкой. Верхнюю нить следует пропустить в
прорезь в прижимной лапке.
a Верхняя нить
b Петля нижней нити
c Нижняя нить
E
CB
A
D
19
Costura con aguja doble
Su máquina de coser ha sido concebida para poder utilizar una aguja
doble y permitir la costura con dos hilos superiores. Puede usar el
mismo color de hilo o dos hilos de colores distintos para puntadas
decorativas. Las costuras con aguja doble dan muy buenos resultados
con las siguientes puntadas: la puntada recta (6-10) y la puntada
zigzag (2). Sin embargo, debe asegurarse de que los dos hilos usados
para enhebrar la aguja doble sean del mismo peso. Si los hilos son de
pesos distintos, las puntadas resultarán erróneas.
PARA INTRODUCIR LA AGUJA DOBLE.
Introdúzcala de la misma manera que una aguja simple (véase página
6). La parte plana de la aguja debe estar cara hacia atrás mientras
que la parte redonda está cara a usted.
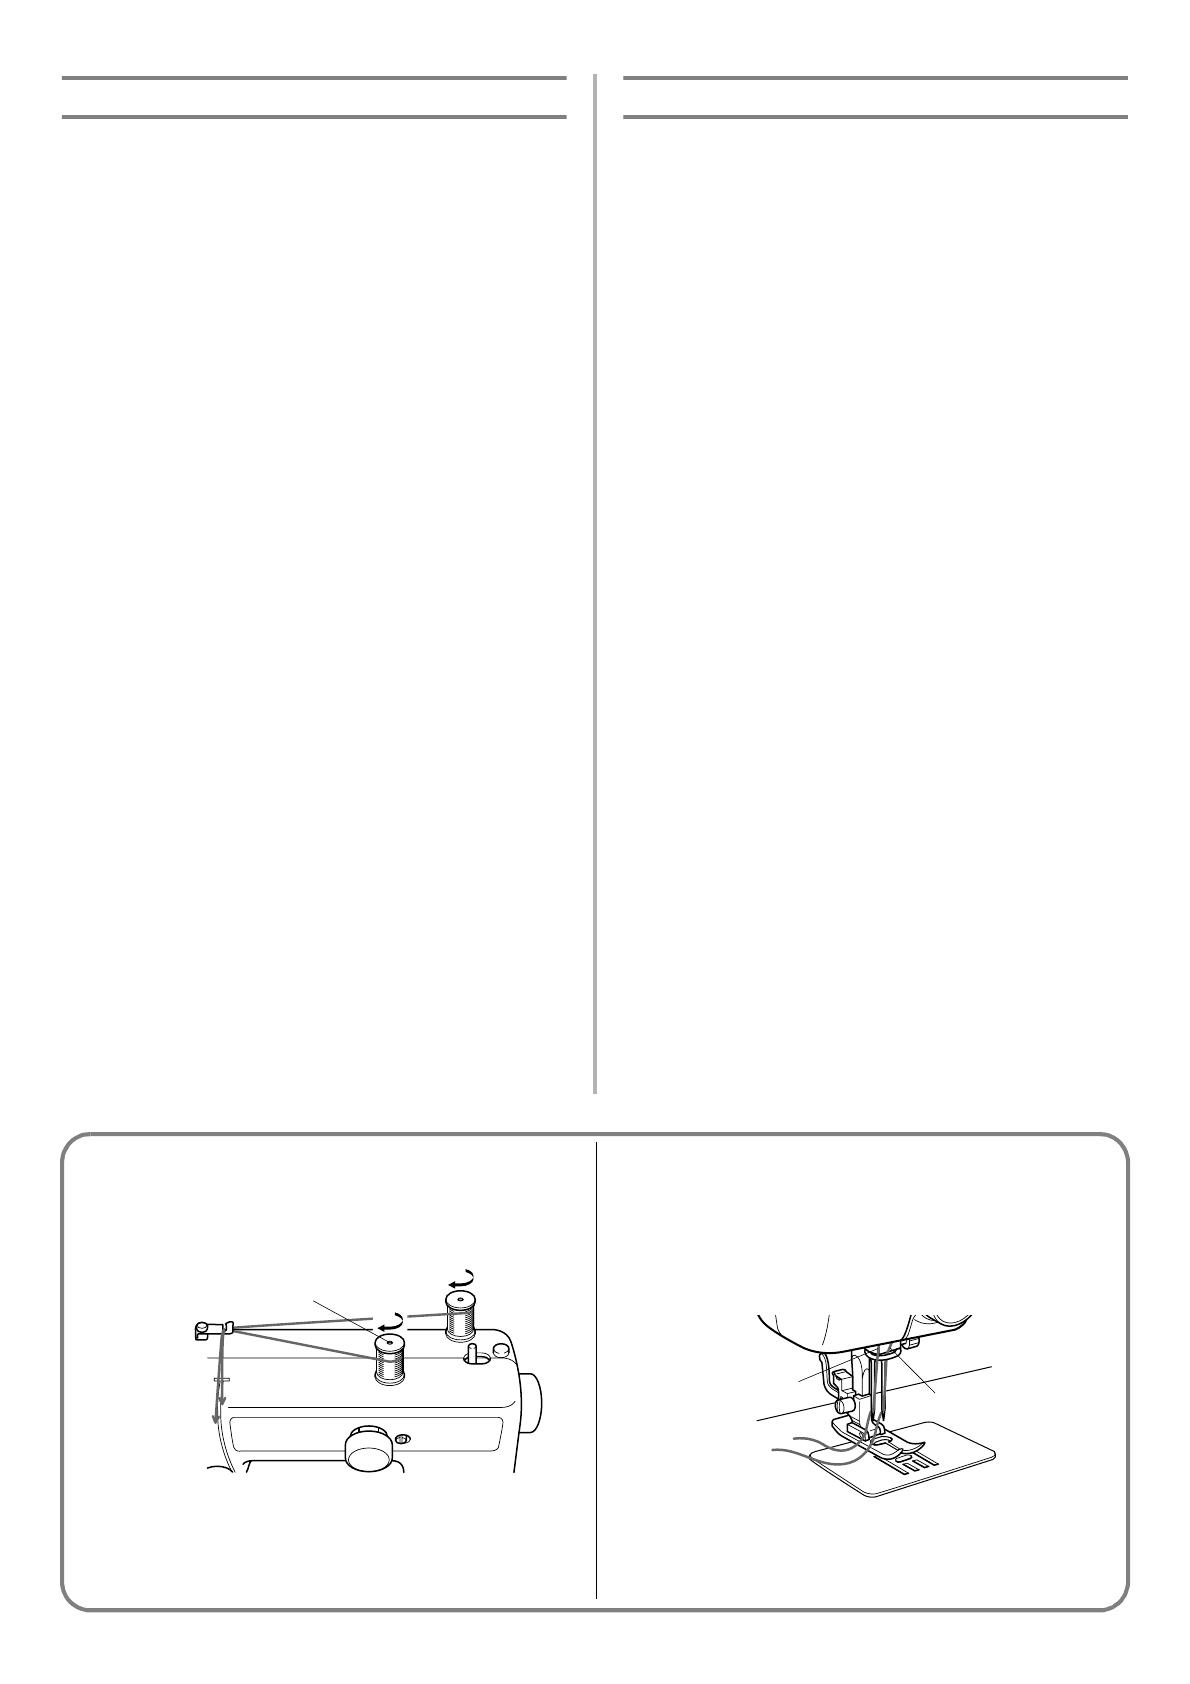
PARA INSTALAR EL PORTA CARRETES EXTRA
Coloque el porta carretes vertical extra en el orificio previsto arriba
de la máquina, en la parte derecha. Coloque el segundo carrete de
hilo en el eje tal como indica la fig. A.
a Porta carretes extra
ENHEBRADO DE LA AGUJA DOBLE
Cada una de las agujas debe ser enhebrada por separado.
1. Enhebrado de la aguja derecha
Siga las mismas instrucciones que para el enhebrado de una sola
aguja (véase página 15 para mayores detalles al respecto).
2. Enhebrado de la aguja izquierda
Enhebre la aguja izquierda de la misma manera que la aguja
derecha. Sin embargo, no hay que pasar el hilo por la guía que se
sitúa arriba de la aguja. Conviene pasarlo directamente por el ojo
de la aguja izquierda, tal como ilustrado arriba en la fig. B.
b El hilo de la aguja derecha pasa por la guía.
c El hilo de la aguja izquierda pasa delante de la guía.
Шитье двойной иглой
Швейная машина поддерживает шитье двойной иглой, то есть
можно шить с использованием двух верхних нитей. Можно
использовать нити одинаковых или двух разных цветов для
выполнения декоративных строчек. Шитьё двойной иглой
подходит для следующих строчек: прямая строчка (6-10) и
строчка «Зигзаг» (2). Обе верхние нити, используемые для
заправки двойной иглы, должны иметь одинаковый номер
(толщину). В противном случае трудно обеспечить требуемое
качество строчки.
УСТАНОВКА ДВОЙНОЙ ИГЛЫ
Установите двойную иглу тем же способом, которым
устанавливалась одиночная игла. (Подробную информацию
см. на стр.6.) Плоская сторона иглы должна быть повернута к
задней стороне машины, а полукруглая – к Вам.
УСТАНОВКА ДОПОЛНИТЕЛЬНОГО СТЕРЖНЯ
КАТУШКИ
Вставьте дополнительный стержень для катушки в
предназначенное для него отверстие, расположенное сверху в
правой части машины. На этот стержень наденьте вторую
катушку с нитью, как показано на рис. A.
a Дополнительный стержень для установки катушки
ЗАПРАВКА ДВОЙНОЙ ИГЛЫ НИТЬЮ
Каждую нить следует заправлять в иглу по отдельности.
1. Заправка правой нити в иглу
Следуйте тем же инструкциям, что и для заправки нити в
одиночную иглу. Подробную информацию см. на стр. 15.
2. Заправка левой нити в иглу
Заправляйте левую нить в иглу так же, как и правую, но
при этом не надо пропускать нить через нитенаправитель
над иглой перед тем как продеть её в ушко левой иглы
(см рис. B).
a Нить правой иглы пропущена через нитенаправи-
тель.
b Нить левой иглы проходит перед нитенаправителем.
1
3
2
AB
20
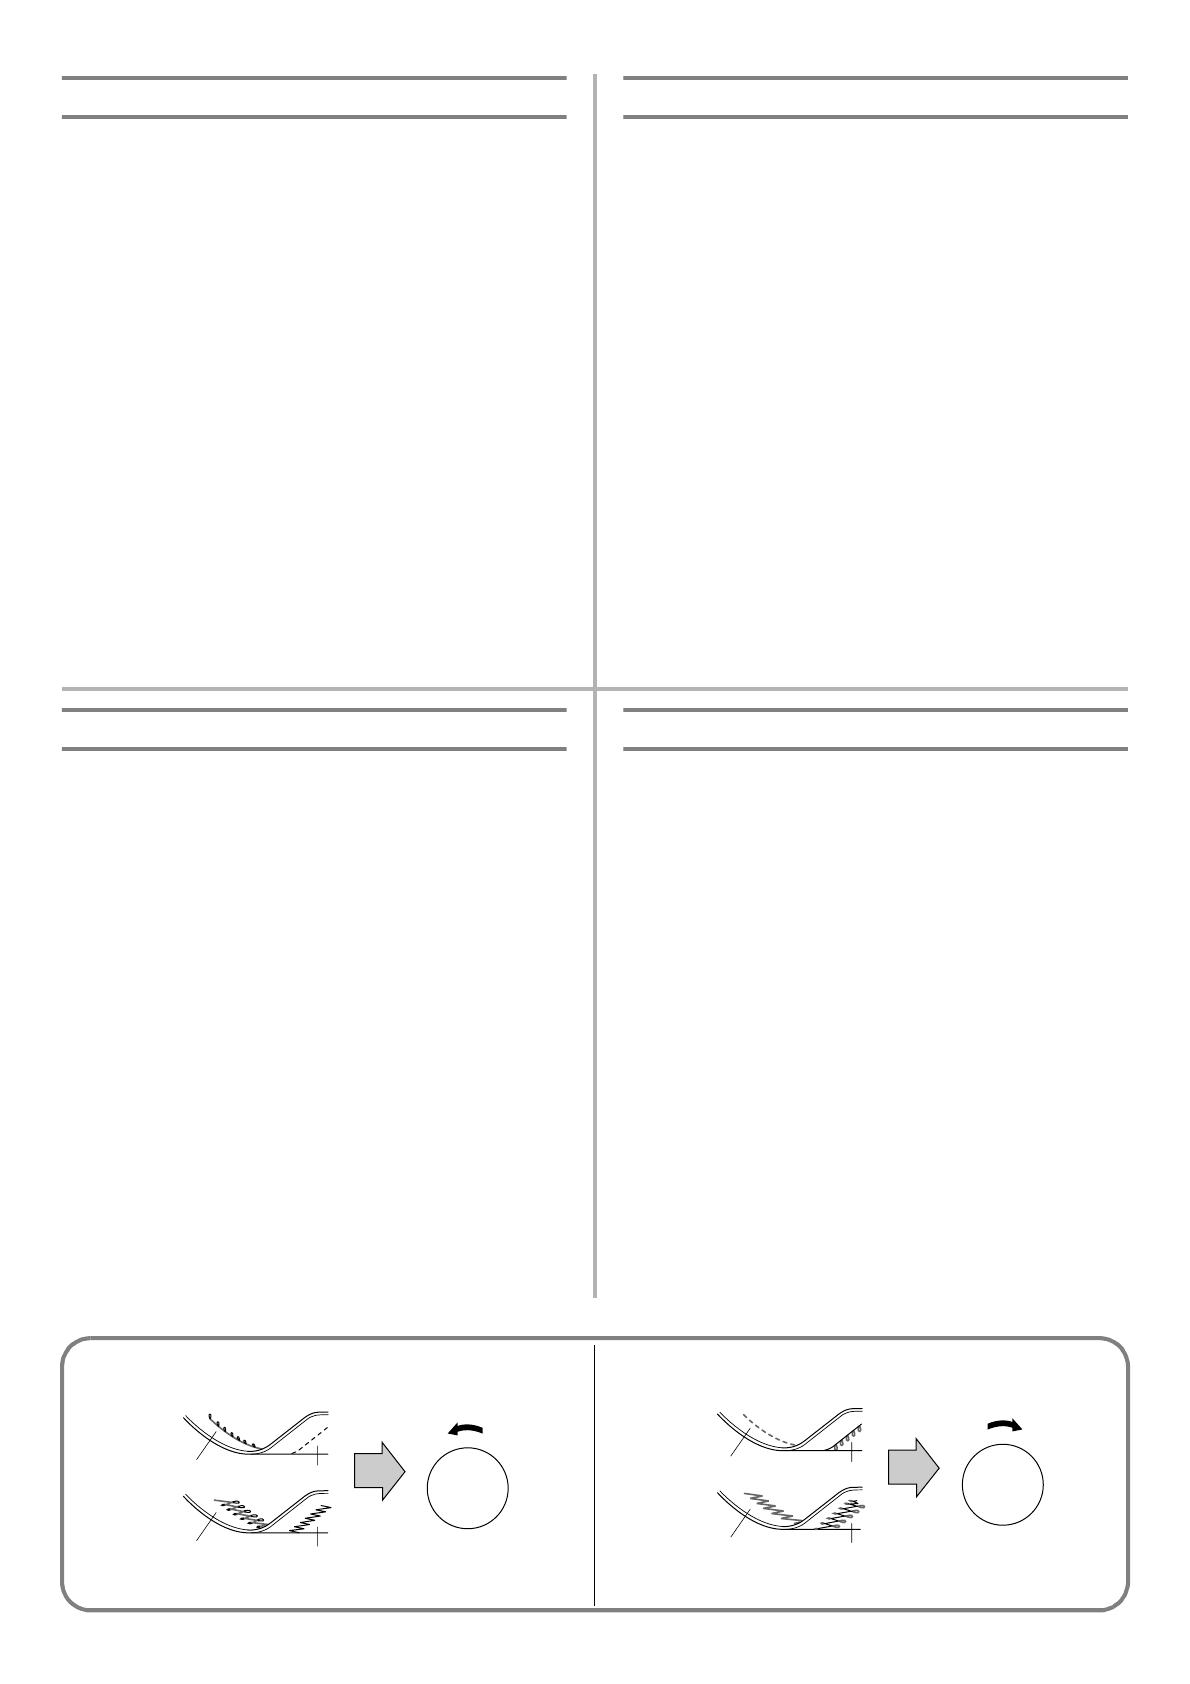
Thread Tension
Thread tension will affect the quality of your stitches. It may need
to be adjusted when you change fabric or thread type.
NOTE:
It is recommended that a test sample be made on a fabric scrap
before sewing on your project.
The basic thread tension setting is “5”.
Possible problems and how to correct them.
A Upper tension is too tight.
Locks appear on the surface of the fabric.
A-1 Upper tension control dial
Decrease the tension by turning the dial to a lower number.
B Upper tension is too loose.
Locks appear on the reverse side of the fabric.
B-1 Upper tension control dial
Increase the tension by turning the dial to a higher number.
a Reverse
b Surface
Tension des fils
La tension des fils va affecter directement la qualité des points et
il se peut qu’elle doive être réglée lors du changement de tissu
ou de fil.
REMARQUE:
Il est conseillé d’effectuer une couture d’essai sur une chute de
tissu avant de coudre sur l’ouvrage proprement dit.
La tension du fil est réglée par défaut sur “5”.
Problèmes possibles et leurs remèdes.
A La tension supérieure est excessive.
Formation de boucles sur l’endroit du tissu.
A-1 Sélecteur de tension supérieure
Diminuer la tension en mettant le sélecteur sur un chiffre
inférieur.
B La tension supérieure est insuffisante.
Formation de boucles sur l’envers du tissu.
B-1 Sélecteur de tension supérieure
Augmenter la tension en plaçant le sélecteur sur un chiffre
plus élevé.
a Envers
b Endroit
Tensión de los hilos
La tensión de los hilos es muy importante para la calidad de las
puntadas y puede requerir cierto ajuste al cambiar de tejido o de hilo.
NOTA:
Le recomendamos hacer una prueba en un pedazo de tela antes de
empezar a coser con el tejido de trabajo.
El parámetro inicial de tensión del hilo es “5”.
Problemas posibles y sus soluciones
A El hilo superior esta demasiado tirante
Aparecen bagas en la superficie del tejido.
A-1 Disco de control de la tensión superior
Disminuya la tensión al poner el disco en un número inferior.
B La tensión superior es insuficiente
Aparecen bagas en el revés del tejido.
B-1 Disco de control de la tensión superior
Aumente la tensión al poner el disco en un número superior.
a Revés
b Derecho
Натяжение нитей
Натяжение нитей оказывает воздействие на качество строчки.
При смене ткани или нити может потребоваться настройка
натяжения нитей.
ПРИМЕЧАНИЕ:
Рекомендуется до начала работы над изделием осуществлять
пробную строчку на лоскуте аналогичной ткани.
Базовая позиция натяжителя нити – «5».
Возможные затруднения и методы их разрешения.
A Слишком сильное натяжение верхней нити
На поверхности ткани появляются петли.
A-1 Дисковый регулятор натяжения верхней нити
Уменьшите натяжение, повернув регулятор к меньшей
цифре.
B Слишком слабое натяжение верхней нити
На обратной стороне ткани появляются петли.
B-1 Дисковый регулятор натяжения верхней нити
Увеличьте натяжение, повернув регулятор к большей
цифре.
a Изнаночная сторона ткани
b Лицевая сторона ткани
B-1B
2
1
2
1
0
1
2
3
4
5
6
7
8
9
A-1A
2
1
2
1
0
1
2
3
4
5
6
7
8
9
/
Скачать
Black
PMS8363
Instruction Manual
Manuel d’instructions
Manual de instrucciones
Инструкция по эксплуатации
- Manuals
- Brands
- Brother Manuals
- Sewing Machine
- LS-2720
Manuals and User Guides for Brother LS-2720. We have 4 Brother LS-2720 manuals available for free PDF download: Instruction Manual, Operation Manual
Brother LS-2720 Instruction Manual (67 pages)
Brother LS-2125 Sewing Machines: Users Manual
Brand: Brother
|
Category: Sewing Machine
|
Size: 1.1 MB
Table of Contents
-
Important Safety Instructions
2
-
Sewing Light Switch
6
-
Connecting Plugs and Main Power
6
-
Table of Contents
7
-
Principal Parts
9
-
Pieces Principales
9
-
Elementos Principales
9
-
Principais Componentes
9
-
Principal Parts
10
-
Piéces Principales
10
-
Elementos Principales
10
-
Principais Componentes
10
-
Accessories
11
-
Accessoires
11
-
Accesorios
11
-
Acessórios
11
-
Operating Your Sewing Machine
12
-
Connecting Plugs
12
-
Fonctionnement De La Machine a Coudre
12
-
Raccordement
12
-
Funcionamiento De La Máquina De Coser
12
-
Conexión De Los Enchufes
12
-
Funcionamento Da Sua Máquina De Costura
12
-
Tomadas De Ligação
12
-
Main Power and Sewing Light Switches
13
-
Foot Controller
13
-
Interrupteur Principal Et De La Lampe
13
-
Pédale
13
-
Interruptor Principal Y De Luz
13
-
Pedal
13
-
Interruptor De Força E De Iluminação
13
-
Pedal Do Motor
13
-
Inserting the Needle
14
-
Checking the Needle
14
-
Pour Mettre L’aiguille En Place
14
-
Vérification De L’aiguille
14
-
Inserción De La Aguja
14
-
Comprobación De La Aguja
14
-
Colocação Da Agulha
14
-
Verificação Da Agulha
14
-
Changing the Presser Foot
15
-
Changement De Pied-De-Biche
15
-
Cambio Del Prensatelas
15
-
Troca Do Pé Calcador
15
-
Converting to Free-Arm Style
16
-
Steadying the Machine
16
-
Modèle Bras Libre
16
-
Pour Stabiliser La Machine
16
-
Conversión En Modalidad De Brazo Libre
16
-
Para Estabilizar La Máquina
16
-
Uso Do Braço Livre
16
-
Para Estabilizar a Máquina
16
-
Various Controls
17
-
Pattern Selection Dial
17
-
Descriptif Des Differentes Commandes
17
-
Sélecteur De Modèle De Point
17
-
Distintos Mandos
17
-
Selector De Puntadas
17
-
Controles Diversos
17
-
Botão Seletor De Pontos
17
-
Patterns and Stitch Names
18
-
Motifs Et Noms Des Points
18
-
1(A-B-C-D)
19
-
Dibujo Y Nombre De Los Puntos
19
-
Padrões E Nomes Dos Pontos
19
-
Reverse Sewing Lever
20
-
Threading the Machine
20
-
Winding the Bobbin
20
-
Levier De Couture En Marche Arrière
20
-
Enfilage De La Machine
20
-
Remplissage De La Canette
20
-
Palanca De Retroceso
20
-
Alavanca De Retrocesso
20
-
Enhebrado De La Máquina
21
-
Bobinado De La Canilla
21
-
Passagem Das Linhas
21
-
Enrolador Da Bobina
21
-
Lower (Bobbin) Threading
22
-
Mise En Place Du Fil Inférieur (Canette)
22
-
Enhebrado Inferior (De La Canilla)
22
-
Passagem Da Linha Inferior (Da Bobina)
22
-
Upper (Needle) Threading
23
-
Mise En Place Du Fil Supérieur (Fil De L’aiguille)
23
-
Enhebrado Superior (De La Aguja)
23
-
Passagem Da Linha Superior (Agulha)
23
-
Drawing up Lower (Bobbin) Thread
25
-
Remontée Du Fil Inférieur (Canette)
25
-
Para Sacar El Hilo De La Canilla
25
-
Para Puxar O Fio Da Bobina
25
-
Twin-Needle Sewing (Option)
26
-
Couture Avec L’aiguille Jumelée (Option)
26
-
Costura Con Aguja Doble (Opción)
27
-
Costura Com Agulha Dupla (Opções)
27
-
Thread Tension
28
-
Tension Des Fils
28
-
Tensión De Los Hilos
28
-
Tensão Da Linha
28
-
Relative Chart of Sewing Fabrics, Needles and Threads Combinations
30
-
Tableau Des Combinaisons Tissu/Aiguille/Fil
30
-
Tabla De Relación Entre Tejidos, Hilos Y Agujas
31
-
Quadro Proporcional De Tecidos, Agulhas E Linhas Para Costura
31
-
Straight Stitching
32
-
Point Droit
32
-
Straight Stitch
32
-
STRAIGHT STITCH (Left Needle Position)
32
-
POINT DROIT (Aiguille Placée À Gauche)
32
-
Puntada Recta
32
-
Costurar Com Ponto Reto
32
-
Zigzag Stitching
34
-
Points Zigzag
34
-
Zigzag Stitch
34
-
Zigzag (Satin) Stitch
34
-
Modèle
34
-
Point Zigzag
34
-
Point Zigzag (Point De Bourdon)
34
-
Puntadas Zigzag
34
-
Ponto Ziguezague
34
-
Blind Hem Stitching
35
-
Point Élastique Invisible
35
-
Stretch Blind Stitch
35
-
Puntadas Invisibles
35
-
Embainhar Com Ponto Invisível Elástico
35
-
Elastic Stitching
36
-
Point Élastique
36
-
Elastic Stitch
36
-
Puntada Elástica
36
-
Costura Elástica
36
-
Shell Tuck Stitching
37
-
Point Picot
37
-
Shell Tuck Stitch
37
-
Puntada Ondas
37
-
Ponto Concha
37
-
Making a Buttonhole
38
-
Création D’une Boutonnière
38
-
4-Step Automatic Buttonhole
38
-
Boutonnière Automatique En 4 Temps
38
-
Para Coser Ojales
38
-
Casear
38
-
Buttonhole Fine Adjustment
42
-
Equilibrage Des Boutonnières
42
-
Ajuste Fino De Los Ojales
42
-
Ajuste Do Caseado
42
-
Button Sewing
43
-
Pour Coudre Un Bouton
43
-
Coser Botones
43
-
Pregar Botões
43
-
Zipper Insertion
44
-
Insertion De Fermeture À Glissière
44
-
Poner De Cremalleras
44
-
Pregar Zípers
44
-
Gathering
45
-
Pour Froncer Un Tissu
45
-
Fruncido
45
-
Franzir
45
-
Darning
46
-
Reprisage
46
-
Zurcido
46
-
Cerzidura (Passajar)
46
-
Appliques
47
-
Aplicaciones
47
-
Aplicações Decorativas
47
-
Monogramming and Embroidering
48
-
Monogrammes Et Broderies
48
-
Monogramas Y Bordados
48
-
Execução De Monogramas E De Bordados
48
-
Changing the Bulb
50
-
Remplacement De L’ampoule
50
-
Cambio De La Bombilla
50
-
Substituição Da Lâmpada
50
-
Oiling
51
-
Cleaning
51
-
Graissage
51
-
Nettoyage
51
-
Engrasado
51
-
Lubrificação
51
-
Limpieza
52
-
Limpeza
52
-
Performance Checklist
53
-
Liste De Vérification En Cas De Défaillances
53
-
Listado De Posibles Incidencias
53
-
Eventuais Problemas E Sua Solução
53
-
Performance Check List
54
-
Liste De Verification En Cas De Defaillances
56
-
Listado De Posibles Incidencias
58
-
Lista De Controlo Da Execução
60
-
Repacking the Machine
62
-
Emballage De La Machine
62
-
Embalaje De La Máquina
62
-
Reembalagem Da Máquina
62
-
Index
63
-
Index
64
-
Indice
65
-
Índice
66
Advertisement
Brother LS-2720 Instruction Manual (67 pages)
Brother LS-2125i Sewing Machines: Users Manual
Brand: Brother
|
Category: Sewing Machine
|
Size: 0.99 MB
Table of Contents
-
Important Safety Instructions
2
-
Sewing Light Switch
6
-
Connecting Plugs and Main Power
6
-
Table of Contents
7
-
Elementos Principales
9
-
Principal Parts
9
-
Pieces Principales
9
-
Principais Componentes
9
-
Principal Parts
10
-
Piéces Principales
10
-
Elementos Principales
10
-
Principais Componentes
10
-
Accessories
11
-
Accessoires
11
-
Accesorios
11
-
Acessórios
11
-
Operating Your Sewing Machine
12
-
Connecting Plugs
12
-
Fonctionnement De La Machine a Coudre
12
-
Raccordement
12
-
Funcionamiento De La Máquina De Coser
12
-
Conexión De Los Enchufes
12
-
Funcionamento Da Sua Máquina De Costura
12
-
Tomadas De Ligação
12
-
Main Power and Sewing Light Switches
13
-
Foot Controller
13
-
Interrupteur Principal Et De La Lampe
13
-
Pédale
13
-
Interruptor Principal Y De Luz
13
-
Pedal
13
-
Interruptor De Força E De Iluminação
13
-
Pedal Do Motor
13
-
Inserting the Needle
14
-
Checking the Needle
14
-
Pour Mettre L’aiguille En Place
14
-
Vérification De L’aiguille
14
-
Changing the Presser Foot
15
-
Changement De Pied-De-Biche
15
-
Cambio Del Prensatelas
15
-
Troca Do Pé Calcador
15
-
Converting to Free-Arm Style
16
-
Steadying the Machine
16
-
Modèle Bras Libre
16
-
Pour Stabiliser La Machine
16
-
Conversión En Modalidad De Brazo Libre
16
-
Para Estabilizar La Máquina
16
-
Uso Do Braço Livre
16
-
Para Estabilizar a Máquina
16
-
Various Controls
17
-
Pattern Selection Dial
17
-
Descriptif Des Differentes Commandes
17
-
Sélecteur De Modèle De Point
17
-
Distintos Mandos
17
-
Selector De Puntadas
17
-
Controles Diversos
17
-
Botão Seletor De Pontos
17
-
Patterns and Stitch Names
18
-
Motifs Et Noms Des Points
18
-
Dibujo Y Nombre De Los Puntos
19
-
Padrões E Nomes Dos Pontos
19
-
Reverse Sewing Lever
20
-
Threading the Machine
20
-
Winding the Bobbin
20
-
Levier De Couture En Marche Arrière
20
-
Enfilage De La Machine
20
-
Remplissage De La Canette
20
-
Enhebrado De La Máquina
21
-
Bobinado De La Canilla
21
-
Passagem Das Linhas
21
-
Enrolador Da Bobina
21
-
Lower (Bobbin) Threading
22
-
Mise En Place Du Fil Inférieur (Canette)
22
-
Enhebrado Inferior (De La Canilla)
22
-
Passagem Da Linha Inferior (Da Bobina)
22
-
Upper (Needle) Threading
23
-
Mise En Place Du Fil Supérieur (Fil De L’aiguille)
23
-
Enhebrado Superior (De La Aguja)
23
-
Passagem Da Linha Superior (Agulha)
23
-
Upper Needle Threading
24
-
Drawing up Lower (Bobbin) Thread
25
-
Remontée Du Fil Inférieur (Canette)
25
-
Para Sacar El Hilo De La Canilla
25
-
Para Puxar O Fio Da Bobina
25
-
Twin-Needle Sewing
26
-
Couture Avec L’aiguille Jumelée
26
-
Costura Con Aguja Doble
27
-
Costura Com Agulha Dupla
27
-
Thread Tension
28
-
Tension Des Fils
28
-
Tensión De Los Hilos
28
-
Tensão Da Linha
28
-
Relative Chart of Sewing Fabrics, Needles and Threads Combinations
30
-
Tableau Des Combinaisons Tissu/Aiguille/Fil
30
-
Tabla De Relación Entre Tejidos, Hilos Y Agujas
31
-
Straight Stitching
32
-
Point Droit
32
-
Straight Stitch
32
-
STRAIGHT STITCH (Left Needle Position)
32
-
POINT DROIT (Aiguille Placée À Gauche)
32
-
Puntada Recta
32
-
Costurar Com Ponto Reto
32
-
Zigzag Stitching
34
-
Points Zigzag
34
-
Zigzag Stitch
34
-
Zigzag (Satin) Stitch
34
-
Point Zigzag
34
-
Point Zigzag (Point De Bourdon)
34
-
Puntadas Zigzag
34
-
Ponto Ziguezague
34
-
Blind Hem Stitching
35
-
Point Élastique Invisible
35
-
Stretch Blind Stitch
35
-
Puntadas Invisibles
35
-
Embainhar Com Ponto Invisível Elástico
35
-
Elastic Stitching
36
-
Point Élastique
36
-
Elastic Stitch
36
-
Puntada Elástica
36
-
Costura Elástica
36
-
Shell Tuck Stitching
37
-
Point Picot
37
-
Shell Tuck Stitch
37
-
Puntada Ondas
37
-
Ponto Concha
37
-
Making a Buttonhole
38
-
Création D’une Boutonnière
38
-
4-Step Automatic Buttonhole
38
-
Boutonnière Automatique En 4 Temps
38
-
Para Coser Ojales
38
-
Casear
38
-
Buttonhole Fine Adjustment
42
-
Equilibrage Des Boutonnières
42
-
Ajuste Fino De Los Ojales
42
-
Ajuste Do Caseado
42
-
Button Sewing
43
-
Pour Coudre Un Bouton
43
-
Coser Botones
43
-
Pregar Botões
43
-
Zipper Insertion
44
-
Insertion De Fermeture À Glissière
44
-
Poner De Cremalleras
44
-
Pregar Zípers
44
-
Gathering
45
-
Pour Froncer Un Tissu
45
-
Fruncido
45
-
Franzir
45
-
Darning
46
-
Reprisage
46
-
Zurcido
46
-
Cerzidura (Passajar)
46
-
Appliques
47
-
Aplicaciones
47
-
Aplicações Decorativas
47
-
Monogramming and Embroidering
48
-
Monogrammes Et Broderies
48
-
Monogramas Y Bordados
48
-
Execução De Monogramas E De Bordados
48
-
Changing the Bulb
50
-
Remplacement De L’ampoule
50
-
Cambio De La Bombilla
50
-
Substituição Da Lâmpada
50
-
Oiling
51
-
Cleaning
51
-
Graissage
51
-
Nettoyage
51
-
Engrasado
51
-
Lubrificação
51
-
Limpieza
52
-
Limpeza
52
-
Performance Checklist
53
-
Liste De Vérification En Cas De Défaillances
53
-
Listado De Posibles Incidencias
53
-
Eventuais Problemas E Sua Solução
53
-
Performance Check List
54
-
Liste De Verification En Cas De Defaillances
56
-
Listado De Posibles Incidencias
58
-
Lista De Controlo Da Execução
60
-
Repacking the Machine
62
-
Emballage De La Machine
62
-
Embalaje De La Máquina
62
-
Reembalagem Da Máquina
62
-
Index
63
-
Index
64
-
Indice
65
-
Quadro Proporcional De Tecidos, Agulhas E Linhas Para Costura
66
-
Índice
66
Brother LS-2720 Instruction Manual (67 pages)
Brother Sewing Machine Instruction Manual
Brand: Brother
|
Category: Sewing Machine
|
Size: 1.43 MB
Table of Contents
-
English
3
-
Important Safety Instructions
3
-
Table of Contents
8
-
Principal Parts
10
-
Principal Parts
11
-
Accessories
12
-
Operating Your Sewing Machine
13
-
Connecting Plugs
13
-
Main Power and Sewing Light Switches
14
-
Foot Controller
14
-
Inserting the Needle
15
-
Checking the Needle
15
-
Changing the Presser Foot
16
-
Converting to Free-Arm Style
17
-
Steadying the Machine
17
-
Various Controls
18
-
Pattern Selection Dial
18
-
Patterns and Stitch Names
19
-
Reverse Sewing Lever
21
-
Threading the Machine
21
-
Winding the Bobbin
21
-
Lower (Bobbin) Threading
23
-
Upper (Needle) Threading
24
-
Drawing up Lower (Bobbin) Thread
26
-
Twin-Needle Sewing
27
-
Thread Tension
29
-
Relative Chart of Sewing Fabrics, Needles and Threads Combinations
31
-
Straight Stitching
33
-
Zigzag Stitching
35
-
Blind Hem Stitching
36
-
Elastic Stitching
37
-
Shell Tuck Stitching
38
-
Making a Buttonhole
39
-
Buttonhole Fine Adjustment
43
-
Button Sewing
44
-
Zipper Insertion
45
-
Gathering
46
-
Darning
47
-
Appliques
48
-
Monogramming and Embroidering
49
-
Changing the Bulb
51
-
Oiling
52
-
Cleaning
52
-
Performance Checklist
54
-
Performance Check List
55
-
Repacking the Machine
63
-
Index
64
-
-
French
10
-
Pieces Principales
10
-
Piéces Principales
11
-
Accessoires
12
-
Fonctionnement de la Machine a Coudre
13
-
Raccordement
13
-
Interrupteur Principal Et de la Lampe
14
-
Pédale
14
-
Pour Mettre L’aiguille en Place
15
-
Vérification de L’aiguille
15
-
Changement de Pied-De-Biche
16
-
Modèle Bras Libre
17
-
Pour Stabiliser la Machine
17
-
Descriptif des Differentes Commandes
18
-
Sélecteur de Modèle de Point
18
-
Motifs Et Noms des Points
19
-
Levier de Couture en Marche Arrière
21
-
Enfilage de la Machine
21
-
Remplissage de la Canette
21
-
Mise en Place du Fil Inférieur (Canette)
23
-
Mise en Place du Fil Supérieur (Fil de L’aiguille)
24
-
Remontée du Fil Inférieur (Canette)
26
-
Couture Avec L’aiguille Jumelée
27
-
Tension des Fils
29
-
Tableau des Combinaisons Tissu/Aiguille/Fil
31
-
Point Droit
33
-
Points Zigzag
35
-
Point Élastique Invisible
36
-
Point Élastique
37
-
Point Picot
38
-
Création D’une Boutonnière
39
-
Equilibrage des Boutonnières
43
-
Pour Coudre un Bouton
44
-
Insertion de Fermeture À Glissière
45
-
Pour Froncer un Tissu
46
-
Reprisage
47
-
Monogrammes Et Broderies
49
-
Remplacement de L’ampoule
51
-
Graissage
52
-
Nettoyage
52
-
Liste de Vérification en Cas de Défaillances
54
-
Liste de Verification en Cas de Defaillances
57
-
Emballage de la Machine
63
-
Index
65
-
-
Spanish
10
-
Elementos Principales
10
-
Elementos Principales
11
-
Accesorios
12
-
Funcionamiento de la Máquina de Coser
13
-
Conexión de Los Enchufes
13
-
Interruptor Principal y de Luz
14
-
Pedal
14
-
Inserción de la Aguja
15
-
Comprobación de la Aguja
15
-
Cambio del Prensatelas
16
-
Conversión en Modalidad de Brazo Libre
17
-
Para Estabilizar la Máquina
17
-
Distintos Mandos
18
-
Selector de Puntadas
18
-
Dibujo y Nombre de Los Puntos
20
-
Palanca de Retroceso
21
-
Enhebrado de la Máquina
22
-
Bobinado de la Canilla
22
-
Enhebrado Inferior (de la Canilla)
23
-
Enhebrado Superior (de la Aguja)
24
-
Para Sacar el Hilo de la Canilla
26
-
Costura con Aguja Doble
28
-
Tensión de Los Hilos
29
-
Tabla de Relación entre Tejidos, Hilos y Agujas
32
-
Puntada Recta
33
-
Puntadas Zigzag
35
-
Puntadas Invisibles
36
-
Puntada Elástica
37
-
Puntada Ondas
38
-
Para Coser Ojales
39
-
Ajuste Fino de Los Ojales
43
-
Coser Botones
44
-
Poner de Cremalleras
45
-
Fruncido
46
-
Zurcido
47
-
Aplicaciones
48
-
Monogramas y Bordados
49
-
Cambio de la Bombilla
51
-
Engrasado
52
-
Limpieza
53
-
Listado de Posibles Incidencias
54
-
Listado de Posibles Incidencias
59
-
Embalaje de la Máquina
63
-
Indice
66
-
-
Russian
10
-
Основные Части
10
-
Основные Части
11
-
Принадлежности
12
-
Работа На Швейной Машине
13
-
Органы Управления
18
-
Наименования Строчек И Соответствующие Им Позиции Переключателя
19
-
Заправка Нити В Машину
21
-
Таблица Рекомендуемых Комбинаций Тканей, Игл И Нитей
31
-
Уазатель
64
-
Advertisement
Brother LS-2720 Operation Manual (56 pages)
Users Manual — English
Brand: Brother
|
Category: Sewing Machine
|
Size: 2.25 MB
Table of Contents
-
Important Safety Instructions
3
-
Table of Contents
6
-
1 Knowing Your Sewing Machine
8
-
Names of Machine Parts and Their Functions
8
-
The Main Parts
8
-
Needle and Presser Foot Section
10
-
Flat Bed Attachment
10
-
-
Accessories
11
-
Using Your Sewing Machine
12
-
Power Supply Precautions
12
-
Power Supply
12
-
Foot Controller
13
-
Steadying the Machine
13
-
-
Threading the Machine
14
-
Winding the Bobbin
14
-
Lower Threading
16
-
Upper Threading
18
-
Drawing up the Lower Thread
20
-
-
Replacing the Needle
21
-
Needle Precautions
21
-
Selecting the Needle Depending on the Thread and Fabric Types
21
-
Checking the Needle
22
-
Replacing the Needle
22
-
Sewing with a Twin Needle (Option)
24
-
-
Replacing the Presser Foot
25
-
Removing the Presser Foot Holder
26
-
-
-
2 Sewing Basics
27
-
Sewing
27
-
General Sewing Procedure
27
-
Selecting Stitching
28
-
Starting to Sew
29
-
Sewing in Reverse
30
-
Thread Tension
30
-
-
Useful Sewing Tips
32
-
Trial Sewing
32
-
Changing the Sewing Direction
32
-
Sewing Curves
32
-
Sewing Thick Fabrics
32
-
Sewing Thin Fabrics
33
-
Sewing Stretch Fabrics
33
-
Using a Free-Arm Style
33
-
-
-
3 Utility Stitches
34
-
Useful Stitches
34
-
Zigzag Stitches
34
-
Basic Stitching
35
-
Blind Hem Stitching
35
-
Darning
37
-
-
Buttonhole Sewing
38
-
Making the Buttonhole
38
-
Adjusting Buitching Stitching
40
-
Button Sewing
40
-
-
Zipper Insertion
42
-
Appliqué, Monogramming and Embroidering
43
-
Appliqués
43
-
Monogramming and Embroidering
43
-
-
Decorative Stitching
45
-
Gathering
45
-
Shell Tuck Stitching
45
-
Elastic Stitching
46
-
-
-
4 Appendix
47
-
Maintenance
47
-
Oiling
47
-
Changing the Bulb
47
-
Cleaning the Machine Surface
48
-
Cleaning the Shuttle Race
48
-
Cleaning the Feed Dogs
49
-
Repacking the Machine
50
-
Bobbin Case Tension Adjustment
50
-
-
Troubleshooting
52
-
Index
55
-
Advertisement
Related Products
-
Brother LS-2020
-
Brother LS-2000
-
Brother LS2-B877
-
Brother LS2-F52A
-
Brother LS2-F53A
-
Brother LS2250PRW
-
Brother LS2325
-
Brother LS200
-
Brother LS2400
-
Brother LS2-B892
Brother Categories
Sewing Machine
![]()
All in One Printer
![]()
Printer
Label Maker
Fax Machine
More Brother Manuals
Как пользоваться?
Наша цель — обеспечить Вам самый быстрый доступ к руководству по эксплуатации устройства Brother LS-2720. Пользуясь просмотром онлайн Вы можете быстро просмотреть содержание и перейти на страницу, на которой найдете решение своей проблемы с Brother LS-2720.
Для Вашего удобства
Если просмотр руководства Brother LS-2720 непосредственно на этой странице для Вас неудобен, Вы можете воспользоваться двумя возможными решениями:
- Полноэкранный просмотр -, Чтобы удобно просматривать инструкцию (без скачивания на компьютер) Вы можете использовать режим полноэкранного просмотра. Чтобы запустить просмотр инструкции Brother LS-2720 на полном экране, используйте кнопку Полный экран.
- Скачивание на компьютер — Вы можете также скачать инструкцию Brother LS-2720 на свой компьютер и сохранить ее в своем архиве. Если ты все же не хотите занимать место на своем устройстве, Вы всегда можете скачать ее из ManualsBase.
Руководство по эксплуатации Brother LS-2720
Печатная версия
Многие предпочитают читать документы не на экране, а в печатной версии. Опция распечатки инструкции также предусмотрена и Вы можете воспользоваться ею нажав на ссылку, находящуюся выше — Печатать инструкцию. Вам не обязательно печатать всю инструкцию Brother LS-2720 а только некоторые страницы. Берегите бумагу.
Резюме
Ниже Вы найдете заявки которые находятся на очередных страницах инструкции для Brother LS-2720. Если Вы хотите быстро просмотреть содержимое страниц, которые находятся на очередных страницах инструкции, Вы воспользоваться ими.
-
Руководства по ремонту
2

Brother LS-2720 каталог запчастей
(15 страниц)
-
Тип:
PDF -
Размер:
1.14 MB
Просмотр

Brother LS-2720 сервис-мануал
(19 страниц)
-
Тип:
PDF -
Размер:
380.26 KB
Просмотр
Brother LS-2720 (Швейные машинки) сервис мануалы в PDF-формате помогут найти неполадки и ошибки, а также осуществить ремонт Brother LS-2720 и восстановить работу устройства.
-
Brother LS-2720 — page 1
Black PMS8363 Instruction Manual Manuel d’instructions Manual de instrucciones Инструкция по эксплуатации …
-
Brother LS-2720 — page 2
…
-
Brother LS-2720 — page 3
«IMPORT ANT SAFETY IN STR UCTIONS» When us ing the se wi ng machine , ba sic saf ety pre cautions should a lwa ys be f ollo wed, includi ng the f ollo wing: «Read all instructi ons bef ore u sing.» DA N G E R – T o reduce the risk of e lectric shoc k: 1. The sew ing mach ine should ne v er be left unatte nded when plugg ed in. …
-
Brother LS-2720 — page 4
“IMPOR T ANTES CONSIGNES D E SECURITE” Lors de l ’utilisa tion de l a machine à co udre, i l con vient de toujours sui v re les c onsigne s de sécurit é essentiel l es et de prend re nota mment les p récautions suiva ntes: “Lir e tou tes les ins tr uc tion s avant d’uti lis er l a machi ne. ” DA N G E R — P our réduire le risque de …
-
Brother LS-2720 — page 5
“IMPOR T A NTES INSTR UCCIONES D E SEGURID A D” Cuand o se usa una máqu ina de co ser , debe seg uirse una s precauc iones bá sicas y que se d etallan a contin uación. “Leer toda s las inst ru ccio nes antes de us ar la” PELIGR O — P ara reduci r el riesgo de una descarga eléc trica. 1. La máqu ina no d ebe deja rse nu nca des atendida …
-
Brother LS-2720 — page 6
ИНСТРУКЦИИ ПО ТЕХНИКЕ БЕЗОПАСНОСТИ При эк сплуата ции швейн ой машины с ледует все г да собл юд ать пере численные н иже основные мер ы безопасности. Прочтите в се инструкции пе ред использова …
-
Brother LS-2720 — page 7
Подключение соеди нителей и выключатель питания/ лампочки подсветки 1. Вставь те трехконтактный разъем сетевого шнура в гнездо на машине. 2. Вставь те вилку сетевого шнура в настенную розетк у …
-
Brother LS-2720 — page 8
CONTENTS Page PRINCIPAL PAR TS …………………. ……………. …………….. …………. 1 PRINCIPAL PAR TS …………………. ……………. …………….. …………. 2 ACCESSO RIES ……………. …………….. …………….. …………………… 3 OPERATING Y OUR SEWING MACHINE ……….. …………….. …
-
Brother LS-2720 — page 9
INDICE Págin a ELEMENTOS PRINCIPALES …….. ……….. ……….. ……….. ……….. ….. 1 ELEMENTOS PRINCIPALES …….. ……….. ……….. ……….. ……….. ….. 2 ACCESORI OS…………. ……….. ……….. ……….. ……….. ……….. ……….. ….. 3 FUNCIONA MIENTO DE LA MÁQUINA DE CO SER …………. …
-
Brother LS-2720 — page 10
1 1 3 4 5 6 2 L O H I J K M N P 7 8 9 0 A B C E F D G 1 3 4 5 6 2 PRINCIPAL PARTS * The illust rations of the sewi ng machine on the foll owing pages may differ slightly from your machine. PIECES PR INCIPALES * Les illustrations représentée s aux pages suivantes peuvent différer légèreme nt de votre machine à coudre. ELEMENTOS PRINCIPALES * L …
-
Brother LS-2720 — page 11
2 PRINCIPAL PARTS a Pattern selection dial b Buttonhole fine-adj usting screw c Thread take-up lever d Extens ion tab le with access ory stor age e Upper tens ion contro l dial f Reverse sewing lever g Thread cu tter h Presser foot holder assembly i Presser foot screw j Presser foot (Zigzag) k Needl e pla te (Zig zag) l Shuttle h ook m Bobbin c ase …
-
Brother LS-2720 — page 12
3 1 X59369-251 2 X59370-051 7 XA3442-151 9 130920-051 3 X59375-051 4 129583-001 5 X57521-001 6 X52800-150 8 X55467-051 ACCESSORIES a Buttonhol e foot (1 pc.) b Zipper fo ot (1 pc.) c Button sew ing Foot (1 pc.) d Needle set (re gular sing le needle No. 14) (3 pcs.) e Twin ne edle (1 p c.) f Bobbins (3 pcs.) g Darning pl ate (1 pc .) h Screwdriver ( …
-
Brother LS-2720 — page 13
4 OPERATING YO UR SEWING MACHINE Connecting Pl ugs 1. Insert the fo ot controller plu g , locate d between the foot controlle r and the po wer supply plug on the cord , into the jack on the mac hine. 2. Insert the pow er supply plu g into an electrical o utlet. CAUTION: 1. When chang ing the ligh t bulb or when the sew ing machin e is not in use, t …
-
Brother LS-2720 — page 14
5 1 2 1 Main Power and S ewing Lig ht Switches This switch tu rns the ma in power and sew ing light on or off. (See fig. A .) a Turn on (toward the “I” m ark) b Turn off (toward the “O” m ark) Foot Contro ller When the foot contro ller is depressed li ghtly, the mach ine will run at a lo w speed. When the p ressure on the fo ot controlle r …
-
Brother LS-2720 — page 15
6 1 1 Inserting the Nee dle Turn powe r switch to “O” . 1. Remove th e power supply plug from the ele ctrical outl et. 2. Raise the ne edle ba r to its highest po sition. 3. Lower the press er foo t. 4. If a needle is already insta lled, rem ove the needle by loosening the ne edle cla mp with a coin an d pulling the needl e down. 5. With the fl …
-
Brother LS-2720 — page 16
7 Cha nging the Pr esse r Foot It m ay be ne cessary to cha nge the p resser foot ac cording to your sewi ng needs. SNAP-ON TY PE Turn powe r switch to “O” . 1. Raise the n eedle to its h ighest posi tion by turnin g the ba lance wheel tow ard you (coun terclockwise), a nd raise the pre sser foot lev er. 2. Release the foot by raisin g the leve …
-
Brother LS-2720 — page 17
8 1 Converting to Fr ee-Arm Style Free-Arm se wing is convenie nt for sewing tubular and hard-t o- reach areas on garm ents. To chan ge yo ur mach ine to the free- arm style, lif t up on the e xtension table and pull it out. a Lift the bottom of the extension table up toward you. b Pull t he extens ion table out to rem ove it. a Extension table Ste …
-
Brother LS-2720 — page 18
9 ba c 1 d 2 c a 3 4 5 12 14 13 11 1 678 9 1 0 VARIOUS CONTROLS Patt ern Sel ection Di al To selec t a stitch, simpl y turn the patte rn selection dia l in either directio n. Stitch width s and length s are shown on th e following page . a Pattern selection dial DESCRIPTIF DE S DIFFER ENTES COMMANDES Sélecteur de modèle de point Pour sélec tionn …
-
Brother LS-2720 — page 19
10 PATTERNS AND STITCH NAMES PATTERN STITCH NAME PAGE I N INSTRUCTIO NS 1(a-b-c-d) 4-STEP AUTO MATIC BUTTONH OLE 30 2 ZIGZAG ST ITCH 26 3 ZIGZAG ST ITCH 26 4 ZIGZAG ST ITCH 26 5 ZIGZAG (S ATIN) S TITCH 26 6-10 STRAIGHT S TITCH 24 11 STRAIGHT S TITCH (Left needle position) 24 12 STRETCH BLIND STITCH 27 13 SHELL TUCK STITCH 29 14 ELASTIC STITCH 28 MO …
-
Brother LS-2720 — page 20
11 НАИМЕНОВАН ИЯ СТРОЧЕК И СООТВЕТСТВУЮЩИЕ ИМ ПОЗИ ЦИИ ПЕРЕКЛЮЧАТЕЛЯ ПОЗИЦИЯ НАИМЕНОВАНИ Е СТРОЧКИ СТРАНИЦЫ С ИНСТ РУКЦ И ЯМИ 1(a*b*c*d) Автоматическ ое выметывание пете ль за четыре приема 30 2 С? …
-
Brother LS-2720 — page 21
12 Reverse Sew ing Lever To sew in revers e, pre ss down t he reve rse sewi ng le ver as fa r as possible an d hold it in that positio n while lightly step ping on the foot controlle r. To sew forward, release the reve rse sewing lever. Reverse sew ing is used for locking and reinfo rcing seams. THREADING THE MACHINE Winding the Bobbin 1. Place the …
-
Brother LS-2720 — page 22
13 2 3 4 ENHEBRADO DE LA MÁQUINA Bobinado de l a canilla 1. Coloque un carrete de hilo e n el porta c arr etes y p ase el hi lo por el disco de t ensión de bobi nado de l a canil la a Disco de t ensión de bobina do de la canill a b Bobina do de la canilla 2. P ase el ex tr emo del hilo po r el orif icio de la canill a a partir del interior . 3. …
-
Brother LS-2720 — page 23
14 Lower (bobbin) Threadi ng Turn powe r switch to “O” . 1. Raise the n eedle to its h ighest posi tion by turnin g the ba lance wheel tow ard you (coun terclockwi se) and raise the pre sser foot lifte r. 2. Open the shuttl e cover behind the ext ension table on the front of the m achine and remove the bobb in case b y pulling its latch toward …
-
Brother LS-2720 — page 24
15 1 2 3 24 2 3 4 1 Uppe r (Needle) Threading Mise en place du fil supérieur (fil de l’a iguille ) Enhebrado superior (de la aguja) Заправка верхней ни ти (в иг лу) AB — 1 B — 2 C B-3 …
-
Brother LS-2720 — page 25
16 1. Raise the p resser foo t using the presser foot l ifter and turn the balanc e wheel towa rd you (cou ntercloc kwise) to rai se the thread t ake-up lever to its highest position. 2. Pull up th e spool pin and p lace a sp ool of thre ad on this pin. 3. Pass the thread thro ugh both thread guides: the rear one first, then the front one. ( fig. A …
-
Brother LS-2720 — page 26
17 1 2 1 2 3 4 5 6 7 7 8 3 1 Drawing Up Lower (bobbin) Thr ead 1. Raise the presser foo t and the n ee dle to their h ighest po sitions. 2. With your le ft hand, hold the e nd of the upp er thread. With your right hand, turn the balance wh eel toward yo u (counte rclockwise) u ntil the nee dle moves dow n and back u p again to i ts hi ghes t pos it …
-
Brother LS-2720 — page 27
18 1 3 2 Twin-Nee dle Se wing Your sew ing mach ine is designed for twin-nee dle sewing w hich allows you to sew using two uppe r threads. You can u se the sa me color o r two diffe rent colors of thread for decor a tive stitche s. Twin-nee dle sewing wo rks well with these stitc hes: the Stra ight Stitch ( 6-10)-and th e Zigzag S titch (2). Be sur …
-
Brother LS-2720 — page 28
19 Costura con aguja dobl e Su máquin a de coser ha sido concebida pa ra poder u tilizar una aguja doble y permitir la co stura con d os hilos superiores. Pue de usar el mismo color de hilo o dos h ilos de color es distintos par a puntadas decorativa s. Las c osturas con aguja do ble dan muy buenos r esult ados con las si guient es punta das: l a …
-
Brother LS-2720 — page 29
20 Thread Tensi on Thread tension will affect the quality of yo ur stitches. It may need to be a djusted when you change fab ric or threa d type. NOTE: It is rec omme nded that a test samp le b e ma de on a f abri c scr ap before sewing on your proje ct. The ba sic thread ten sion sett ing is “5”. Possi ble proble ms an d how to c orrect th em. …
-
Brother LS-2720 — page 30
21 2 1 2 1 NOTE: The bo bbin t hread te nsion has alread y been adjusted at the factory for general use. F or most sewing applicat ions, no adjustme nt is need ed. When se wing with t h in threa d on th in fabrics, the thread tension may n ot be a djusted ad equately w ith the upper ten sion contro l dial. The refore, the thre ad tensi on must be a …
-
Brother LS-2720 — page 31
22 RELATIVE CHART OF SEWING FABRICS, NEED LES AND THREADS COMBINATIONS NOTE: 1.Se lec t the cor rect needle and t hrea d size f rom th e above char t. 2.Use the same size thre ad for the upper (spool) and lower (b obbin) thre ads. SEWING FABRICS NEEDLE SIZE S THREAD SIZES VERY T HIN Fine tricot, Fine lace, Thin linen, Silk, Orga nza, Ch if fon #65/ …
-
Brother LS-2720 — page 32
23 T ABLA DE RELACIÓN ENTRE TEJIDOS, HILOS Y AGUJAS NO T A: 1.E lija la ag uja y el hil o corr ectos en la tabla a rriba. 2.Utilic e el mismo tamaño de hilo para l os hilos superior (ca rr ete) e inferio r (canilla). TEJIDOS T AMA ÑO DE A GUJA T AMAÑO DE HILO MUY F INO Punto fino, Encaje fino , Lino fino, S eda, Tul , Gasa n° 65/9 Algodó n: 8 …
-
Brother LS-2720 — page 33
24 Straig ht Stitchi ng The St raight Sti tch (6-10 or 11) is used for top stitching an d sewing lig htweight fabric s. Starting Sewing (fig . A) 1. Set the pa ttern selectio n dial to th e appropriate Straigh t Stitch (6-10 or 1 1) with the de sired length. 2. Raise the ne edle to its high est positio n and lift the presser foot lift er. 3. Pull u …
-
Brother LS-2720 — page 34
25 1 Нача ло шит ья (рис . A) 1. У становите ручку выбора строчки в положение, соответствующее прямой строчке (6*10 или 11) с требу е мой длиной стежка. 2. Поднимите иглу в крайнее верхнее положение, а за? …
-
Brother LS-2720 — page 35
26 Zigzag Stitc hing ZIGZAG STITCH Set the pattern select ion dial to th e appropriate Zigzag Stitc h (2, 3 or 4) with th e desired width. It is reco mmended to sew using the Straight Stitch a t the begin ning an d en d of th e Zigz ag St itc hes. ZIGZAG (SATIN) STITCH The Sa tin Stitc h can be used f or ma king d eco rativ e sti tches. Set the pa …
-
Brother LS-2720 — page 36
27 ABCD Blind Hem Stitchi ng The St retch Blin d Stitch is used to fin ish the edge of projec ts made with stretch fabrics witho ut the stitc h showing. 1. Set the pa ttern selectio n dial to 12. 2. Both the threads should b e the same color as the fabric. 3. Fold back the fabric to the de sired location of the hem as show n in fig. A . Then , fold …
-
Brother LS-2720 — page 37
28 Elastic S titching The Elas tic Stitch can be used in 3 ways: mending , sewing elastic or jo ining fabri c. Each is e xplained be low. Set the pattern sele ction dia l to 14. MENDING 1. Place t he reinforc ement fab ric under t he tear to be mend ed. 2. Following the line o f the tear , sew using the Elastic S titch as illustrated in fig. A. SEW …
-
Brother LS-2720 — page 38
29 Shell Tuck Stitchin g The S hell Tuck S titch ca n be used t o sew a picot (lace-like) edge on a lig htweight fabri c . 1. Set the pa ttern selectio n dial to 13. 2. Use a ti ghter thread tension than norm al. 3. At a slow spee d, sew the fab ric on the bia s, placing it under the presse r foot so that the straight stitche s are sewn on the seam …
-
Brother LS-2720 — page 39
30 2 1 Making a Buttonho le NOTE: 1. It is recomm ended to prac tice mak ing a buttonhole on a scrap piece o f fabric b efore attem pting it on the actual garment. 2. When making buttonholes on soft fabrics, pla ce stabilizer material on the unde rside of the fa bric. Buttonho le-making is a simple process that pro vides reliable results. MAKING A …
-
Brother LS-2720 — page 40
31 MAKING A BUTTO NHOLE Step Sewn Portion Pattern How to Sew Step a (Front end of buttonhole) 1. Set the pattern selec tion dial to a . 2. Lower the presser foot and se w 5 to 6 stitches. 3. Stop the machine when the need le is at the left sid e of the stitches and raise the nee dle from t he fabr ic. Step b (Left side) 1. Turn the pattern selectio …
-
Brother LS-2720 — page 41
32 COSIDO DE UN OJAL Pa s o s Zo na de cosido Dis eño Co mo cos er Pa s o a (remate de la part e dela nter a del oj al) 1. P onga el selecto r de diseño en a. 2. Baje el prensatelas y cosa 5 ó 6 pun tadas. 3. P ar e la máqu ina cuando la aguja se encue ntre a la izquierda de las puntadas y levant e la agu ja d el tej ido. Pa s o b (lado izqu ie …
-
Brother LS-2720 — page 42
33 SECURI NG TH E STIT CHING A ND CU TTING THE BUTT ONHOL E 1. To secure t he stitching, turn the mat erial 90 degre es counter clockwise, set the patt ern selectio n dial to the Straight Stitch (6 -10) with the d esired length and sew to the edge of the front bar tack. 2. Remove the fabr ic from the m achine. It is recom mended tha t pins be place …
-
Brother LS-2720 — page 43
34 1 2 + – 3 4 + – Buttonhole Fi ne Adjustment If th e stitching on the two sides of th e buttonh ole do n ot appear uniform, the follow ing adjustme nts can b e made. 1. After sewing th e left side of the b uttonhole, st itch the right side and ob serve t he feed ing. 2. If the ri ght side is too coarse or fine c ompared to the left side, adju …
-
Brother LS-2720 — page 44
35 Button Sewing 1. Measur e the di stance be tween the button holes and set the pattern se lection dial to the Zigzag Stit ch (2, 3 or 4) with the desired w idth. 2. Attach the b utton sewing foot. 3. Place the darning pla te on the need le plate as shown in fig. A . 4. Place a button be tween the foo t and the fabr ic, turn the balan ce wh eel an …
-
Brother LS-2720 — page 45
36 Zipper Ins ertion The zip per foot is use d to sew on va rious types of zi ppers and can easily b e positioned t o the right or left side of the needle. When sewing th e right side of t he zippe r, attach th e shan k to the left pin of th e zipper foo t. When sewing the le ft side of the zippe r, attach the shank to the right pin of the zip per …
-
Brother LS-2720 — page 46
37 1 2 3 4 4 Gatherin g 1. Set the patte rn selection dia l to the Strai ght Stitch (6-10 ) with the desi red leng th. 2. Loosen the tension of the upper t hread (to about 2) so that the lower threa d lies on th e underside o f the fabri c. 3. Sew a sing le row or e venly-space d multiple row s of Straigh t Stitches. 4. Pull the lower thread (s) to …
-
Brother LS-2720 — page 47
38 Darning 1. Place the darning pla te on the need le plate as shown in fig. A . 2. Set the patte rn selection dia l to the Strai ght Stitch (6-10 ) with the desi red leng th. 3. Place th e portion to be darned under the presser foot to gether with a f abric und erlay for reinforc ement. 4. Either remove both the presser foo t and presser fo ot hol …
-
Brother LS-2720 — page 48
39 Appliques An appli que is created by cutting a contrasting p iece of fa bric into a sh ape to be used a s a decor ation on a g arment or project. 1. Baste the cut design to the fabric in the desired loc ation where desired. 2. Carefully sew around the edge of the cu tout design with the appr opri ate Z igzag Stit ch (2 , 3, 4 or 5) . 3. Cut away …
-
Brother LS-2720 — page 49
40 Monogramming and Embroid ering PREPARING F OR MONOGRAM MING AND EMB ROIDERING 1. Place t he darning p late on th e needle plate. 2. Set the p attern selec tion dial to the appro priate Zigzag Stitch (2, 3, 4 o r 5). 3. Draw the lettering (for monog ramming ) or design (for embroid ering) on the surface of the fa bric. 4. Stretch the fa bric in a …
-
Brother LS-2720 — page 50
41 MONOG RAMMI NG ( fig. A ) 1. Sew mov ing t he ho op slow ly al ong t he le tter ing at a const ant speed. 2. To secure the stitching, set the pattern selection d ial to the Straigh t Stitch (6-1 0) with the desired length and sew a few stitches a t the end of th e last lett er. EMBROI DERING (fig . B) 1. Stitch the outline of the design by mov i …
-
Brother LS-2720 — page 51
42 1 3 2 Changing the B ulb 1. Remove th e power supply plug from the ele ctrical outl et. 2. Loosen the face plate sc rew as shown in fig. A . 3. Remove the face plate from the machine as illust rated in fig. B . 4. Replace th e sewing lig ht bulb. S ee fig. C . a Bulb b Loosen c Tighten 5. Reattac h the face pla te and fa sten the scre w as shown …
-
Brother LS-2720 — page 52
43 Oilin g 1. Remove th e power supply p lug from t he outlet . 2. Put 2 to 3 drops of oil at each of the points in dicated in fig. A . 3. After oiling, run the machine at a fast speed without thread install ed for a short ti me. 4. Be sure to w ipe any ex cess oil off th e mach ine. NOTE: The ma chine shou ld be oiled o nce a week if it is use d m …
-
Brother LS-2720 — page 53
44 1 2 6 1 5 1 3 4 NOTE: When th e needle is lowe red, the sh uttle hook cannot be removed. Clea ning the S huttle Race 1. Remove any accumu lated lint and thread with a brush from the reta ining ring , hook, dri ver and rac e body. 2. A clo th da mpened with mach ine o il sh ould be us ed to wipe the shuttle race clea n of lint. 3. Clean the lin t …
-
Brother LS-2720 — page 54
45 Clea ning th e Feed Dogs 1. Remove th e presser foo t holder a nd the ne edle. 2. Rem ove th e ne edle p late usin g a coin or sc rew drive r to take out the sc rews. 3. Clean the l int from th e upper part of the feed dog s and shuttle race bo dy with a br ush. Performance Checkl ist Whenev er sewing di fficulties are en countered, rev iew the …
-
Brother LS-2720 — page 55
46 PERFORMA NCE CHECK LIST UPPER THREAD BREAKS LOWER (BOBBIN) THREAD BREAKS Upper thread is not correctly installed. Lint is clinging to the bottom of the needle plate. Spool of thread is not correctly installed. Upper thread tension is too tight. Lower thread tension is too tight. Bobbin is not threaded properly in the shuttle hook. The combinatio …
-
Brother LS-2720 — page 56
47 PERFORMA NCE CHECK LIST Page 6 No Pages 43-45 Page 6 No Page 43 Page 22 No No No No Page 4 No Page 5 No Page 5 No Page 12 No Page 22 No Page 6 No Pages 12-17 No No CONTACT YOUR LOCAL SERVICE CENTER NEEDLE BREAKS FABRIC DOES NOT FEED PROPERLY MACHINE IS NOISY OR SLOW MACHINE DOES NOT START Damaged or worn needle is used. Damaged or worn needle is …
-
Brother LS-2720 — page 57
48 LISTE DE VERIFI CATION EN CA S DE DEFAIL LANCES RUPTURE DU FIL SUPERIEUR LA COUTURE FAIT DES BOUCLES RUPTURE DU FIL INFERIEURÅ (canette) DES POINTS SAUTENT LE TISSU FRONCE Le fil supérieur n’est pas bien enfilé. Le fil inférieur (canette) est emmêlé. Le fil supérieur est emmêlé. Le fil supérieur est trop tendu. Le fil inférieur est …
-
Brother LS-2720 — page 58
49 LISTE DE VERIFI CATION EN CA S DE DEFAIL LANCES CONTACTER LE SERVICE TECHNIQUE LE PLUS PROCHE L’ENTRAINEMENT DU TISSU N’EST PAS CORRECT LA MACHINE EST BRUYANTE OU LENTE LA MACHINE NE DEMARRE PAS L’AIGUILLE CASSE La combinaison aiguille/fil/tissu est incorrecte. Une aiguille endommagée ou usée est utilisée. Des peluches sont accrochées …
-
Brother LS-2720 — page 59
50 LIST ADO DE POSIBLES INCIDENCIAS ROTURA DEL HILO SUPERIOR BAGAS EN LAS PUNTADAS ARRUGAS EN EL TEJIDO SALTO DE PUNTADAS ROTURA DEL HILO INFERIOR (de la canilla) ROTURA DEL HILO SUPERIOR El hilo superior está enredado La canilla no está bien enhebrada en el garfio Se está usando una aguja dañada o gastada. La aguja está mal colocada La tensi? …
-
Brother LS-2720 — page 60
51 LIST ADO DE POSIBLES INCIDENCIAS EL TEJIDO NO ARRASTRA BIEN LA MAQUINA NO ARRANCA LA MAQUINA ES RUIDOSA O FUNCIO- NA MUY DESPACIO LAAGUJA SE ROMPE Página 6 No Página 6 No Página 43 Página 23 No No No No Página 4 No Página 5 No Página 5 No Página 12 No La combinaison aiguille/fil/tissu est incorrecte. La combinación tamaño de aguja/grue …
-
Brother LS-2720 — page 61
52 Т АБЛИЦА КО Н ТРОЛ ЬНЫХ ПРОВЕРОК ТЕ ХНИЧЕСКИХ ХАР АКТЕР ИСТИК …
-
Brother LS-2720 — page 62
53 Т АБЛИЦА КО Н ТРОЛ ЬНЫХ ПРОВЕРОК ТЕ ХНИЧЕСКИХ ХАР АКТЕР ИСТИК …
-
Brother LS-2720 — page 63
54 Repa cking t he Mach ine Keep t he carton and pac king mate rials for futu re use. It may become necess ary to r eship the sew ing mac hine. Impro per packi ng or impr oper pac king ma terial cou ld result in damage during ship ping. Instruct ions for repacking t he machine are illustrate d below. IMPORTANT This pac king materia l is design ed t …
-
Brother LS-2720 — page 64
55 INDEX Page A Accessories ….. ……………. …………….. …………….. …………….. ……. 3 Applique ………….. …………….. …………….. …………….. ……………. .. 9 B Blind H em Stitching ……………….. ……………. …………….. ……….. 27 Bobbin w inding ………….. ………. …
-
Brother LS-2720 — page 65
56 INDEX Page A Accessoires ….. ……………. …………….. …………….. …………….. ……. 3 Aiguille Remplace ment/Inspec tion ………… …………….. ……………. .. 6 Applique s ………… …………….. …………….. …………….. ……………. 39 B Boutonn ière ……………….. ………… …
-
Brother LS-2720 — page 66
57 INDICE Págin a A Acces orios ……… ……….. ……….. ……….. ……….. ……….. ……….. ……….. …. 3 Aguja Cambio/V e rifica ción ………… ……….. ……….. ……….. ……….. ……… 6 Ajuste fin o de los o jales ….. ………………. ……………… ………….. ……….. 34 Aplica cio …
-
Brother LS-2720 — page 67
58 УКА ЗА ТЕЛЬ Стр. А Аппл икация . …… …… …… ……. …… …… …… ……. …… ………. ……. …. 9 В Виды стро чек Атла сная стр очка …… ………. …… ……. …… …… …… ……. …. 26 Пота йная с трочка *мереж ка …… ……. .. …
Найди любой мануал:
Например: Sony VGN-FW460J/T
Вы можете бесплатно скачать Инструкция по эксплуатации для Brother LS-2720.
Также вы сможете прочесть онлайн этот документ без скачивания.
Скачать Инструкция по эксплуатации для Brother LS-2720
Тип файла
PDF
Размер
1.36 Mb
Кол-во страниц
67
Просмотров
3083
Читать онлайн Инструкция по эксплуатации для Brother LS-2720 (Страница 1)

Другие Швейные машинки Brother LS-2720
Топ Brother Швейные машинки
Вопросы
Ранее вы смотрели
Эта страница полезна для вас? Поделитесь ссылкой: