-
Contents
-
Table of Contents
-
Troubleshooting
-
Bookmarks
Quick Links
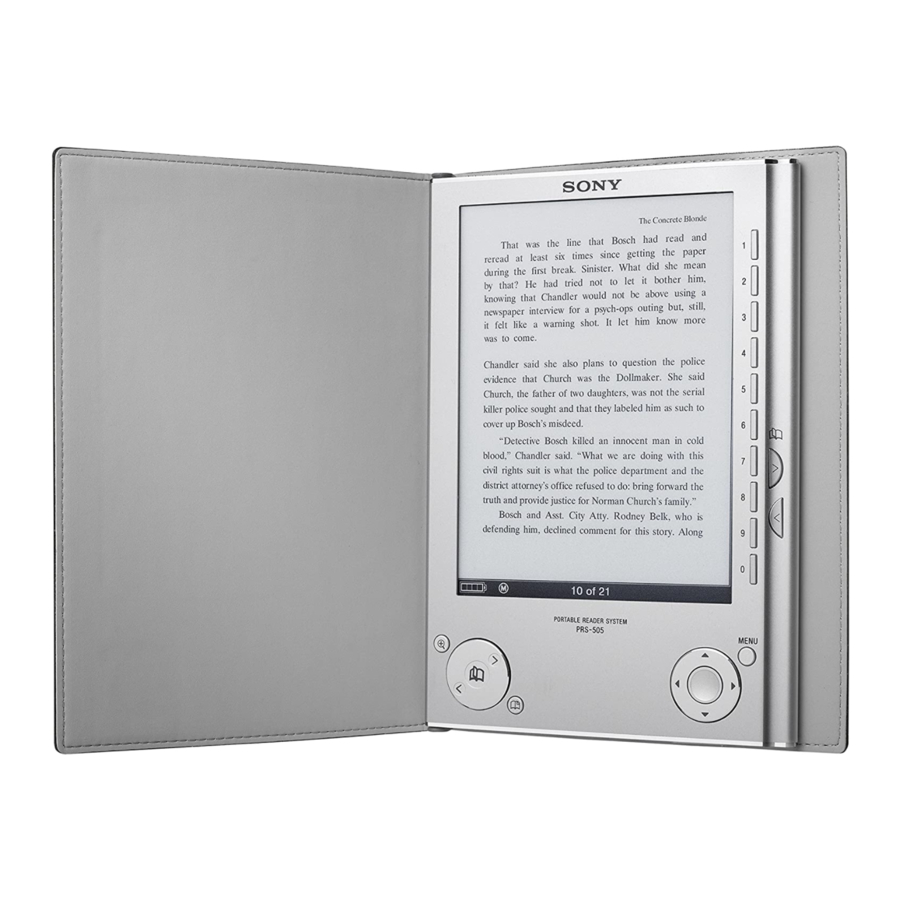
Reader
Jump to the table of contents
User’s Guide
PRS-505
Portable Reader System
© 2007, 2008 Sony Corporation
3-277-508-11(1)
Related Manuals for Sony PRS-505
Summary of Contents for Sony PRS-505
-
Page 1
Reader Jump to the table of contents User’s Guide PRS-505 Portable Reader System © 2007, 2008 Sony Corporation 3-277-508-11(1) -
Page 2: About The Manuals
About the Manuals Included with the Reader is the Quick Start Guide and this User’s Guide. Additionally, after installing eBook Library software from the supplied CD-ROM, you can refer to the Help within eBook Library. Browsing the User’s Guide Browsing this Guide on your computer Click the Start menu in the bottom left of the Desktop, then select “All Programs”…
-
Page 3: Using The Ebook Library Help
Using the eBook Library Help Refer to the eBook Library Help for details about using eBook Library, such as importing books to your computer and transferring them to the Reader. Follow the steps below to start eBook Library and browse Help.
-
Page 4: Table Of Contents
Table of Contents About the Manuals … 2 Browsing the User’s Guide …2 Using the eBook Library Help …3 Introduction What You Can Do with Reader … 7 Guide to Parts and Controls … 8 Basic Operations Menu Operations … 13 Turning on Reader …
-
Page 5
Reading/Playing/Viewing Content Reading Books … 36 Reading books transferred from your computer …36 Jumping to the specified number page directly …43 Switching screen orientation (vertical/horizontal) …44 Displaying the book information …45 Sorting the Book list…46 Selecting a book from the Collection list …49 Creating a bookmark on a page …50 Reading previously displayed pages …53 Deleting a book …54… -
Page 6
Troubleshooting Troubleshooting … 72 Restoring default settings …80 Uninstalling eBook Library … 81 Other Information Updating the Reader’s Firmware … 82 About Books Pre-installed on Reader … 83 Notes on Reader Disposal … 84 Precautions … 85 On safety …87 On installation …87 On heat build-up …88 On the headphones …88… -
Page 7: Introduction
Introduction What You Can Do with Reader First, read the Quick Start Guide to prepare the Reader for use. Initially after purchase, you need to charge the Reader battery, and install the dedicated software “eBook Library” and the software “Adobe Digital Editions” on your computer. Once initial preparation is complete, you can transfer content from your computer to the Reader to take anywhere you wish.
-
Page 8: Guide To Parts And Controls
Guide to Parts and Controls Front Enter button* To decide an item or apply a setting, press the Enter button. /// buttons* To select an item or scroll around the screen, press (left), (up), (down), or (right). In this manual, the operation of the ////Enter buttons are explained as follows.
-
Page 9
MENU button To return to the previous screen or show a menu. ( page (page) / (>/<) buttons To turn the page or proceed/return to the next (>)/ previous (<) content. ( Number (1 – 9,0) buttons To select the numbered items on the screen or input numeric values on the Setting menu. -
Page 10
Holes for soft cover attachment The soft cover is attached when purchased. ( Folds open in use Note • Do not leave the Reader in a high temperature conditions, as it may damage the soft cover. (size) button To zoom in/out a page or picture. -
Page 11
(Headphones) jack To connect headphones (optional). ( VOLUME +/– buttons To adjust the volume. ( To mute the sound, press and hold the VOLUME +/– buttons. To restore the sound, press the VOLUME +/– buttons again. Rear … -
Page 12
About the serial number The serial number provided for the Reader is required for the customer registration. The number is on the label on the rear of the Reader. Do not remove the label. Removing/attaching the soft cover Removing the soft cover … -
Page 13: Basic Operations
Basic Operations Menu Operations You can switch between screens, read/play/view content, or set items, using the ////Enter buttons, number buttons, or MENU. Example: screen transition diagram of the Home menu – Book list – Option menu – Book page Press MENU to return to the previous screen.
-
Page 14
Hints • By pressing and holding switched (vertically/horizontally). ( • By using the number buttons, corresponding numbered items can be selected. • By pressing and holding MENU, the screen can be returned to the Home menu. (size), screen orientation can be page… -
Page 15: Turning On Reader
Turning on Reader Slide the POWER switch in the direction of to turn on the Reader. Slide the POWER switch. The Reader turns on. It may take a few moments to turn on the Reader and the start-up screen to appear when used for the first time, after a reset or shut down, or when the battery has depleted.
-
Page 16
About the Sleep Mode (resume function) You can set the Reader to automatically enter sleep mode. In sleep mode, the Reader automatically turns off if no operation is performed for 60 minutes (resume function). The previously displayed screen appears when turned on by sliding the POWER switch from this state. -
Page 17: About Charging
About charging Charging the Reader is required when using for the first time. Turn on the Reader, and then charge in one of the following two ways. • Connect to a computer via USB (Refer to the Quick Start Guide page 28).
-
Page 18
You can verify the remaining battery power by checking the indicator in the bottom left of the screen. Charge the battery when remaining power is low (the fewer black segments indicated, the lower the remaining power). Note • If the remaining battery power is low, the following warning appears. -
Page 19: Inserting A Memory Card
Cards. miniSD Card adaptor (sold separately) required. Notes • An operation check is performed when using a “Sony Memory Stick Duo” of up to 16 GB, however, operation of all “Memory Stick Duo” is not guaranteed. • An operation check is performed when using an SD Memory Card of up to 16 GB, however, operation of all SD Memory Cards is not guaranteed.
-
Page 20
Inserting a memory card into the Reader Remove the plastic cards from the “Memory Stick Duo” slot and SD Memory Card slot. The plastic cards are inserted in the “Memory Stick Duo” slot and the SD Memory Card slot at purchase. When not using the memory card, insert the plastic card into the slot. -
Page 21
Insert a memory card in the direction with its label side up until it clicks into the place. Note • The Reader has separate slots for “Memory Stick Duo” and the SD Memory Card. Be sure to insert the memory card in the correct slot. -
Page 22
Removing a memory card from the Reader Gently push in the memory card. You will hear a click, and the memory card pops out. “Memory SD Memory Stick Duo” Card Remove the memory card squarely from the “Memory Stick Duo” slot or the SD Memory Card slot. -
Page 23: Importing Content
Importing Content Importing eBooks from eBook Store You can download eBooks from an online eBook store to your computer. Notes • To download eBooks, you need to prepare an Internet-accessible environment on your computer. • You need to authorize eBook Library and the Reader with Adobe Digital Editions.
-
Page 24
Follow the page instructions to purchase (download). You can download eBooks using Adobe Digital Editions. Hints • eBooks can be read on eBook Library using your computer. For details on eBook Library operations, refer to the eBook Library Help. • eBook Library and the Reader support interoperability with Adobe Digital Editions 1.5 or later. -
Page 25: Importing Content From Your Computer
Importing Content from Your Computer You can import content files stored on your computer into Library of eBook Library. You can import the following content files. • Book PDF file* , EPUB file* BBeB Book • Audio MP3 and AAC format audio files (unsecured) –…
-
Page 26: Importing Content Files
Importing content files You can select content files stored on your computer and import them into Library. Click the Start menu, then select “All Programs” – “Reader” – “eBook Library” to start eBook Library. Click “Import Files” on the “File” menu. The “Import Files”…
-
Page 27: Transferring Content
Transferring Content Transferring Content to Reader Connected with Your Computer You can transfer (copy) the content in the Library to the Reader. You can also transfer downloaded content to the Reader using Adobe Digital Editions. For details about usage or support of Adobe Digital Editions, refer to the Adobe information page at the following web site: http://www.adobe.com/go/digitaleditions_uk.
-
Page 28
Connect the Reader to your computer using the supplied USB cable. USB cable (supplied) “Reader” appears in the Source view of eBook Library. A screen appears on the Reader, indicating that it is connected to the computer. Notes • If “Reader” does not appear in the Source view after connecting the Reader to your computer, disconnect the USB cable from the Reader, then reconnect it after a while. -
Page 29
Click “Library” in the Source view, then click view). The View area is switched to the List view and all the content in the Library is listed. Hints • When you click “Books,” “Audio” or “Pictures” in the Source view, only their respective content is displayed. -
Page 30: Transferring Content Via A Memory Card
Hint • You can store computer data into the built-in flash memory of the Reader by transferring the data from your computer using Windows Explorer. Notes • If there is not enough free space on the memory of the Reader, content may not be transferable.
-
Page 31
Insert a memory card into the Media slot of the Reader. ( page “Memory Stick/SD Card on Reader” appears in the Source view. Click “Library” in the Source view, then click view). The View area is switched to the List view and all the content in Library is listed. -
Page 32
( Delete any unnecessary book on the Reader. ( • Do not delete files in the folder under “Sony Reader,” and files in “Sony Reader,” using Windows Explorer. Perform data management on eBook Library. -
Page 33
Click “Reader” in the Source view, then click view). The View area is switched to the List view and all the content in Library is listed. Hints • When you click “Books,” “Audio” or “Pictures” in the Source view, only their respective content is displayed. -
Page 34: Synchronizing Content In Library With Reader
Synchronizing content in Library with Reader You can synchronize content in the Library of eBook Library with the Reader by specifying a folder (such as “Library” or the sub-items under “Library”). The Reader can be automatically updated to match the content in the Library, when you connect it to your computer.
-
Page 35
Hints • eBook Library also starts synchronizing content in Library with the Reader automatically in the following situations: When you start eBook Library after connecting the Reader to your computer. After a period of time when any changes have been made to the specified folder. -
Page 36: Reading/Playing/Viewing Content
Reading/Playing/Viewing Content Reading Books Reading books transferred from your computer Follow the steps below to read books transferred from your computer. In the Home menu, press / to select “Books by Title,” then press Enter. The Book list appears. If the contents of the book on the Reader and the memory card exceed 30 items, the Index menu appears.
-
Page 37
Hints • The content on the memory card also appears in the Book list. • In addition to /, you can also select an item by pressing the same number button as indicated on the number tab. • To display the rest of the list, press > (repeatedly). •… -
Page 38
About the Option menu The book title is displayed. To open the last displayed page. To open the first page of the book. To open the final page of the book. To open the Bookmark list. ( page To open the table of contents of the book or the bookmarks of the PDF file, if contained in the book/PDF file. -
Page 39
Book types supported by the Reader The following are the book types supported by the Reader and their characteristics. eBook (.lrf and .lrx file extension) PDF file* (.pdf file extension) EPUB file* (.epub file extension) Text file (.txt file extension) RTF file (rtf. -
Page 40
Operations on the Book page screen On the Book page screen, the following operations can be performed. Size indicator Current page number/ total page number Button Operation > button To proceed to the next page (press); jump 10 pages ahead of the current page (press and hold). -
Page 41
Button Operation (size) To zoom in/out a page. button Every time you press magnified in steps and returns to the original scale after the maximum magnification. • The scale switches in 3 steps ( , at the bottom of the screen). •… -
Page 42
About screen view of a magnified page If you zoom in on a Book page by pressing characters on the page are magnified. The text is reflowed in the Book page screen, and the original page is divided into multiple divided sections. To display the next section, press > . Notes •… -
Page 43: Jumping To The Specified Number
Jumping to the specified number page directly You can jump directly to a page by inputting the page number with the number buttons. On the Book page screen, press the number buttons to input the page number. The input page number appears in the center of the page.
-
Page 44: Switching Screen Orientation (Vertical/Horizontal)
Switching screen orientation (vertical/ horizontal) Screen orientation (including menu screens) can be switched in the following 2 ways. • Press and hold Press and hold • Configure the setting from the Setting menu. About screen division when screen orientation is set to horizontal When set to horizontal, the Book page is divided into 2 parts (upper and lower).
-
Page 45: Displaying The Book Information
Displaying the book information You can display the book information, such as the title, author, book cover thumbnail, etc. In the Option menu, press / to select “Info,” then press Enter. The book information appears. Options Description Book cover Displays the book cover thumbnail.
-
Page 46: Sorting The Book List
Sorting the Book list On the Book list of “Books by Title”, books are sorted by title alphabetically. You can also sort books by author or date. If the contents of the book on the Reader and the memory card exceed 30 items, the Index menu appears. The Book list can be further sorted by selecting the category item in the Index menu.
-
Page 47
Press / to select how to sort the Book list, then press Enter. Press / to select the desired book from the list, then press Enter. The Option menu appears. Press / to select how to open the book, then press Enter. -
Page 48
About the Index menu Index menu of “Books by Title” and “Books by Author” When selecting “Books by Title” and “Books by Author” You can select the first character of the book’s title or author. A Book list sorted alphabetically by title or author, starting with the selected characters, appears. -
Page 49: Selecting A Book From The Collection List
Selecting a book from the Collection list You can select and read a book from the list of collections created on eBook Library. Hint • For details on how to create or transfer a collection, refer to the eBook Library Help. …
-
Page 50: Creating A Bookmark On A Page
Creating a bookmark on a page You can create a bookmark on a page you may wish to return to. On the Book page screen, press desired page. The mark appears in the top right corner of the page. If you press removed.
-
Page 51
To open the desired page from the Bookmark list In the Option menu, press / to select “Bookmarks,” then press Enter. The Bookmark list appears. Press / to select the desired page, then press Enter. Hints • Bookmarks can also be created in the eBook Library. The bookmarks created on the Reader or eBook Library will be retained when you transfer books between the Reader and eBook Library. -
Page 52
To remove all bookmarks in the current book In the Option menu, press / to select “Utilities,” then press Enter. Press / to select “Remove All Bookmarks,” then press Enter. All bookmarks in the current book are removed. Note •… -
Page 53: Reading Previously Displayed Pages
Reading previously displayed pages The Reader stores all displayed pages in memory for easy recall at any time. On the Book page screen, press . As you press repeatedly, previously displayed pages appear in reverse order. To show the displayed page history …
-
Page 54: Deleting A Book
Deleting a book You can delete a book on the Reader and the memory cards. In the Option menu, press / to select “Utilities,” then press Enter. Press / to select “Delete Book,” then press Enter. Press (MARK) to delete the current book.
-
Page 55: Playing Audio Files
Playing Audio Files Playing audio files transferred from your computer MP3 and AAC files (unsecured) can be played back on the Reader. You can also read books while listening to an audio file. ( page When listening to audio files, connect the optional headphones to the headphone jack.
-
Page 56: Operations On The Playback Screen
• To display the rest of the list, press > (repeatedly). • If an invalid operation is performed, the screen. • If an audio file is played, “Now Playing” can be selected on the Home menu and the Playback screen can be displayed. •…
-
Page 57: Reading Books While Playing An Audio File
Button Operation > button To skip to the next track. < button To skip to the previous track. / To rewind/fast-forward the track. Enter button To stop/restart playing the track. VOLUME +/– To adjust the volume. buttons Reading books while playing an audio file You can read books while listening to an audio file.
-
Page 58
Press / to select how to open the book, then press Enter. The Book page screen appears. While an audio file is played, the volume indicator appears at the bottom of the screen. Hint • To stop playback, press MENU 3 times to return to the Home menu, select “Now Playing”… -
Page 59: Viewing Pictures
Viewing Pictures Viewing pictures transferred from your computer BMP/JPEG/GIF/PNG files can be viewed on the Reader. In the Home menu, press / to select “Pictures,” then press Enter. The Picture list appears. Hints • The content on the memory card also appears in the Picture list. •…
-
Page 60: Operations On The Picture Viewer
Press / to select the desired picture from the list, then press Enter. The Picture appears. Operations on the Picture viewer On the Picture viewer, the following operations can be performed. Current picture number/ total picture number Size indicator Button Operation >…
-
Page 61
To scroll the magnified picture If you zoom in the picture by pressing (size), / / / appear at the edges of the screen. Press /// to scroll the screen. To view a slideshow of pictures You can view a slideshow of pictures. With the slideshow set to on, select the desired picture with which to start the slideshow from the Picture list. -
Page 62: Setting Screen Orientation
Settings Setting screen orientation Screen orientation (including menu screens) can be set to vertical/horizontal. In the Home menu, press / to select “Settings,” then press Enter. The Setting menu appears. Press / to select “Orientation,” then press Enter. The orientation is switched from vertical to horizontal.
-
Page 63: Setting The Date And Time
Setting the Date and Time You can set the date and time displayed on the Reader. In the Home menu, press / to select “Settings,” then press Enter. The Setting menu appears. Press / to select “Date and Time,” then press Enter. …
-
Page 64: Setting The Slideshow
Setting the Slideshow Follow the steps below to configure the slideshow settings. In the Home menu, press / to select “Settings,” then press Enter. The Setting menu appears. Press / to select “Slideshow,” then press Enter. The Slideshow setting screen appears. …
-
Page 65: Setting The Sleep Mode (Resume Function)
Setting the Sleep Mode (Resume Function) You can set the Reader to automatically enter sleep mode. In sleep mode, the Reader automatically turns off if no operation is performed for 60 minutes (resume function). In the Home menu, press / to select “Settings,” then press Enter.
-
Page 66
Notes • The default setting of Sleep Mode is “On.” • In the following states, the Reader does not automatically turn off if no operation is performed for 60 minutes. – When connecting the computer using the supplied USB cable –… -
Page 67: Setting The Advanced Settings
Setting the Advanced Settings You can lock the Reader, format the built-in flash memory, and shut down the Reader. Locking the Reader You can lock the Reader by setting a password. Follow the steps below. In the Home menu, press / to select “Settings,” then press Enter.
-
Page 68
Press the number buttons to input the password, press to select “OK,” then press Enter. Note • Be careful not to forget the password. If you lost your password, please call Sony Support Center. -
Page 69: Formatting The Internal Memory
Formatting the internal memory You can format the built-in flash memory of the Reader. If the memory is formatted, all content will be erased. Note • Be sure to verify the content in memory prior to formatting and transfer any necessary content to the hard disk of your computer or other device.
-
Page 70: Shutting Down Reader
Shutting down Reader If you will not be using the Reader for several days, the power consumption of the battery can be minimized by shutting down the Reader. In the Home menu, press / to select “Settings,” then press Enter. The Setting menu appears.
-
Page 71: Checking Version Information For Reader
Checking Version Information for Reader The product name and the firmware version of the Reader can be displayed. In the Home menu, press / to select “Settings,” then press Enter. The Setting menu appears. Press / to select “About,” then press Enter. The About screen appears.
-
Page 72: Troubleshooting
Troubleshooting Troubleshooting If the Reader does not function as expected, try the following steps to resolve the issue. Reset the Reader by pressing the Reset button with a small pin or clip. The content and settings stored on the Reader are not affected by resetting, and no information is erased.
-
Page 73
Efficiency of the battery will be improved by repeatedly charging and discharging. The battery needs to be replaced. Consult your nearest Sony Service Center. The battery has not been given enough time to charge fully. Charge the battery until the indicator goes off. -
Page 74
Power (continued) Symptom The Reader cannot be turned on. Screen Symptom It takes time for the display to appear. Cause or corrective action Moisture condensation may have occurred. Wait for a few hours and then turn on the Reader. … -
Page 75
Reading/playing/viewing contents Symptom A book cannot be read. An audio file cannot be played back. Sound is not output. Raise the volume if it is set low. A picture cannot be displayed. The data on Continue Reading, Bookmark or History of some files is missing. -
Page 76
Connection to the computer Symptom The Reader cannot be operated during USB connection. The Reader cannot be recognized. Cause or corrective action The Reader cannot be operated while it is connected to a computer. Is the power of the Reader turned on? Is the USB cable connected properly? Verify the above and try again. -
Page 77
Connection to the computer (continued) Symptom Content cannot be transferred to the Reader from your computer. There is no response from eBook Library during communication with the Reader. The Reader becomes unstable while it is connected to the computer. The Reader’s battery cannot be charged. -
Page 78
eBook Symptom An eBook cannot be read. Cause or corrective action You may not have signed up for the service or authorized which is necessary for reading eBooks. Authorize your computer and the Reader. You may have tried to read the content owned by another user. -
Page 79: Memory Card
Memory card Symptom Content on a memory card cannot be read/played/ viewed. Content cannot be transferred to a memory card. A memory card cannot be recognized. Cause or corrective action Check that the memory card is inserted in the Media slot in the correct direction.
-
Page 80: Restoring Default Settings
Restoring default settings All default settings of the Reader can be restored. Notes The following occurs when you restore the default settings. • The screen orientation setting will be vertical. • The password will be erased and the device lock released. •…
-
Page 81: Uninstalling Ebook Library
Click “Start” – “Control Panel.” Double-click “Add/Remove Programs.” * Click “eBook Library by Sony” in the “Currently Installed Programs” list, then click “Remove.” * Follow the on-screen instructions and restart your computer. The uninstallation is complete when the computer has restarted.
-
Page 82: Other Information
Reader has the latest features. The latest firmware updates can be performed from the update menu on eBook Library from “Help” – “Check for Updates.” For details on updates, refer to the eBook Library Help or the following website. http://support.sony-europe.com/eBook/PRS…
-
Page 83: About Books Pre-Installed On Reader
About Books Pre-installed on Reader The Reader is pre-installed with sample data so that you can try it out right away. The pre-installed sample data is for the purpose of trial reading, viewing and listening. About sample data The Reader is pre-installed with sample data. If you delete the sample data, you cannot restore it, and we will not supply any replacement data.
-
Page 84: Notes On Reader Disposal
Notes on Reader Disposal The built-in rechargeable battery of the Reader is recyclable. Do not remove the battery yourself, consult Sony Support Center.
-
Page 85: Precautions
Precautions Disposal of Old Electrical & Electronic Equipment (Applicable in the European Union and other European countries with separate collection systems) This symbol on the product or on its packaging indicates that this product shall not be treated as household waste.
-
Page 86
Notice for customers: the following information is only applicable to equipment sold in countries applying EU Directive The manufacturer of this product is Sony Corporation, 1-7-1 Konan, Minato-ku, Tokyo, Japan. The Authorized Representative for EMC and product safety is Sony Deutschland GmbH, Hedelfinger Strasse 61, 70327 Stuttgart, Germany. -
Page 87: On Safety
On safety • Do not insert any foreign objects in the DC IN jack of the Reader. • Be sure not to short-circuit the terminals of the Reader with metallic objects. On installation • Never subject the Reader to extremes of light, temperature, moisture or vibration.
-
Page 88: On Heat Build-Up
On heat build-up Heat may build up in the Reader while charging, or if it is used for an extended period of time. On the headphones Road safety Do not use headphones while driving, cycling, or operating any motorized vehicle. It may create a traffic hazard and is illegal in many areas.
-
Page 89: Notes On Memory Cards
Notes on memory cards About “Memory Stick Duo” “Memory Stick Duo” is a high-capacity compact IC recording media. Not only can you exchange data among “Memory Stick Duo” compatible devices, but also you can use as an external removable data storage. About SD Memory Card SD Memory Card complies with compact memory card standard and is commonly used as a storage media for…
-
Page 90
• Do not disassemble or modify a memory card. • Do not allow a memory card to get wet. • Avoid the following to prevent data damage. Sony does not provide any guarantee for damaged data. − Remove a memory card or turn off the Reader while reading or writing data. -
Page 91: On Software
• In no event will SONY be liable for any financial damage, or loss of profits, including claims made by third parties, arising out of the use of the software supplied with this Reader.
-
Page 92: On Cleaning
• Recorded content is limited to private use only. Use of the content beyond this limit requires permission of the copyright holders. • Sony is not responsible for incomplete recording/downloading or damaged data due to problems of the Reader or computer.
-
Page 93: On Copyrights
Sony’s permission except for personal use. • SONY and the SONY logo are registered trademarks of Sony Corporation. • BBeB, BBeB Book, and their logos are trademarks of Sony Corporation.
-
Page 94: About Gnu General Public License
• This product includes software developed by the OpenSSL Project for use in the OpenSSL Toolkit. (<http://www.openssl.org/>) Copyright © 1998-2006 The OpenSSL Project. All rights reserved. This product includes cryptographic software written by Eric Young (eay@cryptsoft. com). This product includes software written by Tim Hudson (tjh@cryptsoft.com). For details on OpenSSL License, refer to “openssl.txt” on the CD-ROM. All other system names and product names appearing in this document are generally the registered trademarks or trademarks of their respective manufacturers. Further, the trademark registered trademark ® symbols are not indicated throughout this document. Program ©2006, 2007, 2008 Sony Corporation Documentation ©2006, 2007, 2008 Sony Corporation About GNU GENERAL PUBLIC LICENSE Dear customers Thank you for purchasing this product. Included with this product is the following software which applies to GPL/LGPL. You may obtain, modify and redistribute the source codes of the software. bash fileutils findutils glib glibc grep hardhatutils and Continued…
-
Page 95
These source codes are available on the web site. Access the following web site to download. http://www.sony.net/Products/Linux/ Note that Sony accepts no inquiries concerning the contents of these source codes. For details on GNU GENERAL PUBLIC LICENSE, refer to “GPL (English).rtf,” “GPL (French).rtf,” “LGPL (English).rtf”… -
Page 96: Specifications
Specifications Model name PRS-505 Power source Built-in rechargeable battery: DC 3.7 V AC power adapter: DC 5.2 V Battery life (continuous playback) Approx. 6800 pages with EPUB contents (when the battery is fully charged) User available capacity Approx. 192MB Available storage capacity of the Reader may vary. Operating temperature 5 to 35 °C (41 to 95 °F) Dimensions (w/h/d)
-
Page 97: Index
Index Symbols (MARK) button …10, 50 (page) …9 (size) button …10 < buttons …9 > buttons …9 /// buttons …8 Adobe Digital Editions …7, 23, 25, 27, 39, 51 Advanced Settings …67 Device Lock…67 Device Shutdown …70 Format Internal Memory …69 Audio file …55 Battery …18 BBeB Book …25…
-
Page 98
Import…23 Content…25 eBooks…23 Index.menu..46,.48 Indicator..9 Information..45 Link…41 Manual..2 Media.slot…9,.19 “Memory.Stick.Duo”.slot..9 SD.Memory.Card.slot…9 Memory.Card..19 “Memory.Stick.Duo”..19,.89 MENU.button…9,.13 NEXT.button…40 Number.button..9,.37,.40,.55,.59 Number.tab..37,.55,.59 Option.menu…13,.38 Picture…59 POWER.switch…9,.15 Reading.books..36 while.playing.an.audio.file…57 Reset…72 Reset.button. -
Page 99
Updating …82 USB …28 USB connector …10, 28 Vertical …44, 62 VOLUME button …11…

What You Can Do with Reader
Thank you for purchasing this Sony Portable Reader System PRS-505.
Read through this Quick Start Guide to prepare the Reader for use.
Once initial preparation is complete, you can transfer content from
your computer to the Reader to take it anywhere you wish.
Reading/Playing/Viewing
CONNECT
eBooks
*1
Content (book/audio/
picture fi les, etc.)
*2
*1 Online eBook store
*2 Content that you already have can also be transferred.
For details on content type compatible with the Reader,
refer to the User’s Guide (PDF).
Download eBooks from CONNECT eBooks from your
computer.
Transfer content from your computer to the Reader
using eBook Library.
Enjoy content on the Reader.
Read this manual for initial preparation.
• Charge the Reader.
• Install eBook Library on your computer.
Getting Started
Importing
Transferring
Getting Started
Checking the package contents
The Reader comes installed with a built-in rechargeable battery.
• Reader (with Soft cover) (1)
• USB cable (1)
• CD-ROM (1)
— eBook Library software
— User’s Guide (PDF)
— Sample contents
• Quick Start Guide (this manual) (1)
• Flyers
• Dummy cards (2)
1
1
Note
• This CD-ROM will not play in an audio CD player.
Charging
First, charge the Reader battery, as battery power may not be
suffi cient immediately after purchase.
Turn on the Reader, then connect the Reader to your computer
using the supplied USB cable. The indicator lights up red while
charging, and goes off when charging is complete.
USB cable
To USB connector
Charge indicator
Slide POWER switch
Notes
•
When you connect the Reader to your computer,
(indicating
connection via a USB) is displayed on the Reader’s screen. If the
battery has been fully depleted, it takes about 40 minutes until
is
displayed, and you will not be able to turn on the Reader by the POWER
switch during this time. In this case, wait until
is displayed.
The indicator lights up in red while
is not displayed, and the
Reader is charged.
• If the remaining battery power of a connected notebook computer
is low, charging via USB connection may not be possible.
• If you connect the Reader to a notebook computer which is not
connected to an AC outlet, the battery of the notebook computer will be
drained. Do not leave the Reader connected to a notebook computer
which is not connected to an AC outlet for an extended period.
Hint
• The Reader can also be charged by connecting to an AC outlet
using the AC Adaptor for Reader (AC-S5220E) (optional).
Installing eBook Library
Turn on the computer and start Windows.
Log on using an account with administrator privileges and
connect to the Internet with your computer.
Insert the supplied CD-ROM into your computer’s drive.
The launcher appears.
Select “Install eBook Library.”
The Install Wizard screen appears. Follow the on-screen
instructions to install.
Subsequently, install the User’s Guide as well by selecting
“Install PRS-505 User’s Guide (PDF)” on the launcher.
If the installation is not successful, refer to “When installation is
not successful – Q&A” on this Quick Start Guide.
To start eBook Library
Double-click the eBook Library icon (
) on the Windows
desktop.
Hint
• You can also start eBook Library by clicking the Start menu and
then selecting “All Programs” – “Reader” – “eBook Library.”
3
3
Customer
registration
It is recommended that you perform customer registration by
registering your contact information, which enables Sony to send
you information regarding technical support, software updates, etc.
Select “Product Registration Website” on the launcher.
4
4
System requirements
The following are requirements to use eBook Library.
OS
Microsoft
Windows Vista
Windows Vista Home Basic
Windows Vista Home Premium
Windows Vista Business
Windows Vista Ultimate
Microsoft
Windows XP
Microsoft Windows XP Home Edition
Windows XP Professional
Windows XP Media Center Edition
Windows XP Media Center Edition 2004
Windows XP Media Center Edition 2005
CPU
800 MHz Celeron class processor or better
RAM
128 MB or more (minimum 512 MB for Windows
Vista)
Free space on hard
disc
20 MB or more
Depending on the content amount, more space
may be required.
Monitor
High Color or more, 1024 × 768 pixels or more
(True Color, 1280 × 1024 pixels, or more
recommended)
Other devices
CD-ROM drive, USB port, pointing device such as
mouse or track pad
• Internet connection (broadband recommended, some fees may
apply) is also required on your computer.
• This software is not supported by the following environments:
— An operating system other than those included above
— Personally built computer or operating system
— Upgraded manufacturer-installed operating system
— Multi-boot environment
— Multi-monitor environment
— Macintosh
When installation is not successful — Q&A
Q1
Does your computer meet system requirements?
A1
Check that your computer meets the system requirements listed above.
Q2
Were you logged on as an “Administrator,” did you close all
running software programs before beginning the installation?
A2
Log on as “Administrator.”
Close all running software programs, including background programs
such as virus-protection software.
Q3
The set-up program does not start automatically.
A3
If the set-up program does not start automatically when you insert the
CD-ROM, click “Start” on the Windows taskbar, click “My Computer,” and
then double-click the optical disc drive icon to start the program.
Q4
Is the progress bar in the installation window moving, and the
access lamp of the CD drive fl ashing?
A4
When the bar is moving and the lamp is fl ashing, the installation is still in
progress. Please wait for the installation to fi nish.
If the solutions listed here do not resolve the issue, refer to “Support”
on this Quick Start Guide.
Hint
• For the latest information on eBook Library and to download any software
updates, visit the Web site:
http://www.sony.com/reader
PRS-505
© 2007 Sony Corporation Printed in China
3-274-631-
01
(2)
Portable Reader System
English
About the serial number
The serial number provided for this unit is required for customer registration. The
number is on a label on the back of the unit. Do not remove the label.
Owner’s Record
The model and serial numbers are located on the back of the unit. Record them in the
space provided below. Refer to these numbers in the spaces whenever you call upon
your Sony dealer regarding this product.
Model No. ___________________________
Serial No. ___________________________
On Copyrights
The contents of each book pre-installed on this product are copyrighted works, edited
with the cooperation of the publisher and editor hereto mentioned.
Copyright laws prohibit copying the data of this product or the contents of this manual
(illustrations, related documents, etc.) in whole or in part without the permission of the
copyright holder. Additionally, use of the data of this product or the contents of this
manual is not allowed without Sony’s permission except for personal use.
• SONY and the SONY logo are registered trademarks of Sony Corporation.
• BBeB, BBeB Book, and their logos are trademarks of Sony Corporation.
• “Memory Stick”, “Memory Stick Duo”, “Memory Stick PRO”, and their logos are
trademarks of Sony Corporation.
• Bitstream is a registered trademark, and Dutch, Font Fusion, and Swiss are
trademarks, of Bitstream Inc.
• Microsoft, Windows, Windows Vista and Windows Media are trademarks or
registered trademarks of Microsoft Corporation in the United States and / or other
countries.
• Adobe, Adobe Reader and Adobe PDF are trademarks or registered trademarks of
Adobe Systems Incorporated in the United States and/or other countries.
• MPEG Layer-3 audio coding technology and patents licensed from Fraunhofer IIS
and Thomson.
All other system names and product names appearing in this document are generally
the registered trademarks or trademarks of their respective manufacturers. Further,
the trademark ™ and registered trademark ® symbols are not indicated throughout
this document.
Program ©2006, 2007 Sony Corporation
Documentation ©2006, 2007 Sony Corporation
Reader
Quick Start Guide
Guide de démarrage
How to Use
Read to learn about advanced features
Included with the Reader is this Quick Start Guide and the PDF-format
User’s Guide pre-loaded on the Reader. Additionally, after installing the
supplied eBook Library, you can refer to the Help within eBook Library.
User’s Guide (PDF)
Contains instructions for advanced features of the Reader and
troubleshooting information.
Browsing the User’s Guide on your computer
The PDF fi le of the User’s Guide is
provided on the supplied CD-ROM.
Click the Start menu at the bottom
left of the Desktop, then select “All
Programs” – “Reader” – “PRS-505
User’s Guide” to start Adobe Reader
and open the User’s Guide.
For details on how to use Adobe
Reader, refer to Adobe Reader Help.
Hint
• To view the User’s Guide,
you should have installed
Adobe Reader 5.0 or later.
Adobe Reader can be
downloaded by selecting
“Get Adobe® Reader®” on
the launcher.
Browsing the User’s Guide using Reader
PDF
Link
(size)
The PDF fi le of the User’s Guide is
transferred to PRS-505.
From the Home menu, select
“Books by Title” – “User’s Guide”
from the Book list.
Hints
• A
mark in this Guide indicates a
link. Press
/
to select the desired
link, then press Enter to jump to the
linked page.
• To zoom in a page, press
(size).
eBook Library Help
Provides detailed information about using eBook Library and the
Reader.
Click “Help” − “eBook Library
Help.”
Support
If you encounter an issue, try the following.
• If you cannot install eBook Library
Refer to “When installation is not successful – Q&A” in this Quick
Start Guide.
• For other issues
Refer to the “Troubleshooting” section in the User’s Guide.
If the issue persists
Visit the support site (http://www.sony.com/readersupport).
If the issue still persists
Contact Sony Portable Reader System Support Center.
Phone number : 1-866-962-7669
For details, refer to “Other Information” in the User’s Guide.
Importing eBooks from CONNECT
eBooks to eBook Library
You can purchase (download) eBooks from the online eBook
store “CONNECT eBooks” to your computer.
Hint
• The following explains how to import/transfer/read eBooks. For
details on other content formats supported by the Reader, refer to
the User’s Guide (PDF) included on the CD-ROM.
Note
• To purchase (download) eBooks, you need to prepare an Internet-
accessible environment on your computer.
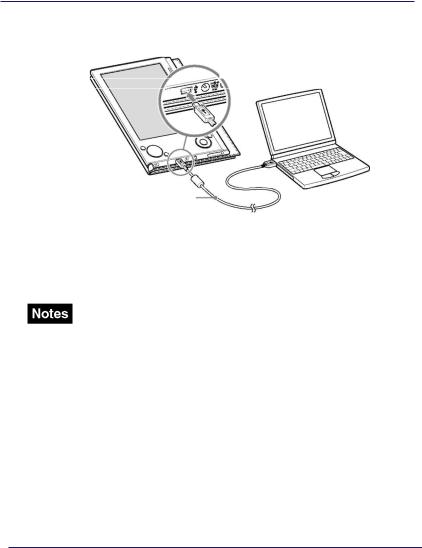
Turn on the Reader, then connect it to your computer
using the supplied USB cable.
Slide POWER switch.
USB cable
To USB Connector
Hint
• When you connect the Reader to your computer with eBook
Library started, the date and time of the Reader is
automatically synchronized with your computer clock.
Click the Start menu, then select “All Programs” –
“Reader” – “eBook Library” to start eBook Library.
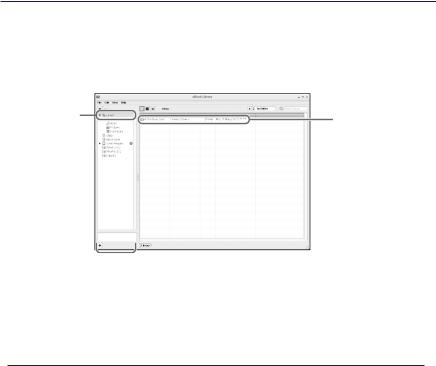
Click “eBook Store” in the Source view of eBook Library.
The eBook Store page appears.
Follow the instructions in the store to authorize the
Reader and your computer.
Authorization is required only on the fi rst visit to CONNECT
eBooks.
Follow the instructions in the store to purchase
(download) eBooks.
Downloaded eBooks are automatically imported to “Library”
in the Source view of eBook Library.
Library
Downloaded
content
Source view
Hint
• eBooks can be read on eBook Library using your computer. For
more information about using eBook Library, refer to the eBook
Library Help.
5
5
Transferring eBooks from your
computer to the Reader
Check that eBook Library is running and that the Reader
is connected to your computer using the USB cable.
“Sony’s Reader” appears in the Source view of eBook
Library.
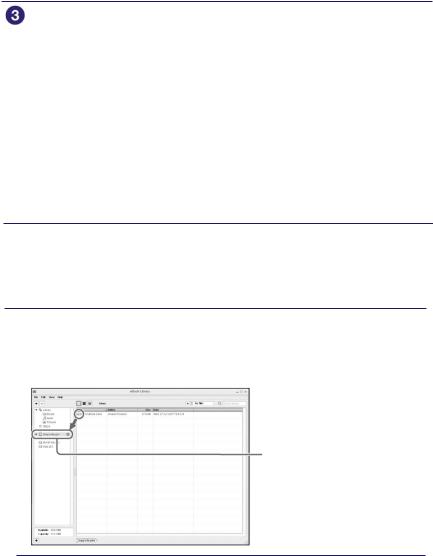
Click “Library” in the Source view, then click
(List view).
The View area is switched to the List view and all the content
in Library is listed.
List view
Library
Hints
• When you click “Books,” “Audio” or “Pictures” in the Source
view, only their respective content types are displayed.
• When you click
(Thumbnail view), content can be displayed
as thumbnails.
Select the content you want to transfer from the list.
To select multiple content, click the content while holding
down the Ctrl key.
Drag the content from the list to “Sony’s Reader” in the
Source view.
The content is transferred to the Reader.
Sony’s Reader
Notes
• Do not disconnect the USB cable from the Reader while data is
being transferred.
• Do not leave the Reader connected for extended periods to a
notebook computer that is not connected to AC power, because
the Reader may drain the computer’s battery.
• If the computer enters a power saving mode, such as the system
suspend, sleep or hibernation while the Reader is connected to the
computer directly, the Reader battery will not be charged. Instead,
the Reader will continue to draw power from its battery, discharging
it.
On transferring via a memory card
• To transfer eBooks to a memory card on the Reader, insert the
memory card in the Reader, then follow the above steps (except
drag and drop the content on “Memory Stick on Sony’s Reader/SD
Card on Sony’s Reader” in step 4). For details, refer to “Transferring
content via a memory card” in the User’s Guide.
• With a memory card slot on your computer or a memory card
reader, you can also transfer content directly to the memory card
and then insert it in the Reader.
If a memory card is inserted in your computer or a memory card
reader, the memory card icon appears in the Source view. Follow
the above steps (except drag and drop the content on “Memory
Stick on PC/SD Card on PC” in step 4) to transfer to a memory
card.
• When inserting the memory card into the Reader, it may take time
for the Reader to recognize the content fi les in the memory card if
the capacity of the content fi les stored on the memory card is large.
6
6
Reading eBooks on the Reader
MENU
1
2
3
4
5
6
7
8
9
0
>
<
(size)
>
<
MENU
Enter
Number
/
/
/
Number tabs
From the Home menu, press
/
to
select “Books by Title”, then press
Enter.
The Book list appears.
If the contents of the book on the
Reader and the memory card exceed
30 items, the Index menu appears. The
Book list can be further sorted by
selecting the category item in the Index
menu. For details, refer to “Sorting the
Book list” in the User’s Guide.
Hint
• You can easily select a desired item by
pressing the same number button as
indicated on the number tab.
Press
/
to select the desired book
from the list, then press Enter.
The Option menu appears.
Press
/
to select how to open the
book, then press Enter.
Press > to proceed to the next page.
To return to the previous page, press <.
or
Press
(size) if you want to zoom in the page.
The page can be magnifi ed.
To restore the original scale, press
(size)
repeatedly.
To close the book
Press MENU.
Hint
• To return to the Home menu, press and hold MENU.
7
7
Home Menu
2
2
Как пользоваться?
Наша цель — обеспечить Вам самый быстрый доступ к руководству по эксплуатации устройства Sony PORTABLE READER SYSTEM PRS-505. Пользуясь просмотром онлайн Вы можете быстро просмотреть содержание и перейти на страницу, на которой найдете решение своей проблемы с Sony PORTABLE READER SYSTEM PRS-505.
Для Вашего удобства
Если просмотр руководства Sony PORTABLE READER SYSTEM PRS-505 непосредственно на этой странице для Вас неудобен, Вы можете воспользоваться двумя возможными решениями:
- Полноэкранный просмотр -, Чтобы удобно просматривать инструкцию (без скачивания на компьютер) Вы можете использовать режим полноэкранного просмотра. Чтобы запустить просмотр инструкции Sony PORTABLE READER SYSTEM PRS-505 на полном экране, используйте кнопку Полный экран.
- Скачивание на компьютер — Вы можете также скачать инструкцию Sony PORTABLE READER SYSTEM PRS-505 на свой компьютер и сохранить ее в своем архиве. Если ты все же не хотите занимать место на своем устройстве, Вы всегда можете скачать ее из ManualsBase.
Руководство по эксплуатации Sony PORTABLE READER SYSTEM PRS-505
Печатная версия
Многие предпочитают читать документы не на экране, а в печатной версии. Опция распечатки инструкции также предусмотрена и Вы можете воспользоваться ею нажав на ссылку, находящуюся выше — Печатать инструкцию. Вам не обязательно печатать всю инструкцию Sony PORTABLE READER SYSTEM PRS-505 а только некоторые страницы. Берегите бумагу.
Резюме
Ниже Вы найдете заявки которые находятся на очередных страницах инструкции для Sony PORTABLE READER SYSTEM PRS-505. Если Вы хотите быстро просмотреть содержимое страниц, которые находятся на очередных страницах инструкции, Вы воспользоваться ими.
- Manuals
- Brands
- Sony Manuals
- eBook Reader
- PRS-505/RC — Portable Reader System
Manuals and User Guides for Sony PRS-505/RC — Portable Reader System. We have 3 Sony PRS-505/RC — Portable Reader System manuals available for free PDF download: User Manual, Quick Start Manual, Limited Warranty
 Loading…
![]()
SONY
Ридер
 Просмотр Руководства на Ридере
  Перейти к содержанию
Руководство пользователя
PRS-505
Портативное устройство чтения
|
2007 Sony Corporation |
3-277-508-01(2) |
О Руководстве пользователя
К Ридеру прилагается Руководство по Быстрому Старту и Руководство пользователя в PDF-формате. Дополнительно, после установки програмы eBook Library с прилагаемого CD-ROM, вы можете вызвать Помощь из eBook Library.
Просмотр Руководства пользователя
Данное Руководство в PDF-формате может быть просмотрено как на компьютере так и на Ридере.
Просмотр Руководства на PC
Нажмите кнопку «Пуск», затем выберите «Все программы»
– “Reader” – “PRS-505 User’s Guide” для пуска Adobe Reader и открытия Руководства пользователя.
О том как пользоваться Adobe Reader, см. Adobe Reader Help.
Совет
• Для просмотра Руководства пользователя, Вам необходимо
установить Adobe Reader 5.0 или более позднюю версию Adobe Reader может быть загружен с сайта Adobe (www.adobe.com).
 2
2
Просмотр Руководства на Ридере
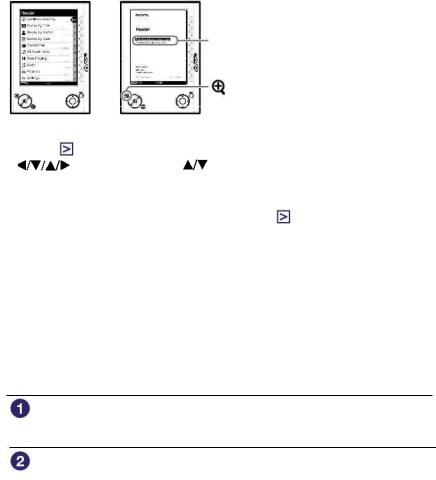
Из Главного меню, выберите “Books by Title” – “User’s Guide” из списка книг. Руководство может быть открыто выбором“Option Menu” –” “Begin.
|
PDF Link |
||
|
(size) кнопка |
||
|
Совет |
||
|
• Знак |
в Руководстве показывает ссылку. Используя кнопки |
|
|
/Enter, нажмите |
для выбора ссылки, затем наж- |
мите Enter для перехода по ссылке.
•Для масштабирования страницы нажмите  (size)
Отом как открыть PDF-книгу, обратитесь [>] на стр. 35, 39.
Использование Помощи Ридера
В файле Помощи Ридера дана детальная информация по работе с eBook Library, как,например, импорт книг в компьютер и загрузка их на Ридер.
Ниже даны шаги по по ипользованию eBook Library и просмотру Помощи (Help).
Нажмите кнопу «Пуск» (Start) на Вашем PC, затем выберите “All Programs”–“Reader”–“eBook Library.”
Выберите “Help”–“eBook Library Help” в панели меню. Появится «Помощь» (Help)
 3
3
Содержание |
|
|
О Руководстве……………………………………………………………. |
2 |
|
Просмотр Руководства пользователя…………………………….. |
2 |
|
Использование помощи Ридера (Help)……………………………. |
3 |
|
Введение |
|
|
Как можно использовать Ридер……………………………………… |
7 |
|
Устройство и органы управления……………………………………. |
8 |
|
Основные операции |
|
|
Меню управления……………………………………………………….. |
13 |
|
Включение Ридера………………………………………………………. |
15 |
|
Использование Memory Card…………………………………………. |
19 |
|
Импорт данных |
|
|
Импорт книг из CONNECT eBook……………………………………… |
23 |
|
Импорт данных с компьютера……………………………………….. |
25 |
|
Импорт файлов………………………………………………………. |
26 |
|
Передача данных |
|
|
Передача данных в Ридер соединенный с компьютером…… |
27 |
|
Передача данных через карту памяти…………………………. |
30 |
|
Синхронизация данных в Library с Ридером…………………… |
34 |
 Продолжение 4
|
Чтение/Прослушивание/Просмотр данных |
|
|
Чтение книг………………………………………………………………… |
35 |
|
Чтение книг загруженных с компьютера……………………….. |
35 |
|
Прямой переход на выбранную страницу……………………… |
40 |
|
Переключение ориентации страницы (vert./horiz.)…………. |
41 |
|
Просмотр информаци о книге…………………………………….. |
42 |
|
Сортировка книг………………………………………………………. |
43 |
|
Выбор книг из списка коллекций…………………………………. |
46 |
|
Создание закладки…………………………………………………… |
47 |
|
Чтение с последней открытой страницы………………………. |
50 |
|
Прослушивание аудио файлов……………………………………….. |
51 |
|
Прослушивание аудио файлов, перемещенных с PC……… |
51 |
|
Чтение книги при прослушивание музыки…………………….. |
53 |
|
Просмотр изображений……………………………………………….. |
55 |
|
Просмотр изображений, перемещенных с PC……………….. |
55 |
|
Настройки |
|
|
Установка ориентации экрана………………………………………. |
58 |
|
Установка даты и времени……………………………………………. |
59 |
|
Установка слайд-шоу………………………………………………….. |
60 |
|
Установка Спящего режима (Resume Function)……………… |
61 |
|
Дополнительные настройки…………………………………………. |
63 |
|
Ограничение доступа к Ридеру………………………………….. |
63 |
|
Форматирование внутренней памяти………………………….. |
65 |
|
Отключение Ридера………………………………………………… |
66 |
|
Информация о версии Ридера……………………………………… |
67 |
 Продолжение 5
|
Поиск неисправностей |
|
|
Поиск неисправности………………………………………………… |
68 |
|
Восстановление первичных настроек………………………… |
76 |
|
Деинсталяция eBook Library………………………………………… |
77 |
|
Прочая информация |
|
|
Обновление прошивки Ридера…………………………………….. |
78 |
|
О книгах, предварительно установленных на Ридере………. |
79 |
|
Повторное использование………………………………………….. |
80 |
|
Меры предосторожности……………………………………………. |
81 |
|
Техника безопасности…………………………………………….. |
84 |
|
Хранение………………………………………………………………. |
84 |
|
Повышенный нагрев……………………………………………….. |
85 |
|
Головные телефоны……………………………………………….. |
85 |
|
Замечания по картам памяти…………………………………… |
86 |
|
Программное обеспечение……………………………………… |
88 |
|
Чистка и уход……………………………………………………………. |
89 |
|
Авторские права……………………………………………………….. |
90 |
|
О GNU GENERAL PUBLIC LICENSE…………………………. |
91 |
|
Технические характеристики………………………………………. |
93 |
|
Алфавитный указатель……………………………………………….. |
94 |
 6
6
Введение
Как можно использовать Ридер
Вначале прочтите Quick Start Guide для подготовки Ридера. Первое что нужно сделать — зарядить батарею Ридера
и установить программное обеспечение “eBook Library” на Ваш компьютер.
После завершения подготовки, Вы можете передать данные с компьютера на Ридер и пользоваться им где Вам угодно.
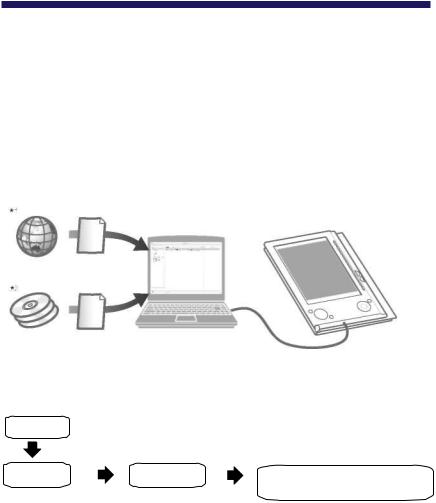
Загружаемые
книги
 CONNECT eBooks (online магазин e-Book)
  Книги/Музыка/Фото Ваши файлы
|
Начало |
Зарядите Ридер, затем загрузите в него данные с |
|
|
компьютера |
||
|
Импорт |
Передача |
Чтение/Прослушивание |
|
Загрузите книги с |
Переместите |
/Просмотр |
|
CONNECT eBooks |
даннае с |
Получите |
|
в компьютер |
компьютера |
удовольствие |
|
на Ридер |
от пользования |
|
|
используя |
Ридером |
|
|
eBook Library |
 7
7
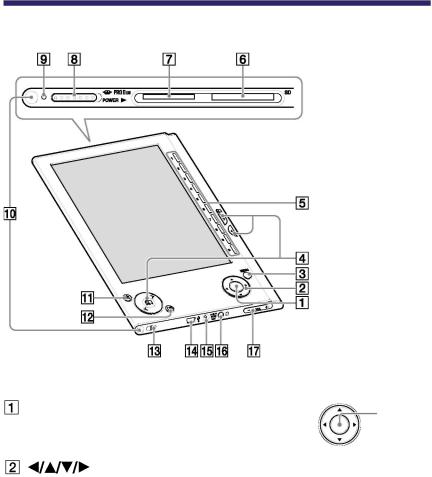
Устройство и органы управления
|
Вид спереди |
|
|
Ввод*1 |
Ввод |
|
Для выбора пункта меню или под- |
ENTER |
|
тверждения изменений, нажмите Ввод |
|
|
клавиши*1 |
Для выбора пункта меню или пролистывания экрана нажмите (вверх),
  (вниз),
 (влево), или
  (вправо).
*1 В этом Руководстве, операци  /Enter описываются так. (Пример) Нажмите
 для выбора “Away” в Book list, затем нажмите Enter.
 Продолжение 8

 МЕНЮ
МЕНЮ
Вернуться к предыдущему экрану или «меню». ( стр. 13)
 (страница) / (>/<)
Перевернуть страницу или продолжить/вернуться к следующей (>)/(<)предыдущей странице.(  стр. 36, 38, 53, 56)
Числа (1 – 9)
Для выбора числовых значений на экране или выбор числовых значений в меню установок.( стр. 36, 38, 51,55)
 SD Memory Card слот
Гнездо для SD Memory Card (опция). ( стр. 20)
 “Memory Stick Duo” слот
Гнездо для “Memory Stick Duo” (опция). ( стр. 20)
 Выключатель
Для включения/выключения Ридера. ( стр. 15)
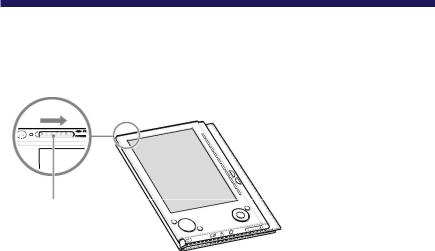
 Индикатор
Красный цвет во время зарядки, гаснет после полной зарядки. ( стр. 17)
Мигает оранжевым цветом при подключение к PC через USB.
Также мигает оранжевым цветом при включение и отключение Ридера.
 Продолжение 9

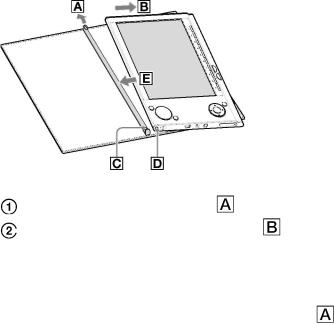
 Отверстия для подсоединения обложки
Мягкая обложка устанавливается при покупке ( стр. 12) В рабочем состоянии открыта.
•Не оставляйте Ридер вблизи источников тепла, они могут повредить мягкую обложк.
 (масштаб)
Для масштабирования страницы. ( стр. 39, 56)
 (ЗАКЛАДКА)
Создание/удаление закладок. ( стр. 47)
 Отверстие для ремешка
Для крепления ремешка.
 USB коннектор
Для подключения USB кабеля. ( стр. 28)
 DC IN гнездо
Для подключения сетьевого адаптора AC.
Совет
•Ридер может быть заряжен от PC при подключении через USB кабель.
 Продолжение 10
![]()
 (Наушники) гнездо
Для подключения наушников. (  стр. 51)
 ГРОМКОСТЬ +/–
Для регулировки громкости. (  стр. 53)
Для отключения звука, нажмите и удерживайте VOLUME +/– . Для включения звука, нажмите VOLUME +/– еще раз.
Обратная сторона
 Reset
Reset
Для холодного перезапуска Ридера, если он не реагирует на другие команды ( стр. 68)
 Продолжение 11
О серийном номере
Серийный номер дается устройству для возможности его регистрации. Номер находится на наклейке на обратной стороне Ридера. Не удаляйте эту наклейку.
Снятие/Установка обложки
Снятие обложки
Оттяните ушко обложки .
Снимите Ридер в направление .
Установка обложки
 Вставте ушко
  обложки в отверстие
  на Ридере.
 Оттяните ушко обложки в направление .
 Установите Ридер в положение
  для соединения с обложкой.
 Убедитесь, что ушки обложки полностью вошли в соответствующие гнезда Ридера.
• Ушки обложки могут деформироваться, если при установке Вы приложите излишние усилия.
 12
12

Основные операции
Меню управления
Вы можете переключаться между экранами, данными, или
|
выбирать опции, используя |
Enter, числовые, |
кнопки или MENU.
Пример: диаграмма переходов экранов Главное меню — Список книг – Меню Опций – Страница книги
Нажмите MENU для возврата к преды-
дущему экрану.
Цифровые кнопки Выбранные пункты засвечиваются черным.
Нажмите для выбора “Books by Title”
Затем нажмите Ввод.
Если в библиотеке более 30 книг, появится алфавитный указатель (  стр. 43, 45)
Нажмите для выбора, Затем нажмите Ввод.
Нажмите  для выбора
затем Ввод.
 Продолжение 13

Совет
• Нажатием и удержанием (масшт.), может быть изменена ориентация экрана (книжная/альбомная). ( стр. 41)
•Цифровыми кнопками могут быть выбраны соответствующие пункты меню.
•Нажатием и удержанием MENU, экран возвращается в Главное меню (Home menu).
 1 4
1 4
Включение Ридера
Для включения Ридера переместите выключатель питания в направлении 
Переместите
выключатель.
Ридер включён.
Может понадобиться некоторое время для включения Ридера и появления стартового экрана при первом использование, после перзагрузки или отключения, при разрядке батареи. При включении световой индикатор горит оранжевым светом.
Выключение Ридера
Для выключения Ридера переместите выключатель питания в направлении  ещё раз.
 15
15

О Спящем режиме (функция продолжения)
Вы можете установить для Ридера автоматический переход в спящий режим. В этом режиме Ридер отключается, если в течение 60 минут он бездействует.
При перемещении выключателя питания POWER из этого положения, откроется последний просмотренный экран. Спящий режим устанавливается из меню Настроек (Setup)
(  стр. 61).
•В следующих ситуациях Ридер не перейдет в спящий режим, даже если он бездействует более 60 минут.
–Когда он подключен к компьютеру через кабель USB
–Когда он заряжается от сети
–Когда на нем проигрываются аудио-файлы.
 16
16

О Зарядке
Зарядка Ридера необходима перед первым включением. Включите Ридер и зарядите его одним из указанных ниже способов.
•Подключите к PC через USB (См. Рук. по Быстрому Старту
истр. 27).
(Время зарядки: примерно. 4 часа*)
•Подключите Ридер к источнику питания используя AC адаптер (опция).
(Время зарядки: примерно. 2 часа*)
*Примерное время, необходимое для полной зарядки батареи.
•При подключении Ридера к компьютеру на экране Ридера,
появится значок . Если батарея полностью разряжена, то потребуется около 40 минут до появления значка  и в течение этого времени Вы не сможите включить Ридер
выключателем POWER. В этом случае, подождите, пока 
появиться на экране. Световой индиатор горит красным светом пока Ридер заряжается, и до появления значка 
•Если заряд батареи ноутбука низок, то заряд Ридера через USB порт ноутбука может быть невозможным.
•Если Вы соединяете Ридер с ноутбуком, который не подключен к сети, для зарядки будет использоваться батарея ноутбука. Не оставляйте Ридер подключенном к ноутбуку, работающим от батареи, на длительное время.
•Подсоединение Ридера через USB хаб или удлинитель не
рекомендуется. Соединяйте USB кабель с компьютером напрямую.
 Продолжение 17
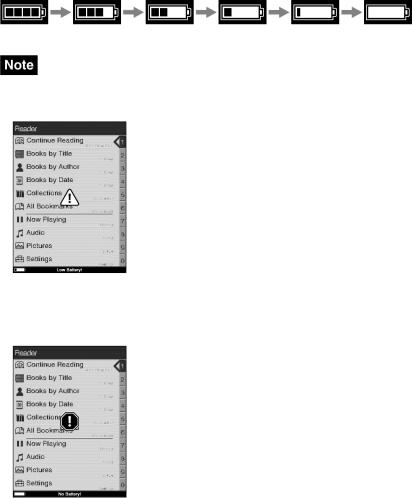
Вы можете контролировать заряд батареи по индикатору в нижнем левом углу экрана. Зарядите батарею при низком заряде батареи (малое количество сегментов на индикаторе говорят о низком заряде батареи).
•При низком заряде батареи, появится следующее предупреждение.Зарядите батарею.
При продолжении использования Ридера без зарядки появится следующее предупреждение и Ридер выключится. автоматически. Зарядите и включите его опять.
 18
18

Использование карт памяти
В Ридере могут использоваться следующие типы карт памяти.
• Ридер имеет раздельные слоты для “Memory Stick Duo” и SD. Убедитесь, что Вы вставляете карту в соответствующий слот. Попытка всавить карту в неподходящий стол может привести к поломке карты и слота.
|
*1 |
“Memory Stick Duo” |
|
“Memory Stick Duo” |
“Memory Stick PRO Duo” |
|
*2 |
SD Memory Card |
|
SD Memory Card |
miniSD Card *3 |
*1 Ридер не поддерживает стандарт MagicGate, поэтому данные, защищенные от копирования не могут быть воспроизведены на Ридере.
*2 Ридер не поддерживает защиту от копирования карт памяти SD
*3Требуется адаптор miniSD Card.
•При использование “Memory Stick Duo” до 8 GB проводится проверка её работоы, однако, работа всех «Memory Stick Duo» карт не гарантируется.
•При использование SD карт до 2 GB проводится проверка их работы,однако, работа всех SD карт не гарантируется.
•После подсоединения карты памяти к Ридеру необходимо время для считывания содержимого карты, если размер файлов на карте большой.
 19
19

Подключение карты памяти
Удалите заглушку из слота “Memory Stick Duo” или SD карты.
Заглушки карт памяти “Memory Stick Duo” и SD установлены при продаже.
Если Вы не пользуетесь картами памяти, установите заглушки на место.
•Если заглушки на поставить в слот карт, то инородные тела попавшие в слот могут вызвать его повреждение.
 Продолжение 20
![]()
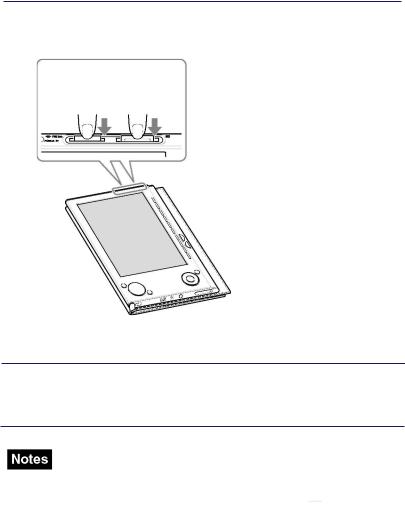
Вставьте карту памяти в направление указанном значком сбоку до её фиксации.
•Ридер имеет раздельные слоты для “Memory Stick Duo” и SD. Убедитесь, что Вы вставляете карту в соответствующий слот Попытка вставить карту в неподходящий слот может привести к поломке карты и слота.
|
“Memory |
SD Memory |
|
Stick Duo” |
Card |
|
Метка |
Метка |
•Убедитесь, что Вы вставляете карту в правильном направление.
Применение силы при непровильной установке карты может привести к ее поломке.
•Не устанавливайте несовместимые карты памяти. Это может привести к возникновению неисправностей.
•Не используйте деформированные карты или адапторы.
 21
21
Извлечение карты памяти из Ридера
 Аккуратно нажмите на карту.
Услышите щелчек и карта выдвинется из слота.
“Memory SD Memory
Stick Duo” Card
 Извлеките карту памяти из слота “Memory Stick Duo” или SD Memory Card.
•Не извлекайте карту памяти и не выключайте Ридер во время записи/считывания, данные могут повредиться
•Подробнее по работе с картами памяти см.  стр. 86.
 22
22

Импорт данных
Импорт книг с CONNECT eBooks
Вы можете загрузить книги на Ваш PC из он-лайн магазина “CONNECT eBooks”.
Используйте предназначенную для этого программу eBook Library.
•Для загрузки книг Ваш компьютер должен иметь доступ в Интернет.
•Для соединения с CONNECT eBooks Вы должны пройти процедуру авторизации.
Для загрузки и чтения книг Вы так же должны пройти процедуру авторизации Ридера на CONNECT eBooks.
Дополнительную информацию смотрите в eBook Library Help.
 Щелкните дважды на иконку eBook Library (
 ) на Рабочем Столе PC.
Совет
•Вы также можете запустить программу, выбрав «Пуск» и затем “Все программы” — “Reader” — “eBook Library.”
Выберите “eBook Store” на экране Source.
Окно View переключится в Store и появится соединение с CONNECT eBooks.
 Продолжение 23
 Следуйте инструкции по покупке (загрузке) книг.
Загруженные книги автоматически импортируются в“Library” в окно Source.
Library
Загруженные
книги
Окно Source
Совет
Купленные книги группируются на Ридере в коллекцию “Purchased”.
Совет
•Книги можно читать в eBook Library на Вашем PC.
Детальная информация по работе с eBook Library смотри в eBook Library Help.
•Экран Source может иметь различный вид, в зависимости от Вашего компьютера.
 24
24

Импорт данных с компьютера
Вы можете импортировать данные с Вашего PC в библиотеку eBook Library.
Вы можете импортировать следующие файлы данных.
• Книги
PDF, Txt, RTF, Word файлы*, книги BBeB
• Аудио
Некодированные MP3 и AAC аудио файлы
– MP3 файлы (с расширением .mp3 )
Импортируются MP3 файлы со следующими параметрами Битрейт: 32 to 320 kbps
Частота: 22.05, 44.1 kHz
– AAC файлы (с расширением .mp4, .m4a, .mov, или .qt) Импортируются AAC файлы со следующими параметрами
Битрейт: 40 to 320 kbps Частота: 24.0, 44.1, 48.0 kHz
• Изображения
Bitmap, JPEG, GIF, и PNG файлы
*Word — файлы будут автоматически конвертированы в RTF если Microsoft Word установлен на Вашем компьютере.
Более подробно о файлах данных, которые можно импортировать смотри в eBook Library Help.
 25
25

Импорт файлов
Вы можете выбрать файлы данных на Вашем PC для импорта их в Library.
 Выберите «Пуск» затем «Все программы»- «Reader»-«eBook Library» для старта eBook Library.
Выберите»Import Files» в меню»File» .
Откроется диалог “Import Files”.
 Нжмите
  «Look in» для выбора каталога содержащего файлы данных, предназначенных для импорта в Ридер.
В выбраном каталоге появятся файлы данных.
Совет
Можно также щелкнуть два раза на каталоге (в списке каталогов ) для получения списка файлов данных.
 Выберите файлы для импорта.
Для выбора нескольких файлов, выбирайте файлы, удерживая клавишу Ctrl.
 Нажмите «Open».
Файлы данных импортируются в Library.
Совет
Можно импортировать все файлы в Library из каталога, выбрав “Import Folder” в меню “File”.
 26
26

Передача данных
Предача данных в Ридера с PC.
Вы можете передать (скопировать) данные из Library в Ридер.
• Если Ридер защищен паролем компьютер его не опознает и Вы не сможете передать данные. ( page 63) Если Ридер подключен к PC отключите его, и снимите защиту, введя пароль.
Cовет
•Книги могут быть сгруппированы в Library в коллекции, которые могут быть скопированы в Ридер. Дополнительную информацию смотри в eBook Library Help.
•Вы можете синхронизировать библиотеку в eBook Library с Ридером определив каталог (напр. “Library” или подкаталог в “Library”). ( page 34) Ридер будет автоматически
отслеживать изменения в Library, после соединения его с Вашим компьютером.
 Нажмите «Пуск», затем “All Programs” – “Reader”
– “eBook Library” для старта eBook Library.
 Продолжение 27
 Cоедините Pидер с компьютером используя USB кабель.
к USB
USB кабель
В окне Source eBook Library появится “Sony’s Reader”.
На Ридере откроется экран, свидетельствующий о том, что он соединился с компьютером.
• Если после подключения Ридера к PC сообщение “Sony ‘s Reader” не появилось в окне Source, необходимо отключить
изаново подключить кабель к компьютеру.
•При подключении Ридера к PC, на экране Ридера появится
 (соединение через USB). Если батарея Ридера полностью разряжена потребуется примерно 40 минут до появления
 знака, в это время Вы не сможете включить Ридер выключателем питания POWER. В этом случае дождитесь появления
  знака . Индикатор будет гореть красным цветом до тех пор, пока не появиться
 и пока Ридер заряжается.
 Продолжение 28
В окнеSourceвыберите“Library”,затем щелкните на  (List view — C одержание).
Произойдет переход от экрана View к экрану List с перечнем всех данных в Library.
Совет
•При выборе Books, Audio или“Pictures в окне Source, отобразятся только соответствующие данные.
•При выборе  (иконки), данные будут отображаться в виде
иконок.
• Вы можете создавать коллекции в Library и коллекции могут передаваться в Ридер. Более подробно о том как создавать и передавать коллекции, см. eBook Library Нelp.
 Выберите из списка данные, которые Вы будете передавать.
Для выбора нескольких файлов, выделяйте файлы при нажатой клавише Ctrl.
 Перетащите данные из списка в“Sony’s Reader” в окне Source.
Данные переместятся в Ридер.
Sony’s Reader
 Продолжение 29