Installation
When installing SpaceEngine, please do not install on top of an older version! Install to a new folder instead.
Automatic Installation (EXE installer)
If you downloaded the executable installer, simply run the installer and follow the instructions. Note: SpaceEngine will automatically configure itself to use the language you select during installation.
Manual Installation (ZIP archive)
If you downloaded the .zip archive version, open the archive and extract it to a location of your choice. If desired, add a shortcut to the SpaceEngine executable (SpaceEngine/system/SpaceEngine.exe) to your desktop or taskbar.
Note: SpaceEngine is a portable application. To copy SpaceEngine to another PC, simply copy the program’s folder and paste it there.
Quickstart
The purpose of this section is to give you a basic overview of everything you need to know to get started in SpaceEngine.
Many topics are not covered here, and those that are covered here are covered in greater detail elsewhere in the manual.
Startup
Launch the program from a shortcut you created when you installed, or directly from the executable/SpaceEngine/system/SpaceEngine.exe. The startup process make take 1-2 minutes the first time, so please be patient.
When the program has loaded, you will see the main menu. This menu can be accessed at any time by pressing [Esc]. The «Settings» page allows you to adjust various options, including language. To change your language, go to the «Player» menu. When you are ready to enter the universe, select «Planetarium» from the main menu’s main page.
Interface
Once in the Planetarium, you’ll notice on your screen a HUD displaying information in several locations. The text in the upper-left displays information about the selected object: its name, type and classification, its distance from you, its temperature, mass, diameter, surface gravity, and so on. The text in the lower-left tells you what object the camera is bound to and the binding mode, the current date and time, your current velocity/acceleration setting, and your actual velocity. The text in the lower-right tells you the limiting magnitude of objects (the dimmest objects visible), and your camera’s current field of view (FOV). The animated circle which sometimes appears in the upper-right tells you when something is being loaded or generated.
You can enable graphical toolbars onscreen (if they’re not already enabled by default) to give easy access to most common controls. This is recommended for new or casual users so that you don’t have to memorize dozens of keyboard commands. The toolbars are located on the edges of the screen at the center-left, center-right, bottom-left, and bottom-right. Move the cursor over these areas to show the toolbars. To see the function of a button, hold your cursor over it. To lock the toolbars open, press the pin icon. For the bottom toolbars, pressing the pin again will set them in a half-closed state until you move your mouse over them, at which point they will open and expose the buttons again.
Camera control
The camera can be moved in any direction and rotated along any axis. To move the camera, press the [W] [A] [S] [D] [R] [F] keys. [W] [A] [S] and [D] move forward, left, backward, and right respectively, similar to most games. [R] and [F] move up and down. To rotate the camera horizontally and vertically, hold the Left Mouse Button [LMB] and move the mouse. To rotate the camera around its long axis, press the [Q] and[E] keys. As an alternative to the above keys and the mouse, you can use the Arrow Keys and Numberpadto move and rotate the camera. To change the speed your camera moves it, scroll the mouse wheel, or use the [+] and [-] keys on the Numberpad.
Selecting Objects
To select an object on the screen, simply move your cursor over it and left-click. To select an object by name, open the Find Object menu, either using the toolbar button or by pressing [F3]. You may then start typing the name of the object you wish to select. When you’ve partially completed a name, you may select it in the list, or you may finish typing it manually. When you have the name input, pressing [Ok] or [Enter] will close the menu and select the object, and pressing [Go To] will automatically fly your camera to the object.
You can browse the planetary system of the currently selected object by opening the Planetary System Browser, either by using the toolbar button or by pressing [F2]. In the system browser, you can select each object by left-clicking on it. To browse up and down the hierarchy of a system, right-click on an object. Right-clicking on a planet will display its moons (if any), right-clicking on a sun will show its planets (if any), and so on. To move back up, right-click on the planet/sun/barycenter at the far left of the list.
Finally, if you want a quick way to select «home», pressing [Shift]-[H] will cycle between selecting the Milky Way, the Sun, and Earth.
Autopilot
To automatically go to a selected object, press [G]. Press [G] a second time to go there faster. Alternately, you can use the Go To toolbar button, which always moves at the faster speed. To center an object on your screen, press [C], or press the Center toolbar button.
Time Control
Information about the current time and rate of time flow is visible in the lower-left HUD section and its toolbar. You can control the flow of time by using the buttons on the right of the lower-left toolbar, or by using the following keyboard commands. Pressing [L] will increase the rate at which time passes. Pressing [K] will decrease this rate. Pressing [J] will reverse the flow of time. Pressing [] (backslash) will set real-time speed (1x forward). Pressing [Ctrl]-[] will set the time to the current real-world time according to your computer’s clock.
Field of View
By default, the camera’s field of view (FOV) is 45°. Your current FOV will always be displayed in the lower-right corner of the screen. There are a few ways to change your camera’s (FOV). Initially, pressing the middle mouse button [MMB] will toggle the camera’s FOV between the default FOV (45°) and the default zoom FOV (20°). After manually changing the FOV using one of the following methods however, [MMB] will toggle between the default FOV and your last-used FOV. On the keyboard, the [Home] key serves the same function. You can use this to quickly reset the FOV to default, and quickly return to your last FOV setting if you wish. You can decrease or increase your FOV (zoom in or out) by holding [Shift]-[LMB] and moving the mouse forward and backward. You can also use [PgUp] and [PgDn] on the keyboard.
Graphics
SpaceEngine has two graphical options that all users will find especially useful: landscape level of detail (LOD), and autoexposure. To open the Graphics menu, use the settings button on the left toolbar, or press [Ctrl]-[F4]. The slider at the upper-right of the window controls Landscape LOD. It ranges from -2 (lowest detail) to 2 (highest detail). This affects the rendered level of detail on detail planet landscapes, planet clouds, and the surfaces of stars. Note: higher LOD settings require progressively greater amounts of memory. LOD 2 cannot be used as a typical setting unless you have a very high end graphics card with at least 4GB of VRAM, though it can still be used in some situations on cards with less memory, like when setting up screenshots, or if you are running SpaceEngine at a low resolution. LODs -1 to 0 are recommended for cards with 1-2GB of VRAM, and LODs between -1 and -2 should be used on cards with less than 1 GB of memory. Land on a planet and explore with different LOD settings to see what effect it has on your system.
Autoexposure adjusts the limiting magnitude of objects when bright objects are on the screen, like planets and suns, so that faint objects like distant planets and stars become dim or invisible when bright objects are in view. This simulates the behavior of eyes and cameras in reality. You can toggle this option on the left side of the graphics menu, or using the [V] key.
Fullscreen
To switch between fullscreen and windowed mode, and to adjust your resolution, open the Display menu, either through the Main Menu or by pressing [Ctrl]-[F8]. You can use the settings in the Window Mode section to set your resolution and change between fullscreen and windowed. You can also toggle between fullscreen and windowed mode by pressing [Ctrl]-[Enter].
Screenshots
There are two types of screenshots you can take in SpaceEngine. The first is a screenshot which captures the scene but does not include the interface, so you can take a clean screenshot even with HUD text and interface items open. The second is a screenshot which does include the interface. To take a screenshot without the interface, press [F11]. To take one with the interface, press [Ctrl]-[F11]. Screenshots taken with SpaceEngine are stored in a folder called screenshots in your SpaceEngine folder.
Spacecraft
See the main spacecraft section of the manual to learn about using and controlling spacecraft.
That’s it, you should now be ready to take your first steps into the universe with SpaceEngine! To learn more about the program, read the rest of the user manual below.
24 июля 2019
24.07.19
7
11K
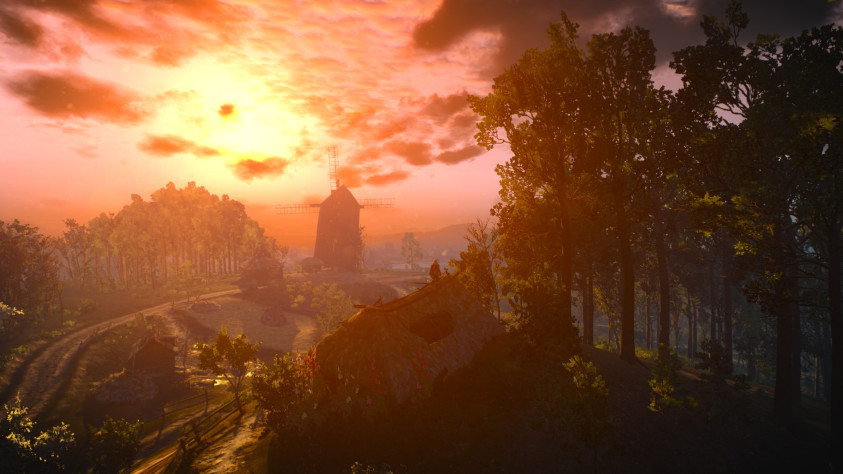
Большинство привыкло считать Ведьмака или Horizon: Zero Dawn красивыми играми, кто-то опровергнет это показав им Forza Horizon 4 или Skyrim с сотней модов, но геймплей названных проектов не предусматривает то, что игрок будет часами рассматривать пейзаж, вид на который открывается с вершины горы, или невероятно долго выискивать ракурс для идеального скриншота, а, может, будет их делать тысячами. Не отрицаю, что в том же Ведьмаке даже на стартовой локации мне удалось сделать под сотню скриншотов, ну или достаточно вспомнить RDR 2…
Правда, мало, кто задумывается, что изначально окружающий мир в этих играх не только приземлен, хоть и фантастически красив, но и является лишь оберткой для игрового процесса…
Доброго времени суток, всем, кто случайно наткнулся на эту статью, и сегодня я представляю вам обзор проекта Space Engine, который изменит все ваше представление о красоте окружающего мира в играх.
Начать хотелось бы с упоминания того, что об этом проекте я узнал совершенно случайно и буквально пару дней назад, причем сразу же купил, что является нонсенсом, а запустив, понял, что обязан сделать обзор.
Что же такое Space Engine? Если верить описанию в Steam, это научно достоверный и фотореалистичный трехмерный космический симулятор, моделирующий всю Вселенную. Моделирование происходит лишь на основе данных, полученных человечеством за столь краткий период изучения космоса. Несомненно, в реальности большинство объектов, представленных в Space Engine, отличается от компьютерного макета, правда, если уж задумываться над этим, наши знания и так невероятно ничтожны, а данный проект, возможно, их хоть как-то расширяет.
Но в чем же суть игрового процесса в подобной…игре, спросите вы. В путешествиях, отвечу я.
Вы будете путешествовать по вселенной, путешествовать по далеким галактиками и туманностям, путешествовать по поверхности сгенерированных и настоящих планетоидов, вы даже сможете посетить запечатленную лишь недавно черную дыру.
Опять же, если верить Steam и официальному сайту разработчиков, в Space Engine можно создавать самолеты и космические корабли для путешествий, но, к сожалению, пока я лишь освоил режим свободной камеры. Серьезно, игра настолько технологически наворочена, что для изучения всех возможностей потребуется не один десяток часов. Вы только посмотрите на информационный интерфейс при все том же режиме свободной камеры, а потом взгляните на настройки управления. Лично я, лишь интуитивно, спустя час понял, как отключить информационный блок.
Замечу, что вот такой высокий порог вхождения в 100% случаев губительно воздействует на восприятие потребителем проекта любого уровня. И Space Engine является настоящим исключением из этого правила. Ведь именно этот громоздкий, первоначально непонятный, интерфейс, позволяет пользователю, изучая его, осознать, что ему нужно от проекта.
Space Engine можно использовать для изучения астрономии, потому что при подлете к любому объекту вам показывается его масса, скорость, удаленность от ближайшей звезды, наличие и процентное содержание кислорода в атмосфере, если такая есть и еще множество других параметров, встроенный Wiki-помощник дает возможность просто узнать что-то новое о звезде или планете, потому что в пару кликов у тебя выводятся известные факты об объекте, вы можете изучать созвездия, включив функцию их дорисовки.

В конце концов, можно просто наслаждаться путешествием по космосу, делая шикарные снимки или перескакивая на другой конец галактики, сменив скорость полета колесиком мыши.
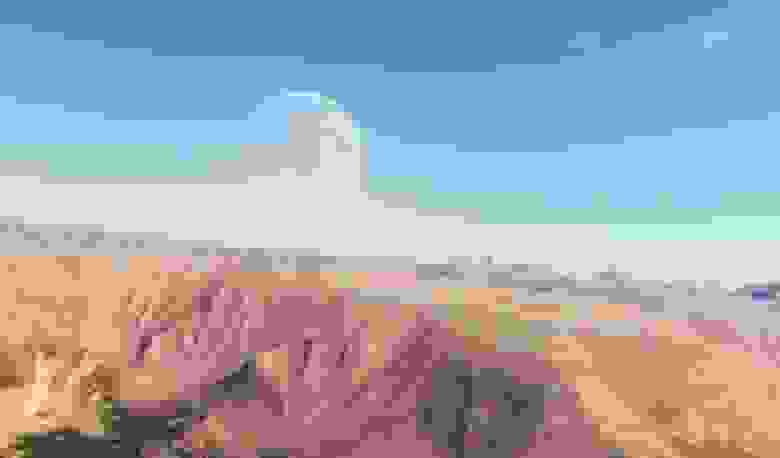
И вот так плавно я дошел до главной особенности Space Engine – космоса. Как же фантастически он выполнен! Учитывайте сразу, что разработкой занималась отечественная команда всего из нескольких человек, а до раннего доступа она шла целых девять лет. Несмотря на это, даже сейчас все в проекте выглядит невероятно красочно. Многие, случайно встречаемые вами, планетоиды имеют высокую детализацию, между прочим, вы можете приземлиться на них и пройтись.
Окружающий вас космос сам по себе выглядит фантастически, а какое количество прекрасных объектов тут можно увидеть… Кроме того, пользователи могут делиться координатами найденных мест, и поверьте на слово, те места, если их можно так назвать, просто невозможно описать словами. Самое интересно, что вся эта красота спокойно отрисовывается на относительно среднем железе.
А еще здесь необыкновенный космический саундтрек, который ты сам включаешь в специальном музыкальном плеере. Да и в пару кликов можно добавить свои композиции, вот так и получилось, что почти полчаса я летал под заглавную тему «Интерстеллара» от Ханца Циммера, и, опять же, это невозможно передать словами…
60 лет назад люди наблюдали на своих черно-белых экранах высадку человека на Луну, тогда все мечтали, глядя на небо, о том, чтобы хоть когда-нибудь посмотреть на Луну вблизи, и 60 лет спустя у меня на жестком диске установлена игра, хотя, это даже сложно назвать игрой, которая позволяет ступить, хоть и на виртуальную, но на поверхность, практически, любой планеты, пролететь сотни галактик на скорости в 326 миллионов км/с или размеренно облететь скопление звезд или же нашу родную Землю.

Я прекрасно понимаю, что этот обзор выглядит, как скомканное субъективное мнение, да и надо выставить какую-то оценку. И получается так, что если я поставлю оценку ниже максимальной («Изумительно»), то обману сам себя, с другой стороны, любители динамического экшена могут вдруг заявить, что Space Engine – это очередной No Man’s Sky, кстати, возможно именно такой должна была быть игра, но что-то пошло не так.
Эх, в любом случае, мне придется сделать какой-то выбор…
Не зря я указал на то, что Space Engine – это проект, который сложно назвать «игрой», но именно такой проект, можно назвать «произведением искусства».
А, как мы знаем, произведения искусства не обязаны нравится всем, но от этого они не перестают быть шедеврами.
P.S. Извините, что не скрыл кадры, но они, правда, невероятны, и я хотел показать их всем.
Содержание
- Space engine как настроить
- Space engine как настроить
- Graphics quality
- Vertical synchronization
- MSAA antialiasing
- Landscape LOD
- Landscape loading speed
- Self-emission
- Planet shine
- Eclipse shadows
- FXAA antialiasing
- Dithering
- Ring shadows on sky
- Landscape target resolution
- Warp & refl. resolution
- Warp/reflection quality
- Black hole quality
- Aurora quality
- Ship engine quality
- Planet shine
- Anisotropy level
- Detail textures
- 3D stones
- Compress textures
- Interstellar reddening
- Volumetric rings quality
- Rings target resolution
- Rings resolution
- Fast temporal rendering
- Volumetric objects resolution
Space engine как настроить


| 2,292 | уникальных посетителей |
| 56 | добавили в избранное |

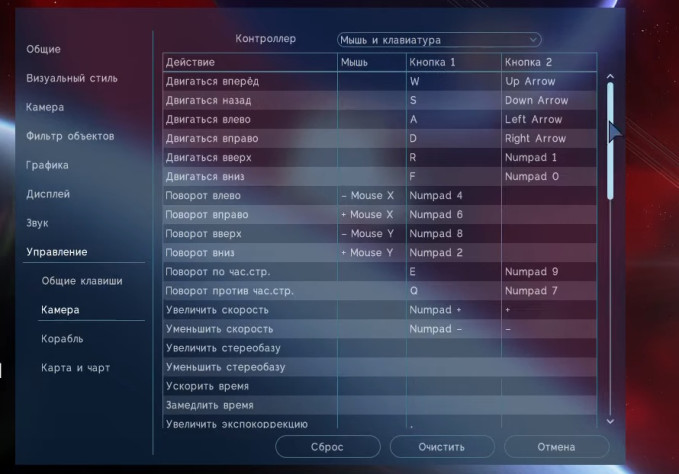
Visual style settings menu, edited to extend the window to fit all settings without scrolling.
This option allows you to adjust the strength of the FidelityFX Contrast Adaptive Sharpening (CAS) filter. Higher values produce greater apparent image sharpness.
This setting has options ranging from 0 to 1, in increments of 0.01. A value of 0 means no sharpening is applied.
This option allows you to adjust the strength of a simple post-processing brightness filter. Note that this only adjusts the output levels of the image (brighter turns black into gray, and darker turns white into gray), and does not actually make dim or bright objects more properly exposed; for that you should adjust exposure.
This setting has options ranging from 0 to 2, in increments of 0.01. A value of 1 means no brightness adjustment is applied.
This option allows you to adjust the strength of a simple post-processing contrast filter. Higher values increase contrast, while lower values decrease contrast, with the entire image becoming a featureless gray color at 0 contrast.
This setting has options ranging from 0 to 2, in increments of 0.01. A value of 1 means no contrast adjustment is applied.
This option allows you to adjust the strength of a simple post-processing saturation filter. As of version 0.990.39.1775, this is actually a «vibrance» filter, not a linear saturation filter, which means the amount it changes a pixel’s saturation by depends on how saturated it was to begin with. Lower values mean less saturated colors (though some color is still visible even at 0 saturation), and higher values mean more saturated colors.
This setting has options ranging from 0 to 2, in increments of 0.01. A value of 1 means no saturation adjustment is applied.
This option allows you to adjust the strength of a simple post-processing gamma filter. Gamma changes the value of each pixel in an image by an exponent — higher values mean a brighter image with less contrast, and lower values mean a darker image with more contrast.
This setting has options ranging from 0 to 2, in increments of 0.01. A value of 1 means no gamma adjustment is applied.
This option allows you to adjust how saturated the color of light emitted from incandescent light sources is (e.g. stars). Lower values mean less saturated lighting color, and higher values mean more saturated lighting color.
Enabling the Auto checkbox tells the program to present the color of sunlight in a way that’s similar to how the human eye might perceive it; light with a color temperature that’s close to the white point of the chosen black body color system (see next setting) will appear white, and color that’s increasingly far away from white will appear increasingly saturated (so light from a brown dwarf might look very red-orange, but light from a red dwarf would only have a muted yellow-orange tint, and light from an orange dwarf would have either a very subtle tint or no noticeable color at all).
When the Auto setting is disabled, this setting has options ranging from 0 to 2, in increments of 0.01. A value of 1 means the light color has no saturation adjustment, and a value of 0 means that all sunlight (even from brown dwarfs) is pure white.
Bloom refers to light from bright pixels «bleeding» onto adjacent pixels in the image, thus allowing bright pixels to convey information about their brightness even if they are brighter than the screen can display. Bloom is an optical phenomenon that occurs in camera lenses and in the human eye.
The checkbox allows you to enable or disable the bloom effect, while the slider allows you to change the magnitude of the bloom effect, ranging from 0 (no bloom) to 1 (maximum bloom), in increments of 0.01.
This slider allows you to change the brightness of the glare effect, on a logarithmic scale ranging from 0.1 (dimmest) to 10 (brightest).
Diffraction spikes are the «spiky» component of lens flares seen around very bright objects (in SpaceEngine, specifically around suns).
The checkbox allows you to enable or disable diffraction spikes, while the drop-down menu allows you to choose different visual options for them. Experiment and use the one you like best.
This slider allows you to change the brightness of diffraction spikes, on a logarithmic scale ranging from 0.1 (dimmest) to 10 (brightest).
Lens flares in this case refers to lens flare «ghosts» — the visual artifacts that accompany diffraction spikes when viewing suns, and which are arranged on a line passing through the sun and the center of the screen.
The checkbox allows you to enable or disable these flares, while the drop-down menu allows you to choose different visual options for them. Experiment and use the one you like best.
This option allows you to select how distant planets (distant enough to appear point-like) are rendered. The options are identical to those for star points (see above).
Enabling this checkbox will cause all star/planet points to be scaled according to screen/window resolution, so that the ratio of point size to screen/window height is always the same, regardless of the resolution you’re using. The reference resolution is a height of 1080 pixels, so if your resolution is smaller than 1080 px in height, the star points will be made smaller, and if your resolution is larger than 1080 px in height, the star points will be made larger.
Источник
Space engine как настроить

Graphics settings menu, edited to extend the window to fit all settings without scrolling. Example settings above tuned for use with a 2560×1440 display and GTX 1080 Ti graphics card.
Graphics quality
This option allows you to select between several different graphics quality presets. The options are:
- low — minimal graphics quality settings best suited to computers with weak GPUs (graphics processors), or which have less than 4 GB of dedicated video memory (VRAM)
- medium — improved graphics quality settings best suited to computers that meet SpaceEngine’s recommended hardware requirements, including having at least 4 GB of VRAM
- high — high graphics quality settings best suited to computers with relatively high-end GPUs, and which have at least 6 GB of VRAM
- ultra — maximum graphics quality settings best suited to computers with extremely high-end GPUs, and which have at least 6 GB of VRAM
- custom — unlocks all graphics settings, allowing you to change each one to suit your preference
Vertical synchronization
Vertical synchronization, more commonly called «vsync», synchronizes the output of rendered frames from the program to the refresh timing of your screen — this prevents the screen from being told to draw a new frame before it finishes drawing the previous one, which can cause tearing (a noticeable horizontal cut in the image at the point where the screen switches from drawing one frame to another). It also prevents the program from rendering frames more quickly than your screen can draw them, which saves processing power. This setting has the following options:
- off — vsync is turned off, and the program will render as many frames as possible and deliver them to your screen as soon as they’re done, regardless of whether your screen is ready to draw them or not
- on — vsync is turned on, and the program will only render and deliver frames to your screen when the screen is ready to draw a new frame
- auto — if the program can render frames faster than your screen’s refresh rate, vsync will turn on; otherwise, vsync will turn off — this option essentially functions as a framerate limiter, with the limit set to your screen’s refresh rate
MSAA antialiasing
Aliasing refers to the jagged, hard edges that objects appear to have on screen, caused by the limited number of pixels available, and each pixel either containing an object or not. Antialiasing refers to techniques that try to reduce this effect by smoothing the edges by allowing pixels to contain an intermediate value between object and no object, making edges seem more natural.
MSAA (multi-sampling antialiasing) is an antialiasing technique that samples multiple points in a pixel along the edge of an object while rendering, and averaging the result, thus increasing the effective resolution of object edges. Note that MSAA is very performance intensive, especially at high settings, and most settings will reduce performance noticeably on all but the highest-end graphics cards (and very high sample counts will noticeably decrease performance even then).
This setting has the following options:
- off — MSAA disabled
- 2 — 2 samples per pixel (small performance impact, small visual improvement)
- 4 — 4 samples per pixel (medium performance impact on mid-range hardware, good visual improvement)
- 8 — 8 samples per pixel (significant performance impact on most hardware, very good visual improvement)
- 16 — 16 samples per pixel (huge performance impact on all hardware, excellent visual improvement) *not supported on all GPUs*
- 32 — 32 samples per pixel (colossal performance impact on all hardware, excellent visual improvement) *not supported on all GPUs*
Landscape LOD
This option allows you to change the level of detail (LOD) that the surfaces of planets and stars are rendered at. Higher values cause more detailed terrain to be rendered at farther distances, but increase the amount of time it takes to fully generate the landscape. Note that in the current version, landscape tiles are stored in a texture array of limited size — this means that it is not possible to fully render the landscapes of some planets (which have many texture layers, like multiple cloud layers, lava/lights, etc.) at maximum detail, depending on your screen resolution and viewing angle. If you encounter a situation like that, reduce the LOD value until everything can fully load.
This setting has options ranging from -1.0 to 1.0, in increments of 0.1.
Landscape loading speed
This setting determines how many landscape tiles can be generated during each frame the program renders. Higher values mean that landscapes can finish rendering more quickly, but at the cost of reduced framerate during loading/generation.
This setting has options ranging from 1 texture per frame to 20 textures per frame, in increments of 1.
Self-emission
This checkbox enables or disables emissive (glowing) textures for planets and spacecraft.
Planet shine
This checkbox enables or disables illumination of objects by light reflected from planets/moons/etc.
Eclipse shadows
This checkbox enables or disables shadows cast by planets/moons onto other objects.
FXAA antialiasing
This checkbox enables or disables FXAA (fast approximate antialiasing). FXAA is a shader-based antialiasing method that blurs high-contrast boundaries in the image to make aliasing less noticeable. It has a very small performance impact, but can make the image look blurry, and makes background stars look dim.
Dithering
This checkbox enables or disables an extremely subtle animated noise pattern on the image, which can significantly reduce banding artifacts (most noticeable in the sky of a planet with an atmosphere, or in the background «milky way»). This can improve image quality with no performance impact, but can significantly increase the file size of PNG screenshots.
Ring shadows on sky
This checkbox enables or disables displaying the shadows of rings on a planet’s atmosphere.
Landscape target resolution
This setting allows you to limit how detailed the terrain will be on high-resolution displays. If your screen resolution is higher than the setting you choose, SpaceEngine will act as if your screen resolution is what this setting is set to for the purposes of landscape generation (e.g. if you are using a 1440p display, and you set this setting to 1080p, then the same landscape tiles will be generated as they would be for someone using a 1080p screen). This helps to prevent the landscape texture arrays being overloaded on high resolution displays, and can be used to reduce landscape generation time for low-end hardware.
This setting has the following options:
Warp & refl. resolution
This setting allows you to choose the environment map resolution used with spacecraft reflections and gravitational lensing (e.g. from black holes, neutron stars, warp drives). Higher values result in higher quality reflections (though in most cases settings above 1024 or 2048 will not be noticeable), but will decrease performance and increase VRAM usage.
This setting has the following options, which represent the width of each environment map face in pixels:
Warp/reflection quality
This setting allows you to adjust the update frequency of the spacecraft reflection and warp effect environment maps, or disable them entirely.
This setting has the following options:
- off — spacecraft reflections and space warping effects are disabled
- low — spacecraft reflections are disabled, space warping that requires data from outside the screen area is filled with mirrored screen imagery (low performance impact)
- medium — spacecraft reflection and space warping environment maps are updated at a rate of one face per frame, meaning the full environment map is updated once per six frames (medium performance impact)
- high — spacecraft reflection and space warping environment maps are fully updated for each rendered frame (huge performance impact)
Black hole quality
This setting allows you to adjust the update frequency of gravitational lensing environment maps (for black holes, neutron stars, and white dwarfs), or disable them entirely.
This setting has the following options:
- off — gravitational lensing effects, as well as accretion disks and relativistic jets, are disabled
- low — gravitational lensing that requires data from outside the screen area is filled with mirrored screen imagery (low performance impact)
- medium — gravitational lensing environment maps are updated at a rate of one face per frame, meaning the full environment map is updated once per six frames (medium performance impact)
- high — gravitational lensing environment maps are fully updated for each rendered frame (huge performance impact)
Aurora quality
This setting allows you to adjust the level of detail (sprite density) used in planetary auroras.
This setting has the following options:
- low — auroras use a small number of low-detail sprites
- high — auroras use large number of high-detail sprites (small performance impact)
Ship engine quality
This setting allows you to adjust the level of detail (raymarch step length) used for spacecraft engine exhaust effects.
This setting has the following options:
- low — half as many sample steps as default/medium quality, noticeable decrease in engine effect quality (small performance improvement)
- medium — default setting, same quality as in older SE versions
- high — 2x as many sample steps as default/medium quality, noticeable increase in engine effect quality in some cases (moderate performance impact)
- ultra — 5x as many sample steps as default/medium quality, quality increase only noticeable on a few engine effect types (medium-high performance impact)
Planet shine
This setting allows you to adjust the color and brightness accuracy of reflected light (planet shine).
This setting has the following options:
- low — light reflected from certain catalog planets (e.g. Earth, Mars) will be colored according to the color value specified in their catalog files; all other objects will reflect white light
- medium — all planets have their average color calculated from an image of their sun-facing side when they are loaded (very small performance impact)
- high — all planets have their average color calculated from an image of their sun-facing side every 8 frames (potentially large performance impact)
Anisotropy level
This setting determines the amount of anisotropic filtering applied to textures (this makes textures much less blurry when seen at a shallow angle).
This setting has the following options (all have a negligible performance impact on most modern graphics hardware):
- off — disables anisotropic filtering
- 2
- 4
- 8 — recommended for users with low-end hardware
- 16 — recommended for most users
Detail textures
This checkbox enables or disables detail textures (grass, rocks, dunes, etc.) that are visible on the ground. Users with low-end hardware should keep this disabled.
3D stones
This checkbox enables or disables displacement mapping for detail textures (gives the textures height variations). Note that not all detail texture materials have displacement maps.
Compress textures
This checkbox enables or disables texture compression. Texture compression converts textures into a compressed format that requires less memory to store — this comes at the expense of slightly reduced performance and increased loading times, and a minor loss of visual quality. Users limited amounts of VRAM — less than 4 GB — should keep this option enabled.
Interstellar reddening
This checkbox enables or disables the reddish color shift of light partially blocked by dust in volumetric raymarched nebulae (in the real world, interstellar dust blocks shorter wavelengths of light, like blue, more strongly than longer wavelengths, like red, causing objects viewed through dust to appear redder than they otherwise would). Note that this setting only affects raymarched nebulae, and does not affect sprite-based nebulae or galaxies.
Volumetric rings quality
This setting allows you to adjust the quality of upscaling used for 3D volumetric planetary rings, or disable 3D rings entirely. Note: these settings only have an effect if you are rendering the rings at less than your native resolution (i.e. when they are being upscaled). If the rings target resolution and rings resolution settings below are set such that the rings render at the same internal resolution as the window SE is running in, there will be no difference between low/medium/high for this setting.
This setting has the following options:
- off — volumetric rings are disabled, only flat 2D rings will be rendered
- low — volumetric rings are upscaled using bilinear filtering
- medium — volumetric rings are upscaled using bicubic filtering (almost identical performance to «low» setting, looks more blurry but aliasing is less noticeable)
- high — volumetric rings are upscaled using bicubic filtering with sharpening, with FXAA applied to the result (small performance impact compared to low/medium)
Rings target resolution
This setting allows you to limit the internal rendering resolution of the 3D rings. If your screen resolution is higher than the setting you choose, SpaceEngine will render the rings at the chosen resolution (e.g. if you are using a 1440p display, and you set this setting to 1080p, then the rings will be rendered at 1080p and upscaled to 1440p). This allows you to increase your screen resolution without the rings resolution changing, thus preventing a huge performance drop in that case.
This setting has the following options:
Rings resolution
This setting determines what resolution scale the volumetric 3D rings are rendered at. The scale is relative to either your current screen resolution or the rings target resolution set above, whichever is smaller. The internal resolution the rings are rendered at will be the value of this setting multiplied by the resolution as determined in the previous sentence. For example, if rings target resolution is set to 1440p, and SE is running in a window/screen that has a vertical resolution of 1440 pixels or more, and rings resolution is set to 0.85, then the internal resolution of the rings will be 1440 * 0.85, or 1224 pixels vertically. This is then upscaled to your window/screen resolution. Note that if this value is set to 1.0, and if the rings target resolution is at least as high as your window/screen resolution, then the rings will be rendered at native resolution and thus won’t be upscaled.
This setting can be set to a value of 0.1 to 1.0, in increments of 0.05.
Fast temporal rendering
This checkbox enables or disables a performance-enhancing temporal rendering method for 3D rings. With this setting enabled, only 1/4 of the ring’s pixels will be rendered in each frame, thus spreading the rendering load across 4 frames. This offers a huge performance boost, equal to reducing the rings resolution value by half, but causes noticeable ghosting if ring particles move a significant amount between frames, since any given pixel in the image is only updated once every 4 frames. If the camera is stationary relative to the ring particles, or moving/rotating slowly, this effect will not be noticeable.
Volumetric objects resolution
This setting determines what level of detail volumetric objects (galaxies and nebulae) are rendered at under different circumstances. While moving refers to what resolution the object is rendered at when the camera is moving enough to noticeably change its perspective of the object. While stationary refers to what resolution the object is rendered at while the camera is stationary, or moving too little to change the perspective of the object (in this case, the object is rendered to a skybox texture). Increasing the «while moving» value can have a very large performance impact, while increasing the «while stationary» value has a much smaller impact, but does increase VRAM usage.
This setting can be set to a value of 0.1 to 1.0, in increments of 0.05; the numbers indicate the amount the full resolution of the object will be multiplied by to get the new resolution (in the case of «while stationary», this means the resolution of the skybox texture relative to the resolution of the display or window SpaceEngine is running in).
Источник
Navigation menu in version 0.9.8.0
In SpaceEngine, the camera is controlled using the mouse and keyboard. There are three control modes: Free mode, spacecraft mode and aircraft mode. These can be toggled by pressing keys [1], [2] and [3]. The camera in Free mode uses no inertia, whereas SpaceCraft and Aircraft mode uses inertia.
Free mode[]
Free mode is the default camera navigation mode and can by pressing the [1] key. The controls are similar to a First-Person Shooter game using WASD+Mouse which controls orientation and movement of the camera.
Spacecraft mode[]
Spacecraft mode can be set by pressing the [2] key. In this mode, inertia is enabled and the user sets an acceleration rather than a velocity.
Aircraft mode[]
This mode can be set by pressing the [3] key. This mode is similar to spacecraft mode in that inertia is enabled and the user sets the acceleration. However, this mode differs from spacecraft mode in that the direction of motion follows the orientation of the camera.
Время на прочтение
8 мин
Количество просмотров 97K
My God, it’s full of stars!
 My God, it’s full of stars!
Arthur C. Clarke
Кто из нас в детстве не мечтал «бороздить просторы вселенной», как капитан Пикард, прогуливаться по неизведанным планетам далёких миров, встречать рассветы двойных или тройных звёзд, погружаться в атмосферы газовых гигантов, ронять корабли в чёрные дыры? И я тоже не исключение. Конечно, частично эту мечту воплощали книги, фильмы и «Элит»-ные игры. Но вся романтика в них разрушалась банальными купи-продай и «пиу-пиу» в «жидком» космосе на скоростях самолётов времён первой мировой войны. Да и тем немногим виртуальным миркам не хватало свободы, детальности и масштабов реальной вселенной.
В начале тысячелетия я познакомился с MojoWorld и был шокирован его возможностями. Наконец-то, можно было бродить по другим планетам и фотографировать местные достопримечательности. Он стал первой ласточкой, дававшей надежду на то, что полномасштабные космические миры технически возможны. Но, к сожалению, производительности железа десятилетней давности было не достаточно для передачи всех красот в реальном времени. Да и планеты оставались всего лишь мёртвыми пейзажами.
Но вот, чуть больше года назад, я совершенно случайно наткнулся на вселенную Space Engine, и она просто взорвала мне мозг и размазала его по полу своим масштабом и невероятной детализацией.
Как всё это выглядит?
Первое, что бросается в глаза – это реальные размеры нашей вселенной. Что такое сотни миллиардов галактик и сотни миллиардов звёзд в каждой из них? – всего лишь сухие цифры в учебнике астрономии. Но здесь, всё это ощущается на собственной шкуре. И начинаешь понимать, насколько же наше человечество со всеми своими мелочными проблемами и мышиными войнами ничтожно по сравнению с величаем и непостижимостью Вселенной. Нет, мы не песчинки, и даже не пылинки, мы вообще ничто. И никто даже не заметит, если наше солнце вдруг завтра погаснет и очередная цивилизация канет в лету, так и не оставив после себя никакого наследия.
Кроме этого удивляет абсолютная свобода перемещения. Можно лететь куда угодно с бесшовными переходами между поверхностью планет, орбитой, звёздами и галактиками.
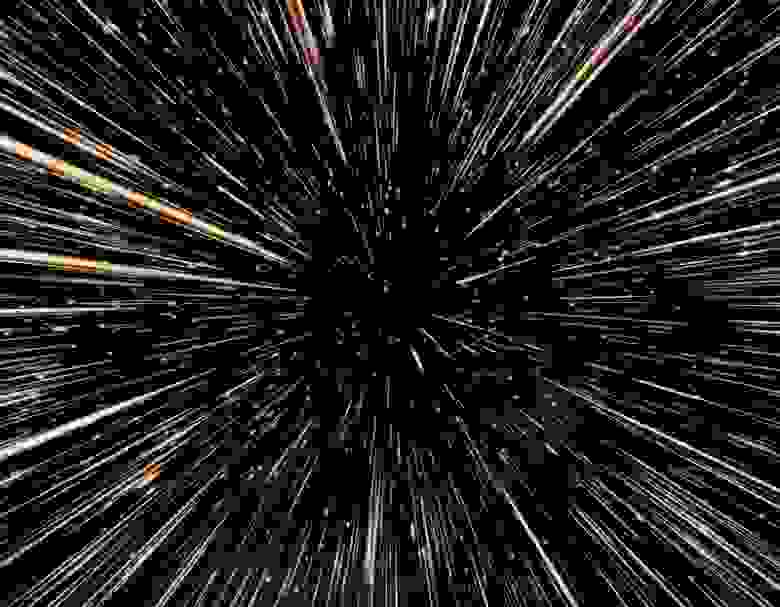
Да, это не скринсейвер «сквозь вселенную», тут каждую пролетающую звезду можно посетить, побродить по её планетам, их спутникам и астероидам.
Конечно, в Space Engine, как и в любом другом уважающем себя планетарии (например, недавно упомянутой Celestia), есть и отображение орбит космических тел и подробной информации по ним, и управление временем, и различные затмения (в том числе от планетарных колец), и возможность рендерить в проекции «рыбий глаз» для проекторов планетария. Но, самое главное то, что он не ограничен каталогами звёзд HIPPARCOS и галактик NGC/IC (которые тоже есть), а генерирует вообще всю обозримую вселенную со всеми типами объектов, что в ней можно встретить. Но при этом основывается исключительно на научных данных и актуальных теориях и моделях, что позволяет использовать Space Engine как полноценное (и безумно красивое) пособие по астрономии.
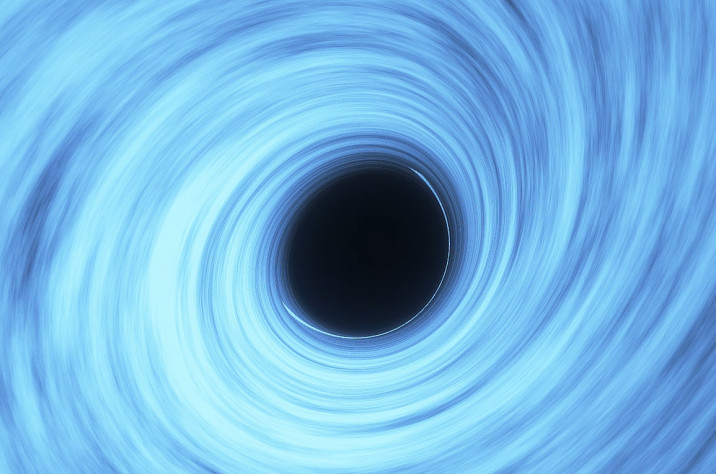
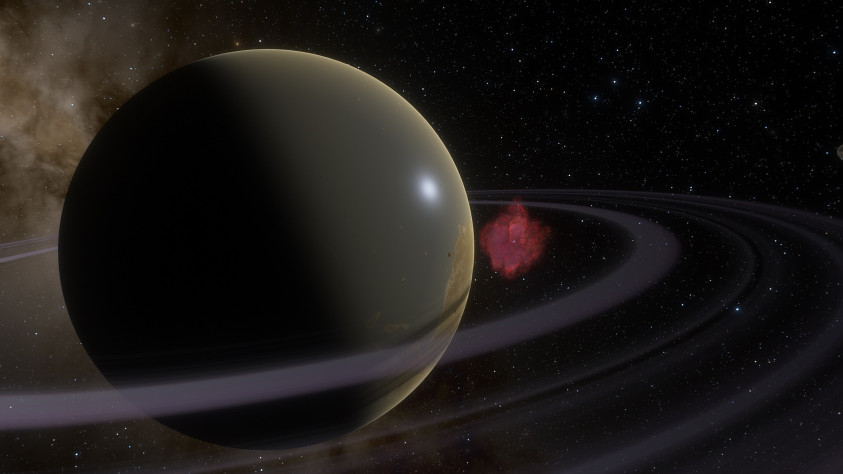
Тут можно своими глазами увидеть космического pac-man-а. Хотя на самом деле, это чёрная дыра с гравитационной линзой на фоне голубого сверхгиганта:

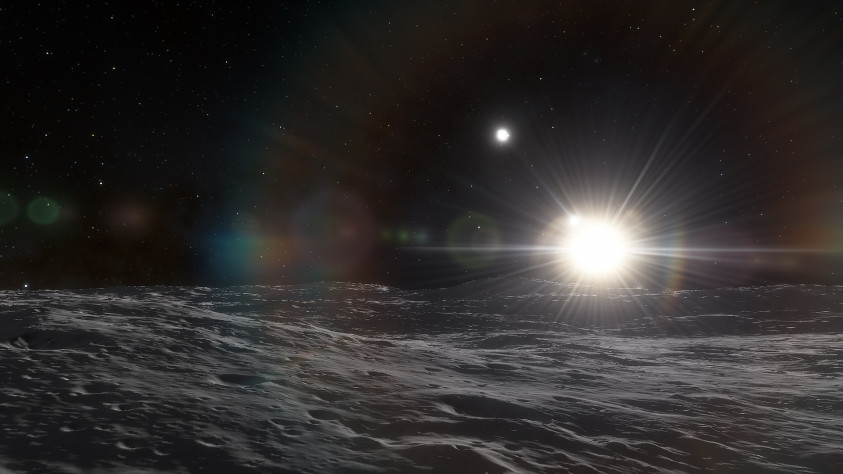
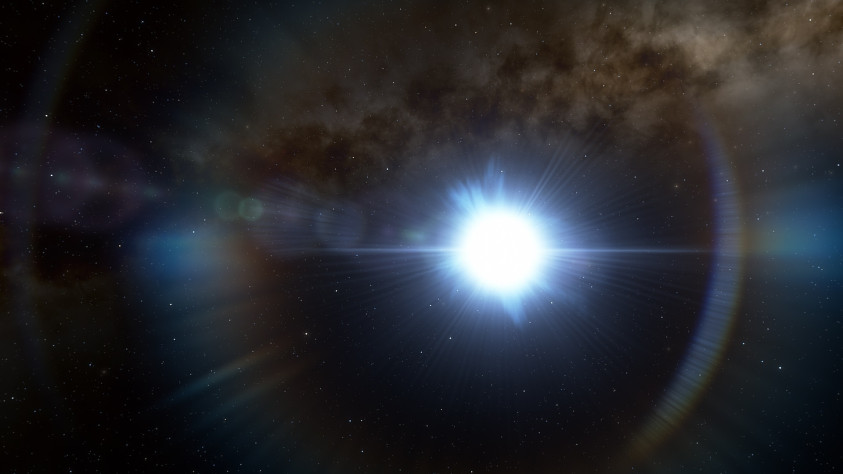
Встретить восход двойной звезды (встречаются даже восьмикратные звёзды):

Посетить соседние и не очень галактики, туманности, звёздные скопления. Узнать, как выглядят красные гиганты, нейтронные звёзды, и многое другое. Не буду сильно спойлерить, просто оставлю несколько картинок.
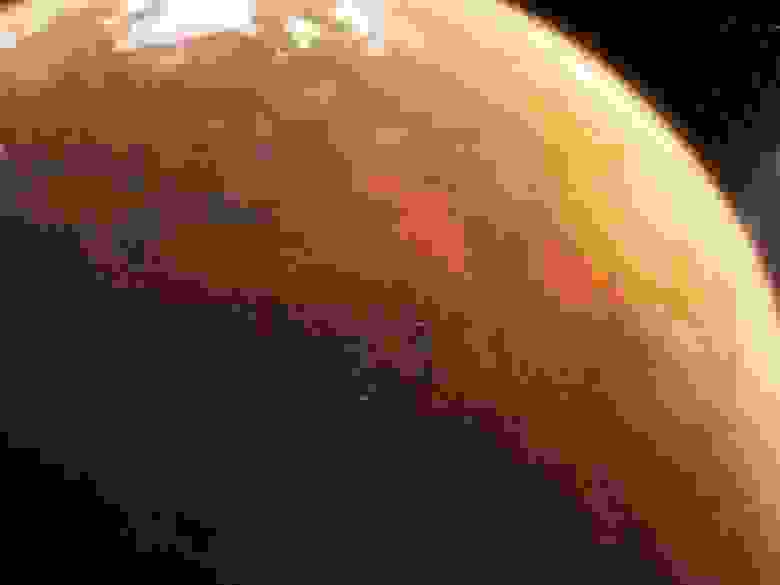


Кстати, как вы думаете, как будет выглядеть планета, которая всегда обращена одной из своих сторон к звезде? Знакомьтесь, приливно-синхронизированная (оказывается это так называется) пустыня. С одной стороны ночь и вечная мерзлота, с другой – выжженная звездой поверхность и огромный супер-циклон, который никогда не останавливается.
Так же как и в Celestia, к Space Engine можно скачать официальные дополнения с текстурами планет солнечной системы и некоторых их спутников в высоком разрешении. Так, например, базовая комплектация «весит» 500 МБ, а полный размер всех дополнений примерно 10 ГБ.
Чего еще не хватает?
К сожалению, еще много чего. Космос куда более разнообразен и удивителен, чем всё, что уже реализовано в Space Engine, но с каждой версией автор со всей тщательностью переносит в свою вселенную частичку настоящей. Например, на картинке с чёрной дырой и голубым гигантом для полного счастья не хватает аккреационного диска и джетов, которые пока в планах. Также пока в планах хвосты комет, квазары, отдельные камни в планетарных кольцах и десятки других деталей, которые сделают вселенную еще более полной, точной и красивой. Так что работы еще очень много.
Что ещё можно будет делать?
На данный момент программа представляет собой бесплатный интерактивный планетарий с зачатками космического симулятора (то есть летать на шаттле над поверхностями планет и ронять корабли в чёрные дыры можно уже сейчас).

В дальнейшем на основе этого же движка планируется разработка MMO игры с упором на исследование космоса, поиски артефактов, строительством и развитием колоний и баз на планетах, астероидах или орбитах газовых гигантов. Никаких телепортаций, «жидкого» космоса и голливудских «пиу-пиу». Да и что делить в такой огромной вселенной?
Для того чтобы летать между планетами и звёздами, придётся вспомнить хотя бы основы астрономии, траектории небесных тел, что такое первая, вторая, третья космические скорости, характеристическая скорость, удельный импульс и прочие атрибуты реальных космических путешествий. Также придётся следить за расходом топлива и реактивной массы (да это потенциально разные вещи), чтобы не остаться «внезапно» в открытом космосе без возможности вернуться в обитаемые системы. Планируется и конструктор кораблей, как в Kerbal Space Program, с расчётами основных динамических характеристик, а также прочности и устойчивости конструкции. Единственное «фантастическое» допущение – гипер-привод, обеспечивающий сверхсветовые перелёты. Без него ММО будет невозможно.
Как всё это возможно?
Вселенная Space Engine создаётся практически одним человеком, нашим соотечественником из Питера, Владимиром Романюком (SpaceEngineer). Он по образованию и профессии – астроном, так что в научной достоверности всех моделируемых объектов и процессов можно быть уверенным. Сообщество, сложившееся вокруг его программы, помогает поддерживать каталоги галактик, звёзд и экзопланет в актуальном состоянии, так как их открывают чуть ли ни каждый день. Также поклонники создают модели кораблей, шаттлов и прочие мелочи для наполнения вселенной.
Создатель не делает секретов из технической составляющей своего мира и делится своими находками с форумчанами. Перечислю некоторые основные моменты и проблемы, которые необходимо было решить для реализации движка.
Координаты
Одной из проблем было представление координат объектов в пределах вселенной. Кто плотно работал с числами с плавающей запятой, знает, как быстро они теряют точность с расстоянием от нуля. А точность в несколько килопарсек на краю вселенной – совсем не дело. Поэтому, для хранения координат используются 64-битные числа с фиксированной запятой, и иерархическое представление объектов. То есть координаты галактик описываются абсолютно, звёзд – относительно центра галактики, а планеты — относительно звезды. Конечно, при рендеринге приходится всё переводить в числа с плавающей запятой, но преобразование в координаты относительно камеры рассчитывается в целых числах. Да и сам рендеринг происходит слоями, так как никакой точности z-буфера не хватит для учёта размеров вселенной.
Звёзды и галактики
Вторая проблема – генерация звёзд и галактик. Звёзд в галактике сотни миллиардов, а значит для того чтобы их все отобразить, потребуется сгенерировать и отрендерить терабайты данных. Конечно, для реального времени это не подходит. Казалось бы, ну ладно, ограничим расстоянием до камеры и будем генерировать и рендерить звёзды только в небольшом объёме. Но тут возникает еще две проблемы. Во-первых, алгоритм должен быть детерминированным, то есть, несмотря на то, что звёзды создаются случайно, они должны появляться всегда на одном и том же месте. Иначе будет странно, если мы улетим от звезды, а потом на её месте будет пустота. Во-вторых, звёзды имеют разную яркость и видны на разных расстояниях. Тусклые коричневые карлики быстро пропадают из виду, а яркие голубые гиганты видны почти через всю галактику. Для решения обеих проблем используется октодерево (octree), узлы которого хранят сид для генерации нижележащих уровней, а так же предельную яркость звёзд в данной ячейке. При этом более яркие звёзды генерируются на более высоких уровнях иерархии, так как их значительно меньше, чем менее ярких. Таким образом, генерация звёзд становится абсолютно детерминированной и зависит лишь от сида корня дерева и текстуры распределения звёзд в галактике. А так же позволяет достаточно быстро генерировать звёзды с указанной предельной видимой яркостью (которая зависит от расстояния и абсолютной яркости) на любом расстоянии от камеры.
Технология рендеринга галактик и туманностей аналогична рендерингу объёмных облаков. То есть это набор спрайтов, которые для ускорения пререндерятся в импостеры или sky box, в зависимости от того, где мы находимся: внутри или снаружи.
Планеты
Принцип моделирования похож на MojoWorld. Его идеи подхватили многие проекты с процедурными планетами, например Outerra и Infinity. Как это работает? Берём обычный кубик, разбиваем каждую его грань на несколько сегментов, а затем сферизуем, то есть, как бы надуваем изнутри. Получается шар с топологией куба. Это позволяет использовать квадратные текстуры с максимальной эффективностью и минимальными искажениями.

Но равномерно разбить кубик на сегменты не достаточно. Так как планета большая и сгенерировать её с максимальной детализацией для полётов над поверхностью будет не возможно (потребуются опять же терабайты данных). На помощь приходят ЛОДы. Реализованы они следующим образом. Каждая грань куба — корень квадродерева (quad tree). Каждый узел дерева — квадрат с фиксированным разрешением сетки и текстуры. При необходимости (при приближении камеры), узел делится на четыре, тем самым увеличивая детализацию в два раза. И так до тех пор, пока в данной точке не будет достигнута требуемая детализация.

Карта высот и текстура для каждого узла дерева создаются полностью на GPU с использованием пиксельных шейдеров 3-й версии (поэтому запустить SE на видеокартах, которые их не поддерживают, не получится). Алгоритмы генерации замечательно описаны в книге от создателей MojoWorld — «Texturing and Modeling: A Procedural Approach». То есть это знакомые большинству шумы Перлина и Ворлея, а так же их вариации и различные способы фрактализации. Отдельным алгоритмом создаются крупные циклоны для приливно-синхронизованных планет.
Но, чисто процедурные ландшафты обычно выглядят слишком искусственно. Дело в том, что на планетах с атмосферой они подвергаются значительной эрозии, которая существенно меняет очертания гор и долин. К сожалению, классические итеративные алгоритмы эрозии довольно сложно масштабируются между ЛОДами, и на данный момент еще не реализованы. Но есть более простой (позиционный) способ имитации этого явления. Это особые виды шума, подробно описанные в статье. Если кратко, то для генерации ландшафта используется не только шум Перлина, но и его производная, которая позволяет построить градиент в каждой точке ландшафта и имитировать вымывание или, наоборот, наплывы грунта сдвигом координат базового шума по этому градиенту. Такой подход уже позволяет создавать довольно симпатичные планеты.

Для моделирования атмосферы используется метод Eric Bruneton-а, который был адаптирован для других планет с разным давлением и составом.
Вместо заключения
Уже сейчас Space Engine утыкает за пояс большинство планетариев и реалистичных космических симуляторов (Celestia, Stellarium, Orbiter) по богатству и красоте космоса. И это только начало пути. Если хотя бы половина из того, что планируется, будет реализовано, Space Engine станет самой полной моделью нашей вселенной, агрегирующей все современные знания человечества из области астрономии. И, не смотря на то, что код автор планирует оставить закрытым, каждый может внести свой посильный вклад в создание самого большого виртуального мира из ныне существующих.
PS: все благодарности автору программы SpaceEngineer. Думаю, он сможет ответить на некоторые вопросы по движку, если такие возникнут.
Ссылки
- Space Engine — планетарий, космический симулятор;
- Celestia — планетарий;
- Stellarium — планетарий;
- Orbiter — планетарий, космический симулятор;
- MojoWorld — генератор процедурных планет;
- Kerbal Space Program — аркадный космический симулятор с конструктором кораблей;
- Infinity — MMO с процедурными планетами;
- Outerra — планетарный движок с возможностью процедурной детализации поверх реальных текстур.