Код: 16489
Извините, товара сейчас нет в наличии
Бесплатная доставка
по Красноярску
Извините, товара сейчас нет в наличии
Новости интернет-магазина «Лаукар»:
Дополнительная информация в категории Увлажнитель воздуха:
В интернет-магазине бытовой техники «Лаукар» Вы можете скачать инструкцию к товару Увлажнитель воздуха Vitek VT-1764 BK совершенно бесплатно.
Все инструкции, представленные на сайте интернет-магазина бытовой техники «Лаукар», предоставляются производителем товара.
Перед началом использования товара рекомендуем Вам ознакомиться с инструкцией по применению.
Для того чтобы скачать инструкцию, Вам необходимо нажать на ссылку «скачать инструкцию», расположенную ниже, а в случае, если ссылки нет,
Вы можете попробовать обратиться к данной странице позднее,
возможно специалисты интернет-магазина бытовой техники «Лаукар» еще не успели загрузить для скачивания инструкцию к товару:
Увлажнитель воздуха Vitek VT-1764 BK.

Фирма-производитель оставляет за собой право на внесение изменений в конструкцию, дизайн и комплектацию товара: Увлажнитель воздуха Vitek VT-1764 BK. Пожалуйста, сверяйте информацию о товаре с информацией на
официальном сайте компании производителя.
| Тип увлажнителя | ультразвуковой |
| Назначение прибора | увлажнение |
| Расход воды | 400 мл/ч |
| Управление | электронное |
| Регулировка скорости вентилятора/интенсивности испарения | есть |
| Регулировка направления увлажнения | есть |
| Обслуживаемая площадь | 50 м2 |
| Индикатор низкого уровня воды | есть |
| Деминерализующий картридж | есть |
| Ионизация | есть |
| Гигростат | есть |
| Таймер | есть |
| Дисплей | есть |
| Подсветка корпуса | есть |
| Пульт ДУ | есть |
| Предварительный нагрев воды | есть |
| Индикатор включения | есть |
| Потребляемая мощность | 140 вт |
| Источник питания | сеть |
| Дополнительно | Запасной фильтр VT-1777 |
| Емкость резервуара для воды | 5 л |
показать все характеристики
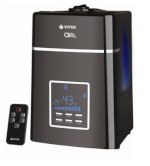
Увлажнитель VITEK VT-1764 BK оснащен резервуаром для воды объемом 5 л, работает на площади до 50 м2. Настроить устройство и установить таймер можно с помощью пульта дистанционного управления. Запасной фильтр станет приятным дополнением к вашей покупке.
 Функция IONIC PLUS
Система IONIC+ — встроенный в моделях «VITEK» генератор отрицательно заряженных ионов, позволяет еще лучше очищать воздух, снимает статистическое напряжение с корпуса пылесоса и делает атмосферу в Вашем доме более здоровой.
 ПДУ
ПДУ
Пульт дистанционного управления для удобства управления прибором
 Airo2
Airo2
 Nano Silver Filter
Nano Silver filter – керамические гранулы, насыщенные ионами серебра, очищают воду от вредоносных микробов и смягчают ее, продлевая срок службы прибора.
-
Инструкции по эксплуатации
1

Vitek VT-1764 BK инструкция по эксплуатации
(48 страниц)
- Языки:Русский
-
Тип:
PDF -
Размер:
705.79 KB -
Описание:
Увлажнитель воздуха
Просмотр
На NoDevice можно скачать инструкцию по эксплуатации для Vitek VT-1764 BK. Руководство пользователя необходимо для ознакомления с правилами установки и эксплуатации Vitek VT-1764 BK. Инструкции по использованию помогут правильно настроить Vitek VT-1764 BK, исправить ошибки и выявить неполадки.
 04:32
04:32
Увлажнитель воздуха VITEK VT-1764
 08:29
08:29
Новый ведущий. Обзор увлажнителя Vitek с Tmall
 15:54
15:54
90% поломок увлажнителей воздуха. Как исправить?
 07:15
07:15
Увлажнитель VITEK Airo 2 ОБЗОР
 16:44
16:44
ТОП-5 недорогих увлажнителей воздуха (2018-2019)
 09:53
09:53
Топ-5 классных и недорогих воздухоувлажнителей
 02:11
02:11
Увлажнитель воздуха VITEK VT-1764
1764.indd 1
1764.indd 1
04.06.2010 14:11:15
04.06.2010 14:11:15

2
1764.indd 2
1764.indd 2
04.06.2010 14:11:17
04.06.2010 14:11:17

3
ENGLISH
3
AIR HUMIDIFIER
DESCRIPTION
1. “Heating” mode on/off button
2. “Timer” setting button
3. Steam “Max/Min” button
4. “Humidity” setting button
5. “Power” on/off button
6. “Ozone” mode on/off button
7. Display (pic. 1)
8. Cover with steam outlets
9. Steam outlets
10. Tank handle
11.
Water tank
12. Opening for filling water
13. Handle for convenient filling/carrying
the tank
14. Filter-cartridge
15. Water tank lid
16. “Sprayer”
17. Body of the unit
18. Water tank backlight
19. Remote control (pic. 2)
20. Brush for cleaning the “sprayer”
Display indications (7) (pic. 1)
21. on/off indication
22. water heating mode indication
23. empty water tank indication
24. time before the switch off indication
25. ionization mode indication
26. humidifying intensity indication
27. room temperature indication
28.
current room humidity/set room hu-
midity indication
Remote control (19) (pic. 2)
29. On/off button
30. Ionization mode on/off button
31. Heating mode on/off button
32. Timer setting button
33. Room relative humidity setting button
34. Outgoing steam intensity setting but-
ton
SAFETY MEASURES
Before using the unit, read these instruc-
tions carefully and keep them for future
reference.
•
Make sure that your home electric-
ity supply corresponds to the voltage
specified on the body of the unit.
• Place the unit on a flat, moisture-resist-
ant surface. Distance from the walls
should be not less than 15 cm.
• Do not direct the nozzle of the unit at
wooden furniture, electrical appliances,
books and objects, which can be dam-
aged by moisture.
•
Do not place the humidifier in places
subject to direct sunlight, high tempera-
tures, near computers or other sensitive
electronic appliances.
•
Do not leave the unit unattended in
closed rooms otherwise condensation
can appear on furniture and the walls,
that is why we recommend keeping the
door of the room, where the humidifier is
used, half-opened.
• Never use the unit outdoors.
• Use only the removable parts which are
supplied with the unit.
• Never allow children to use the unit as a
toy.
•
Close supervision is necessary when
children or disabled persons use the
unit.
• This unit is not intended to be used by
children or disabled persons unless
they have been given all the necessary
instructions on safety measures and in-
formation about danger, which can be
caused by improper usage of the unit.
•
Do not operate the unit without water.
Disconnect the unit from the power sup-
ply when the water tank becomes empty
.
•
Do not use soda water or any perfume
additives.
• Unplug the unit before removing the wa-
ter tank.
1764.indd 3
1764.indd 3
04.06.2010 14:11:17
04.06.2010 14:11:17

4
ENGLISH
•
Do not cover the ventilation openings
and avoid foreign objects getting inside
them
.
• Do not immerse the unit into water or
other liquids.
•
Do not move or tilt the unit during its op-
eration
.
•
Always unplug the unit and pour out the
water from the water tank when clean-
ing the unit or when you do not use it.
Unplug the unit before moving it to an-
other place.
• Do not touch the power plug with wet
hands.
•
Before using the unit, closely examine
the power cord and make sure that it is
not damaged. Do not use the unit, if its
power cord is damaged.
•
Do not disassemble the unit yourself,
if any malfunction is detected, apply to
the nearest authorized service center.
• Regularly clean the unit; be careful not
to make any scratches on the sprayer.
• Store the unit out of reach of children.
FOR HOUSEHOLD USAGE ONLY
USING THE HUMIDIFIER
Unpack the unit and remove the packing
materials. Examine the unit for damages.
Do not switch on the unit if there are any
damages in it.
Note:
— if the unit was subjected to negative
temperatures, before switching it
on for the first time, keep it at room
temperature for 30 minutes.
— use the unit at temperatures from +5
to +40°С, and relative humidity less
than 80%.
— water temperature should not ex-
ceed +40°С.
Before switching on the unit, make sure
that you home electricity supply corre-
sponds to the voltage specified on the
body of the unit.
1. Take the handle (10) and remove the
water tank (11) from the body (17).
2. Turn over the tank (11); unscrew the lid
(15), by turning it anti clockwise. Fill the
water tank (11) with necessary quantity
of water and screw the lid on (15), by
turning it clockwise.
3. Set the filled tank (11) on the body of
the unit (17). Wait for some time, which
is necessary to fill the operating cham-
ber with water.
4. Plug in the humidifier, the indication
(21) will appear on the display (7); the
room temperature (27) and humidity
(28) will be displayed.
5. Switch on the humidifier, by pressing
the (5) “Power” on/off button, the in-
dication (21) will go out, the display will
switch to full brightness and the steam
intensity indication (26) will light up.
Note:
— each pressing of the control buttons
will be accompanied with a sound
signal.
— if no button has been pressed dur-
ing 30 seconds on the control panel
or on the remote control, the display
brightness will decrease automati-
cally.
6. To switch on the ionization mode, press
the (6) “Ozone” button, the indication
(25) will appear on the display (7). To
switch off the ionization mode, press
the (6) “Ozone” button once again, the
indication (25) will disappear.
7. To switch on the heating mode, press
the (1) “Heating” button, the indication
(22) will appear on the display (7). In
this mode the evaporated water will be
4
1764.indd 4
1764.indd 4
04.06.2010 14:11:17
04.06.2010 14:11:17

5
ENGLISH
preliminary heated up; it disinfects wa-
ter and provides its easy evaporation.
Note:
— switching on this function can to
some extent change the indications
of the room temperature (27) and
humidity (28) on the display (7).
8. You can set up operation time of the
unit using the (2) “Timer” button. Press
the button (2) to set the required opera-
tion time of the unit from 1 to 12 hours,
it will be reflected on the display (7) by
corresponding digit indication (24).
9. Use the (3) steam “Max/Min” button to
set the required intensity, it will be re-
flected on the display (7) by the chang-
ing indication (26).
Note:
— if the unit operates in the automatic
humidity maintenance mode, steam
intensity control will be performed
automatically.
10.To switch on the automatic humid-
ity maintenance mode, press the (4)
“Humidity” button, the “Setup” symbol
will be flashing on the display, press
the button (4) again to set the required
humidity in the room (from 45 to 90%,
setting step is 5%). In the automat-
ic humidity maintenance mode the
“Setup” symbol will be flashing on the
display (7), temperature (27), humid-
ity (28) and steam intensity (26) will be
displayed. To view the preset humidity
value, press the (4) “Humidity” button,
the preset humidity value will be flash-
ing on the display (7), in 5 seconds the
information on the display will return to
the previous mode.
To switch off the automatic humid-
ity maintenance mode, press the (4)
“Humidity” button several times, when
humidity value reaches 90%, the
“Setup” symbol will go out.
11.When you want to stop the work of the
unit, switch off the unit, by pressing the
(5) “Power” button, the indication (21)
will appear on the display (7), the room
temperature (27) and humidity (28) will
be displayed.
12.When the water tank becomes empty
(11), the humidifier will switch off au-
tomatically, the indication (23) will light
up on the display (7) and you will hear
sound signals.
Note:
Water tank backlight (18) will help you
estimate water quantity in the tank.
REMOTE CONTROL (19)
For convenient control of the unit, use the
remote control.
If there is an isolation insert in the battery
compartment, remove it, if the battery is
supplied separately, remove the holder of
the battery, by preliminary pressing the
clamp, insert the battery in the holder,
strictly following the polarity, insert the
battery holder into the remote control.
Correspondence of the remote control
buttons to the buttons on the control
panel of the unit:
29. “Power” on/off button (5).
30. “Ozone” mode on/off button (6).
31. “Heating” mode on/off button (1).
32. “Timer” setting button (2).
33. “Humidity” setting button (4).
34. Steam intensity setting button — “Max/
Min” (3).
CLEANING AND CARE
Warning: Always switch off and unplug
the unit before cleaning it.
1764.indd 5
1764.indd 5
04.06.2010 14:11:17
04.06.2010 14:11:17

6
ENGLISH
Hard water causes the appearance of
scale on the “sprayer”, on the inner parts
of the body and on the water tank; it leads
to improper operation of the unit and ap-
pearance of white deposit on the interior.
In order to avoid it, it is necessary to clean
the sprayer every day and replace water
as often as possible, as well as to perform
cleaning of the filter-cartridge (14).
If you are not going to use the unit for a long
time: — pour out water from the tank and
the operating chamber of the “sprayer”,
wash the water tank, wash and clean the
operating chamber of the “sprayer” and
the “sprayer” itself, dry the unit and put it
away for storage.
Weekly care
•
Once a week carefully wash the water
tank (11) and the operating chamber
(11) with a neutral washing liquid solu-
tion. After that, carefully rinse them with
water
.
• Add 5-10 drops of the cleaning agent on
the “sprayer” (16); wait about 2-5 min-
utes. Use the brush (20) to remove the
deposit from the surface of the “sprayer”
(16).
Note:
— As a cleaning agent for the “sprayer”
you can use substances for scale re-
moval in kettles.
• Do not immerse the unit into water or
other liquids.
Cleaning the filter
• Clean the filter (14) after about 1000 l
of water pass through it, and when us-
ing hard water or appearance of white
deposit on the furniture, clean it more
often.
• Take the handle (10) and remove the
water tank (10) from the body of the unit
(17).
• Turn over the water tank (11), unscrew
the lid (15) by turning it anti clockwise
and remove the filter-cartridge (14), by
turning it anti clockwise.
• Put the filter-cartridge (14) for 10 min-
utes into the bowl with vinegar, take out
the filter-cartridge (14) and wash it un-
der tap water.
• Place the filter-cartridge (14) back on
the lid (15), by turning it clockwise.
Replacement of the filter-cartridge
(14)
Replace the filter cartridge (14) when nec-
essary.
Storage
— If you are not going to use the unit for a
long time, make sure that all its parts are
dry, including the operating chamber of
the “sprayer”.
— Do not store the device with water in the
operating chamber.
— Before you put the filter-cartridge away
for storage, clean and dry it, keep the fil-
ter cartridge in a cool dark place.
Store the humidifier in a dry cool place
out of reach of children.
TROUBLESHOOTING GUIDE
Before applying to the service center read
about the following problems:
1764.indd 6
1764.indd 6
04.06.2010 14:11:17
04.06.2010 14:11:17

7
ENGLISH
Problem
Possible cause
Solution
The humidifier does not
operate
The unit is not plugged in
Plug the unit
The water tank is empty, the
indicator light (23) is red
Fill the water tank with water
Steam has an unpleasant
smell
New device – it is normal
Unscrew the lid of the water
tank and leave the unit for
several hours in a cool dark
place
Polluted water in the water tank
Clean the water tank
and fill it with pure water
Small intensity of steam
output
Polluted sprayer
Clean the sprayer
The remote control does not
operate
Obstacle between the remote
control and the sensor on the
unit
Remove the obstacle for proper
operation of the remote control
Large distance between the
remote control and the unit
Use the remote control in the
operating zone
Battery is discharged
Replace the battery
NOTE
Non-observance of rules for cleaning the unit parts from mineral deposits caused by
hard water may affect the overall performance of the unit.
In this case clean the unit and use filtered or distilled water in the future.
SPECIFICATIONS
Power supply: 220-230 V ~ 50 Hz
Power: 140 W
Water tank: 5 l
Water flow:
>=
400ml/h
Humidifying area up to 50m
2
Timer for 12 hours
Ions output: 2.000.000 ~ 3.000.000 ion /cm
2
Ozone output:
<=
0.05 PPM
Specifications subject to change without prior notice.
Service life of appliance — 3 years
GUARANTEE
Details regarding guarantee conditions can be obtained from the dealer from whom the
appliance was purchased. The bill of sale or receipt must be produced when making
any claim under the terms of this guarantee.
This product conforms to the EMC-Requirements as laid down by the Council
Directive 89/336/EEC and to the Law Voltage Regulation (73/23 EEC)
1764.indd 7
1764.indd 7
04.06.2010 14:11:17
04.06.2010 14:11:17

8
LUFTBEFEUCHTER
BESCHREIBUNG
1. EIN/AUS Taste für die Wasserausheizung
«Heating»
2.
Taste für die Zeitschalter Einstellung
«Timer»
3.
Taste für die Intensitätseinstellung des
„Dampf“ Ausgangs «Max/Min»
4.
Taste für die Einstellung der relativen
Feuchtigkeit im Raum «Humidity»
5. EINAUS Taste «Power»
6. EIN/AUS Taste für die Ionisierung «Ozone»
7. Display (Fig. 1)
8. Lochdeckel für den Dampfausgang
9. Löcher für Dampfausgang
10. Griff für die Abnahme des Behälters vom
Gehäuse
11. Wasserbehälter
12. Loch für Wasserfüllen
13. Griff für bequemes Füllen/Übertragung des
Behälters
14. Cartridge Filter
15. Deckel des Wasserbehälters
16. „Sprühgerät“
17. Gehäuse
18. Beleuchtung des Wasserbehälters
19. Fernbedienungspult(Fig. 2)
20. Bürste für Reinigung des „Sprühgerätes“
Bezeichnungen am Display (7) (Fig. 1)
21. Bildsymbol Ein/Aus des Luftbefeuchters
22. Bildsymbol für die Wasseranwärmung
23. Bildsymbol für Wassermangel im Behälter
24.
Zeitanzeige bis zum Ende des
Luftbefeuchtersbetriebes
25. Bildsymbol des Ionisierungsbetriebes
26.
Anzeige des Intensitätsniveaus der
Befeuchtung
27. Anteige der Raumtemperatur
28. Anzeige der Feuchtigkeit im Raum/der an-
gegebenen Feuchtigkeit
Fernbedienungspult (19) (Fig. 2)
29. EIN /AUS Taste
30. EIN/AUS Taste für die Ionisierung
31. EIN/AUS Taste für die Wasserausheizung
32. Taste für die Zeitschalter Einstellung
33.
Taste für die Einstellung der relativen
Feuchtigkeit im Raum
34.
Taste für die Intensitätseinstellung des
„Dampf“ Ausgangs
VORSICHTSMASSNAHMEN
Vor dem Betriebsangang dieses Gerätes lesen
Sie aufmerksam diese Betriebsanleitung und
behalten Sie sie, um sie im Folgenden nachzu-
schlagen.
•
Vergewissern Sie sich, dass die
Betriebsspannung des Gerätes mit der
Netzspannung übereinstimmt.
• Stellen Sie das Gerät auf eine glatte, feuch-
tigkeitsbeständige Oberfl äche. Der Abstand
bis zu Wänden muss mindestens 15 cm be-
tragen.
• Richten Sie die Düse des Luftbefeuchters auf
Holzmöbel, elektrische Geräte, Bücher und
Gegenstände nicht, die durch Wassereinfl uss
können beschädigt werden.
•
Unterbringen Sie den Luftbefeuchter in
den Orten nicht, die von den direkten
Sonnenstrahlen, hohen Temperaturen be-
einfl usst werden, sowie in der Nähe von PCs
oder empfi ndlichen elektronischen Geräten.
•
Lassen Sie das Gerät im geschlossenen
Raum nicht ohne Aufsicht, im gegenfall kann
sich auf/an dem Möbel und an den Wänden
Kondensat bilden, deswegen wird es emp-
fohlen, die Tür in dem Raum mit dem funktio-
nierenden Luftbefeuchter leicht geöffnet zu
halten.
• Es wird nicht gestattet, dieses Gerät außer-
halb der Räumlichkeiten zu betreiben.
• Verwenden Sie nur die mitgelieferten ab-
nehmbaren Teile.
• Lassen Sie Kinder mit dem Gerät nicht spie-
len.
• Seien Sie besonders aufmerksam, wenn das
Gerät von den Kindern oder behinderten
Personen verwendet wird.
Dieses Gerät ist nicht für den Gebrauch von
Kindern oder behinderten Personen be-
stimmt, es sei denn, dass sie von der für ihre
Sicherheit zuständigen Person entsprechend
und verständlich über den Gebrauch des
Gerätes sowie über die möglichen Gefahren
wegen der unrichtigen Benutzung angewie-
sen wurden.
• Schalten Sie das Gerät ohne Wasser nicht ein,
und schalten Sie es aus, wenn das Wasser im
Behälter zu Ende ist.
DEUTSCH
1764.indd 8
1764.indd 8
04.06.2010 14:11:17
04.06.2010 14:11:17

9
DEUTSCH
•
Verwenden Sie kein kohlensäurehaltiges
Wasser und keine Parfümzusanzstoffe.
• Trennen Sie das Gerät vom Netz vor der
Abnahme des Wasserbehälters.
•
Machen Sie die Löcher für den
„Dampf“ Ausgang nicht zu und vermeiden
Sie, dass fremde Gegenstände dorthin gera-
ten.
• Tauchen Sie das Gehäuse des Gerätes ins
Wasser oder jene anderen Flüssigkeiten
nicht ein.
• Während des Betriebes wird es nicht gestat-
tet, das Gerät umzustellen und zu kippen.
• Immer trennen Sie das Gerät vom Netz und
entfernen Sie das Wasser aus dem Behälter
während, wenn Sie das Gerät reinigen oder
es nicht verwenden. Wenn Sie das Gerät zu
einem anderen Ort umstellen möchten, tren-
nen Sie es zuerst vom Netz.
• Greifen Sie den Stecker des Netzkabels mit
den nassen Händen nicht.
• Vor dem Gebrauch des Gerätes untersuchen
Sie aufmerksam das Netzkabel und verge-
wissern Sie sich, dass es nicht beschädigt
ist. Es wird nicht gestatten, das Gerät mit
dem beschädigten Netzkabel zu verwenden.
• Bauen Sie das Gerät selbstständig nicht aus,
bei der Beschädigung wenden Sie sich an
das nächste autorisierte Service Zentrum.
• Reinigen Sie das Gerät regelmäßig, vermei-
den Sie Risse auf dem Sprühgerät.
• Bewahren Sie das Gerät in einer für die
Kinder unzugänglichen Stelle.
NUR FÜR DEN HAUSHALTSGEBRAUCH
BENUTZUNG DES LUFTBEFEUCHTERS
Packen Sie das Gerät aus und entfernen Sie die
Verpackung. Untersuchen Sie das Gerät auf
das Vorhandensein von Beschädigungen. Falls
Beschädigungen vorhanden sind, schalten Sie
das Gerät nicht ein.
Anmerkung:
Falls das Gerät von den negativen Temperaturen
beeinfl usst wurde, wird es empfohlen, es vor
dem Einschalten im Laufe von 30 Minuten in
der Raumtemperatur stehen lassen.
Verwenden Sie den Luftbefeuchter im Raum
mit dem Temperatur von +5 bis +40°C und
mit der relativen Feuchtigkeit von höchstens
80%.
Die Temperatur des Nutzwassers muss
+40°C nicht übersteigen.
• Bevor Sie das Gerät einschalten, vergewis-
sern Sie sich, dass die Netzspannung mit
seinem Betriebsspannung übereinstimmt.
1. Nehmen Sie den Griff (10) in die Hand und
entfernen Sie den Wasserbehälter (11) vom
Gehäuse (17).
2. Kippen Sie den Behälter (11) um, schrau-
ben Sie den Deckel (15)ab, drehen Sie ihn
dafür entgegen dem Uhrzeigersinn. Füllen
Sie den Behälter (11) mit der notwendigen
Wassermenge und verdrehen Sie den Deckel
(15), drehen Sie ihn dafür im Uhrzeigersinn.
3. Bauen Sie den gefüllten Behälter (11) auf
dem Gehäuse des Gerätes (17) an. Warten
Sie eine Weile, bis die Betriebssektion mit
dem Wasser gefüllt wird.
4.
Schalten Sie das Gerät ans Stromnetz
an, dabei leuchtet auf dem Display (7)
das Bildsymbol (21), es werden die
Raumtemperatur (27) und die Feuchtigkeit
im Raum (28) angezeigt.
5. Schalten Sie den Luftbefeuchter ein, dafür
drücken Sie die Ein/Aus Taste (5) «Power»,
dabei erlöscht das Bildsymbol (21), das
Display wird mit voller Helligkeit eingeschal-
tet, und das Bildsymbol der Intensität des
„Dampf“ Ausgangs (26)wird eingeschaltet.
Anmerkung:
Jede Betätigung der Steuerungstasten wird
von dem akustischen Signal begleitet.
Wenn im Laufe von 30 Sekunden keine
Taste auf dem Bedienungspanel oder auf
dem Fernbedienungspult betätigt wurde,
wird die Helligkeit des Displays automa-
tische reduziert.
6.
Um den Ionisierungsmodus einzuschal-
ten, drücken Sie die Taste (6) «OZON»,
dabei leuchtet das Bildsymbol (25). Um
die Ionisierung auszuschalten, drücken Sie
wiederholt die Taste (6) «Ozone», dabei er-
löscht das Bildsymbol (25).
7. Um die Wasseranwärmung einzuschalten,
drücken Sie die Taste (1) «Heating», dabei
1764.indd 9
1764.indd 9
04.06.2010 14:11:17
04.06.2010 14:11:17

10
DEUTSCH
leuchtet das Bildsymbol (22). In diesem
Modus wird das zu verdampfte Wasser vor-
geheizt, dadurch wird das Wasser desinfi —
ziert und leicht verdampft.
Anmerkung:
das Einschalten dieser Funktion kann un-
wesentlich Angaben der Raumtemperatur
(27) und der Feuchtigkeit (28) auf dem
Display(7) ändern.
8. Sie können die Zeit des Funktionierens des
Luftbefeuchters mit der Zeitschalter Taste
(2) «Timer» einstellen. Durch Betätigung der
Taste(2) geben Sie die notwendige Zeit des
Funktionierens des Luftbefeuchters von1
bis 12 Stunden an, was am Display (7) der
digitalen Anzeige (24) gezeigt wird.
9. Mit der Taste für die Einstellung der Intensität
des „Dampf“ Ausgangs (3) «Max/Min» kön-
nen Sie die notwendige Intensität eistellen,
was auf dem Display (7) durch das wech-
selnde Bildsymbol (26) gezeigt wird.
Anmerkung:
Wenn der Luftbefeuchter im Modus
der automatischen Unterhaltung der
Raumfeuchtigkeit funktioniert, wird die
Intensität des „Dampf“ Ausgangs automa-
tische geregelt.
10.Um den Modus der automatischen
Unterhaltung der Raumfeuchtigkeit ein-
zuschalten, betätigen Sie die Taste (4)
«Humidity», auf dem Display erscheint das
blinkende Symbol «Setup», durch wieder-
holte Betätigung der Taste (4) geben Sie den
erwünschten Wert für die Raumfeuchtigkeit
(von 45 bis 90%, Einstellungsschritt 5%) an.
Im Modus der automatischen Unterhaltung
der Feuchtigkeit blinkt auf dem Display (7) das
Symbol «Setup», es werden die Temperatur
(27), die Feuchtigkeit im Raum (28) und
die Intensität des „Dampf“ Ausgangs (26)
gezeigt. Um den angegeben Wert für die
Feuchtigkeit durchzusehen, drücken Sie
einmal auf die Taste (4) «Humidity», auf dem
Display(7) erscheint der blinkende Wert der
angegebenen Feuchtigkeit, in 5 Sekunden
kehrt die Information auf dem Display in den
alten Modus zurück.
Um den Modus der automatischen
Unterhaltung der Raumfeuchtigkeit aus-
zuschalten, betätigen Sie die Taste (4)
«Humidity» so viel, wie es notwendig ist,
wenn der Feuchtigkeitswert 90% übersteigt,
erlöscht das Symbol «Setup».
11.Nach dem Betrieb schalten Sie das Gerät
aus, dafür drücken Sie die Taste (5)
«Power», dabei leuchtet auf dem Display
(7) das Bildsymbol (21), es werden Die
Raumtemperatur (27) und Feuchtigkeit
(28)gezeigt.
12.Wenn das Wasser im Behälter (11) zu Ende
ist, schaltet der Luftbefeuchter automa-
tisch aus, auf dem Display (7) leuchtet das
Bildsymbol (23), und Sie hören akustische
Signale.
Anmerkung:
Sie können den Wasserstand im Behälter
mit Hilfe der Beleuchtungslampe (18) ein-
schätzen.
FERNBEDIENUNGSPULT (19)
Für bequeme Bedienung des Luftbefeuchters
verwenden Sie das Fernbedienungspult.
Wenn in der Batteriensektion eine isolie-
rende Einlage vorhanden ist, entfernen Sie
sie, wenn das Einspeiseelement separat
geliefert wird, nehmen Sie den Halter für
das Einspeiseelement heraus, vorher drü-
cken Sie auf den Feststeller, stellen Sie das
Einsspeiseelement in den Halter ein, dabei
beachten Sie streng die Polarität, installieren
Sie den Halter des Einsspeiseelements in den
Fernbedienungspult.
Entsprechungen der Tasten auf dem
Fernbedienungspult den Tasten auf dem
Bedienungspanel des Luftbefeuchters:
29. EINAUS Taste «Power» (5).
30. EIN/AUS Taste für die Ionisierung «Ozone»
(6).
31. EIN/AUS Taste für die Wasserausheizung
«Heating» (1)
32.
Taste für die Zeitschalter Einstellung
«Timer» (2).
33.
Taste für die Einstellung der relativen
Feuchtigkeit im Raum «Humidity» (4).
34.
Taste für die Intensitätseinstellung des
„Dampf“ Ausgangs «Max/Min» (3).
1764.indd 10
1764.indd 10
04.06.2010 14:11:17
04.06.2010 14:11:17

Комментарии
Посмотреть инструкция для Vitek VT-1764 BK бесплатно. Руководство относится к категории увлажнители, 2 человек(а) дали ему среднюю оценку 6.6. Руководство доступно на следующих языках: русский, английский. У вас есть вопрос о Vitek VT-1764 BK или вам нужна помощь? Задайте свой вопрос здесь
Не можете найти ответ на свой вопрос в руководстве? Вы можете найти ответ на свой вопрос ниже, в разделе часто задаваемых вопросов о Vitek VT-1764 BK.
Инструкция Vitek VT-1764 BK доступно в русский?
Не нашли свой вопрос? Задайте свой вопрос здесь