Note, when downloading a print driver, please select your operating system from the «Platform» drop down menu
Пользовательская документация
Пользовательская документация
Personalized Easy Setup and Install Guide
This guide will provide a setup procedure tailored to fit your network or direct-connect printing preferences, and walk you through installing the necessary print drivers or applications that support your desktop and mobile devices.
- Released: 16.04.2021
- Размер: 574.28 KB
- Filename: B210%20setup_Final%20V2.pdf
- Tags: Recommended, Setup and Installation Guides
Пользовательская документация
Руководство по установке
- Released: 15.07.2021
- Размер: 512.87 KB
- Filename: installation_guide.pdf
- Tags: Setup and Installation Guides
Пользовательская документация
550-Sheet Tray
550-Sheet Tray installation instruction
- Released: 15.07.2021
- Размер: 423.79 KB
- Filename: 550-Sheet_Tray.pdf
- Tags: Setup and Installation Guides
Пользовательская документация
Imaging Unit Replacement
Replacing the Imaging Unit
- Released: 15.07.2021
- Размер: 622.57 KB
- Filename: imaging_unit.pdf
- Tags: Setup and Installation Guides
Пользовательская документация
Toner Cartridge Replacement
Replacing the Toner Cartridge
- Released: 15.07.2021
- Размер: 582.72 KB
- Filename: toner_cartridge.pdf
- Tags: Setup and Installation Guides
Пользовательская документация
Принтер Xerox® B210 Посібник користувача
- Released: 11.02.2021
- Размер: 10.37 MB
- Filename: Xerox_B210_sfp_ug_uk.pdf
- Tags: User Guides
Пользовательская документация
Imprimante Xerox® B210 Guide de l’utilisateur
- Released: 10.02.2021
- Размер: 10.15 MB
- Filename: Xerox_B210_sfp_ug_fr.pdf
- Tags: User Guides
Пользовательская документация
Stampante Xerox® B210 Guida per l’utente
- Released: 10.02.2021
- Размер: 10.12 MB
- Filename: Xerox_B210_sfp_ug_it.pdf
- Tags: User Guides
Пользовательская документация
Xerox® B210 Drucker Benutzerhandbuch
- Released: 10.02.2021
- Размер: 10.12 MB
- Filename: Xerox_B210_sfp_ug_de.pdf
- Tags: User Guides
Пользовательская документация
Tiskárna Xerox® B210 Uživatelská příručka
- Released: 10.02.2021
- Размер: 10.22 MB
- Filename: Xerox_B210_sfp_ug_cs.pdf
- Tags: User Guides
Пользовательская документация
Xerox® B210 Skrivare Användarhandbok
- Released: 10.02.2021
- Размер: 10.09 MB
- Filename: Xerox_B210_sfp_ug_sv.pdf
- Tags: User Guides
Пользовательская документация
Xerox® B210 Yazıcı Kullanım Kılavuzu
- Released: 10.02.2021
- Размер: 10.25 MB
- Filename: Xerox_B210_sfp_ug_tr.pdf
- Tags: User Guides
Пользовательская документация
Impressora Xerox® B210 Guia do Usuário
- Released: 10.02.2021
- Размер: 10.11 MB
- Filename: Xerox_B210_sfp_ug_pt-br.pdf
- Tags: User Guides
Пользовательская документация
Xerox® B210-printer Betjeningsvejledning
- Released: 29.01.2021
- Размер: 10.09 MB
- Filename: Xerox_B210_sfp_ug_da.pdf
- Tags: User Guides
Пользовательская документация
Impresora Xerox® B210 Guía del usuario
- Released: 25.01.2021
- Размер: 10.13 MB
- Filename: Xerox_B210_sfp_ug_es.pdf
- Tags: User Guides
Пользовательская документация
Принтер Xerox® B210 Руководство пользователя
- Released: 25.01.2021
- Размер: 10.38 MB
- Filename: Xerox_B210_sfp_ug_ru.pdf
- Tags: User Guides
Пользовательская документация
Xerox® B210-printer Handleiding voor de gebruiker
- Released: 25.01.2021
- Размер: 10.12 MB
- Filename: Xerox_B210_sfp_ug_nl.pdf
- Tags: User Guides
Пользовательская документация
Xerox® B210 -tulostin Käyttöopas
- Released: 25.01.2021
- Размер: 10.10 MB
- Filename: Xerox_B210_sfp_ug_fi.pdf
- Tags: User Guides
Пользовательская документация
Εκτυπωτής Xerox® B210 Οδηγός χρήσης
- Released: 25.01.2021
- Размер: 10.45 MB
- Filename: Xerox_B210_sfp_ug_el.pdf
- Tags: User Guides
Пользовательская документация
Xerox® B210 nyomtató Felhasználói útmutató
- Released: 25.01.2021
- Размер: 10.25 MB
- Filename: Xerox_B210_sfp_ug_hu.pdf
- Tags: User Guides
Пользовательская документация
Drukarka Xerox® B210 Przewodnik użytkownika
- Released: 25.01.2021
- Размер: 10.32 MB
- Filename: Xerox_B210_sfp_ug_pl.pdf
- Tags: User Guides
Пользовательская документация
Xerox® B210 Printer User Guide
- Released: 23.12.2020
- Размер: 10.07 MB
- Filename: Xerox_B210_sfp_ug_en.pdf
- Tags: User Guides
Пользовательская документация
Xerox Product EPEAT Environmental Information
- Released: 07.02.2020
- Размер: 102.22 KB
- Filename: EPEAT_2sided_default.pdf
- Tags: Other Documentation
- Цифровой интерфейс: built-in controller, Built-in Controller, EX-c Print Server Powered by Fiery®, EX Print Server, EFI Fiery Controller, Integrated Color Server, EX-i C60/C70 Print Server, integrated Fiery Color Server, Built-in Controller, EX-c Print Server Powered by Fiery®, EX-c Entry Server, built-in controller, WorkCentre 7970i Built-in Controller, WorkCentre 7970i EFI Fiery Controller, EX C60/C70 Print Server, Xerox CX Print Server (powered by Creo), EX-i Integrated Server, EX-i C60/C70 Print Server, Xerox EX Print Server (powered by Fiery), Integrated Color Server, FreeFlow Print Server, Xerox FreeFlow Print Server
Пользовательская документация
Принт-картридж
- Released: 25.07.2019
- Размер: 327.29 KB
- Filename: drum_cartridge.pdf
- Tags: Setup and Installation Guides
Пользовательская документация
Тонер-картридж
- Released: 25.07.2019
- Размер: 305.06 KB
- Filename: toner_cartridge.pdf
- Tags: Setup and Installation Guides
Пользовательская документация
Руководство по установке
- Released: 25.07.2019
- Размер: 1.39 MB
- Filename: installation_guide.pdf
- Tags: Setup and Installation Guides
Пользовательская документация
Quick Use Guide
- Released: 25.07.2019
- Размер: 850.53 KB
- Filename: quick_use_guide_en_cs_pl_hu_ro_bg.pdf
- Tags: User Guides
Пользовательская документация
Quick Use Guide
- Released: 25.07.2019
- Размер: 780.41 KB
- Filename: quick_use_guide_en_fr_it_de_es_pt.pdf
- Tags: User Guides
Пользовательская документация
Quick Use Guide
- Released: 25.07.2019
- Размер: 857.43 KB
- Filename: quick_use_guide_en_hr_uk_sk_sl_ca.pdf
- Tags: User Guides
Пользовательская документация
Quick Use Guide
- Released: 25.07.2019
- Размер: 777.34 KB
- Filename: quick_use_guide_en_nl_sv_no_da_fi.pdf
- Tags: User Guides
Пользовательская документация
Краткое руководство пользователя
- Released: 25.07.2019
- Размер: 952.71 KB
- Filename: quick_use_guide_en_ru_tr_el_kk_ar.pdf
- Tags: User Guides
Пользовательская документация
Xerox® B210-skriver Brukerhåndbok
- Released: 25.01.2019
- Размер: 10.08 MB
- Filename: Xerox_B210_sfp_ug_no.pdf
- Tags: User Guides
Third Party Software Disclosure
Third Party Software Disclosure
Third Party SW Disclosures B215/210_B205 3.50.0.36
B215-210-205 Third Party Software Disclosure for v3.50.0.36
- Released: 31.07.2019
- Version: 3.50.0.36
- Размер: 377.65 KB
- Filename: Third_Party_SW_Disclosures_B215-210-205_3.50.0.36.zip
- Tags: Third-Party Software Disclosures
Инструкцию для Xerox B210VDNI на русском языке, в формате pdf можно скачать с нашего сайта. Наш каталог предоставляем Вам инструкцию производителя фирмы Xerox, которая была взята из открытых источников. Ознакомившись с руководством по эксплуатации от Xerox, Вы на все 100% и правильно сможете воспользоваться всеми функциями устройства.
Для сохранения инструкции «Струйный принтер Xerox B210VDNI» на русском языке на вашем компьютере либо телефоне, нажмите кнопку «Скачать инструкцию». Если активна кнопка «Инструкция онлайн», то Вы можете просмотреть документ (manual), в своём браузере онлайн.
Если у Вас нет возможности скачать инструкцию по эксплуатации либо просмотреть её, Вы можете поделиться ссылкой на эту страницу в социальных сетях и при удобном моменте скачать инструкцию. Либо добавьте эту страницу в закладки Вашего браузера, нажав кнопку «Добавить страницу в закладки браузера».
- Manuals
- Brands
- Xerox Manuals
- Printer
- B210
- User manual
-
Contents
-
Table of Contents
-
Troubleshooting
-
Bookmarks
Quick Links
Version 1.0
august 2019
702P07620
Xerox
®
User Guide
B210 Printer
Related Manuals for Xerox B210
Summary of Contents for Xerox B210
-
Page 1
Version 1.0 august 2019 702P07620 Xerox B210 Printer ® User Guide… -
Page 2
, Xerox Secure Access Unified ID System , Xerox Extensible Interface Platform ® ® Global Print Driver , and Mobile Express Driver are trademarks of Xerox Corporation in the United States and / or other countries. ® ® ® ® ®… -
Page 3
® Xerox B210 Printer User Guide… -
Page 4: Table Of Contents
Accessing Xerox® CentreWare® Internet Services……..
-
Page 5
Setting Up the Printing Service…………..72 Configuring Printing Settings Using Xerox® CentreWare® Internet Services … . 72 Printing Printing Overview . -
Page 6
® ® Printing Using Xerox CentreWare Internet Services ……… 93 Print Procedure . -
Page 7
Status Indicator Alerts on the Control Panel ……… . 153 ® ® Viewing Alerts Using Xerox CentreWare Internet Services ……153 Using the Integrated Troubleshooting Tools. -
Page 8
North America …………….194 ® Xerox B210 Printer User Guide… -
Page 9
Other Countries …………….197 ® Xerox B210 Printer User Guide… -
Page 10: Safety
Environmental, Health, and Safety Contact Information …………….21 Your printer and the recommended supplies have been designed and tested to meet strict safety requirements. Attention to the following information ensures the continued safe operation of your Xerox printer. Xerox B210 Printer ® User Guide…
-
Page 11: Notices And Safety
These ® include safety agency evaluation and certification, and compliance with electromagnetic regulations and established environmental standards. The safety and environment testing and performance of this product have been verified using Xerox ® materials only. Note: Unauthorized alterations, which can include the addition of new functions or connection of external devices, can affect the product certification.
-
Page 12: Electrical Safety
Always adhere to national and local building, fire, and electrical codes regarding length of cord, conductor size, grounding, and protection. • Do not use a ground adapter plug to connect the printer to an electrical outlet that does not have a ground connection terminal. Xerox B210 Printer ® User Guide…
-
Page 13: Emergency Power Off
Emergency Power Off If any of the following conditions occur, power off the printer immediately and disconnect the power cord from the electrical outlet. Contact an authorized Xerox service representative to correct the problem if: •…
-
Page 14: Operational Safety
Ozone is heavier than air and is not produced in amounts large enough to harm anyone. Install the printer in a well-ventilated room. For more information in the United States and Canada, go to www.xerox.com/environment. In other markets, please contact your local Xerox representative or go to www.xerox.com/environment_europe.
-
Page 15: Printer Supplies
Use of non-Xerox supplies is not recommended. The Xerox Warranty or Service Agreement do not cover damage, malfunction, or degradation of performance caused by use of non-Xerox supplies, or the use of Xerox supplies not specified for this printer. Xerox B210 Printer ®…
-
Page 16: Maintenance Safety
Do not attempt any maintenance procedure that is not specifically described in the documentation supplied with your printer. • Clean with a dry lint-free cloth only. • Do not burn any consumables or routine maintenance items. For information on Xerox supplies ® recycling programs, go to www.xerox.com/gwa. WARNING: Do not use aerosol cleaners.
-
Page 17: Printer Symbols
This warning symbol alerts users to areas where there is the possibility of personal injury. Do not burn the item. Do not touch the part or area of the printer. Do not load envelopes. Do not touch. Xerox B210 Printer ® User Guide…
-
Page 18
Do not expose the unit to temperatures lower or higher than specified. Do not insert the unit in a different orientation. Toner Clean the areas indicated. Load media face down, and in the direction indicated. Load media face up. Push down. Xerox B210 Printer ® User Guide… -
Page 19
Printer Symbols Symbol Description Push to open. 2-Sided Power Button Stop Button Wi-Fi Protected Setup Button Toner Indicator Status Indicator Local Area Network Universal Serial Bus Xerox B210 Printer ® User Guide… -
Page 20
Printer Symbols Symbol Description This item can be recycled. For details, see Recycling and Disposal. Xerox B210 Printer ® User Guide… -
Page 21: Environmental, Health, And Safety Contact Information
Environmental, Health, and Safety Contact Information Environmental, Health, and Safety Contact Information For more information on Environment, Health, and Safety in relation to this Xerox product and supplies, contact: • United States and Canada: 1-800-ASK-XEROX (1-800-275-9376) • Europe: EHS-Europe@xerox.com For product safety information in the United States and Canada, go to www.xerox.com/environment.
-
Page 22
Environmental, Health, and Safety Contact Information Xerox B210 Printer ® User Guide… -
Page 23: Getting Started
Parts of the Printer …………………………… 24 • Power Options ……………………………. 28 • Information Pages …………………………… 29 • Xerox® CentreWare® Internet Services ………………….. 31 • Xerox Easy Printer Manager ……………………….34 • Installing Software …………………………… 35 • More Information …………………………..36…
-
Page 24: Parts Of The Printer
Before you use your printer, take some time to familiarize yourself with the various features and options. Front View Output Tray Manual Feeder Slot Control Panel Paper Width Guides Front Cover Output Tray Extension Paper Level Indicator Toner Cartridge Paper Tray 1 Drum Cartridge Xerox B210 Printer ® User Guide…
-
Page 25: Media Output Locations
Duplex printing with the rear door open will cause paper jams. CAUTION: The fuser area inside the rear cover of your device becomes very hot when in use. Take care when you access this area. Xerox B210 Printer ® User Guide…
-
Page 26: Rear View
Parts of the Printer Rear View Network Port Power Receptacle USB Port Rear Cover Xerox B210 Printer ® User Guide…
-
Page 27: Control Panel Overview
4 seconds until the status LED blinks fast. Supplies Information and Usage Counter: Press and hold this button for about 6 seconds. Power On/Off: Powers the printer on or off. Status LED: Shows the status of your printer. Xerox B210 Printer ® User Guide…
-
Page 28: Power Options
When the printer does not receive data for an extended period of time, the Power Saver mode becomes active and power consumption is automatically lowered. Powering Off the Printer Press and hold the Power On/Off button. CAUTION: Do not unplug the power cord while the printer powers down. Xerox B210 Printer ® User Guide…
-
Page 29: Information Pages
The date a supply item was installed appears on the report. On the printer control panel, press and hold the red Cancel button for about 6 seconds. When the Printer Status LED blinks fast, release the button. The Supplies Usage report is printed. Xerox B210 Printer ® User Guide…
-
Page 30: Printing Reports Using Xerox Centreware
Note: If you are prompted to enter the Administrator account user name and password, refer to Accessing the Xerox® CentreWare® Internet Services Administrator Account. Click Reports. To print a report, for the required report, click Print. Click OK.
-
Page 31: Xerox® Centreware® Internet Services
Accessing Xerox® CentreWare® Internet Services and Changing the Default System Administrator Password. For printers connected using a USB connection, use Xerox Easy Printer manager to configure, manage and use your printer from a computer. For more information, refer to Xerox Easy Printer Manager.
-
Page 32: Accessing Xerox® Centreware® Internet Services
Finding the IP Address of Your Printer To install the print driver for a network-connected printer, it is often necessary to know the IP address of your printer. Also, the IP address is used to access the settings of your printer through Xerox ®…
-
Page 33
Services. The Index tab displays a list of options available, with links that go directly to each option. The Contents tab displays a table of contents for Xerox CentreWare Internet Services. ® ® Help: Use this option to go directly to the Xerox website for additional help and information. • Xerox B210 Printer ® User Guide… -
Page 34: Xerox Easy Printer Manager
Xerox Easy Printer Manager installs automatically during driver installation. For details about installing printer software, refer to Installing Printer Software. For information about using Xerox Easy Printer Manager, select the ? Help button in the application. Xerox B210 Printer ®…
-
Page 35: Installing Software
® ® Note: Login is required to change Printer Settings. • Xerox Easy Wireless Setup: When installing the printer you can use the wireless setup program that was automatically installed with the print driver to configure the wireless settings. Printer Linux •…
-
Page 36: More Information
Technical support information for your www.xerox.com/office/B210support printer, including online technical support, Online Support Assistant and print driver downloads Information Pages Print reports from the control panel or using Xerox CentreWare ® ® Internet Services. For details, refer to Information Pages.
-
Page 37
More Information Xerox B210 Printer ® User Guide… -
Page 38: Installation And Setup
CentreWare Internet Services ……………………40 ® ® • Initial Setup …………………………….43 • General Setup…………………………….45 • Network Connectivity…………………………49 • Installing Printer Software ……………………….65 • Setting Up the Printing Service ……………………..72 Xerox B210 Printer ® User Guide…
-
Page 39: Installation And Setup Overview
For instructions on unpacking and installing your printer, refer to the Installation Guide packaged with your printer. You can also access the Online Support Assistant at www.xerox.com/office/B210support. When you configure the printer for the first time, complete the following tasks: Connect your printer to a network using a wired or wireless connection, or to a computer using a USB cable connection.
-
Page 40: Xerox ® Centreware ® Internet Services
Finding the IP Address of Your Printer To install the print driver for a network-connected printer, it is often necessary to know the IP address of your printer. Also, the IP address is used to access the settings of your printer through Xerox ®…
-
Page 41: Administrator Password
Special Characters: @ / . ‘ & + — # * , _ % ( ) ! To verify the password, enter the password again in the Verify Password field. To save the new password, click Save. The Administrator Account password is updated and access to Xerox CentreWare Internet ®…
-
Page 42: Changing The System Administrator Password
When you select an option which requires Administrator Account access, a security login window appears. For User Name, enter Admin. For Password, enter the administrator account password that was set during initial access to Xerox CentreWare Internet Services. Click OK.
-
Page 43: Initial Setup
To change settings using Xerox Easy Printer Manager, at your computer, open Easy Printer Manager. Select the printer, then click Advanced Setting or Machine Settings and configure the settings required. Xerox Easy Printer Manager installs automatically during driver installation.
-
Page 44: Usb Direct Connection
If your printer is connected to your computer directly, using a USB AB cable, configure settings using Xerox Easy Printer Manager. Connect the one end of the USB AB cable to the USB B port on the back of the printer. Connect the other end to a standard USB A connection on your computer.
-
Page 45: General Setup
For Machine Name, type a name for the printer. For Location, type the location of the printer. For Xerox Asset Tag Number and Customer Asset Tag Number, type unique identifiers as needed. In the Geographic Location area, for Latitude and Longitude, type coordinates in decimal form.
-
Page 46
Power Saver Mode 2 Timer: Specify how long the printer remains in Low Power Save mode before it goes into Very Low Power Save mode. Note: The sum of the two timers cannot exceed 119 minutes. Click Apply. Click OK. Xerox B210 Printer ® User Guide… -
Page 47
® Click Tray Settings. For Manual Feed Slot: Select a Mode. To enable the tray confirmation screen, click Enable. For Tray 1, to enable the tray confirmation screen, click Enable. Click Apply. Click OK. Xerox B210 Printer ® User Guide… -
Page 48
To reconfigure the network settings to wired, connect the printer to a computer using a USB AB cable, then use Xerox Easy Printer Manager to change the network settings. For instructions, refer to USB Direct Connection. -
Page 49: Network Connectivity
Accessing the Xerox® CentreWare® Internet Services Administrator Account. Configuring TCP/IP Settings Using Xerox CentreWare Internet Services ® ® If your printer has a valid network address, you can configure TCP/IP settings in Xerox CentreWare ® ® Internet Services. For details, refer to Assigning a Network Address.
-
Page 50
Enter a valid IPv6 Domain Name. • For Primary DNSv6 Server Address, enter an IP address. • For Secondary DNSv6 Server Address, enter an IP address. • To enable Dynamic DNSv6 Registration, select Enable. Click Apply. Xerox B210 Printer ® User Guide… -
Page 51: Slp
Click Apply. SNMP Simple Network Management Protocol (SNMP) is a set of network protocols designed to allow you to manage and monitor devices on your network. You can use the SNMP configuration pages in Xerox CentreWare Internet Services to: ®…
-
Page 52: Snmpv3
For Default TRAP Community Name, type a name. For Authentication Failure Generic Traps, to generate a trap for every SNMP request received by the printer which contains an invalid community name, click Enable. Click Apply. Configuring SNMP Trap Destination Address Using Xerox CentreWare ® ®…
-
Page 53
Network Connectivity Configuring SNMPv1/v2c with SNMPv3 Using Xerox CentreWare ® ® Internet Services SNMP version 1 (SNMPv1) is the initial implementation of the SNMP protocol. SNMPv1 operates over protocols such as User Datagram Protocol (UDP). SNMPv2c includes improvements in performance, confidentiality, and manager-to-manager communications over SNMPv1, however it uses the simple-community based security scheme of SNMPv1. -
Page 54: Wins
When configuring settings in Properties, you will be prompted to enter the Administrator account user name and password. For information about logging in as an administrator, refer to Accessing the Xerox® CentreWare® Internet Services Administrator Account. Configuring WINS Using Xerox…
-
Page 55: Raw Tcp/Ip Printing
When configuring settings in Properties, you will be prompted to enter the Administrator account user name and password. For information about logging in as an administrator, refer to Accessing the Xerox® CentreWare® Internet Services Administrator Account. Configuring Raw TCP/IP Settings Using Xerox…
-
Page 56: Http
If a Machine Digital Certificate is configured, you can edit the following fields. For HTTP Security Mode, select a security option. To allow connections to the Xerox device using HTTPS only, select Require HTTPS. Note: To enable one or more TLS versions, for TLSv 1.0, TLSv 1.1, or TLSv 1.2, select Enable.
-
Page 57
From the Google Cloud Print window in Xerox CentreWare Internet Services, click Apply. ® ® To update the Registration Status displayed in your Web browser, refresh the Xerox CentreWare ® ® Internet Services Web page. 10. To access the Google Cloud Print feature, in your Google account, click Manage Your Printer. The default printer name appears in this format: Model name (MAC address). -
Page 58: Proxy Server
When configuring settings in Properties, you will be prompted to enter the Administrator account user name and password. For information about logging in as an administrator, refer to Accessing the Xerox® CentreWare® Internet Services Administrator Account. Configuring the Proxy Server Using Xerox…
-
Page 59: Connecting To A Wireless Network
Before starting, you must get the setup and configuration information, such as name and passphrase, from the router. After you collect the network information, you can set up the printer from the printer control panel or from Xerox CentreWare Internet Services.
-
Page 60
Advanced enterprise networks require certificates loading prior to setup. For details, refer to Security Certificates. Internet Services, click Properties Connectivity Protocols. In Xerox CentreWare ® ® Click Wireless Setup. Click Edit Settings. For Network Name SSID, select an option: Xerox B210 Printer ® User Guide… -
Page 61: Wi-Fi Directtm
When configuring settings in Properties, you will be prompted to enter the Administrator account user name and password. For information about logging in as an administrator, refer to Accessing the Xerox® CentreWare® Internet Services Administrator Account. Configuring Wi-Fi Direct Using Xerox…
-
Page 62: Wsd
When configuring settings in Properties, you will be prompted to enter the Administrator account user name and password. For information about logging in as an administrator, refer to Accessing the Xerox® CentreWare® Internet Services Administrator Account. Enabling WSD Using Xerox…
-
Page 63: Sntp
When configuring settings in Properties, you will be prompted to enter the Administrator account user name and password. For information about logging in as an administrator, refer to Accessing the Xerox® CentreWare® Internet Services Administrator Account. Configuring SNTP Using Xerox…
-
Page 64: Mopria
When configuring settings in Properties, you will be prompted to enter the Administrator account user name and password. For information about logging in as an administrator, refer to Accessing the Xerox® CentreWare® Internet Services Administrator Account. Configuring Mopria Using Xerox…
-
Page 65: Installing Printer Software
All applications should be closed on your PC before beginning installation. You can install the printer software for a local, networked or wireless printer using the recommended or custom method. Xerox B210 Printer ® User Guide…
-
Page 66
After you have assigned and verified the TCP/IP settings, you are ready to install the software on each computer on the network. Make sure that the printer is connected to your computer and powered on. Xerox B210 Printer ® User Guide… -
Page 67
After you have assigned and verified the TCP/IP settings, you are ready to install the software on each computer on the network. To install the printer software and connect to a printer on a wireless network using the Xerox Easy Wireless Setup program, refer to Using the Xerox Easy Wireless Setup Program. -
Page 68
Troubleshooting chapter of this guide. Using the Xerox Easy Wireless Setup Program When installing the printer, you can use the Xerox Easy Wireless Setup program that was automatically installed with the printer driver to configure the wireless settings. Note: Make sure the Xerox Easy Wireless Setup Program is installed on your computer, for… -
Page 69: Installing Macintosh Drivers
Make sure that the printer is connected to your computer and powered on. From the Xerox web site, download the required driver .dmg package to your computer. To extract the files and the MAC_Installer folder, double-click the driver .dmg package.
-
Page 70: Installing Linux Drivers
Select Close. Installing Linux Drivers To print from a Linux workstation, install either a Xerox print driver for Linux or a CUPS (Common UNIX Printing System) print driver. Xerox recommends that you install the Unified Linux Driver for your printer.
-
Page 71
Installing Printer Software Uninstalling the Linux Drivers Open a terminal window, then navigate to the uld directory. To uninstall the printer, type: sudo ./uninstall-printer.sh, then press Enter. Xerox B210 Printer ® User Guide… -
Page 72: Setting Up The Printing Service
Managing Banner Page Printing You can set the printer to print a banner page with each print job. The banner page contains information identifying the user and job name. You can set this option in the print driver, in Xerox ®…
-
Page 73
Reports. Note: If you are prompted to enter the Administrator account user name and password, refer to Accessing the Xerox® CentreWare® Internet Services Administrator Account. To print a report, next to the report name, click Print. Xerox B210 Printer ®… -
Page 74
Setting Up the Printing Service Xerox B210 Printer ® User Guide… -
Page 75: Printing
Printing This chapter includes: • Printing Overview …………………………..76 • Printing Using Windows …………………………. 77 • Xerox Easy Printer Manager ……………………….86 • Printing Using Macintosh ……………………….87 • Printing Using Linux …………………………. 90 • Printing Using Xerox CentreWare Internet Services ………………93 ®…
-
Page 76: Printing Overview
To access the many print drivers which can be used with your printer, refer to the Software and Documentation CD delivered with your printer, or download the latest versions from www.xerox.com/office/B210drivers. Xerox B210 Printer ®…
-
Page 77: Printing Using Windows
• Favorites Tab • Basic Tab • Paper Tab • Graphics Tab • Advanced Tab • Xerox Tab Select OK to confirm your selections. Select Print or OK to print your document. Xerox B210 Printer ® User Guide…
-
Page 78: Print Options
Additional options are available on some tabs which provide information about your device. Paper Tab The Paper tab, in the right panel, is visible on each main tab except for the Favorites and Xerox tabs. It displays a graphical summary of your selections.
-
Page 79
The Preview tab, in the right panel, is visible only on the Favorites tab. It displays a graphical summary of your selections. Details Tab The Details tab, in the right panel, is visible only on the Favorites tab. It displays a summary of the selected Favorite and notes incompatible options. Xerox B210 Printer ® User Guide… -
Page 80
Page images are reordered to enable you to fold the paper after printing to make a booklet. Page Border: Use this option to select from a variety of borders for your output. Xerox B210 Printer ® User Guide… -
Page 81
• • Short Edge: This is the type often used with calendars. The second side images are rotated 180 degrees. Smart Duplexing If the Smart Duplexing mode has been enabled in Xerox CentreWare Internet Services, 2-Sided ® ® printing is selected or deselected automatically. Use Smart Duplexing to reduce the amount of energy and paper used in the printing process. -
Page 82
Edge Enhancement: Use this option to improve image definition. • Advanced: Use this option to adjust the brightness and contrast levels. Select OK to save your selections. Toner Saver Select On to save toner. • Xerox B210 Printer ® User Guide… -
Page 83
Select Edit from the Watermark drop-down list. The Edit Watermarks window appears. Select the watermark you want to delete from the Current Watermarks list and click Delete. Click Yes to confirm the deletion. Click OK. Xerox B210 Printer ® User Guide… -
Page 84
Select Edit from the Overlay drop-down list. The Edit Overlay window appears. Select the Overlay you want to delete from the Overlay List box. Click Delete. When a confirming message window appears, click Yes. Click OK. Xerox B210 Printer ® User Guide… -
Page 85
To add a binding margin, select the Manual Margin check box and select Details to select the margin position and width. Xerox Tab This tab provides version and copyright information as well as links to drivers and downloads, supplies ordering, and the Xerox Web site. Xerox B210 Printer ®… -
Page 86: Xerox Easy Printer Manager
Xerox Easy Printer Manager installs automatically during driver installation. For details about installing printer software, refer to Installing Printer Software. For information about using Xerox Easy Printer Manager, select the ? Help button in the application. Xerox B210 Printer ®…
-
Page 87: Printing Using Macintosh
Copies: This allows you to choose the number of copies to be printed. You can select 1 to 999 • copies. • Pages: Select the pages or range of pages to print. Show Quick Preview: Select this option to display a graphical summary of your selections. • Xerox B210 Printer ® User Guide…
-
Page 88
Page images are reordered to enable you to fold the paper after printing to make a booklet. • Reverse page orientation: Your printer prints all pages from the last page to the first page. Flip horizontally: Use this option to rotate all pages 180 degrees. • Xerox B210 Printer ® User Guide… -
Page 89: Using Airprint
Using Google Cloud Print Google Cloud Print is a service that allows you to print to a printer using your smart phone, tablet, or any other web-connected devices. For more information, refer to Google Cloud Print. Xerox B210 Printer ® User Guide…
-
Page 90: Printing Using Linux
Printing Using Linux Printing Using Linux To print from a Linux workstation, install either a Xerox print driver for Linux or a CUPS (Common UNIX Printing System) print driver. Xerox recommends that you install the Unified Linux Driver for your printer.
-
Page 91: Printer Options
URL, print a test page and view status information. • Policies: This tab provides access to the printing policies for the device. You can set sharing options, Error and Operation policies. Use the Banner options to configure the printer banner sheet. Xerox B210 Printer ® User Guide…
-
Page 92
Jobs: This option shows the list of Print jobs. Select Cancel job to cancel the selected job and select the Show completed jobs check box to see previous jobs on the job list. Click OK to apply the changes and close the Printer Properties window. Xerox B210 Printer ® User Guide… -
Page 93: Printing Using Xerox Centreware Internet Services
CentreWare Internet ® ® Services You can print .pdf, .ps, .pcl, and .xps files directly from Xerox CentreWare Internet Services without ® ® having to open another application or the print driver. The files can be stored on a local computer hard drive, mass storage device, or network drive.
-
Page 94
Printing Using Xerox CentreWare Internet Services ® ® • 2 Sided, Flip on Long Edge: This option prints the job on both sides of the paper to allow binding on the long edge of the paper. The following illustrations show the result for documents with portrait and landscape orientations. -
Page 95
Printing Using Xerox CentreWare Internet Services ® ® Xerox B210 Printer ® User Guide… -
Page 96: Paper And Media
This chapter includes: • Supported Paper…………………………..97 • Loading Paper …………………………..101 • Setting Paper Size and Type ………………………. 105 • Media Output Locations ……………………….107 Xerox B210 Printer ® User Guide…
-
Page 97: Supported Paper
Your printer is designed to use various paper and other media types. To ensure the best print quality and to avoid jams, follow the guidelines in this section. For best results, use Xerox paper and media recommended for your printer.
-
Page 98: Paper That Can Damage Your Printer
Padded envelopes • Plastic media CAUTION: The Xerox Warranty or Service Agreement does not cover damage caused by using unsupported paper or specialty media. Coverage could vary outside these areas. Please contact your local representative for details. Paper Storage Guidelines Storing your paper and other media properly contributes to optimum print quality.
-
Page 99: Supported Standard Paper Sizes
4.33 x 8.66 inches (110 x 220 mm) C5 Envelopes 6.38 x 9.02 inches (162.0 x 229 mm) C6 Envelopes 4.49 x 6.38 inches (114 x 162 mm) No.10 Envelopes 4.12 x 9.5 inches (105 x 241 mm) Xerox B210 Printer ® User Guide…
-
Page 100: Supported Paper Types And Weights
Postcard 32 to 43 lb (121 to 163 g/m²) card stock Envelopes g/m² 20 to 24 lb (75 to 90 Key: Supported Not Supported Xerox B210 Printer ® User Guide…
-
Page 101: Loading Paper
For more media specifications, refer to Supported Paper. Pull out tray 1 and load paper into the tray, print side down. Do not fill above the Maximum Fill line indicated by the symbol Xerox B210 Printer ® User Guide…
-
Page 102: Using The Manual Feed Slot
Acceptable print media is plain paper from 3.0 x 5.0 inches to 8.5 x 14 inches Legal (76 mm x 127 mm to 216 mm x 356 mm) and weighing between 16 lb and 58 lb (60 g/m² and 220 g/m²). For more media specifications, refer to Supported Paper. Xerox B210 Printer ® User Guide…
-
Page 103
Paper option in the print driver to specify the correct paper size and type. For the source, you must select Manual Feed Slot. Not confirming the paper details may result in printing delays. Xerox B210 Printer ® User Guide… -
Page 104
Paper option in the print driver to specify the correct paper size and type. For the source, you must select Manual Feed Slot. Not confirming the paper details may result in printing delays. After printing, close the manual feed slot. Xerox B210 Printer ® User Guide… -
Page 105: Setting Paper Size And Type
If your device is directly connected to your computer using a USB direct connection, the paper settings can be set using Xerox Easy Print Manager. If your device is Ethernet or Wireless connected, the Xerox Easy Printer Manager connects to Xerox CentreWare Internet Services for configuring device settings.
-
Page 106
Select the printer. Click Advanced Setting or Machine Settings. If using Windows, click Device Settings. Note: If your device is Ethernet or Wireless connected, device settings are configured using Xerox ® CentreWare Internet Services. Refer to Changing Tray Settings Using Xerox CentreWare ®… -
Page 107: Media Output Locations
Note: The rear cover output can only be used for simplex jobs. Duplex printing with the rear door open will cause paper jams. Xerox B210 Printer ® User Guide…
-
Page 108: Using The Output Tray
Duplex printing with the rear cover open causes paper jams. CAUTION: The fuser area inside the rear cover of your device becomes very hot when in use. Take care when you access this area. Xerox B210 Printer ® User Guide…
-
Page 109: Maintenance
Maintenance This chapter includes: • General Precautions …………………………110 • Cleaning the Printer …………………………111 • Supplies………………………………. 114 • Managing the Printer …………………………121 • Moving the Printer …………………………. 123 Xerox B210 Printer ® User Guide…
-
Page 110: General Precautions
Do not touch the electrical contacts or gears. Doing so could damage the printer and cause the print quality to deteriorate. • Ensure any parts removed during cleaning are replaced before you plug in the printer. Xerox B210 Printer ® User Guide…
-
Page 111: Cleaning The Printer
Cleaning inside the printer clears and reduces these problems. Power off the printer and unplug the power cord. Wait for the printer to cool down. Open the front cover of the printer. Xerox B210 Printer ® User Guide…
-
Page 112
Re-install the drum cartridge and then the toner cartridge. Tabs on the sides of the cartridge and corresponding grooves within the printer will guide the cartridge into the correct position until each locks into place. Close the front cover. Xerox B210 Printer ® User Guide… -
Page 113
Cleaning the Printer Plug in the power cord and power on the printer. When the green system status light is solid, the printer is ready.. Xerox B210 Printer ® User Guide… -
Page 114: Supplies
Use of toner other than genuine Xerox Toner can affect print quality and printer ® reliability. Xerox Toner is the only toner designed and manufactured under strict quality controls ® by Xerox for specific use with this printer. Xerox B210 Printer ® User Guide…
-
Page 115: Ordering Supplies
At your computer, open a Web browser. In the address field, type the IP address of the printer, then press Enter or Return. Click Support. Click the link to go to the Xerox website to order supplies online, or use the Supplies contact details shown to place a telephone order. Supply Status Information If you enabled the Low Toner Indicator during the setup of your printer, an orange LED symbol at the top of the control panel indicates the status of the toner level in the toner cartridge.
-
Page 116
Supplies You can check the status and percentage of life remaining for your printer supplies by printing a Supplies Usage report at the control panel, using Xerox CentreWare Internet Services, or using Xerox ® ® Easy Printer Manager. When printer supplies near their replacement time, warning alerts appear on the control panel. -
Page 117: Toner Cartridge
• White streaks on prints or light printing occurs. • The low toner status indicator appears if the Low Toner Alert feature was enabled in Xerox ® CentreWare Internet Services. An error message will also appear on the user interface.
-
Page 118
Replace the toner cartridge using the following instructions. Open the front cover. Pull out the toner cartridge. Remove the new toner cartridge from the packaging. Remove the protective materials from the cartridge as directed in the packaging labels. Xerox B210 Printer ® User Guide… -
Page 119: Drum Cartridge
Never manually rotate the drum in the drum cartridge, especially in the reverse direction; this can cause internal damage. • To prevent damage to the drum cartridge, do not expose it to light for more than a few minutes. Cover it with a piece of paper, if necessary. Xerox B210 Printer ® User Guide…
-
Page 120: Recycling Supplies
Close the front cover. Make sure that the door is securely closed. When the green system status light is solid, the printer is ready. Recycling Supplies For information on Xerox supplies recycling programs, go to www.xerox.com/gwa. Xerox B210 Printer ®…
-
Page 121: Managing The Printer
Refresh option. Software Updates Xerox is continually seeking to improve its products. A software revision may become available to improve the functionality of your printer. The Software Upgrade feature allows the customer to upgrade the printer software without needing a Customer Service Representative to be present.
-
Page 122
Select Upgrade Management. Note: If prompted to enter a user name and password, for information about logging in as an administrator, refer to Accessing the Xerox® CentreWare® Internet Services Administrator Account. Select the Upgrades enable check box. Select the Firmware Upgrade. -
Page 123: Moving The Printer
CAUTION: Failure to repackage the printer properly for shipment can result in damage not covered by the Xerox Warranty or Service Agreement. The Xerox Warranty or Service Agreement do not cover damage to the printer caused by improper moving. After moving the printer: Reinstall any parts that you removed.
-
Page 124: Troubleshooting
Troubleshooting This chapter includes: • Troubleshooting Overview……………………….125 • General Troubleshooting ……………………….128 • Paper Jams …………………………….133 • Printing Problems…………………………..142 • Print-Quality Problems …………………………148 • Getting Help…………………………….153 Xerox B210 Printer ® User Guide…
-
Page 125: Troubleshooting Overview
If the problem persists, call for service. When you call for service, provide the service representative with the device serial number, IP address, and a description of the error. For information about locating the printer serial number, refer to Locating the Serial Number. Xerox B210 Printer ® User Guide…
-
Page 126: Status Indicators
The printer is connected to a wireless network The printer is not connected to a wireless network. Power Blue The printer is in power save mode. The printer is in ready mode or the printer’s power is off. Xerox B210 Printer ® User Guide…
-
Page 127
Troubleshooting Overview Status LED Color Status Description Duplex Green Duplex printing is on. Printing Duplex printing is off. Xerox B210 Printer ® User Guide… -
Page 128: General Troubleshooting
Restarting the Printer To restart the printer, refer to Power Options. Note: If restarting the printer does not resolve the problem, refer to Printer Fails to Power On Printer Resets or Powers Off Frequently. Xerox B210 Printer ® User Guide…
-
Page 129: Printer Fails To Power On
Access the application from which you are printing, then go to the page setup or printer settings. Set the paper source to match the tray selected in the print driver, or set the paper source to Auto Select. Xerox B210 Printer ® User Guide…
-
Page 130: Paper Tray Fails To Close
The power cord is not plugged into the Power off the printer, confirm that the power cord is plugged in outlet correctly. correctly to the printer and the outlet, then power on the printer. Xerox B210 Printer ® User Guide…
-
Page 131: Printer Makes Unusual Noises
Probable Causes Solutions There is an obstruction or debris inside Power off the printer. the printer. Remove the obstruction or debris. Note: If you cannot remove the obstruction or debris, contact a service representative Xerox B210 Printer ® User Guide…
-
Page 132: Condensation Has Formed Inside The Printer
Leave the rear cover open. Prints will be delivered face up. Note: The rear cover output can only be used for simplex jobs one sheet at a time. Do not leave rear cover open for duplex jobs. Xerox B210 Printer ® User Guide…
-
Page 133: Paper Jams
Paper Jams Paper Jams Minimizing Paper Jams The printer is designed to function with minimal paper jams using Xerox supported paper. Other paper ® types can cause jams. If supported paper is jamming frequently in one area, clean that area of the paper path.
-
Page 134: Locating Paper Jams
Do not attempt to clear any paper jams using tools or instruments. Using tools or instruments can damage the printer permanently. The following illustration shows where paper jams can occur: Paper Tray 1 Inside the Printer Manual Feed Slot Duplex and Rear Exit Areas Xerox B210 Printer ® User Guide…
-
Page 135: Clearing Paper Jams
Remove any jammed paper by gently pulling it straight out. Release the green latch positioned on the left side, above where the paper tray sits. When the baffle drops down, remove any paper from that area of the paper path. Xerox B210 Printer ® User Guide…
-
Page 136
Clearing Paper Jams at the Manual Feed Slot To resolve the error, clear all paper from the manual feed slot. If the paper is not feeding properly, pull the paper out of the printer. Close the manual feed slot cover. Xerox B210 Printer ® User Guide… -
Page 137
Some areas of the printer are hot. Take care when removing paper from the printer. Open the front cover. Pull the toner cartridge out. Remove the jammed paper by gently pulling it straight out. Xerox B210 Printer ® User Guide… -
Page 138
To resolve the error, clear all paper from the duplex and rear exit areas. Open the rear cover of the printer. Press down and pull out the green latches and attached baffle on either side of opening. Xerox B210 Printer ® User Guide… -
Page 139
Remove any paper you see, working slowly so that you don’t tear any pieces or damage printer parts. After removing the paper you see, pull the baffle up until the latches click into place. Close the rear cover. Printing will resume automatically. Xerox B210 Printer ® User Guide… -
Page 140: Troubleshooting Paper Jams
Remove the paper from the tray, then replace it with new, dry paper. Too much static electricity is present. Load new paper into the printer. Using unsupported paper. Use only Xerox-approved paper. For details, refer to Supported Paper. Xerox B210 Printer ®…
-
Page 141
The paper is moist from humidity. Remove the moist paper, then replace it with new, dry paper. Using paper of the wrong size, thickness Use only Xerox-approved paper. For details, refer to Supported or type. Paper. -
Page 142: Printing Problems
Reduce the complexity of the page or slow. try adjusting the print quality settings. After 100 consecutive prints the device print speed will slow down until the current job completes. The next job will return to rated speed. Xerox B210 Printer ® User Guide…
-
Page 143
The resolution of the photo is very low. Reduce the photo size. If you increase photos is not good. the photo size in the software Images are not clear. application, the resolution will be reduced. Xerox B210 Printer ® User Guide… -
Page 144: Common Postscript Problems
The print job may not be PostScript. Make sure that the print job is a prints. PostScript job. Check to see whether the software application expected a setup or PostScript header file to be sent to the printer. Xerox B210 Printer ® User Guide…
-
Page 145: Common Windows Problems
If the message appears in standby mode or after printing has been completed, check the connection and/or whether an error has occurred. Note: Refer to the Microsoft Windows User Guide supplied with your computer for further information on Windows error messages. Xerox B210 Printer ® User Guide…
-
Page 146: Common Linux Problems
Print jobs. If this situation occurs, try to release the port by selecting Release port in Port configuration window. Note: Refer to the Linux User Guide supplied with your computer for further information on Linux error messages. Xerox B210 Printer ® User Guide…
-
Page 147: Common Macintosh Problems
English alphabet and numbers are displayed normally on the cover page. Note: Refer to the Macintosh User Guide supplied with your computer for further information on Macintosh error messages. Xerox B210 Printer ® User Guide…
-
Page 148: Print-Quality Problems
Adjust the print resolution and switch off Toner Save mode. See the help screen of the print driver. • A combination of faded or smeared defects may indicate that the toner cartridge needs replacing. For details, refer to Replacing the Toner Cartridge. Xerox B210 Printer ® User Guide…
-
Page 149
• Check the environmental conditions: very dry conditions or a high level of humidity (higher than 80% RH) can increase the amount of background shading. • Remove the old toner cartridge and install a new one, refer to Replacing the Toner Cartridge. Xerox B210 Printer ® User Guide… -
Page 150
• Ensure that the paper is loaded properly. • Check the paper type and quality. For details, refer to Supported Paper. • Ensure that the guides are not too tight or too loose against the paper stack, refer to Loading Paper. Xerox B210 Printer ® User Guide… -
Page 151
• Check the paper type and quality. For details, refer to Supported Paper. • Remove the toner cartridge and install a new one, refer to Replacing the Toner Cartridge. • The printer may require repair. Contact a service representative. Xerox B210 Printer ® User Guide… -
Page 152
• The high altitude may affect the print quality, such as loose toner or light a few sheets or loose imaging. For optimum performance, use the printer at elevations below 3100 M toner, light print, or (10,170 ft.). contamination occurs. Xerox B210 Printer ® User Guide… -
Page 153: Getting Help
Warning alerts inform you about printer conditions, such as low supplies or low paper supply that require your attention. For more information, refer to Status Indicators. Information about current errors and printer status can also be viewed using Xerox CentreWare ® ®…
-
Page 154: Helpful Information Pages
For example, you can find solutions for print-quality problems, paper jams, and software installation issues. To access the Online Support Assistant, go to www.xerox.com/office/B210support. Locating the Serial Number The printer’s serial number is located on the data plate on the rear cover, and is printed on the Configuration report.
-
Page 155: More Information
Technical support information for your www.xerox.com/office/B210support printer, including online technical support, Online Support Assistant and print driver downloads Information Pages Print reports from the control panel or using Xerox CentreWare ® ® Internet Services. For details, refer to Information Pages.
-
Page 156
Getting Help Xerox B210 Printer ® User Guide… -
Page 157: Security
Concealing or Showing Job Names ……………………166 • 802.1x ………………………………167 • System Timeout …………………………..168 • USB Port Security …………………………… 169 • Restricting Access to the Web User Interface ………………..170 • Software Verification Test ……………………….171 Xerox B210 Printer ® User Guide…
-
Page 158: Xerox ® Centreware ® Internet Services
Finding the IP Address of Your Printer To install the print driver for a network-connected printer, it is often necessary to know the IP address of your printer. Also, the IP address is used to access the settings of your printer through Xerox ®…
-
Page 159: Accessing The Xerox ® Centreware
When you select an option which requires Administrator Account access, a security login window appears. For User Name, enter Admin. For Password, enter the administrator account password that was set during initial access to Xerox CentreWare Internet Services. Click OK.
-
Page 160: Changing The System Administrator Password
To prevent unauthorized changes to printer settings, ensure the Administrator Account password is changed regularly. Be sure to store the password in a secure location. Note: If you are accessing Xerox CentreWare Internet Services for the first time after printer ®…
-
Page 161: Setting Print Permissions
® Click Print Permissions. Note: If prompted to enter a user name and password, for information about logging in as an administrator, refer to Accessing the Xerox CentreWare Internet Services Administrator Account. ® ® For 2-Sided Printing Policy, for Always Require 2-Sided Printing, select On or Off.
-
Page 162: Secure Http
Ensure that the date and time configured on the printer is correct. The time that is set on the printer is used to set the start time for the Xerox Device Certificate. A Xerox Device Certificate is installed when you enable HTTP. After you enable HTTP, check the device certificate.
-
Page 163: Ip Filtering
® Click IP Filtering. Note: If prompted to enter a user name and password, for information about logging in as an administrator, refer to Accessing the Xerox CentreWare Internet Services Administrator Account. ® ® To enable IP filtering, select IPv4 Filtering Enabled, IPv6 Filtering Enabled, or both.
-
Page 164: Ipsec
® Click IPSec. Note: If prompted to enter a user name and password, for information about logging in as an administrator, refer to Accessing the Xerox CentreWare Internet Services Administrator Account. ® ® To enable the protocol, for Protocol, select Enabled.
-
Page 165: Security Certificates
® Click Machine Digital Certificate. Note: If prompted to enter a user name and password, for information about logging in as an administrator, refer to Accessing the Xerox CentreWare Internet Services Administrator Account. ® ® Click Create New Certificate, then select an option: •…
-
Page 166: Concealing Or Showing Job Names
Concealing or Showing Job Names Concealing or Showing Job Names You can conceal job names from displaying in the Active Jobs and Completed Jobs lists in Xerox ® CentreWare Internet Services. ® In Xerox CentreWare Internet Services, click Properties Security.
-
Page 167: 167
® ® Click 802.1x. Note: If prompted to enter a user name and password, for information about logging in as an administrator, refer to Accessing the Xerox CentreWare Internet Services Administrator Account. ® ® For 802.1x, select Enabled. For Authentication Method, select an option: •…
-
Page 168: System Timeout
® Click System Timeout. Note: If prompted to enter a user name and password, for information about logging in as an administrator, refer to Accessing the Xerox CentreWare Internet Services Administrator Account. ® ® For Web System Timer, type the amount of time the system waits before it resets settings to the default options and logs out inactive users from the Web User Interface.
-
Page 169: Usb Port Security
® Click USB Port Security. Note: If prompted to enter a user name and password, for information about logging in as an administrator, refer to Accessing the Xerox CentreWare Internet Services Administrator Account. ® ® To enable a port, for the port, select the check box.
-
Page 170: Restricting Access To The Web User Interface
® Click Security Settings. Note: If prompted to enter a user name and password, for information about logging in as an administrator, refer to Accessing the Xerox CentreWare Internet Services Administrator Account. ® ® To restrict access to the Web User Interface, for Lock WebUI, select the check box. To allow access to the Web interface, clear the check box.
-
Page 171: Software Verification Test
You can test the printer software to confirm that it is operating correctly. The test checks software files to confirm that they are not corrupt. If the printer software appears to function improperly, a Xerox representative can ask you to perform this test.
-
Page 172
Specifications This chapter includes: • Printer Specifications …………………………173 • Feature Specifications …………………………. 177 • Network Environment …………………………178 • System Requirements …………………………179 • Electrical Specifications ……………………….180 • Environmental Specifications ……………………..181 Xerox B210 Printer ® User Guide… -
Page 173: Printer Specifications
Up to 15 images per minute on Letter (215 x 279 mm) and A4 (210 x 297 mm) First Print Out Time As fast as 8.5 seconds from Ready status Warm Up Time Less than 32 seconds from Sleep mode Xerox B210 Printer ® User Guide…
-
Page 174: Physcial Specifications
14.5 inches (368 mm) Depth 13.2 inches (334 mm) Height 8.4 inches (213 mm) Weight 16.67 lb (7.56 kg) Clearance Requirements 10 cm 10 cm (3.9 in.) (3.9 in.) 36 cm (14.2 in.) 10 cm (3.9 in.) Xerox B210 Printer ® User Guide…
-
Page 175: Media Specifications
• Envelope Monarch, Com-10, DL, C5, C6, Postcard 4 x 6 Custom Sizes: • Minimum Size: 3 x 5 inch (76 x 127 mm) • Maximum Size: 8.5 x 14 inch (216 x 356 mm) Xerox B210 Printer ® User Guide…
-
Page 176
A4, Letter, Oficio, Folio, Legal Media Types Plain Paper, Light weight, Heavy weight, Recycled Media Output Feature Specification Output Tray Capacity 150 sheets of 20 lb (80 g/m²) face down Rear Cover Capacity 1 sheet face up Xerox B210 Printer ® User Guide… -
Page 177: Feature Specifications
• Starter Toner Cartridge: 1500 standard prints for 220V devices and 1000 standard prints for 110V devices Standard Printer Memory 128 — 256 MB Compatibility Windows PC / MAC / Linux PDL / PCL PCL5e, PCL6, Postscript 3 Xerox B210 Printer ® User Guide…
-
Page 178: Network Environment
• Mac OS X 10.9 ~ 10.14 Network protocols • TCP/IPv4, TPC/IPv6 • DHCP, BOOTP • DNS, WINS, DDNS, Bonjour, SLP, UPnP • Standard TCP/IP Printing (RAW), LPR, IPP, WSD • SNMPv1/v2c/v3, HTTP, IPSec Xerox B210 Printer ® User Guide…
-
Page 179: System Requirements
13.10, 14.04, 14.10, 15.04, 15.10, 16.04, 16.10, 17.04, 17.10, 18.04, 18.10 • Debian 6, 7, 8, 9 • Redhat Enterprise Linux 5, 6, 7 ® • SuSE Linux Enterprise Desktop 10, 11, 12 • Mint 15, 16, 17, 17.1 Xerox B210 Printer ® User Guide…
-
Page 180: Electrical Specifications
• Power Save mode: 1.1 Watts • Stand By mode: Less than 50 Watts • Sleep mode: 0.9 Wh • Ready mode: 55 Wh • Average Operation — Continuous Printing: less than 500 Wh Xerox B210 Printer ® User Guide…
-
Page 181: Environmental Specifications
Optimal humidity range: 30 — 80% Note: Under extreme environmental conditions, such as 10 C and 90% relative humidity, issues can occur due to condensation. Elevation For optimum performance, use the printer at elevations below 3100 M (10,170 ft.). Xerox B210 Printer ® User Guide…
-
Page 182
Environmental Specifications Xerox B210 Printer ® User Guide… -
Page 183
Regulatory Information This appendix contains: • Basic Regulations …………………………… 184 • Safety Certification …………………………190 • Material Safety Data …………………………191 Xerox B210 Printer ® User Guide… -
Page 184: Basic Regulations
• Consult the dealer or an experienced radio/television technician for help. Changes or modifications to this equipment not approved by Xerox can void the authority of the user to operate this equipment. Note: To ensure compliance with Part 15 of the FCC rules, use shielded interface cables.
-
Page 185: European Union
Basic Regulations European Union The CE mark applied to this printer symbolizes a declaration of conformity by Xerox with the following applicable Directives of the European Union as of April 16, 2014: Radio Equipment Directive 2014/53/EU. Hereby, Xerox declares that the radio equipment model B210 is in compliance with Directive 2014/53/EU.
-
Page 186
Basic Regulations Environmental Benefits of Duplex Printing Most Xerox devices have duplex printing, also known as 2-sided printing, capability. This enables you to print on both sides of the paper automatically, and therefore helps to reduce the use of valuable resources by reducing your paper consumption. -
Page 187: Germany
Eco Certified to Office Machines CCD-035 This product is certified to EcoLogo standard for office machines, meeting all requirements for reduced environmental impact. As part of achieving certification, Xerox Corporation has proven this product meets the EcoLogo criteria for energy efficiency. Certified copier, printer, multifunctional device, and fax products must also meet criteria such as reduced chemical emissions and demonstrate compatibility with recycled supplies.
-
Page 188: Turkey Rohs Regulation
This device may not cause harmful interference, and (2) this device must accept any interference received, including interference that may cause undesired operation. Changes or modifications to this device not specifically approved by the Xerox Corporation may void the user’s authority to operate this equipment.
-
Page 189: Ozone Release
Ozone is heavier than air and is not produced in amounts large enough to harm anyone. Install the printer in a well-ventilated room. For more information in the United States and Canada, go to www.xerox.com/environment. In other markets, please contact your local Xerox representative or go to www.xerox.com/environment_europe.
-
Page 190: Safety Certification
Underwriters Laboratories Inc. (US/Canada) UL 60950-1, 2nd Edition, 2014-10-14 CAN/CSA C22.2 No. 60950-1-07, 2nd Edition, 2014-10 Underwriters Laboratories Inc. (Europe) IEC 60950-1:2005 + A1:2009 + A2:2013 EN 60950-1:2006 + A11:2009 + A1:2010 + A12:2011 + A2:2013 Xerox B210 Printer ® User Guide…
-
Page 191: Material Safety Data
Material Safety Data Material Safety Data For Material Safety Data information regarding your printer, go to: • North America: www.xerox.com/msds • European Union: www.xerox.com/environment_europe For the Customer Support Center phone numbers, go to www.xerox.com/office/worldcontacts. Xerox B210 Printer ® User Guide…
-
Page 192
Recycling and Disposal This appendix contains: • All Countries …………………………….. 193 • North America …………………………..194 • European Union …………………………..195 • Other Countries …………………………..197 Xerox B210 Printer ® User Guide… -
Page 193: All Countries
All Countries All Countries If you are managing the disposal of your Xerox product, please note that the printer may contain lead, mercury, perchlorate, and other materials whose disposal may be regulated due to environmental considerations. The presence of these materials is fully consistent with global regulations applicable at the time that the product was placed on the market.
-
Page 194: North America
North America Xerox operates an equipment take-back and reuse/recycle program. Contact your Xerox representative (call 1-800-ASK-XEROX) to determine if this Xerox product is part of the program. For more information about Xerox environmental programs, visit www.xerox.com/environment, or for local recycling and disposal information, contact your local authorities.
-
Page 195
In accordance with European legislation, end of life electrical and electronic equipment subject to disposal must be managed within agreed procedures. Prior to disposal, please contact your local reseller or Xerox representative for end of life take-back information. Collection and Disposal of Equipment and Batteries… -
Page 196
This wheeled bin symbol may be used in combination with a chemical symbol. This establishes compliance with the requirements set out by the Directive. Battery Removal Batteries should only be replaced by a MANUFACTURER-approved service facility. Xerox B210 Printer ® User Guide… -
Page 197
Other Countries Other Countries Please contact your local waste management authority to request disposal guidance. Xerox B210 Printer ® User Guide… -
Page 198
Other Countries Xerox B210 Printer ® User Guide…

Версия 1.0
Август 2019 г.
702P07620
Принтер Xerox
®
B210
Руководство пользователя

©2019 Xerox Corporation. All rights reserved. Xerox
®
, Xerox and Design
®
, VersaLink
®
, FreeFlow
®
, SMARTsend
®
, Scan to PC
Desktop
®
, MeterAssistant
®
, SuppliesAssistant
®
, Xerox Secure Access Unified ID System
®
, Xerox Extensible Interface Platform
®
,
Global Print Driver
®
, and Mobile Express Driver
®
are trademarks of Xerox Corporation in the United States and / or other countries.
Adobe
®
, Adobe PDF logo, Adobe
®
Reader
®
, Adobe
®
Type Manager
®
, ATM™, Flash
®
, Macromedia
®
, Photoshop
®
, and PostScript
®
are trademarks or registered trademarks of Adobe Systems, Inc.
Apple
®
, Bonjour
®
, EtherTalk™, TrueType
®
, iPad
®
, iPhone
®
, iPod
®
, iPod touch
®
, AirPrint
®
and the AirPrint Logo
®
, Mac
®
, Mac OS
®
,
and Macintosh
®
are trademarks or registered trademarks of Apple Inc. in the U.S. and other countries.
Google Cloud Print™ web printing service, Gmail™ webmail service, and Android™ mobile technology platform are trademarks of
Google, Inc.
HP-GL
®
, HP-UX
®
, and PCL
®
are registered trademarks of Hewlett-Packard Corporation in the United States and/or other countries.
IBM
®
and AIX
®
are registered trademarks of International Business Machines Corporation in the United States and/or other
countries.
McAfee
®
, ePolicy Orchestrator
®
, and McAfee ePO™ are trademarks or registered trademarks of McAfee, Inc. in the United States and
other countries.
Microsoft
®
, Windows Vista
®
, Windows
®
, Windows Server
®
, and OneDrive
®
are registered trademarks of Microsoft Corporation in
the United States and other countries.
Mopria is a trademark of the Mopria Alliance.
Novell
®
, NetWare
®
, NDPS
®
, NDS
®
, IPX™, and Novell Distributed Print Services™ are trademarks or registered trademarks of Novell,
Inc. in the United States and other countries.
PANTONE
®
and other Pantone, Inc. trademarks are the property of Pantone, Inc. SGI
®
and IRIX
®
are registered trademarks of
Silicon Graphics International Corp. or its subsidiaries in the United States and/or other countries.
Sun, Sun Microsystems, and Solaris are trademarks or registered trademarks of Oracle and/or its affiliates in the United States and
other countries.
UNIX
®
is a trademark in the United States and other countries, licensed exclusively through X/ Open Company Limited.
Wi-Fi CERTIFIED Wi-Fi Direct
®
is a trademark of the Wi-Fi Alliance.

Xerox
®
B210 Printer
User Guide
3

Принтер Xerox
®
B210
Руководство пользователя
4
1 Безопасность
Уведомления по технике безопасности . . . . . . . . . . . . . . . . . . . . . . . . . . . . . . . . . . . . . . . . . . . . . . . . . 11
Электробезопасность . . . . . . . . . . . . . . . . . . . . . . . . . . . . . . . . . . . . . . . . . . . . . . . . . . . . . . . . . . . . . . . . . . 12
Общие инструкции . . . . . . . . . . . . . . . . . . . . . . . . . . . . . . . . . . . . . . . . . . . . . . . . . . . . . . . . . . . . . . . . . 12
Шнур питания . . . . . . . . . . . . . . . . . . . . . . . . . . . . . . . . . . . . . . . . . . . . . . . . . . . . . . . . . . . . . . . . . . . . . . 12
Аварийное отключение электропитания . . . . . . . . . . . . . . . . . . . . . . . . . . . . . . . . . . . . . . . . . . . . 13
Лазерная безопасность. . . . . . . . . . . . . . . . . . . . . . . . . . . . . . . . . . . . . . . . . . . . . . . . . . . . . . . . . . . . . 13
Техника безопасности при эксплуатации . . . . . . . . . . . . . . . . . . . . . . . . . . . . . . . . . . . . . . . . . . . . . . . 14
Указания по эксплуатации. . . . . . . . . . . . . . . . . . . . . . . . . . . . . . . . . . . . . . . . . . . . . . . . . . . . . . . . . . 14
Выделение озона . . . . . . . . . . . . . . . . . . . . . . . . . . . . . . . . . . . . . . . . . . . . . . . . . . . . . . . . . . . . . . . . . . . 14
Размещение принтера . . . . . . . . . . . . . . . . . . . . . . . . . . . . . . . . . . . . . . . . . . . . . . . . . . . . . . . . . . . . . . 15
Расходные материалы для принтера. . . . . . . . . . . . . . . . . . . . . . . . . . . . . . . . . . . . . . . . . . . . . . . . 16
Техника безопасности при обслуживании . . . . . . . . . . . . . . . . . . . . . . . . . . . . . . . . . . . . . . . . . . . . . . 17
Символы на принтере . . . . . . . . . . . . . . . . . . . . . . . . . . . . . . . . . . . . . . . . . . . . . . . . . . . . . . . . . . . . . . . . . . 18
Контактные сведения для обращения по вопросам охраны труда, техники безопасности и
охраны окружающей
среды . . . . . . . . . . . . . . . . . . . . . . . . . . . . . . . . . . . . . . . . . . . . . . . . . . . . . . . . . . . . 22
2 Начало работы
Части принтера . . . . . . . . . . . . . . . . . . . . . . . . . . . . . . . . . . . . . . . . . . . . . . . . . . . . . . . . . . . . . . . . . . . . . . . . 25
Вид спереди . . . . . . . . . . . . . . . . . . . . . . . . . . . . . . . . . . . . . . . . . . . . . . . . . . . . . . . . . . . . . . . . . . . . . . . . 25
Места вывода готовых отпечатков. . . . . . . . . . . . . . . . . . . . . . . . . . . . . . . . . . . . . . . . . . . . . . . . . . 26
Вид сзади . . . . . . . . . . . . . . . . . . . . . . . . . . . . . . . . . . . . . . . . . . . . . . . . . . . . . . . . . . . . . . . . . . . . . . . . . . 27
Обзор панели управления . . . . . . . . . . . . . . . . . . . . . . . . . . . . . . . . . . . . . . . . . . . . . . . . . . . . . . . . . . 28
Параметры электропитания . . . . . . . . . . . . . . . . . . . . . . . . . . . . . . . . . . . . . . . . . . . . . . . . . . . . . . . . . . . . 29
Включение электропитания принтера. . . . . . . . . . . . . . . . . . . . . . . . . . . . . . . . . . . . . . . . . . . . . . . 29
Режим энергосбережения . . . . . . . . . . . . . . . . . . . . . . . . . . . . . . . . . . . . . . . . . . . . . . . . . . . . . . . . . . 29
Выключение электропитания принтера . . . . . . . . . . . . . . . . . . . . . . . . . . . . . . . . . . . . . . . . . . . . . 29
Информационные страницы. . . . . . . . . . . . . . . . . . . . . . . . . . . . . . . . . . . . . . . . . . . . . . . . . . . . . . . . . . . . 30
Печать отчета о конфигурации с помощью панели управления. . . . . . . . . . . . . . . . . . . . . . 30
Печать отчета об использовании расходных материалов с панели управления. . . . . . 30
Печать отчетов с помощью приложения Xerox
®
CentreWare
®
Internet Services . . . . . . . . 32
Xerox® CentreWare® Internet Services . . . . . . . . . . . . . . . . . . . . . . . . . . . . . . . . . . . . . . . . . . . . . . . . . . 33
Доступ к Xerox® CentreWare® Internet Services . . . . . . . . . . . . . . . . . . . . . . . . . . . . . . . . . . . . . 34
Сертификаты для Xerox® CentreWare® Internet Services . . . . . . . . . . . . . . . . . . . . . . . . . . . . 34
Использование приложения Xerox® CentreWare® Internet Services. . . . . . . . . . . . . . . . . . 35
Xerox Easy Printer Manager. . . . . . . . . . . . . . . . . . . . . . . . . . . . . . . . . . . . . . . . . . . . . . . . . . . . . . . . . . . . . . 36
Installing Software (Установка ПО) . . . . . . . . . . . . . . . . . . . . . . . . . . . . . . . . . . . . . . . . . . . . . . . . . . . . . . 37
Дополнительные сведения . . . . . . . . . . . . . . . . . . . . . . . . . . . . . . . . . . . . . . . . . . . . . . . . . . . . . . . . . . . . . 38
3 Установка и настройка
Обзор установки и настройки . . . . . . . . . . . . . . . . . . . . . . . . . . . . . . . . . . . . . . . . . . . . . . . . . . . . . . . . . . 41
Xerox
®
CentreWare
®
Internet Services . . . . . . . . . . . . . . . . . . . . . . . . . . . . . . . . . . . . . . . . . . . . . . . . . . . . 42
Определение IP-адреса принтера. . . . . . . . . . . . . . . . . . . . . . . . . . . . . . . . . . . . . . . . . . . . . . . . . . . 42
Доступ к приложению Xerox
®
CentreWare
®
Internet Services и изменение пароля

Принтер Xerox
®
B210
Руководство пользователя
5
системного администратора по умолчанию . . . . . . . . . . . . . . . . . . . . . . . . . . . . . . . . . . . . . . . . . 43
Доступ к учетной записи администратора Xerox
®
CentreWare
®
Internet Services . . . . . . 43
Изменение пароля системного администратора. . . . . . . . . . . . . . . . . . . . . . . . . . . . . . . . . . . . . 44
Начальная настройка . . . . . . . . . . . . . . . . . . . . . . . . . . . . . . . . . . . . . . . . . . . . . . . . . . . . . . . . . . . . . . . . . . 45
Физическое подключение принтера. . . . . . . . . . . . . . . . . . . . . . . . . . . . . . . . . . . . . . . . . . . . . . . . . 45
Назначение сетевого адреса. . . . . . . . . . . . . . . . . . . . . . . . . . . . . . . . . . . . . . . . . . . . . . . . . . . . . . . . 45
Доступ к настройкам администрирования и конфигурации. . . . . . . . . . . . . . . . . . . . . . . . . . 45
Прямое подключение через USB . . . . . . . . . . . . . . . . . . . . . . . . . . . . . . . . . . . . . . . . . . . . . . . . . . . . 46
Общие настройки . . . . . . . . . . . . . . . . . . . . . . . . . . . . . . . . . . . . . . . . . . . . . . . . . . . . . . . . . . . . . . . . . . . . . . 47
Общие настройки с использованием приложения Xerox
®
CentreWare
®
Internet Services .
47
Сетевое подключение . . . . . . . . . . . . . . . . . . . . . . . . . . . . . . . . . . . . . . . . . . . . . . . . . . . . . . . . . . . . . . . . . . 53
TCP/IP . . . . . . . . . . . . . . . . . . . . . . . . . . . . . . . . . . . . . . . . . . . . . . . . . . . . . . . . . . . . . . . . . . . . . . . . . . . . . . 53
SLP . . . . . . . . . . . . . . . . . . . . . . . . . . . . . . . . . . . . . . . . . . . . . . . . . . . . . . . . . . . . . . . . . . . . . . . . . . . . . . . . . 55
SNMP . . . . . . . . . . . . . . . . . . . . . . . . . . . . . . . . . . . . . . . . . . . . . . . . . . . . . . . . . . . . . . . . . . . . . . . . . . . . . . . 55
SNMPv3 . . . . . . . . . . . . . . . . . . . . . . . . . . . . . . . . . . . . . . . . . . . . . . . . . . . . . . . . . . . . . . . . . . . . . . . . . . . . 57
WINS . . . . . . . . . . . . . . . . . . . . . . . . . . . . . . . . . . . . . . . . . . . . . . . . . . . . . . . . . . . . . . . . . . . . . . . . . . . . . . . 59
LPR/LPD. . . . . . . . . . . . . . . . . . . . . . . . . . . . . . . . . . . . . . . . . . . . . . . . . . . . . . . . . . . . . . . . . . . . . . . . . . . . . 60
Raw TCP/IP Printing . . . . . . . . . . . . . . . . . . . . . . . . . . . . . . . . . . . . . . . . . . . . . . . . . . . . . . . . . . . . . . . . . 61
IPP . . . . . . . . . . . . . . . . . . . . . . . . . . . . . . . . . . . . . . . . . . . . . . . . . . . . . . . . . . . . . . . . . . . . . . . . . . . . . . . . . 61
HTTP . . . . . . . . . . . . . . . . . . . . . . . . . . . . . . . . . . . . . . . . . . . . . . . . . . . . . . . . . . . . . . . . . . . . . . . . . . . . . . . 62
Google Cloud Print. . . . . . . . . . . . . . . . . . . . . . . . . . . . . . . . . . . . . . . . . . . . . . . . . . . . . . . . . . . . . . . . . . . 63
Прокси—сервер . . . . . . . . . . . . . . . . . . . . . . . . . . . . . . . . . . . . . . . . . . . . . . . . . . . . . . . . . . . . . . . . . . . . . . 65
Подключение к беспроводной сети . . . . . . . . . . . . . . . . . . . . . . . . . . . . . . . . . . . . . . . . . . . . . . . . . 66
Wi-Fi DirectTM . . . . . . . . . . . . . . . . . . . . . . . . . . . . . . . . . . . . . . . . . . . . . . . . . . . . . . . . . . . . . . . . . . . . . . 69
WSD . . . . . . . . . . . . . . . . . . . . . . . . . . . . . . . . . . . . . . . . . . . . . . . . . . . . . . . . . . . . . . . . . . . . . . . . . . . . . . . . 69
AirPrint. . . . . . . . . . . . . . . . . . . . . . . . . . . . . . . . . . . . . . . . . . . . . . . . . . . . . . . . . . . . . . . . . . . . . . . . . . . . . . 70
SNTP . . . . . . . . . . . . . . . . . . . . . . . . . . . . . . . . . . . . . . . . . . . . . . . . . . . . . . . . . . . . . . . . . . . . . . . . . . . . . . . 71
Mopria . . . . . . . . . . . . . . . . . . . . . . . . . . . . . . . . . . . . . . . . . . . . . . . . . . . . . . . . . . . . . . . . . . . . . . . . . . . . . . 72
Установка программного обеспечения принтера. . . . . . . . . . . . . . . . . . . . . . . . . . . . . . . . . . . . . . . . 73
Установка драйверов для Windows . . . . . . . . . . . . . . . . . . . . . . . . . . . . . . . . . . . . . . . . . . . . . . . . . 73
Установка драйверов для Macintosh . . . . . . . . . . . . . . . . . . . . . . . . . . . . . . . . . . . . . . . . . . . . . . . . 78
Установка драйверов для Linux . . . . . . . . . . . . . . . . . . . . . . . . . . . . . . . . . . . . . . . . . . . . . . . . . . . . . 79
Настройка службы печати . . . . . . . . . . . . . . . . . . . . . . . . . . . . . . . . . . . . . . . . . . . . . . . . . . . . . . . . . . . . . . 80
Определение настроек печати с помощью приложения Xerox® CentreWare® Internet
Services . . . . . . . . . . . . . . . . . . . . . . . . . . . . . . . . . . . . . . . . . . . . . . . . . . . . . . . . . . . . . . . . . . . . . . . . . . . . . 80
4 Печать
Обзор печати. . . . . . . . . . . . . . . . . . . . . . . . . . . . . . . . . . . . . . . . . . . . . . . . . . . . . . . . . . . . . . . . . . . . . . . . . . . 83
Печать в системе Windows . . . . . . . . . . . . . . . . . . . . . . . . . . . . . . . . . . . . . . . . . . . . . . . . . . . . . . . . . . . . . . 84
Процедура печати . . . . . . . . . . . . . . . . . . . . . . . . . . . . . . . . . . . . . . . . . . . . . . . . . . . . . . . . . . . . . . . . . . 84
Опции печати. . . . . . . . . . . . . . . . . . . . . . . . . . . . . . . . . . . . . . . . . . . . . . . . . . . . . . . . . . . . . . . . . . . . . . . 85
Xerox Easy Printer Manager . . . . . . . . . . . . . . . . . . . . . . . . . . . . . . . . . . . . . . . . . . . . . . . . . . . . . . . . . . . . . . 94

Принтер Xerox
®
B210
Руководство пользователя
6
Печать в системе Macintosh . . . . . . . . . . . . . . . . . . . . . . . . . . . . . . . . . . . . . . . . . . . . . . . . . . . . . . . . . . . . 95
Процедура печати . . . . . . . . . . . . . . . . . . . . . . . . . . . . . . . . . . . . . . . . . . . . . . . . . . . . . . . . . . . . . . . . . . 95
Опции печати. . . . . . . . . . . . . . . . . . . . . . . . . . . . . . . . . . . . . . . . . . . . . . . . . . . . . . . . . . . . . . . . . . . . . . . 95
Использование AirPrint . . . . . . . . . . . . . . . . . . . . . . . . . . . . . . . . . . . . . . . . . . . . . . . . . . . . . . . . . . . . . 97
Использование Google Cloud Print. . . . . . . . . . . . . . . . . . . . . . . . . . . . . . . . . . . . . . . . . . . . . . . . . . . 97
Печать в системе Linux . . . . . . . . . . . . . . . . . . . . . . . . . . . . . . . . . . . . . . . . . . . . . . . . . . . . . . . . . . . . . . . . . 98
Печать из приложений Linux . . . . . . . . . . . . . . . . . . . . . . . . . . . . . . . . . . . . . . . . . . . . . . . . . . . . . . . . 98
Печать с помощью системы CUPS . . . . . . . . . . . . . . . . . . . . . . . . . . . . . . . . . . . . . . . . . . . . . . . . . . . 98
Опции принтера . . . . . . . . . . . . . . . . . . . . . . . . . . . . . . . . . . . . . . . . . . . . . . . . . . . . . . . . . . . . . . . . . . . 100
Печать с помощью приложения Xerox
®
CentreWare
®
Internet Services . . . . . . . . . . . . . . . . . . . 102
Процедура печати . . . . . . . . . . . . . . . . . . . . . . . . . . . . . . . . . . . . . . . . . . . . . . . . . . . . . . . . . . . . . . . . . 102
Опции печати. . . . . . . . . . . . . . . . . . . . . . . . . . . . . . . . . . . . . . . . . . . . . . . . . . . . . . . . . . . . . . . . . . . . . . 102
5 Бумага и материалы
Поддерживаемые виды бумаги. . . . . . . . . . . . . . . . . . . . . . . . . . . . . . . . . . . . . . . . . . . . . . . . . . . . . . . . 105
Заказ бумаги . . . . . . . . . . . . . . . . . . . . . . . . . . . . . . . . . . . . . . . . . . . . . . . . . . . . . . . . . . . . . . . . . . . . . . 105
Общие указания по вкладыванию бумаги в лотки. . . . . . . . . . . . . . . . . . . . . . . . . . . . . . . . . . 105
Бумага, которая может повредить принтер . . . . . . . . . . . . . . . . . . . . . . . . . . . . . . . . . . . . . . . . 106
Рекомендации по хранению бумаги. . . . . . . . . . . . . . . . . . . . . . . . . . . . . . . . . . . . . . . . . . . . . . . . 106
Поддерживаемые стандартные форматы бумаги . . . . . . . . . . . . . . . . . . . . . . . . . . . . . . . . . . 108
Поддерживаемые типы и плотность бумаги. . . . . . . . . . . . . . . . . . . . . . . . . . . . . . . . . . . . . . . . 109
Загрузка бумаги. . . . . . . . . . . . . . . . . . . . . . . . . . . . . . . . . . . . . . . . . . . . . . . . . . . . . . . . . . . . . . . . . . . . . . . 110
Подготовка бумаги к загрузке . . . . . . . . . . . . . . . . . . . . . . . . . . . . . . . . . . . . . . . . . . . . . . . . . . . . . 110
Загрузка в лоток 1. . . . . . . . . . . . . . . . . . . . . . . . . . . . . . . . . . . . . . . . . . . . . . . . . . . . . . . . . . . . . . . . . 110
Использование лотка ручной подачи . . . . . . . . . . . . . . . . . . . . . . . . . . . . . . . . . . . . . . . . . . . . . . 111
Задание формата и типа бумаги. . . . . . . . . . . . . . . . . . . . . . . . . . . . . . . . . . . . . . . . . . . . . . . . . . . . . . . 114
Изменение
настроек лотка на компьютере . . . . . . . . . . . . . . . . . . . . . . . . . . . . . . . . . . . . . . . . 114
Места вывода готовых отпечатков . . . . . . . . . . . . . . . . . . . . . . . . . . . . . . . . . . . . . . . . . . . . . . . . . . . . 117
Использование выходного лотка . . . . . . . . . . . . . . . . . . . . . . . . . . . . . . . . . . . . . . . . . . . . . . . . . . 118
Использование задней дверцы . . . . . . . . . . . . . . . . . . . . . . . . . . . . . . . . . . . . . . . . . . . . . . . . . . . . 118
6 Обслуживание
Общие меры предосторожности . . . . . . . . . . . . . . . . . . . . . . . . . . . . . . . . . . . . . . . . . . . . . . . . . . . . . . . 121
Очистка принтера . . . . . . . . . . . . . . . . . . . . . . . . . . . . . . . . . . . . . . . . . . . . . . . . . . . . . . . . . . . . . . . . . . . . . 122
Очистка наружных поверхностей . . . . . . . . . . . . . . . . . . . . . . . . . . . . . . . . . . . . . . . . . . . . . . . . . . 122
Очистка внутренних поверхностей . . . . . . . . . . . . . . . . . . . . . . . . . . . . . . . . . . . . . . . . . . . . . . . . . 122
Расходные материалы. . . . . . . . . . . . . . . . . . . . . . . . . . . . . . . . . . . . . . . . . . . . . . . . . . . . . . . . . . . . . . . . . 125
Расходные материалы. . . . . . . . . . . . . . . . . . . . . . . . . . . . . . . . . . . . . . . . . . . . . . . . . . . . . . . . . . . . . 125
Заказ расходных материалов. . . . . . . . . . . . . . . . . . . . . . . . . . . . . . . . . . . . . . . . . . . . . . . . . . . . . . 126
Информация о состоянии расходных материалов . . . . . . . . . . . . . . . . . . . . . . . . . . . . . . . . . . 126
тонер—картридж . . . . . . . . . . . . . . . . . . . . . . . . . . . . . . . . . . . . . . . . . . . . . . . . . . . . . . . . . . . . . . . . . . . 129
Принт—картридж. . . . . . . . . . . . . . . . . . . . . . . . . . . . . . . . . . . . . . . . . . . . . . . . . . . . . . . . . . . . . . . . . . . 131
Переработка расходных материалов . . . . . . . . . . . . . . . . . . . . . . . . . . . . . . . . . . . . . . . . . . . . . . 132
Управление принтером. . . . . . . . . . . . . . . . . . . . . . . . . . . . . . . . . . . . . . . . . . . . . . . . . . . . . . . . . . . . . . . . 133
Информация о счетчиках учета . . . . . . . . . . . . . . . . . . . . . . . . . . . . . . . . . . . . . . . . . . . . . . . . . . . . 133
Обновления программного обеспечения . . . . . . . . . . . . . . . . . . . . . . . . . . . . . . . . . . . . . . . . . . . 133

Принтер Xerox
®
B210
Руководство пользователя
7
Перемещение принтера . . . . . . . . . . . . . . . . . . . . . . . . . . . . . . . . . . . . . . . . . . . . . . . . . . . . . . . . . . . . . . . 135
7 Поиск и устранение неисправностей
Обзор процедуры поиска и устранения неисправностей . . . . . . . . . . . . . . . . . . . . . . . . . . . . . . . 139
Решение проблем. . . . . . . . . . . . . . . . . . . . . . . . . . . . . . . . . . . . . . . . . . . . . . . . . . . . . . . . . . . . . . . . . . 139
Индикаторы состояния . . . . . . . . . . . . . . . . . . . . . . . . . . . . . . . . . . . . . . . . . . . . . . . . . . . . . . . . . . . . 140
Устранение распространенных неисправностей . . . . . . . . . . . . . . . . . . . . . . . . . . . . . . . . . . . . . . . 142
Перезапуск принтера . . . . . . . . . . . . . . . . . . . . . . . . . . . . . . . . . . . . . . . . . . . . . . . . . . . . . . . . . . . . . . 142
Принтер не включается . . . . . . . . . . . . . . . . . . . . . . . . . . . . . . . . . . . . . . . . . . . . . . . . . . . . . . . . . . . . 143
Частый сброс или отключение принтера . . . . . . . . . . . . . . . . . . . . . . . . . . . . . . . . . . . . . . . . . . . 143
Документ печатается из другого лотка. . . . . . . . . . . . . . . . . . . . . . . . . . . . . . . . . . . . . . . . . . . . . 144
Лоток бумаги не закрывается. . . . . . . . . . . . . . . . . . . . . . . . . . . . . . . . . . . . . . . . . . . . . . . . . . . . . . 144
Печать занимает слишком много времени . . . . . . . . . . . . . . . . . . . . . . . . . . . . . . . . . . . . . . . . . 144
Не удается выполнить работу печати . . . . . . . . . . . . . . . . . . . . . . . . . . . . . . . . . . . . . . . . . . . . . . 145
Принтер издает необычный шум . . . . . . . . . . . . . . . . . . . . . . . . . . . . . . . . . . . . . . . . . . . . . . . . . . . 146
Внутри принтера образовался конденсат . . . . . . . . . . . . . . . . . . . . . . . . . . . . . . . . . . . . . . . . . . 147
Скручивание бумаги . . . . . . . . . . . . . . . . . . . . . . . . . . . . . . . . . . . . . . . . . . . . . . . . . . . . . . . . . . . . . . . 147
Застревание бумаги . . . . . . . . . . . . . . . . . . . . . . . . . . . . . . . . . . . . . . . . . . . . . . . . . . . . . . . . . . . . . . . . . . . 148
Предотвращение застревания бумаги . . . . . . . . . . . . . . . . . . . . . . . . . . . . . . . . . . . . . . . . . . . . . 148
Поиск застрявшей бумаги. . . . . . . . . . . . . . . . . . . . . . . . . . . . . . . . . . . . . . . . . . . . . . . . . . . . . . . . . . 149
Извлечение застрявшей бумаги . . . . . . . . . . . . . . . . . . . . . . . . . . . . . . . . . . . . . . . . . . . . . . . . . . . . 150
Устранение неисправностей в связи с застрявшей бумагой. . . . . . . . . . . . . . . . . . . . . . . . . 156
Неполадки при печати. . . . . . . . . . . . . . . . . . . . . . . . . . . . . . . . . . . . . . . . . . . . . . . . . . . . . . . . . . . . . . . . .158
Типичные проблемы при использовании PostScript . . . . . . . . . . . . . . . . . . . . . . . . . . . . . . . . . 161
Типичные проблемы в операционной системе Windows . . . . . . . . . . . . . . . . . . . . . . . . . . . . 161
Типичные проблемы в операционной системе Linux . . . . . . . . . . . . . . . . . . . . . . . . . . . . . . . . 162
Типичные проблемы в операционной системе Macintosh . . . . . . . . . . . . . . . . . . . . . . . . . . . 163
Дефекты качества печати. . . . . . . . . . . . . . . . . . . . . . . . . . . . . . . . . . . . . . . . . . . . . . . . . . . . . . . . . . . . . . 164
Контроль качества печати . . . . . . . . . . . . . . . . . . . . . . . . . . . . . . . . . . . . . . . . . . . . . . . . . . . . . . . . . 164
Устранение
проблем с качеством печати. . . . . . . . . . . . . . . . . . . . . . . . . . . . . . . . . . . . . . . . . . . 165
Получение помощи . . . . . . . . . . . . . . . . . . . . . . . . . . . . . . . . . . . . . . . . . . . . . . . . . . . . . . . . . . . . . . . . . . . . 170
Индикаторы статуса на панели управления . . . . . . . . . . . . . . . . . . . . . . . . . . . . . . . . . . . . . . . . 170
Просмотр предупреждений с помощью приложения Xerox
®
CentreWare
®
Internet Services
170
Использование интегрированного инструмента поиска неисправностей . . . . . . . . . . . 170
Страницы с полезной информацией. . . . . . . . . . . . . . . . . . . . . . . . . . . . . . . . . . . . . . . . . . . . . . . . 171
Online Support Assistant (Онлайновый ассистент поддержки) . . . . . . . . . . . . . . . . . . . . . . . 171
Определение серийного номера . . . . . . . . . . . . . . . . . . . . . . . . . . . . . . . . . . . . . . . . . . . . . . . . . . . 171
Дополнительные сведения. . . . . . . . . . . . . . . . . . . . . . . . . . . . . . . . . . . . . . . . . . . . . . . . . . . . . . . . . 172
8 Защита
Xerox
®
CentreWare
®
Internet Services . . . . . . . . . . . . . . . . . . . . . . . . . . . . . . . . . . . . . . . . . . . . . . . . . . . 175
Определение IP-адреса принтера . . . . . . . . . . . . . . . . . . . . . . . . . . . . . . . . . . . . . . . . . . . . . . . . . . 175
Доступ к учетной записи администратора Xerox
®
CentreWare
®
Internet Services . . . . . 176
Изменение пароля системного администратора. . . . . . . . . . . . . . . . . . . . . . . . . . . . . . . . . . . . 177
Настройка разрешений на печать . . . . . . . . . . . . . . . . . . . . . . . . . . . . . . . . . . . . . . . . . . . . . . . . . . . . . 178
Безопасный HTTP. . . . . . . . . . . . . . . . . . . . . . . . . . . . . . . . . . . . . . . . . . . . . . . . . . . . . . . . . . . . . . . . . . . . . . 179

Принтер Xerox
®
B210
Руководство пользователя
8
Фильтрация IP-адресов. . . . . . . . . . . . . . . . . . . . . . . . . . . . . . . . . . . . . . . . . . . . . . . . . . . . . . . . . . . . . . . . 180
Включение фильтрации IP-адресов . . . . . . . . . . . . . . . . . . . . . . . . . . . . . . . . . . . . . . . . . . . . . . . . 180
IPSec . . . . . . . . . . . . . . . . . . . . . . . . . . . . . . . . . . . . . . . . . . . . . . . . . . . . . . . . . . . . . . . . . . . . . . . . . . . . . . . . . . 181
Настройка IPSec . . . . . . . . . . . . . . . . . . . . . . . . . . . . . . . . . . . . . . . . . . . . . . . . . . . . . . . . . . . . . . . . . . . 181
Сертификаты безопасности . . . . . . . . . . . . . . . . . . . . . . . . . . . . . . . . . . . . . . . . . . . . . . . . . . . . . . . . . . . 182
Создание цифрового сертификата устройства . . . . . . . . . . . . . . . . . . . . . . . . . . . . . . . . . . . . . 182
Скрытие или отображение имен работ . . . . . . . . . . . . . . . . . . . . . . . . . . . . . . . . . . . . . . . . . . . . . . . . 183
802.1x. . . . . . . . . . . . . . . . . . . . . . . . . . . . . . . . . . . . . . . . . . . . . . . . . . . . . . . . . . . . . . . . . . . . . . . . . . . . . . . . . 184
Настройка протокола 802.1x . . . . . . . . . . . . . . . . . . . . . . . . . . . . . . . . . . . . . . . . . . . . . . . . . . . . . . 184
Тайм—аут системы . . . . . . . . . . . . . . . . . . . . . . . . . . . . . . . . . . . . . . . . . . . . . . . . . . . . . . . . . . . . . . . . . . . . . 185
Настройка значений тайм—аута системы . . . . . . . . . . . . . . . . . . . . . . . . . . . . . . . . . . . . . . . . . . . 185
Безопасность порта USB. . . . . . . . . . . . . . . . . . . . . . . . . . . . . . . . . . . . . . . . . . . . . . . . . . . . . . . . . . . . . . . 186
Активация или деактивация портов USB . . . . . . . . . . . . . . . . . . . . . . . . . . . . . . . . . . . . . . . . . . . 186
Ограничение доступа к веб—интерфейсу пользователя . . . . . . . . . . . . . . . . . . . . . . . . . . . . . . . . . 187
Тест для проверки программного обеспечения . . . . . . . . . . . . . . . . . . . . . . . . . . . . . . . . . . . . . . . . 188
A Технические характеристики
Характеристики принтера . . . . . . . . . . . . . . . . . . . . . . . . . . . . . . . . . . . . . . . . . . . . . . . . . . . . . . . . . . . . . 191
Стандартная конфигурация. . . . . . . . . . . . . . . . . . . . . . . . . . . . . . . . . . . . . . . . . . . . . . . . . . . . . . . . 191
Физические характеристики . . . . . . . . . . . . . . . . . . . . . . . . . . . . . . . . . . . . . . . . . . . . . . . . . . . . . . . 192
Характеристики материалов. . . . . . . . . . . . . . . . . . . . . . . . . . . . . . . . . . . . . . . . . . . . . . . . . . . . . . . 193
Характеристики режимов . . . . . . . . . . . . . . . . . . . . . . . . . . . . . . . . . . . . . . . . . . . . . . . . . . . . . . . . . . . . . 195
Функции печати . . . . . . . . . . . . . . . . . . . . . . . . . . . . . . . . . . . . . . . . . . . . . . . . . . . . . . . . . . . . . . . . . . . 195
Сетевая среда . . . . . . . . . . . . . . . . . . . . . . . . . . . . . . . . . . . . . . . . . . . . . . . . . . . . . . . . . . . . . . . . . . . . . . . . . 196
Системные требования . . . . . . . . . . . . . . . . . . . . . . . . . . . . . . . . . . . . . . . . . . . . . . . . . . . . . . . . . . . . . . . . 197
Характеристики электропитания . . . . . . . . . . . . . . . . . . . . . . . . . . . . . . . . . . . . . . . . . . . . . . . . . . . . . . 198
Требования к окружающей среде . . . . . . . . . . . . . . . . . . . . . . . . . . . . . . . . . . . . . . . . . . . . . . . . . . . . . 199
B Соответствие нормативным требованиям
Основные нормативные требования. . . . . . . . . . . . . . . . . . . . . . . . . . . . . . . . . . . . . . . . . . . . . . . . . . . 201
Правила Федеральной комиссии связи США . . . . . . . . . . . . . . . . . . . . . . . . . . . . . . . . . . . . . . . 201
Канада . . . . . . . . . . . . . . . . . . . . . . . . . . . . . . . . . . . . . . . . . . . . . . . . . . . . . . . . . . . . . . . . . . . . . . . . . . . . 201
Европейский союз . . . . . . . . . . . . . . . . . . . . . . . . . . . . . . . . . . . . . . . . . . . . . . . . . . . . . . . . . . . . . . . . . 202
Соглашение ЕС по оборудованию для создания изображений (группа 4). Экологическая
информация . . . . . . . . . . . . . . . . . . . . . . . . . . . . . . . . . . . . . . . . . . . . . . . . . . . . . . . . . . . . . . . . . . . . . . . 202
Германия. . . . . . . . . . . . . . . . . . . . . . . . . . . . . . . . . . . . . . . . . . . . . . . . . . . . . . . . . . . . . . . . . . . . . . . . . . 205
Правила ограничения содержания опасных веществ (Турция) . . . . . . . . . . . . . . . . . . . . . 206
Сертификация Евразийского экономического сообщества . . . . . . . . . . . . . . . . . . . . . . . . . 206
Нормативная информация для модуля беспроводной локальной сети 2,4 ГГц . . . . . . 206
Выделение озона . . . . . . . . . . . . . . . . . . . . . . . . . . . . . . . . . . . . . . . . . . . . . . . . . . . . . . . . . . . . . . . . . . 207
Сертификация безопасности . . . . . . . . . . . . . . . . . . . . . . . . . . . . . . . . . . . . . . . . . . . . . . . . . . . . . . . . . . 208
Сведения о безопасности материалов . . . . . . . . . . . . . . . . . . . . . . . . . . . . . . . . . . . . . . . . . . . . . . . . . 209
C Вторичная переработка иутилизация
Все страны . . . . . . . . . . . . . . . . . . . . . . . . . . . . . . . . . . . . . . . . . . . . . . . . . . . . . . . . . . . . . . . . . . . . . . . . . . . . 211

Принтер Xerox
®
B210
Руководство пользователя
9
Северная Америка . . . . . . . . . . . . . . . . . . . . . . . . . . . . . . . . . . . . . . . . . . . . . . . . . . . . . . . . . . . . . . . . . . . . 212
Европейский союз . . . . . . . . . . . . . . . . . . . . . . . . . . . . . . . . . . . . . . . . . . . . . . . . . . . . . . . . . . . . . . . . . . . . . 213
Бытовое использование . . . . . . . . . . . . . . . . . . . . . . . . . . . . . . . . . . . . . . . . . . . . . . . . . . . . . . . . . . . 213
Коммерческое использование . . . . . . . . . . . . . . . . . . . . . . . . . . . . . . . . . . . . . . . . . . . . . . . . . . . . . 213
Сбор и утилизация оборудования и аккумуляторов . . . . . . . . . . . . . . . . . . . . . . . . . . . . . . . . 213
Символ предупреждения для аккумуляторов . . . . . . . . . . . . . . . . . . . . . . . . . . . . . . . . . . . . . . 214
Извлечение аккумуляторов . . . . . . . . . . . . . . . . . . . . . . . . . . . . . . . . . . . . . . . . . . . . . . . . . . . . . . . . 214
Другие страны. . . . . . . . . . . . . . . . . . . . . . . . . . . . . . . . . . . . . . . . . . . . . . . . . . . . . . . . . . . . . . . . . . . . . . . . . 215

Принтер Xerox
®
B210
Руководство пользователя
10
1
Безопасность
В данном разделе рассматриваются следующие вопросы:
• Уведомления по технике безопасности……….…………..……………………..…………..…………..………..…………..…… 11
• Электробезопасность …….…………..…………..………..…………..…………..…………..……………………..…………..…………..… 12
• Техника безопасности при эксплуатации …….………..…………..…………..……………………..…………..…………..… 14
• Техника безопасности при обслуживании ……………………..…………..…………..………..…………..…………..……… 17
• Символы на принтере …………..………..………………………..…………..………..…………..…………..…………..…..……………… 18
• Контактные сведения для обращения по вопросам охраны труда, техники безопасности и
охраны окружающей среды ……….…………..…………..…………..………..…………..…………..…………..…………………….. 22
Данный принтер и рекомендуемые расходные материалы разработаны с учетом строгих
требований
обеспечения безопасности и прошли проверку на соответствие этим требованиям.
Точное соблюдение следующих правил обеспечит длительную и безопасную работу принтера
Xerox.

Уведомления по технике безопасности
Принтер Xerox
®
B210
Руководство пользователя
11
Уведомления по технике безопасности
Прежде чем приступить к эксплуатации принтера, внимательно ознакомьтесь с приведенными
ниже указаниями. Соблюдение перечисленных указаний позволит обеспечить длительную
ибезопасную эксплуатацию принтера.
Принтер Xerox
®
и расходные материалы разработаны с учетом строгих требований техники
безопасности и прошли проверку на соответствие этим требованиям. Эти проверки включают
проводимые агентствами по безопасности испытания, утверждение и подтверждение
соответствия установленным стандартам по электромагнитной совместимости и охране
окружающей среды.
Проверки безопасности и функционирования данного аппарата выполнялись только
сиспользованием материалов Xerox
®
.
Примечание. Любое несанкционированное изменение, включая добавление новых функций
или подключение внешних устройств, может повлиять на соответствие аппарата
сертификационным требованиям. Дополнительную информацию можно получить
в представительстве Xerox.

Электробезопасность
Принтер Xerox
®
B210
Руководство пользователя
12
Электробезопасность
Общие инструкции
ПРЕДУПРЕЖДЕНИЕ.
• Не вставляйте никаких предметов в щели и отверстия принтера. Прикосновение
к электрическим контактам или короткое замыкание могут привести к пожару
или поражению электрическим током.
• Не снимайте крышки и ограждения, закрепленные винтами, за исключением случаев
установки дополнительного оборудования и выполнения специальных указаний.
При выполнении таких операций отключайте питание принтера. Устанавливая
дополнительное оборудование, выньте
шнур питания из розетки. Кроме
устанавливаемого дополнительного оборудования, под этими крышками нет
компонентов, подлежащих обслуживанию пользователем.
Угроза вашей безопасности возникает в следующих случаях:
• Шнур питания поврежден или изношен.
• В принтер попала жидкость.
• Принтер намок.
• Принтер дымится или поверхность нагревается больше обычного.
• Принтер издает необычный шум или запах.
•
Из—за принтера срабатывает автоматический выключатель, предохранитель или другое
защитное устройство.
При возникновении любой из перечисленных ситуаций выполните следующие действия:
1. Сразу отключите питание принтера.
2. Выньте шнур питания из розетки.
3. Обратитесь в уполномоченное сервисное представительство.
Шнур питания
Используйте шнур питания, поставляемый с принтером.
• Подключайте шнур питания напрямую к правильно заземленной электрической розетке.
Убедитесь, что шнур надежно подключен с обоих концов. Если вы не знаете, заземлена
ли розетка, попросите специалиста проверить ее.
ПРЕДУПРЕЖДЕНИЕ. Во избежание возгорания или поражения электрическим током
не используйте удлинители, сетевые разветвители и переходники более 90 дней. Если
невозможно установить постоянную розетку, используйте только соответствующий
удлинитель заводского изготовления для каждого принтера или МФУ. Длина шнура,
сечение проводника, заземление и защита должны соответствовать действующим

Электробезопасность
Принтер Xerox
®
B210
Руководство пользователя
13
строительным нормам и правилам, нормам пожарной безопасности и правилам
устройства электроустановок.
• Не используйте вилку адаптера с заземлением для подключения принтера к сетевой
розетке без контакта заземления.
• Убедитесь, что принтер подключен к розетке, обеспечивающей соответствующее
напряжение питания и мощность. В случае необходимости обсудите со специалистом
режимы питания принтера.
• Не размещайте принтер
в таком месте, где на шнур питания могут случайно наступить.
• Не ставьте предметы на шнур питания.
• Не вынимайте вилку шнура питания из розетки, когда выключатель питания находится
вположении «включено».
• При повреждении или износе шнура питания замените его.
• Во избежание поражения электрическим током и повреждения шнура питания при
отсоединении его
от розетки держитесь за вилку.
Шнур питания подключается через розетку на задней панели принтера. Если требуется
полностью отключить электропитание принтера, выньте вилку шнура питания из розетки.
Аварийное отключение электропитания
При возникновении любого из следующих условий немедленно отключите питание принтера
ивыньте вилку шнура питания от розетки. В следующих случаях необходимо обращаться
в авторизованный сервисный центр Xerox:
• Аппарат издает необычные шумы или запахи.
• Шнур питания поврежден или изношен.
• Сработал настенный автоматический выключатель, предохранитель или другие
защитные устройства.
• В принтер попала жидкость.
• Принтер
намок.
• Произошло повреждение любого компонента принтера.
Лазерная безопасность
Данный лазерный принтер соответствует стандартам для лазерных устройств, установленным
правительственными, государственными и международными организациями, и сертифицирован
как лазерное устройство класса 1. Принтер не является источником опасного излучения,
поскольку лазерный луч находится в полностью закрытом пространстве во всех режимах
работы и обслуживания.
ПРЕДУПРЕЖДЕНИЕ. Использование не указанных в этом руководстве средств управления,
настроек и процедур может привести к опасному воздействию лазерного излучения.
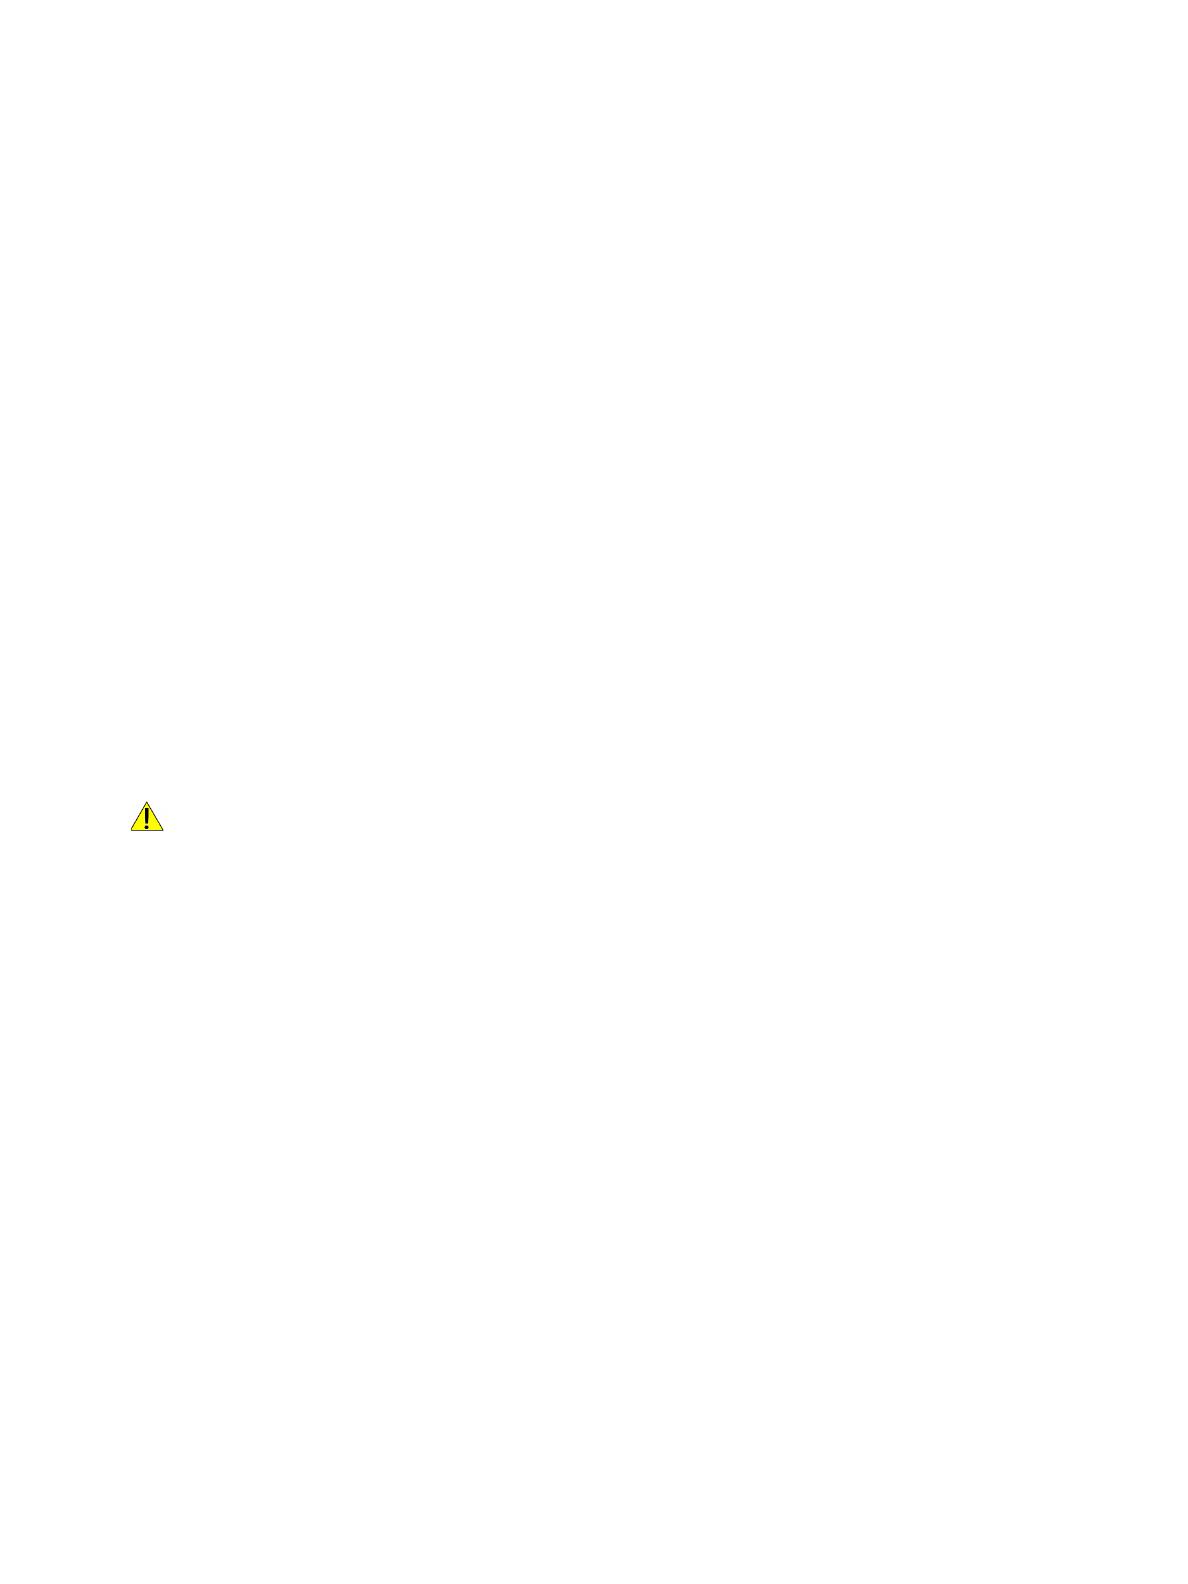
Техника безопасности при эксплуатации
Принтер Xerox
®
B210
Руководство пользователя
14
Техника безопасности при эксплуатации
Принтер и расходные материалы разработаны с учетом строгих требований техники
безопасности и прошли проверку на соответствие этим требованиям. Это включает проверку
иутверждение агентствами по технике безопасности, а также соответствие установленным
стандартам охраны окружающей среды. Соблюдение вами перечисленных условий обеспечит
длительную и безопасную работу принтера.
Указания по эксплуатации
• Не извлекайте бумагу из лотков в процессе печати.
• Не открывайте дверцы во время печати.
• Не перемещайте принтер во время печати.
• Следите за тем, чтобы руки, волосы, галстук и т. п. не попадали между роликами вывода
иподачи.
• Опасные участки принтера закрыты крышками, которые снимаются с помощью
инструмента. Не снимайте
защитные крышки.
• Запрещается блокировать устройства электрической и механической блокировки.
• Не пытайтесь извлечь бумагу, застрявшую глубоко внутри принтера. Немедленно
выключите принтер и обратитесь в местное представительство Xerox.
ПРЕДУПРЕЖДЕНИЕ.
• Металлические поверхности в зоне фьюзера нагреваются. Извлекая застрявшую бумагу
на этом участке, соблюдайте осторожность, чтобы не коснуться металлической
поверхности.
• Во избежание опрокидывания не двигайте аппарат, когда выдвинуты все лотки.
Выделение озона
В процессе нормальной эксплуатации данный принтер выделяет озон. Количество выделяемого
озона зависит от объемов печати. Озон тяжелее воздуха и выделяется в количествах,
недостаточных для причинения вреда здоровью. Установите принтер в хорошо проветриваемом
помещении.
Дополнительные сведения для США и Канады см. на веб—сайте www.xerox.com/environment.
Вдругих регионах обратитесь в местное представительство Xerox или
посетите веб—сайт
www.xerox.com/environment_europe.

Техника безопасности при эксплуатации
Принтер Xerox
®
B210
Руководство пользователя
15
Размещение принтера
• Размещайте принтер на ровной, прочной и устойчивой поверхности, которая может
выдержать его вес. Сведения о весе принтера см. в разделе Физические характеристики
Руководства пользователя.
• Не блокируйте и не закрывайте щели и отверстия принтера. Эти отверстия предназначены
для вентиляции и предотвращения перегрева принтера.
• Размещайте принтер таким образом, чтобы оставалось достаточно
свободного места
для работы и обслуживания.
• Принтер не следует устанавливать в пыльных помещениях и пространствах.
• Принтер нельзя хранить и эксплуатировать в условиях высоких и низких температур
или влажности.
• Не размещайте принтер рядом с источником тепла.
• Не размещайте принтер в местах, где он может подвергнуться воздействию прямых
солнечных лучей, во избежание повреждения
чувствительных к свету компонентов.
• Не размещайте принтер на пути потока холодного воздуха из кондиционера.
• Не устанавливайте принтер в местах, подверженных вибрации.
• Наилучшая производительность обеспечивается на высоте, указанной в разделе
Требования к окружающей среде Руководства пользователя.

Техника безопасности при эксплуатации
Принтер Xerox
®
B210
Руководство пользователя
16
Расходные материалы для принтера
• Используйте расходные материалы, предназначенные для этой модели принтера.
Использование неподходящих материалов может привести к ухудшению работы принтера
ипредставлять угрозу вашей безопасности.
• Следуйте предупреждениям на маркировке и инструкциям, поставляемым с продуктом,
дополнительными узлами и расходными материалами.
• Храните все расходные материалы, соблюдая указания, изложенные на упаковке.
• Храните все расходные материалы в
недоступном для детей месте.
• Избегайте контакта тонера, тонер— и принт—картриджей или сборников тонера
с отрытым огнем.
• При обращении с картриджами соблюдайте осторожность – берегите глаза и
незащищенные участки тела. При попадании содержимого в глаза может возникать
раздражение и воспаление. Не пытайтесь разбирать картридж – содержимое при этом
может попасть в
глаза или на незащищенные участки тела.
ВНИМАНИЕ. Не рекомендуется использовать расходные материалы других
производителей. Гарантийные обязательства, соглашение об обслуживании и гарантия
Total Satisfaction Guarantee (Общая гарантия качества) не распространяются на поломки,
неправильную работу или снижение качества, вызванные использованием расходных
материалов других производителей или использованием расходных материалов Xerox,
не предназначенных для этого принтера. Гарантия Total Satisfaction Guarantee (Общая
гарантия качества) действует в США и Канаде.
В других регионах могут действовать иные
гарантийные условия. За дополнительной информацией обращайтесь в региональное
представительство компании Xerox.

Техника безопасности при обслуживании
Принтер Xerox
®
B210
Руководство пользователя
17
Техника безопасности при обслуживании
• Не выполняйте никакие действия по обслуживанию, не описанные в документации
принтера.
• Для чистки используйте только сухую безворсовую ткань.
• Не сжигайте расходные материалы и компоненты, подлежащие регулярной замене.
Информацию о программах утилизации расходных материалов Xerox
®
см. на веб—сайте
www.xerox.com/gwa.
ПРЕДУПРЕЖДЕНИЕ. Не применяйте аэрозольные очистители. Аэрозольные очистители при
контакте с электромеханическим оборудованием могут быть взрыво— и пожароопасны. При
установке аппарата в проходе или другом похожем месте, кпространству вокруг аппарата
могут применяться дополнительные требования. Следует убедиться, что выполняются все
действующие требования к безопасности на рабочем месте, строительные и
противопожарные нормативы.
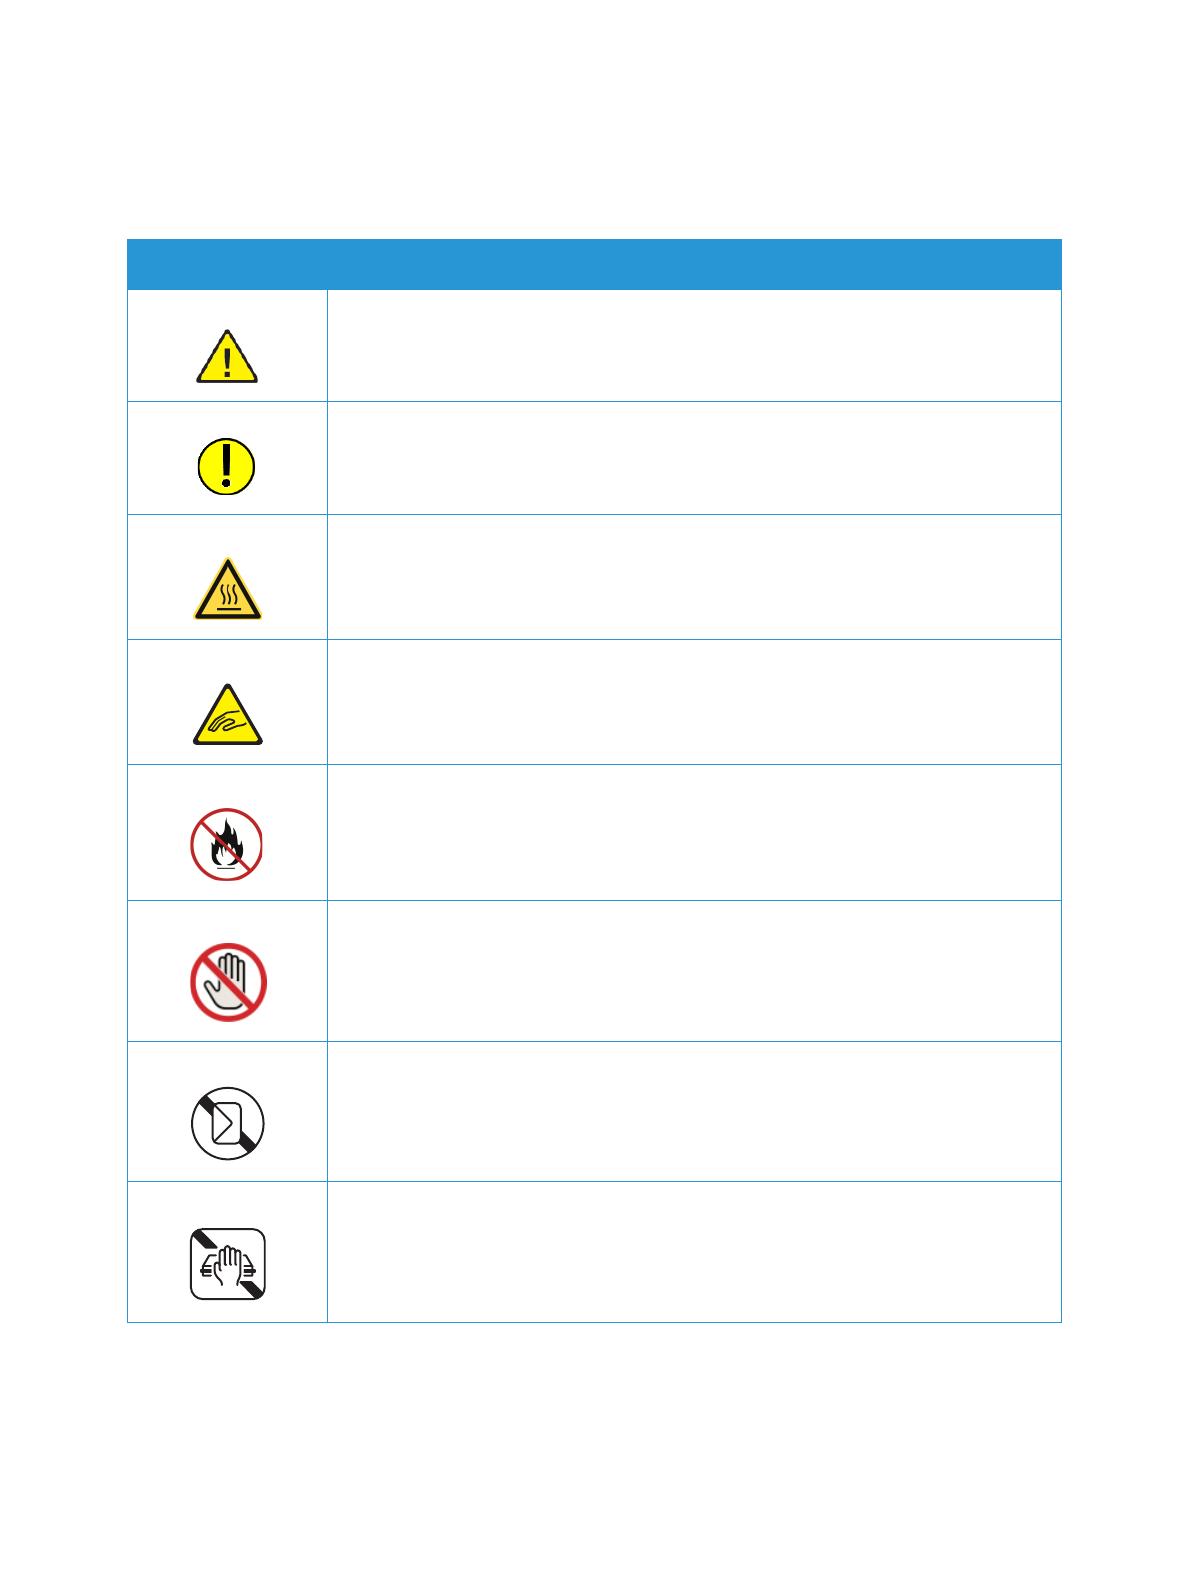
Символы на принтере
Принтер Xerox
®
B210
Руководство пользователя
18
Символы на принтере
Значок Описание
Предупреждение.
Указывает опасность, которая в случае неосторожности может привести
к тяжелой травме или даже гибели.
Внимание!
Показывает обязательное действие, которое необходимо выполнить
для предотвращения материального ущерба.
Наружная или внутренняя поверхность принтера может нагреваться.
Во избежание травм соблюдайте осторожность.
Опасность защемления.
Этот предупреждающий символ указывает на зоны аппарата,
при работе в которых возможно
получение травмы.
Не сжигайте данный компонент.
Не касайтесь данной детали или участка принтера.
Не вкладывайте конверты.
Не прикасайтесь.

Символы на принтере
Принтер Xerox
®
B210
Руководство пользователя
19
Не нажимайте.
Не допускайте воздействия прямого солнечного света.
Не допускайте воздействия температуры выше или ниже указанного
уровня.
Не помещайте аппарат в другой плоскости.
Тонер
Очистите указанные зоны.
Вложите материал лицевой стороной вниз и в указанном направлении.
Вложите материал лицевой стороной вверх.
Нажмите.
Значок Описание
Символы на принтере
Принтер Xerox
®
B210
Руководство пользователя
20
Нажмите, чтобы открыть.
Двусторонняя печать
Кнопка «Питание»
Кнопка «Стоп»
Кнопка безопасной настройки беспроводной сети Wi-Fi
Индикатор тонера
Индикатор состояния
LAN
Локальная сеть
USB
Универсальная последовательная шина
Значок Описание
/