- Manuals
- Brands
- Asus Manuals
- Cell Phone
- Zenfone 2 Laser ZE500KL
- User manual
-
Contents
-
Table of Contents
-
Bookmarks
Quick Links
Related Manuals for Asus Zenfone 2 Laser ZE500KL
Summary of Contents for Asus Zenfone 2 Laser ZE500KL
-
Page 1
ZE500KL User Guide… -
Page 2: Care And Safety
Use only AC adapters and cables approved by ASUS for use with this device. Refer to the rating label on the bottom of your device and ensure that your power adapter complies with this rating.
-
Page 3: Proper Disposal
Check local regulations for disposal of electronic products. DO NOT throw this product in fire. DO NOT short circuit the contacts. DO NOT disassemble this product. ZenTalk Fans Forum (http://www.asus.com/zentalk/global_forward.php)
-
Page 4: Table Of Contents
Contents Basics Welcome! …………………………8 Get your ASUS Phone ready! ………………….9 Starting for the first time ……………………18 Using the touchscreen……………………20 There’s no place like Home Zen Home features …………………23 Home screen ……………………….23 Quick settings ……………………….25 System notifications ………………………26 Personalizing your Home screen …………….27 App shortcuts ……………………….27…
-
Page 5
File Manager……………………53 Accessing the internal storage …………………..53 Accessing the external storage device ………………53 Accessing Cloud Storage ……………………53 The Cloud ……………………54 ASUS WebStorage ……………………..54 Data Transfer …………………..55 ZenUI Help ……………………56 Keeping in touch Call in style ……………………57 Dual SIM feature ………………………57 Making calls ……………………….59… -
Page 6
Disabling Wi-Fi ……………………… 118 Bluetooth ……………………118 ® Enabling Bluetooth® ……………………118 Pairing your ASUS Phone to a Bluetooth® device …………..119 Unpairing your ASUS Phone from the Bluetooth® device ……….119 Tethering ……………………120 Wi-Fi Hotspot ……………………….. 120 Bluetooth Tethering ……………………. 121 Travel and Maps Weather ……………………122… -
Page 7
There’s more to your Zen ………………146 ASUS Cover ……………………….146 Maintain your Zen Keeping your device up-to-date …………….148 Updating your system ……………………148 Storage …………………………148 Backup and reset ……………………..148 Securing your ASUS Phone ………………….149 Appendix Notices ……………………153 Index Index …………………………158… -
Page 8: Basics
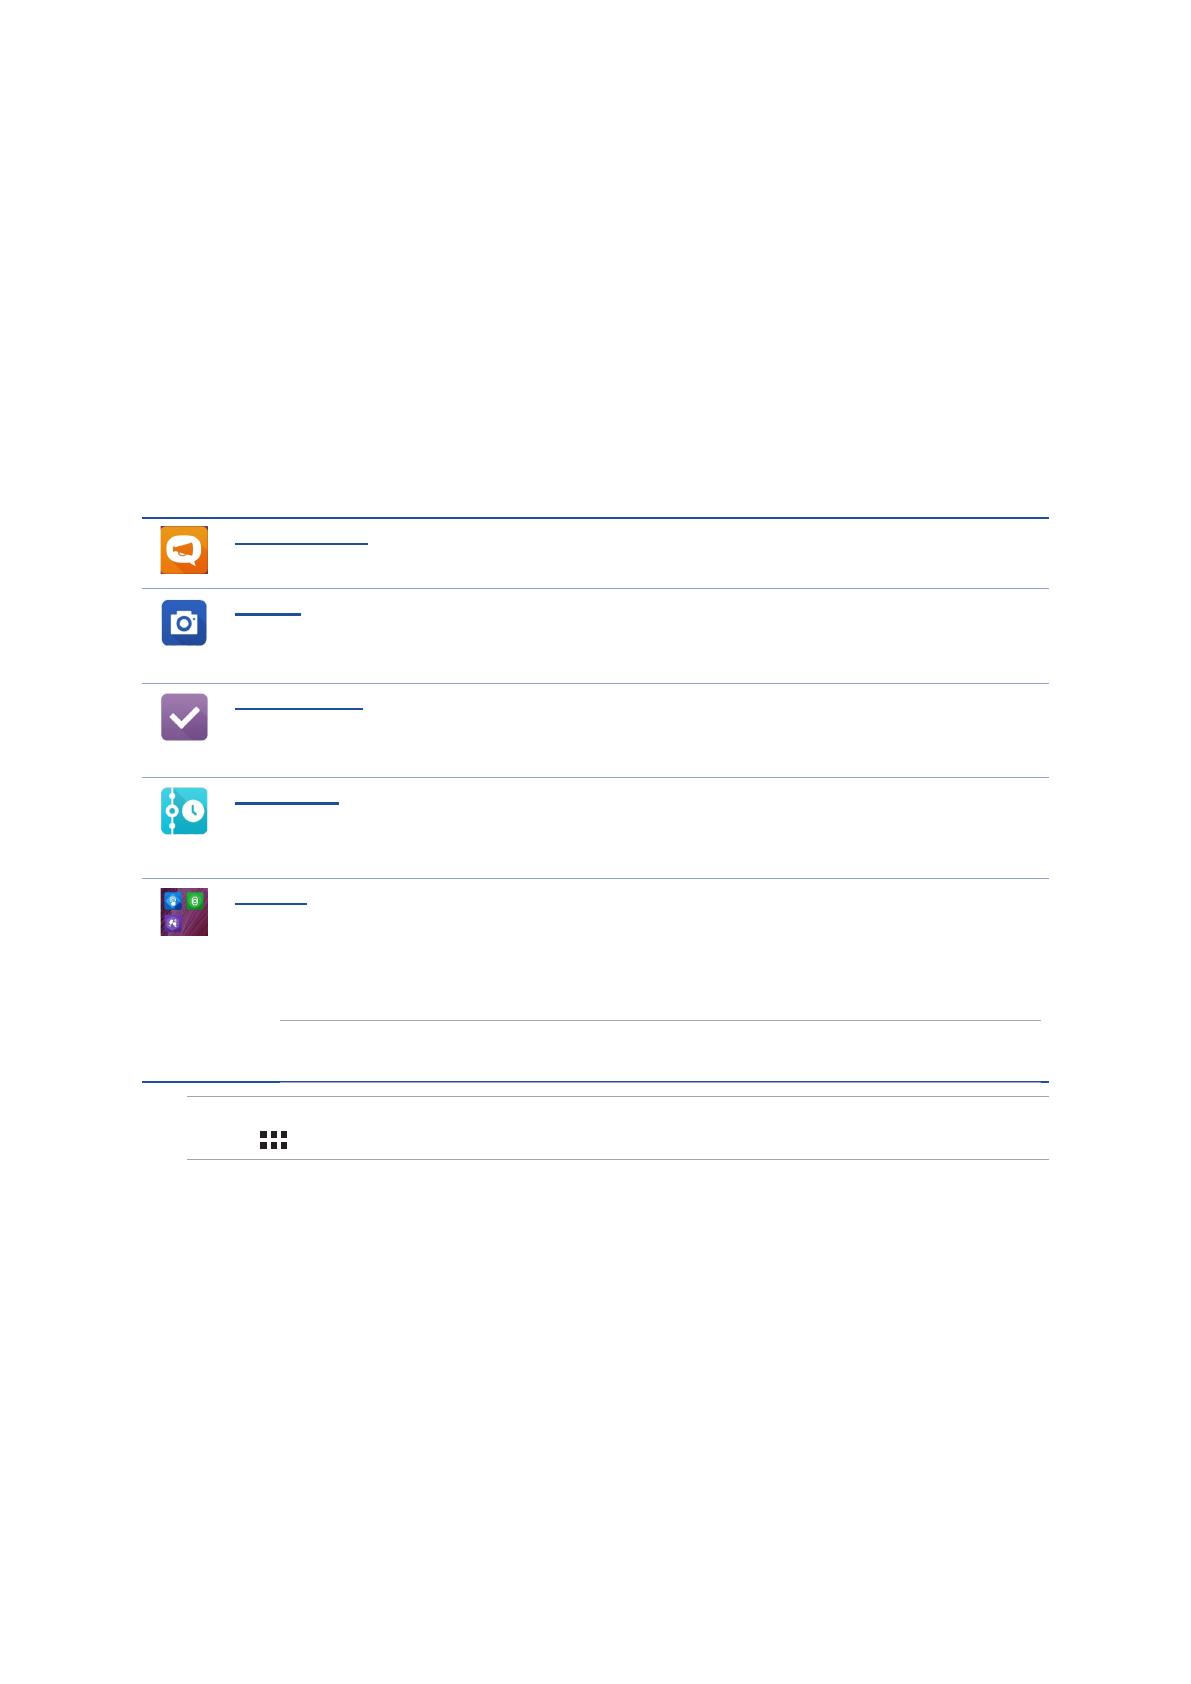
Explore the intuitive simplicity of ASUS Zen UI 2.0! ASUS Zen UI 2.0 is a charming and intuitive interface exclusively for ASUS Phones. It provides you with special apps, which are integrated in or with other apps, to fit your unique individual needs and make your life easier while letting you have fun with your ASUS Phone.
-
Page 9: Get Your Asus Phone Ready
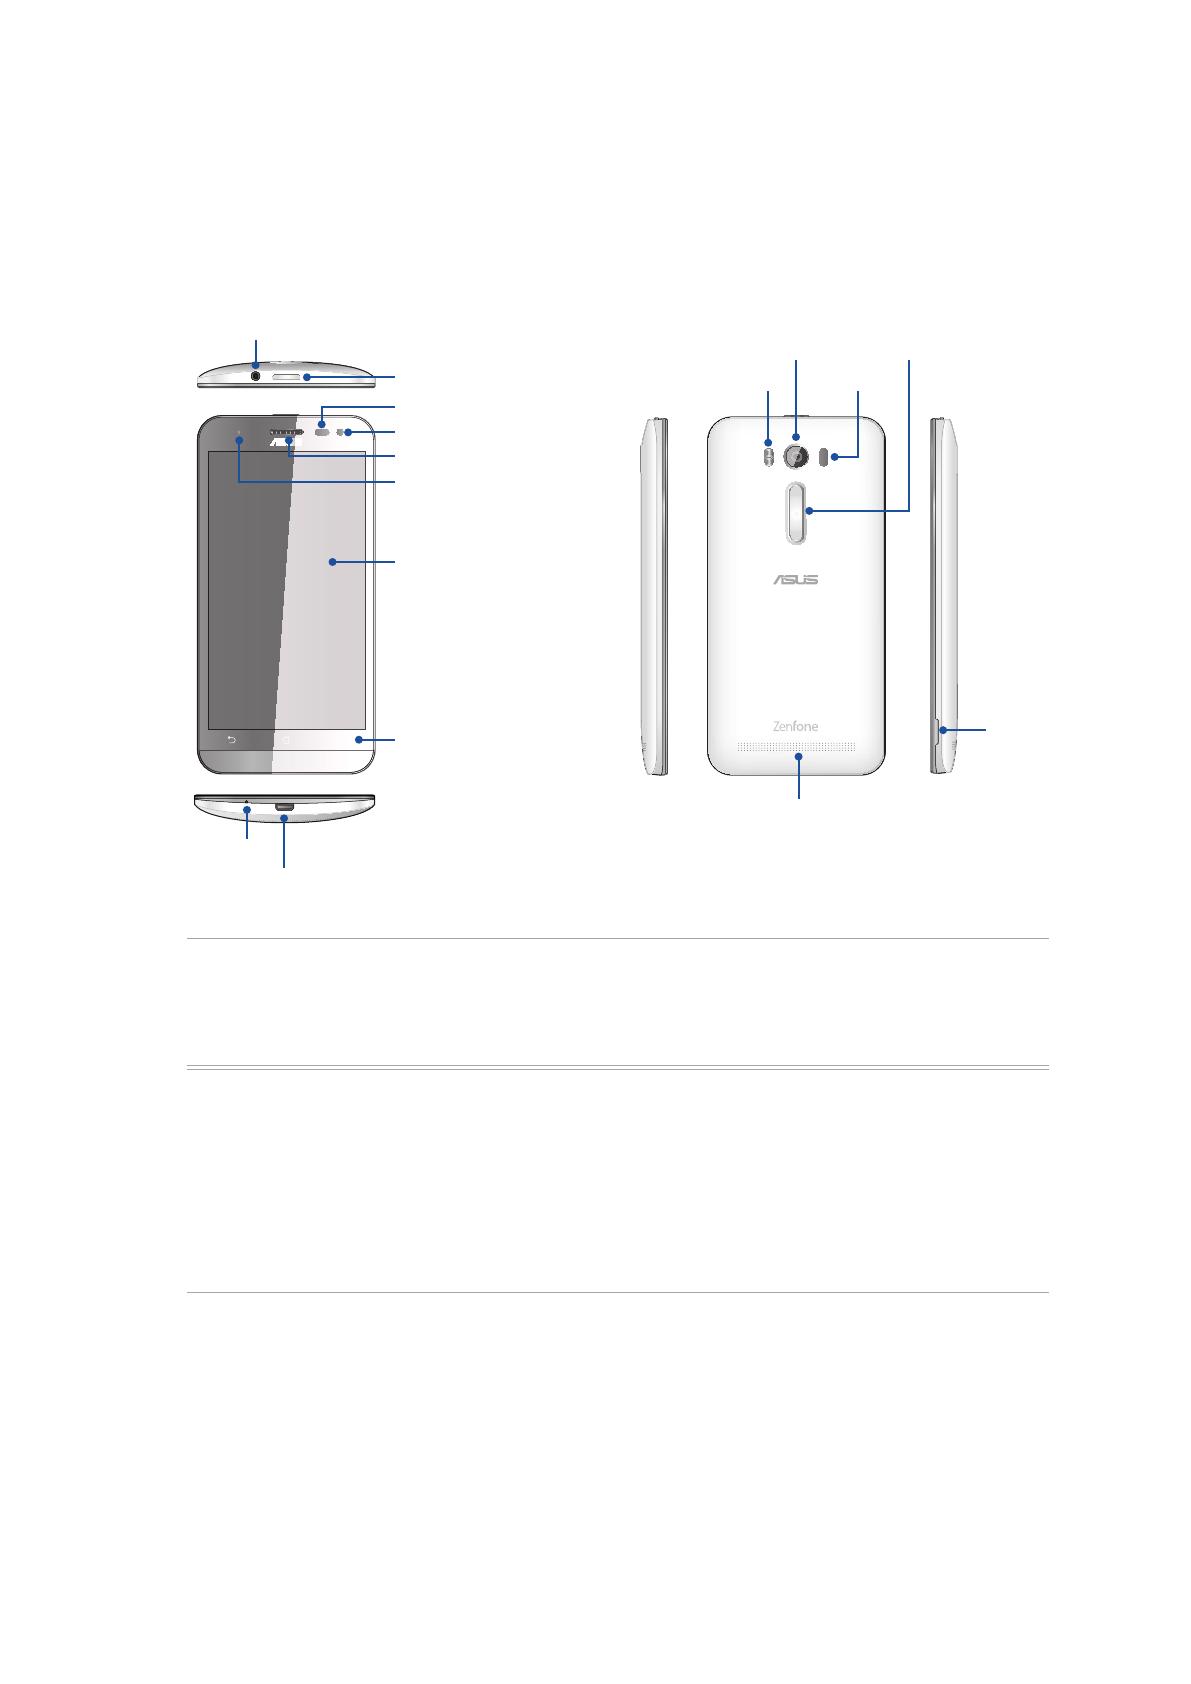
Get your ASUS Phone ready! Parts and features Take a hold of your device and have it running in a jiffy. Audio jack Rear camera Volume key Power key Laser focus Camera flash Sensor Front camera Receiver LED indicator Touchscreen…
-
Page 10
Your ASUS Phone comes with two micro-SIM card slots that allows you to setup and use two mobile network services without having to carry two mobile devices at the same time. -
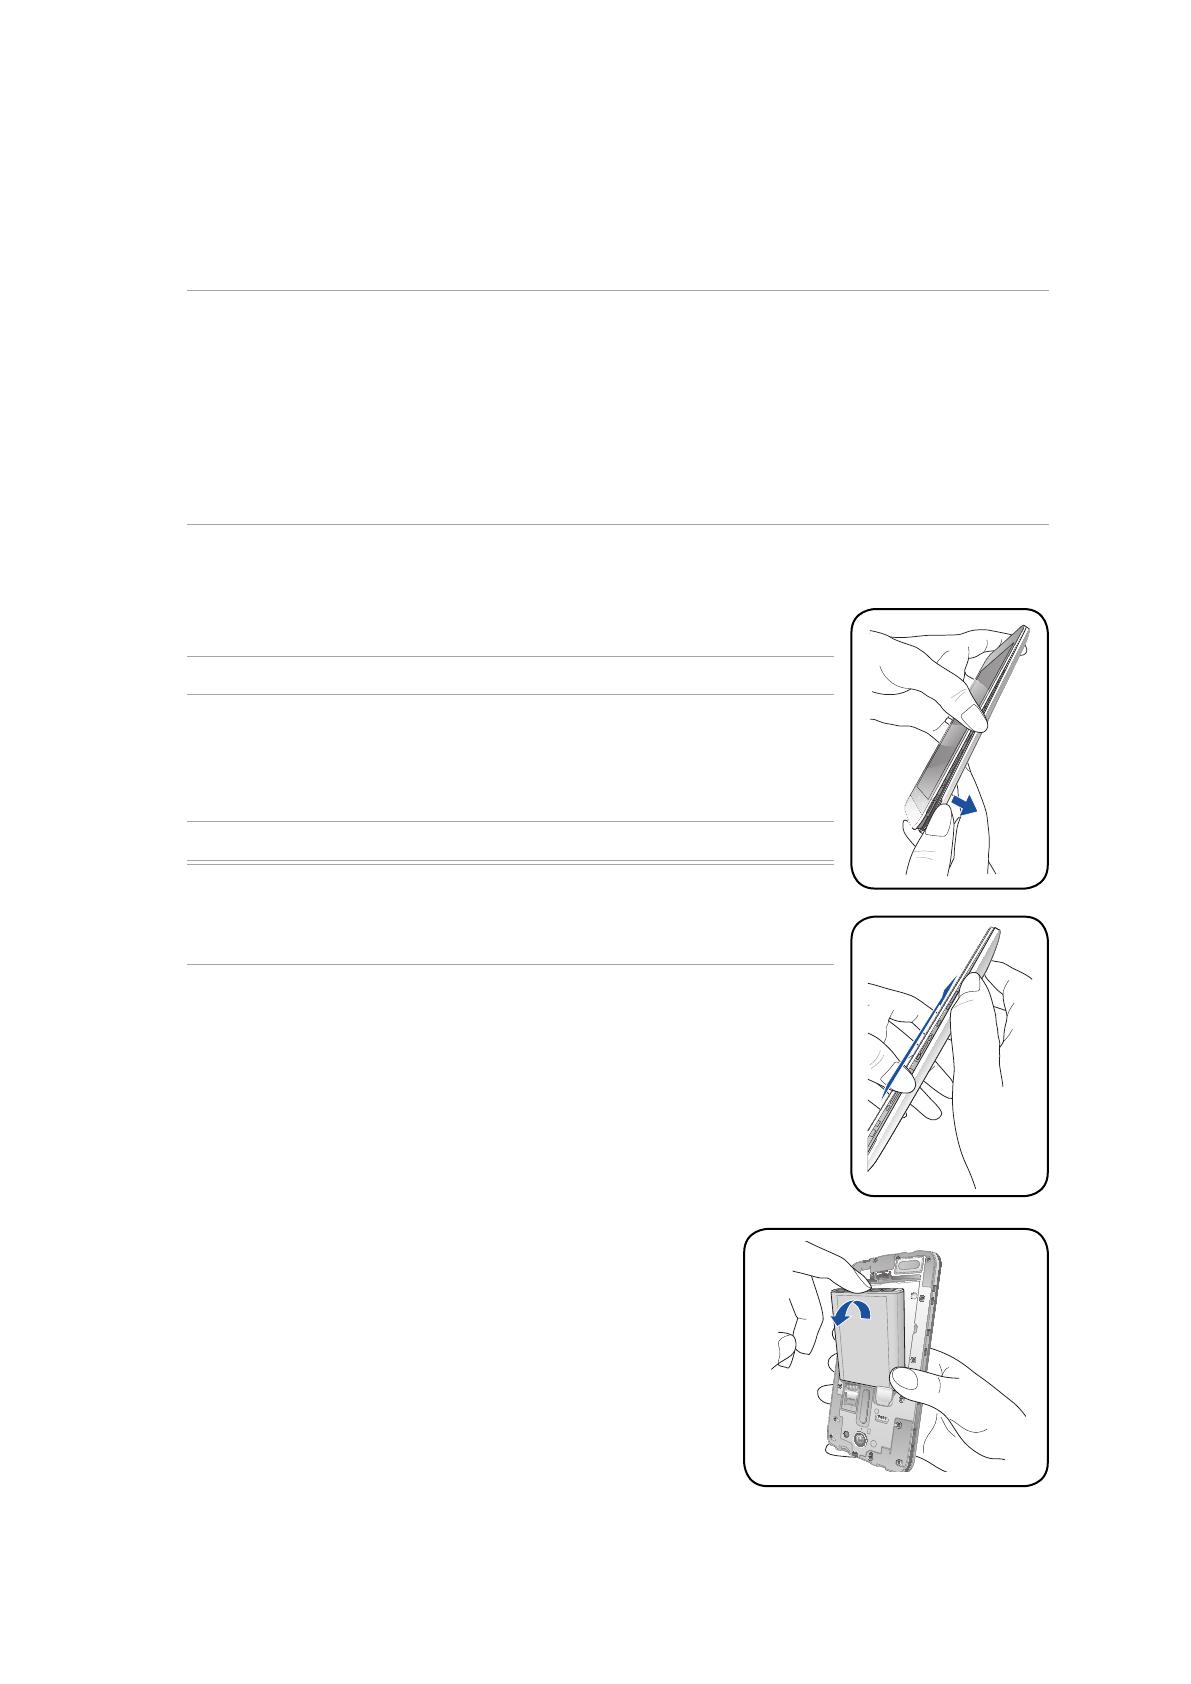
Page 11: Removing Micro-Sim Card
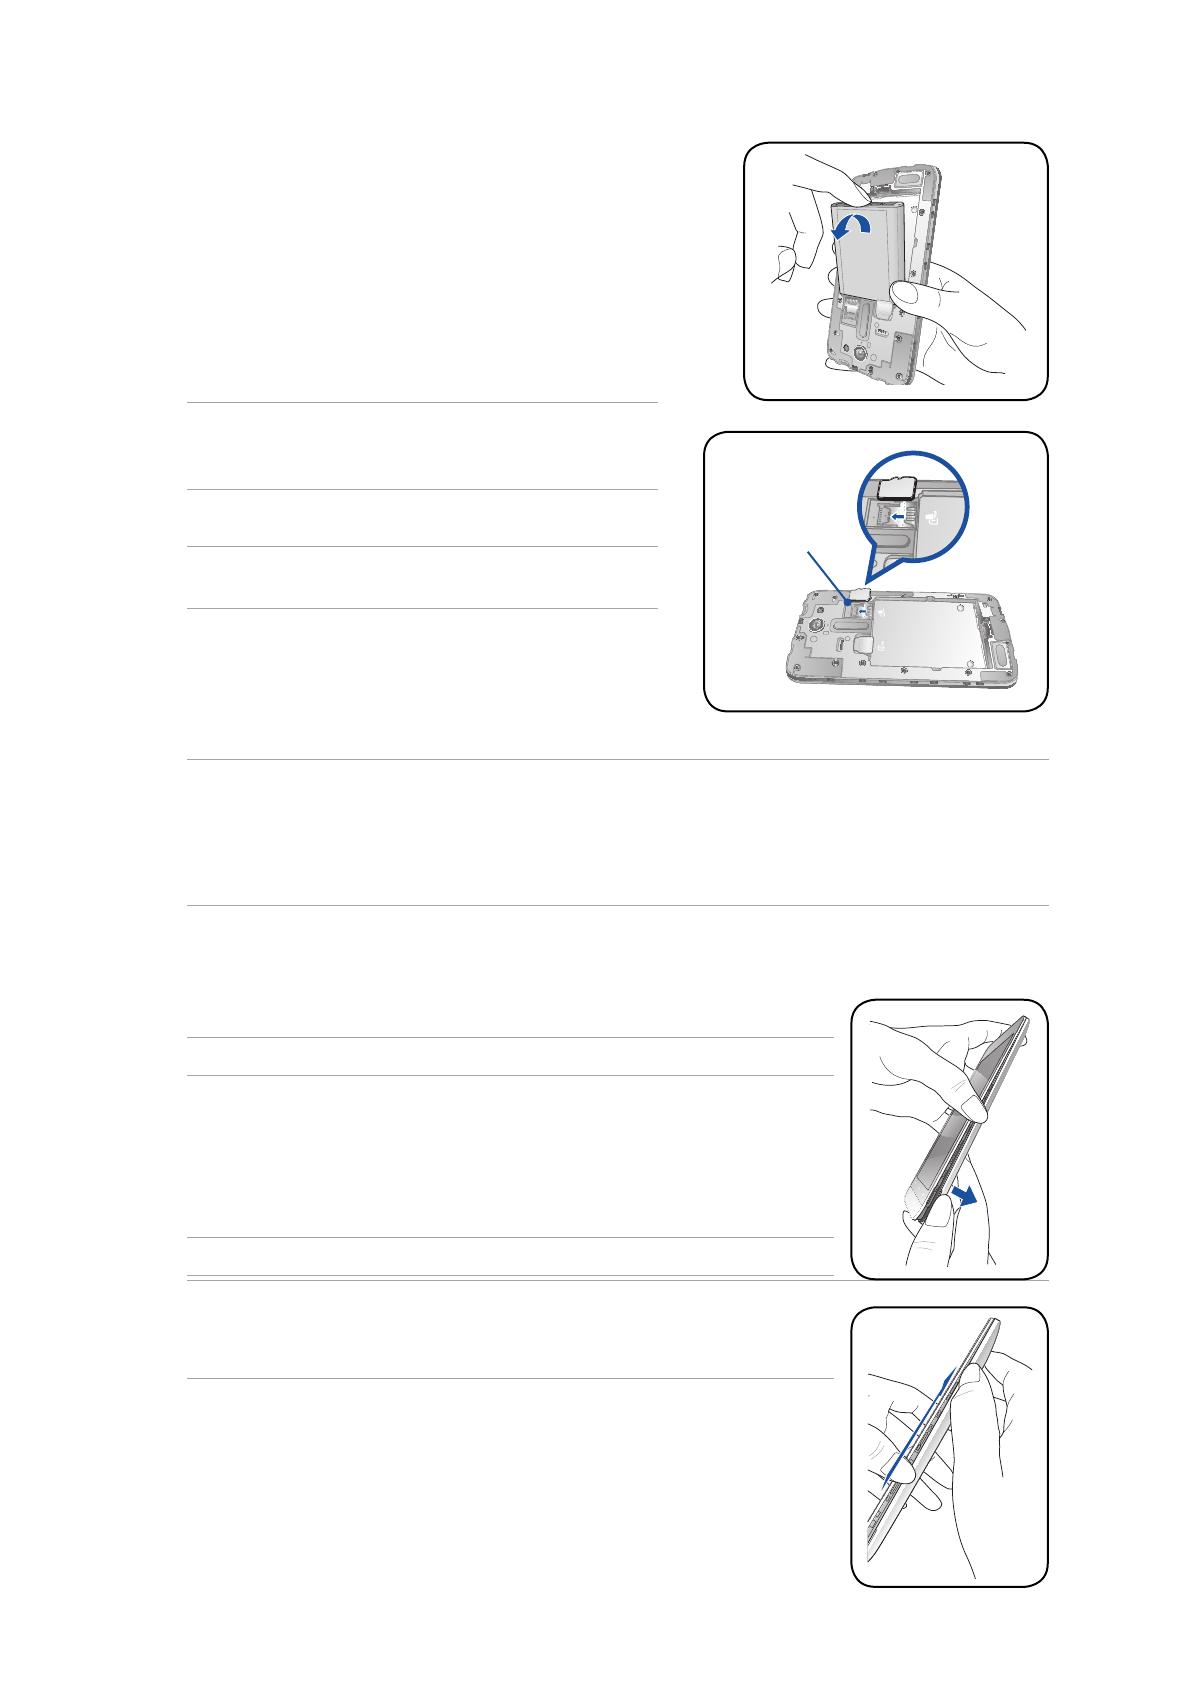
CAUTION! Do not use sharp tools or solvent on your device to avoid scratches on it. Removing a Micro-SIM card CAUTION: Be extra careful when handling a micro-SIM card. ASUS is not responsible for any loss or damage incurred to your micro-SIM card.
-
Page 12: Installing A Memory Card
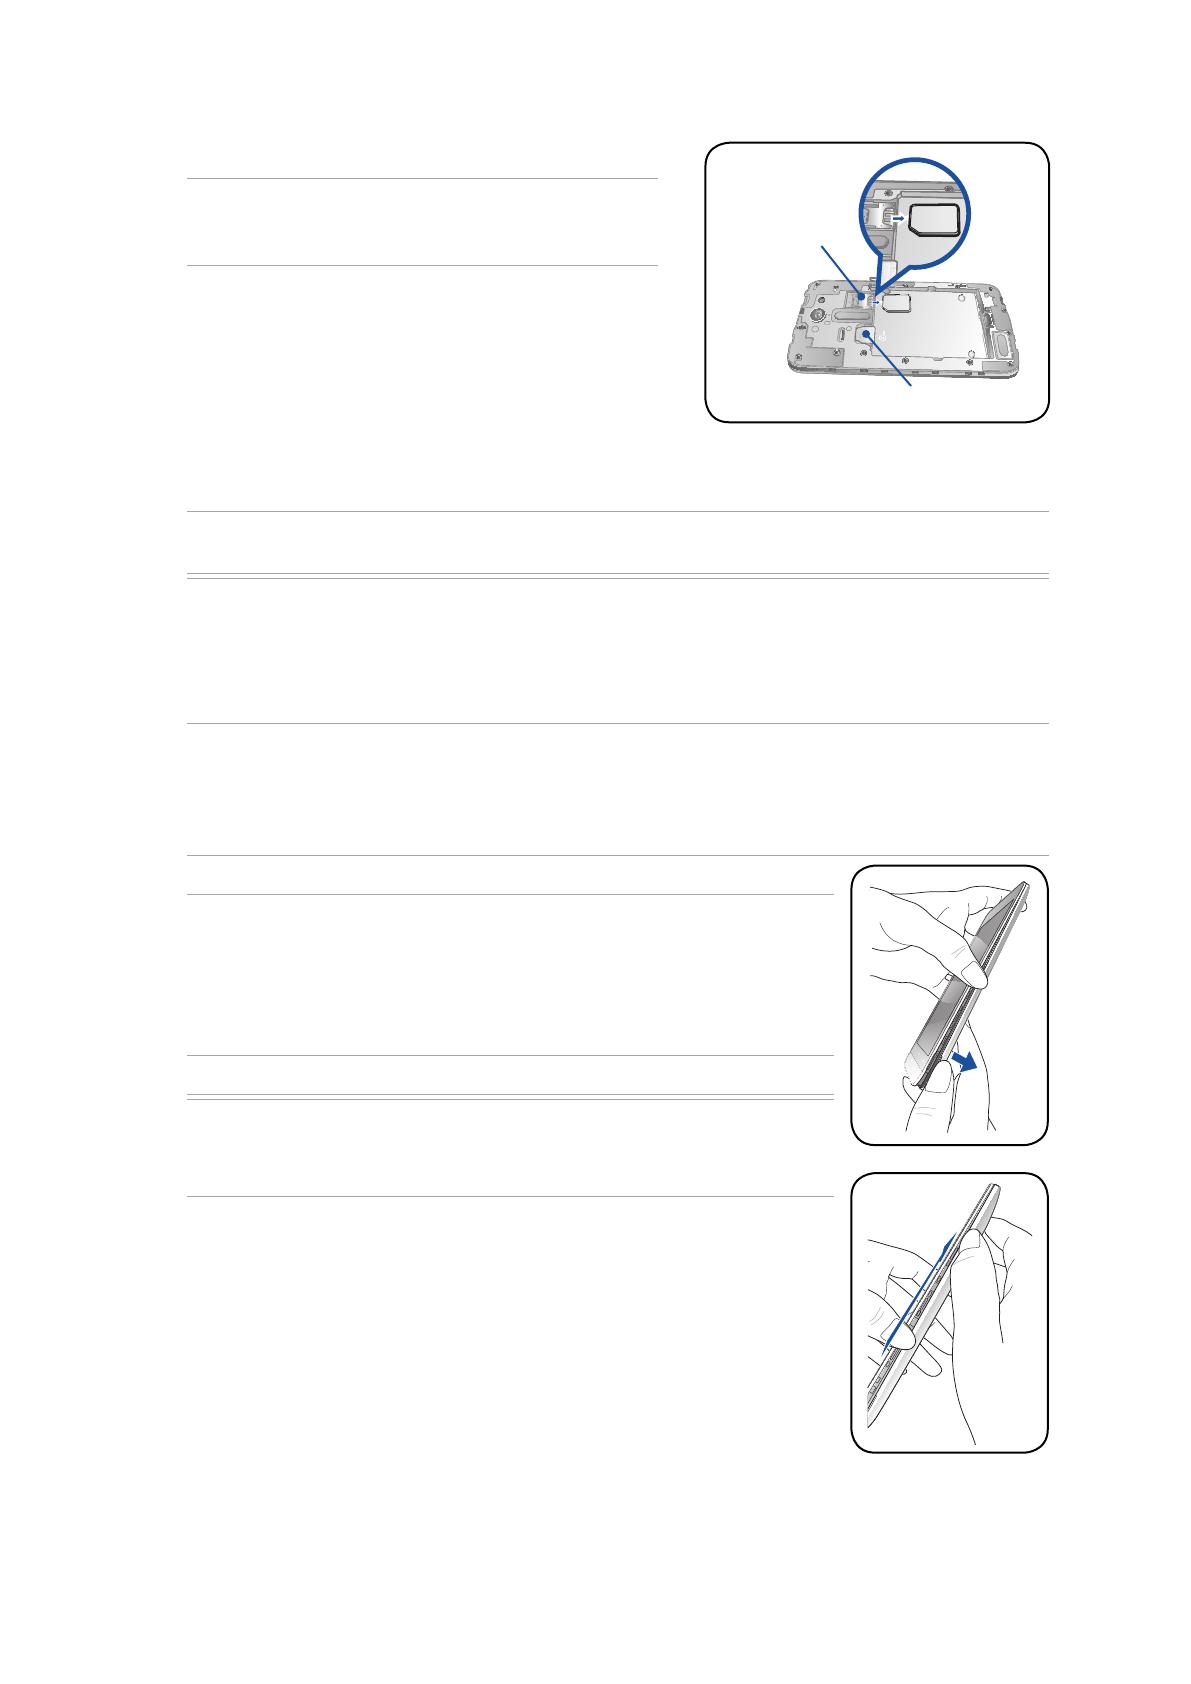
Your ASUS Phone supports a microSD™ and microSDHC™ memory card with up to 64 GB capacity. NOTE: Some memory cards may not be compatible with your ASUS Phone. Ensure that you use only compatible memory cards to prevent loss of data, damage to your device or memory card, or both.
-
Page 13: Removing A Memory Card
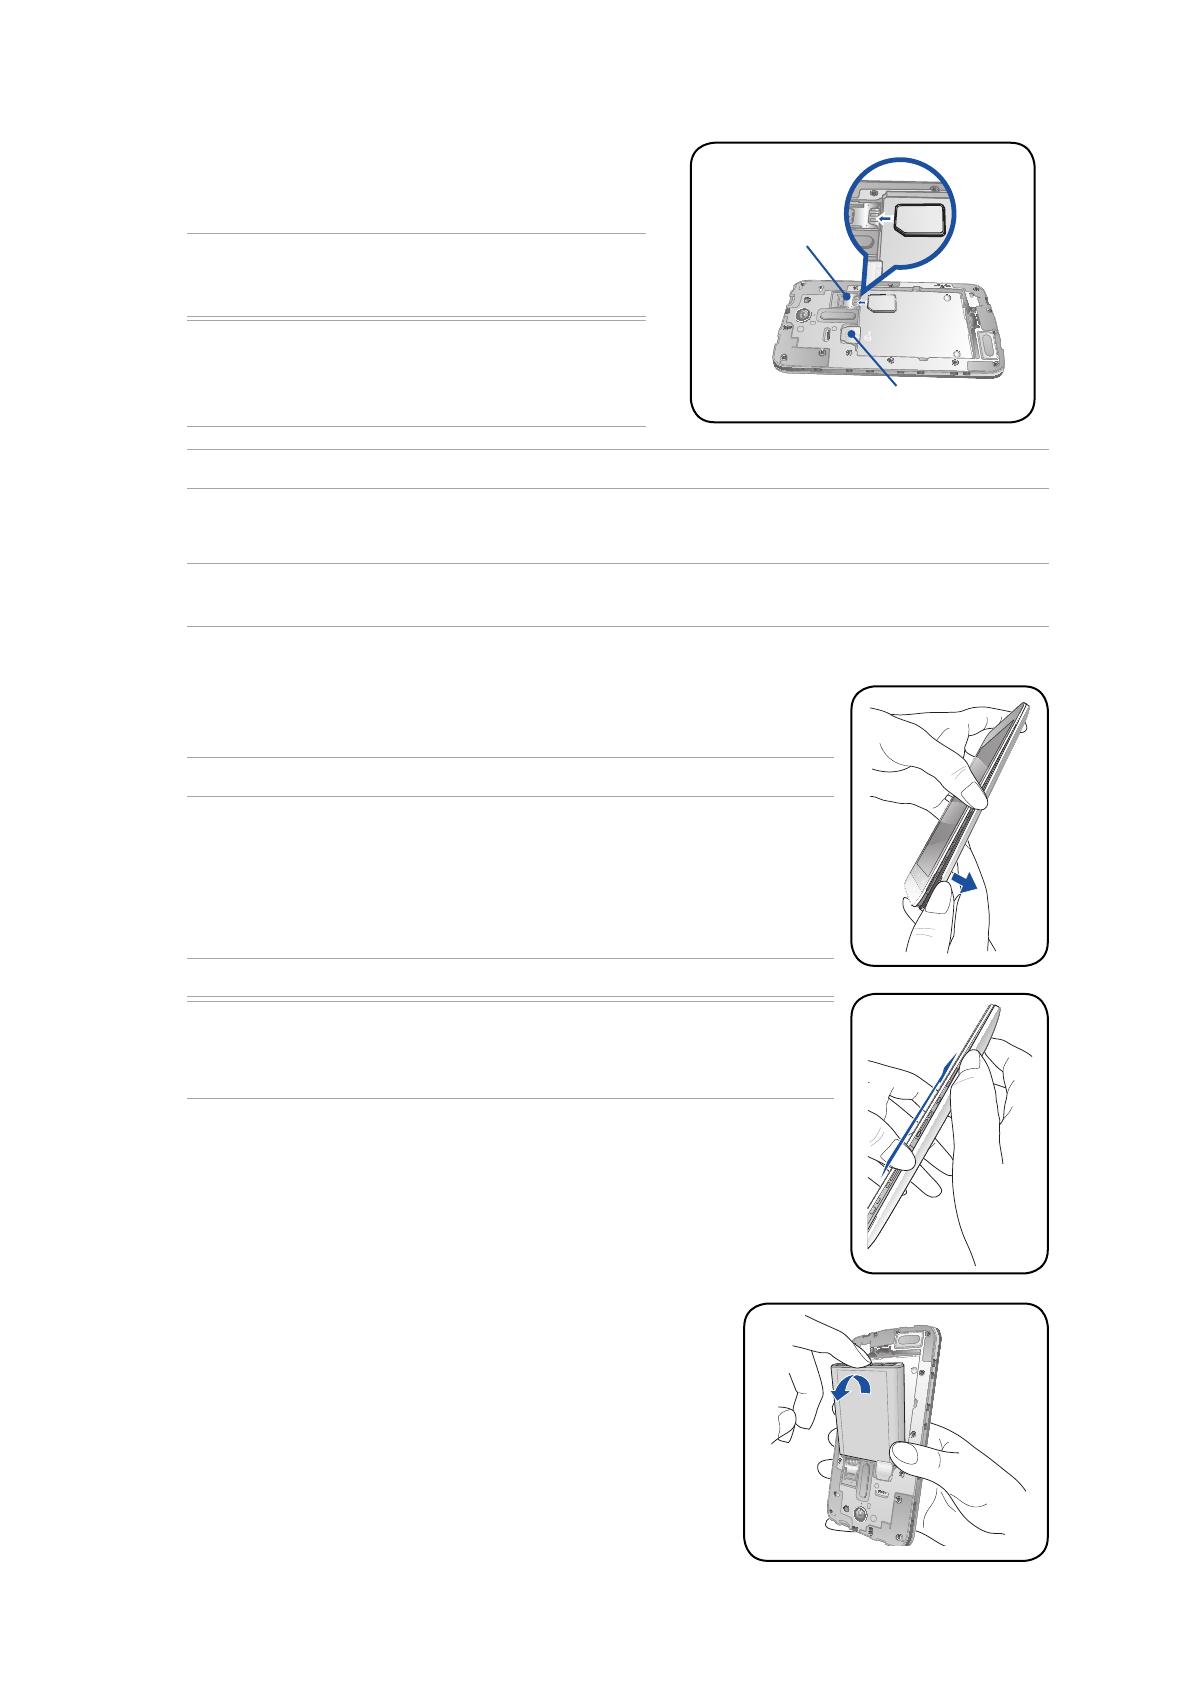
CAUTION! Do not use sharp tools or solvent on your device to protect it from scratches. Removing a memory card CAUTION! • Be extra careful when handling a memory card. ASUS is not responsible for any data loss or damage incurred to your memory card. • Eject the memory card properly to safely remove it from device. To eject the memory card, go to Home > All Apps > Settings > Storage > Unmount external storage.
-
Page 14
4. Remove the battery. 5. Remove the microSD card from the microSD card slot. NOTE: The microSD card slot is at the upper part of the Micro SIM/ micro SIM/ microSD combo card slot. microSD combo card slot 6. Put the rear cover back in place. CAUTION! Do not use sharp tools or solvent on your device to protect it from scratches. -
Page 15
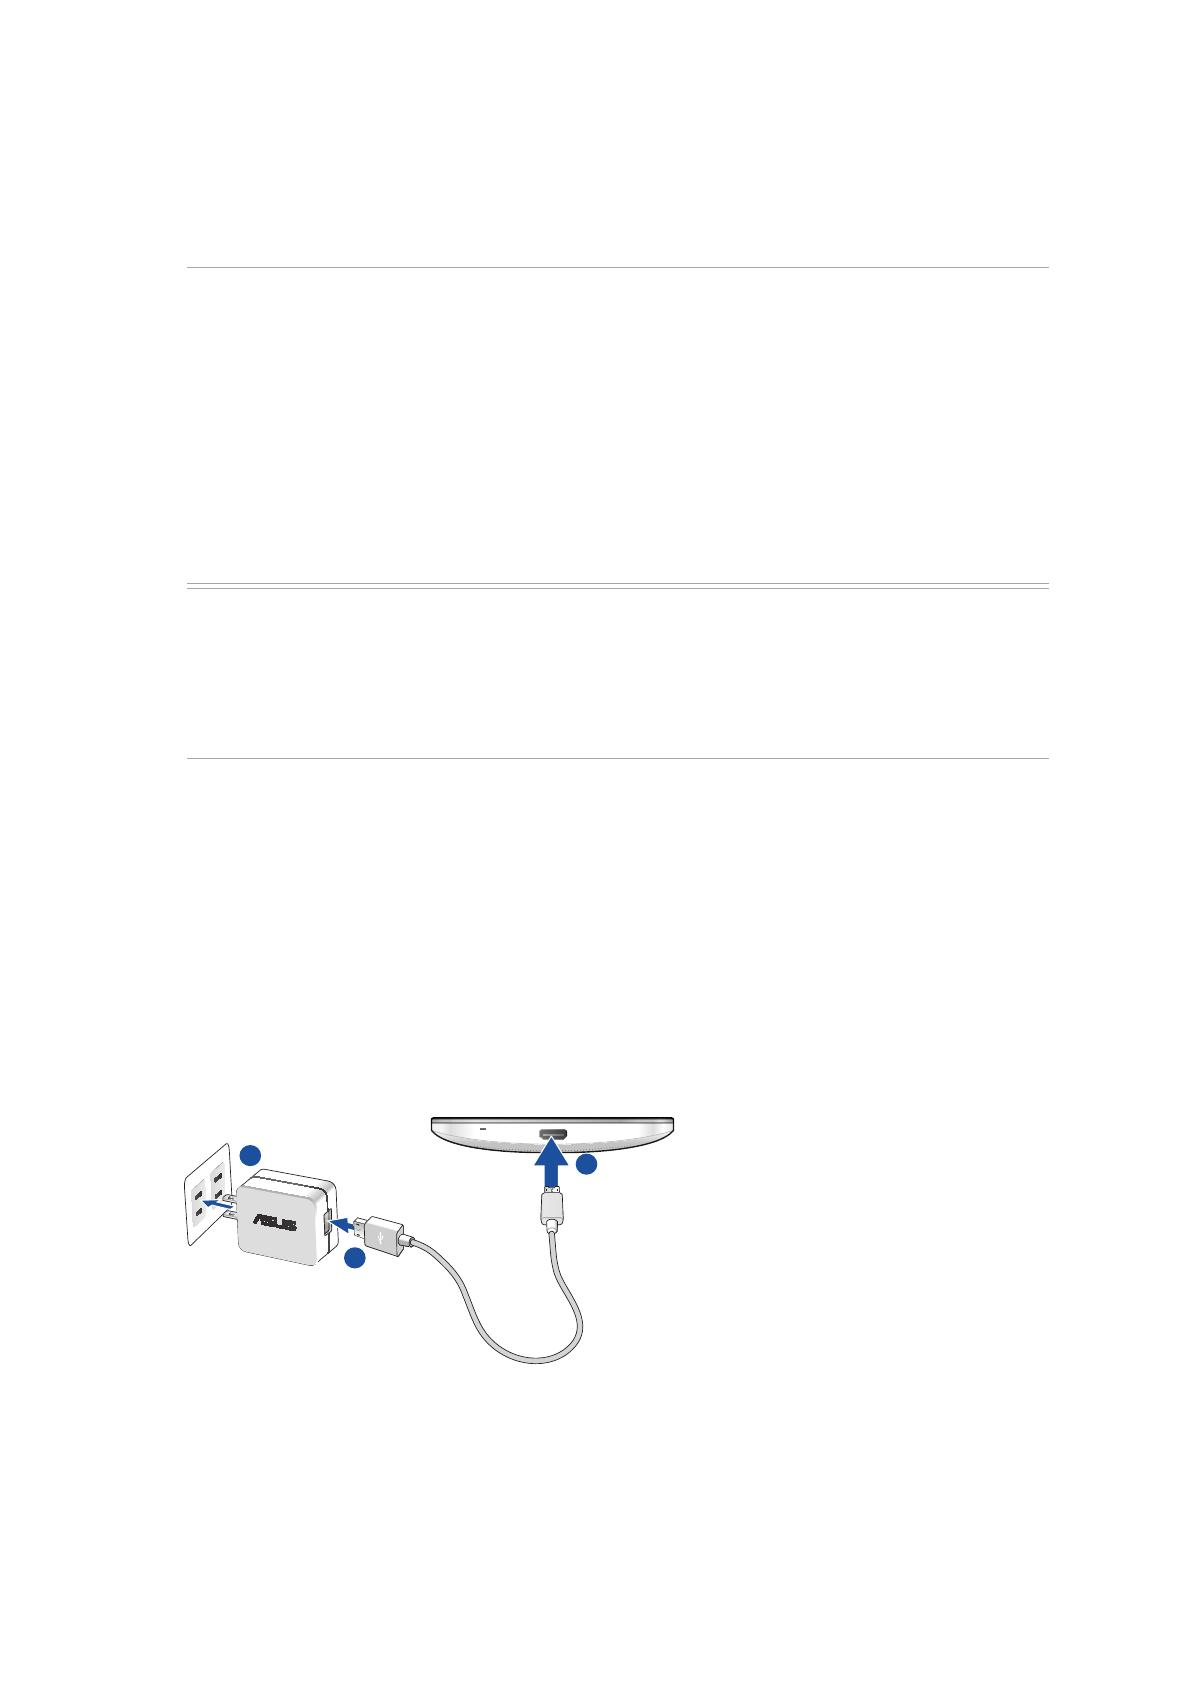
Charging your ASUS Phone Your ASUS Phone comes partially charged but you must charge it fully before using it for the first time. Read the following important notices and cautions before charging your device. IMPORTANT! • Use only the bundled AC power adapter and micro-USB cable to charge your ASUS Phone. Using a different AC power adapter and cable may damage your device. -
Page 16
ASUS Phone. • The input voltage range between the wall outlet and this adapter is AC 100V — 240V. The output voltage of the device is +5.2V 1A, 5W. 4. When fully-charged, disconnect the USB cable from your ASUS Phone first before unplugging the AC power adapter from the power outlet. NOTES: • You can use your device while charging but it may take longer to fully charge the device. -
Page 17: Sleep Mode
Turning your ASUS Phone on or off Turning your device on To turn your device on, press and hold the power button until your device vibrates and starts up. Turning your device off To turn your device off: 1. If your screen is turned off, press the power button to turn it on. If your screen is locked, unlock the device screen.
-
Page 18: Starting For The First Time
> Data Transfer. For more details, see Data Transfer. Use your Google or ASUS account to set up your device, if you do not have a Google or ASUS account yet, go ahead and create one. Google Account Using a Google Account allows you to fully utilize these Android OS features: • Organize and see all your information from anywhere.
-
Page 19
Battery power conservation tips The battery charge is the lifeline of your ASUS Phone. Here are some battery power conservation tips that helps preserve the power of your ASUS Phone battery. – Close all running apps that are not in use. -
Page 20: Using The Touchscreen
Using the touchscreen Use these gestures on the touchscreen to launch apps, access some settings, and navigate your ASUS Phone. Launching apps or selecting items Do any of the following: • To launch an app, simply tap on it. • To select an item such as in File Manager app, simply tap on it. Moving or deleting items Do any of the following: • To move an app or widget, tap and hold then drag it to the location where you want it to be.
-
Page 21: Moving Through Pages Or Screens
Moving through pages or screens Do any of the following: • Swipe your finger to the left or to the right to switch between screens or to flip through a Gallery of images. • Scroll your finger up or down to go through web pages or list of items. Zooming in Spread apart your two fingers on the touch panel to zoom in an image in Gallery or Maps, or zoom in a web page. Chapter 1: Basics…
-
Page 22: Zooming Out
Zooming out Bring together your two fingers on the touch panel to zoom out an image in Gallery or Maps, or zoom out of a web page. NOTE: You may not be able to zoom in/out of some web pages as these pages may have been designed specifically to fit your mobile screen.
-
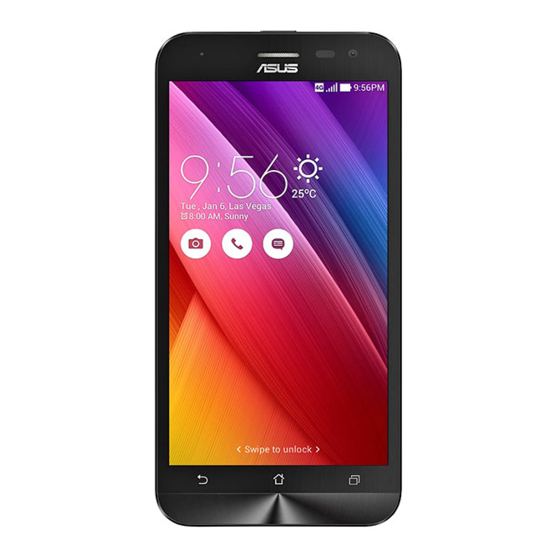
Page 23: There’s No Place Like Home
There’s no place like Home There’s no place like Home Zen Home features Home screen Get reminders of important events, app and system updates, weather forecasts, and text messages from people who really matter to you, right from your Home screen. Swipe down this area once to display System notifications Swipe down this area twice to display Quick settings Tap to display Time settings…
-
Page 24
Understanding notification icons These icons are shown on the status bar and will guide you of the current status of your ASUS Phone. Mobile network Shows the signal strength of your mobile network. Micro SIM card 1 Shows that a micro SIM card is inserted in micro SIM card slot 1. -
Page 25: Quick Settings
ASUS Phone. Each of these features are represented by a button. To launch the Quick settings panel, swipe down from the upper right corner of your ASUS Phone. NOTE: A blue button indicates that the feature is currently enabled while a gray button indicates a disabled feature.
-
Page 26: System Notifications
To add or remove existing buttons from the ASUS Quick Settings notification panel: 1. Launch Quick settings then tap 2. Tap the box beside the feature to add or remove it from the ASUS Quick Setting Notification Panel. NOTE: A checked box indicates that the feature’s button is accessible via the ASUS Quick Settings Notification Panel while an unchecked box means the opposite.
-
Page 27: Personalizing Your Home Screen
Personalizing your Home screen Stamp your own personality on your Home screen. Select an attractive design as your wallpaper, add shortcuts for quick access to your favorite apps, and add widgets for a quick review of important info. You can also add more pages so you can add and quickly access or view more apps or widgets on your Home screen.
-
Page 28: Widgets
Grouping your app shortcuts in a folder Create folders to organize your app shortcuts on your Home screen. 1. On your Home screen, tap and drag an app onto another app and a folder will appear. 2. Tap the new folder and tap Unnamed Folder to assign a name to this folder. Widgets You can put widgets, which are small dynamic apps, on your Home screen.
-
Page 29: Wallpapers
Wallpapers Let your apps, icons, and other Zen elements sit on an attractively designed wallpaper. You may add a translucent background tint to your wallpaper for readability and clarity. You can also select an animated wallpaper to make your screen come alive. Move the slider to adjust the transparency of the wallpaper Tap to apply a background tint Tap to select the background tint…
-
Page 30: Extended Home Screen
Easy Mode Navigate your ASUS Phone better with Easy Mode, an intuitive interface with large icons, buttons, and font size for better readability and easier user experience . You can also quickly do your core tasks such as making calls, sending messages, and more in Easy Mode.
-
Page 31: Adding Shortcuts
Adding shortcuts In Easy Mode, you can add up to twelve (12) app shortcuts on the Home screen. 1. Swipe to the right of the Home screen, then tap 2. From the All apps screen, select the app that you want to add to the list. Removing shortcuts Do the following: 1.
-
Page 32: Setting Up The Date And Time
You can also choose to enable or disable the dial pad touch tones, touch sounds, screen lock sound, or you can choose to have your ASUS Phone vibrate when you tap on it. To set up the sound settings: 1.
-
Page 33: Lock Screen
2. Scroll down the Settings screen and select Lock screen. 3. In the next screen, tap Screen lock. 4. Tap the screen lock option you would like to use. NOTE: For more details, see Securing your ASUS Phone. Chapter 2: There’s no place like Home…
-
Page 34: Customizing The Quick Access Buttons
Customizing the quick access buttons By default, your lock screen includes quick access buttons for these apps: Phone, Messaging, and Camera. Change this default settings and customize these buttons to launch other apps on the lock screen using the following steps: 1.
-
Page 35: Work Hard, Play Harder
Its clean and intuitive Zen interface powered by text-reflow technology optimizes web contents to better fit the screen of your ASUS Phone. With its magazine view mode via its Smart Reader feature, you can pleasurably read your favorite web contents online or offline without any distracting items such as banner ads.
-
Page 36: Sharing Pages
Sharing pages Share interesting pages from your ASUS Phone to others via an email account, cloud storage account, Bluetooth, or other ASUS Phone apps. 1. Launch the browser. 2. From a web page, tap > Share link. 2. Tap the account or app that you want to use as medium in sharing the page.
-
Page 37: Bookmarking Pages
Smartly read online Your ASUS Phone automatically enables the Smart Reader Mode on pages that contain a lot of items that you may find unneccessary or distracting such as banner ads, icons, or menu items. You can remove these items and read only the main contents of the page.
-
Page 38: Clearing The Browser Cache
5. Key in an account name that you want to be displayed in the outgoing messages, then tap Next to log into your inbox. NOTE: If you want to set up your work account on your ASUS Phone, ask for the email settings from your network administrator.
-
Page 39: Adding Email Accounts
Setting up a Gmail account Set up your Gmail account to get into Google-related services and apps as well as receive, send, and browse emails right from your ASUS Phone. 1. Tap Google then tap Gmail. 2. Tap Existing and key in your existing Gmail account and password, then tap NOTES: • Tap New if you do not own a Google account.
-
Page 40: Emailing Invites To Events
Emailing invites to events You can email invites to an event right from your ASUS Phone as well as set an alert notice for the event. 1. From the Home screen, tap Email. 2. Tap > Meeting invitation. 3. In the Event name field, enter the name of the event.
-
Page 41: Calendar
Adding accounts to Calendar Aside from creating an event logged on your ASUS Phone, you can also use Calendar to create events that get automatically synced with your online accounts. But first, these accounts must be added to Calendar using the following steps: 1.
-
Page 42: Creating An Event From Your Account
Creating an event from your account After adding online accounts that you would like to sync with Calendar, you may now use your ASUS Phone to create notifications for those online accounts by following these steps: 1. Tap ASUS > Calendar.
-
Page 43: What’s Next
What’s Next Do not miss out on important events, having fun out in the sun, or getting messages/emails/calls from your VIP contacts. Set up your calendar of events, VIP groups, or weather update settings to get alerts and reminders of What’s Next. View your What’s Next alerts from the Lock screen, System notifications panel, and What’s Next widget or app.
-
Page 44: Accepting Or Declining Invites To Events
When you accept email invites, the events will be synced with the Calendar app. NOTE: For more details, see Email and Calendar. IMPORTANT! Your ASUS Phone must be connected to a Wi-Fi or mobile network to get emailed invites or event-related alerts. For more details, see Staying connected.
-
Page 45: Getting Event-Related Alerts
Getting event-related alerts When you accept an invitation to an event, you’ll get reminders of any changes to the event such as postponement, cancellation, change in event location, or shift in event schedule. These event- related alerts will be posted on the Lock screen, System notifications panel, and What’s Next widget or app.
-
Page 46: Cancelled Event Alert
Cancelled event alert You’ll get a cancellation alert when the organizer or host cancels the event. Rescheduled event alert You’ll get an alert if the event has been postponed, rescheduled, or moved to another location. Chapter 3: Work hard, play harder…
-
Page 47: Getting The Weather Updates
4. In the search box, enter the city or area whose weather updates you want search for. 5. Wait for a while your ASUS Phone gets the weather information. The city or area’s weather data will be added to your location list. Tap the city’s or area’s weather data that you want to display on the What’s Next widget on the Home screen.
-
Page 48: Do It Later
Adding to-do tasks Create important to-do tasks to organize your work or social activities in your professional or social life. 1. From the Home screen, tap ASUS > Do It Later. 2. Tap then fill in the necessary information. 3. If you want to set the importance level, select High in the Importance field.
-
Page 49: Calling Back Now
When you’ve previously set an important call as a call later task, you can retrieve it and call back when you’ve got the time to do so from the Do It Later app. 1. From the Home screen, tap ASUS > Do It Later. 2. Select the call that you want to call back, then tap Call now.
-
Page 50: Replying Now
When you’ve previously set an SMS message as a reply later task, you can retrieve it and reply to the message when it’s convenient from the Do It Later app. 1. From the Home screen, tap ASUS > Do It Later. 2. Select the SMS message that you want to send a reply to, then tap Reply now.
-
Page 51: Supernote
SuperNote Turn note-taking into a fun and creative activity that syncs with your mobile data using Supernote. This intuitive app allows you to create notes organized per notebook by directly writing or drawing on the touchscreen. While creating notes, you can also add multimedia files from other apps and share them via social networks or your Cloud storage account.
-
Page 52: Creating A Notebook
1. On the Supernote home screen, tap-and-hold the notebook you would like to share. 2. In the pop-up screen, tap Enable cloud sync. 3. Input your ASUS WebStorage account’s User name and Password details to proceed with syncing your notebook to the Cloud.
-
Page 53: File Manager
To access the internal storage: 1. Tap ASUS > File Manager. 2. Tap > Internal storage to view the contents of your ASUS Phone then tap an item to select. Accessing the external storage device To access the external storage device: 1.
-
Page 54: The Cloud
Cloud account such as ASUS WebStorage, Drive, OneDrive, and Dropbox. ASUS WebStorage Register for or sign in to ASUS WebStorage and get free cloud storage. Automatically upload newly captured photos for instant sharing, sync files among different devices, or share files via your ASUS WebStorage account.
-
Page 55: Data Transfer
1. Pair your old mobile device with your ASUS Phone via Bluetooth. NOTE: For more details on pairing devices, see Pairing your ASUS Phone to a Bluetooth device. 2. On your ASUS Phone, do any of the following to launch the Settings screen: • Launch Quick settings then tap > Settings.
-
Page 56: Zenui Help
Find answers from FAQs (Frequently Asked Questions) or directly interact with other Zen UI users to find and share solutions about ZenUI 2.0 apps. To access ZenUI Help: > ZenUI Help. 1. Tap 2. Tap ASUS ZenUI Apps, then select the app that you want to find answers for.
-
Page 57: Keeping In Touch
Call in style Dual SIM feature The dual SIM feature of your ASUS Phone lets you manage the settings of the installed micro SIM cards. With this feature, you can enable/disable the micro SIM cards, assign SIM names, or set one as a preferred network.
-
Page 58: Assigning A Preferred Micro Sim Card
Assign a micro SIM card as your preferred SIM for voice calls and data services. SIM card for voice calls When you make a call, your ASUS Phone automatically uses the preferred micro SIM card to connect the call. To assign a micro SIM card for voice calls, tap Voice call then tap the SIM that you want to use.
-
Page 59: Making Calls
Making calls Your ASUS Phone offers you many ways to make a call. Call your friends from your contacts list, smart dial to quickly place a call, or enter a speed-dial number to call your frequently-called contact. NOTE: Organize your contacts in the Contacts app. For details, see Managing contacts.
-
Page 60
Auto-dialing an extension number You can insert a short or long pause after dialing the main number, then the extension number is dialed automatically. 1. From the Phone app, enter the main number. 2. Tap and hold * to insert a pause, which is denoted by a comma (,). NOTE: If you want a longer pause, tap and hold * again. -
Page 61: Creating A Speed Dial Entry
Creating a speed dial entry Create speed dial entries from digits 2 to 9 for your frequently-called contacts. 1. From the Phone app, do any of the following: • Tap and hold any digits from 2 to 9, then tap OK on the Speed Dial confirmation screen. •…
-
Page 62: Home Dialing
Home dialing When you’re on a trip abroad, enabling and configuring the Home dialing settings make it easier for you to quickly call home. NOTE: Using a roaming service will incur additional charges. Inquire from your mobile service provider before using the roaming service. 1.
-
Page 63: Receiving Calls
Receiving calls The touch screen of your ASUS Phone lights up when there is an incoming call. The display of the incoming call also varies, depending on the status of your ASUS Phone. Answering calls There are two ways to answer a call depending on the status of your ASUS Phone: • If your device is active, tap Answer or to reject a call, tap Decline.
-
Page 64: Blocking Calls
Blocking calls You can add a number or call from your call log to your block list. 1. From the Phone app, tap to display your call logs. 2. Select the number that you want to block, tap > Add to block list, then tap OK. Saving calls to Contacts You can add a call/number from your call logs to your contacts list.
-
Page 65: Other Call Options
Other call options During an active call, tap and tap any of the possible call options for when a call is in progress. Microphone Turns the microphone for the active call on or off. When the microphone is off or in mute mode, you can hear the caller but the caller can’t hear you.
-
Page 66: Managing Multiple Calls
Managing multiple calls Your ASUS Phone provides you the convenience of making or taking two calls. You can also set up a conference call that suits for business meetings, party lines, and other group calls. Answering another call While you are talking on your ASUS Phone, you can hear a beeping sound, indicating of another incoming call.
-
Page 67: Setting Up A Conference Call
Setting up a conference call Your ASUS Phone, together with its GSM capability, can set up a conference call of up to five (5) people. During a call, you can add more contacts and merge all calls into one conference call.
-
Page 68: Managing A Conference Call
Managing a conference call During the conference call, you can separate the contact from the conference group for private conversation, or disconnect a contact from the conference call. 1. From the Conference call screen, tap Manage conference call to open a list of contacts in the conference call.
-
Page 69: Recording Calls
Recording calls Your ASUS Phone allows you to record a conversation for future reference or information. 1. Call a contact or dial a number. 2. Tap to record the call. IMPORTANT! Before recording a call, ensure that you ask for permission from the other party or parties.
-
Page 70: Managing Contacts
1. Launch the Contacts app then tap Set up my profile or ME. NOTE: ME appears when you’ve set up your Google account on your ASUS Phone. 2. Fill in your info such as mobile or home number. To add other info, tap Add another field.
-
Page 71: Adding Contacts
Adding contacts Add contacts to your device, corporate, Google, or other email accounts and fill in more important contact information such as contact numbers, email addresses, special events for VIPs, and more. 1. Launch the Contacts app then tap 2. Select Device. NOTES: • You can also save the contact to your SIM card or an email account.
-
Page 72: Setting Up Your Vips
Customizing your contact’s profile Edit your contact’s info, add a photo, set a ringtone, or take a photo as a cover for your contact’s profile. 1. Launch the Contacts app then select the contact whose info or profile you want to edit or customize.
-
Page 73
Setting up your VIP from the VIP screen To set up your VIP from the VIP screen: 1. Launch the Contacts app. 2. Tap > VIP. 3. In the VIP screen, tap 4. Select the contact or contacts you want to group as VIPs, then tap Add. The contact or contacts are added to your VIP list. -
Page 74: Marking Your Favorite Contacts
• You can also set a favorite contact as a VIP. For more details, refer to the section Setting up your VIPs. Importing contacts Import your contacts and their respective data from one contact source to your ASUS Phone, email account, or a micro SIM card. 1. Tap Asus > Contacts then tap > Manage contacts. 2. Tap Import/export then select from the following importing options: a.
-
Page 75: Exporting Contacts
Exporting contacts Export your contacts to any of the storage accounts in your ASUS Phone. 1. Tap Asus > Contacts then tap > Manage contacts. 2. Tap Import/export then select from the following exporting options: a. Export to SIM 1 card/Export to SIM 2 card b.
-
Page 76: Social Networking With Your Contacts
Syncing your social network account Sync your social network account to add the social network accounts of your contacts to your ASUS Phone. 1. Do any of the following to launch the Settings app: •…
-
Page 77: Linking Your Contacts’ Info
2. Tap then tap Backup call log. 3. Tap Backup call log to device to save the call log backup in your ASUS Phone. To email the call log backup, tap Backup call log to device and send out. 4. Key in a backup file name then tap OK. After the backup is successful, tap OK.
-
Page 78: Call Settings
Set up the ringtone for your SIM 1 or SIM 2 card. Vibrate when ringing Tick when you want your ASUS Phone to vibrate when it rings. Call forwarding Use this feature if you want to send calls to another number on any of these conditions: Always forward, Forward when busy, Forward when unanswered, and Forward when unreachable.
-
Page 79: Send Messages And More
Messaging lets you send, promptly reply, or reply at a later time to important messages from your contacts in any of your SIM cards installed on your ASUS Phone. You can also email your message threads or conversations to others to keep them in the loop.
-
Page 80: Blocking Messages
2. Tap Reply later. The message is added to your Do It Later tasks. 3. To retrieve and reply to the email, tap ASUS > Do It Later from the Home screen. NOTE: For details on replying to reply-later messages, see Replying now.
-
Page 81: Omlet Chat
Other messaging options When you are in an active message thread or while composing a message, you can tap and do any of these other options below. Add subject Tap to add the title of your message. Insert smiley Insert a smiley or emoticon into your message. Insert text templates Insert a predefined reply into the body of your message.
-
Page 82: Using Your E-Mail Account
6. Tap Okay! Let’s do it! to update your friends from your contacts list. Tap No thanks to add your friends manually to your contacts list. NOTE: Your Omlet contacts are automatically integrated to your contacts list in Contacts app. Refer to Viewing your Omlet contacts from Contacts app section for more information.
-
Page 83
Using your Facebook® account To register using your Facebook account: 1. Tap then tap Omlet Chat. 2. On the Sign Up screen, tap Connect a different account here then tap Facebook. Omlet Chat app will take you to Facebook screen to log in to your Facebook account. 3. -
Page 84
Using Omlet chat Send text and multimedia messages for a fun, creative, and interactive conversation. To start a conversation: 1. From the Omlet Chat screen, tap to display Omlet Chat menu then tap Contacts. 2. Tap the contact that you wish to chat then tap Sending a chat message To send a chat message, key in your message in What’s up field then tap Sending a voice message… -
Page 85: Using Drawer Apps
Using drawer apps Omlet Chat features these value-added drawer apps, allowing you to share multimedia messages for a more fun and personal touch. To use these drawer apps, tap from the chat thread then select an app from the drawer app list to send a specific multimedia message.
-
Page 86
Using Social Hotspot Social Hotspot is a quick and easy way to chat with your friends in one chat room. With this feature, you can start a group chat or simply join in a group chat without giving out your identification or contact information. -
Page 87
Joining a Social Hotspot To join a Social Hotspot: 1. From the Omlet Chat screen, tap to display Omlet Chat menu then tap Broadcasts here. Omlet Chat launches the Google Maps app to your screen and shows the active social hotspots. NOTE: The social hotspots are marked by the icon. -
Page 88
On the Social Hotspot screen, you can chat with your friends, send stickers, or share photos with the group. NOTE: To view shared photos, refer to section Viewing shared photos in Gallery app. Chapter 4: Keeping in touch… -
Page 89: Viewing Shared Photos In Gallery App
Viewing shared photos in Gallery app The photos that you and your friends have shared in the Omlet Chat app’s chat room are instantly saved to your device. You can view the shared photos using the Gallery app. To view the shared photos: 1.
-
Page 90
Viewing all shared photos Tap All shared photos to view all photos shared by you and your Omlet Chat contacts. Viewing shared photos by chat room Tap Chat room to view photos shared by chat room or social hotspot. Chapter 4: Keeping in touch… -
Page 91
To view Omlet Contacts from Contacts app: 1. Launch the Contacts app by doing any of the following: a. From the Home screen, tap ASUS > Contacts app. b. From the Home screen, tap Phone app then tap c. From the All Apps screen, tap Contacts app. -
Page 92
2. Tap Contacts to display dropdown list to view the contact groups. 3. Untick all contact groups except Omlet Chat, then tap anywhere on the screen to display all Omlet contacts. 4. Tap an Omlet contact to select and view the contact details or chat with that contact directly. Chapter 4: Keeping in touch… -
Page 93: Syncing Omlet Chat To Cloud
Syncing Omlet Chat to Cloud If you have a Dropbox®, Box®, or Baidu PCS Cloud account, the Omlet Chat app instantly uploads your private conversations and chat logs securely. Before Omlet Chat app uploads your data, you have to sync your Cloud account to Omlet Chat app first.
-
Page 94: Fun And Entertainment
Fun and entertainment Fun and entertainment Using a headset Have the freedom to do other things while you’re in a call or enjoy listening to your favorite music, using a headset. Connecting the audio jack Insert the 3.5mm headset jack into the audio port of your device. WARNING! • Do not insert other objects into the audio jack port.
-
Page 95: Music
Music app automatically searches for music files from the internal and external storages on your ASUS Phone. You can organize these music files in a playlist or add them in a queue to play them sequentially. You can also stream music from cloud accounts such as ASUS WebStorage, Dropbox, OneDrive, and Drive.
-
Page 96: Streaming Cloud Music
Get answers to your questions and you can send to us your feedbacks. Streaming Cloud music Register or sign in to a cloud account and stream music from your cloud account to your ASUS Phone. IMPORTANT! Ensure that Wi-Fi or mobile network is enabled on your ASUS Phone. For details, see Staying connected.
-
Page 97: Creating A Playlist
Streaming music from the cloud To stream music from your cloud account. 1. From the Music home screen, tap 2. Under Cloud Music, tap the cloud account where you want to stream music from. 3. Select the song, then tap to play it. Creating a playlist Get your favorite songs from different sources such as internal storage, external storage, or cloud accounts and organize them in a playlist.
-
Page 98: Playto Other Devices
To use PlayTo: 1. From a currently-playing song, tap > PlayTo. 2. Tap the device that you want to stream music to. Music from your ASUS Phone will play or stream on the other device. 3. To stop PlayTo, tap >…
-
Page 99: Scanning For Local Stations
Scanning for local stations To scan for stations in your area, tap to automatically scan for your local radio stations. The available local stations are displayed on the FM Radio screen. Tuning to another frequency Do the following if you want to listen to a specific radio station: 1.
-
Page 100: Your Precious Moments
Your precious moments Your precious moments Capture moments Launching the Camera app Capture images and record videos using your ASUS Phone’s Camera app. Refer to any of the steps below to open the Camera app. From the lock screen Drag down until the camera app is launched.
-
Page 101: Using Camera For The First Time
Tutorial and Image locations. Tutorial If it is your first time to use your ASUS Phone’s camera, you will encounter the following tutorial screen after launching the Camera app. Refer to the following steps to proceed from this screen.
-
Page 102: Camera Home Screen
Your ASUS Phone’s camera is equipped with auto-scene detection and auto-image stabilizer features. It also features a video stabilization function that helps prevent shakiness while video recording. Tap the icons to start using your camera and explore the image and video features of your ASUS Phone. Adjust settings…
-
Page 103: Image Settings
Image settings Adjust the appearance of your captured images by configuring your camera’s settings using the steps below. IMPORTANT! Apply the settings first before taking images. 1. On the camera’s home screen, tap > 2. Scroll down and configure the available options. Image Configure the image quality using these options.
-
Page 104: Video Settings
Video settings Adjust the appearance of your recorded videos by configuring your camera’s settings using the steps below. IMPORTANT! Apply the settings first before taking images. 1. On the camera’s home screen, tap > 2. Scroll down and configure the available options. Image Configure the video quality using these options.
-
Page 105: Advanced Camera Features
Advanced camera features Explore new ways of capturing images or videos and make captured extra special moments using the advanced camera features of your ASUS Phone. IMPORTANT! Apply the settings first before taking images. Available features may vary per model.
-
Page 106
2. Tap then pan your ASUS Phone to the left or right to capture the scenery. NOTE: While panning your ASUS Phone, a timeline of thumbnails appears on the lower part of your screen as it captures the scenery. 3. Tap when finished. -
Page 107
> Selfie. 3. Tap to choose how many people should be included in the photo. 4. Use the rear camera to detect faces and wait for your ASUS Phone to start beeping, counting down until it captures the photo. 5. Tap to save the photo. -
Page 108: Capturing Miniature/Smart Remove Photos
Simulate the tilt-shift effect of DSLR lenses via the Miniature feature. Using this feature allows you to focus on specific areas of your subject, adding a bokeh effect that can be used on both photos and video using your ASUS Phone. Capturing Miniature photos 1.
-
Page 109: All Smiles
Have fun during and after taking photos of your family and friends using the Beautification feature of your ASUS Phone. When enabled, this feature allows you to make live beauty enhancements on your subject’s face before you press the shutter button.
-
Page 110: Time Lapse
Time lapse The time lapse video feature of your ASUS Phone allows you to capture stills for automatic time lapse playback. In effect, events seem to move in a fast-forward manner though they actually occured and were recorded between long intervals.
-
Page 111: Using The Gallery
View images and play videos on your ASUS Phone using the Gallery app. This app also allows you to edit, share, or delete image and video files stored in your ASUS Phone. From Gallery, you can display images in a slideshow or tap to view the selected image or video file.
-
Page 112: Viewing The Photo Location
Viewing the photo location Enable the location access on your ASUS Phone, and get the location details on your photos. Your photos’ location details include the area where the photos are taken, as well a map of the location via Google Map or Baidu (in China only).
-
Page 113: Sharing Files From The Gallery
Editing images The Gallery also features its own image editing tools that you can use to enhance images saved on your ASUS Phone. 1. From the Gallery screen, tap the folder where the files are located. 2. After opening the folder, tap the image you want to edit.
-
Page 114
This feature is only enabled after setting events on the Calendar. For more details on how to set events, see Calendar. • Only photos taken with your ASUS Phone’s camera on the same date and time as a Calendar event can use this feature. Chapter 6: Your precious moments… -
Page 115: Using Minimovie
Using MiniMovie Turn photos into a creative slideshow using the MiniMovie feature of the Gallery. MiniMovie contains a theme of slideshow presentations which you can immediately apply to selected photos. To create a MiniMovie from a photo folder: 1. Launch Gallery then tap to select the location of your photo folder.
-
Page 116: Using Playto (On Selected Models Only)
5. After selecting a theme, tap to save the slideshow. You can access your saved slideshows from ASUS > File Manager > Movies > MiniMovie. 6. You can then share the slideshow to social network sites or instant messaging apps such as Facebook, Google Plus, or Omlet Chat.
-
Page 117: Staying Connected
• For more details on your mobile network charges/fees and setttings, contact your mobile service provider. Wi-Fi The Wi-Fi technology of your ASUS Phone gets you connected to the wireless world. Update your social media accounts, browse the Internet, or exchange data and messages wirelessly from your ASUS Phone. Enabling Wi-Fi 1.
-
Page 118: Connecting To A Wi-Fi Network
Bluetooth ® Use the Bluetooth feature of your ASUS Phone to send or receive files and stream multimedia files with other smart devices over short distances. With Bluetooth, you can share your media files with your friends’ smart devices, send data for print with a Bluetooh printer, or play music files with a Bluetooth speaker.
-
Page 119: Pairing Your Asus Phone To A Bluetooth® Device
Pairing your ASUS Phone to a Bluetooth® device Before using the Bluetooth feature of your ASUS Phone in full scale, you have to pair it first with the Bluetooth device. The ASUS Phone automatically stores the pairing connection of the Bluetooth device.
-
Page 120: Tethering
Tethering When Wi-Fi service is not available, you can use your ASUS Phone as a modem or turn it into a Wi-Fi hotspot to get Internet access on your laptop, tablet, and other mobile devices. IMPORTANT! Most mobile service providers may require a data plan for you to be able to use the tethering function.
-
Page 121: Bluetooth Tethering
4. From the Tethering screen, slide Portable Wi-Fi hotspot to ON. 5. Connect other devices to your ASUS Phone’s hotspot connection the same way you connect to a Wi-Fi network. Bluetooth Tethering Enable Bluetooth on your ASUS Phone and use it as a modem for Internet access on your Bluetooth-enabled mobile devices such as a laptop or a tablet.
-
Page 122: Travel And Maps
Travel and Maps Travel and Maps Weather Get real-time weather updates straight from your ASUS Phone using the weather app. Using Weather, you can also check other weather details from around the world. Launching the Weather app From your Home screen, launch the Weather app using either of the following options: >…
-
Page 123: Weather Home Screen
Weather home screen Set up and get your current location’s weather updates as well as other parts of the world. You can display the weather updates or daily weather forecast on the What’s Next widget or app, and on the Calendar app.
-
Page 124: Clock
Clock Customize the time zone settings of your ASUS Phone, set alarms, and use your ASUS Phone as a stop watch using the Clock app. Launching Clock Launch the Clock app using either of the following options: • > Clock.
-
Page 125: Alarm Clock
Alarm clock to access the alarm clock settings of your ASUS Phone. Tap this to delete any of the previously set alarms. Tap this to access the settings of the alarm clock feature. Tap this to set a new alarm time.
-
Page 126: Timer
Timer You may set multiple timer options for your ASUS Phone. To do this, follow the steps below: Setting the timer 1. Tap to access the timer feature of your ASUS Phone. numeric keypad 2. Use the numeric keypad to input your target time then tap start to start the timer.
-
Page 127: Zenlink
Your ZenLink comprises of the following apps: Party Link, Share Link, PC Link, and Remote Link NOTE: Some of these ZenLink apps may not be available in your ASUS Phone. Party Link Create or join a virtual group to seamlessly share photos in real-time.
-
Page 128: Receiving Photos
Receiving photos To receive photos from other Party Link-enabled devices: 1. Launch Camera then tap 2. Tap > OK. 3. Tap Join a group > Scan to start searching for other Party Link-enabled devices. 4. From the list, tap the group you would like to join then tap Join. 5.
-
Page 129: Share Link
2. Tap Send file then select from the options that appear on your screen. 3. Tap the files that you want to send then tap Done. 4. After your ASUS Phone detects the other devices, tap the device that you want to share your files with.
-
Page 130: Receiving Files
2. Tap Receive file to receive the files from the sender. PC Link Use your computer to access and control your ASUS Phone and its apps via the PC Link. It allows you to control your ASUS Phone using your computer’s keyboard and mouse.
-
Page 131
Understanding the PC Link settings Click this icon to rotate the mirrored ASUS Phone screen on your computer screen. Click this icon to minimize or maximize the volume. Click this icon to capture a screenshot. Click this icon to wake your ASUS Phone or put it to sleep. -
Page 132: Remote Link
Remote Link Turn your ASUS Phone into a wireless input device and a presentation tool. Using this app, you can use your ASUS Phone as a touchpad, touchscreen panel, laser pointer for presentations, and Windows® Media Player controller while connected to your computer via bluetooth.
-
Page 133
Remote Link presentation controller to control the presentation slides on your computer. Tap and hold this button to activate the laser pointer. Tap this button to go to next slide. Tap this button to go back to previous slide. Remote Link Windows® Media Player controller to control the Windows®… -
Page 134
Remote Link keyboard input to use keyboard input. You can also use the microphone icon for voice input. Tap this button to key in your message via voice input. Tap this button to send the message to your computer. Key in your message in this field. Chapter 9: ZenLink… -
Page 135: Zen Everywhere
Special Zen Tools Flashlight You can turn your ASUS Phone to an instant flashlight by launching your Quick settings panel from any screen or any open app. From the Quick settings panel, simply tap on the Flashlight icon to activate its function.
-
Page 136
Flashlight menu options Tap this to enable or disable the flashlight mode. Tap this to enable or disable the SOS mode. Tap any of these icons to toggle between the flashlight’s speed while blinking. Tap this to turn on or turn off the light. Chapter 10: Zen Everywhere… -
Page 137: Calculator
Calculator One-swipe and a tap is all it takes to launch your Calculator. When you open the Quick settings panel, the Calculator icon is there visibly on top of the list. Tap it to get started with your computations. Tap this to enable the calculator Calculator screen Chapter 10: Zen Everywhere…
-
Page 138: Quick Memo
Creating a sticky note You can turn Quick memo notes into a sticky note so you can view them wherever, on your ASUS Phone. To create a sticky note, just tap on the pin icon on the upper right corner of Quick memo after creating your note.
-
Page 139: Sound Recorder
Sound Recorder Record audio files using your ASUS Phone by enabling the Sound Recorder app. Launching Sound Recorder > Sound Recorder. To launch Sound Recorder, tap Tap to customize the Sound Recorder settings Tap to view the list of saved audio recording files…
-
Page 140: Recording List
Pausing a recording During a paused recording, you can choose to resume, delete, or save the recording. Tap to delete the recording Tap to resume the recording Tap to save the recording Recording List From the Recording List, you can play, rename, share, or delete a saved audio recording file. To view your recording list, tap from the Sound Recorder main screen.
-
Page 141: Audio Wizard
Audio Wizard AudioWizard allows you to customize the sound modes of your ASUS Phone for a clearer audio output that fits actual usage scenarios. Using Audio Wizard To use AudioWizard: 1. Tap ASUS > Audio Wizard. 2. In the AudioWizard window, tap the sound mode you want to activate then tap Done to save and exit.
-
Page 142: Splendid
Splendid ASUS Splendid allows you to easily adjust the display settings. It enriches the color of your screen with its preset screen color modes. Using Splendid To use Splendid: 1. From your Home screen tap ASUS > Splendid. 2. Select any of these screen color modes: Balance, Reading, Vivid, and Customized.
-
Page 143: Reading Mode
Move to adjust the yellow tint Tap to reset to factory defaults Vivid mode This mode provides a fine-tuned color preset that enriches the screen color of your ASUS Phone. Tap to reset to factory defaults Move to adjust the color temperature…
-
Page 144
Customized mode This mode allows you to adjust the screen display based on your preferred color temperature, hue, and saturation. Move to adjust the color temperature Move to adjust hue Tap to reset to factory defaults Move to adjust saturation NOTE: You can also quickly set the Splendid screen mode from the Quick settings panel. -
Page 145: Power Saver
Power Saver Fully maximize or extend the power of your ASUS Phone even when it is idle or while it stays connected to your network. Smartly customize the power settings for your frequent activities such as reading emails or watching videos.
-
Page 146: There’s More To Your Zen
You can also enable the power saving function for some apps or enable the auto-disconnection of your network when your ASUS Phone is asleep. 1. From Power Saver, tick Customized mode, then tap 2.
-
Page 147
Configuring the ASUS Cover settings To configure the ASUS Cover settings: 1. Tap > Settings. 2. Tap ASUS customized settings > Enable ASUS Cover. Chapter 10: Zen Everywhere… -
Page 148: Maintain Your Zen
You can store data, apps, or files on your ASUS Phone (internal storage), on an external storage, or on an online storage. You need an internet connection to transfer or download your files on an online storage. Use the bundled USB cable to copy files to or from the computer to your ASUS Phone.
-
Page 149: Securing Your Asus Phone
Use the security features of your ASUS Phone to prevent unauthorized calls or access of information. Unlocking your screen When the screen is locked, you can open it with the security unlocking options that the ASUS Phone offers you. 1. Tap then tap Settings >…
-
Page 150
Key in at least four numbers to set a PIN. IMPORTANT! Ensure to remember the PIN that you created to unlock your device. Pattern Slide your finger on the dots and create a pattern. IMPORTANT! You can create a pattern with a minimum of four dots. Ensure to remember the pattern that you created to unlock your device. -
Page 151
• Instant camera: Slide the Instant camera switch to ON to launch the Camera app even if your ASUS Phone is in idle mode by pressing the volume button twice. • Owner info: Tap this to edit and key in the information that you want to appear even when your screen is locked. -
Page 152
Know your ASUS Phone’s identity such as serial number, IMEI (International Mobile Equipment Identity) number, or model number. This is important, as when you may lose your ASUS Phone, you can contact your mobile carrier and provide the information to blacklist the unauthorized use of your ASUS Phone. -
Page 153: Appendix
H05VV-F, 2G, 0.75mm ASUS Recycling/Takeback Services ASUS recycling and takeback programs come from our commitment to the highest standards for protecting our environment. We believe in providing solutions for you to be able to responsibly recycle our products, batteries, other components as well as the packaging materials. Please go to http://csr.asus.com/english/Takeback.htm…
-
Page 154
I/O ports are located. Green ASUS notice ASUS is devoted to creating environment-friendly products and packaging to safeguard consumers’ health while minimizing the impact on the environment. The reduction of the number of the manual pages complies with the reduction of carbon emission. -
Page 155: Index
App shortcuts 27 — see also Do It Later 48 — adding 27 — setting up — removing 27, 28 — incoming calls 63 ASUS Cover 146 — missed calls 63 — installing 146 Call logs ASUS Phone 9 — blocking 64…
-
Page 156
Conference calls 68 Contacts 70 Favorites — adding 71 — calling 62 — adding an extension number 71 — marking up 74 — Contacts Settings 70 — see also Contacts 70 — customizing your contact’s profile 72 File Manager 53 — exporting 75 — accessing the cloud storage 53 — importing 74… -
Page 157
Low light 105 — using your e-mail account 82 — see also Advanced camera features 105 — using your Facebook account 83 — using your Google account 82 — using your mobile phone number 81 — viewing your Omlet contacts from Contacts Messaging 79 app 91 — blocking 80… -
Page 158
Social networking — getting event reminders 43 — syncing 76 — getting the weather updates 47 Sound Recorder 139 — see also Weather 122 Speed Dialing — see also Calendar 41 — creating a speed dial entry 61 — see also Email 38 — deleting a speed dial entry 61 — see also Event-related alerts 45 Splendid 142…
-
Инструкции по эксплуатации
9
Языки:

ASUS ZenFone 2 Laser (ZE500KL) инструкция по эксплуатации
(158 страниц)
- Языки:Русский
-
Тип:
PDF -
Размер:
13.1 MB -
Описание:
ASUS ZenFone 2 Laser (ZE500KL) Russian Version E-Manual
The screenshot pictures in this manual may differ between various firmware versions.
Content availability varies by country and coverage areas and is subject to change without notice.
All specifications are subject to change without notice.

ASUS ZenFone 2 Laser (ZE500KL) инструкция по эксплуатации
(154 страницы)
- Языки:Итальянский
-
Тип:
PDF -
Размер:
13.87 MB -
Описание:
ASUS ZenFone 2 Laser (ZE500KL) Italian Version E-Manual
The screenshot pictures in this manual may differ between various firmware versions.
Content availability varies by country and coverage areas and is subject to change without notice.
All specifications are subject to change without notice.

ASUS ZenFone 2 Laser (ZE500KL) инструкция по эксплуатации
(151 страница)
- Языки:Японский
-
Тип:
PDF -
Размер:
5.11 MB -
Описание:
ASUS ZenFone 2 Laser (ZE500KL) Japanese Version E-Manual
The screenshot pictures in this manual may differ between various firmware versions.
Content availability varies by country and coverage areas and is subject to change without notice.
All specifications are subject to change without notice.

ASUS ZenFone 2 Laser (ZE500KL) инструкция по эксплуатации
(154 страницы)
- Языки:Французский
-
Тип:
PDF -
Размер:
9.4 MB -
Описание:
ASUS ZenFone 2 Laser (ZE500KL) French Version E-Manual
The screenshot pictures in this manual may differ between various firmware versions.
Content availability varies by country and coverage areas and is subject to change without notice.
All specifications are subject to change without notice.

ASUS ZenFone 2 Laser (ZE500KL) инструкция по эксплуатации
(154 страницы)
- Языки:Испанский
-
Тип:
PDF -
Размер:
5.21 MB -
Описание:
ASUS ZenFone 2 Laser (ZE500KL) Spanish Version E-Manual
The screenshot pictures in this manual may differ between various firmware versions.
Content availability varies by country and coverage areas and is subject to change without notice.
All specifications are subject to change without notice.

ASUS ZenFone 2 Laser (ZE500KL) инструкция по эксплуатации
(154 страницы)
- Языки:Португальский
-
Тип:
PDF -
Размер:
5.18 MB -
Описание:
ASUS ZenFone 2 Laser (ZE500KL) Brazil-Portuguese Version E-Manual
The screenshot pictures in this manual may differ between various firmware versions.
Content availability varies by country and coverage areas and is subject to change without notice.
All specifications are subject to change without notice.


ASUS ZenFone 2 Laser (ZE500KL) инструкция по эксплуатации
(3 страницы)
-
Тип:
PDF -
Размер:
681.89 KB -
Описание:
Software Update SOP for ZenFone (Eng)
The screenshot pictures in this manual may differ between various firmware versions.
Content availability varies by country and coverage areas and is subject to change without notice.
All specifications are subject to change without notice.
На NoDevice можно скачать инструкцию по эксплуатации для ASUS ZenFone 2 Laser (ZE500KL). Руководство пользователя необходимо для ознакомления с правилами установки и эксплуатации ASUS ZenFone 2 Laser (ZE500KL). Инструкции по использованию помогут правильно настроить ASUS ZenFone 2 Laser (ZE500KL), исправить ошибки и выявить неполадки.
ZE500KL
Руководство пользователя

2
Эксплуатация и безопасность
Инструкция
Безопасность на дороге. Мы настоятельно рекомендуем не использовать устройство при
вождении автомобиля.
Это устройство может использоваться при температуре воздуха в диапазоне от 0°C (32°F) до
35°C (95°F).
Выключайте устройство где запрещено использование мобильных устройств. Соблюдайте
правила при нахождении в местах с ограничениями, например в самолете, в кинотеатре, в
больнице или рядом с медицинским оборудованием, рядом с горючими материалами или
зонах проведения взрывных работ и других местах.
Используйте только блок питания и кабели, одобренные ASUS для использования с этим
устройством. Обратите внимание на этикетку на нижней стороне устройства и убедитесь,
что Ваш блок питания поддерживает соответствующее напряжение.
Не пользуйтесь поврежденными сетевыми шнурами, аксессуарами и периферийными
устройствами.
Сохраняйте устройство сухим. Не подвергайте устройство воздействию жидкостей и не
используйте в условиях повышенной влажности.
Устройство можно пропускать через рентгеновский сканер, но не рекомендуется проносить
его через магнитные детекторы или подвергать его воздействию магнитных жезлов.
Экран устройства изготовлен из стекла. Если стекло разбилось, прекратите использование
устройства и не прикасайтесь к сломанным частям. Немедленно обратитесь к
квалифицированным специалистам ASUS для ремонта.
Для предотвращения возможной потери слуха не слушайте звук на высокой громкости в
течение длительного времени.
Перед очисткой устройства отключите его от сети. Для очистки экрана устройства
используйте чистую губку или кусочек замши.
Для ремонта обращайтесь только к квалифицированным специалистам ASUS.
R11234
Декабрь 2015
Второе издание
3
Утилизация
При неправильной замене аккумулятора возможен взрыв. Утилизируйте использованные
аккумуляторы в соответствии с инструкциями производителя.
Не выбрасывайте аккумулятор вместе с бытовым мусором. Символ перечеркнутого
мусорного бака означает, что аккумулятор нельзя выбрасывать вместе с бытовым мусором.
Не выбрасывайте этот продукт вместе с бытовым мусором. Этот продукт предназначен для
повторного использования и переработки. Символ перечеркнутого мусорного бака означает,
что продукт (электрическое и электронное оборудование и содержащие ртуть аккумуляторы)
нельзя выбрасывать вместе с бытовым мусором. Ознакомьтесь с правилами утилизации
таких продуктов.
Не выбрасывайте устройство вместе с бытовым мусором. НЕ замыкайте электрические
контакты. НЕ разбирайте устройство.
Форум ZenTalk
(http://www.asus.com/zentalk/global_forward.php)

4
1 Основы
Добро пожаловать! …………………………………………………………………………………………………………… 8
Подготовка телефона! ………………………………………………………………………………………………………… 9
Первое включение ……………………………………………………………………………………………………………. 18
Использование сенсорного экрана ……………………………………………………………………………………. 20
2 В гостях хорошо, а дома лучше
Возможности ……………………………………………………………………………………………………………………….. 23
Главный экран ……………………………………………………………………………………………………………….. 23
Панель быстрой настройки ………………………………………………………………………………………………. 25
Системные уведомления …………………………………………………………………………………………………… 26
Персонализация главного экрана ………………………………………………………………………………………. 27
Ярлыки приложений………………………………………………………………………………………………………. 27
Виджеты …………………………………………………………………………………………………………………………… 28
Обои ………………………………………………………………………………………………………………………………… 29
Расширенный главный экран ……………………………………………………………………………………………. 30
Простой режим…………………………………………………………………………………………………………………. 30
Настройка даты и времени ……………………………………………………………………………………………….. 32
Настройка рингтона и звуков оповещений ………………………………………………………………………… 32
Экран блокировки ………………………………………………………………………………………………………………. 33
Настройка экрана блокировки…………………………………………………………………………………………… 33
Настройка кнопок быстрого доступа ………………………………………………………………………………… 34
3 Работайте и играйте
Браузер ………………………………………………………………………………………………………………………………… 35
Запуск браузера ………………………………………………………………………………………………………………… 35
Обмен страницами ……………………………………………………………………………………………………………. 36
Прочитать страницу позже ……………………………………………………………………………………………….. 36
Добавление новой вкладки ……………………………………………………………………………………………….. 36
Добавление страниц в закладки ………………………………………………………………………………………… 37
Режим чтения веб-страниц ……………………………………………………………………………………………….. 37
Очистка кэша браузера ……………………………………………………………………………………………………… 38
Электронная почта …………………………………………………………………………………………………………….. 38
Настройка учетных записей электронной почты ……………………………………………………………….. 38
Добавление учетных записей электронной почты …………………………………………………………….. 39
Настройка учетной записи Gmail ……………………………………………………………………………………… 39
Отправка приглашений на события …………………………………………………………………………………… 40
Ответить позже ………………………………………………………………………………………………………………… 40
Календарь ……………………………………………………………………………………………………………………………. 41
Создание событий …………………………………………………………………………………………………………….. 41
Добавление учетной записи в календарь …………………………………………………………………………… 41
Создание события для учетной записи ……………………………………………………………………………… 42
Включение уведомлений для событий ………………………………………………………………………………. 42
Что дальше ………………………………………………………………………………………………………………………….. 43
Получение напоминаний о событиях ………………………………………………………………………………… 43
Как принимать или отклонять приглашения на события …………………………………………………… 44
Получение оповещений о событиях ………………………………………………………………………………….. 45
Получение сводки погоды ………………………………………………………………………………………………… 47
Сделать позже ……………………………………………………………………………………………………………………… 48
Добавление задачи ………………………………………………………………………………………………………….. 48
Содержание

5
Приоритезация задач ……………………………………………………………………………………………………… 48
Ответный звонок сейчас …………………………………………………………………………………………………… 49
Ответить сейчас ……………………………………………………………………………………………………………….. 49
Чтение отложенных страниц …………………………………………………………………………………………. 49
Отвечаем сейчас ……………………………………………………………………………………………………………… 50
Удаление задач ………………………………………………………………………………………………………………… 50
SuperNote …………………………………………………………………………………………………………………………….. 51
Создание блокнота ……………………………………………………………………………………………………………. 52
Общий доступ к блокнотам через облачное хранилище ……………………………………………………. 52
Общий доступ к заметкам через облачное хранилище ………………………………………………………. 52
Диспетчер файлов ………………………………………………………………………………………………………………. 53
Доступ к внутреннему накопителю …………………………………………………………………………………… 53
Доступ к внешнему накопителю ……………………………………………………………………………………….. 53
Доступ к облачному хранилищу ……………………………………………………………………………………….. 53
Облако …………………………………………………………………………………………………………………………………. 54
ASUS WebStorage ……………………………………………………………………………………………………………. 54
Передача данных ………………………………………………………………………………………………………………… 55
Помощь ZenUI …………………………………………………………………………………………………………………….. 56
4 На связи
Звонки …………………………………………………………………………………………………………………………………. 57
Использование двух SIM ………………………………………………………………………………………………… 57
Совершение вызовов ………………………………………………………………………………………………………… 59
Прием вызова …………………………………………………………………………………………………………………. 63
Управление журналом вызовов ……………………………………………………………………………………… 63
Другие опции вызова ………………………………………………………………………………………………………… 65
Управление несколькими вызовами ………………………………………………………………………………….. 66
Запись вызова …………………………………………………………………………………………………………………… 69
Управление контактами …………………………………………………………………………………………………….. 70
Настройки контактов ………………………………………………………………………………………………………… 70
Настройка профиля ………………………………………………………………………………………………………….. 70
Добавление контактов ………………………………………………………………………………………………………. 71
Настройка VIP-контактов …………………………………………………………………………………………………. 72
Добавление контактов в избранное …………………………………………………………………………………… 74
Импорт контактов …………………………………………………………………………………………………………….. 74
Экспорт контактов …………………………………………………………………………………………………………. 75
Контакты из социальных сетей …………………………………………………………………………………………. 76
Связывание данных контакта ……………………………………………………………………………………………. 77
Резервное копирование/восстановление журнала вызовов ………………………………………….. 77
Отправка сообщений и многое другое ……………………………………………………………………………….. 79
Сообщения ……………………………………………………………………………………………………………………….. 79
Omlet Chat ………………………………………………………………………………………………………………………. 81
5 Развлечения
Использование гарнитуры …………………………………………………………………………………………………. 94
Подключение аудио-разъема …………………………………………………………………………………………….. 94
Музыка ………………………………………………………………………………………………………………………………… 95
Запуск приложения Музыка ……………………………………………………………………………………………… 95
Воспроизведение музыки …………………………………………………………………………………………………. 95
Воспроизведение музыки из облачного хранилища ………………………………………………………….. 96
Создание плейлиста ………………………………………………………………………………………………………….. 97

6
Воспроизведение на других устройствах ………………………………………………………………………….. 98
FM-радио …………………………………………………………………………………………………………………………….. 98
6 Драгоценные моменты
Лови момент ………………………………………………………………………………………………………………………. 100
Запуск приложения Камера …………………………………………………………………………………………….. 100
Использование камеры в первый раз ………………………………………………………………………………. 101
Дополнительные функции камеры ………………………………………………………………………………….. 105
Использование Галереи ………………………………………………………………………………………………………111
Просмотр файлов из социальной сети или облачного хранилища ……………………………………..111
Просмотр данных о месте съемки …………………………………………………………………………………… 112
Общий доступ к файлам из галереи ………………………………………………………………………………… 113
Удаление файлов из галереи ……………………………………………………………………………………………. 113
Редактирование изображений …………………………………………………………………………………………. 113
Использование MiniMovie ………………………………………………………………………………………………. 115
Использование PlayTo (только на некоторых моделях) ……………………………………………………. 116
7 Оставайтесь на связи
Мобильная сеть ………………………………………………………………………………………………………………… 117
Включение мобильной сети …………………………………………………………………………………………. 117
Wi-Fi …………………………………………………………………………………………………………………………………… 117
Включение Wi-Fi …………………………………………………………………………………………………………… 117
Подключение к беспроводной сети ………………………………………………………………………………. 118
Отключение Wi-Fi ………………………………………………………………………………………………………… 118
Bluetooth …………………………………………………………………………………………………………………………….. 118
Включение Bluetooth …………………………………………………………………………………………………….. 118
Сопряжение устройства с устройством Bluetooth ……………………………………………………………. 119
Удаление сопряжения устройств Bluetooth ……………………………………………………………………… 119
Привязка устройств ………………………………………………………………………………………………………….. 120
Точка доступа Wi-Fi ………………………………………………………………………………………………………… 120
Модем Bluetooth ……………………………………………………………………………………………………………… 121
8 Путешествия и Карты
Погода ………………………………………………………………………………………………………………………………… 122
Запуск приложения Погода …………………………………………………………………………………………….. 122
Главный экран приложения Погода …………………………………………………………………………………. 123
Часы …………………………………………………………………………………………………………………………………… 124
Мировое время ……………………………………………………………………………………………………………….. 124
Будильник ………………………………………………………………………………………………………………………. 125
Секундомер …………………………………………………………………………………………………………………….. 125
Таймер ……………………………………………………………………………………………………………………………. 126
9 ZenLink
Знакомство с ZenLink ……………………………………………………………………………………………………….. 127
Party Link ………………………………………………………………………………………………………………………… 127
Отправить ссылку …………………………………………………………………………………………………………… 129
PC Link …………………………………………………………………………………………………………………………… 130
Remote Link ……………………………………………………………………………………………………………………. 132
10 Zen везде
Специальные утилиты Zen ………………………………………………………………………………………………. 135
Фонарик …………………………………………………………………………………………………………………………. 135
Калькулятор ……………………………………………………………………………………………………………………. 137

7
Блокнот …………………………………………………………………………………………………………………………… 138
Диктофон ……………………………………………………………………………………………………………………….. 139
Мастер настройки звука ………………………………………………………………………………………………….. 141
Splendid ………………………………………………………………………………………………………………………….. 142
Энергосбережение ………………………………………………………………………………………………………….. 145
Дополнительные принадлежности …………………………………………………………………………………… 146
ASUS View Flip Cover …………………………………………………………………………………………………….. 146
11 Эксплуатация устройства
Получение обновлений для устройства ……………………………………………………………………………. 148
Обновление системы ………………………………………………………………………………………………………. 148
Накопитель …………………………………………………………………………………………………………………… 148
Резервное копирование и сброс ……………………………………………………………………………………. 148
Безопасность устройства ………………………………………………………………………………………………… 149
Приложение
Уведомления ……………………………………………………………………………………………………………………… 153
Индекс
8
Глава 1: Основы
Основы
1
1 Основы
Добро пожаловать!
Получайте удовольствие от знакомства с простым и интуитивно понятным интерфейсом ASUS Zen UI 2.0!
ASUS Zen UI это очаровательный и интуитивно понятный интерфейс для устройств ASUS. Он содержит
встроенные приложения, которые подстраиваются под вас и позволяют сделать жизнь проще.
Помощь ZenUI
На форуме можно найти ответы на часто задаваемые вопросы или написать отзывы.
Камера
С помощью технологии PixelMaster сохраняйте драгоценные моменты на фото и видео.
Сделать позже
Отвечайте на письма, сообщения, просматривайте интересные сайты и выполняйте другие
важные задачи тогда, когда это удобно для Вас.
Что дальше
Отслеживайте информацию о встречах, входящих сообщениях и других событиях прямо на
главном экране, экране блокировки или в приложении «Что дальше».
ZenLink
Подключайтесь к различным устройствам с помощью ZenLink, который включает приложения
Remote Link, Share Link, PC Link и Party Link. Используйте любое из этих приложений для
подключения к другим устройствам и обмена файлами.
ПРИМЕЧАНИЕ:Доступность тех или иных приложений может отличаться в зависимости от
модели.
ПРИМЕЧАНИЕ:Доступность тех или иных приложений может отличаться в зависимости от модели и региона.
Нажмите
на главном экране для проверки доступных приложений.
9
Глава 1: Основы
Подготовка телефона!
Части и компоненты
Настроить ваше новое устройство легко и быстро. Давайте приступим.
Углубление
Микрофон
Разъем micro-USB
Вспышка камеры
Тыловая камера
Регулировка громкости
Динамик
ПРИМЕЧАНИЯ:
• Для доступа к слотам для карт micro-SIM и MicroSD снимите заднюю крышку.
• Слот для карты micro-SIM поддерживает карты с поддержкой сетей стандарта LTE, WCDMA и GSM/EDGE.
Слот для карт памяти MicroSD поддерживает карты памяти MicroSD и MicroSDHC.
ВАЖНО!
• Не рекомендуется использовать защитную пленку, поскольку это может помешать работе датчика
приближения. Если Вы хотите использовать защитную пленку, убедитесь, что она не блокирует датчик
приближения.
• Сохраняйте устройство, особенно сенсорный экран, сухим. Вода или другая жидкость может вызвать
неисправность сенсорного экрана.
• Убедитесь, что крышка, закрывающая отсек с картой micro-SIM/картой памяти, закрыта при использовании
устройства.
Фронтальная камера
Приемник
Индикатор
Сенсорный
дисплей
Сенсорные
клавиши
Аудиоразъем
Кнопка питания
Датчик
Лазерный
фокус
10
Глава 1: Основы
Установка карты micro-SIM
Карта micro-SIM хранит информацию, например номер мобильного телефона, контакты, сообщения и другие
данные, необходимые для доступа к мобильной сети.
Устройство оснащено двумя слотами для карт micro-SIM, позволяя использовать две мобильных сети
одновременно.
ОСТОРОЖНО!
• Устройство предназначено для использования только с картой micro-SIM.
• Не рекомендуется вставлять в слот карты micro-SIM обрезанные SIM-карты
• Выключите устройство перед установкой карты micro-SIM.
• Будьте осторожны при использовании карты памяти. ASUS не несет ответственности за потерю данных или
повреждение карты micro-SIM.
• Не вставляйте карту памяти в слот карты micro-SIM! Если карта памяти оказалась вставленной в слот карты
micro-SIM, обратитесь в сервис-центр ASUS.
Для установки карты micro-SIM:
1. Выключите устройство.
2. Найдите углубление на нижнем правом углу устройства.
ОСТОРОЖНО!Будьте осторожны при открытии крышки.
3. Приподнимите крышку и снимите ее.
ОСТОРОЖНО!Будьте осторожны при открытии крышки.
ВНИМАНИЕ!
• НЕ используйте инструменты, например отвертки для снятия задней крышки.
• НЕ приподнимайте разъем micro-USB
4. Извлеките аккумулятор.
11
Глава 1: Основы
ПРИМЕЧАНИЕ: Слот карты micro-SIM1 находится в
нижней части комбинированного слота для карт micro-SIM
и MicroSD.
5. Вставьте карту micro-SIM в любой слот для карты micro-
SIM.
Комбинированный
слот для карт micro-
SIM и MicroSD
Слот карты micro-SIM 2
ВАЖНО! Слоты для карт micro-SIM поддерживают сети
стандарта 3G WCDMA/ 4G LTE. Но только одна карта
micro-SIM может быть подключена к 3G WCDMA/ 4G LTE
одновременно.
ОСТОРОЖНО! Во избежание царапин не касайтесь устройства острыми предметами.
Извлечение карты micro-SIM
ВНИМАНИЕ: Будьте осторожны при использовании карты памяти. ASUS не несет ответственности за потерю
данных или повреждение карты micro-SIM.
Для извлечения карты micro-SIM:
1. Выключите устройство.
2. Найдите углубление на нижнем правом углу устройства.
ОСТОРОЖНО!Будьте осторожны при открытии крышки.
3. Приподнимите крышку и снимите ее.
ОСТОРОЖНО!Будьте осторожны при открытии крышки.
ВНИМАНИЕ!
• НЕ используйте инструменты, например отвертки для снятия задней крышки.
• НЕ приподнимайте разъем micro-USB.
4. Извлеките аккумулятор.
12
Глава 1: Основы
5. Извлеките карту micro-SIM из слота.
ПРИМЕЧАНИЕ: Слот карты micro-SIM1 находится в
нижней части комбинированного слота для карт micro-SIM и
MicroSD.
6. Поставьте заднюю крышку на место.
Комбинированный
слот для карт micro-
SIM и MicroSD
Слот карты micro-SIM 2
Установка карты памяти
Телефон поддерживает карты памяти MicroSD и MicroSDHC объемом до 64 ГБ.
ПРИМЕЧАНИЕ:Некоторые карты памяти могут быть несовместимы с устройством. Для предотвращения
потери данных, повреждения устройства или карты памяти используйте только совместимые карты памяти.
ОСТОРОЖНО!
• Будьте осторожны при использовании карты памяти. ASUS не несет ответственности за потерю данных или
повреждение карты памяти.
• Не вставляйте карту micro-SIM в слот карты памяти! Если карта micro-SIM оказалась вставленной в слот
карты памяти, обратитесь в сервис-центр ASUS.
Для установки карты памяти:
1. Выключите устройство.
2. Найдите углубление на нижнем правом углу устройства.
ОСТОРОЖНО!Будьте осторожны при открытии крышки.
3. Приподнимите крышку и снимите ее.
ОСТОРОЖНО!Будьте осторожны при открытии крышки.
ВНИМАНИЕ!
• НЕ используйте инструменты, например отвертки для снятия задней крышки.
• НЕ приподнимайте разъем micro-USB.
13
Глава 1: Основы
4. Извлеките аккумулятор.
5. Вставьте MicroSD-карту в слот.
ПРИМЕЧАНИЕ: Слот для карты MicroSD находится на
верхней части комбинированного слота для карт micro-SIM и
MicroSD.
6. Поставьте заднюю крышку на место.
ОСТОРОЖНО!Во избежание царапин не касайтесь
устройства острыми предметами.
Комбинированный
слот для карт micro-
SIM и MicroSD
Извлечение карты памяти
ОСТОРОЖНО!
• Будьте осторожны при использовании карты памяти. ASUS не несет ответственности за потерю данных или
повреждение карты памяти.
• Безопасно извлекайте карту памяти из устройства. Для извлечения карты памяти перейдите на Главный
экран > Все приложения > Настройки > Накопитель > Отключить внешний накопитель.
Для извлечения карты памяти:
1. Выключите устройство.
2. Найдите углубление на нижнем правом углу устройства.
ОСТОРОЖНО!Будьте осторожны при открытии крышки.
3. Приподнимите крышку и снимите ее.
ОСТОРОЖНО!Будьте осторожны при открытии крышки.
ВНИМАНИЕ!
• НЕ используйте инструменты, например отвертки для снятия задней крышки.
• НЕ приподнимайте разъем micro-USB.

14
Глава 1: Основы
4. Извлеките аккумулятор.
5. Извлеките карту MicroSD из слота.
ПРИМЕЧАНИЕ: Слот для карты MicroSD находится на
верхней части комбинированного слота для карт micro-SIM и
MicroSD.
6. Поставьте заднюю крышку на место.
ОСТОРОЖНО!Во избежание царапин не касайтесь
устройства острыми предметами.
Комбинированный
слот для карт
micro-SIM и
MicroSD
15
Глава 1: Основы
Зарядка устройства
Телефон поставляется частично заряженным, но его необходимо полностью зарядить перед первым
использованием. Перед зарядкой устройства ознакомьтесь с информацией ниже.
ВАЖНО!
• Для подзарядки телефона используйте поставляемый блок питания и USB-кабель. Использование иного блока
питания может привести к повреждению устройства.
• Перед зарядкой устройства снимите защитную пленку с блока питания и кабеля micro-USB.
• Убедитесь, что напряжение в электросети соответствует входному напряжению для блока питания. Блок
питания можно подключить к розетке с напряжением 100 — 240 В переменного тока.
• Выходное напряжение блока питания:5,2 В 1 A.
• При питании телефона от сети розетка должна быть расположена рядом с устройством и быть легко
доступной.
• Отключите блок питания от розетки, если он не используется.
• Не ставьте ставьте что-либо на телефон.
ОСТОРОЖНО!
• Во время зарядки, устройство может нагреваться. Это нормально, но если устройство становится слишком
горячим, отсоедините от устройства кабель micro-USB и отправьте устройство, включая блок питания и
кабель, в сервис-центр ASUS.
• Для предотвращения повреждения устройства, блока питания или кабеля micro-USB:. убедитесь в
правильности подключения кабеля micro-USB, блока питания и устройства перед зарядкой.
Для зарядки устройства:
1. Подключите разъем micro-USB к блоку питания.
2. Подключите кабель micro-USB к устройству.
3. Подключите блок питания к розетке с заземлением.
3
1
2

16
Глава 1: Основы
ВАЖНО!
• При питании устройства от сети розетка должна быть расположена рядом с устройством и быть легко
доступной.
• Для зарядки вашего устройства от компьютера подключите его с помощью USB-кабеля к USB-порту
компьютера.
• Избегайте зарядки вашего устройства при окружающей температуре выше 35°C (95°F).
• Перед использованием устройства в первый раз, зарядите аккумулятор в течение 8 часов.
• Состояние заряда аккумулятора обозначается следующими иконками:
Разряжен Не заряжается Заряжается Заряжен
ПРИМЕЧАНИЯ:
• Используйте только блок питания, поставляемый с устройством. При использовании других блоков питания
устройство может быть повреждено.
• Зарядку устройства лучше всего выполнять путем подключения к сетевой розетке с помощью входящего в
комплект поставки блока питания и соединительного кабеля.
• Блок питания рассчитан на работу с входным напряжением от 100 до 240 В переменного тока. Выходное
напряжение (на кабель с разъемом «micro-USB») составляет 5,2 В 1 А постоянного тока.
4. Когда подзарядка закончена, отключите кабель USB от устройства перед отключением блока питания от
розетки.
ПРИМЕЧАНИЯ:
• Устройство можно использовать во время подзарядки, но это может увеличить время зарядки.
• Зарядка от USB-порта компьютера займет больше времени.
• Если компьютер не обеспечивает достаточную мощность для зарядки устройства, используйте для подзарядки
блок питания.

17
Глава 1: Основы
Включение и отключение устройства
Включение устройства
Для включения устройства нажмите и удерживайте кнопку питания.
Выключение устройства
Для выключения устройства:
1. Если экран выключен, для включения нажмите кнопку питания. Если экран заблокирован, разблокируйте
устройство.
2. Нажмите и удерживайте кнопку питания до появления запроса, затем выберите Выключить и нажмите
OK.
Спящий режим
Для перевода устройства в спящий режим нажмите и удерживайте кнопку питания, пока экран не погаснет.
Кнопка
питания
18
Глава 1: Основы
Первое включение
При включении устройства в первый раз появится мастер установки, который поможет настроить параметры
устройства. Следуйте инструкциям на экране для выбора языка, способа ввода, настройки мобильной связи,
Wi-Fi, вашего местоположения и синхронизации учетных записей.
Можно перенести ваши данные, например контакты и другую соответствующую информацию, со старого
устройства на новое с помощью приложения передачи данных.
ПРИМЕЧАНИЕ: Приложение Передача данных можно использовать в любое время. В Главный экран
нажмите > Передача данных. Для получения подробной информации смотрите Передача данных.
Используйте учетную запись Google или ASUS для настройки устройства; если у вас еще нет учетной записи
Google или ASUS, создайте их.
Учетная запись Google
Учетная запись Google позволяет использовать все возможности ОС Android:
• Организация и отображение всей информации в любом месте.
• Автоматическое резервное копирование всех данных.
• Использование службы Google в любом месте.
Учетная запись ASUS
Учетная запись ASUS позволяет использовать следующие преимущества:
• Персональная служба поддержки ASUS и продление гарантии для зарегистрированных продуктов.
• 5 Гб места в облачном хранилище бесплатно.
• Получение обновлений.
ПРИМЕЧАНИЕ: Мастер установки можно использовать в любое время для повторной конфигурации
устройства. На главном экране нажмите > Мастер установки.

19
Глава 1: Основы
Советы для увеличения времени автономной работы
Время автономной работы очень важно для устройства. Ниже приведены советы для его увеличения.
– Закройте все неиспользуемые работающие приложения.
– Если Вы не пользуетесь устройством, нажмите кнопку питания для перевода его в спящий режим.
– Активируйте интеллектуальное энергосбережение в приложении Power Saver.
– Установите звук в интеллектуальный режим.
– Уменьшите яркость дисплея.
– Уменьшите громкость динамика.
– Отключите Wi-Fi.
– Отключите Bluetooth.
– Отключите автоматический поворот экрана.
– Отключите автоматическую синхронизацию.
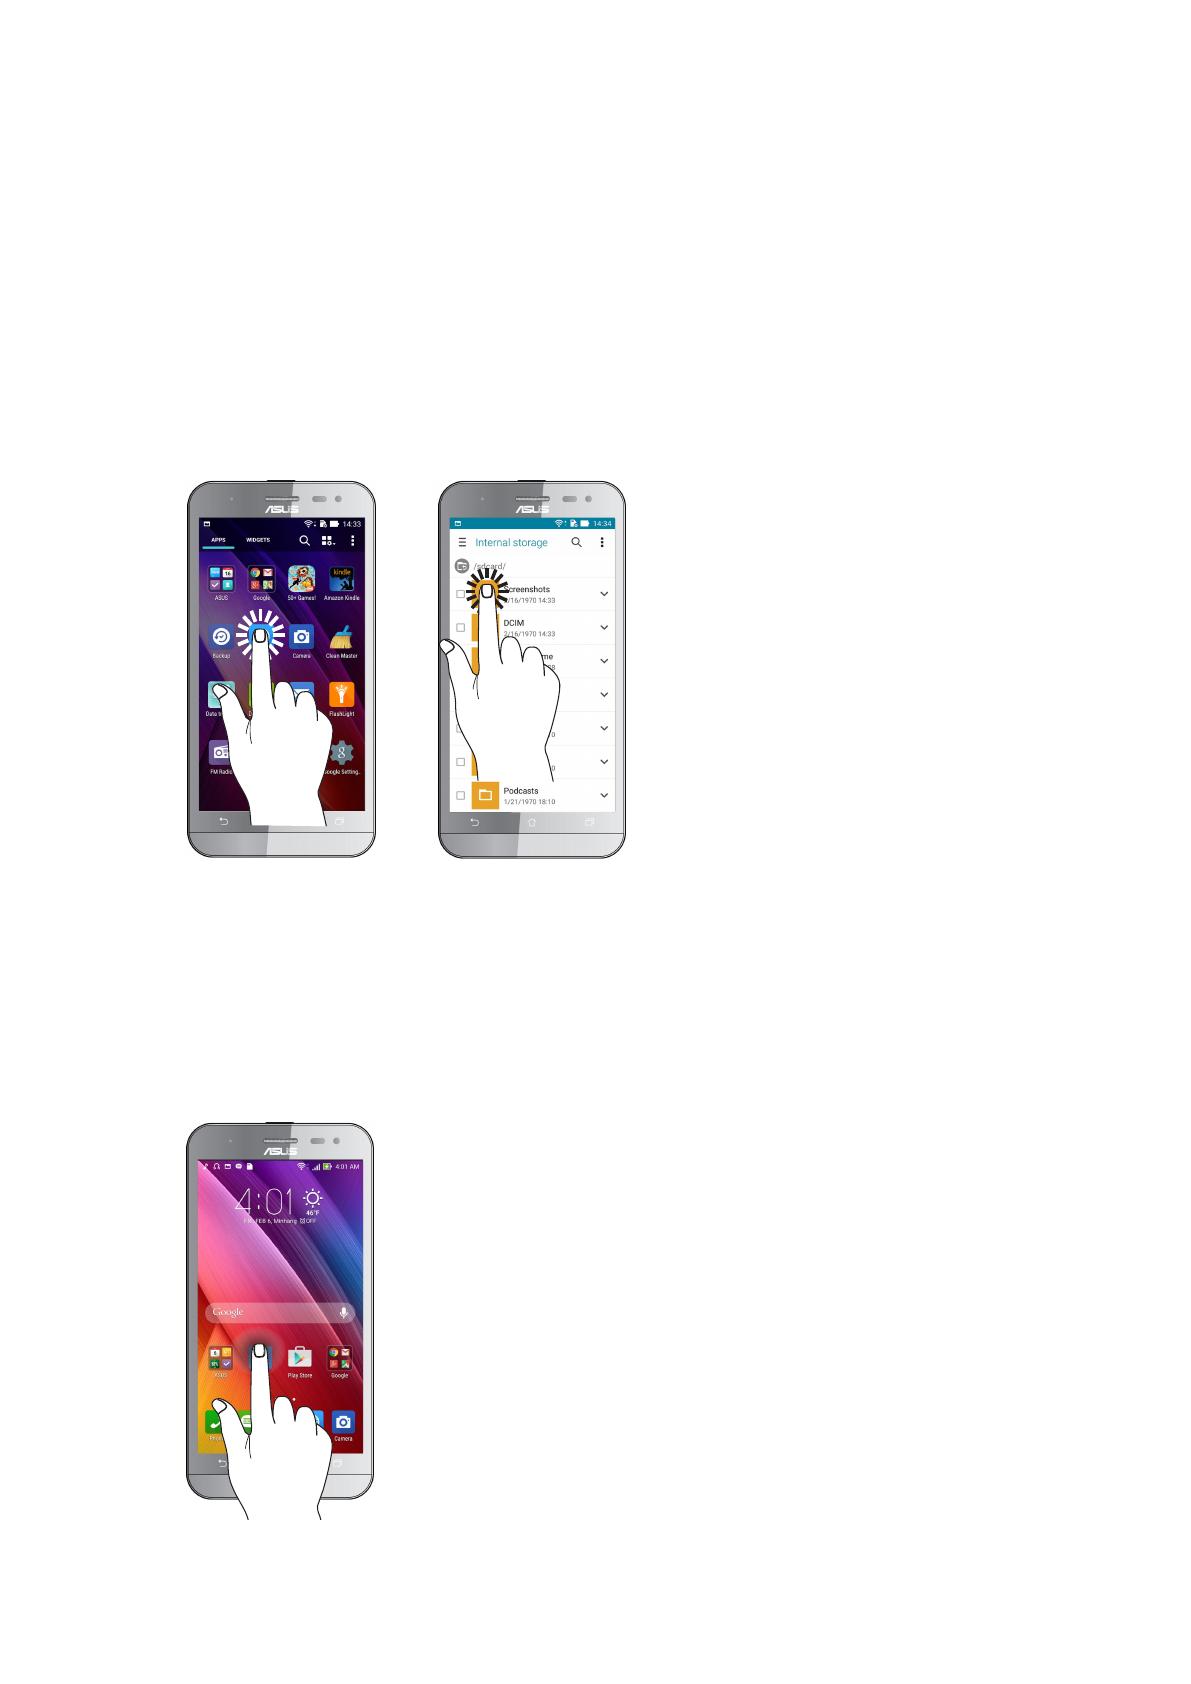
20
Глава 1: Основы
Использование сенсорного экрана
Жесты позволяют запускать программы и получать доступ к настройкам устройства.
Запуск приложений или выбор элементов
Выполните любое действие из следующих:
• Для запуска приложения нажмите на него.
• Для выбора элемента, например Диспетчера файлов, просто нажмите на него.
Перемещение или удаление элементов
Выполните любое действие из следующих:
• Для перемещения приложения или виджета выберите его и перетащите на новое место.
• Для удаления приложения или виджета с главного экрана выберите его и перетащите в X Удалить.
/
Скачать
ZE500KL
Руководство пользователя
Посмотреть инструкция для Asus ZenFone 2 Laser ZE500KL бесплатно. Руководство относится к категории Смартфоны, 2 человек(а) дали ему среднюю оценку 7.9. Руководство доступно на следующих языках: русский. У вас есть вопрос о Asus ZenFone 2 Laser ZE500KL или вам нужна помощь? Задайте свой вопрос здесь
Не можете найти ответ на свой вопрос в руководстве? Вы можете найти ответ на свой вопрос ниже, в разделе часто задаваемых вопросов о Asus ZenFone 2 Laser ZE500KL.
Как перезагрузить Asus ZenFone 2 Laser ZE500KL?
Моя SIM-карта слишком мала и не подходит к моему телефону Asus. Что мне теперь делать?
Каковы размеры экрана Смартфон?
Может ли аккумулятор моего Смартфон взорваться?
Какой вес Asus ZenFone 2 Laser ZE500KL?
Какая высота Asus ZenFone 2 Laser ZE500KL?
Какая ширина Asus ZenFone 2 Laser ZE500KL?
Какая толщина Asus ZenFone 2 Laser ZE500KL?
Какой тип USB-подключения Asus ZenFone 2 Laser ZE500KL имеет?
Какое разрешение экрана дисплея Asus ZenFone 2 Laser ZE500KL?
Какая операционная система в Asus ZenFone 2 Laser ZE500KL используется?
Какой объем памяти Asus ZenFone 2 Laser ZE500KL имеет?
Какой размер экрана Asus ZenFone 2 Laser ZE500KL?
Инструкция Asus ZenFone 2 Laser ZE500KL доступно в русский?
Не нашли свой вопрос? Задайте свой вопрос здесь